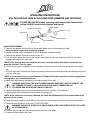
1
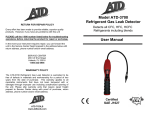
®
OPERATING INSTRUCTIONS
ATD-3639 NO GAS LOSS R134A VALVE CORE R
EMOVER AND INSTALLER
PLEASE USE CAUTION when removing valve cores from a pressurized system ALWAYS wear safety glasses and gloves!
Valve Handle
knob
Shaft Connection Nut
Adapter (1 of 5)
Shaft Knob
Valve Body
Shaft (1 of 5)
Locking Nut
VALVE CORE REMOVAL
2. Connect the adapter and shaft to the valve body. Make sure all connections are tight.
Failure to do this can cause refrigerant leakage.
3. Open the handle on the valve body, so the shaft can go through the body.
4. Connect the adapter to the service port of the car.
5. Push the shaft toward the service port. Slowly and carefully rotate the shaft until the tip of the shaft
engages the body of the valve core.
*NOTE: If the shaft tip does not reach the valve core, turn the locking nut counter clockwise and
back the shaft out. Then try again.
6. Once the valve core is engaged, turn the locking nut clockwise and screw it on to the shaft connection
nut.
7. This will allow one to remove the valve core without the pressure within the system disengaging the shaft
from the valve core.
*NOTE: It is not necessary to use the locking nut. Simply follow the same steps without engaging the
locking nut to the shaft connection nut.
8. Rotate the shaft counter clockwise by turning the knob of the shaft.
WARNING: MAKE SURE THE SHAFT CONNECTION NUT DOES NOT START TO TURN AS YOU
ARE TURNING THE SHAFT. THIS COULD CAUSE THE SHAFT CONNECTION NUT
TO LOOSEN AND REFRIGERANT WOULD LEAK OUT!
9. Continue rotating the shaft until you cannot turn the shaft anymore. (Do not force!!!)
10. Slowly loosen the locking nut from the shaft connection nut.
*NOTE: If the valve core is correctly removed, the shaft will automatically travel outward due to the
pressure in the system.
If it does not travel outward, either there is no pressure in the system or the valve core was not removed.
11. With the shaft pulled out all the way, CLOSE THE VALVE.
WARNING: FAILURE TO CLOSE VALVE COULD CAUSE INJURY AND WOULD RESULT INA LOSS OF REFRIGERANT!!!
12. Loosen and remove the shaft connection nut from the valve body.
13. Remove the damaged valve core.
VALVE CORE INSTALLATION
1. Insert the new valve core onto the tip of the shaft.
2. Tighten the shaft connection nut to the valve body.
3. Open the valve handle.
4. Push the shaft forward and turn the shaft clockwise to insert the valve core.
*NOTE: One can use the locking nut to help insert the valve core.
5. Once the valve core is in place, pull the shaft back and turn the valve knob to the closed position.
6. Remove the shaft from the valve body.
7. SLOWLY open the valve handle to assure the valve core is in place. If the valve is in place, the pressure in
the tool will dissipate quickly. If the valve core is not in place, quickly close the valve and try again.
8. Remove the adapter and valve body from the car.
81490-INST-ATD