1
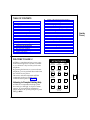
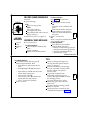
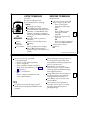
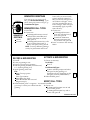
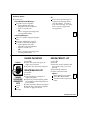
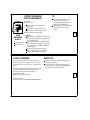
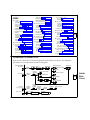
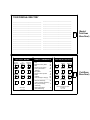
A PORTABLE GUIDE TO R AUDIX VOICE MESSAGING To order additional copies of this document, call: AT&T Customer Information Center USA (800) 432-6600 Canada (800) 255-1242 For more detailed information on AUDIX features, see the AUDIX Feature Descriptions manual (585-305-203). For more information about AT&T documents, see the Global Business Communications Systems Publications Catalog (555-000-010). (Outside Front Cover) NOTICE: The information in this document is subject to change without notice. AT&T assumes no responsibility for any errors that may appear in this document. Prepared by AT&T Product Documentation Development Department, Denver, Colorado Copyright 1993 AT&T 585-305-715, Issue 1 November 1993 (Outside Back Cover) TABLE OF CONTENTS 1 1 2 2 3 4 4 4 4 4 5 6 6 6 8 9 10 10 11 11 11 Welcome to AUDIX Listening to Prompts/Getting Help Logging In Leaving AUDIX AUDIX Terms Record (Send) Messages Address/Send Message For Each Individual For Lists of People For Special Options To Schedule Delivery Get (Listen to) Messages Listen to Message Respond to Message Multiple Personal Greetings — An Overview Sample Greetings Administer (Record) Greetings Administer Call Types Record a New Greeting Activate a New Greeting Modify Call Types WELCOME TO AUDIX! AUDIX is a complete and easy-to-use voice mail and message service system, available to you 24 hours a day from any touch-tone telephone. By pressing the buttons on your touch-tone telephone, you can perform these tasks from the AUDIX Activity Menu. This menu and other important AUDIX commands are always visible on the command menu panel on page 27. Listening to Prompts / Getting Help AUDIX has a comprehensive help system that "talks you through" its layers of menu options. If you need more information, simply listen to the system prompts or press *H to get HELP. 12 12 14 15 15 15 17 17 17 18 18 19 19 20 20 21 22 23 24 25 26 27 Modify a Recorded Personal Greeting Activate Other Existing Personal Greetings Listen to or Scan Greetings Review Outgoing Messages Review Outgoing Messages/Headers Modify/Resend Outgoing Message Change Password/Administer Lists Create Mailing List Review/Modify List Scan List Summary Create/Add to Personal Directory Review/Modify Directory Entries Record Your Name Scan Messages Quickly Listen to Headers and/or Messages Guest Password Mailing Lists Personal Greetings Log Index Flowchart of Shortcuts Your Personal Directory Command Menus (Inside Cover) ACTIVITY MENU Record Messages Get Messages Create Greetings ABC DEF 1 2 3 Review Messages Password/ Lists GHI JKL MNO 4 5 6 1 Scan Messages PRS TUV WXY 7 8 9 * 0 **R Relog in Q=7 Z=9 # LOGGING IN 1. Dial your AUDIX number and wait for the system to answer. 2. Press (if calling from your ext.). OR Enter your extension and press . 3. Enter your password and press . NOTE: Your AUDIX system may require that you record your own name when you log in the first time. If so, AUDIX will prompt you through the steps. See page 19 for the complete procedure. LEAVING AUDIX You can: Hang up. Press *T, enter an extension, and press to transfer to an inside extension. AUDIX TERMS Activity Menu — The initial options you can access after logging in to AUDIX. Header — A spoken message summary: "Message from Ward Corbett delivered 1:09 AM, Friday, May first, extension 54399." Address — Your extension or name. (Use *A to switch between these two modes of addressing.) Incoming Message — A message received from someone. The categories are: new, unopened, and old. Outgoing Message — A message you’ve recorded to send to others. The categories are: undelivered, undeliverable, delivered, filed, and accessed. Press **X to exit AUDIX and place another call or drop AUDIX from a conference call. Your AUDIX number ________ Your extension ________ TIPS Get your initial password from your system administrator. See page 17 to change your password. You can usually interrupt the AUDIX prompts when you’re ready to enter a command. To bypass greetings, press 1 immediately when the system answers. 2 AUDIX Mailbox — A storage area for incoming and outgoing messages (and headers). AUDIX keeps old and new messages until you delete them or until your system’s automatic delete date. Your system administrator determines how long AUDIX stores old and new messages before deleting them. Because mailbox space is limited, it is wise to regularly delete unnecessary messages. AUDIX stores file copies in the file cabinet portion of the outgoing mailbox. While listening to AUDIX headers or messages, you can select which ones you want to hear by skipping headers/ categories. 3 RECORD (SEND) MESSAGES PRESS RECORD MESSAGES record edit address file For Lists of People – (See page 17 to create lists.) 1. Press 1. Press *L. 2. Speak message. Press (if you are list owner). Edit – OR Press 1 to stop/pause. Enter list owner’s address and THEN press . Press 1 to continue. Enter list ID (name) and press . Press 2 3 to play back. Repeat either group of steps Press *D to delete and re-record. above for more individuals or (Begin at step 1.) more lists. 4 5. Press ** to send now 3. When done, press * to approve. OR Press * to approve address list and ADDRESS / SEND MESSAGE access Options Menu. For Special Options – 4. Use as necessary: Press 0 to hear all available For Each Individual – Options Menu selections. Enter recipient’s address and — Press 1 to make message private. press . — Press 2 to make message priority. Listen to address. — Press 3 to schedule delivery. Repeat for more individuals. — Press 4 to file a copy. CONTINUED ON NEXT PAGE To Schedule Delivery – To schedule future delivery press 3 while in Options Menu, then: — Enter delivery time (enter 405 for 4:05). — Enter A (AM) or P (PM) and press . — Enter delivery month and day (enter 502 for May 2) and press . — Listen to the schedule. (If incorrect, press *D to delete and repeat delivery steps above.) — Press * to approve schedule. Press * to send. TIPS When recording a message, you can skip the edit options and just press * to approve. AUDIX will deliver your message as soon as possible, usually within seconds, unless you specify a delivery time. To prevent recipients from forwarding a message, press 1 while in the Options Menu to make the message private. To switch between ext./name addressing, press *A. Enter last name, first. To pause while recording, press 3, then 1 to continue. See the play-back controls (on the command menu panel on page 27). 5 LISTEN TO MESSAGE PRESS A B C GET MESSAGES listen replay/ forward save/delete RESPOND TO MESSAGE 1. Press 2. 2. Listen to message header. 3. Press 0 and listen to message. 4. Choose one: Call sender directly, press 1 0. Reply to sender by voice mail: — Press 1 7 and speak Options – message (to send reply Respond, go to step 4. only). Press 2 3 to play back summary. OR Press *D to delete and skip to next Press 1 1 9 and speak summary. If, immediately after message (to attach deleting a message, you need to original). restore it, press **U to undelete the — Press ** to approve and message. send now. Press 2 to return to previous OR summary. Press * to approve message Press to save and skip to next and access Options Menu. summary. Forward with comment, OR press 1 2. Press * to skip to next category. OR Press **H to hold message in current category and skip to next header. 6 CONTINUED ON NEXT PAGE Record a new message, press 1 4. — Speak message. — Press 1 to stop/pause (optional). — Press * to approve. — Enter recipient’s address and press . (Repeat for more addresses. See page 4 to use lists.) — Press ** to send now. OR Press * to approve address list and access Options Menu. TIPS To quickly scan your messages, press 7 (from the Activity Menu) and listen to the prompts. While listening to messages, press 1 7 to respond to sender with voice mail (without attaching original) and press ** to send it now. Periodically, you may find broadcast messages in your mailbox. These are general AUDIX messages from authorized users. Using **H to hold a new message in its category leaves your message lamp (or altered dial tone) on. Press *R any time to re-start at the Activity Menu. After pressing 1 to respond to a message, you can press * to cancel the reply option and return to getting messages. 7 MULTIPLE PERSONAL GREETINGS — AN OVERVIEW AUDIX allows you to greet callers with a personal message, as an answering machine does. But AUDIX can also allow you to record up to nine different greetings and to play one greeting for all callers or specific greetings for different types of callers (known as call types). These are: Internal calls (from the same PBX) External calls (from an outside PBX) Busy calls (when you are on the phone) No answer calls (when you are not in) Out-of-hours (when your office is closed) The easiest way to use this powerful feature is to: Select or administer your call types (select a number, 1-9, for each call type). Record the corresponding greetings. Activate the appropriate greetings. You can have up to three different greetings active simultaneously, and you can assign different greetings for the following call-type combinations: Internal and external calls Busy and no answer calls Prime-time and out-of-hours calls Prime-time busy, prime-time no answer, and out-of-hours calls Prime-time internal, prime-time external, and out-of-hours calls To use the Multiple Personal Greetings feature, see the procedures under Administer Greetings, beginning on page 10. SAMPLE GREETINGS NOTES ABOUT YOUR GREETINGS You might want to create a library of greetings to use for different call types and occasions. For example: Internal — "Hi, this is John. Sorry I missed your call. Leave me a message, and I’ll call you back." External — "Hello, this is John Endall at Smith Propulsion Systems. I’m away from my desk. Please leave your name and number, and I’ll return your call." Out-of-hours — "Hello, this is John Endall at Smith Propulsion Systems. We are open from 8 AM to 5 PM weekdays. Please leave a message at the tone, and I’ll return your call." Vacation — "Hi, this is John Endall. I’ll be on vacation May 3 through May 14. Leave a message, and I’ll call you when I return." _______________________________________ 8 _______________________________________ _______________________________________ _______________________________________ _______________________________________ _______________________________________ _______________________________________ _______________________________________ _______________________________________ _______________________________________ _______________________________________ _______________________________________ _______________________________________ 9 ADMINISTER GREETINGS PRESS D E F If you plan to use one greeting for all calls, go to Record a New Greeting. If you plan to distinguish between call types, go to Administer Call Types. ADMINISTER CALL TYPES ADMINISTER GREETINGS record activate 1. Press 3 4. 2. Choose one: To distinguish between internal calls (from the same PBX) and external calls (from an outside PBX), press 1. To distinguish between busy calls (you’re on the phone) and no answer calls (you’re out), press 2. NOTE: To set up different greetings strictly for prime-time and out-of- RECORD A NEW GREETING hours calls, you must initially specify internal/external or busy/no answer call types and out-of-hours call types. Once you have specified the out-ofhours call type, other call types automatically apply to primetime calls only. 3. Choose one: To distinguish between prime-time calls and out-ofhours calls, press 3. To make no distinction between prime-time and out-of-hours calls, press 4. 4. Press * to return to the Activity Menu. 10 ACTIVATE A NEW GREETING 7. Choose as necessary: Press 3. Listen to greeting in use. For All Calls – Press 1 to record a new greeting. Press 1. Indicate greeting number you will record, 1-9. (System greeting is 0.) For Different Call Types – 5. Speak greeting at the tone. Listen to AUDIX prompts and select Edit – call types for this greeting, 0-3. (Prompts will vary depending on the Press 1 to stop/pause. call types you have administered.) THEN Press 1 to continue. 8. When finished, press * . Press 2 3 to play back. Press *D to delete and re-record. MODIFY CALL TYPES (Begin at step 5.) 6. When finished, press * to approve. You must1. Press 3 4. 2. Choose one: go to step 7 to have your callers hear this greeting. To distinguish between internal and external calls, press 1. To distinguish between busy and no answer calls, press 2. 1. 2. 3. 4. 11 CONTINUED ON NEXT PAGE CONTINUED FROM PAGE 11 To distinguish between prime-time and out-of-hours calls, press 3. To remove the prime-time and out-ofhours distinction, press 4. To use the same greeting for all calls, press 5. Repeat step 2 until call-type setup is correct. 3. When finished, press * . MODIFY A RECORDED PERSONAL GREETING Press 3. Listen to greeting in use. Press 1 to record greeting. Indicate greeting number you will record, 1-9. (System greeting is 0.) 5. Choose one: Press 1 to re-record, then go to step 5 of Record a New Greeting, page 11. 1. 2. 3. 4. Press 2 to see if greeting is active. Press 0 to play the greeting. Press *D to delete the greeting, then go to step 3 of Record a New Greeting. Repeat step 5 as necessary. 6. Press * to approve greeting as is. NOTE: AUDIX usually returns you to step 2. However, if you have re-recorded an inactive greeting, AUDIX will present further options. Go to Activate Other Existing Personal Greetings. 12 ACTIVATE OTHER EXISTING PERSONAL GREETINGS If you have already recorded personal greetings, and you now want to activate them: 1. Press 3. 2. Press 3. CONTINUED ON NEXT PAGE 3. Choose one: Identify the greeting, 0-9, you want to activate. (System greeting is 0.) If you enter a number for a greeting not yet recorded, AUDIX will ask you to select another number. When finished activating greetings, press * and return to step 2. 4. Choose one, and return to step 3: To use greeting for all calls, press 0. To use greeting for internal or busy calls, press 1. NOTE: If you selected internal/external when administering call types, AUDIX will use this greeting for internal calls. Likewise, if you selected busy/no answer, AUDIX will use this greeting for busy calls. To use greeting for external or no answer calls, press 2. NOTE: If you selected internal/external when administering call types, AUDIX will use this greeting for external calls. Likewise, if you selected busy/no answer, AUDIX will use this greeting for no answer calls. To use greeting for out-of-hours calls (if you selected out-of-hours when administering call types), press 3. NOTE: To set up different greetings for prime-time and out-of-hours calls only, you must assign the same greeting to the two prime-time call types (internal/external or busy/no answer). When finished selecting call types, press * . 13 LISTEN TO OR SCAN GREETINGS AUDIX allows you to listen to specific greetings or to scan the status of all greetings using the following easy steps: 1. Press 3. 2. Press 0 to listen to a specific greeting and enter the greeting number you wish to hear. OR Press 2 to scan all greetings. 3. Listen to AUDIX prompts. PRESS G H I REVIEW OUTGOING MESSAGES / HEADERS MODIFY / RESEND OUTGOING MESSAGE 1. Press 4. 2. Listen to header and press 0 to listen to its message. OR Listen to header only. For an Undelivered, Nondeliverable, or Filed Message – 3. Repeat steps 1 and 2 (and options) until you find the message to modify. 4. Press 1 to modify or resend the message. NOTE: If the message has been delivered/accessed, you cannot listen to it. REVIEW MESSAGES review modify resend check files 14 Options – Press to skip to the next header. Press 2 3 to play back header. Press *D to delete header (and any attached message). Press * to skip to the next category. Message Options – Press * to send message as it exists. Go to step 5. Press 1 to re-record. — Speak message. — Press 1 to stop. — Press * to approve. Go to step 5. 15 CONTINUED ON NEXT PAGE CONTINUED FROM PAGE 15 Addressee Options – 5. Choose one: Filed & Nondeliverable Messages – To send to a new recipient: — Enter address and press (Repeat for more recipients.) — Press ** to send now. OR — Press * to approve message and access Options Menu. Undelivered Messages – Press ** to send to original recipient only. To review addressees, press * 1. To send to additional recipients: — Enter address and press . (Repeat for more recipients.) — Press ** to send now. OR — Press * to approve message and access Options Menu. PRESS J K L create scan modify If you send a filed message to a recipient, the message leaves your file cabinet. To retain a copy of the message, you must save a copy of it again after you approve it. 16 CHANGE PASSWORD REVIEW / MODIFY LIST 1. Press 5 4. 2. Enter new password (up to 15 digits, 0-9) and press . 3. Re-enter new password and press . 1. Press 5 1. 2. Press 3. 3. Enter list owner’s address and press (press only, if you own the list). 4. Enter list ID and press . 5. Listen to the first name. CREATE MAILING LIST CHANGE PASSWORD/ ADMINISTER LISTS TIP 1. Press 5 1. 2. Press 1. 3. Enter list ID (up to 6 letters or digits) and press . 4. Press 1 for private list, 2 for public (accessible by other subscribers on your system). 5. Enter recipient’s address and press . 6. Repeat step 5 until list is complete. 7. Press * to approve the list. Options – Press to skip to next name. Press *D to delete name. Press 2 to return to previous name. 17 CONTINUED ON NEXT PAGE CONTINUED FROM PAGE 17 To add/delete one or more specific entries, press 1. — Press Y or N to change list status (public/private). — Enter new address/address to delete and press . (Confirm name, and if deleting, press *D.) Repeat for each new recipient/deletion. — Press * to stop adding/deleting entries. — Press *1 to review from beginning. — When finished reviewing, press * . SCAN LIST SUMMARY 1. Press 5 1. 2. Press 2. 3. Listen to the list summary. Options – Press to skip to the next list. Press *D to delete list. Press 0 to review list members. REVIEW / MODIFY DIRECTORY ENTRIES 1. Press 5 2. 2. Use as necessary: Press 2 to review all entries. Options – While listening to each entry: — Press to skip to the next alias. — Press *D to delete. — Press 2 to return to previous alias. — Press * to stop reviewing. Press 3 to review specific entries. — Enter alias to review and press . (Repeat for more aliases.) — Press * to stop reviewing. 3. Press * to return to Activity Menu. CREATE / ADD TO PERSONAL DIRECTORY The personal directory allows you to use system directory information more efficiently through aliases (abbreviations for those you call frequently). 1. Press 5 2. 2. Press 1. 3. Enter extension/name address and press . 4. Listen to your entry’s name address. Options – Incorrect name — press *D (delete). Repeat steps 3 and 4. Correct name — enter alias (up to 10 characters that identify subscriber) and press . 5. Repeat steps 3 and 4 to add names. 6. When finished, press * to approve additions. 18 RECORD YOUR NAME 1. Press 5 5. 2. Speak your name after the tone. 3. Press 1 after speaking your name. Options – Press 1 to re-record and go to step 2. Press * to approve. Press 2 3 to play back. 19 LISTEN TO HEADERS AND / OR MESSAGES PRESS P R S TIP 1. Press 7. 2. Choose one: Press 1 to scan headers and messages. Press 2 to scan headers only. Press 3 to scan messages only. If you select headers only, press 0 to listen to the accompanying message just after each header plays. Mobile phone users will find this "hands-free" feature useful. 3. Make selection and listen. SCAN MESSAGES QUICKLY scan messages scan headers Options – Do nothing. AUDIX will alert you as it skips to the next message after a 3-second pause. Press *D to delete. If, immediately after deleting a message, you need to restore it, press **U to undelete the message. Press to skip to next message. Press * to skip to next category. Press **H to hold in category. GUEST PASSWORD The guest password allows outside callers to bypass an operator/receptionist and leave you confidential voice mail. To use it, outside callers must: 1. 2. 3. 4. 5. Dial AUDIX number and wait for answer. Enter recipient’s extension and press . Enter guest password and press . Speak message. Hang up when finished. Guest Password _________________________ (Get this from your system administrator.) 20 MORE TIPS Send yourself an AUDIX message as a meeting reminder. If you prefer to address messages by name, ask your system administrator to set that as your normal mode. 21 MAILING LISTS _______________________________________ _______________________________________ _______________________________________ _______________________________________ _______________________________________ _______________________________________ _______________________________________ _______________________________________ _______________________________________ _______________________________________ _______________________________________ _______________________________________ _______________________________________ _______________________________________ _______________________________________ _______________________________________ _______________________________________ _______________________________________ _______________________________________ _______________________________________ _______________________________________ _______________________________________ _______________________________________ _______________________________________ _______________________________________ _______________________________________ _______________________________________ _______________________________________ 22 PERSONAL GREETINGS LOG 1. _______________________________________ _______________________________________ _______________________________________ 2. _______________________________________ _______________________________________ _______________________________________ 3. _______________________________________ _______________________________________ _______________________________________ 4. _______________________________________ _______________________________________ _______________________________________ _______________________________________ _______________________________________ 5. _______________________________________ _______________________________________ _______________________________________ 6. _______________________________________ _______________________________________ _______________________________________ 7. _______________________________________ _______________________________________ _______________________________________ 8. _______________________________________ _______________________________________ _______________________________________ 9. _______________________________________ _______________________________________ 23 INDEX A activate call types 10 greeting 11 other existing pers. greetings 12 Activity Menu 1,3,7,10,19,27 address 3,4,5,7,16,17,18,21 address message 4 Administer Greetings 10 Administer Lists 17 AUDIX definition of 1 exit from 2 logging in 2 mailbox 3 terms 3 transfer from 2 B broadcast message 7 C call types 8,10,11,12,13 busy 8,10,11,13 external/internal 8,10,11,13 modify 11 no answer 8,10,11,13 out-of-hours 8,10,11,12,13 prime time 8,10,11,12,13 lists, mailing - cont. review 17,18 summary 18 categories 3,6,7,15,20 Change Password 17 Check Outgoing Messages 15 commands, basic 27 M messages incoming 3 outgoing 3 schedule delivery 5 summary 6 Multiple Personal Greetings 8 D directory, personal 18 create 18 modify 19 review 19 F file cabinet 3,16 file options 5,6,7,16 fold-down menu panel 1,5,27 forward message 6 O Options Menu 4,5,6,7 P password 2,17 guest 21 initial 2 Play-Back Controls 5,27 G Get Messages 6 guest password 21 24 R record messages 4 name 19 new greeting 11 Record Messages 4 reply by voice mail 6,7 respond to message 6 H header 3,6,15,20 L listen to greetings 14 headers 20 messages 6,20 lists, mailing 17 create 17 ID 17 modify 17,18 S Scan Messages Quickly 20 send message 4 shortcuts 25 T Tips 2,5,7,16,20,21 FLOWCHART OF SHORTCUTS Here are a few shortcuts for the most frequently used AUDIX procedures. For additional procedures, see the individual activities in this guide. ACTIVITIES Record/Send 1 Get/Respond 2 Speak message Listen to header Approve Enter Extension # * # Listen to message 0 Skip to next header # Respond/Forward 1 Delete *D Administer/ Record Greeting 3 Change Password 5 Listen to greeting status Change 4 Change/ Create greeting Choose greeting 1 number (0-9) Enter New password # Deliver now * * # Undelete * * U Speak greeting Re-enter New password # Reply-Voice Mail Speak message 7 Deliver now * * # Call sender 0 Forward with comment 2 New message 4 Return to getting messages * # Approve * # Use for all calls 1 25 (Inside Back Cover) YOUR PERSONAL DIRECTORY _______________________________________ _______________________________________ _______________________________________ _______________________________________ _______________________________________ _______________________________________ _______________________________________ _______________________________________ _______________________________________ _______________________________________ _______________________________________ _______________________________________ _______________________________________ _______________________________________ ACTIVITY MENU Record Messages Get Messages Administer Greetings ABC DEF 1 Review Messages 2 Password/ Lists 3 GHI JKL MNO 4 Scan Messages 5 6 PRS TUV WXY 7 8 9 * 0 **R Relog in Q=7 Z=9 # _______________________________________ _______________________________________ _______________________________________ _______________________________________ _______________________________________ _______________________________________ _______________________________________ _______________________________________ _______________________________________ _______________________________________ _______________________________________ _______________________________________ _______________________________________ _______________________________________ BASIC COMMANDS Help *H Restart at Activity Menu *R Wait *W Transfer out of system *T Look up name/ext. in **N Directory Exit system **X Transfer call to operator *0 Delete *D Undelete **U Hold message in category **H ________________________________ Alternate addressing *A (switch between name/ext.) Use group list during *L addressing Hear Options Menu 0 (after addressing) 26 (Back of Fold-Down Menu Panel) 27 (Fold-Down Menu Panel) PLAY-BACK CONTROLS Rewind Play/Pause ABC DEF 1 2 3 Louder Back Up Advance GHI JKL MNO 4 5 6 Softer Slower Faster PRS TUV WXY 7 8 9 Listen/Replay Skip * 0 # Press 3 to pause and 3 again to continue. Q=7 Z=9