1
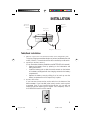
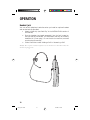
2
User’s Manual for
Cordless Telephone
Answering System 9050
Part 2
Please read Part 1 — Important Product
Information, included in your package.
9050_cover.1AT&T
3
8/12/98, 4:14 PM
© 1998 Philips Consumer Communications L.P. All rights reserved.
Printed in China. 848232518 Issue 1AT&T
9050_cover.1AT&T
2
8/12/98, 4:14 PM
CONTENTS
INSTALLATION................................. 3
Table/Desk Installation .......................... 3
Wall Installation ..................................... 4
Belt Clip ................................................ 5
OPERATION..................................... 6
Making a Call ......................................... 8
Answering a Call ................................... 8
Ending a Call ......................................... 8
Redial .................................................... 8
Handset Ringer Selection and
Ringer OFF ........................................ 8
Handset Ringer Volume ......................... 9
Temporary Tone .................................... 9
Special Telephone Services ................... 9
Page/Handset Locator ........................... 9
Headset Jack ........................................ 10
OPERATING RANGE ........................11
TELEPHONE MEMORY .................... 12
Storing Memory Numbers ................... 12
Replacing Stored Memory Numbers ... 12
Storing a Pause in a
Memory Number ............................. 12
Dialing Memory Numbers ................... 12
Memory Guard .................................... 12
ANSWERING SYSTEM OPERATION
At the Base .................................. 17
Answering Calls ................................... 18
Call Screening/Intercept ..................... 18
Listening to Your Messages .................. 18
Saving Messages .................................. 19
Deleting Messages ............................... 19
Recording a Memo .............................. 19
ANSWERING SYSTEM OPERATION
From a Remote Touch Tone Phone .. 20
Connect with the Answering System .. 20
Voice Help Menu ................................. 20
Remote Access Commands ................. 20
Remote ON/OFF ................................. 21
BATTERIES .................................... 22
Charging the Handset Battery Pack ..... 22
Charging the Spare Battery Pack ......... 22
Replacing the Handset Battery Pack ... 23
IN CASE OF DIFFICULTY ................. 24
ANSWERING SYSTEM SETUP .......... 13
Turning the System ON/OFF ............... 13
Volume ................................................ 13
Setting the Clock ................................. 13
Announcement Options ...................... 13
Selecting Your Announcement ............ 14
Recording Your Announcement .......... 14
Ring Select and Toll Saver .................... 15
Audible Message Alert ......................... 15
Remote Access Code ........................... 16
Base Ringer Setting .............................. 16
1
9050_book.1AT&T
1
8/12/98, 4:14 PM
2
9050_book.1AT&T
2
8/12/98, 4:14 PM
INSTALLATION
Standard
Electrical
Outlet
Modular
Telephone
Jack
Telephone
Line Jack
Telephone Line Cord
Power Cord
Table/Desk Installation
1
2
3
Choose a spot near an electrical outlet and a telephone jack.
This phone requires a modular telephone jack and a standard electrical
outlet (110v AC). The outlet should not be controlled by a wall switch.
Install the handset battery.
(For an illustration of battery installation, see BATTERIES in this manual.)
• Remove the battery cover by pressing on the indentation and
sliding downward.
• Install the battery pack so that the metal contacts on the bottom
of the battery are aligned with the charging contacts in the battery
compartment.
• Replace the battery cover by sliding it on its track up over the
battery compartment until it snaps firmly in place.
Set the dial mode.
If you have touch tone service, set the switch on the bottom of the
base to TONE. If you have dial pulse (rotary) service, set the switch
to PULSE. Even if you have dial pulse service, you can still use
telephone services requiring tone signals. See “Temporary Tone” in
the OPERATION section of this manual.
3
9050_book.1AT&T
3
8/12/98, 4:14 PM
INSTALLATION
4
5
6
7
Connect the telephone line cord.
Plug one end of the telephone line cord into the jack on the back of
the base. Plug the other end of the line cord into a modular jack. Make
sure the plugs snap firmly in place.
Connect the power cord.
Plug the power adapter into the jack labeled 11V DC on the back of
the base. Plug the AC adapter on the power cord into an electrical
outlet not controlled by a wall switch. The Message Window flashes
— — as the set initializes.
Charge the handset batteries for 16 hours.
Place the handset face down in the base. The CHARGING light on the
base goes on to show the handset is in the right position to charge the
batteries.
Check for dial tone.
After the batteries are charged, pick up the handset and extend the
base antenna. Check for dial tone by pressing P; the PHONE light
should go on and you should hear a dial tone.
Wall Installation
1
2
Follow Steps 1–3 under Table/Desk Installation.
Turn the base unit over, and attach the wall mounting base to
the lower half of the base unit. Gently press down until it snaps
firmly into place.
4
9050_book.1AT&T
4
8/12/98, 4:14 PM
INSTALLATION
3
4
5
6
Connect the power cord.
• Plug the power adapter into the jack labeled 11V DC on the back
of the base.
• Run the cord under the tab on the bottom of the base unit and
under the tab on the wall mounting base.
• Plug the AC adapter into an electrical outlet not controlled by a
wall switch. The Message Window flashes — — as the set initializes.
Connect the telephone line cord.
• Using the short telephone line cord supplied, insert one end of
the telephone line cord into the telephone jack on the back of the
telephone base.
• Feed the excess line cord under the tab on the bottom of the
telephone base.
• Plug the line cord into the standard wall jack.
Mount the telephone on the wall.
Position the telephone base so the mounting studs on the wall jack fit
into the base of the telephone. Slide the telephone down on the
mounting studs until the phone locks into place.
Follow Steps 6 and 7 under Table/Desk Installation.
CAUTION: Use only the AC power adapter supplied with this telephone,
Power Supply for 9050. Input: AC 117V, 60 Hz, 12W Output: DC 11V,
500mA.
Belt Clip
If you wish, you can attach the belt clip to the cordless handset, following the
illustrations below.
To Attach
To Remove
5
9050_book.1AT&T
5
8/12/98, 4:14 PM
OPERATION
Latch for
Spare Battery
Compartment
Light goes on
when system is
connected to
power and
phone line
Adjust speaker
volume
Send paging tone to handset
Light goes on when spare battery (optional) is
placed in Spare Battery Compartment
Light goes on when handset is in use, or
when handset is charging in base
Directory card
6
9050_book.1AT&T
6
8/12/98, 4:14 PM
OPERATION
Light goes on while
you are on a call
Light goes on
when battery
needs charging
Handset Volume
Control
Headset jack
Make or answer
a call
End a call
Change channel
Temporary Tone
Redial last
number called
Store numbers in
telephone memory
Access numbers in
telephone memory
7
9050_book.1AT&T
7
8/12/98, 4:14 PM
OPERATION
Making a Call
1
2
Press and release P, and wait for dial tone.
When you hear a dial tone, dial the number.
Answering a Call
Press P. The P light goes on, and the call is connected.
Ending a Call
Press o on the handset.
Redial
The last number dialed on this phone (up to 16 digits) is stored in redial memory
until you dial another number.
1 Press P.
2 When you hear a dial tone, press R.
Handset Ringer Selection and Ringer OFF
You can select from four different handset ringer styles for each line. You can
also turn off the ringer.
1 Press p, #.
2 Press 1, 2, 3 or 4 to select your ringer style. You will hear a sample
of the ringer style
— OR —
Press 5 to turn the ringer off.
3 Press o.
Checking Handset Ringer Selection
1
2
3
Press p, #.
Press 0. You will hear the current ringer style selection.
Press o.
8
9050_book.1AT&T
8
8/12/98, 4:14 PM
OPERATION
Handset Volume
Adjust the handset volume to high (H) or low (L) using the switch on the side
of the handset.
Temporary Tone
NOTE: If you have touch tone service, you do not need to use the Temporary
Tone feature.
If you have dial pulse (rotary) service, this feature allows you to enter codes or
tones needed to operate answering machines, or use electronic banking services,
calling cards, and other special services. This feature will operate most special
services; however, some services may actually require a touch tone line. To be
sure, ask the company that provides the special service.
1 Dial the call, then press *. Any buttons pressed after this send tone
signals.
2 After you hang up, the phone automatically returns to dial pulse (rotary)
dialing.
Special Telephone Services
If you subscribe to special local telephone company services like Call Waiting
or Call Forwarding, you can access them by pressing P whenever you
would press the switchhook on a corded phone. This is like the Flash feature
on some other phones.
Page/Handset Locator
The Page feature allows you to signal someone at the handset from the base.
You can also use this feature to help you locate the handset.
Press G on the base. The handset will ring four times before ending
automatically. Press o on the handset or G on the base to cancel
the page.
9
9050_book.1AT&T
9
8/12/98, 4:14 PM
OPERATION
Headset Jack
You can use this telephone hands-free when you install an optional headset
and use the belt clip provided.
1 Attach the belt clip (see “Belt Clip” in the INSTALLATION section of
this manual).
2 Plug the headset (purchased separately) into the jack located on
the right side of the handset. (For best results, use only an accessory
headset with 2.5 mm plug.) Do not force the connection, but make
sure the plug fits securely.
3 Follow instructions under “Making a Call” or “Answering a Call.”
NOTE: The earpiece and microphone on the handset are disabled when the
headset is plugged in.
10
9050_book.1AT&T
10
8/12/98, 4:14 PM
OPERATING RANGE
This cordless telephone operates at the maximum power allowed by the Federal
Communications Commission (FCC). Even so, this handset and base can
communicate over only a certain distance — which can vary with the locations
of the base and handset, the weather, and the construction of your home or
office. For best performance, keep the base antenna fully extended.
If you receive a call while you are out of range, the handset might not ring —
or if it does ring, the call might not connect when you press P. Move
closer to the base, then press P to answer the call.
If you move out of range during a phone conversation, you will hear noise or
interference. To improve reception, move closer to the base.
If you move out of range without pressing o, your phone will be left “off
the hook.” To hang up properly, walk back into range, periodically pressing
o.
This cordless telephone has 10 channels available for maximum performance.
If you notice noise or interference while using the handset:
1 Press c.
2 If the interference doesn’t clear, continue to press c until you find
a clear channel
— OR —
Move closer to the base and press c.
11
9050_book.1AT&T
11
8/12/98, 4:14 PM
TELEPHONE MEMORY
This cordless phone can store 10 telephone numbers that you can dial just by
pressing m and a number button.
Storing Memory Numbers
1
2
3
4
5
Make sure the handset is off.
Press p (the PHONE light blinks).
Press a number key (0 to 9) to select a memory location.
Enter the number you want to store (up to 16 digits)
— OR —
Press R to store the last number dialed.
Press m. You will hear a confirmation tone.
Replacing Stored Memory Numbers
You can replace a stored number by storing a new number in its place.
Storing a Pause in a Memory Number
While storing a number in memory, press and hold down the number button
that comes before the pause until you hear the second beep. This inserts a
two-second pause after that digit. If you hold the button down longer, you
will hear more beeps as additional pauses are stored.
For example, to store 9, PAUSE, 555–0123 in memory location 3: Press p,
3, then hold down 9 until you hear the second beep. Then press 5 5 5 0
1 2 3, e.
Dialing Memory Numbers
1
2
3
Press P.
Press m.
Press the number button (0–9) for the memory location of the number
you’re calling.
Memory Guard
The phone numbers you store in memory are protected from loss when you
change the handset battery, or in the event of a power failure.
12
9050_book.1AT&T
12
8/12/98, 4:14 PM
ANSWERING SYSTEM SETUP
Turning the System ON/OFF
Press O to turn the answering system on or off. The ON/OFF light is on
when the system is on.
Volume
Press + to increase volume when listening to messages. Press to decrease volume.
Setting the Clock
You’ll need to set the clock so it can record the day and time that each message
is received.
1 Press and release U until you hear “Set day and time.”
2 Press and release S until you hear the correct day of the week.
3 Press C to confirm your selection. The system announces the hour.
4 Press and release S until you hear the correct hour.
5 Press and release C to confirm your selection. The system
announces the minutes.
6 Press and release S until you hear the correct minutes.
7 Press and release C to confirm your selection. The system
announces the current day and time.
8 Press and release U to set up another feature
— OR —
Press and release Y to exit.
Announcement Options
Normal Announce Mode
Before using this answering system, you should record an announcement (up
to 90 seconds long) that callers will hear when the system answers a call. For
example:
“Hello. You’ve reached Meadowlark Nursery. We are unable to answer
your call at this time. Please leave a message after the tone.”
If you choose not to record an announcement, the system answers with a
prerecorded announcement: “Hello. I’m unable to answer your call right
now. Please leave your name, number and a message after the tone.”
13
9050_book.1AT&T
13
8/12/98, 4:14 PM
ANSWERING SYSTEM SETUP
Announce Only Mode
You can choose whether the answering system will signal callers and record
their message (Normal Announce mode, described above) or play an
announcement for callers and then hang up (Announce Only mode). The system
lets you record up to two different announcements, one for Normal Announce
mode, and one for Announce Only mode. For example:
“You’ve reached the Meadowlark Nursery. We’re sorry we cannot
take your call. Please call back tomorrow between 9 AM and 5 PM.”
If you choose not to record an announcement for Announce Only, the system
answers with the prerecorded announcement: “Hello. I’m unable to answer
your call right now. Please call again. Thank you.”
NOTE: In the Announce Only mode, callers will hear the outgoing
announcement twice.
Selecting Your Announcement
1
2
3
4
Press and release U five times, until you hear “Set Announce Only.”
Press and release S. The system prompts with “On” or “Off.”
Press and release S until you hear your choice. Select Off if you
want callers to be able to leave a message.
Press and release C to confirm your selection.
Press and release U to set up another feature
— OR —
Press and release Y to exit.
Recording Your Announcement
1
2
3
4
5
Select your announcement (see above).
Press and release U until you hear “Set outgoing message.”
Press and release M. The system prompts “Now recording.”
Begin recording your announcement, up to 90 seconds long. The
Message Window shows the elapsed time of your announcement as
you record. Record your announcement in a quiet location, away
from any background noise.
Press and release Y. The system plays back your announcement.
14
9050_book.1AT&T
14
8/12/98, 4:14 PM
ANSWERING SYSTEM SETUP
To return to the prerecorded announcement
1
2
3
4
Press and release U until you hear “Set outgoing message.”
Press and release Y. The system plays the current announcement.
Press and release D while the announcement is playing. The
system prompts “Outgoing message has been erased.”
Press and release U to set up another feature
— OR —
Press and release Y to exit.
Ring Select and Toll Saver
Use Ring Select to select how many times the phone will ring before the system
answers a call. Set for 2, 4 or 6 rings, or set to Toll Saver. When you set the
system to Toll Saver, the system answers after 4 rings when you have no new
messages, and after 2 rings when you have new messages.
1 Press and release U until you hear “Set number of rings.”
2 Press and release S until you hear your desired setting (2, 4, 6 or
Toll Saver).
3 Press and release C to confirm your selection. The system
announces your ring selection.
4 Press and release U to set up another feature
— OR —
Press and release Y to exit.
Audible Message Alert
If you want the base to beep once every 10 seconds to notify you that new
messages have been received, set the Message Alert to ON. (The Message
Window displays ON for on, and OF for off.)
1 Press and release U until you hear “Set audible message alert.”
2 Press and release S. The system announces the current setting.
3 Press and release S until the system announces your selection
(on or off).
4 Press and release C to confirm your selection. The system
announces your selection.
5 Press and release U to set up another feature
— OR —
Press and release Y to exit.
15
9050_book.1AT&T
15
8/12/98, 4:14 PM
ANSWERING SYSTEM SETUP
NOTE: You may stop the Audible Message Alert beep by pressing any button
(except G) on the base. When new messages are received, the
Audible Message Alert is activated again.
Remote Access Code
The Remote Access Code allows you to access features and functions of the
answering system from a touch tone phone. The Remote Access Code is preset
to 19, but you can change it to any two-digit number following the steps below.
1 Press and release U until you hear “Set security code.”
2 Press and release S to hear the current Remote Access Code.
3 Press and release S to increase the code by one
— OR —
Press and hold S to increase the code by ten. The Message Window
displays the Remote Access Code as you change it.
4 Press and release C to confirm your selection. The system
announces your new Remote Access Code.
5 Press and release U to set up another feature
— OR —
Press and release Y to exit.
Base Ringer Setting
1
2
3
4
5
Press and release U until you hear “Set base ringer.”
Press and release S. The Message Window briefly displays the
current setting.
Press and release S until the Message Window displays your
selection — ON (on) or OF (off).
Press and release C to confirm your selection. The system
announces your selection.
Press and release U to set up another feature
— OR —
Press and release Y to exit.
NOTE: The Base Ringer Setting does not affect the handset ringer.
16
9050_book.1AT&T
16
8/12/98, 4:15 PM
ANSWERING SYSTEM OPERATION
AT THE BASE
Message Window
displays number
of messages
Set/review
answering
system features
Use with other
buttons to
change settings
Set/review day
and time
Turn answering
system on or off
Record a memo
Skip to next
message
Stop/start message playback
Repeat all or part of message
Delete all or some messages
Light goes on when answering system is on
17
9050_book.1AT&T
17
8/12/98, 4:15 PM
ANSWERING SYSTEM OPERATION
AT THE BASE
Answering Calls
When the system is on and you’ve selected the Normal Announce mode, the
caller hears the announcement, followed by a beep. A caller can leave a message
up to 4 minutes long. If the message is longer than 4 minutes or shorter than
2 seconds, or if the caller is silent for more than 6 seconds, or if the system runs
out of memory, the system beeps once and hangs up.
If you’ve selected Announce Only, callers hear your announcement twice,
but cannot leave a message.
Call Screening/Intercept
Set the volume control so you can hear the caller’s message. If you decide to
take the call, press P on the handset, or lift the handset of an extension
phone. (If you pick up the handset or an extension phone during the
announcement and the announcement does not stop right away, press * 0
on the handset or extension phone, or press Y on the base.)
Listening to Your Messages
As the system plays back messages, the Message Window displays the number
of the message playing. After playing each message, the system announces the
day and time the message was received. After playing the last message, the
system announces “End of messages.”
Play all messages
Press and release Y. The system announces the total number of new and
old messages, then plays the new messages. If there are no new messages, the
system plays the old messages.
Repeat entire message
Press and release r after hearing the first 2 seconds.
Back up to earlier message
Press and release r until the Message Window displays the number of the
message you want.
Skip to next message
Press and release K.
Skip ahead to later message
Press and release K until the Message Window displays the number of the
message you want.
Stop message playback
Press and release Y.
18
9050_book.1AT&T
18
8/12/98, 4:15 PM
ANSWERING SYSTEM OPERATION
AT THE BASE
Saving Messages
The system saves your messages automatically until you delete them, and can
store approximately 15 minutes of messages, memos and announcements (up
to a maximum of 99 messages). When memory is full, or the maximum
number of messages is recorded, the Message Window flashes F (for Full) and
the number of messages. You’ll need to delete messages to make room for new
ones. (Messages are saved even if the power adapter is unplugged, or in the
event of a power failure.)
NOTE: When full, the system automatically turns off. The system answers
calls after 10 rings and prompts “Memory full. Please enter your security
code.” You can now access your system remotely, even though it’s set to
off. (See ANSWERING SYSTEM OPERATION – FROM A REMOTE TOUCH
TONE PHONE.)
Deleting Messages
Delete all messages
Press and hold D to delete all old messages. The system will not delete
messages that have not been played.
Delete selected messages
Press and release D while the message you want to delete is playing. The
system continues with the next message.
Recording a Memo
You can record a memo to be stored as an incoming message. The memo can
be up to 4 minutes long, and will be played back with other messages.
1 Press and release M . The system prompts “Now recording,”
followed by a beep.
2 After the beep, speak toward the microphone.
3 To stop recording, press and release Y.
19
9050_book.1AT&T
19
8/12/98, 4:15 PM
ANSWERING SYSTEM OPERATION
FROM A REMOTE TOUCH TONE PHONE
This cordless telephone answering system allows you to retrieve messages and
access other features using a remote touch tone phone, even when you are
away from your home or office.
Connect with the Answering System
1
2
3
Dial your telephone number.
When the outgoing announcement begins to play, press and release
#, then immediately enter your Remote Access Code (see “Remote
Access Code” in ANSWERING SYSTEM SETUP).
The system beeps once, announces the number of new messages,
and plays back any new messages.
Voice Help Menu
About 10 seconds after messages have been played, the system gives you a list
of remote commands:
Press # 2 to play all messages
Press # 5 to stop
Press # 4 to repeat the message
Press # 6 to skip the message
Press # 9 to erase the message
Press # 1 for other functions.
If you press # 1 for other functions, the system gives you a new list of selections:
Press # 7 to review the outgoing message
Press * 7 to record an outgoing message
Press * 8 to record a memo
Press # 4 twice to repeat the previous message
Press # 0 to turn the system on or off
Press # 1 for other functions (returns you to first list of selections)
Press * 0 to exit remote operation mode.
Remote Access Commands
Playing Messages
1
2
3
20
Connect with the answering system.
Listen to new messages.
To play all messages, press # 2.
To repeat a message, press # 4.
To return to the previous message, press # 4 # 4.
To skip a message, press # 6.
To stop message playback, press # 5.
To save messages, hang up.
9050_book.1AT&T
20
8/12/98, 4:15 PM
ANSWERING SYSTEM OPERATION
FROM A REMOTE TOUCH TONE PHONE
Deleting Messages
1
2
Connect with the answering system, and begin playing
messages.
While the message is playing, press # 9.
Recording Outgoing Announcement
1
2
3
Connect with the answering system.
Press * 7, and begin recording your announcement.
When you’re finished recording, hang up.
Reviewing Outgoing Announcement
1
2
Connect with the answering system.
Press # 7.
Recording a Memo
1
2
3
Connect with the answering system.
Press * 8, and begin recording your memo.
When you’re finished recording, hang up.
Remote ON/OFF
Turning System Off
1
2
Connect with the answering system.
Press # 0. The system announces the new on/off status. (Pressing
# 0 again changes the status again.)
Turning System On
1
2
3
When the system is off, or if memory is full, the system answers after
10 rings, and prompts you to enter your Remote Access Code.
Press # and enter your Remote Access Code.
Press # 0 to turn the system on.
21
9050_book.1AT&T
21
8/12/98, 4:15 PM
BATTERIES
CAUTION: To reduce the risk of fire or injury to persons or damage to
the telephone, read and follow these instructions carefully.
•
•
•
•
•
•
Use only Replacement Battery 3470.
Do not dispose of the battery in a fire. The cell might explode. Check
with local codes for special disposal instructions.
Do not open or mutilate the battery. Released electrolyte is corrosive
and may cause damage to the eyes or skin. It may be toxic if swallowed.
Exercise care in handling batteries in order not to short the battery
pack with conducting materials such as rings, bracelets, and keys. The
battery pack or conductor may overheat and cause harm.
Charge the battery provided with or identified for use with this product
only in accordance with the instructions and limitations specified in
this manual.
Make sure the battery is inserted properly so the metal contacts on the
battery are aligned with the charging contacts in the battery
compartment.
Charging the Handset Battery Pack
The batteries need charging when:
• The LOW BATT light on the handset is on.
• The phone does not respond when you press P, and no lights
go on.
Place the handset in the base so the CHARGING light goes on. The batteries
will be fully charged in 10 hours (16 hours for first charge).
NOTE: For optimum battery performance, do not place the handset in the
base until the LOW BATT indicator lights.
Charging the Spare Battery Pack
The spare battery charging compartment is located in the base cradle. You can
use the spare battery pack to replace the current handset battery pack right
away if it becomes depleted. The spare handset battery pack is optional, and
must be purchased separately.
22
9050_book.1AT&T
22
8/12/98, 4:15 PM
BATTERIES
1
2
3
Open the battery door on top of the base cradle by lifting the latch
on top.
Insert the battery. The SPARE BATT CHARGING light goes on.
Replace the battery door. The spare battery will be charged in about
24 hours.
Replacing the Handset Battery Pack
1
2
3
4
5
Remove the battery cover by pressing on the indentation and sliding
downward.
Lift out the old battery pack.
Install the new battery pack so that the metal contacts on the bottom
of the battery are aligned with the charging contacts in the battery
compartment.
Replace the battery cover by sliding it on its track up over the battery
compartment until it snaps firmly in place.
The new battery pack must be charged before using this telephone.
Place the handset in the base and allow it to charge for 16 hours. Your
telephone might operate before that, but for best performance, let
the handset battery pack charge fully.
23
9050_book.1AT&T
23
8/12/98, 4:15 PM
IN CASE OF DIFFICULTY
If you have difficulty operating this phone, try the suggestions below. If you
still have trouble, call 1 800 722-9125.
If the phone doesn’t work at all, check these items first:
•
•
•
•
•
•
Make sure the AC adapter is plugged in.
Make sure the telephone line cord is plugged firmly into the base unit and
the modular jack.
Make sure the antenna is fully extended.
If the LOW BATT light is on, the battery pack needs recharging. If the
battery pack will not charge, replace it with replacement battery 3470.
Make sure the battery pack is installed correctly.
If you have dial pulse (rotary) service on your phone line, make sure the
dial mode switch is set to PULSE.
If the above suggestions don’t solve the problem, try
re-initializing the handset and base:
1
2
3
4
5
6
Disconnect the power to the base.
Remove the handset battery pack.
Wait a few minutes.
Connect the power to the base.
Insert the handset battery pack.
Put the handset in the base to re-initialize.
If you hear noise or interference when using the phone:
•
•
•
•
•
Make sure the base antenna is fully upright.
You may be out of range. Move closer to the base.
Press and release c to change to another of the 10 channels available.
If the noise is exceptionally loud, move closer to the base before changing
channels.
Household appliances plugged into the same circuit as the base can
sometimes cause interference. Try moving the appliance or the base to
another outlet.
The layout of your home or office might be limiting the operating range.
Try moving the base to another location, preferably on an upper floor.
24
9050_book.1AT&T
24
8/12/98, 4:15 PM
IN CASE OF DIFFICULTY
If the phone does not ring when you receive a call:
•
•
•
•
•
•
Make sure the handset ringer is on.
Make sure the telephone line cord is connected firmly to the base and the
telephone jack.
Make sure the AC adapter is plugged firmly into an outlet not controlled by
a wall switch.
You might be too far from the base; move closer.
You might have too many extension phones on your telephone line to
allow all of them to ring. Try unplugging some of them.
Press c to change to another channel.
If you hear other calls while using your phone:
•
•
Press c to change to another channel.
Disconnect the base from the modular jack and plug in a corded telephone.
If you still hear other calls, the problem is probably in your wiring or
local service. Call your local telephone service company.
If messages are incomplete:
•
•
•
If a caller leaves a very long message, part of it may be lost when the
system disconnects the call after 4 minutes.
If the caller pauses for more than 6 seconds, the system stops recording
and disconnects the call.
If the system’s memory becomes full during a message, the system stops
recording and disconnects the call.
If you have difficulty hearing messages:
Check the volume setting on the base.
If the system does not answer after the correct number of rings:
•
•
•
•
Make sure the ON/OFF light is on. If it is not, press O on the base.
If Toll Saver is on, the number of rings changes to two when you have
new messages waiting.
In some cases, the system may be affected by the ringing system used by
the local telephone company.
If the memory is full or the system is off, the system answers after 10 rings.
If CL appears in the Message Window:
You need to reset the clock.
25
9050_book.1AT&T
25
8/12/98, 4:15 PM
IN CASE OF DIFFICULTY
If the system does not respond to remote commands
from a touch tone phone:
•
•
•
•
Make sure you are calling from a touch tone phone. When you dial a number,
you should hear tones. If you hear clicks instead, the phone is not a touch
tone telephone.
The answering system may not detect the Remote Access Code while your
announcement is playing. Try waiting until the announcement is over before
entering the code.
Be sure to press #, then enter your Remote Access Code within two
seconds. Make sure you enter your Remote Access Code correctly.
There may be noise or interference on the phone line you are using. Press
keys firmly.
If your outgoing announcement isn’t clear:
•
•
When you record your announcement, make sure you speak in a normal
tone of voice, about nine inches from the base.
Make sure there is no “background” noise while you are recording.
26
9050_book.1AT&T
26
8/12/98, 4:15 PM
2
Cordless Telephone
Answering System 9050
Connect with Answering System
1 Dial telephone number and wait
for system to answer.
2 Press and release #, then immediately
enter Remote Access Code.
3 After the system beeps once,
new messages are played. Enter
a command from the other side
of this card.
Your Remote Access Code ______
(The preset code is 19)
© 1998 Philips Consumer Communications L.P.
All rights reserved. Printed in China.
848232542 Issue 1AT&T
Perf.
2
Cordless Telephone
Answering System 9050
Connect with Answering System
1 Dial telephone number and wait
for system to answer.
2 Press and release #, then immediately
enter Remote Access Code.
3 After the system beeps once,
new messages are played. Enter
a command from the other side
of this card.
Your Remote Access Code ______
(The preset code is 19)
© 1998 Philips Consumer Communications L.P.
All rights reserved. Printed in China.
848232542 Issue 1AT&T
9050_wc.1AT&T
1
8/12/98, 4:13 PM
OPTION
PRESS
Play all messages
Save messages
Delete messages
Repeat a message
Return to the
previous message
Skip a message
Stop playback
Change announcement
#2
Hang up
#9
#4
#4#4
OPTION
PRESS
Play all messages
Save messages
Delete messages
Repeat a message
Return to the
previous message
Skip a message
Stop playback
Change announcement
#2
Hang up
#9
#4
#4#4
#6
#5
* 7, hang up
when finished
recording
Review announcement # 7
Record a memo
* 8, hang up
when finished
recording
Change on/off status
#0
Turn system on
#, enter Remote
Access Code, press
# 0 to change
on/off status
Perf.
#6
#5
* 7, hang up
when finished
recording
Review announcement # 7
Record a memo
* 8, hang up
when finished
recording
Change on/off status
#0
Turn system on
#, enter Remote
Access Code, press
# 0 to change
on/off status
9050_wc.1AT&T
2
8/12/98, 4:13 PM