1
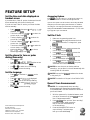
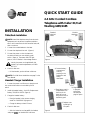
QUICK START GUIDE
2.4 GHz Corded Cordless
Telephone with Caller ID/Call
Waiting 1485/1185
INSTALLATION
Modular
telephone
jack
Standard
electrical
outlet
Table/Desk Installation
Install this telephone away from electronic
¥NOTE:
equipment, such as personal computers,television
sets or microwave ovens. Avoid excessive heat,cold,
dust or moisture.
1
2
Connect the corded handset to the base.
Connect the telephone line cord. (figure a)
3
Connect the power cord to the base and
an electrical outlet not controlled by a wall
switch. (figure a) The answer ON/OFF light
goes on, and CL flashes in the message window.
Power Cord
Line Cord
figure a
Use only the power cord supplied with this
product. If you need a replacement, call 1-800222–3111.
4
a) Remove battery
compartment
cover by
pressing on the
indentation and
sliding
downward.
Check for dial tone .
• Lift the handset, you should hear a dial tone.
NOTE: For Wall Mount Installation see page 5 in the
¥User
Manual.
Handset Charger Installation
1 Connect the power cord. Be sure to plug the cord
into an electrical outlet not controlled by a wall
switch.
2 Install the handset batter y. Use NiCd Replacement
Battery 3301,SKU# 91076. (figure b)
3
c) Place battery pack in
compartment with
the wires in the
lower left corner,
along the bottom of
the battery pack.
Charge the handset batter y.
• Place the handset in the remote charging
stand.The CHARGING light goes on.
d) Replace cover
by sliding it up
into place.
• Charge the battery at least 12 hours.
4
Check for dial tone.
• After the batteries are charged,lift the handset
and press
; you should hear a dial tone.
b) Align two holes
in plug with
socket pins,
and snap the
plug into place.
figure b
FEATURE SETUP
Set the time and date displayed on
handset screen
If you subscribe to Caller ID service, the date and time will
be set automatically with the first incoming call.
If you do not have Caller ID service, you can set the date
and time manually.
•
•
•
•
•
•
Press
, then press
until
is
displayed. Press
.
The month is flashing. Use
or
to select the
current month. Press
.
The day is flashing. Use
or
to select the
correct day. Press
.
The hour is flashing. Use
or
to select the
current hour. Press
.
The minute is flashing. Use
or
to select the
correct minute. Press
.
or
is flashing. Use
or
to choose
between
and . Press
.
Set the phone for tone or pulse
dialing (base only)
•
•
•
•
Press
on base.
Press
or
until
and the current
setting is displayed,then press
.
Use
or
to select the correct setting.
Press
to save the setting.
Set the language
•
•
•
•
•
Press
on the base or
on the
handset.
Press
or
until
is displayed.
Press
, the current setting is flashing.
Use
or
to select
,
or
.
Press
to save the setting.
Answering System
Press
to turn the system on or off. When the system is on,
you will hear “Machine on” and the ON/OFF light will be lit.
If you turn the system on at the first time, it works using the default
setting and pre-recorded outgoing announcements. For details on
recording your own outgoing announcements and changing system
settings, see “ANSWERING SYSTEM OPERATION AT THE BASE” starting on page 24 of your User’s Manual.
Set the Clock
1
2
3
4
5
6
7
Make sure the answering system is on.
Press
.The system announces the clock
setting then announces:“To change clock, press
.”
Press
.
Press
until the system announces the
correct day, then press
.
Press
until the system announces the
correct hour, then press
.
Press
until the system announces the
correct minutes,then press
.
Press
until the system announces the
correct years,then press
. The system
announces the current clock setting.
You can choose to set the day and time
¥NOTE:
manually, or you can allow it to be set automatically with
incoming Caller ID Information.
Press and hold
¥NOTE:
or the year by 10.
to advance the minute
¥NOTE: The selection of the year is from 2000 to 2039.
Record Your Announcement
NOTE: For complete details about recording
¥announcements,
see “Record Your Announcement”
in the ANSWERING SYSTEM OPERATION section of
your User’s Manual.
1
2
© 2003 Advanced American Telephones.
All Rights Reserved.
AT&T and the Globe Design are
trademarks of AT&T Corp., licensed to
Advanced American Telephones.
Printed in China. Issue 1AT&T 05/03
3
With the system set for the desired answer mode
(normal or Announce Only) press
until you
hear “Change announcement.”
Press
. After you hear “Now recording”
followed by a beep, speak toward the
base to record an nnouncement up
to 90 seconds long.
Press any MAILBOX/STOP button to
stop recording. The system plays
back your recorded message.