1
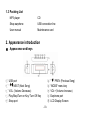
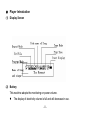
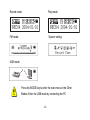
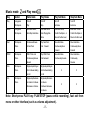
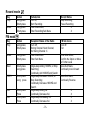
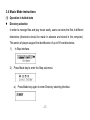
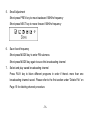
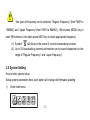
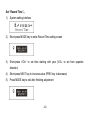
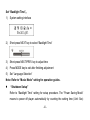
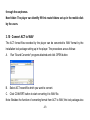
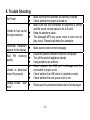
Contents Legal Disclaimer ……………………..….….…………….………….….…… Warning …………………………………..….………..………………………… 3 1. Brief Product Introduction ………….……………………….….….….…. 5 1.1 Function Overview …..…………….………….………….…………..….… 6 1.2 Specifications ……..………………….……….……………….…….……... 8 1.3 Packing List …………………..…….…………………….….….…..……… 10 2. Appearance Introduction ………….…….…………………….…………... 10 3. Operation Introduction …………………………….................................. 12 4 3.1 Simple Operation …...………………………………………...……………. 12 3.2 Basic Operation …….………………………………………...……………. 12 3.3 Enter Various Function Modes …….………………………...……………. 13 3.4 Music Mode Instructions .…………………………………………...……… 17 3.5 Sound Recording ....…………………………………………...……………. 29 -1- 3.6 Play Recorded File .…………………………………………...……………. 33 3.7 FM Radio …………………………………………………………………….. 35 3.8 System Setting ……..………………………..…………….……................. 37 3.9 Use USB Disk …….…………...........………..…………………………….. 48 3.10 Convert ACT to WAV …………….………………………………………... 49 4. Installation Program ………….…………………………………………….. 50 5. Important Recommendations ……………………………….…......…...... 52 6. Trouble Shooting ………………………………….………..……….……… 56 -2- Legal Disclaimer 1. Astone Holdings Pty Ltd known herein as ‘Astone’, does not guarantee the accuracy or validity of the information outlined in this user manual, although all attempts have been made to display the most accurate information. 2. Astone will not be held liable for any loss, accident or miss use caused by incorrectly following these instructions. At the same time Astone will not be held responsible for damages caused by misinterpretation. 3. Furthermore any data files that have been damaged or accidentally erased during the course of operation and or use are not the responsibility or fault of Astone. 4. Astone holds the right to modify this user manual, software, product packaging or hardware without any advance notice. -3- Warning Battery must be removed from the unit if it is to be left unused for an extended period. Failure to do so can result in the battery leaking, and damaging the unit. -4- 1. Brief Product Introduction Thank you for purchasing this high quality Astone product. The Astone Samba 1000 Digital Audio Box is a unique unit capable of playing Mp3 music, FM Radio and recording high quality voice or radio. This awesome little Digital Audio Box is packed full of features including an equalizer with seven different sound effects, a huge support base capable of displaying eleven different languages, 20 preset radio channels and the display comes in a highly fashionable indigo blue backlight colour. Designed with modern and contemporary views in mind, the Samba 1000 Digital Audio Box fits perfectly in today’s technology and fashion conscious environment where having the best is only a matter of Astone. -5- 1.1 Function Overview ¾ Support multiple audio frequency, such as MP1, MP2, MP3, WMA, WMV, ASF and WAV. ¾ Firmware updating Download the latest updating software from the website for function extension. ¾ FM stereo radio Automatic broadcast station searching with storage capability up to 20 broadcasting channels with various frequencies. ¾ Free-driver Flash Disk Function For WIN2000 and above, there is no need to setup the driver program. The file operation can be done directly though “flash disk” in “My Computer” without the management program. ¾ “ My Domain” Disk mode Using the tool attached to partition the disk into two disks and encrypt one of them, which can hide the space and leaves the encrypted part invisible to outsiders. -6- ¾ Synchronized display of lyric (Karaoke) Support the most popular LRC lyric file on internet. ¾ Record/repeat Recording through microphone, then save it as WAV and ACT file format with the option to select section repeat or contrast repeat. This fulfills the function of digital repeat. ¾ Seven EQ Normal, Rock, Pop, Classic, Soft, Jazz and DBB. ¾ Multiple play mode Normal, Single Circle, Directory Playing, Directory Circle, All Circle, Random and Browse. ¾ Set up cutting off time Sleeping mode and power saving mode can be set for your convenience. -7- ¾ Animation menu Vivid animation menu comes along with the display of words, which makes it handy and easy to use. 1.2 Specifications Size: 60(L)*23(W)*15(H)mm Display screen: 32mm(L)*10mm(W), back-lighted EL Connection: USB2.0(FS) (read 1000K Byte/s, write 900K Byte/s) Memory: 128MB/256MB/512MB/1G Power : one AAA battery Record: Sampling 8KHZ Record format, WAV(32Kbps), ACT(8K bps) Record time: 9 hours -8- MP3,WMA: MP3’s bit rate: 32Kbps-320Kbps WMA’s bit rate: 5Kbps-192Kbps Frequency response: from 20HZ to 20KHZ Signal to Noise ratio: >85db Distortion: <0.05% FM Radio Frequency response range: 76MHZ-90MHZ/87MHz-108MHZ Channels storage: 20 Music format: MP1, MP2, MP3, WMA, WMV, ASF, WAV Temperature: -5 ~ 40 Centigrade Support multi-language: English, Chinese simplified, Chinese traditional, Japanese, Korean, French, German, Italian, Dutch, Portuguese and Spanish. Supported Operation System: Windows98/SE/ME/2K/XP, MacOS10.3, Linux2.4.2 -9- 1.3 Packing List MP3 player CD Strap earphone USB connection line User manual Maintenance card 2. Appearance introduction ● ① ③ ⑤ ⑦ ⑨ Appearance and keys USB port “ ” NEXT (Next Song) VOL- (Volume Decrease) Play/Stop/Turn on Key/ Turn Off Key Strap port ② ④ ⑥ ⑧ ⑩ -10- “ ” PREV (Previous Song) “MODE“ menu key VOL+ (Volume Increase) Earphone port LCD Display Screen ● Player Introduction (1) Display Screen (2) Battery This machine adopts the monitoring on power volume. z The display of electricity volume is full and will decrease in use. -11- z The icon of battery turns to blank while the volume is used up and the battery need to be charged accordingly. 3. Operation Introduction 3.1 Simple operation 1) Connect earphone 2) Long-press PLAY key to start player; enter “Music Mode” and short-press PLAY key again to play music. 3) Select music: PREV key is for the last piece and NEXT is for the next piece. 4) Volume control: press VOL+ to increase volume; press VOL- to decrease volume. 5) Long-press PLAY key to turn on or turn off the player. 3.2 Basic operation 3.2.1 Entering menu Press the Mode key to enter the menu. The menu consists of main menu -12- (long-press to enter while in halted state), the playing submenu (short-press to enter) and the Stopping submenu (short-press to enter) 3.2.2 Browse Operation A. Press PREV and NEXT key to browse the song or browse the menu. B. Press PREV and NEXT key to select last piece/Next piece while playing song, hold the key for fast forward/fast backward. 3.3 Enter various function modes Enter various function modes through main menu. Main menu: Music mode: -13- Record mode: Play mode: FM mode: System setting: USB mode: Press the MODE key to enter the main menu in the Other Modes; Enter the USB mode by connecting the PC -14- Music mode and Play mode Key Action Halted state Play Status Play Sub Menu Stop Sub Menu Play Long-press Turn off Turn Off Turn Off Turn Off Short-press Play Stop Exit menu Exit menu Long-press Enter Main Menu; Enter Main Menu Enter Main Menu; Enter Main Menu Short-press Enter Stop Sub Menu Enter Playing Sub Confirm the Option or Confirm the Option or Menu Move to Further Level Move to Further Level Mode Next PREV Short-press Continuous Browse Play Next Track Move Sub Menu Move Sub Menu Press of Next Track Fast Forward Continuously Move Continuously Move Forward Forward Short-press PREV Track and Play PREV Track Move Sub Menu Move Sub Menu Press Continuously browse Fast backward Continuously Reverse Continuously Reverse forward Vol+ Vol- Short-press Single-step Adding on Single-step Adding on Press Vol Continues Adding Vol Continues Adding on Vol on Vol Short-press Single-step Decrease Single-step Decrease Press on Volume Continues on Volume Decrease on Volume. Continues Decrease X X X X on Volume. Note: Short-press PLAY key: PLAY/STOP (pause while recording), fast exit from menu or other interface (such as volume adjustment). -15- Record mode Key Play Action Long-press Short-press Long-press Short-press Halted state Turn off; Start Recording Enter Main Menu; Enter Recording Sub Menu Record Status Stop Recording; Pause Recording X X Key Play Action Long-press; Short-press FM Sub menu Turn off: Exit Mode Long-press Short-press Reception Status of the Radio Turn Off; Storing Channel: Next Channel; No Storing Channel: X Enter Main Menu Enter Sub Menu Next Short-press Long-press PREV Short-press Long press Vol+ Short-press Press Short-press Press Mode FM mode Vol- Single-step Adding 100KHZ, or Stop Searching; Continually Add 100KHZ and Search Single-step Decrease 100KHZ, or Stop Searching; Continually Decrease 100KHZ and Search Single-step Adding vol. Continually Decrease Vol. Single-step Decreasing Vol. Continually Decrease Vol. -16- Enter Main Menu; Confirm the Option or Move to Further Level Move Sub Menu; Continually move forward Move Sub Menu; Continually Reverse X X X X 3.4 Music Mode instructions (1) Operation in halted state z Directory selection In order to manage files and play music easily, users can store the files in different directories (directories should be made in advance and stored in the computer). This series of players support the identification of up to 99 root directories. 1) 2) In Stop interface. Press Mode key to enter the Stop sub-menu. a) Press Mode key again to enter Directory selecting interface. -17- 3) Press NEXT or PREV key to select the option you want. 4) Press MODE key to confirm what you selected. Note: Customer can make individual directory for Music Mode, Record Mode and Play Mode. These three modes can be in different directories. z Delete Files Files and the stored channel can be deleted in music mode, play mode and FM mode. 1) In Stop interface. (FM function does not have Stop interface) -18- 2) Short-press MODE key to stop sub-menu. 3) Short-press NEXT or PREV key to select “Delete File” or “Delete All Files” on the menu. 4) Short-press MODE key to enter Delete interface. 5) Short-press NEXT key to “YES” position. -19- 6) Short-press MODE key to start deleting files. Pressing “Delete All” will delete all the corresponding files under the current directory in current Mode. (E.g. press “Delete All” button in the Music Mode, only the music files will be deleted, while the recorded file will not be deleted). The Delete interface in FM Mode is much simpler. There are only three steps. The deleted files are the Radio Channels stored before. Note: When you delete files in computer system, please don’t disconnect USB until the MP3 Player is safely disconnect from the computer. Otherwise the files you want to delete will still exist. -20- (2) Operation under PLAY mode z Play Mode Different Play Mode can be selected (such as Repeat and Shuffle) when playing music and recorded music files. The first selection on the PLAY sub-menu is “Play Mode”. After confirming selection, the player will run as the setting Repeat: Normal After finishing the music files in the current directory, the music files in the following directory will be played until all the music files are done. Repeat One Playing one piece of music repeatedly Folder Playing all music files in this folder. Repeat Folder Playing all music files in this folder repeatedly Repeat All Playing all music files stored in the MP3 player repeatedly. Random Playing music file in the current folder randomly. Intro Playing the first 10 seconds of all the music files in sequence. in the current folder -21- z Sound effect mode: 1) Music playing (as shown in right). 2) Short-press MODE key to enter sub menu. 3) Short-press Next key to select “sound effect mode” menu. 4) Short-press Mode key to enter “sound effect mode” menu. (as shown in below): Symbols represent various sound effects (EQ): Natural Rock Pop Soft Jazz DBB -22- Classical 5) Short-press Next key to select; short-press Mode key to confirm. z Synchronous display of lyric (KALAOKE function) The player supports *.LRC” lyric file (the users can download the files from (http://www.51lrc.com) or obtain this kind of file by searching “LRC lyric” on internet) and synchronizes lyric and song. A) How to use the lyric file? Keep the lyric file name same as the song file name. For Example: The name of song: Adu-Siye.mp3; The name of lyric file: Adu-Siye.lrc B) How to know whether the song comes with lyric or not? If the song comes with lyric, then the icon “ will turn to “ C) ”。 How to display the lyric? A. The song comes with lyric. -23- ”in the music mode on the top corner B. Long-press MODE key to enter the lyric interface, then the lyric will be displayed: C. Short-press MODE key to return to the music mode. D. Short-press VOL KEY to read the lyric back and forth manually. z Play Speed: You can select different Play Speed (slower or faster) when you play music (MP3 format only) or the recorded file. The tone of music will not change. -24- 1. Music playing (as shown in right) 2. Short-press 3. Short-press NEXT key to enter “Play Speed” menu. 4. Short-press MODE key to enter “Play Speed” selection menu. 5. Short-press NEXT key to select faster speed. MODE key to enter Play sub-menu. Short-press PREV key to select slower speed. ● Repeat Mode 1. ● Enter this status through Play sub-menu. A-B Repeat: 1. Play music or recorded files. 2. Short-press MODE key to enter Play sub-menu 3. Short-press NEXT key and select “Repeat Mode” 4. Short-press MODE key to enter “Repeat Mode” 5. Short-press NEXT key and confirm the start point A. Letter B is flashing on -25- the “Repeat button 6. ” , waiting to determine the start point “B”. Note: Under Repeat Mode, you can press VOL+ or VOL- directly to set “Play Speed”. Short-press Next key to confirm the start point B. The Repeat button is set. The player is starting to play repeatedly from point A and point B until reaching the set repeating times and exits repeat mode. In this mode, user can reset starting point A through short-pressing PREV key. (For the playing times, users can refer to the next section “Repeat Times”). ● Echo function ( This function does not exit in Play Mode): 1. A-B section is repeating. 2. 2) 3. Repeat icon “ Short-press NEXT key to enter Echo mode ”changes to Echo icon “ ”. The player starts to record user’s voice. The recording time is same as the A-B repeating time. 4. When the time is over, the player plays back the original sound and the icon -26- on the screen changes to “ ”. Press NEXT key to enter Compare function. Note: Press PREV key to go back to “A-B Repeat” mode. ● Compare function ( Play mode does not support this function): 1. After selecting Compare function, the icon on the screen is “ ”. Now MP3 player plays user’s echo voice. 2. After finishing playing the recorded file, the icon on the screen changes to “ 3. ”. Now the player plays original audio. After finishing playing the original audio, the player will start to play echo audio again. This repeated situation will not stop until pressing Mode key to exist. Note: Press PREV key in this mode to return to “Echo function” mode. ● Repeat times (Play sub-menu): Please refer to “Back-Light time” for setting method. The exit time is determined by A-B Repeated times. ● Repeat Interval (Play sub-menu): -27- Please refer to “Back-Light time” for setting method. The interval time between two playing is determined by Repeat interval (unit: second). How to study language by using automatic repeat function? Now more and more language-training materials are made in MP3 format. The key feature of these materials is pure language material without music or noise background. Therefore in regarding to this kind of learning materials, the Repeat function of this player brings great convenience for many language learners. The automatic Repeat function can be used to study language while the MP3 file is played in pure voice mode, an effective result can be achieved. 1) Please refer to “Repeat Function Setting” section to set “Automatic Mode”. 2) Please refer to “Repeat Times” and “Repeat Interval” sections to set corresponding 3) Use Repeat function and experience the automatic interval between sentences. parameter. -28- 3.5 Sound Recording Make sure the battery comes with enough volume while recording, this player supports the storage of 99 recording files under each directory. z Recording in “recording mode”: 1. Enter main menu 3. Press MODE key to enter recording mode 2. Press Next key to select record mode 4. Short-press PLAY key to start recording, short-press PLAY key again to stop. 5. Long-press PLAY or MODE key to save recorded file during recording. -29- (1) The recorded sound will be stored in the current folder set in “Stop Recording Sub Menu/Main Disk Directory”. (2) If “space full” is shown on the screen, meaning that there is no space for recording, new file. Please delete other files to release space. 6. If the “folder full” is shown on the screen meaning that this folder have already contained 99 recorded files, please change a folder. 7. Only “Play” and “Mode” key can be applicable during the process of recording. z Select Recording Type: 1. The interface of stop recording -30- 2. Press MODE key to enter recording submenu to record. 3. Press NEXT key to select “RECORDING TYPE” submenu 4. Short-press MODE key to enter the recording type for selection interface 5. Press NEXT key to select appropriate recording type 6. Press MODE key to confirm selection -31- Note: Recording Type available High Quality Recording, WAV format, Superior Timbre Long-play Recording, ACT format, Ordinary Timbre Fine Sound Control, WAV format, Sound Control Recording Time Limited Sound Control, ACT format, Sound Control Recording (5) Press PLAY key to start recording z Sound Control Recording: (1) Sound control recording means the on-off status of recording is controlled by sound. Recording will stop when no sound received whereas it will continue. This function helps to save storage space. -32- (2) It’s suggested to record sounds in an environment with little noise for better result. (3) Do not speak when the recording is starting. In order to achieve the best result, leave 5-6 seconds for the player to be familiar with audio surroundings, then start to speak. 3.6 Play recorded file 1. Enter main menu 2. Short-press NEXT key to select “PLAYING MODE” -33- 3. Press MODE key to enter playing mode interface( as shown in below). 4. Press PLAY key again to play 5. Select recording files 6. PREV key: Select PREV recording file 7. NEXT key: Select next recording file 8. Volume Control 9. VOL+: Increase volume, VOL-: Decrease volume -34- 3.7 FM Radio 1. Go to main menu 3. Press MODE key to enter “FM mode” 4. Automatic Search 2. Short-press NEXT key to select FM Mode Press PREV OR NEXT key for 2 seconds, the player will search radio channel based on every 100KHz and will stop when a channel is found. Press PREV or NEXT key again to stop searching. -35- 5. Small Adjustment Short-press PREV key to move backward 100KHz frequency Short-press NEXT key to move forward 100KHz frequency 6. Save found frequency Short-press MODE key to enter FM submenu Short-press MODE key again to save this broadcasting channel 7. Select and play saved broadcasting channel Press PLAY key to listen different programs in order if there’s more than one broadcasting channel saved. Please refer to the first section under “Delete File” on Page 15 for deleting channel procedure. -36- Two types of frequency can be selected, “Regular Frequency” (from FM87 to 108MHZ) and “Japan Frequency”(from FM76 to 90MHZ)). (Short-press MODE key to enter FM submenu, then short-press NEXT key to select appropriate frequency). (1) Symbol “ ” will show on the screen if current broadcasting is stereo. (2) Up to 20 broadcasting channels information can be saved respectively in the range of “Regular Frequency” and “Japan Frequency”. 3.8 System Setting How to enter system setup: Setup system parameters here, each option will change with firmware updating. 1) Enter main menu -37- 2) Short-press NEXT key to select “System Setting” 3) Press MODE key to enter “System Setting” -38- Relative Parameter Introduction: Record Time Backlight time Language Selection Closedown Setting Set date and time when recording files are saved The lasting shining time (second) after backlight function is induced without any following operation. Set different Languages Set a count down time (minutes) at which the player will be shut down Repeat Setting Set repeat mode Contrast Ratio Adjustment Set the contrast ratio of LCD screen Online Mode Select “different space” function Storage Status Check usable RAM size Firmware Version Display the version of current player firmware Firmware Update For firmware update Exist Exit menu -39- Set “Record Time”: 1) System setting interface 2) Short-press MODE key to enter Record Time setting screen 3) Short-press VOL+ to set time starting with year (VOL- to set from opposite direction) 4) Short-press NEXT key to increase value (PREV key to decrease) 5) Press MODE key to exit after finishing adjustment -40- Set “Backlight Time”: 1) System setting interface 2) Short-press NEXT key to select “Backlight Time” 3) Short-press NEXT/PREV key to adjust time 4) Press MODE key to exit after finishing adjustment 5) Set “Language Selection” Note: Refer to “Music Mode” setting for operation guides. z “Shutdown Setup” Refer to “Backlight Time” setting for setup procedure. The “Power Saving Mode” means to power off player automatically by counting the setting time (Unit: Sec) -41- from the halted state, which is no operation on the player. Figure 0 represents that this function is closed. “Sleeping Mode” means to automatically power off player at any status by counting the setting time (Unit: Sec) from the latest operation on player. It’s designed for listening music before sleep. Please notice that this “Sleeping Mode” setting just functions once at a time and will be cleared after the player turned off. It must be reset for the next time if needed. z “Repeat Setup” Refer to “Music Mode” setting for setup procedure. “Manual Mode” means that sentences from A to B only can be broken by manual operation instead of automatically. “Automatic Mode” means that sentences from A to B can be broken automatically. (For English reciting without background music) z “Contrast Ratio Adjustment” Refer to “Backlight Time” setting for setup procedure. -42- z “Online Mode” Refer to “Music Mode” setting for setup procedure. Certain systems (Window2K SP4 previous version) cannot support one USB with two modules. Hence, when running “Asynchronous Space” function, you need to indicate which module is the current disk, which is named “Mono-regular Disk” or “Mono-encrypted Disk”, so that the computer can identify the selected disk after connection. z “Storage Status” The figure represents total volume of the disk. Percentage represents used space ratio. z “Firmware Version” The version of current firmware adopted by the player can be checked -43- z “Firmware Update” The firmware of this player can be updated or maintained by software tools installed in computers. 1) Enter main menu 2) Short-press NEXT key to select “System Setup” 3) Short-press MODE key to enter “System Setting” -44- 4) Short-press NEXT key to select “Firmware Updating” 5) Short-press MODE key to enter “Firmware Updating” menu 6) Install driving program and application software in the PC platform, which is going to be updating. (Please refer to installation procedure in the fourth section of the following part) 4) Connect the player to PC with USB port. 5) Run updating software “MP3 Player”, then click “Select New Version” key -45- 6) Select *.bin firmware updating file. 7) Click “Start Updating” key to update the system 8) Updating Success -46- 9) It will show information as follow: Warning: (1) Firmware updating is used to improve and optimize performances of this player, of which normal operation won’t be influenced if not in this way. (2) Firmware might result in the player trouble due to error operation. Please read the instruction carefully before update. It is recommended that customer who wants to update firmware by himself/herself, should have some computer knowledge. (3) The update software of this player is not compatible with other series players and vice versa. Skill Hint: Short-press Mode key to finish the above settings, short-press PLAY key to exit from all menus. Press PLAY key for Fast Exit, which can be applied in all menus. -47- 3.9 Use USB disk This player is installed with standard USB disk and supports Windows98 (driver program installation required), Windows 2K system or above (driver program installation not required), Mac OS X10.3 or above, and Linux2.4 or above. This player supports “Suspend” mode. How to connect the player to PC? Turn on the player and connect it with USB line. The player will enter mode 1 as following. The player has three modes after connecting it to PC. (1) Waiting (2) Downloading (3) Transmitting data When unit plays music files in USB mode, it plays only through the computer, not -48- through the earphones. New folder: The player can identify 99 first-route folders set up in the mobile disk by the users. 3.10 Convert ACT to WAV The ACT format files recorded by the player can be converted to WAV format by the installation tool package setting up in the player. The procedures are as follows: A. Run “Sound Converter” program attached and click OPEN button. B. Select ACT record file which you want to convert. C. Click CONVERT button to start converting it to WAV file. Note: Besides the function of converting format from ACT to WAV, this tool package also -49- can play WAV and MP3 format files. 4. Installation Program Installation program includes: driver program, formatting tool and record converting tool. z Install driver and applications The MP3 player does not need to install driver under Windows Me/2000/XP system except Windows98SE. Please run the Windows/setup.exe file under the disk directory to begin the installation before connecting the MP3 player to computer. The system will show the following tip: Click "next" button, the installation screen will display as following -50- Click "next" button to confirm installation Click "next" button to start installation Click "close" button to finish the installation, the computer would need to be re-booted. -51- Find the “MP3 Player Utilities 1.43” suite under the program item in the start menu, including: MP3 Player Disk Tool, MP3 Player Update tool and Sound Convert. 5. Important Recommendations z “My Domain” Function Because beset generally by “data disclosure”, each MP3 user doesn’t like to make personal data seen by others, these “privacies’ has no option but to be deleted when being lent to friends, this will result in many troubles. From this day onwards, this player provides you with a function of “my domain” to resolve the problem completely. User can partition the USB flash memory into two separate parts using the attached software, (Users can find one disk name on the computer. For another disk name, users need to enter “System Setting/Connecting -52- Mode” to select “Single Normal Disk” or “Single Encryption Disk”) and encrypt one of them (not necessary to encrypt disk and these two disks can be use separately), therefore the information can be hidden. The information can not be accessed without password. This is the powerful “My Domain” Function connecting the player to the PC. The steps are as follows: (1) Run “MP3 Player Disk Tools” software, like the figure on the right: (2) Formatting Tool form appears on the screen and select “Partition and Encryption” to set appropriate capacity for the encrypted disk. Then select user name or password. -53- Input user name and password correspondently. Confirm your new password by entering the same password, click “Start” button and start partitioning disk. (3) The information below appears after partition finish. (4) After pressing “OK” button, a tip comes up for restarting computer, please confirm and restart computer. (5) You can find two disks after computer rebooted. (You can find only one disk if use Windows2K Pre-SP4 version). Click the encrypted disk (listed on the second place). Three files appear, two of them are hidden files and the other one is executable file with 300k disk space. -54- (6) Run executable file “RdiskDecrypt.exe”. Please input user name and password in the window coming up. If the password is correct, you can open the disk and copy file. (7) You need to input user name and password to open the encrypted disk each time. ● The player can not identify the files in the encrypted disk. ● Please back up your data before disk partition or disk integration because the data saved on the disk will be clear during these processes. ● Please don’t forget your user name and password otherwise you can’t use this encrypted disk. The only way to cancel this encrypted disk is to merge two parts, which will result in file lost. -55- 6. Trouble Shooting z z z No Power Unable to hear sound through earphone Abnormal characters appear on the display Bad FM quality receiving Unable to download music file properly Display shows “ disk error” z z Make sure that the batteries are correctly inserted. Check whether the player is turned on. Make sure that the connection of earphone is correct and the sound volume status is not at 0 point. Keep the earphone clean. The damaged MP3 may cause noise or even can not play music. Please keep these files complete. z Make sure to select correct language z z z z z z Adjust the position between earphone and player Turn off the electric appliance nearby Using earphone as antenna Check whether the USB port is damage and the connection is proper or not. Check whether the USB driver is installed correctly. Check whether the ram space is full or not. z Please use the provided software tool to format player. -56-