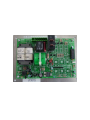
1
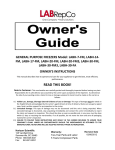
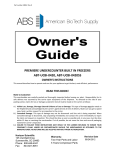
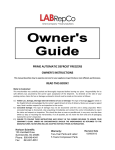
MFP & MCFP UNITS
Enzyme/Manual Defrost Freezer PLUS Series
OWNER’S INSTRUCTIONS
How to operate and care for your appliance and how to get the best, as well as the
lowest cost, performance.
READ THIS BOOK!
Note to Customer:
This merchandise was carefully packed and thoroughly inspected before leaving our plant. Responsibility
for its safe delivery was assumed by the carrier, upon acceptance of the shipment. As directed on the
side of your packing carton, claims for loss or damage sustained in transit must be made on the carrier as
follows:
A.) Exterior Damage: Make thorough damage notation on your delivery receipt and have driver
acknowledge by signature and date. Send a written request asking for an inspection report from
carrier. Include the name of carrier representative and the date the inspection was requested. Retain
inspection report and receipt for filing of a claim.
B.) Concealed Damage: This must be reported to carrier within fifteen days. Obtain inspection report
from the carrier. Retain the inspection report for filing of the claim. DO NOT RETURN DAMAGED
MERCHANDISE TO MANUFACTURER - - FILE THE CLAIM WITH THE CARRIER.
Lab Research Products
125 Varnfield Drive
Summerville, SC 29483
Phone: 800-648-4041
Fax:
843-821-8051
Warranty:
Three-Year Parts and Labor
5 Years Compressor Parts
Revision Date
03/12/04
General
Specifications…………………………………………………………..…………1
RECEIVING .................................................................................................1
INSTALLATION AND STARTING INSTRUCTIONS ....................................1
OPERATING INSTRUCTIONS ....................................................................2
COMPRESSOR – CONDENSER ................................................................2
SERVICE .....................................................................................................2
OPERATION MANUAL FOR LR5 TEMPGUARD REFRIGERATION
CONTROL………………………………………………………………………...3
Lab Research Products PRODUCT WARRANTY .....................................11
SPECIFICATIONS:
Enzyme/Manual Defrost Freezer PLUS Series
Inner
Usable Int. Dim.
Ext. Dim.
Ship
Model
Cu.Ft.
Doors
Doors/Drawers
Shelves
W"
D"
H" W" D" H" H.P Amps
BTU/hr
Ibs
Ibs
MFP-0920
9
1 swing
5/2
6 fixed
16
16
50
22 24 64* 1/6
7
850
136
176
MFP-2020
20
1 swing
5/0
4 fixed
27
18
57
32 29 77* 1/4
5
770
315
355
MFP-2030
20
1 swing
5/0
4 fixed
27
18
57
32 29 77* 1/4
5
770
315
355
MFP-2920
29
1 swing
5/0
4 fixed
32
26
65
35 32 84* 1/3
5
2174
328
368
MCFP-1520
15
1 swing
N/A
2 baskets
42
24
28
48 30 35* 1/4
5
770
191
231
MCFP-2020
20
1 swing
N/A
2 baskets
56
24
28
62 30 35* 1/4
5
770
220
265
RECEIVING
A. LRP ships by carriers that we have used for many years and have selected for their good service,
but accidents in shipping occur regardless of how much care is taken. Therefore the following is
very important:
B. Inspect unit at once for any shipping damage, including concealed damage.
C. You should check for any shipping damage immediately, preferably before the carrier leaves
your receiving dock, as nearly all shipments are FOB ship point.
D. If there is any damage, note it on the carrier's receiving documents and notify the office of the
carrier immediately.
E. The responsibility of the shipper and the delivering carrier ends five days after goods are received.
It becomes the responsibility of YOU, the customer, to unpack the unit and check for concealed
damage caused during shipping. Immediate attention should be given to this.
F. Retain all packing materials if damage is found.
INSTALLATION AND STARTING INSTRUCTIONS
LOCATION – This unit requires a minimum of 4 inches of air flow in back and 1 to 2 inches on the sides
and top. Leveling legs are required in front only. Unit may have a slight tilt from front to back after
legs are installed. This is acceptable and is recommended on this unit.
POWER SOURCE – The supply circuit to this cabinet must conform to all National and Local Electrical
Codes. Consult the cabinet Serial-Data plate for voltage, cycle, phase, and ampere requirements
before making connection. VOLTAGE SHOULD NOT VARY MORE THAN 5% FROM SERIAL
PLATE RATINGS. A separate circuit is recommended to prevent possible loss of product due to
over-loading or failure of other equipment on the same circuit. PROTECT THE CIRCUIT WITH A 20
AMP DELAY-TYPE FUSE.
STARTING – There are no compressor shipping bolts to loosen or valves to open. All that is necessary
after the freezer has been properly leveled is to plug the service cord into an electrical outlet. Do not
use an extension cord. Be sure your freezer is properly grounded. Use the 3-prong plug provided
into a 3-prong grounded outlet. (Only this method complies with national electrical codes, local
codes and ordinances.) Unless the above grounding method is followed, you are not protected
against severe or lethal shock in the event of a short circuit of an electrical component or wiring of the
freezer. When starting this new appliance, allow the cabinet to operate a minimum of three hours or
until it has started cycling normally before placing product in the cabinet. The motor compressor may
start and stop several times when the unit is first started or after defrosting, especially if the weather
is very hot. This is only normal functioning of the motor overload protector. The motor compressor
will cycle normally as soon as the excess heat has been removed.
1
OPERATING INSTRUCTIONS
A. DEFROSTING-This is a manual defrost system. If ice build up is present ¼ inch or more on the
fixed shelves, defrosting is recommended. Large ice build-up will reduce cooling efficiency.
B. CLEANING
1. Cabinet Exterior – Wash with a mild soap and water solution. Rinse with clear water and dry.
2. Cabinet Interior – Wash with 2 tbls. of baking soda and 1 qt. warm water solution or mild soap.
DO NOT USE STRONG CLEANERS, SCOURING POWDER OR PADS.
COMPRESSOR – CONDENSER
A. The compressor is hermetically sealed and will require no attention. The condenser is located
between the inside and outside walls of the freezer and also requires no attention. Its natural heat
keeps the exterior free of moisture; because of this, the outside may feel warm to the touch. This
condition entirely normal.
SERVICE
A. In the event this freezer does not operate properly, check the following before calling the service
man:
1. Is there adequate air circulation around the unit and in the room?
2. Is electrical power reaching the unit? (Check for blown fuse.)
3. Is service cord connected to outlet?
4. Is door closed tightly?
If this does not correct the difficulty, contact a competent service man.
2
Operation Manual
for
LR5 TempGuard
Refrigeration Control
3
Safety:
This product operates at 120 VAC or 220 VAC power. Please unplug the power
cord from the wall socket before performing any work on any of the electrical
components of this system. Performing work while the unit is plugged in could result
in a severe electrical shock.
Introduction:
The LR-5 TempGuard control system was designed to provide many years of
reliable service. This control utilizes micro-controller technology to continuously
monitor the temperature in the refrigerator/freezer and to maintain the temperature
within the limits set by the user. The control settings are easily adjusted through the
LR5 TempGuard front panel and the control “remembers” the coldest and the
warmest temperatures achieved in operation.
Hardware Requirements:
LR5:
LR5 TempGuard temperature control
LR3-S: The laser trimmed sensor for the LR5 TempGuard
Setting up the LR5 TempGuard Control:
Setting the high temperature and low temperature of the control range.
1. Press the HIGH TEMP button and the corresponding LED will start flashing
2. Use the ↑ and the ↓ buttons to change the temperature.
3. Press the HIGH TEMP button again to lock in the desired temperature. The
LED will stop flashing.
4. Follow the same steps for the low temperature using the LOW TEMP button.
4
Set the high temperature alarm and the low temperature alarm.
1. Press the High Alarm button and the corresponding LED will start flashing
2. Use the ↑ and the ↓ buttons to change the alarm temperature.
3. Press the High Alarm button again to lock in the desired alarm. The LED will
stop flashing.
4. Follow the same steps for the low temperature alarm using the Low Alarm
button.
Pressing and holding the ↑ and the ↓ buttons cause a rapid increase or decrease in
the value on the display. This can be used for large changes in the temperature
settings. Also, after the High Temp, the Low Temp, the High Alarm, or the Low
Alarm button is pressed, the user has 15 seconds to press the ↑ or the ↓ buttons. If
no activity is detected, the control reverts to its main control activity while leaving the
settings unchanged.
How the LR5 Control works:
The LR5 TempGuard control continuously monitors the temperature of the
refrigerator/freezer through its sensor assembly. When the temperature warms to
the point where it reaches the upper temperature limit, the LR5 sends a signal to
turn on the compressor, which cools the unit. The compressor is kept running until
the temperature reaches the cold setting. When this lower temperature set point is
reached the LR5 turns off the compressor. The refrigerator/freezer warms over time
and the process continues.
The LR5 TempGuard records the warmest and the coldest temperatures seen by the
control.
To access these temperatures, press the ↑ button for the warmest
temperature or press the ↓ button for the coldest temperature. To clear out the
warmest and coldest temperature, press both ↑ and ↓ buttons at the same time and
hold them until the display blinks (approximately 5 seconds). The warmest and
coldest temperatures are reset to equal the High Temp and the Low Temp settings.
5
The new LR-5 includes the following features:
•
Red LED for visual indication of an error condition
•
Beeper for audible indication of an error condition
•
Battery for indication of error even when the control has lost power
•
Door open indication and door open too long alarm
•
Remote Alarm Dry Contacts
The LR5 TempGuard provides a flashing red LED and an audible tone for alarm
situations. The alarms are run off a NiMH battery so that an alert occurs regardless
of whether or not the control has power.
The feature package can be
enabled/disabled with a switch installed on the main circuit board. Moving the switch
to the ON position activates these features and moving it to the OFF position
deactivates these features.
The LR-5 TempGuard provides an indication if a door is opened by sounding a
single beep. If the door stays open for 10 minutes then the LR5 indicates that an
error condition has occurred by activating the red LED and the beeper.
Control Limits:
The High Temp and Low Temp can be adjusted within the entire range as desired.
The range varies depending on the model of refrigerator or freezer that was
purchased. The High Temp cannot be lower than the Low Temp.
If the High Temp is being lowered and it runs into the Low Temp it will push the Low
Temp lower. The Low Temp will always be at least 4 degrees C less than the High
Temp.
If the Low Temp is being raised and it runs into the High Temp it will push the High
Temp higher. The High Temp will always be at least 4 degrees C higher than the
Low Temp.
The High Alarm can be adjusted in the range from the (High Temp + 2) to the upper
limit.
The Low Alarm can be adjusted in the range from the (Low Temp – 2) to the lower
limit.
If the High Temp is being raised and it runs into the High Alarm, the High Alarm will
automatically be adjusted upward. The High Alarm is always at least 2 degrees
higher than the High Temp.
If the Low Temp is being lowered and it runs into the Low Alarm, the Low Alarm will
automatically be adjusted downward. The Low Alarm is always at least 2 degrees
lower than the Low Temp.
6
If the High Alarm is being lowered and it runs into the High Temp, it will go no lower
than the (High Temp + 2).
If the Low Alarm is being raised and it runs into the Low Temp, it will go no higher
than the (Low Temp – 2).
Control Status and Error Conditions:
When the control is operating normally, the temperature detected by the sensor
assembly is displayed on the control panel. If the temperature gets too warm and
reaches the High Alarm setting, the display will flash alternatively between the actual
temperature and the message Hi. If the temperature gets too cold and reaches the
Low Alarm setting, the display will flash alternatively between the actual temperature
and the message Lo. If the sensor assembly is disconnected or gets damaged the
display will read Er.
Temperature Zones & Validation:
Each refrigerator or freezer will display its own characteristics in regard to the
temperature gradient throughout the inner chamber.
The uniformity of the
temperature throughout the inner chamber can be influenced by many factors such
as location of the sensor, air flow patterns, mass of the sensor, location of shelves,
location of the product stored, quantity of the product stored, mass of the product
stored, number of doors, insulation and frequency of door openings/closings. Some
temperature variation in the refrigerator or freezer should be expected and is a
normal occurrence. The LR5 TempGuard control monitors and controls the
temperature at the location of its sensor assembly. At the location of the sensor the
temperature will be accurate to within 1 degree C.
Validation can be performed on the LR5 TempGuard control by testing at a known
temperature. Ice water has a known temperature of 0o C. To validate the control,
dip the sensor assembly into a bath of ice water made from distilled water. After
letting the temperature settle, the LR5 TempGuard will display a temperature of 0
degrees +/- 1 degree. This test validates the temperature accuracy of the sensor
assembly.
7
Wiring the LR5 TempGuard:
The LR5 Tempguard is supplied with a green 7-contact plug to make wiring easy. A
plug legend is attached to the back plate of the control. It is summarized below:
Pin 1
AC Line (polarity does not matter)
Pin 2
AC Line (polarity does not matter)
Pin 3
Door Alarm (polarity does not matter)
Pin 4
Door Alarm (polarity does not matter)
Pin 5
Remote alarm
(normally open contact)
Pin 6
Remote alarm
(common)
Pin 7
Remote alarm
(normally closed contact)
AC Line - Power wired into AC line of the system.
Door alarm - The door alarm circuit on the LR5 detects an open or closed circuit.
An open circuit indicates that a door has been opened while a closed circuit
indicates that all doors are closed. The circuit should be wired in series through
switches attached at each door.
Remote Alarm - A relay is provided on the LR5 to signal an error condition.
Continuity exists between pins 6 & 7 in a normal condition. An error condition
provides continuity between pins 5 & 6.
8
Roadmap to the Circuit Board:
A – Contactor: Connects to the refrigeration compressor.
B - Sensor Connector: The LR5 sensor assembly connects here.
C – Battery: NiMH battery provides alarm capability when power is lost.
D – 7-pin connector: Wiring for LR-5 Tempguard system into connector.
E – Optional Feature Switch: Turns on/off the optional features of the control.
9
Specifications:
•
Power:
120 VAC or 240 VAC
•
•
•
•
•
•
•
Alarms:
Relay output for remote alarm
12A max load for 120 VAC
10A max load for 240 VAC
Visual – red LED (optional)
Audible
(optional)
Battery backed
(optional)
Door Open too long (optional)
Temperature Detection:
DS1821 Digital Thermometer
•
Dimensions:
6 ¾ ” wide x 4 ¾” high x 2” high
10
Lab Research Products PRODUCT WARRANTY
Lab Research Products warrants to the original purchaser every new Lab Research Products
refrigerated unit, the cabinet and all parts thereof, to be free from defects in material or workmanship,
under normal use and service, for a period of three (3) year. The warranty period starts two weeks from
the date of shipment from Lab Research Products. This two week period allows ample shipping time so
that the warranty will go into effect at approximately the same time your equipment is delivered. Unless
subject to prior written agreement with Lab Research Products, this warranty does not allow for any
warranty start deferment greater than two weeks from date of shipment due to a delayed installation
and/or start-up.
Under this warranty, Lab Research Products, through its authorized service organizations, will repair, or
at its option, replace any part found to contain a manufacturing defect in material or workmanship without
charge to the owner for parts, service labor or any shipping or cartage costs. Replacement or repaired
parts will be warranted for only the unexpired portion of the original warranty.
ADDITIONAL TWO YEAR COMPRESSOR WARRANTY
In addition to the three (3) year warranty stated above, Lab Research Products warrants its hermetically
and semi-hermetically sealed compressors to be free from defects in both material and workmanship
under normal use and service for a period of two (2) additional years from the end of the initial three (3)
year warranty period, but not to exceed five (5) years after shipment from Lab Research Products.
Compressors determined by Lab Research Products to have been defective within this extended time
period will, at Lab Research Products' option, be either repaired or replaced with a compressor or
compressor parts of similar design and capacity.
The two (2) year extended compressor warranty applies only to hermetically and semi-hermetically sealed
parts of the compressor and does not apply to any other parts or components, including, but not limited
to, cabinet, paint finish, temperature control, refrigerant, metering device, driers, motor starting
equipment, fan assembly or any other electrical components.
Lab Research Products' sole obligation under this warranty is limited to either repair or replacement of
parts, subject to the additional limitations below. This warranty neither assumes nor authorizes any
person to assume obligations other than expressly covered by this warranty.
NO CONSEQUENTIAL DAMAGES. Lab Research Products is not responsible for economic loss; profit
loss; or special, indirect or consequential damages, including without limitation, losses or damages arising
from contents spoilage claims whether or not on account of refrigeration failure.
WARRANTY IS NOT TRANSFERABLE. This warranty is not assignable and applies only in favor of the
original purchaser/user to whom delivered. Any such assignment or transfer shall void the warranties
herein made and shall void all warranties, express or implied, including any warranty of merchantability or
fitness for a particular purpose.
NO IMPLIED WARRANTY OF MERCHANTABILITY OR FITNESS FOR A PARTICULAR PURPOSE.
There are no other warranties, express, implied, or statutory, except the three (3) year warranty and the
additional two (2) year compressor warranty as described above. These warranties are exclusive and in
lieu of all other warranties, including implied warranty and merchantability or fitness for a particular
purpose. There are no warranties which extend beyond the description on the face hereof.
ALTERATION, NEGLECT, ABUSE, MISUSE, ACCIDENT, DAMAGE DURING TRANSIT OR
INSTALLATION, FIRE, FLOOD OR OTHER EXTERNAL CAUSES.
Lab Research Products is not responsible for the repair or replacement of any parts that Lab Research
Products determines have been subjected after the date of manufacture to alteration, neglect, abuse,
misuse, accident, damage during transit or installation, fire, flood or other external causes. It does not
apply to defects resulting from failure to properly install, operate or maintain the product in accordance
with the printed instructions provided, or damage caused by the storage of any corrosive material that
comes in contact with the interior or exterior portions of the cabinet, or the use of spark producing
equipment or containers (such as galvanized or carbonized steel containers) that come in contact with
any interior portion of the cabinet.
TRANSPORTATION COSTS. Lab Research Products will accept parts covered under this warranty
freight collect, provided that shipment has received prior approval.
11
OUTSIDE U.S./CANADA. This warranty does not apply to, and Lab Research Products is not
responsible for, any warranty claims made on products sold or used outside the United States and
Canada.
WARRANTY CLAIMS. To obtain prompt warranty service, simply contact Lab Research Products at
800-648-4041. Lab Research Products' shipping records showing date of shipment shall be conclusive
in establishing the warranty period. All claims should include: model number of the refrigerator, the serial
number of the cabinet, proof of purchase, date of installation, and all pertinent information supporting the
existence of the alleged defect. Any action or breach of these warranty provisions must be commenced
within one (1) year after that cause of action has accrued.
12
MFP-2030
This section pertains to -30°C FREEZER ONLY
This freezer has been factory set to run at -30°C. The LR-5 TempGuard may require
adjustment depending on the final ambient operating condition. The freezer has
reserve rangeand will average –30°C, depending on load and ambient temperature.
Plug into a standard 110-120 volt electrical outlet. The unit will start to operate. It will
require 5 amps. The freezer's operation will be extremely quiet due to the unique
design of the compressor system.
As with the –20 models, pre-cool unit before placing any product into the chamber. The
temperature will reach -30°C in less than four hours; however, let the chamber cool for 8
hours minimum to allow for total heat removal from the cabinet.
Again, this is a manual defrost system. If ice build up is present ¼ inch or more on the
fixed shelves, defrosting is recommended. Large ice build up will reduce cooling
efficiency.
If this system is equipped with a temperature display or alarm system it is not
uncommon to observe a rise in temperature on the display following a door opening.
Unless the door is left open for long periods of time this should not affect product
temperature. The temperature display is independent of the thermostat that is actually
controlling the off/on cycling of the compressor. Door opening will greatly affect air
temperature but generally does not affect product temperature.
13