1
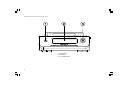
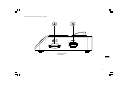
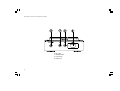
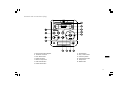
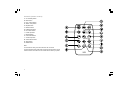
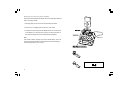
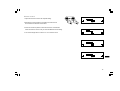
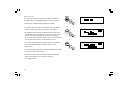
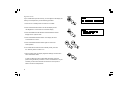
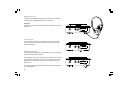
MMC-96iRS
GB
Version 1
iPod is a trademark of Apple Inc., registered in the U.S. and other countries.
“Made for iPod” means that an electrical accessory has been designed to connect specifically to
iPod and has been certified by the developer to meet Apple performance standards.
Apple is not responsible for the operation of the device or its
compliance with safety and regulatory standards.
1
Contents
Controls and connections ................................................... 3-7
Intro ......................................................................................... 16
iPod docking ............................................................................ 8
Random one folder ............................................................... 16
Docking your iPod by dock adapter ...................................... 9
Random all folders ................................................................ 16
Docking your iPod by dock adjuster ................................... 10
Random cancel ..................................................................... 16
Playing a folder on your iPod .............................................. 11
Shuffle in iPod mode ............................................................ 17
Navigating your iPod ............................................................ 11
Volume control ...................................................................... 18
Using SD cards or USB memory devices ......................... 12
Sleep function ....................................................................... 19
Inserting and removing memory devices ........................... 12
Standby brightness control .................................................. 20
Playing MP3 / WMA folders - SD / USB ............................. 13
System reset .......................................................................... 21
Selecting a folder .................................................................. 13
Software version .................................................................... 22
To skip to another track ........................................................ 13
Mute function ......................................................................... 22
To seek forward or backward within a track ......................... 13
Headphone jack .................................................................... 23
To skip to another folder ....................................................... 13
Line-out jack .......................................................................... 23
To view folder / title / artist / album /
RS232 possibilities .............................................................. 23
SW version information ........................................................ 13
Cautions ................................................................................. 24
Repeat a single track ............................................................ 14
Specifications ........................................................................ 25
Repeat one folder .................................................................. 14
Circuit features ...................................................................... 25
Repeat all folders .................................................................. 14
Repeat cancel ........................................................................ 14
Repeat in iPod mode ........................................................... 15
2
GB
Controls and connections (front)
1. Infra-red sensor
2. LCD display
3. On / Standby button
3
Controls and connections (side)
4. SD card reader
5. USB port
GB
4
Controls and connections (rear)
6. DC-in jack
7. Headphone jack
8. Line-out jack
9. RS232 port
5
Controls and connections (Top)
10. iPod Universal Dock adjuster
11. iPod Dock connector
12. Info / Menu button
13. Folder Up button
14. Select / Stop button
15. Fast-forward button
16. Folder down button
17. Rewind button
18. Play / Pause button
19. Volume Up button
20. Volume Down button
21. Sleep button
22. Media button
GB
6
Controls (remote control)
A. On / Standby button
B. Mute button
C. Play / Pause button
D. Select / Stop button
E. Repeat button
F. Random button
G. Folder down button
H. Info / Menu button
I. Folder Up button
J. Rewind button
K. Fast-forward button
L. Volume Up button
M. Volume Down button
N. Sleep button
O. Media button
Note:
For the sake of clarity, the instructions for the use of the
controls throughout this instruction manual show the buttons on the
remote control. The buttons on the cradle can be used if you prefer.
7
iPod docking
Your cradle has an iPod dock facility which allows you to play digital
audio folders and video soundtracks held on your iPod using the
headphone of your cradle.
Your cradle uses the iPod Universal Dock connector developed for use
with iPods. Recent models of iPod are supplied with Universal Dock
Adapter inserts which ensure correct alignment of the iPod with the
electrical connector. Should you require a Universal Dock Adapter to
use your iPod with your cradle, then please contact an iPod
accessories supplier.
Important:
To avoid possible damage to your iPod, do not use your iPod with the
product without the correct adapter fitted to the cradle.
GB
8
Docking your iPod by dock adapter
Place the iPod Universal Dock Adapter into the iPod docking recess so
that it is securely seated.
1. Carefully place your iPod onto the Universal Dock connector.
2. Press the On / Standby button to switch on your cradle.
3. To select the iPod mode press the Media button until “iPod” shows
on the display. If it was previously playing, your iPod will switch on
and continue playing from where it was previously stopped.
Note:
Your cradle is able to recharge your iPod’s internal battery. Your iPod
will use its backlight settings as configured. If these need changing,
use the Settings menu on your iPod.
9
Docking your iPod by dock adjuster
This unit comes with the iPod dock adjuster. iPod adaptors are
not supplied.
1. Press and turn the iPod dock adjuster dial to move slide door
backwards until end.
2. Carefully place your iPod onto the cradle.
3. Turn the iPod dock adjuster dial to move slide door forwards until
holding you iPod.
GB
10
Playing a folder on your iPod
Navigating your iPod
To navigate iPod menus to make selections or to change settings,
you should use your iPod controls. The cradle controls can be used for
Fast-forward / Rewind and Play / Pause functions.
1. When you have found the required item use the Play / Pause button
on the cradle to start the iPod playing. If you have just docked
your iPod, you may need to press the button more than once to
ensure that the cradle is communicating with your iPod.
1. Use the Menu button to navigate to higher level menus on your iPod.
2. Use the Folder Up button or Folder Down buttons as required to move
up and down a menu screen on your iPod.
3. Press the Select button to choose the highlighted on-screen
menu item. If this item is a lower level menu item, you may then
navigate further using the Folder Up button or Folder Down buttons
and Select button.
2. Adjust the volume to the required setting using the Volume Up or
Down buttons on your cradle.
3. To pause playback press the Play / Pause button. To resume
playback press the Play / Pause button again.
4. iPods do not have a Stop button (they use the Pause function).
To play an alternative selection, use the iPod menus to make the
selection using the Play / Pause button to stop playing the current
item if needed.
Note:
iPods vary in how they respond to the Play / Pause button dependent
upon the iPod model and software revision. Play / Pause may pause
and resume the current selection, or it may pause the current selection
and then start playing a new selection. The use of the Select button to
start playing an item avoids this inconsistency.
11
Using SD cards or USB memory devices
Secure Digital (SD or SDHC) cards or USB memory devices can
be used with the MMC-96i RS for playback of MP3 or WMA folders.
The SD card reader and USB ports are located on the right side of
the cradle.
The MMC-96i RS has been tested with a range of SD cards and USB
memory devices. SD cards up to 2GB and SDHC cards up to 16GB
are supported.
However, there are many different card variants available and not all
cards can be guaranteed to work in the MMC-96i RS.
Memory must use the FAT or FAT32 filing system in order to operate
with the MMC-96i RS.
Inserting and removing memory devices
1. Insert an SD card into your cradle with the card label side upward and
gold contacts first into the card slot on the front of your cradle until
it clicks. To remove the card, push the card in so that it clicks
once more. It will then be pushed out slightly, allowing removal.
USB memory devices plug into the rectangular slot on the right hand
side of the cradle.
GB
2. To select either SD card or USB mode press the Media button until
the desired mode is shown on the display.
12
Playing MP3 / WMA folders - SD / USB
To skip to another track
1. Press the Play / Pause button to start playing from the
SD card / USB memory device.
1. To skip to another track while the SD card / USB memory device is
playing, press and release the Fast-forward or Rewind buttons.
Release the button when the desired track is reached.
2. To pause playing press the Play / Pause button. To resume playing
press the Play / Pause button again.
3. To stop play, press the Stop button. The total number of folders and
folders on the media and the stop symbol ( ) will be displayed.
If you put the unit into standby mode without pressing the
Stop button, then the next time the unit is switched on it will return
to the previously played folder.
Selecting a folder
1. While the SD card / USB memory device is playing, press either the
Folder Up or Folder Down buttons to change to the desired folder.
The folder number is updated on the display. If there is more than
one folder, when all folders in the current folder have been played the
next folder will be played.
2. You can also skip folders when the player is in stop mode. Skip to
the desired folder using the Folder Up or Folder Down buttons and
release the button when the desired folder number is displayed.
3. Press the Play / Pause button to pause the selected folder.
To seek forward or backward within a track
1. To seek a desired part of a track while the SD card / USB memory
device is playing, press and hold the Fast-forward or Rewind buttons.
Release the button when the desired part of the current folder
is reached.
To skip to another folder
1. With the SD card / USB memory device in stop or play mode,
press and release either the Folder Up button or Folder
Down buttons. The first folder of the next or previous folder will
be played.
To view folder / title / artist / album /
SW version information
1. While in SD card / USB memory device mode, press and release
the Menu / Info button to view folder information. Continute to
press and release the button to see title, artist album and
SW version information. In iPod mode you cannot view
this information. Pressing and releasing the Menu / Info button in
iPod mode functions as a back button, changing the iPod display to
the previous page.
2. The folders and tracks on the LCD display mean the current
playing folder, total folders, current playing track, and the current
playing time.
13
Repeat a single track
1. While the SD card / USB memory device is playing, press and
release the Repeat button on the remote control until the repeat
single track symbol (
) appears on the display. The current track
will be repeated.
Repeat one folder
2. While the SD card / USB memory device is playing, press and
release the Repeat button until the repeat one folder symbol (
appears on the display. One of the folders on the SD card /
USB memory device will be played repeatedly.
)
Repeat all folders
3. While the SD card / USB memory device is playing, press and
release the Repeat button until the repeat all folders symbol (
appears on the display. All of the folders on the SD card /
USB memory device will be played repeatedly.
)
Repeat cancel
GB
4. While the SD card / USB memory device is playing, press and
release the Repeat button until the repeat symbol disappears from
the display. All of the folders or tracks on the SD card / USB memory
device will be discontinue playing repeatedly.
14
Repeat in iPod mode
1. While the iPod is playing, press and release the Repeat button so the
repeat one song symbol (
) appears on the iPod display.
One song will repeat continually.
2. Press and release the Repeat button a second time and the all songs
symbol (
) will appear on the iPod display. All songs in the folder
will repeat.
3. Press the Repeat button a third time and the iPod will discontinue
repeating songs.
Note:
The Repeat button is on the remote control only. The cradle does not
have a Repeat button.
15
Intro
1. While the SD card / USB memory device is playing, press and
release the Random button until the symbol (
) appears on
the display and the track information is introduced.
2. While the SD card / USB memory device is playing, press and
release the Random button until the track introduction symbol
(
) appears on the display. The first 10 seconds of each
track will be played.
Random one folder
2. Press and release the Random button a second time so the symbol
(
) appears. In this mode you can play randomly seleted
tracks from within the selected folder only.
Random all folders
3. Press and release the Random button a third time so the symbol
(
) appears. In this mode you can play tracks randomly
selected from all folders.
Random cancel
4. Press and release the Random button a fourth time will make the
symbol disappear and random play will discontinue.
GB
16
Shuffle in iPod mode
1. While the iPod is playing, press and release the Random button so
the Random symbol (
) appears on the iPod display and the
shuffle function begins. The tracks in the current album or playlist
will be played in random when shuffle is enabled.
2. Press and realease the Random button again and again until you turn
the shuffle function off.
Note:
The Random button is on the remote control only. The cradle does not
have a Random button.
17
Volume control
1. Adjust the volume control to the required setting.
2. Rotate the control clockwise to increase the volume level or
anti-clockwise to decrease volume level.
3. Press the Volume Up button to raise the volume or Volume Down
button to lower the volume until you reach the desired volume setting.
4. The volume ranges from a minimum of 1 to a maximum of 29.
GB
18
Sleep function
Your cradle can be set to turn off after a preset time has elapsed.
The sleep setting can be adjusted between 15 and 120 minutes.
1. Press the On / Standby button to switch on the cradle.
2. To use the sleep timer, press and release the Sleep set button to
enter the sleep setup. “Sleep off” will appear on the display.
3. Repeatedly press and release the Sleep set button to select the
desired sleep time. The options are 15, 30, 60, 90 or 120 minutes.
After a short time the remnant time will appear on the display.
Or press and release the Select button to show the remnant setting.
You can use the OFF option to cancel the sleep function.
4. Your cradle will switch off after the preset sleep time has elapsed.
Press and release the Sleep set button to see the current
sleep setting,
5. You can re-start the sleep setting, press and release twice the Sleep
set button to enter the sleep setup.
6. To cancel the sleep function before the preset time has elapsed,
either set the sleep timer to off (step 2) or press the
On / Standby button.
19
Inactive brightness control
The brightness of the display when the unit is in switch-on mode may
be adjusted. If you use the unit in the bedroom, you may prefer a lower
standby brightness level than the standard setting.
1. Press the On / Standby button to switch on the cradle.
2. Press and hold the Menu button so that the display shows
“Set Brightness” on the lower line of the text display.
3. Press and release the Select button to show the current setting.
4. Press and release the Fast-forward or Rewind buttons to change the
inactive brightness level. The backlight level will change at the same
time so that you can see the effect of the change.
5. Press and release the Select button to save the new setting.
The default setting after a system reset is 5. Possible brightness values
range from 1 - 7.
GB
20
System reset
If your cradle fails to operate correctly, or some digits on the display are
missing or incomplete carry out the following procedure.
1. Press the On / Standby button to switch on the cradle.
2. Press and hold the Menu button so that the display shows
“Set Brightness” on the lower line of the text display.
3. Press and release the Fast-forward or Rewind buttons until the
display shows “System reset”.
4. Press and release the Select button. The display will show
“Press SELECT to reset”.
5. Press and release the Select button again to confirm the
reset operation.
6. Your cradle will be switch off and in standby mode, press the
On / Standby button to switch it on.
7. After a system reset, the display brightness settings will have been
set to their default values.
In case of malfunction due to electrostatic discharge, reset the
product using the above procedure. In some circumstances it may be
necessary to disconnect and then reconnect the mains power in
order to resume normal operation.
21
Software version
The software version display cannot be altered and is provided for
reference only.
1. Press the On / Standby button to switch on the cradle.
2. To view the software version installed in your cradle, press and
release the Menu button so that software version will appear on
the display.
Mute function
Press the Mute button on the remote control to mute the sound.
The controls on the cradle do not have a mute button.
Note:
Pressing the Mute button will mute the output from the headphone.
GB
22
Headphone jack
A 3.5mm stereo Headphone jack located on the rear of your cradle is
provided for use with either headphones or an earpiece.
Important:
Excessive sound pressure from earphones and headphones can cause
hearing loss.
Line-out jack
A 3.5mm stereo Line-out jack is provided on the rear of your sound
system to permit the audio signal to be fed to an external amplifier
or other audio device.
RS232 possibilities
The Sangean MMC-96i RS has a DB-9 female connector for controlling
the device through serial commands.
Via the serial port, you can change the source or choose the next song
by using another application, running on a control system with serial
RS232 port (e.g. Home-automation systems, intelligent multi-room
systems, etc).
The protocol of the MMC-96i RS can be obtained by simple demand to
your local distributer
23
Cautions
Do not allow this cradle to be exposed to water, steam or sand. Do not
leave your cradle where excessive heat could cause damage such as in
a parked car where the heat from the sun can build up even though the
outside temperature may not seem too high.
Your cradle should not be exposed to dripping or splashing and
that no objects filled with liquids, such as vases, shall be placed
on the cradle.
It is recommended to operate the product such that there is a
minimum distance (10cm recommended) to adjacent objects in
order to ensure good ventilation.
The ventilation of the product should not be restricted by covering it
or its ventilation openings with items such as newspapers,
tablecloths, curtains etc.
No naked flame sources such as lighted candles should be placed
on the product.
It is recommended to avoid using or storing the product at extremes
of temperature. Avoid leaving the unit in cars, on window sills,
in direct sunlight etc.
GB
24
Specifications
Circuit Features
Power Requirements
Mains: AC 100 – 240 volts, 50 Hz - 60 Hz
only (switching adaptor)
Headphone jack: 3.5mm dia
Line-out jack: 3.5mm dia
The Company reserves the right to amend the specification without notice.
If at any time in the future you should need to dispose of this product please note that: Waste electrical products should not be
disposed of with household waste. Please recycle where facilities exist. Check with your Local Authority or retailer for recycling
advice. (Waste Electrical and Electronic Equipment Directive)
25