1
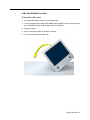
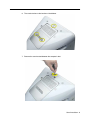
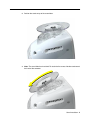
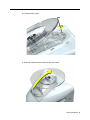
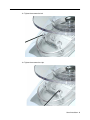
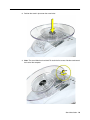
eMac Computers Stand Installation Installing the Optional Stand Follow the instructions for the type of eMac that you have. The procedure for installing the stand on the eMac (ATI Graphics) and eMac (USB 2.0) is slightly different from the original eMac model. Note: Written and video instructions covering customer-installable parts are available at http://www.info.apple.com/installparts/. Tools Required No tools are required. The tool is supplied with the stand. 073-0704 Rev. C eMac Installation Procedure To install the eMac stand: 1. Save open documents and quit all open applications. 2. Turn the computer off by choosing Shut Down from the Special menu (if using Mac OS 9), or choose Shut Down from the Apple menu if using OS X. 3. Unplug all cables. 4. Place a soft towel or cloth on the desk or surface. 5. Turn the computer over onto the cloth. Stand Installation - 2 6. The stand attaches to the locations circled below. 7. Remove the screw located between the computer’s feet. Stand Installation - 3 8. Position the stand on top of the screw holes. 9. Note: The stand slides back and forth. To attach the first screw, slide the stand toward the back of the computer. Stand Installation - 4 10. Tighten the first screw. 11. Slide the stand forward to access the two rear screws. Stand Installation - 5 12. Tighten the screw on the left. 13. Tighten the screw on the right. Stand Installation - 6 14. Carefully turn the computer over. Stand Installation - 7 eMac (ATI Graphics) and eMac (USB 2.0) Installation Procedure To install the eMac (ATI Graphics) or eMac (USB 2.0) stand: 1. Save open documents and quit all open applications. 2. Turn the computer off by choosing Shut Down from the Special menu (if using Mac OS 9), or choose Shut Down from the Apple menu if using OS X. 3. Unplug all cables. 4. Place a soft towel or cloth on the desk or surface. 5. Turn the computer over to access the screw holes on the bottom. Stand Installation - 8 6. The stand attaches to the locations circled below. 7. Remove the screw circled below. Stand Installation - 9 8. Position the stand in place over the screw holes. 9. Note: The stand slides back and forth. To attach the first screw, slide the stand toward the back of the computer. Stand Installation - 10 10. Push the stand forward. Tighten the second screw. 11. Tighten the third screw. Stand Installation - 11 12. Carefully turn the computer over. Stand Installation - 12 Apple Computer, Inc. © 2004 Apple Computer, Inc. All rights reserved. This document is protected under U.S. Copyright Law and International Treaties, and no part of this document may be reproduced in any form without written permission from Apple. Apple is not responsible for typographical, printing, or inadvertent errors. Apple Computer, Inc. 1 Infinite Loop Cupertino, CA 95014-2084 USA + 1 408 996 1010 http://www.apple.com Apple, the Apple logo, Mac, Macintosh, and the Mac logo are trademarks of Apple Computer, Inc., registered in the U.S. and other countries. Power Mac is a trademark of Apple Computer, Inc. Stand Installation - 13