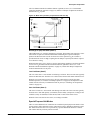
1
Operation Maintenance Manual
OM 751-1
Group: Applied Systems
Part Number: OM 751
Date: November 2006
MicroTech II® Unit Ventilator Controls
for AAF®-HermanNelson® Classroom Unit Ventilators
DX Cooling OnlySoftware Model UV05
Used with AAF-HermanNelson Classroom Unit Ventilator
Model AVV - Floor Mounted
Model AHV - Ceiling Mounted
Model AZV, AZU - Floor Mounted Self Contained Air Conditioner
IMPORTANT
Before unit commissioning, please read this publication in its entirety.
Develop a thorough understanding before starting the commissioning procedure.
This manual is to be used by the commissioner as a guide. Each installation is unique, only general topics are covered.
The order in which topics are covered may not be those required for the actual commissioning.
© 2006 McQuay International
Introduction. . . . . . . . . . . . . . . . . . . . . . . . . . . . . . . . 3
Acronyms/Abbreviations . . . . . . . . . . . . . . . . . . . . . . . . . . . . . . . . . . 5
Getting Started . . . . . . . . . . . . . . . . . . . . . . . . . . . . . 7
Using the Keypad/Display . . . . . . . . . . . . . . . . . . . . . . . . . . . . . . . . . 7
Display Format . . . . . . . . . . . . . . . . . . . . . . . . . . . . . . . . . . . . . 7
Keypad Functions . . . . . . . . . . . . . . . . . . . . . . . . . . . . . . . . . . . 7
Using the Keypad/Display . . . . . . . . . . . . . . . . . . . . . . . . . . . . . 9
Menu Reference . . . . . . . . . . . . . . . . . . . . . . . . . . . . . . . . . . . . 9
Description of Operation . . . . . . . . . . . . . . . . . . . . 12
State Programming . . . . . . . . . . . . . . . . . . . . . . . . . . . . . . . . . . . . . 12
UVC Unit Modes . . . . . . . . . . . . . . . . . . . . . . . . . . . . . . . . . . . . . . . 13
OFF Mode (State 9) . . . . . . . . . . . . . . . . . . . . . . . . . . . . . . . . 14
Night Purge Mode (State 8) . . . . . . . . . . . . . . . . . . . . . . . . . . 15
Fan Only Mode (State A) . . . . . . . . . . . . . . . . . . . . . . . . . . . . 15
Emergency Heat Mode (Super State) . . . . . . . . . . . . . . . . . . . 16
Auto Mode. . . . . . . . . . . . . . . . . . . . . . . . . . . . . . . . . . . . . . . . 17
Cool Mode (Super State) . . . . . . . . . . . . . . . . . . . . . . . . . . . . 18
Special Purpose Unit Modes. . . . . . . . . . . . . . . . . . . . . . . . . . 21
Unit Mode Priority . . . . . . . . . . . . . . . . . . . . . . . . . . . . . . . . . . . . . . 23
Occupancy Modes. . . . . . . . . . . . . . . . . . . . . . . . . . . . . . . . . . . . . . 24
Occupied Mode . . . . . . . . . . . . . . . . . . . . . . . . . . . . . . . . . . . . 24
Unoccupied Mode . . . . . . . . . . . . . . . . . . . . . . . . . . . . . . . . . . 24
Standby Mode . . . . . . . . . . . . . . . . . . . . . . . . . . . . . . . . . . . . . 24
Bypass Mode . . . . . . . . . . . . . . . . . . . . . . . . . . . . . . . . . . . . . 25
Additional Occupancy Features . . . . . . . . . . . . . . . . . . . . . . . . . . . 25
Networked Occupancy Sensor Capability. . . . . . . . . . . . . . . . 25
Unit-Mounted Time-Clock . . . . . . . . . . . . . . . . . . . . . . . . . . . . 25
Unit-Mounted Tenant Override Switch . . . . . . . . . . . . . . . . . . 25
Remote Wall-Mounted Sensor Tenant Override Switch . . . . . 25
Remote Wall-Mounted Sensor Status LED. . . . . . . . . . . . . . . 25
Space Temperature Set Points . . . . . . . . . . . . . . . . . . . . . . . . . . . . 26
Networked Set Point Capability. . . . . . . . . . . . . . . . . . . . . . . . 26
Networked Set Point Offset Capability . . . . . . . . . . . . . . . . . . 26
Networked Set Point Shift Capability . . . . . . . . . . . . . . . . . . . 26
Networked Space Temperature Sensor Capability . . . . . . . . . 26
Remote Wall-Mounted Sensor with +/–3°F
Adjustment (optional) . . . . . . . . . . . . . . . . . . . . . . . . . . . 27
Remote Wall-Mounted Sensor with 55°F to 85°F
Adjustment (optional) . . . . . . . . . . . . . . . . . . . . . . . . . . . 27
Effective Set Point Calculations . . . . . . . . . . . . . . . . . . . . . . . 27
Proportional Integral (PI) Control Loops . . . . . . . . . . . . . . . . . . . . . 29
Discharge Air Temperature Control . . . . . . . . . . . . . . . . . . . . 29
PI Control Parameters. . . . . . . . . . . . . . . . . . . . . . . . . . . . . . . . . . . 30
Proportional Band . . . . . . . . . . . . . . . . . . . . . . . . . . . . . . . . . . 30
Integral Time . . . . . . . . . . . . . . . . . . . . . . . . . . . . . . . . . . . . . . 31
Indoor Air Fan Operation. . . . . . . . . . . . . . . . . . . . . . . . . . . . . . . . . 31
Auto Mode. . . . . . . . . . . . . . . . . . . . . . . . . . . . . . . . . . . . . . . . 31
Occupied, Standby, and Bypass Operation . . . . . . . . . . . . . . 31
Unoccupied Operation . . . . . . . . . . . . . . . . . . . . . . . . . . . . . . 32
Cycle Fan. . . . . . . . . . . . . . . . . . . . . . . . . . . . . . . . . . . . . . . .
Off Delay . . . . . . . . . . . . . . . . . . . . . . . . . . . . . . . . . . . . . . . .
Outdoor Air Damper Operation . . . . . . . . . . . . . . . . . . . . . . . . . . .
Minimum Position . . . . . . . . . . . . . . . . . . . . . . . . . . . . . . . . .
Economizer Operation . . . . . . . . . . . . . . . . . . . . . . . . . . . . . .
Networked Space Humidity Sensor Capability . . . . . . . . . . .
Networked Outdoor Humidity Sensor Capability . . . . . . . . . .
CO2 Demand Controlled Ventilation (optional) . . . . . . . . . . .
Networked Space CO2 Sensor Capability . . . . . . . . . . . . . . .
ASHRAE Cycle II . . . . . . . . . . . . . . . . . . . . . . . . . . . . . . . . . .
Compressor Operation . . . . . . . . . . . . . . . . . . . . . . . . . . . . . . . . .
Compressor Envelope . . . . . . . . . . . . . . . . . . . . . . . . . . . . . .
Compressor Cooling Lockout . . . . . . . . . . . . . . . . . . . . . . . .
Compressor Minimum On and Off Timers . . . . . . . . . . . . . . .
Compressor Start Delay . . . . . . . . . . . . . . . . . . . . . . . . . . . .
Outdoor Air Fan Operation . . . . . . . . . . . . . . . . . . . . . . . . . .
Floating-Point Actuator Auto-Zero, Overdrive and Sync . . . . . . . .
External Binary Inputs . . . . . . . . . . . . . . . . . . . . . . . . . . . . . . . . . .
External Binary Input 1 . . . . . . . . . . . . . . . . . . . . . . . . . . . . .
External Binary Input 2 . . . . . . . . . . . . . . . . . . . . . . . . . . . . .
External Binary Input 3 . . . . . . . . . . . . . . . . . . . . . . . . . . . . .
External Binary Outputs. . . . . . . . . . . . . . . . . . . . . . . . . . . . . . . . .
External Binary Output 1 . . . . . . . . . . . . . . . . . . . . . . . . . . . .
External Binary Output 2 . . . . . . . . . . . . . . . . . . . . . . . . . . . .
External Binary Output 3 . . . . . . . . . . . . . . . . . . . . . . . . . . . .
32
32
32
32
32
34
34
34
34
35
35
35
35
36
36
36
36
37
37
37
37
38
38
38
38
UVC Input and Output Table . . . . . . . . . . . . . . . . . 40
Diagnostics and Service. . . . . . . . . . . . . . . . . . . . . 41
Alarm and Fault Monitoring . . . . . . . . . . . . . . . . . . . . . . . . . . . . . .
Space Temp Sensor Failure (F0). . . . . . . . . . . . . . . . . . . . . .
DX Pressure Fault (F1) . . . . . . . . . . . . . . . . . . . . . . . . . . . . .
Compressor Envelope Fault (F2) . . . . . . . . . . . . . . . . . . . . . .
Discharge Air DX Cooling Low Limit Indication (F3) . . . . . . .
Condensate Overflow Indication (optional) (F4). . . . . . . . . . .
Space Coil DX Temp Sensor Failure (F5) . . . . . . . . . . . . . . .
Outdoor Temp Sensor Failure (F6) . . . . . . . . . . . . . . . . . . . .
Discharge Air Temp Sensor Failure (F7) . . . . . . . . . . . . . . . .
Outdoor Coil DX Temp Sensor Failure (F8). . . . . . . . . . . . . .
Space Humidity Sensor Failure (optional) (FA) . . . . . . . . . . .
Outdoor Humidity Sensor Failure (optional) (Fb) . . . . . . . . . .
Space CO2 Sensor Failure (optional) (FC). . . . . . . . . . . . . . .
Change Filter Indication (FF) . . . . . . . . . . . . . . . . . . . . . . . . .
EPROM Memory Indicator (EE) . . . . . . . . . . . . . . . . . . . . . . .
Configuration Display (--) . . . . . . . . . . . . . . . . . . . . . . . . . . .
Troubleshooting Temperature Sensors . . . . . . . . . . . . . . . . . . . . .
Troubleshooting Humidity Sensors . . . . . . . . . . . . . . . . . . . . . . . .
Troubleshooting Carbon Dioxide (CO2) Sensors. . . . . . . . . . . . . .
41
42
42
42
42
43
43
43
43
43
44
44
44
44
44
44
44
45
46
UVC Configuration Parameters . . . . . . . . . . . . . . . 47
Introduction
Introduction
This manual provides information on the MicroTech II® control system used in the AAF®HermanNelson® Unit Ventilator product line. It describes the MicroTech II components, input/
output configurations, field wiring options and requirements, and service procedures.
For installation and general information on the MicroTech II Unit Ventilator Controller, refer
to IM 747, MicroTech II Unit Ventilator Controller.
For installation, commissioning instructions, and general information on a particular unit
ventilator model, refer to the appropriate manual (Table 1), as well as accompanying software
operating instruction manual (Table 4), and possible accessory manuals that may pertain to the
unit (Table 3).
For installation and maintenance instructions on a plug-in communications card, refer to the
appropriate protocol-specific installation and maintenance manual (Table 2). For a description
of supported network variables for each protocol, refer to Protocol Data Packet bulletin ED
15065.
Description
Air Source Heat Pump
DDC Control Components
Self-Contained
Self-Contained DDC
Control Components
Vertical Split-system
Horizontal Split-system
Ceiling Vent
Manual #
AEQ
AER
AHB
AHF
AHR
AHV
AVB
AVF
AVH
AVR
AVS
AVV
AZB
AZR
AZS
AZU
AZQ
AZV
ARQ
ERQ
Table 1: Model-specific unit ventilator installation literature
IM 502
X
AED-Q-MTII-811 X
IM 503
AZS Q V U R MII
810
IM 817-1
IM 830
AH IM 830
X X X X X X
X X X X X
X
X X X X X
X X X X
X X X
X X X
Table 2: Protocol-specific communication card installation literature and protocol data
Description
Unit Ventilator Unit Controller LonWorks®
Communications Module
Unit Ventilator Unit Controller JCI N2 Open®
Communications Module
Unit Ventilator Unit Controller BACnet®
Communications Module
Protocol Data Packet
Manual #
IM 729
IM 730
IM 731
ED-15065
Table 3: Accessory-specific installation literature
Description
MTII Unit Ventilator Controls Installation
Room Temperature Sensors Installation
ATS Service Cable Installation for Unit Ventilators
McQuay OM 751
Manual #
IM 747
IM 629-1
IM 762-0
3
Introduction
Table 4: Software program literature
Description
Air Source Heat Pump with Electric Heat (Software Model 00)
Water Source Heat Pump with Electric Heat (Software Model 02)
Water Source Heat Pump without Electric Heat (Software Model 03)
DX Cooling with Electric Heat (Software Model 04)
DX Cooling Only (Software Model 05)
Electric Heat Only (Software Model 06)
DX Cooling with Hydronic Heat - Valve Control (Software Model 07)
DX Cooling with Hydronic Heat - F&BP Damper Control (Software Model 08)
2-Pipe Hydronic Heat Only - Valve Control (Software Model 09)
2-Pipe Hydronic Heat Only - F&BP Damper Control (Software Model 10)
2-Pipe Chilled Water Cooling and Hot Water Heat - Valve Control (Software Model 11)
2-Pipe Chilled Water Cooling and Hot Water Heat - F&BP Damper Control (Software
Model 12)
4-Pipe Chilled Water Cooling and Hydronic Heat - Valve Control (Software Model 13)
4-Pipe Chilled Water Cooling and Hydronic Heat - F&BP Damper Control (Software
Model 14)
2-Pipe Chilled Water Cooling Only - Valve Control (Software Model 15)
2-Pipe Chilled Water Cooling Only - F&BP Damper Control (Software Model 16)
2-Pipe Chilled Water Cooling with Electric Heat - Valve Control (Software Model 17)
2-Pipe Chilled Water Cooling with Electric Heat - F&BP Damper Control (Software
Model 18)
Manual #
OM 748
OM 749
OM 750
OM 751
OM 752
OM 753
OM 754
OM 755
OM 756
OM 757
OM 758
NOTICE
This equipment generates, uses, and can radiate radio frequency energy and, if not installed
and used in accordance with this instruction manual, may cause interference to radio
communications. It has been tested and found to comply with the limits for a Class A digital
device, pursuant to part 15 of the FCC rules. These limits are designed to provide
reasonable protection against detrimental interference when the equipment is operated in a
commercial environment. Operation of this equipment in a residential area is likely to cause
detrimental interference in which case users are required to correct the interference at their
own expense. McQuay International disclaims any liability resulting from any
interference or for the correction thereof.
WARNING
Electric shock hazard. Can cause personal injury or equipment damage.
This equipment must be properly grounded. Connections and service to the MicroTech II
control panel must be performed only by personnel that are knowledgeable in the operation
of the equipment being controlled.
CAUTION
Extreme temperature can damage system components.
The MicroTech II controller is designed to operate in ambient temperatures from -20°F to
125°F. It can be stored in ambient temperatures from -40°F to 140°F. It is designed to be
stored and operated in relative humidity up to 95% (non-condensing).
CAUTION
Static sensitive components. A static discharge while handling electronic circuit
boards can damage components.
Discharge any static electrical charge by touching the bare metal inside the main control
panel before performing any service work. Never unplug any cables, circuit board terminal
blocks, relay modules, or power plugs while power is applied to the panel.
4
McQuay OM 751
Introduction
Acronyms/Abbreviations
The following table list acronyms and abbreviations that may or may not be used within this
manual. Other abbreviations for keypad displays and parameters can be found in Table 8 on
page 14 and Table 26 on page 47.
Table 5: Acronyms and abbreviations
Description
Air Fan
Auxiliary Heat End Differential
Auxiliary Heat Start Differential
American Standard Code for Information Interchange
American Society of Heating, Refrigerating, and Air
Conditioning Engineers, Inc
Compressorized Cooling Lockout
Space CO2 Setpoint
Chilled Water
Chilled Water Valve Position
Discharge Air
Discharge Air High Limit
Discharge Air Temperature
Discharge Air Temperature Setpoint
Demand Controlled Ventilation
DX Cooling Discharge Air Low Limit
Economizer Compare Differential
Economizer IA/OA Enthalpy Differential
Economizer OA Enthalpy Setpoint
Emergency Heat Setpoint
Exhaust Interlock OAD Min Position Setpoint
Outdoor Air Temperature Setpoint
End-of-Cycle
EOC OAT Low Setpoint
Outdoor Air Humidity Output
Space Humidity Setpoint
Economizer IA/OA Temp Differential
Economizer OA Temp Setpoint
Source (water in) Temperature
Face and Bypass Damper Position
Federal Communications Commission
Face and Bypass
Heating, Ventilating, Air Conditioning Refrigeration
Heating EOC Valve Setpoint
Hot Water
Indoor Air
Indoor Air Fan
Indoor Air Temperature
Light Emitting Diode
Local User Interface
Mixed Air Low Limit
Mechanical Cooling Low Limit Setpoint
National Electric Code
Outside Air
Outside Air Dampers
Energize Exhaust Fan OAD Setpoint
OAD Min Position High-Speed Setpoint
OAD Min Position Low-Speed Setpoint
OAD Min Position Med-Speed Setpoint
Outdoor Air Damper Position
OAD Lockout Setpoint
OAD Max Position Setpoint
Outside Air Temperature
McQuay OM 751
Acronym/
Abr.
AF
AHED
AHSD
ASCII
ASHRAE
CCLO
CO2S
CW
CWVP
DA
DAHL
DAT
DATS
DCV
DXLL
ECD
EED
EES
EHS
EOAD
EOAT
EOC
EOCS
EORH
ERH
ETD
ETS
EWIT
FBDP
FCC
F & BP
HVACR
HEOC
HW
IA
IAF
IAT
LED
LUI
MALL
MCLL
NEC
OA
OAD
OADE
OADH
OADL
OADM
OADP
OALS
OAMX
OAT
5
Introduction
Description
Occupied Cooling Setpoint
Occupied Heating Setpoint
Occupancy Override Input
Occupancy Sensor Input
Proportional Integral
Parts Per Million
Positive Temperature Coefficient
Relative Humidity
Space Humidity Setpoint
Read Only
Read Write
Standby Cooling Setpoint
Standby Heating Setpoint
Thermal Expansion Valve
Unoccupied Cooling Setpoint
Unoccupied Heating Setpoint
Unit Ventilator
Unit Ventilator Controller
UVC (Heat/Cool) Mode Output
UVC State Output
Wet Heat Valve Position
Ventilation Cooling Low Limit Setpoint
Ventilation Cooling Lockout
Ventilation Cooling Setpoint
Wet Heat
Source (water in) Temperature Differential
6
Acronym/
Abr.
OCS
OHS
OOI
OSI
PI
PPM
PTC
RH
RHS
RO
RW
SCS
SHS
TXV
UCS
UHS
UV
UVC
UVCM
UVCS
VALP
VCLL
VCLO
VCS
WH
WITD
McQuay OM 751
Getting Started
Getting Started
The MicroTech II Unit Vent Controller (UVC) is a self-contained device that is capable of
complete, stand-alone operation. Information in the controller can be displayed and modified
by using the keypad/display (local user interface). The following sections describe how to use
the keypad/display.
Note – Many UVC parameters are accessible both through the keypad/display and the network
interface. The shared keypad/display and the network interface variables have a “lastchange-wins” relationship.
Using the Keypad/Display
The keypad/display shown in Figure 1 is provided with all MicroTech II Applied Unit
Ventilator unit controllers. With the keypad/display, operating conditions, system alarms, and
control parameters can be monitored. Set points and other parameters also can be modified.
Figure 1: Keypad/display
MicroTech II TM
FAN ONLY
HIGH
COOL
MED
HEAT
LOW
AUTO
AUTO
MODE
FAN
FUNC
ON /
STOP
Display Format
The keypad/display’s 2-digit, 7-segment display normally shows the effective heating or
cooling temperature set point (Effective Set Point Output). The display also is used to view
and modify UVC parameters as explained in the following sections.
Note – When the UVC is in the OFF mode, the effective heating set point appears in the display.
All other LEDs are switched off.
Keypad Functions
Security Levels
The keypad/display provides a 4-level password security feature that can be used to restrict
access. The available security levels are shown in Table 6.
Note – All unit ventilator controllers ship with the lowest security (level 0) enabled. To change
security levels, see Figure 2. Once a security level is changed, the keypad/display
remains at that security level until the next time it is changed.
Why can’t I use the MODE or FAN key or adjust Set Point Offset?
Most likely this is due to the security feature being used. If the security feature is set higher
than level 0, then some keypad/display functionality is locked out. To ensure this is not the
problem, enter the level 0 password then try to use the keypad/display again.
McQuay OM 751
7
Getting Started
Table 6: Keypad/display security levels
Level
0
1
2
3
Display
What is restricted?
Password
U0
Default level (access all)
10
Does not allow set point offset changes;
U1
also locks out keypad/display menu
21
access.
Does not allow set point offset changes
nor MODE key changes; also locks out
32
U2
keypad/display menu access.
Does not allow set point offset changes
U3
nor MODE and FAN key changes; also
43
locks out keypad/display menu access.
Figure 2: Changing keypad/display security levels
ON/STOP Key and LED
Use the ON/STOP key to toggle the UVC between OFF mode and running (Application Mode
Input). The ON/STOP LED is off when the UVC is in the OFF mode.
Note – When the UVC is in the OFF mode, the effective heating set point appears in the display.
All other LEDs are switched off.
– The UVC archives each change to the keypad/display FAN and MODE keys. When the
ON/STOP key is used to bring the unit out of OFF mode, the UVC implements the last
active fan and unit modes.
– Each time the UVC power cycles, the UVC is in the auto fan and auto unit modes when
power is returned.
WARNING
Off mode is a “stop” state for the unit ventilator. It is not a “power
off” state. Power may still be provided to the unit.
FAN Key
Use the FAN key to toggle through each of the fan speeds (Fan Speed Command Input): Auto,
Low, Medium, and High.
MODE Key
Use the MODE key to toggle through the keypad/display accessible unit modes (Heat/Cool
Mode Input): Auto, Heat, Cool, and Fan Only.
Arrow Keys
Use the arrow keys to scroll between parameters and to adjust parameters.
FUNC Key
Use the Func key to view the actual space temperature or to confirm selection and changes to
user-adjustable parameters.
8
McQuay OM 751
Getting Started
Using the Keypad/Display
Viewing Actual Indoor Air Temperature (IAT)
Normally, the effective set point temperature appears on the keypad/display. You also can use
the keypad/display to view the indoor air temperature (IAT). See Figure 3.
Note – When the actual indoor air temperature (Effective Space Temp Output) equals the
effective set point temperature (Effective Set Point Output), you there is no change to the
keypad/display when you view space temperature.
Figure 3: Viewing indoor air temperature
70
FUNC
71
70
Effective
set point
Enter
(5-sec)
Actual space
temperature
Effective
set point
Changing Set Points
The keypad/display can be used to make a +/–5°F (+/–3°C) offset adjustment to the effective
temperature set point. See Figure 4. Also see “Space Temperature Set Points” on page 26 to
learn more about temperature set points.
Figure 4: Adjusting the set point offset
70
So
Effective
set point
Set point
offset
-1
Adjusted
offset
FUNC
Save
change
00
FUNC
Enter
-1
Flash
value
Current
offset
So
69
Effective
set point
Note – The set point offset clears whenever UVC power is cycled. When you change the set point
offset after a power cycle, or for the very first time, this cleared value shows as the highest
allowed value (5°F/3°C) but is not an actual offset value.
– When using the +/–3°F (+/–1.7°C) remote wall sensor, any set point offset adjustment
made at the keypad/display causes the UVC to override and ignore the remote wall
sensor set point adjustment knob. To use the remote wall sensor set point adjustment
knob after you changed the set point offset on the keypad/display, clear the keypad/
display set point offset by cycling UVC power.
– When using the 55°F to 85°F remote wall sensor, the UVC ignores any LUI set point offset
adjustments.
Menu Reference
The keypad/display menu eases troubleshooting and simplifies UVC configuration. The user
can access the most common parameters and system status values without a PC or network
interface.
The keypad/display menu is accessed via an unmarked, hidden key. This hidden key is located
approximately behind the letter “h” in the MicroTech II logo on the keypad/display face.
The keypad/display menu consists of two levels. The first level is the keypad/display Menu
Item List containing alphanumeric characters representing each parameter. The second level is
where the parameter’s value is viewed and adjusted if the parameter is adjustable. After 15seconds, an inactivity timer automatically causes the display to back out of the menu levels,
returning to the effective set point display.
McQuay OM 751
9
Getting Started
Figure 5: Changing a keypad/display menu item
Table 7: Keypad/display menu item list
Display Keypad menu item list
rA
HC
Reset Alarm Input
UVC (Heat/Cool) Mode
Output
UVC State Output
St
d0
d1
d2
d3
SL
Eo
o(
(o
(S
(U
ko
kS
kU
rS
o1
o2
Discharge Air Temp Set
point Output
Discharge Air Temp
Output
Ventilation Cooling Low
Limit set point
Mechanical Cooling Low
Limit set point
Slave Type Configuration
05
RW
x
RO
x
RO
x
RO
x
DAT Display current DA temperature.
RO
x
VCLL Adjust economizer cooling DA temperature low limit.
RW
x
MCLL Adjust mechanical cooling DA temperature low limit.
RW
x
Set slave type: 0 = Independent (slave uses own sensors), 1 = Dependent (slave
follows master). This feature requires a network over which the master and slave
UVCs can communicate.
RW
x
Display current occupancy.
RO
x
Set occupancy: 0 = occupied, 1 = unoccupied, 2 = bypass, 3 = standby. Adjusting
this variable is intended only for troubleshooting. Once you are done, cycle unit
power to clear this variable and return the UVC to normal operation.
RW
x
Occupied Cooling set
point
Standby Cooling Set
point
Unoccupied Cooling Set
point
Occupied Heating Set
point
Standby Heating Set
point
Unoccupied Heating Set
point
Wall Sensor Type
OCS Adjust occupied cooling set point.
RW
x
SCS Adjust standby cooling set point.
RW
x
UCS Adjust unoccupied cooling set point.
RW
x
OHS Adjust occupied heating set point.
RW
x
SHS Adjust standby heating set point.
RW
x
UHS Adjust unoccupied heating set point.
RW
x
RW
x
RO
x
RW
x
20%
o3
RW
x
25%
o4
OAD Min Position LowSpeed Set point
RW
x
30%
Description
Enter 1 to clear alarms (clears all inactive alarms, except filter alarm). To enable
the alarm again, enter 0.
Display current UVC mode. 1 = Heat, 3 = Cool, 4 = Night Purge, 6 = Off, 8 = Emerg.
UVCM
Heat, 9 = Fan Only
Display current UVC state. 1 = EconMech, 2 = Mech, 3 = Econ, 4 = DA Heat, 5 =
Heat, 6 = ActiveDehum, 7 = Full Heat, 8 = Night Purge, 9 = Off, 10 = Fan Only, 11
UVCS
= Heat Mode Cant Heat, 12 = CantCool, 13 = Emerg Heat Mode Cant Heat, 14 =
Heat Mode Low Limit, 15 = Cool Mode Low Limit
DATS Display current DA temperature set point.
Effective Occupancy
Output
Occupancy Override
Input
Outside Air Damper
Position Output
OAD Min Position HighSpeed Set point
OAD Min Position MedSpeed Set point
10
RO
RW1
Abr.
Set wall sensor type: 0 = +/–3F, 1 = 55°F to 85°F.
OADP Display OA damper position.
Adjust OA damper minimum position with IAF at high speed. (This variable is
factory set to 5% open when the unit is ordered with optional CO2 DCV.)
Adjust OA damper minimum position with IAF at medium speed. (This variable is
OADM not used when the optional CO2 DCV is enabled. Only OADH is active as the OA
damper minimum regardless of fan speed.)
Adjust OA damper minimum position with IAF at low speed. (This variable is not
OADL used when the optional CO2 DCV is enabled. Only OADH is active as the OA
damper minimum regardless of fan speed.)
OADH
Default
//2
54°F
(12°C)
45°F
(7°C)
0
//2
73.4°F
(23°C)
77°F
(25°C)
82.4°F
(28°C)
69.8°F
(21°C)
66.2°F
(19°C)
60.8°F
(16°C)
0
McQuay OM 751
Getting Started
RO
RW1
05
RW
x
99%
RW
x
12%
RW
x
99%
RW
x
0
RW
x
35.6°F
(2°C)
Set economizer status: 0 = disable, 1 = enable.
RW
x
1
Adjust economizer OA temperature set point. DO NOT lower this set point below
CCLO or you risk creating a deadband where no cooling occurs.
RW
x
68°F
(20°C)
ETD Adjust economizer IA/OA temperature differential.
RW
x
1.8°F (1°C)
EES Adjust economizer OA enthalpy set point.
RW
x
EED Adjust economizer IA/OA enthalpy differential.
RW
x
ERH Display room humidity (optional). 00 = No sensor connected.
RO
x
RO
x
Outdoor Air Temp Output EOAT Display OA temperature.
RO
x
Emergency Heat Enable
RW
x
1
RW
x
53.6°F
(12°C)
RW
x
0
AHSD Adjust auxiliary heat start differential.
RW
x
1.8°F (1°C)
AHED Adjust auxiliary heat stop differential.
RW
x
1.8°F (1°C)
RW
x
0
RW
x
0
RW
x
0
RW
x
2
Display Keypad menu item list
o5
o6
o7
o8
o9
E1
E2
E3
E5
E6
r1
r3
ot
k1
k2
k3
A1
A2
A3
b3
b6
(F
(E
(r
(1
Exhaust Interlock OAD
Min Position set point
Energize Exhaust Fan
OAD Set point
OAD Max Position Set
point
OAD Lockout Enable
OAD Lockout Set point
Abr.
Adjust OA damper position above which the exhaust fan output will be energized.
There is a fixed –5% differential associated with this set point.
Adjust OA damper minimum position when the exhaust interlock input is
OADE
energized.
EOAD
OAMX Adjust OA damper maximum position.
Set OA damper lockout feature status: 0 = disable, 1 = enable. (This variable is
factory set to 1 when the unit is ordered as a recirc unit with no OAD.)
Adjust OA temperature below which the OA damper closes if the OA damper
OALS lockout is enabled. (This variable is factory set to –99°C when the unit is ordered
as a recirc unit with no OAD.)
Economizer Enable
Economizer OA Temp
Set point
Economizer IA/OA Temp
Differential
Economizer OA Enthalpy
Set point
Economizer IA/OA
Enthalpy Differential
Space Humidity Output
Outdoor Air Humidity
Output
Emergency Heat Set
point
Emergency Heat
Shutdown Configuration
Auxiliary Heat Start
Differential
Auxiliary Heat End
Differential
Auxiliary Heat
Configuration
External BI-3
Configuration
External BO-3
Configuration
Fan Cycling
Configuration
Description
ETS
EORH Display OA humidity (optional). 00 = No sensor connected.
Set emergency heat status: 0 = disable, 1 = enable.
EHS Adjust emergency heat set point.
Set emergency heat operation during shutdown, 0 = no emergency heat during
shutdown: 1 = allow emergency heat during shutdown.
Set auxiliary heat type: 0 = N.O. device, 1 = N.C. device.
Set the function external binary Input 3: 0 = ventilation lockout, 1 = exhaust
interlock.
Set the function of external binary output 3: 0 = exhaust fan on/off signal, 1 =
auxiliary heat.
Set space fan cycles (switches off) during occupied, bypass, and standby mode: 2
= continuous, 3 = cycling.
Default
25 Btu/lb
(58 kJ/kg)
1.3 Btu/lb
(3 kJ/kg)
Filter Alarm Enable
Set filter alarm status: 0 = disable, 1 = enable.
RW
x
0
Reset Filter Alarm Input
Enter 1 to clear filter alarm.
RW
x
//2
Set compressor status: 0 = disable, 1 = enable.
RW
x
1
RW
x
63.5°F
(17.5°C)
RW
x
25°F
(-4°C)
RW
x
0 sec
Compressor Enable
Adjust compressor cooling lockout set point. When the OA temperature falls below
this set point, compressor cooling is not allowed. DO NOT make this setting lower
CCLO
than the factory default. There is a fixed +3.6°F (2°C) differential associated with
this set point.
Adjust compressor heating lockout set point. When the OA temperature falls below
CHLO
this set point, compressor heating is not allowed and only electric heat will be used.
Adjust compressor start delay. Where several units (inductive loads) are
connected to the same electrical supply, make this set point unique for every UVC
to prevent multiple compressors from energizing at the same time after a power
failure or occupancy change.
(2
Compressor Cooling
Lockout Set point
(3
Compressor Heating
Lockout Set point
(6
Compressor Start Delay
SP
Space Temp Sensor
Offset
Adjust this setting to bias the UVC measured space temperature.
RW
x
0
Un
Keypad/display
Temperature Units
Set keypad/display temperature units in English or SI. This set point also effects
which unit types displayed over Metasys N2 and BACnet MS/TP networks using
the appropriate optional communications modules.
RW
x
F
1. RW = read and write capable, RO = read only.
2. If a menu value is greater than 2-digits (higher than 99), then
McQuay OM 751
//
will be displayed on the keypad/display.
11
Description of Operation
Description of Operation
State Programming
The MicroTech II UVC takes advantage of “state” machine programming to define and
control unit ventilator operation. “State” defines specific states or modes of operation for each
process within the unit ventilator (e.g., heating, cooling, etc.) and contain the specific logic for
each state. This eliminates some of the most common problems associated with control
sequences such as the possibility of simultaneous heating and cooling, rapid cycling, etc.
State machine programming, and the unique nature of state diagrams, can be easily used to
describe operation. It can simplify sequence verification during unit commissioning, as well as
simplify troubleshooting. With the unique combination of state machine programming and the
keypad/display’s ability to allow a technician to easily determine the active UVC state,
troubleshooting the UVC can be very simple.
The state diagrams presented in the following sections consist of several “elements” including
super states, states, conditional jumps (also called transitions) and transition points. Super
states are used as a means to group two or more related states into a single control function
such as cooling, or heating, etc. States are where all the actual work takes place, within each
state the UVC enables PI-loops and other logic sequences required to control unit ventilator
operation within that particular state, while other functions and PI-loops not needed during
that state may be disabled. Conditional jumps, or transitions, are the logic paths used by the
UVC to determine which state should be made active, these are the “questions” the UVC
continually considers. The transition point is simply a point through which a number of
conditional jumps meet. Think of it as a point where a number of questions must be
considered from which the UVC then determines which path is followed and which state is
then made active.
The UVC states and super states are used to define the “normal” unit modes, such as Off,
Night Purge, Fan Only, Emergency Heat, Auto, Cool, and Heat. The UVC also supports
several “special purpose” unit modes such as Purge, Pressurize, De-pressurize, and Shutdown,
which can be forced via a network connection and override typical UVC operation.
Note – Not all states or modes are available for all UV configurations, and some states (such as
Active Dehum) are optional.
– In the state descriptions below the terms, saturated high and saturated low, indicate that
the heating or cooling function being described has reached 100% or 0%, respectively.
12
McQuay OM 751
Description of Operation
Figure 6: Complete UVC—state diagram
Off
NightPurge
9
8
EmergencyHeat
ModeSuperState
FullHeat
7
FanOnly
A
CantHeat
D
AutoMode
HeatMode
SuperState
CantHeat
B
CoolMode
SuperState
Heat
Econ
5
3
LowLimit
E
CantCool
C
EconMech
1
DAHeat
4
LowLimit
F
Mech
2
UVC Unit Modes
The UVC provides several “normal” modes of unit operation. These include: Off, Night
Purge, Fan Only, Cool, Emergency Heat, Auto, Heat, and Cool.
Normal UVC modes can contain a single state or several states depending upon the
functionality required for each particular mode. Each UVC state is assigned a number, which
can be very helpful when trying to understand which state is currently active within the UVC.
To view the current UVC state number, use the keypad/display.
McQuay OM 751
13
Description of Operation
Table 8: UVC state names and numbers
Normal UVC modes
State names
OFF
Night purge
Fan only
OFF
Night Purge
Fan Only
Full Heat
Cant Heat
Heat
Cant Heat
Low Limit
EconMech
Mech
Econ
DA Heat
Cant Cool
Low Limit
Emergency heat
Heat
Auto
Cool
State numbers
Decimal
9
8
10
7
13
5
11
14
1
2
3
4
12
15
ASCII
9
8
A
7
D
5
B
E
1
2
3
4
C
F
Hex
57
56
65
55
68
53
66
69
49
50
51
52
67
70
WARNING
Off mode is a “stop” state for the unit ventilator. It is not a “power
off” state. Power may still be provided to the unit.
OFF Mode (State 9)
Off mode is provided so that the UVC can be forced into a powered OFF condition. OFF mode
is a “stop” state for the unit ventilator; it is not a power off state. OFF mode consists of a
single UVC state: OFF [9].
When OFF mode becomes active, the UVC stops all normal heating, cooling, and ventilation
(OA damper is closed), and fan operation ends. The UVC continues to monitor space
conditions, indicate faults, and provide network communications (if connected to a network)
in the OFF mode while power is maintained to the unit.
While in OFF mode, the UVC does not maintain DA temperatures. If the space temperature
drops below EHS while in the OFF mode, the UVC is forced into the Emergency Heat mode
(see “Emergency Heat Mode (Super State)” on page 16).
The space lighting output continues to operate based upon the current occupancy mode.
Note – Special purpose unit modes such as Purge, Pressurize, and De-pressurize can force the
UVC to perform “special” functions during which the display appears to be in the OFF
mode.
Figure 7: Off state diagram
OFF
9
UVC Mode = OFF
UVC Mode ≠ OFF
Transition
point
14
McQuay OM 751
Description of Operation
Night Purge Mode (State 8)
Night Purge mode is provided as a means to more easily and quickly ventilate a space. Night
purge can be useful in helping to remove odor build up at the end of each day, or after
cleaning, painting, or other odor generating operations occur within the space. Night Purge
mode consists of a single UVC state: Night Purge [8].
Night Purge is a full ventilation with exhaust mode, during which room comfort is likely to be
compromised. Therefore, McQuay strongly recommends using Night Purge only when the
space is unoccupied.
When Night Purge mode becomes active, the UVC stops all normal heating and cooling. Since
any new energy used to treat the incoming air would be wasted in the purge process. In the
Night Purge mode, the space fan is set to high speed, the OA damper is set to 100% open, and
the Exhaust Fan binary output (see “External Binary Outputs” on page 38) is set to ON. If the
UVC is not set to another mode within 1 hour (fixed), the UVC automatically switches to the
Fan Only mode (see “Fan Only Mode (State A)” on page 15).
While in Purge mode, the UVC does not maintain DA temperatures. If the space temperature
drops below the EHS, the UVC is forced into the Emergency Heat mode (see “Emergency
Heat Mode (Super State)” on page 16).
Figure 8: Night purge state diagram
Night Purge
8
UVC Mode ≠
Night purge
UVC Mode =
Night purge
Transition
point
Fan Only Mode (State A)
The Fan Only mode is provided so that the UVC can be forced into a Fan Only operation via a
keypad/display or a network connection. Fan Only mode consists of a single UVC state: Fan
Only [A].
When Fan Only mode becomes active, the UVC stops all normal heating and cooling.
While in Fan Only mode, the UVC does not maintain DA temperatures. If the space
temperature drops below the EHS, the UVC is forced into the Emergency Heat mode (see
“Emergency Heat Mode (Super State)”).
Figure 9: Fan only state diagram
UVC Mode ≠
Fan Only
Transition
point
McQuay OM 751
UVC Mode =
Fan Only
Fan Only
A
15
Description of Operation
Emergency Heat Mode (Super State)
The Emergency Heat mode is provided for situations where the UVC is in a mode that does
not normally allow heating, such as OFF, Cool, Night Purge, or Fan Only. If Emergency Heat
mode is enabled, the UVC can automatically force itself into the Emergency Heat mode from
OFF, Cool, Night Purge, Fan Only, Purge, Pressurize, De-pressurize, and Shutdown.
Emergency Heat mode consists of UVC states: Full Heat [7] and Cant Heat [D].
Software model 05 does not have the primary or secondary heating devices. The UVC uses
auxiliary heat (if field provided and field connected) when emergency heat is required.
When the Emergency Heat mode becomes active, the UVC automatically determines which
state to make active, Full Heat [7], or Cant Heat [D], based on the transitions for each of those
states.
Figure 10: Emergency heat state diagram
Emergency Heat Mode
Super State
Full Heat
7
Heat ≠
Available
Heat =
Available
UVC Mode =
Emergency Heat
UVC Mode ≠
Emergency Heat
Transition
point
Cant Heat
D
Full Heat State (State 7)
The Full Heat [7] state is the “normal” state that the UVC goes into when Emergency Heat
mode is active. It is activated when the space temperature is lower than the EHS.
When Emergency Heat mode becomes active, the UVC goes into 100% heating until the space
temperature raises to the EHS plus a fixed differential (5.4°F/3°C). In the Emergency Heat
mode, the space fan is set to high speed, and the OA damper operates normally.
If the UVC automatically forces itself into the Emergency Heat mode from another mode
(e.g., Cool, Fan Only, etc.), then the UVC returns to the appropriate unit mode once the space
temperature rises to the EHS plus a fixed differential (5.4°F/3°C).
The UVC monitors the DAT to ensure it does not exceed DAHL. If the DAT does exceed
DAHL, then heating is set to 0% for a minimum of 2-minutes (fixed) and until the DAT drops
36°F (20°C) fixed differential below DAHL.
Cant Heat State (State D)
The Cant Heat [D] state is a “non-normal” state that the UVC can go into when Emergency
Heat mode is active. An IAT or DAT sensor fault during Emergency Heat mode causes the
UVC to make this state active.
When the Cant Heat state becomes active, the space fan remains at high speed as set during
the Full Heat state.
The UVC will remain in the Cant Heat state until heat becomes available.
16
McQuay OM 751
Description of Operation
Auto Mode
Auto mode is provided so that the UVC can be set to automatically determine if heating or
cooling is required. Auto mode is the default power-up UVC mode. Auto mode is made up of
the Heat and Cool modes. When the UVC is set to auto mode, the UVC automatically
determines which mode (Heat or Cool) to use.
Heat Mode (Super State)
When in Heat mode, the UVC will use auxiliary heat (if field provided and field connected to
the unit) as needed to maintain the effective heating setpoint (see “Space Temperature Set
Points” on page 26). The keypad/display or a network connection can be used to force the unit
into the Heat mode. Additionally, the UVC when set to Auto mode can automatically force the
unit into the Heat mode as needed. When the UVC is in Auto mode, it is “normal” for the
UVC to “idle” in Heat mode when there is no need to switch to another mode.
The Heat mode super state consists of UVC states: Heat [5], Low Limit [E], and Cant Heat
[B].
When the Heat mode super state becomes active, the UVC automatically determines which of
the Heat Mode states to make active based upon the transitions for each state.
Figure 11: Heat mode super state diagram
Transition
point
UVC Mode = Heat
OR
UVC Mode = Auto AND
Space ≠ Warm
UVC Mode ≠ Heat AND
UVC Mode ≠ Auto
OR
UVC Mode = Auto AND Space =
Warm AND Heat Pl = Sat Low
Heat Mode
Super State
Heat ≠ Available
Heat
Heat = Available
AND
Low Limit = Inactive
5
Heat Pl = Sat Hi
(2 minutes)
AND
DAT<VCLL LLPl = Sat Lo
(2 minutes)
AND
DAT<(VCLL + 1.8F)
Cant Heat
B
Heat = Available
AND
Low Limit = Inactive
Heat ≠ Available
Low Limit
E
Heat State (State 5)
The Heat state is the “normal” state during Heat mode. When the Heat state becomes active,
the UVC will (within State) continually calculate the DATS (“Discharge Air Temperature
Control” on page 29) required to maintain the effective heat setpoint (see “Space Temperature
Set Points” on page 26). The calculated DATS will not be allowed to go above DAHL. The
UVC will use auxiliary heat (if field provided and field connected to the unit) as needed to
maintain the current DATS.The auxiliary heat binary output will be used as needed. The Heat
Timer (3-minutes fixed) will begin counting. The CO2 demand controlled ventilation function
will be active, if the unit is equipped for CO2 control (see “CO2 Demand Controlled
Ventilation (optional)” on page 34), and the OA damper will be adjusted as needed to maintain
the CO2 setpoint. The UVC will remain in this state until one of the transition out conditions
become true, or until one of the super state transition out conditions becomes true.
McQuay OM 751
17
Description of Operation
Note – The OAD is considered to be in “alarm” when the OAD is forced below the active minimum
position in the Low Limit state. This is not an actual unit “alarm” or “fault” condition, but
only a condition used for the purpose of transition arguments.
Low Limit State (State E)
The Low Limit state is a “non-normal” state the UVC can go into while Heat mode is active
when the unit reaches 100% heating and still cannot meet the current DATS (see “Discharge
Air Temperature Control” on page 29) required to maintain the effective heating set point (see
“Space Temperature Set Points” on page 26). This is likely to occur only if the OA
temperature is very cold, the OA damper minimum position is set too high, the unit ventilator
is oversized for the application, or if the electric heating has failed, or is set incorrectly.
When the Low Limit state becomes active, the Low Limit PI-loop can override the OA
damper position (see “Outdoor Air Damper Operation” on page 32) and adjust the OA damper
toward closed as necessary to maintain the current DATS (see “Discharge Air Temperature
Control” on page 29).
Cant Heat State (State B)
The Cant Heat state is a “non-normal” state the UVC can go to when Heat mode is active. An
IAT or DAT sensor fault during the Heat mode causes the UVC to make this state active.
When the Cant Heat state becomes active, no heating or ventilation takes place. The OA
damper goes to the minimum position unless it is forced closed by other functions such as
freezestat (T6) or morning warm-up.
Cool Mode (Super State)
When in Cool mode the UVC uses primary cooling (economizer) and secondary cooling
(mechanical, DX) as needed to maintain the effective cooling set point (see “Space
Temperature Set Points” on page 26). The keypad/display or network connection can be used
to force the unit into the Cool mode. When the UVC is in Auto mode, it is “normal” for the
UVC to “idle” in Cool mode when there is no need to switch to another mode. The Cool mode
super state consists of the following UVC states: Econ Mech [1], Mech [2], Econ [3], DA Heat
[4], Low Limit [F], and Cant Cool [C].
When the Cool mode super state becomes active, the UVC will automatically determine which
UVC state to make active based upon the transitions for each state.
If the space temperature drops below EHS, and the Emergency Heat function is enabled, the
UVC will be forced into the Emergency Heat mode (see “Emergency Heat Mode (Super
State)” on page 16).
18
McQuay OM 751
Description of Operation
Figure 12: Cool mode super state diagram
Transition
Point
UVCMode≠Cool AND UVCMode≠Auto
OR
UVCMode=Auto AND Space=Cold AND
MechPI=SatLow(3min) AND
EconPI=SatLow
UVCMode=Cool
OR
UVCMode=Auto AND Space=Warm
CoolMode
SuperState
Econ≠Available
AND
MechCool≠Available
Econ
3
Econ = Available
AND
MechCool≠Available
CantCool
Econ≠Available
AND
MechCool=Available
C
Econ≠Available
AND
MechCool=Available
Space=HighCO2
OR
DAT<VCLL
Space≠HighCO2
AND
HeatPI=SatLow
AND
DAT>VCLL
EconTimer=Expired
(3 minutes) AND
EconPI=SatHi AND
MechCool=Available
MechPI=SatLow (3min) AND
EconMechTimer=Expired
(3 minutes) OR
MechCool≠Available
EconMech
1
DAHeat
4
HeatPI=SatHi(2min)
AND DAT<VCLL
LLPI=SatLow (2min)
AND
DAT>(VCLL+1.8F)
LowLimit
F
Econ≠Available
Econ=Available
MechCool≠Available
Mech
2
Econ State (State 3)
The Econ state is a “normal” state during Cool mode. The Econ state typically is active in the
Cool mode when primary cooling (economizer) is available and adequate to meet the cooling
requirements.
When the Econ state becomes active, the UVC uses economizer cooling (see “Economizer
Operation” on page 32) as needed to maintain the effective cooling set point (see “Space
Temperature Set Points” on page 26). If cooling is not required while in the Econ state, the
UVC can “idle” in the Econ state until cooling is required or until there is a call to switch to
another mode or state.
The UVC monitors the DAT to ensure it does not fall below VCLL.
The CO2 demand controlled ventilation function (optional) will be active (see “CO2 Demand
Controlled Ventilation (optional)” on page 34) and the OA damper is adjusted as needed to
maintain the CO2 set point.
McQuay OM 751
19
Description of Operation
Figure 13: Econ state operation (occupied mode and auto fan)
Econ Mech State (State 1)
The Econ Mech state is a “normal” state during Cool mode. The Econ Mech state typically is
active in the Cool mode when primary cooling (economizer) alone is not adequate to meet the
cooling requirements and both primary cooling and secondary cooling (compressor) are
available.
When the Econ Mech state becomes active, the OA damper is set to 100% open, and the UVC
uses the units mechanical cooling capabilities as needed to maintain the effective cooling set
point (see “Space Temperature Set Points” on page 26).
The UVC monitors the DAT to ensure it does not fall below MCLL.
Figure 14: Econ mech state operation (occupied mode and auto fan)
Mech State (State 2)
The Mech state is a “normal” state during Cool mode. The Mech state typically is active in the
Cool mode when primary cooling (economizer) is not available and secondary cooling
(compressor) is available.
When the Mech state becomes active, the UVC uses the unit’s mechanical cooling capabilities
as needed to maintain the effective cooling set point (see “Space Temperature Set Points” on
page 26). If cooling is not required while in the Mech state, the UVC can “idle” in the Mech
state until cooling is required or until there is a call to switch to another mode or state.The
UVC monitors the DAT to ensure it does not fall below MCLL.
20
McQuay OM 751
Description of Operation
The CO2 demand controlled ventilation function (optional) is active (see “CO2 Demand
Controlled Ventilation (optional)” on page 34), and the OA damper is adjusted as needed to
maintain the CO2 set point.
Figure 15: Mech state operation (occupied mode and auto fan)
Discharge Air (DA) Heat State (State 4)
The DA Heat state is a “normal” state during Cool mode. The DA Heat state typically is active
when reheat is required to maintain DATS while maintaining the required OA damper
position. The DA Heat state can also be made active if the optional CO2 DCV feature is
provided and CO2 levels are high, requiring the OA damper to open beyond what is required
for economizer cooling.
When DA Heat state is active, the UVC uses the units heating capability as needed to maintain
VCLL. The CO2 demand controlled ventilation function (optional) is active (see “CO2
Demand Controlled Ventilation (optional)” on page 34), and the OA damper is adjusted as
needed to maintain the CO2 set point.
Low Limit State (State F)
The Low Limit state is a “non-normal” state during Cool mode. The Low Limit state typically
follows the DA Heat state when the UVC reaches 100% heat and still cannot maintain VCLL.
When the Low Limit state becomes active, the Low Limit PI-loop overrides the OAD
minimum position (see “Outdoor Air Damper Operation” on page 32) and adjusts the OAD
toward closed as necessary to maintain the DAT set point (see “Discharge Air Temperature
Control” on page 29).
Cant Cool State (State C)
The Cant Cool state is a “non-normal” state during Cool mode. The Cant Cool state typically
becomes active when both primary (economizer) and secondary (compressor) cooling are not
available (or they are disabled) or when an IAT, DAT or OAT sensor failure occurs.
When the Cant Cool state becomes active, no cooling is available.
Special Purpose Unit Modes
There are some additional UVC modes that are considered special purpose unit modes. These
special purpose modes include Pressurize, Depressurize, Purge, Shutdown, and Energy Hold
Off. These modes force the UVC to perform very specific and limited functions. Use these
with caution and only for short periods as needed.
McQuay OM 751
21
Description of Operation
In each of these special purpose UVC modes, if the space temperature drops below EHS and
the Emergency Heat function is enabled, the UVC is forced into the Emergency Heat mode
(see “Emergency Heat Mode (Super State)” on page 16) and then return once the Emergency
Heat function is satisfied.
Table 9: Actions during special purpose unit modes
Action
Pressurize
Depressurize
Purge
Shutdown
Energy hold off
Indoor air fan
(IAF)
High
Off
High
Off
Off
Outdoor air
damper (OAD)
100% Open
Closed
100% Open
Closed
Closed
Exhaust fan
output
Off
On
On
Off
Off
Pressurize Mode
When in Pressurize mode, the UVC uses the IAF, OAD, and exhaust output as needed to
pressurize the space. The UVC stops all normal heating and cooling but does allow emergency
heat if required. The pressurize mode can only be accessed via a network connection.
Depressurize Mode
When in Depressurize mode the UVC will use the IAF, OAD, and exhaust output as needed to
depressurize the space. The UVC stops all normal heating and cooling but does allow
emergency heat if required. The de-pressurize mode can only be accessed via a network
connection or with ServiceTools for MicroTech II Applied Terminal Unit Controllers (ATS).
Purge Mode
When in Purge mode, the UVC uses the IAF, OAD, and exhaust output as needed to purge the
space. The UVC stops all normal heating and cooling but does allow emergency heat if
required. The purge mode can only be accessed via a network connection or with ServiceTools
for MicroTech II Applied Terminal Unit Controllers (ATS).
Shutdown Mode
Shutdown mode is the equivalent of the Off mode, but is an Off mode forced by a network
connection. When in Shutdown mode, the UVC stops all normal heating, cooling, ventilation
(OA damper is closed), and fan operation. By default emergency heat is not be used during the
shutdown mode, however, the UVC can be configured (Emergency Heat Shutdown
Configuration) to allow emergency heat operation during shutdown mode. The shutdown
mode can be accessed via a network connection, a binary input to the UVC, or with
ServiceTools for MicroTech II Applied Terminal Unit Controllers (ATS).
WARNING
Shutdown mode and energy hold off mode are a “stop” state for
the unit ventilator. It is not a “power off” state.
Energy Hold Off Mode
The UVC supports an energy hold off state, which when active forces the UVC to stop all
normal heating, cooling and ventilation. Typically used by a network connection to force the
UVC to cease heating, cooling and ventilation when conditions exist where heating, cooling
and ventilation are not required or desired. Energy hold off mode is very similar to shutdown
mode except that energy hold off always allows emergency heat if required. The energy hold
off mode can only be accessed via a network connection or with ServiceTools for
MicroTech II Applied Terminal Unit Controllers (ATS).
22
McQuay OM 751
Description of Operation
Unit Mode Priority
The UVC uses the network variables and binary inputs listed in Table 10 and Table 11 to
determine the current unit mode. Special purpose UVC unit modes have higher priority than
the normal UVC unit modes as shown in the tables.
Each table lists the highest priority items on the left to the lower priority items to the right. The
right-most columns indicate unit operation as a result of the left-most columns. The term
“Don’t care” in these tables implies that another network variable or binary input to the left
has a higher priority.
Table 10: Special purpose UVC unit mode priority
Priority result
Emergency override
input1
Normal3
Pressurize
De-pressurize
Purge
Shutdown
1.
2.
3.
4.
5.
Remote shutdown
binary input
Energy hold
off input1
Energy hold
off output2
De-energized4
Normal
Normal
Energy hold off
Don’t care
Don’t care
Don’t care
Don’t care
Don’t care
Energy hold off
Energy hold off
Don’t care
Don’t care
Don’t care
Don’t care
Energized5
Don’t care
Don’t care
Don’t care
Don’t care
Unit mode
Actual UVC action
output2
See the normal
UVC mode priority (Table 11)
Off
Off
Off
Off
Off
Pressurize
Off
De-pressurize
Off
Purge
Off
Off
Network input.
Network output.
Normal indicates the UVC power-up condition.
De-energized indicates that the contacts connected to this binary input are open.
Energized indicates that the contacts connected to this binary input are closed.
Table 11: Normal UVC mode priority
Priority result
Application override Unit mode override
input 1
input1
Normal (Auto)3
Normal (Auto)3
Heat
Cool
Night purge
Off
Emergency heat
Fan only
Heat
Cool
Night purge
Off
Emergency heat
Fan only
Don’t care
Don’t care
Don’t care
Don’t care
Don’t care
Don’t care
Unit mode output 2
Heat
Cool
Emergency heat
Heat
Cool
Night purge
Off
Emergency heat
Fan only
Heat
Cool
Night purge
Off
Emergency heat
Fan only
1. Network input.
2. Network output.
3. Normal (Auto) is the normal UVC power-up state.
McQuay OM 751
23
Description of Operation
Occupancy Modes
The UVC is provided with four occupancy modes: Occupied, Standby, Unoccupied, and
Bypass. The occupancy mode affects which heating and cooling temperature set points are
used, affects IAF operation, and affects OAD operation. The Manual Adjust Occupancy and
Networked Occupancy Sensor network variables, along with the Unoccupied and Tenant
Override binary inputs, are used to determine the Effective Occupancy. The term “Don’t care”
in Table 12 implies that another network variable or binary input to the left has a higher
priority.
Note – The Occupancy Override Input is provided as a way for a network connection to manually
force the UVC into a particular occupancy mode. The Occupancy Override Input can
override the tenant override feature. For example, if the network uses the Occupancy
Override Input to force the unit into unoccupied mode, then the tenant override switch
does not operate as expected. Therefore, McQuay strongly recommends using the
Occupancy Sensor Input to control occupancy modes over a network and only using the
Occupancy Override Input if there is reason to ensure tenant override does not occur.
Table 12: Occupancy mode priority
Priority result
Occupancy
Override input
Occupancy
sensor input1
Occupied
Unoccupied
Don’t care
Don’t care
Occupied
Unoccupied
Bypass
Null (default)
Standby
Null (default)3
Don’t care
Occupied
Unoccupied
Null (default)
1.
2.
3.
4.
Unoccupied binary input
Don’t care
Don’t care
Don’t care
Don’t care
Contacts open (Occupied)
Contacts Closed (Unoccupied)
Don’t care
Don’t care
Don’t care
Contacts open (Occupied)
Contacts closed (Unoccupied)
Effective
occupancy
output2
Occupied
Unoccupied
Occupied
Bypass
Occupied
Bypass
Standby
Occupied
Unoccupied4
Occupied
Unoccupied4
Network input.
Network output.
Typical operation is defined in this row of the table.
The tenant override switch (unit or wall sensor mounted) can be used here to force the UVC
into bypass.
Occupied Mode
The occupied mode is the normal day time mode of UVC operation. During occupied mode
the UVC uses the occupied heating and cooling set points, the OAD operates normally, and by
default the IAF remains on.
Unoccupied Mode
The unoccupied occupancy mode is the normal night time mode of UVC operation. During
unoccupied mode the UVC uses the unoccupied heating and cooling set points, the OAD
remains closed, and the IAF cycles as needed for heating or cooling. The IAF remains off
when there is no need for heating or cooling.
Standby Mode
The standby mode is a special purpose daytime mode of UVC operation. During standby,
mode the UVC uses the standby heating and cooling set points, the OAD remains closed, and
by default the IAF remains on.
24
McQuay OM 751
Description of Operation
Bypass Mode
The bypass mode (also called Tenant Override) is the equivalent of a temporary occupied
mode. Once the bypass mode is initiated, it remains in effect for a set period of time (120
minutes, default). During the bypass mode, the UVC uses the occupied heating and cooling set
points, the OAD operates normally, and by default the IAF remains on.
Additional Occupancy Features
Networked Occupancy Sensor Capability
A networked occupancy sensor can be interfaced with the Occupancy Sensor Input variable to
select occupancy modes. When the Occupancy Sensor Input variable is used, it automatically
overrides any hard-wired unoccupied binary input signal.
Unit-Mounted Time-Clock
An optional unit-mounted factory-installed electronic 24-hour/7-day time clock can be
provided on stand-alone unit ventilator configurations. It is factory wired to the UVC
unoccupied binary input and can be set to automatically place the unit into occupied and
unoccupied modes based upon its user configured schedule.
Unit-Mounted Tenant Override Switch
A tenant override switch is factory installed in all floor mounted units and is located near the
LUI on the unit. This switch provides a momentary contact closure that can be used by room
occupants to temporarily force the UVC into the bypass occupancy mode from unoccupied
mode.
Note – The Occupancy Override Input can override the tenant override feature. For example, if
the network uses the Occupancy Override Input to force the unit into unoccupied mode,
then the unit-mounted tenant override switch does not operate as expected. Therefore,
McQuay strongly recommends using the Occupancy Sensor Input to control occupancy
modes over a network and only using the Occupancy Override Input if there is reason to
ensure tenant override does not occur.
Remote Wall-Mounted Sensor Tenant Override Switch
The optional remote wall-mounted sensors include a tenant override switch. This switch
provides a momentary contact closure that can be used by room occupants to temporarily force
the UVC into the bypass occupancy mode from unoccupied mode.
Note – The Occupancy Override Input can override the tenant override feature. For example, if
the network uses the Occupancy Override Input to force the unit into unoccupied mode,
then the wall sensor tenant override switch does not operate as expected. Therefore,
McQuay strongly recommends using the Occupancy Sensor Input to control occupancy
modes over a network and only using the Occupancy Override Input if there is reason to
ensure tenant override does not occur.
Remote Wall-Mounted Sensor Status LED
The optional remote wall-mounted sensors each include a UVC status LED. This status LED
aids diagnostics by indicating the UVC occupancy mode and fault condition.
Table 13: Remote wall-mounted sensor status LED
Indication
Occupied
Unoccupied
Bypass
Standby
Fault
McQuay OM 751
LED operation
On continually
On 1 second/off 9 seconds
On continually
On 9 seconds/off 1 second
On 5 seconds/off 5 seconds
25
Description of Operation
Space Temperature Set Points
The UVC uses the six occupancy-based temperature set points as the basis to determine the
Effective Set point Output. The effective set point is calculated based on the unit mode, the
occupancy mode, and the values of several network variables. The effective set point then is
used as the temperature set point that the UVC maintains.
Table 14: Default occupancy-based temperature set points
Temperature set point
Unoccupied cool
Standby cool
Occupied cool
Occupied heat
Standby heat
Unoccupied heat
Abbreviation
UCS
SCS
OCS
OHS
SHS
UHS
Defaults
82.4°F (28.0°C)
77.0°F (25.0°C)
73.4°F (23.0°C)
69.8°F (21.0°C)
66.2°F (19.0°C)
60.8°F (16.0°C)
Networked Set Point Capability
The Space Temp Setpoint Input variable is used to allow the temperature set points for the
occupied and standby modes to be changed via the network; the unoccupied set points are not
affected by this variable.
Networked Set Point Offset Capability
The Networked Set Point Offset Input variable is used to shift the effective occupied and
standby temperature set points by adding the value of the Setpoint Offset Input variable to the
current set points; the unoccupied points are not affected by this variable. This variable is
typically set bound to a supervisory network controller or to a networked wall module having
a relative set point knob.
Use the keypad/display to make adjustments to the value of the Setpoint Offset Input variable.
See “Changing Set Points” on page 9.
Note – The keypad/display and the network both affect the Set Point Offset Input variable. Keep
in mind that changes to this variable are last-one-wins.
Networked Set Point Shift Capability
The Set Point Shift Input variable is used to shift the effective heat/cool set points. It typically
is bound to a networked supervisory controller or system that provides functions such as
outdoor air temperature compensation. All occupied, standby, and unoccupied set points are
shifted upward (+) or downward (–) by the corresponding value of the Set Point Shift Input
variable.
Note – The Set Point Shift Input capability is not available through the BACnet® interface.
Networked Space Temperature Sensor Capability
A networked space temperature sensor can be interfaced with the Space Temp Input variable.
When the Space Temp Input variable is used (valid value), it automatically overrides the hardwired space temperature sensor.
26
McQuay OM 751
Description of Operation
Remote Wall-Mounted Sensor with +/–3°F
Adjustment (optional)
When the optional remote wall-mounted sensor with +/–3°F adjustment dial is used, the UVC
effectively writes the value of the set point adjustment dial to the Set Point Offset Input
variable.
Note – If a network connection is used to adjust the Set Point Offset Input variable, you must not
use the optional remote wall-mounted sensor with +/–3°F adjustment.
– If the keypad/display is used by room occupants to adjust the Set Point Offset, do not use
the optional remote wall-mounted sensor with +/–3°F adjustment.
If you have the optional remote wall-mounted sensor with +/–3°F adjustment and an
occupant uses the keypad to make Set Point Offset adjustments, this overrides any
+/–3°F adjustment on the optional remote wall-mounted sensor since the keypad/display
has higher priority. If you find that changes to the +/–3°F adjustment on the remote wallmounted sensor have no effect, it is likely that an occupant used the keypad/display to
make a Set Point Offset change. Cycle unit power to clear this situation and restore the
ability to change the Set Point Offset from the +/–3°F adjustment on the remote
wall-mounted sensor.
Remote Wall-Mounted Sensor with 55°F to 85°F
Adjustment (optional)
When the optional remote wall-mounted sensor with 55°F to 85°F adjustment dial is used, the
UVC will effectively write the value of the set point dial to the Space Temp Set Point Input
variable.
Note – If a network connection is using the Space Temp Set Point Input variable, do not use the
optional remote wall-mounted sensor with 55°F to 85°F adjustment.
– If it is intended that the LUI will be used by room occupants to adjust the Setpoint Offset,
then you must not use the optional remote wall-mounted sensor with 55°F to 85°F
adjustment. When using the optional remote wall-mounted sensor with 55°F to 85°F
adjustment, the UVC will ignore any Setpoint Offset changes made at the LUI.
Effective Set Point Calculations
The UVC calculates the effective set point (Effective Set Point Output) based on several
factors. These factors include the six occupancy set points for heating and cooling (Occupancy
Temperature Set Point), occupancy mode, the value of the network variables Space Temp Set
Point Input, Set Point Offset Input, and the Set Point Shift Input as well as the optional wallmounted sensor’s set point adjustment knob. As always, network inputs have priority over
hardwired connections.
The UVC determines if heating or cooling is required based on the current unit mode (Heat/
Cool Mode Output) and then calculates the required set point for heating or cooling. After
calculating, the Effective Set Point Output network variable is set equal to the calculated set
point. The Effective Set Point Output is the temperature set point that the UVC maintains,
which normally appears on the keypad/display.
McQuay OM 751
27
Description of Operation
Figure 16: Effective set point calculations
Occupancy Temperature Setpoints
(network configuration variables)
Effective Set Point Calculations for each Occupancy Mode
Occupied Cooling Set Point (OCS)
Standby Cooling Set Point (SCS)
Unoccupied Cooling Set Point (UCS)
Occupied Heating Set Point (OHS)
Standby Heating Set Point (SHS)
Unoccupied Heating Set Point (UHS)
Space Temp
Set Point Input
(network input)
WallSensorType
Config. Value
Set Point
Offset Input
(network input)
AbsOffsetOccupied = Setpoint - (OCS + OHS)/2
AbsOffsetStandby = Setpoint - (SCS + SHS)/2
Network Value
1
0
55°F/85°F
Wall Sensor
Set Point
Standby Mode
EffectiveCoolSetpoint = SCS + AbsOffsetStandby + SetptOffset + SCSS
EffectiveHeatSetpoint = SHS + AbsOffsetStandby + SetptOffset + SHSS
+3°F/–3°F
Wall Sensor
Local User
Interface
+5°F/–5°F
Occupied and Bypass Modes
EffectiveCoolSetpoint = OCS + AbsOffsetOccupied + SetptOffset + OCSS
EffectiveHeatSetpoint = OHS + AbsOffsetOccupied + SetptOffset + OHSS
SetptOffset
Unoccupied Mode
EffectiveCoolSetpoint = UCS + UCSS
EffectiveHeatSetpoint = UHS + UHSS
Network Value
SetptShift (network inputs)
Occupied Cooling Set Point Shift (OCSS)
Standby Cooling Set Point Shift (SCSS)
Unoccupied Cooling Set Point Shift (UCSS)
Occupied Heating Set Point Shift (OCSS)
Standby Heating Set Point Shift (SHSS)
Unoccupied Heating Set Point Shift (UHSS)
If both entering paths have
valid values, then the network
value has priority.
If both entering paths have
valid values, then the keypad/display value
has priority.
Example A
Table 15: Set point calculation examples
Given
OccupancyMode = Occupied or BypassHeat/CoolMode = Heat
SpaceTempSetpoint = (not used)
SetpointOffset = (not used) = 0.0°F
SetpointShift = (not used) = 0.0°F
OHS = 69.8°F
Example B
Effective set point calculations
EffectiveSetpoint = OHS + SetpointOffset + SetpointShift = 69.8 + 0.0 + 0.0 = 69.8°F
28
Given
OccupancyMode = Occupied or BypassHeat/CoolMode = Heat
SpaceTempSetpoint = 71.0°F
SetpointOffset = -1.0°F (occupant adjustment on remote wall sensor, or LUI)
SetpointShift = (not used) = 0.0°F
OCS = 73.4°F, OHS = 69.8F
Effective set point calculations
AbsoluteOffset = (OCS – OHS) / 2 =(73.4°F – 69.8°F) / 2 = 1.8°F
EffectiveSetpoint = SpaceTempSetpoint – AbsoluteOffset + SetpointOffset + SetpointShift = 71.0 1.0 - 1.0 + 0.0 = 68.2°F
McQuay OM 751
Description of Operation
Proportional Integral (PI) Control Loops
The MicroTech II UVC uses PI-loop control for heating, cooling and ventilation processes
within the unit ventilator. Numerous PI algorithms can be used depending upon the unit
ventilator configuration. The UVC uses “single” and “cascading” PI loops where needed.
Table 16: PI loop list
PI loops
PI-1
PI loop type
Space Temperature
PI-2 Primary Cooling (Economizer)
Cascading
PI-3
Secondary Cooling
PI-4
Primary Heating
PI-5
CO2 (optional)
Single
PI-6
Low Limit
Single
Feedback
(controlled
variable)
Output
Space Temperature
Calculated Discharge Air
Temperature Setpoint Output
Set point
Effective Heating or Cooling
Temperature Setpoint
Calculated Discharge Air Temperature
Setpoint Output
Calculated Discharge Air Temperature
Setpoint Output
Discharge Air
Temperature
Discharge Air
Temperature
Position the OA Damper
Operate the Compressor
Calculated Discharge Air Temperature
Setpoint Output
Discharge Air
Temperature
Position the Wet Heat Valve or
F&BP Damper
Effective CO2 Setpoint
Calculated Discharge Air Temperature
Setpoint
Space CO2
Discharge Air
Temperature
Position the OA Damper
Position the OA Damper
Figure 17: PI loop graphic for CO2
Effective
CO2 set point
+
-
PI - 5
Position the
OA damper
Space CO2
sensor
Discharge Air Temperature Control
The UVC uses two “cascading” PI loops to aid in providing very stable space temperature
control. The Space Temperature PI-loop is used to calculate the Discharge Air Temperature
Setpoint Output required to meet the Effective Temperature Setpoint Output. A second PI-loop
(Primary Cooling, Secondary Cooling, or Primary Heating) is then activated to control the
heating or cooling device required to achieve the calculated Discharge Air Temperature
Setpoint Output.
Figure 18: Cascading PI loop graphic 1 (primary heat)
Figure 19: Cascading PI loop graphic 2 (primary cool—economizer)
McQuay OM 751
29
Description of Operation
PI Control Parameters
Associated with each PI loop is a set of two adjustable parameters: Proportional Band and
Integral Time. When the unit ventilator is properly sized for the space, the factory settings for
these parameters provides the best and most robust control action (see Figure 20).
If field problems arise, first ensure these parameters are set back to the factory default settings.
If adjustment is required, only make small adjustments to one parameter at a time. After each
adjustment, allow enough time for the system to stabilize before making further adjustments.
If you do not have the means to graph the space performance, record the actual measured
value and set point for several minutes and then plot the results using a spreadsheet to
determine the correct action to change the PI parameter.
CAUTION
Adjusting PI parameters can cause erratic unit operation,
and potentially damage the equipment.
PI control parameters should only be adjusted by trained
personnel having a complete understanding of how these
parameters affect system operation. Generally these parameters
do not need to be adjusted from the factory default settings.
Figure 20: Optimized PI loop control
Proportional Band
The proportional band, or proportional action, causes the controlled output to changes in
proportion to the magnitude of the difference between the sensor value and set point.
A proportional band setting that is too small (see Figure 21) causes control oscillations that go
fully above and below the set point.
Figure 21: Proportional bands
A proportional band setting that is too large (see Figure 21) causes an offset between the actual
measured oscillation center and the set point. A small offset is not necessarily a problem since
most systems have a small “natural” offset and the integral function automatically works to
eliminate or reduce this effect.
30
McQuay OM 751
Description of Operation
In general, it is best to start with a relatively large proportional band setting (the factory
default setting is best) and adjust to smaller values.
If you want the system to respond strongly to small changes in the space, adjust the
proportional band to a higher setting.
If you want the system to react weakly to small changes in the space, adjust the proportional
band to a higher setting.
Integral Time
The integral time, or integral action, causes the controlled output to change in proportion to
time difference between the sensor value and set point. The difference over time between the
actual value and set point forms an “area under the curve” (see Figure 22). The integral action
works to reduce this “area under the curve” and to eliminate any natural system offset.
Figure 22: Integral time
Area Under The Curve
Too Small
The smaller the integral time, the faster the output ramps up or down with small changes in the
space. The smaller the integral time, the quicker the system reacts to small changes in the
space. If the Integral Time is set too small, long oscillations occur (see Figure 22).
In general, it is best to start with a relatively large integral time setting (the factory default
setting is best) and adjust to smaller values. If you want the system respond strongly to small
changes in the space, lower the integral time. If you want the system to react weakly to small
changes in the space, adjust the integral time to a higher setting.
Indoor Air Fan Operation
The UVC supports a three-speed indoor air (IA) fan; low, medium, and high. The UVC
calculates the effective fan speed and operation based on the unit mode, the occupancy mode,
and the values of several network variables.
Auto Mode
The UVC is provided with a user selectable auto fan mode feature. When in auto fan mode,
the UVC uses the space temperature PI loop to automatically adjust the fan speed as needed to
maintain space temperature. This ensures that the UVC maintains the lowest and quietest fan
speeds whenever possible. When in auto fan mode, a maximum of six fan speed changes per
hour is allowed (by default). This prevents frequent automatic fan speed changes from
disturbing room occupants.
Occupied, Standby, and Bypass Operation
During occupied standby and bypass modes, the IA fan, by default, remains On.
McQuay OM 751
31
Description of Operation
Unoccupied Operation
During unoccupied mode, the IA fan typically remains off and cycles with calls for heating
and cooling.
Cycle Fan
The UVC is provided with a Fan Cycling Configuration variable that can be used to force the
IA fan to cycle with calls for heating and cooling during the occupied, standby, and bypass
occupancy modes. When the fan is off, the OA damper is closed. McQuay recommends using
this feature only when it is acceptable that normal ventilation is not required.
When the IA fan is set to cycle, the UVC is configured to continue fan operation for a time
period after heating or cooling is complete.
Off Delay
When the UVC is placed into off mode or shutdown mode, the UVC is configured to continue
fan operation for a short time period and then shutdown.
Outdoor Air Damper Operation
The UVC is configured for an OA damper operated by a floating-point actuator. The OA
damper actuator contains a spring that ensures the OA damper is closed upon loss of power.
The floating-point actuator is driven by the UVC using two binary (Triac) outputs. The OA
damper typically is open to the current minimum position during the occupied and bypass
occupancy modes and closed during the unoccupied and standby occupancy modes.
A Triac output is best tested under load using a 24 V relay for verification. To verify:
1 Put a relay across the Triac outputs.
2 Cycle the power.
3 Verify the relay’s closed contacts during calibration.
Minimum Position
The UVC is configured to maintain three OA damper minimum positions based on the
operation of the IAF fan. This allows each unit to be field configured to provide the amount of
fresh air required to the space at each of the three IA fan speeds.
Table 17: Default OA damper minimum positions
IAF speed
Without CO2
With CO2
High
20%
5%
Medium
25%
5%
Low
30%
5%
Note – If the CO2 Demand Controlled Ventilation (DCV) option is used, the UVC only uses the IA
fan high speed OA damper minimum position regardless of fan speed. The DCV function
adjusts the OA damper above this minimum as needed to maintain CO2 set point.
Economizer Operation
The economizer function is used by the UVC to determine if the OA is adequate for
economizer (primary) cooling. When both the economizer and mechanical cooling are
available, the economizer is used as primary cooling and the UVC adds mechanical cooling
only if the economizer is not adequate to meet the current cooling load (e.g., the OA damper
reaches 100% and cooling is still required).
The UVC supports three economizer functions:
• Basic (default)—Temperature Comparison Economizer
32
McQuay OM 751
Description of Operation
• Expanded (optional)—Temperature Comparison with OA Enthalpy Setpoint Economizer
(Strategy 1)
• Leading Edge (optional)—Temperature Comparison with Enthalpy Comparison Economizer
(Strategy 2)
Temperature Comparison Economizer (default)
If the default Basic economizer function is selected, the unit ventilator is provided from the
factory without the optional IA and OA humidity sensors. In this case, the UVC is factory set
for Economizer Strategy 1—the UVC automatically detects that no OA humidity sensor is
present and adjusts to use the Temperature Comparison Economizer function.
Temperature Comparison with OA Enthalpy Setpoint Economizer (optional)
If the optional Expanded economizer function is selected, the unit ventilator is provided from
the factory with the optional OA humidity sensor, which is used along with the OA
temperature sensor to calculate OA enthalpy. In this case, the UVC is factory set for
Economizer Strategy 1 and uses the Temperature Comparison with OA Enthalpy Setpoint
Economizer function.
Note – Temperature Comparison with OA Enthalpy Setpoint Economizer requires an optional OA
humidity sensor.
Temperature Comparison with Enthalpy Comparison Economizer (optional)
If the optional Leading Edge economizer function is selected, the unit ventilator is provided
from the factory with both the IA humidity and OA humidity sensors, which are used along
with the IA temperature and OA temperature sensors to calculate IA enthalpy and OA
enthalpy. In this case, the UVC is factory set for Economizer Strategy 2 and uses the
Temperature Comparison with Enthalpy Comparison Economizer function.
Note – Temperature Comparison with Enthalpy Comparison requires both an optional OA
humidity sensor and an optional IA humidity sensor.
Table 18: Economizer enable/disable tests defined
Tests
A
B
C
D
Economizer
Enable test
Disable test
enable/disable tests
OA temp set point
EffectiveOATemp < (EconOATempSetpt – EconTempDiff)
EffectiveOATemp >= EconOATempSetpt
IA/OA differential temp EffectiveOATemp < (EffectiveSpaceTemp – 3.6°F – EconTempDiff) EffectiveOATemp >= (EffectiveSpaceTemp – 3.6°F)
EffectiveOAEnthalpy < (EconOAEnthalpySetpt –
OA enthalpy set point
EffectiveOAEnthalpy >= EconOAEnthalpySetpt
EconEnthalpyDiff)
IA/OA differential
EffectiveOAEnthalpy < (EffectiveSpaceEnthalpy –
EffectiveOAEnthalpy >= EffectiveSpaceEnthalpy
enthalpy
EconEnthalpyDiff)
Table 19: How economizer enable/disable tests are selected
Economizer
strategy
Space temp sensor
OA temp sensor
Unreliable
Don’t care
Reliable
Reliable
Don’t care
Unreliable
Reliable
Reliable
Space humidity
sensor
Don’t care
Don’t care
Don’t care
Don’t care
Expanded
Reliable
Reliable
Don’t care
Reliable
Leading Edge
Reliable
Reliable
Reliable
Reliable
Reliable
Reliable
Reliable
Reliable
Reliable
Unreliable
Reliable
Unreliable
Reliable
Reliable
Unreliable
Unreliable
All
Basic
OA humidity sensor
Don’t care
Don’t care
Unreliable
Reliable
Economizer enable/
disable tests
OA damper closed
OA damper closed
Test B
Test C
Test C and Either
Test B or Test A
Test D and Test B
Test B
Test B
Test B
Note: The hard-wired sensor and the equivalent input must both be unreliable for the value to be considered
unreliable.
McQuay OM 751
33
Description of Operation
Networked Space Humidity Sensor Capability
A networked space humidity sensor can be network interfaced with the Space Humidity Input
variable. When the Space Humidity Input variable is used (valid value), it automatically
overrides the hard-wired space humidity sensor (if present).
Networked Outdoor Humidity Sensor Capability
A networked outdoor humidity sensor can be network interfaced with the Outdoor Humidity
Input variable. When the Outdoor Humidity Input variable is used (valid value), it
automatically overrides the hard-wired outdoor humidity sensor (if present).
CO2 Demand Controlled Ventilation (optional)
Ventilation equipment typically uses fixed damper positions to determine the amount of OA
for proper ventilation within the space. Most commonly, the fixed position of the OA damper
is based on the maximum number of occupants the space is designed to accommodate.
However, this fixed OA damper operation ignores the fact that most spaces during the day
have varying occupancy levels and may only rarely reach maximum design occupancy levels.
This type of fixed damper control for ventilation is energy wasteful since you are treating OA
not actually needed for ventilation during low occupancy levels.
People produce CO2 when they breath; the CO2 level within the space has a direct relationship
with the number of people within that space.
The UVC can optionally be factory configured to provide CO2-based Demand Controlled
Ventilation (DCV). The CO2 DCV function is useful in saving the energy typically wasted in
treating OA not actually needed for ventilation within a space during occupancy levels below
maximum design. The CO2 DCV function uses a PI-loop control to adjust the OA damper
above the minimum position as needed to maintain the Space CO2 Setpoint (1200 PPM
default).
The minimum damper position used with CO2 DCV typically can be set at ~20% of the
minimum position that would be used without CO2 DCV. For example, if the minimum OA
damper position typically is 20% then when using CO2 DCV, you could set the new minimum
OA damper position as low as 4% (e.g., 20% × 0.20 = 4%). This new, smaller minimum OA
damper position then should provide enough ventilation to keep odors in check within the
space for most applications.
Note – The CO2 DCV function can increase the OA damper position past that required by the
economizer and vice versa.
– If odors within the space become a problem, increase the OA damper minimum position
as needed to eliminate these odors. It may be necessary with new construction or after
renovation to raise the minimum position for some time period to help reduce odor buildup due to the out-gassing of new construction material and then return the minimum OA
damper position at a later date.
– If the CO2 Demand Controlled Ventilation (DCV) option is used, the UVC only uses the IA
fan high speed OA damper minimum position regardless of fan speed. The DCV function
adjusts the OA damper above this minimum as needed. In this case, the IA fan high speed
OA damper minimum position is factory set at 5%.
Networked Space CO2 Sensor Capability
A networked space CO2 sensor can be network interfaced with the Space CO2 Input variable.
When the Space CO2 Input variable is used (valid value), it automatically overrides the hardwired space CO2 sensor (if present).
34
McQuay OM 751
Description of Operation
ASHRAE Cycle II
The UVC supports ASHRAE Cycle II operation. The basis of ASHRAE Cycle II is to
maintain the required minimum amount of ventilation whenever possible, which can be
increased during normal operation for economizer cooling or CO2 DCV control or reduced to
prevent excessively cold discharge air temperatures.
A discharge air temperature sensor is installed in all unit ventilators. If necessary, the
ASHRAE II control algorithm overrides room control and modifies the heating, ventilating,
and cooling functions (as available) to prevent the discharge air temperature from falling
below the VCLL set point.
Compressor Operation
The UVC is configured to operate the compressor as secondary (mechanical) cooling when the
economizer is available. When the economizer is not available and the compressor is
available, the UVC uses the compressor when cooling is required.
Compressor Envelope
The compressor envelope protects the compressor from adverse operating conditions that can
cause damage and or shortened compressor life by ending compressor operation if coil
temperatures exceed the defined operating envelope.
For self-contained units, the UVC is configured to monitor both the inside air/refrigerant and
outside air/refrigerant coil temperatures to prevent compressor operation under adverse
conditions.
For split-system units, the UVC is configured at the factory to only monitor the inside air/
refrigerant coil as part of the compressor envelope function.
Figure 23: Compressor envelope in self-contained units
Evaporator temperature
(indoor air coil)
DX cooling
160˚F (71.1˚C)
2
40˚F (4.4˚C)
1
28˚F (-2.2˚C)
120˚F (48.9˚C)
Condenser temperature
(outdoor air coil)
Area for compressor operation envelope.
1 Area where liquid slugging could occur.
2 Area where starving could occur.
Compressor Cooling Lockout
The UVC is configured to lockout compressor cooling when the OA temperature falls below
the Compressor Cooling Lockout set point (63.5°F/17.5°C). Below this point, only
economizer cooling is available.
McQuay OM 751
35
Description of Operation
Compressor Minimum On and Off Timers
The UVC is provided with minimum On (3-minute default) and minimum Off (5-minute
default) timers to prevent adverse compressor cycling.
Compressor Start Delay
The UVC is provided with a Compressor Start Delay configuration variable, which is intended
to be adjusted as part of the start-up procedure for each unit. This variable is used to delay
compressor operation each time the compressor is required.
Note – To prevent strain on a building’s electrical supply system from multiple unit compressors
all starting at the same time after a power failure or after an unoccupied-to-occupied
changeover, McQuay strongly recommends configuring each unit or groups of units at
start-up with different start delays.
Outdoor Air Fan Operation
The UVC is configured with a fan on delay that delays OA fan operation for a time period (10
seconds, default) after the compressor starts. The OA fan stops with the compressor.
Floating-Point Actuator Auto-Zero, Overdrive and Sync
The UVC at power-up auto-zeros all floating-point actuators (OA damper) before going into
normal operation to ensure proper positioning. During auto-zero, the unit remains off. The
actuators all open approximately 30% and then are driven full closed. The overdrive feature
then is used to continue forcing the actuators closed for one full stroke period. Once the
zeroing process is complete, normal unit operation begins.
The UVC is configured such that whenever a floating-point actuator is commanded to go to
0% or 100%, the UVC overdrives the actuator one full stroke period past the 0% or 100%
position to ensure proper positioning.
Additionally, the UVC is configured to sync all floating-point actuators once every six hours
of operation. To do this, the UVC forces the actuator to the closest rail position (0% or 100%),
uses the overdrive feature, and then returns to the required position. For example, if the
actuator is at 20% when the six-hour limit is reached, the UVC then forces the actuator to 0%,
overdrive for one full stroke and then returns to the 20% position.
36
McQuay OM 751
Description of Operation
External Binary Inputs
The UVC is provided with three binary inputs that provide the functions described below.
Figure 24: Binary inputs
Binary Inputs
3 sets of dry contacts to signal UVC
Input 1: Unoccupied (default)
Input 2: Remote shutdown
Input 3: Ventilation lockout (default)
or
Exhaust interlock system
These inputs each allow a single set of dry contacts to be used as a signal to the UVC. Multiple
units can be connected to a single set of dry contacts. For wiring examples, see MicroTech II
Unit Ventilator Controller IM 747.
Note – Not all of the functions listed can be used at the same time. The UVC is provided with
configuration parameters that can be adjusted to select which function is used for these
inputs where multiple functions are indicated below.
External Binary Input 1
This input can be configured as an unoccupied (default) or dew point/humidity signal.
Unoccupied Input Signal
This input allows a single set of dry contacts to be used to signal the UVC to go into
unoccupied or occupied mode. When the contacts close, the UVC goes into unoccupied mode.
When the contacts open, the UVC goes into occupied mode. Additional variables can effect
occupancy mode and override this binary input. See “Occupancy Modes” on page 24.
External Binary Input 2
This input can only be used for remote shutdown.
Remote Shutdown Input Signal
This input allows a single set of dry contacts to be used to signal the UVC to go into shutdown
mode. When the contacts close (shutdown), the UVC goes into shutdown mode. When the
contacts open. the UVC returns to normal operation. See “Special Purpose Unit Modes” on
page 21.
External Binary Input 3
This input can be configured as a ventilation lockout (default) or exhaust interlock signal.
Ventilation Lockout Input Signal
This input allows a single set of dry contacts to be used to signal the UVC to close the OA
damper. When the contacts close (ventilation lockout signal), the UVC closes the OA damper.
When the contacts open, the UVC returns to normal OA damper operation.
McQuay OM 751
37
Description of Operation
Exhaust Interlock Input Signal
This input allows a single set of dry contacts to be used to signal the UVC that an exhaust fan
within the space is energized. The UVC repositions the OA damper to a user adjustable
minimum position (Exhaust Interlock OA Damper Min Position Setpoint). When the contacts
close (exhaust fan on signal), the UVC uses the value defined by the Exhaust Interlock OA
Damper Min Position Setpoint as the new minimum OA damper position regardless of IA fan
speed. When the contacts open, the UVC returns to normal OA damper operation.
External Binary Outputs
The UVC is provided with three binary outputs that provide the functions described below.
Figure 25: Binary outputs
Binary Outputs
3 relay type outputs w/signal voltage
Output 1: Relay output for light signal
Output 2: Fault signal
Output 3: Exhaust fan operation (default)
or
Auxiliary heat device
These outputs are relay type outputs that are intended to be used with signal level voltages (24
VAC maximum) only. For wiring examples, see MicroTech II Unit Ventilator Controller IM
747.
Note – Not all of the functions listed can be used at the same time. The UVC is provided with
configuration parameters that can be adjusted to select which function will be used for
these outputs when multiple functions are indicated below.
External Binary Output 1
This output can only be used as a signal for space lights.
Lights On/Off Signal
This relay output provides one set of Normally Open dry contacts that can be used to signal
the operation of the space lights. When the UVC is in occupied, standby, or bypass occupancy
modes, the relay output signals the lights ON (contacts closed). When the UVC is in
unoccupied occupancy mode, the relay output signals the lights OFF (contacts open).
External Binary Output 2
This output can only be used as a fault signal.
Fault Signal
This relay output provides Normally Open, Normally Closed, and Common connections that
can be used to signal a fault condition. When a fault exists, the UVC energizes this relay
output. When the fault or faults are cleared, the UVC de-energizes this relay output.
External Binary Output 3
This output can only be used to signal exhaust fan operation (default) or operate an auxiliary
heat device.
38
McQuay OM 751
Description of Operation
Exhaust Fan ON/OFF Signal
This relay output provides one set of Normally Open dry contacts that can be used to signal
the operation of an exhaust fan. When the OA damper opens more than the Energize Exhaust
Fan OA Damper set point, then the relay output signals the exhaust fan ON (contacts closed).
When the OA damper closes below this set point, the relay output signals the exhaust fan OFF
(contacts open).
Auxiliary Heat Signal
This relay output provides one set of Normally Open dry contacts that can be used to operate
an auxiliary heat device. The UVC by default is configured to operate a Normally Open
auxiliary heat device (de-energize when heat is required), such as a wet heat valve actuator
with a spring setup to open upon power failure. However, the Auxiliary Heat Configuration
variable can be used to set the UVC to use a Normally Closed auxiliary heat device (energize
when heat is required), such as electric heat.
Table 20: Auxiliary heat start/stop calculation
Start/Stop
Auxiliary heat
starts when:
Auxiliary heat
stops when:
McQuay OM 751
Calculation
Primary Heat PI-Loop = saturated high (100%) for
more than two minutes
AND
EffectiveSpaceTemp ≤ EffectiveSetpoint –
AuxiliaryHeatStartDifferential
EffectiveSpaceTemp ≥ (EffectiveSetpoint –
AuxiliaryHeatStartDifferential) +
AuxiliaryHeatStopDifferential
39
UVC Input and Output Table
UVC Input and Output Table
All UVC input and output connections and their corresponding unit ventilator usage are shown
in the following table.
Table 21: Inputs and outputs, software model 05—DX cooling only
I/O
BO-1
BO-2
BO-3
BO-4
BO-5
BO-6
BO-7
BO-8
BO-9
BI-1
BI-2
BI-3
BI-4
BI-5
BI-6
BI-7
BI-8
BI-9
BI-10
BI-11
BI-12
AI-1
AI-2
AI-3
AI-4
AI-5
AI-6
Description
Inside Fan High
Inside Fan Medium
Electric Heat 1
Electric Heat 2
Electric Heat 3
External Output Option 2: Fault Indication1
Compressor2
Condensate Overflow
External Input Option 3:Ventilation Lockout (default) or Exhaust
Interlock3
External Input Option 2: Remote Shutdown3
External Input Option 1: Unoccupied (default)
DX Press Switch (NC)4
IA Temp. Sensor + T.O.
Remote Setpt. Adjust. Pot.
OA Coil DX Temp Sensor5
OA Temp Sensor
IA Coil DX Temp Sensor
DA Temp Sensor
Expansion board
xBO-1 External Output Option 1: Lights On/Off 1
External Output Option 3: Exhaust Fan On/Off (default) or
xBO-2
Auxiliary Heat 1
xBO-3 OA Damper Open
xBO-4 OA Damper Close
xBO-5
xBO-6
xBO-7 Outdoor Fan5
xBO-8 Inside Fan Low
xAI-1 IA Humidity Sensor6
xAI-2 OA Humidity Sensor6
xAI-3 Indoor CO2 Sensor6
xAI-4
1.
2.
3.
4.
Field selectable external output options (all possible options are shown).
This is the condensing unit on/off signal on split-systems.
Field selectable external input options (all possible options are shown).
DX pressures switch not installed on split-systems; this input is then wired
for constant no-fault condition.
5. Not installed or wired on split-systems.
6. Optional.
40
McQuay OM 751
Diagnostics and Service
Diagnostics and Service
The most important aspect of troubleshooting unit ventilator controls is to isolate the source of
the problem into one of two categories:
1 The problem resides within the UVC.
2 The problem is external to the UVC. Under most circumstances the problem is external to
the UVC.
Alarm and Fault Monitoring
The UVC is programmed to monitor the unit for specific alarm conditions. If an alarm
condition exists, a fault occurs. When a fault exists, the following occurs:
• The UVC indicates the fault condition by displaying the fault code on the keypad/display.
• The remote wall-mounted sensor (optional) LED flashes a pattern indicating that a fault
condition exists.
• The fault signal binary output energizes.
• The fault performs the appropriate control actions as described for each fault.
Manual reset faults can be reset in one of three ways:
• By cycling the unit power.
• Via the keypad/display menu.
• Via the network interface.
Table 22: Alarm and fault code summary
Keypad/
display fault
codes
1
Space Temp Sensor Failure
Auto
F0
2
DX Pressure Fault
2-Auto in 7 days, then Manual
F1
Compressor Envelope Fault
2-Auto in 7 days, then
3
F2
Manual*
4
Discharge Air DX Cooling Low Limit Indication
Auto
F3
5
Condensate Overflow Indication
Auto
F4
6
Space Coil DX Temp Sensor Failure
Auto
F5
7
Outdoor Temp Sensor Failure
Auto
F6
8
Discharge Air Temp Sensor Failure
Auto
F7
9
Water Coil DX Temp Sensor Failure
Auto
F8
10
Water-out Temp Sensor Failure
Auto
F9
11
Space Humidity Sensor Failure
Auto
FA
12
Outdoor Humidity Sensor Failure
Auto
Fb
13
Space CO2 Sensor Failure
Auto
FC
14
Not used
Fd
15
Not used
FE
16
Change Filter Indication
Manual
FF
17
EPROM Memory Indicator
Replace conroller board
EE
18
Configuration Display
Download file
-* Rev 1_27 has auto reset
Priority
McQuay OM 751
Fault description
Reset
41
Diagnostics and Service
Space Temp Sensor Failure (F0)
The Space Temp Sensor Failure fault occurs when the UVC detects open or short conditions
from the sensor.
Effect:
• Space fan de-energizes (unless in emergency heat mode).
• Compressor immediately de-energizes.
• Outdoor fan (if present) de-energizes.
• Outside air damper is forced closed.
• Electric heat stages are de-energized.
• Fault is indicated.
DX Pressure Fault (F1)
The DX Pressure Fault occurs when the UVC detects a switch open condition from the
refrigerant pressure switch.
Effect:
• Compressor immediately de-energizes.
• Outdoor fan (if present) de-energizes.
• Fault is indicated.
Compressor Envelope Fault (F2)
The UVC monitors refrigerant temperatures. The Compressor Envelope Fault occurs when the
UVC detects compressor operation that exceeded the allowed operating parameters.
Effect:
• Compressor immediately de-energizes.
• Outdoor fan (if present) de-energizes.
• Fault is indicated.
Cause:
• Poor air or water flow through the refrigerant coils. Check fans for proper rpm. Check air
filters.
• If the unit has a three-phase scroll compressor, check for proper electrical phasing.
• Refrigerant circuit component failure or improper adjustment. Check refrigerant pressures
and TXV adjustment.
• Coil sensors may have lost proper contact with the refrigerant coil. Check coil sensors.
Discharge Air DX Cooling Low Limit Indication (F3)
The Discharge Air DX Cooling Low Limit Indication fault occurs when the UVC detects a
low discharge air temperature (DAT < MCLL) during compressor cooling.
Effect:
• Compressor immediately de-energizes.
• Outdoor fan (if present) de-energizes.
• Fault is indicated (on earlier software versions).
42
McQuay OM 751
Diagnostics and Service
Condensate Overflow Indication (optional) (F4)
The Condensate Overflow Indication fault will occur when the UVC detects high condensate
levels within the units indoor coil drain pan.
Effect:
• Compressor is immediately de-energized if in cooling.
• Outdoor fan (if present) is de-energized.
• Fault is indicated.
Space Coil DX Temp Sensor Failure (F5)
The Space Coil DX Temp Sensor Failure fault occurs when the UVC detects open or short
conditions from the sensor.
Effect:
• Compressor immediately de-energizes.
• Outdoor fan (if present) de-energizes.
• Fault is indicated.
Outdoor Temp Sensor Failure (F6)
The Outdoor Temp Sensor Failure fault occurs when the UVC detects open or short conditions
from the sensor.
Effect:
• Outside air damper is forced closed.
• Compressor immediately de-energizes.
• Fault is indicated.
Discharge Air Temp Sensor Failure (F7)
The Discharge Air Temp Sensor Failure fault occurs when the UVC detects open or short
conditions from the sensor. Emergency heat mode is available during this fault condition.
Effect:
• Space fan is immediately de-energized (unless in emergency heat mode).
• Outside air damper is forced closed.
• Electric heat stages are de-energized.
• Compressor immediately de-energizes.
• Outdoor fan (if present) immediately de-energizes.
• Fault is indicated.
Outdoor Coil DX Temp Sensor Failure (F8)
The Outdoor Coil DX Temp Sensor Failure fault occurs when the UVC detects open or short
conditions from the sensor.
Effect:
• Compressor immediately de-energizes.
• Outdoor fan (if present) de-energizes.
• Fault is indicated.
McQuay OM 751
43
Diagnostics and Service
Space Humidity Sensor Failure (optional) (FA)
The Space Humidity Sensor Failure fault occurs when the UVC detects open or short
conditions from the sensor.
Effect:
• IA/OA Enthalpy comparison economizer (if used) is disabled.
• Dehumidification function (optional) is disabled.
• Fault is indicated.
Outdoor Humidity Sensor Failure (optional) (Fb)
The Outdoor Humidity Sensor Failure fault occurs when the UVC detects open or short
conditions from the sensor.
Effect:
• IA/OA Enthalpy comparison or OA Enthalpy economizer (if used) is disabled.
• Fault is indicated.
Space CO2 Sensor Failure (optional) (FC)
The Space CO2 Sensor Failure fault occurs when the UVC detects open or short conditions
from the sensor.
Effect:
• CO2 Demand Controlled Ventilation function is disabled.
• Fault is indicated.
Change Filter Indication (FF)
The Change Filter Indication fault occurs when the UVC calculates that the total fan run time
has exceeded the allowed number of hours since the last filter change.
Effect:
• Fault is indicated.
EPROM Memory Indicator (EE)
The EPROM Memory Indicator occurs when an unusual electrical event has scrambled the
EPROM memory within the controller board. In the event that this happens, the controller
board must be replaced.
Configuration Display (--)
The Configuration Display occurs when the display file “**.cfg” is incorrect or has not been
downloaded with the appropriate file from service tools.
Troubleshooting Temperature Sensors
The UVC is configured to use passive positive temperature coefficient (PTC) sensor whose
resistance increases with increasing temperature. The element has a reference resistance of
1035 ohms at 77°F (25°C). Each element is calibrated according to the tables shown.
Use the following procedure to troubleshoot a suspect sensor.
1 Disconnect both sensor leads from the UVC.
2 Using some other calibrated temperature sensing device, take a temperature reading at the
sensor location.
44
McQuay OM 751
Diagnostics and Service
3 Use the temperature reading from Step 2 to determine the expected sensor resistance from
Table 23.
4 Using a calibrated ohmmeter, measure the actual resistance across the two sensor leads.
5 Compare the expected resistance to the actual resistance.
6 If the actual resistance value deviates substantially (more than 10%) from the expected
resistance, replace the sensor.
Table 23: Temperature versus resistance
°F (°C)
–40 (–40)
–31 (–35)
–22 (–30)
–13 (–25)
–4 (–20)
5 (–15)
14 (–10)
23 (–5)
32 (0)
41 (5)
50 (10)
59 (15)
68 (20)
77 (25)
86 (30)
95 (35)
104 (40)
Resistance in ohms
613
640
668
697
727
758
789
822
855
889
924
960
997
1035
1074
1113
1153
°F (°C)
113 (45)
122 (50)
131 (55)
140 (60)
149 (65)
158 (70)
167 (75)
176 (80)
185 (85)
194 (90)
203 (95)
212 (100)
221 (105)
230 (110)
239 (115)
248 (120)
Resistance in ohms
1195
1237
1279
1323
1368
1413
1459
1506
1554
1602
1652
1702
1753
1804
1856
1908
Troubleshooting Humidity Sensors
The UVC is configured to use a 0–100% RH, 0–5 VDC, capacitive humidity sensor. Each
sensor is calibrated according to the table shown.
CAUTION
The humidity sensor is not protected against reversed polarity.
Check carefully when connecting the device or damage can
result.
Use the following procedure to troubleshoot a suspect sensor:
1 Disconnect the sensors output voltage lead from the UVC analog input.
2 Using some other calibrated humidity sensing device, take a humidity reading at the sensor
location.
3 Use the humidity reading from Step 2 determine the expected sensor voltage from
Table 24.
4 Using a calibrated multi-meter, measure the actual voltage across the yellow and white
sensor leads.
Wire color definitions:
White = ground
Yellow = output VDC
Blue = supply VDC
5 Compare the expected voltage to the actual voltage.
6 If the actual voltage value deviates substantially (more than 10%) from the expected
voltage, replace the sensor.
McQuay OM 751
45
Diagnostics and Service
Table 24: Humidity versus voltage.
RH (%)
10
15
20
25
30
35
40
45
50
VDC (mV)
1330
1475
1610
1740
1870
1995
2120
2235
2360
RH (%)
55
60
65
70
75
80
85
90
95
VDC (mV)
2480
2600
2730
2860
2980
3115
3250
3390
3530
Troubleshooting Carbon Dioxide (CO2) Sensors
The UVC is configured to use a 0–2000 PPM, 0–10 VDC, single beam absorption infrared gas
sensor. Each sensor is calibrated according to the table shown.
Use the following procedure to troubleshoot a suspect sensor.
1 Disconnect the sensors output voltage lead from the UVC analog input (xAI-3).
2 Using some other calibrated CO2 sensing device, take a CO2 reading at the sensor location.
3 Use the CO2 reading from Step 2 to determine the expected sensor voltage from Table 25.
4 Using a calibrated multi-meter, measure the actual voltage across the lead removed from
xAI-3 and ground.
5 Compare the expected voltage to the actual voltage.
6 If the actual voltage value deviates substantially (more than 10%) from the expected
voltage, replace the sensor.
In the unlikely event that the CO2 sensor requires calibration, consult the factory for
information on obtaining calibration equipment and instructions.
Table 25: CO2 versus voltage table
CO2 (PPM)
300
400
500
600
700
800
900
1000
46
VDC (V)
1.5
2.0
2.5
3.0
3.5
4.0
4.5
5.0
CO2 (PPM)
1200
1300
1400
1500
1600
1700
1800
1900
VDC (V)
6.0
6.5
7.0
7.5
8.0
8.5
9.0
9.5
McQuay OM 751
UVC Configuration Parameters
UVC Configuration Parameters
The UVC is been provided with a number of configuration variables as listed in the following
table. These configuration variables are stored in UVC non-volatile memory. For a description
of supported network variables for each protocol, refer to Protocol Data Packet bulletin ED
15065.
Table 26: UVC configuration parameters (OM 751)
Configuration Parameter Name
Abr.
Notes
Default
Occupied Cooling Setpoint
OCS
73°F (23°C)
Standby Cooling Setpoint
SCS
77°F (25°C)
Unoccupied Cooling Setpoint
UCS
82°F (28°C)
Occupied Heating Setpoint
OHS
70°F (21°C)
Standby Heating Setpoint
SHS
66°F (19°C)
Unoccupied Heating Setpoint
UHS
61°F (16°C)
Local Bypass Time
Tenant override
2
Space CO2 Setpoint
Space Humidity Setpoint
CO2S
2
RHS
Emergency Heat Enable
Emergency Heat Setpoint
used with both active (reheat) and passive dehumidification
sequences
0 = disable, 1 = enable (uses auxiliary heat where primary heat is
not applicable)
EHS
0 = no emergency heat during shutdown, 1 = emergency heat
available during shutdown
0 = +/- 3°F, 1 = 55°F to 85°F
Slave Type Configuration2
0 = independent slave, 1 = dependent slave
OAD Min Position High-Speed Setpoint
(this variable will be factory set to 5% open when the unit is ordered
with optional CO2 DCV)
(this variable is ignored when the unit is ordered with optional CO2
DCV)
(this variable is ignored when the unit is ordered with optional CO2
DCV)
OA damper minimum position when the exhaust interlock input is
energized
defines position above which exhaust fan output will be energized
OAD Min Position Med-Speed Setpoint
OAD Min Position Low-Speed Setpoint
Exhaust Interlock OAD Min Position
Setpoint
Energize Exhaust Fan OAD Setpoint
OADM
OADL
EOAD
OADE
OAD Max Position Setpoint
OAMX
OAD Lockout Enable
0 = disable, 1 = enable (this variable will be factory set to 1 when
the unit is ordered as a recirc unit with no OAD)
OA temperature below which the OA damper will remain closed
OALS (this variable will be factory set to –99°C when the unit is ordered
as a recirc unit with no OAD)
0 = disable, 1 = enable
OAD Lockout Setpoint
Economizer Enable
120 min
60% Rh
1
H1
54°F (12°C)
H2
0
H3
0
0
r5
SL
20% open
o2
25% open
o3
30% open
o4
99% open
o5
12% open
99% open
o6
o7
0
o8
36°F (2°C)
o9
1
E1
E2
e3
e5
e6
B3
B6
CE
Economizer OA Temp Setpoint
ETS
68°F (20°C)
Economizer IA/OA Temp Differential
ETD
2°F (1°C)
Economizer OA Enthalpy Setpoint
EES
25 btu/lb (58 kJ/kg)
Economizer IA/OA Enthalpy Differential
EED
1.3 btu/lb (3 kJ/kg)
External BI-3 Configuration
0 = Ventilation Lockout, 1 = Exhaust Interlock
0
External BO-3 Configuration
0 = Exhaust Fan On/Off, 1 = Auxiliary Heat
0
Filter Alarm Enable
0 = disable, 1 = enable
0
Filter Change Hours Setpoint
fan run hours between filter change alarms
McQuay OM 751
Co
C5
CU
Ho
H5
HU
1200 PPM
Emergency Heat Shutdown
Configuration
Wall Sensor Type2
OADH
LUI Menu
Item1
700 hrs
47
UVC Configuration Parameters
Configuration Parameter Name
Abr.
Notes
Primary Cool Proportional Band
Default
18°F (10°C)
Primary Cool Integral Time
180 sec
Secondary Cool Proportional Band
18°F (10°C)
Secondary Cool Integral Time
600 sec
Discharge Air Temp Proportional Band
4°F (2.22°C)
Discharge Air Temp Integral Time
300 sec
CO2 Proportional Band2
100 PPM
CO2 Integral Time2
600 sec
Ventilation Cooling Low Limit Setpoint
VCLL discharge air low limit during ventilation or economizer cooling
54°F (12°C)
Mechanical Cooling Low Limit Setpoint MCLL discharge air low limit during mechanical (compressor) cooling
45°F (7°C)
Discharge Air High Limit
DAHL
30 sec
Fan Cycling Configuration
Space Fan Speed Changes Per Hour
Space Fan Run Time Reset
Compressor Run Time Reset
Compressor Enable
space fan operation during occupied, standby and bypass
occupancy modes: 2 = continuous, 3 = cycle
example: 6/60min = 10min (maximum of 1 fan speed change every
10min when fan in auto)
reset total run time: 1 = reset (you must return the variable back to
0 after reset)
reset total run time: 1 = reset (you must return the variable back to
0 after reset)
0 = disable, 1 = enable
CF
2
6
0
0
C!
1
Compressor Minimum On Time
180 sec
Compressor Minimum Off Time
300 sec
Compressor Cooling Lockout Setpoint
CCLO OA temperature below which compressor cooling is not allowed
Compressor Envelope Cool Max In
63.5°F (17.5°C)
120°F (48.89°C)
Compressor Envelope Cool Min In
28°F (-2.22°C)
Compressor Envelope Cool Max Out
160°F (71.11°C)
Compressor Envelope Cool Min Out
40°F (4.44°C)
Compressor Envelope Cool Max Ratio
0.00
Compressor Envelope Cool Max Offset
88°F (48.89°C)
Compressor Envelope Cool Min Ratio
0.0
Compressor Envelope Cool Min Offset
-4°F (-2.22°C)
Auxiliary Heat Start Differential
AHSD degrees above auxiliary heat start point where auxiliary heat ends
2°F (1°C)
Auxiliary Heat End Differential
AHED degrees above auxiliary heat start point where auxiliary heat ends
2°F (1°C)
Auxiliary Heat Configuration
2
Outdoor Humidity Sensor Enable2
48
d2
d3
140°F (60°C)
Space Fan Off Delay
Space Humidity Sensor Enable
LUI Menu
Item1
0 = normally open heat device (hot water valve, etc.),
1 = normally closed heat device (electric heat, etc.)
0 = disable, 1 = enable (this variable will be factory set to 1 when
the unit is ordered with optional humidity sensor)
0 = disable, 1 = enable (this variable will be factory set to 1 when
the unit is ordered with optional humidity sensor)
0
A1
A2
A3
0
0
McQuay OM 751
UVC Configuration Parameters
Configuration Parameter Name
Abr.
Notes
OAD Stroke Time
Split-System OA/DX Coil Temp
Default
LUI Menu
Item1
90 sec
used on split-system units only to partially disable the compressor
envelope by setting the outside DX coil temperature to a fixed valid
value, enter 122°F (50°C) on split-systems, use 327.67 for selfcontained units (327.67 = invalid)
327.76
adjust the compressor delay used to prevent multiple compressor
units from starting simultaneously (each unit or group of units
should have a different delay setting)
0 sec
Application Name and Version Label
Compressor Start Delay
Outdoor Fan Delay
C6
10 sec
1. Indicates parameters accessible through the keypad/display.
2. Requires optional equipment.
McQuay OM 751
49
McQuay Training and Development
Now that you have made an investment in modern, efficient McQuay equipment, its care should be a high priority.
For training information on all McQuay HVAC products, please visit us at www.mcquay.com and click on training, or
call 540-248-9646 and ask for the Training Department.
Warranty
All McQuay equipment is sold pursuant to its standard terms and conditions of sale, including Limited Product
Warranty. Consult your local McQuay Representative for warranty details. Refer to Form 933-43285Y. To find your
local McQuay Representative, go to www.mcquay.com.
This document contains the most current product information as of this printing. For the most up-to-date product
information, please go to www.mcquay.com.
© 2006 McQuay International • www.mcquay.com • 800-432-1342