1
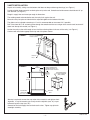
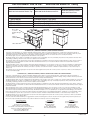
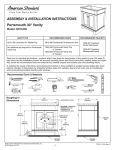
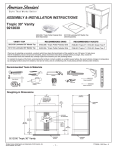
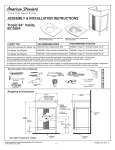
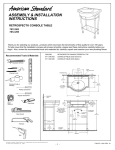
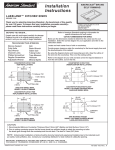
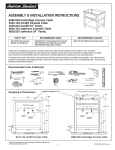
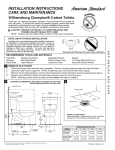
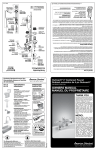
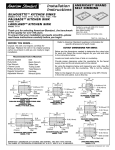
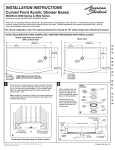
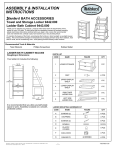
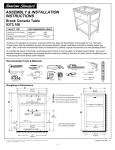
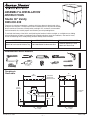
ASSEMBLY & INSTALLATION
INSTRUCTIONS
Studio 30" Vanity
9205.030.339
Thank you for selecting our products...products which have been the benchmarks of fine
quality for over 100 years. To help insure that the installation process will proceed smoothly,
please read these instructions carefully before you begin. Also, review the recommended
tools and materials list; carefully unpack and examine your new plumbing fixture.
To maintain the beauty of the finish, avoid placing the furniture in direct sunlight, as sunlight causes fading.
Also avoid extreme changes in temperature by arranging furniture away from radiators, heat and air vents,
and air conditioning units. Avoid placing furniture directly under windows.
VANITY TOP
9205.130 Laminated 30" Marble Top
RECOMMENDED SINKS
RECOMMENDED FAUCETS
0614.000 Studio Undercounter Sink
2506.201 Moments Faucet
2064.101P Deck Plate
Recommended Tools & Materials
Adjustable Wrench
Channel Locks
Drill
Pipe Wrench
Hacksaw
Basin Wrench
Phillips Screwdriver
Putty Knife
Plumbers’ Putty
or Caulking
Tape
Measure
Regular Screwdriver
Tubing Cutter
Level
Roughing-in
Dimensions
30"
(762mm)
35-1/4"
(895mm)
LAMINATED
MARBLE TOP
UNDERMOUNT SINK
7-1/2"
(191mm)
22"
(559mm)
8"
(203mm)
FINISHED
WALL
1-1/4" (32mm)
O.D. WASTE
24"
22" (610mm)
(559mm)
6-1/4"
(159mm)
FINISHED
FLOOR
Product names listed herein are trademarks of AS America, Inc.
© AS America, Inc. 2008
- 1 -
FINISHED
FLOOR
770013-100
VANITY INSTALLATION
Unpack unit carefully, taking care that bottom shelf does not drop and damage front legs (see Figure 2).
Provide suitable reinforcement for anchoring the vanity to the wall. Centerline of reinforcement should be 33-1/2" up
from the floor (see Figure 1).
Rough in supply lines and waste per rough-in dimensions.
The molding needs to be notched to seat the vanity flush against the wall.
Move the vanity into place and level with the adjustable glides on the bottom of the feet.
The glides can be adjusted outward up to 1" but it is recommended not to exceed 1/2" if possible.
Drill at least two 3/8" O.D. anchoring holes through the centerline of the rear stringer of the vessel stand, located 3/4"
down from the top of the table (see Figure 2).
Anchor the vanity to the wall through at least 2 of the anchoring holes in the rear of the vanity (see Figure 2).
Continue with installation appropriate for top and sink options chosen.
FIGURE 1
C/L of 2 x 6
Reinforcement
33-1/2"
(851mm)
Finished
Floor
FIGURE 2
22"
(559mm)
REAR STRINGER WITH
ANCHORING HOLES TO
SECURE VANITY TO WALL
4-1/4"
(108mm)
ANCHORING HOLES
IN REAR STRINGER
[NOT SHOWN]
35-1/4"
(895mm)
FINISHED
WALL
ADJUSTABLE
LEVELLERS
(under each foot)
After top is replaced, connect the trap to the drain assembly hand tight to check
alignment. It may be necessary to cut off part of the tailpiece (area "A") or part
horizontal leg of the trap (area "B").
B
A
Connect hot and cold supply lines to the shut off valves. Tighten trap joints for
watertight assembly.
770013-100
- 2 -
MARBLE TOP 9205.130.250 WITH STUDIO 0614 UNDERMOUNT SINK
Two people recommended for this installation
A
NOTE: Marble top comes pre-cut for the Studio Under Counter mount sink and 8"
faucet spread. Also it is strongly recommended that the marble top be sealed after
installation and prior to use.
Mount the drain assembly (not included) on the sink. Be certain to apply a bead of
sealing putty on the underside of the drain (Part "A") in order to ensure a watertight seal
between the sink and drain. Remove excess putty after installing the drain on the sink.
Turn the marble top upside down and place it on a clean, scratch
resistant surface. Apply a bead of silicone adhesive to the rim of
the sink. Center the sink over the cutout and (secure it to the top
using the mounting kit provided).
NOTE:
Use the 4 brackets supplied with the sink mounting kit
and the 4 screws supplied with the marble top to secure the sink to
the underside of the marble top.
Turn the top right-side up and install the faucet per the manufacturer’s instructions.
Apply a bead of silicone adhesive to the rim of the vanity. Place the marble top
centered left to right on the vanity and with the back edge of the top even with the
rear of the vanity. Clean up any excess silicone.
Connect the trap to the drain assembly hand tight to check alignment. It may be
necessary to cut off part of the tailpiece (area "A") or part horizontal leg of the
trap (area "B").
B
A
Connect hot and cold supply lines to the shut off valves. Tighten trap joints for
watertight assembly.
Care and Cleaning of Vanity
Clean the product by using soft, slightly damp cloth. Buff the product by using a soft dry cloth. Avoid using silicone
cleaners and waxes.
Clean up excess water and spills immediately. Use a blotting rather than a wiping action. Water left over a long period of
time will cause white spots in the finish.
NOTE: Please note that some chemicals may damage the finish. Take care to avoid the following: iodine, hair dye, after
shave lotion, shaving cream, alcohol, perfume, Lestoil®, Lysol Tub and Tile Cleaner®, Lysol Spray Disinfectant®, Dow
Disinfectant®, acetone, paint remover, Formula 409®, Tile-X®, and Nair®.
Care and Cleaning of the Marble Vanity Top
Marble is porous and easily stained. Wipe off anything spilled on it immediately. It should be washed or cleaned regularly
with fresh warm water and a non-abrasive clean cloth. Also, using a non-abrasive, neutral (pH balanced) cleaner will help
remove dirt and grime, but it is recommended to first try warm water only.
Marble should be sealed regularly with a good quality marble sealer. Marble sealers are available at most retail home
supply stores. Follow the instructions on the sealer container for proper application and frequency of use. The sealer acts
as a stain inhibitor and prevents most stains and soil from being absorbed into the porous surface, but it is NOT a
guarantee against staining. All spills should be cleaned immediately. Avoid contact with all oils and petroleum-based
products. Also, avoid contact with all acid or caustic products such as vinegar, citrus or fruit juices, soda, chlorine, and nail
polish remover. If the marble is well sealed, the warm water and non-abrasive cloth should keep it clean.
- 3 -
770013-100
REPLACEMENT PARTS LIST
VANITY TOP
9205.130 Laminated 30" Marble Top
REPLACEMENT PART NO.
730679-0070A
770003-0070A
770004-2950A
770005-2950A
Door opens
to access
Gallery /Storage
Rail
9205.030.339 Studio 30" Vanity
RECOMMENDED SINKS
RECOMMENDED FAUCETS
0614.000 Studio Undercounter Sink
2506.201 Moments Faucet
2064.101P Deck Plate
DESCRIPTION
Threaded Leveller (1 per pack)
Glass Shelf - Studio 30" Vanity
Metal Gallery Rail / Left Hand - Studio 30" Vanity
Metal Gallery Rail / Right Hand - Studio 30" Vanity
Laminated
Marble Top
Metal
Gallery Rail
Glass Shelf
AS AMERICA, INC. (“AMERICAN STANDARD”) WOOD FURNITURE WARRANTY
If inspection of this AS America, Inc. (“American Standard”) plumbing product, within one year after its initial purchase, confirms that it is defective in materials or
workmanship, American Standard will repair or, at its option, exchange the product for a similar model. Variations in actual wood color and finishes which may result
from natural characteristics of the wood, such as grain patterns, mineral streaks and the like, are not defects and are not covered by this warranty.
This warranty applies only to the original purchaser and installation of these products.
This limited warranty does not apply to local building code compliance. Since local building codes vary considerably, the purchaser of this product should check with a
local building or plumbing contractor to insure local code compliance before installation.
This warranty shall be void if the product has been moved from its initial place of installation; if it has been subjected to faulty maintenance, abuse, misuse, accident or
other damages; if it was not installed in accordance with American Standard’s instructions; or if it has been modified in a manner inconsistent with the product as
shipped by American Standard.
American Standard’s option to repair or exchange the product under this warranty does not cover any labor or other costs of removal or installation, nor shall American
Standard be responsible for any other incidental or consequential damages attributable to a product defect or to the repair or exchange of a defective product, all of
which are expressly excluded from this warranty. (Some states or provinces do not allow the exclusion or limitation of implied warranties, so this exclusion may not
apply to you).
This warranty gives you specific legal rights. You may have other statutory rights that vary from state to state or province to province, in which case this warranty does
not affect such statutory rights.
AS AMERICA, INC. (“AMERICAN STANDARD”) MARBLE / GRANITE VANITY/TABLE TOP LIMITED WARRANTY
If inspection of this AS America, Inc. (“American Standard”) plumbing product, within one year after its initial purchase, confirms that it is defective in materials or
workmanship, American Standard will repair or, at its option, exchange the product for a similar model. Variations in shading, veining, and texture which may result from
natural characteristics of stone and as such are not defects and are not covered by this limited warranty.
This limited warranty applies only to the original purchaser and installation of these products. In the event of a claim, proof of purchase will be required; save your receipt.
This limited warranty does not apply to local building code compliance. Since local building codes vary considerably, the purchaser of this product should check with a
local building or plumbing contractor to insure local code compliance before installation.
This limited warranty is void if the product has been moved from its initial place of installation; if it has been subjected to faulty maintenance, abuse, misuse, accident or
other damages; if it was not installed in accordance with American Standard’s instructions; or if it has been modified in a manner inconsistent with the product as shipped
by American Standard.
American Standard’s option to repair or exchange the product under this limited warranty does not cover any labor or other costs of removal or installation, nor shall
American Standard be responsible for any other incidental or consequential damages attributable to a product defect or to the repair or exchange of a defective product,
all of which are expressly excluded from this limited warranty. This limited warranty does not cover any liability for consequential or incidental damages, all of which are
hereby expressly disclaimed, or the extension beyond the duration of this limited warranty of any implied limited warranties, including those of merchantability or fitness
for an intended purpose. (Some states or provinces do not allow the exclusion or limitation of implied limited warranties, so this exclusion may not apply to you).
This limited warranty gives you specific legal rights. You may have other statutory rights that vary from state to state or province to province, in which case this limited
warranty does not affect such statutory rights.
For service under these limited warranties, it is suggested that a claim be made through the contractor or dealer from or through whom the product was purchased, or
that a service request (including a description of the product model and of the defect) be sent to the following address:
In the United States:
American Standard Inc.
P.O. Box 6820
Piscataway, New Jersey 08855
Attention: Director of Consumer Affairs
For residents of the United States, warranty information
may also be obtained by calling the following
toll free number: (800) 442-1902
www.americanstandard-us.com
In Canada:
American Standard
2480 Stanfield Rd.
Mississauga, Ontario
Canada L4Y 1S2
Toll Free: (800) 387-0369
www.americanstandard.ca
-4-
In Mexico:
Customer Service Manager
Ideal Standard, S.A. de C.V.
Via Morelos #330
Col. Santa Clara
Ecatepec 55540 Edo. Mexico
www.americanstandard.com.mx
770013-100