1
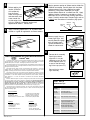
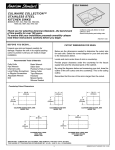
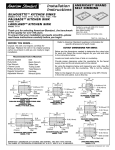
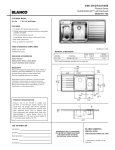
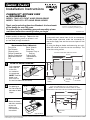
M
™
ADE WITH
Installation Instructions
Right Hand
Drain Board
CHANDLER™ KITCHEN SINK
w/DRAINBOARD
MODEL 7048.401 RIGHT HAND DRAIN BOARD
MODEL 7048.501 LEFT HAND DRAIN BOARD
Left Hand
Drain Board
Thank you for selecting American-Standard...the benchmark
of fine quality for over 100 years.
To ensure that your installation proceeds smoothly--please
read these instructions carefully before you begin.
BEFORE YOU BEGIN...Unpack new sink and
inspect carefully for damage. Replace the sink
in its original packing carton to protect it until
you are ready to begin installation.
Recommended Tools & Materials
Putty Knife
Pipe Wrench
Channel Locks
Phillips Screwdriver
Regular Screwdriver
Adjustable Wrench
Drill
1
2
Basin Wrench
Saber Saw
Plumbers' Putty or
Caulking
Tubing Cutter
Tape Measure
Hacksaw
AFTER THE CUTOUT IS DRAWN...
Drill a clearance
Perimeter
hole inside the
of sink
cutout line
as marked on
the countertop.
NOTE: The drainboard is not
part of the cut
out and sits above the countertop.
Cut opening on
cut line inside the
perimeter of bowl
shape.
Certified to comply with ANSI Z124.6
Observe local plumbing and building codes.
790760-100
CUTOUT DIMENSIONS FOR SINK
Locate and mark center lines of sink on countertop.
Provide proper clearance under the countertop for
the faucet supply lines and the structural parts of the
cabinet.
By using the diagram below and measuring your sink,
draw the outline of the sink onto the countertop. This
is not the cutting outline.
CUTOUT FOR NEW INSTALLATION
49-1/2"
35"
32"
10-1/2"
RIGHT
HAND
DRAIN
BOARD
21"
Cutout
CUTTING
LINE
(SHADED
AREA)
1/2"TYP.
SINK
OUTLINE
C/L OF
DOUBLE
BOWL
MODIFICATION REQUIRED TO FIT CHANDLER SINK
INTO A STANDARD 33" X 22" SINK CUTOUT
NOTE: ALLOW ROOM ON EITHER SIDE OF SINK
DEPENDING ON RIGHT OR LEFT HAND DRAIN BOARD
Perimeter
of sink
35"
1-1/2"
Cutout
3
22"
32"
10-1/2"
19-1/2"
Mount the faucet
and drain assembly
on the sink
following the
manufacturer's
instructions.
21"
a d iu
21" R
s
CENTER LINE
d iu
21" Ra
s
19-1/2"
CUTTING
LINE
Right Hand Shown
Product names listed herein are trademarks of American Standard Inc. unless otherwise noted.
Corian® Dupont registered trademark
© American Standard Inc. 2000
4
5
6
Before applying the
sealant, place the
sink temporarily
into the cutout.
Check for alignment
and clearance, then
Right Hand Shown
trace around the
outside edge of the
sink as a guide for installation location and
application of sealant. Remove sink.
Apply a generous portion of silicone sealant inside line
traced on countertop. Carefully lower sink into place
and press down firmly. Use guidelines for proper
positioning. Using water to dampen your finger,
remove excess sealant for a smooth even line. Apply
additional sealant if necessary to provide a uniform
bead from the rim of sink to the masking tape line as
shown. Carefully remove tape. Dampen finger and run
it slightly over the sealant to remove any high spots.
Masking
Tape
Silicone
Sealant
Sink
Apply a masking tape outline 1/8" outside traced
outline as a guide for application of silicone sealant.
7
Cutout
Masking
1/8"
tape
outline
Sink
outline
Connect supply lines to
faucet finger tight, and
carefully bend to engage
with the supply stops.
Tighten connections to
faucet for secure seal.
Right Hand Shown
8
AMERICAN STANDARD TEN-YEAR LIMITED WARRANTY
CORIAN® SINK
If inspection of the Corian Sink of this American Standard product, within ten years after
its initial purchase, confirms that it is defective in materials or workmanship, American
Standard will repair or, at its option, exchange the product for a similar model.
This warranty applies only to the original purchaser and installation of these products. All
labor and transportation costs or charges incidental to warranty service are to be borne by
the original consumer-purchaser.
This limited warranty does not apply to local building code compliance. Since local
building codes vary considerably, the purchaser of this product should check with a local
building or plumbing contractor to insure local code compliance before installation.
Connect drain assembly
hand tight to check
alignment. It may be
necessary to cut off part
of the tailpiece (area "A")
or part of the horizontal
leg of the trap (area "B").
Secure joint for watertight assembly.
This warranty shall be void if the product has been fabricated or modified in a manner
inconsistent with the product as shipped by American-Standard; moved from its initial place
of installation; if it has been subjected to faulty maintenance, abuse, misuse, accident or
other damages; or if it was not installed in accordance with American Standard's
instructions.
Trap
Right Hand Shown
American Standard's option to repair or exchange the product under this warranty does
not cover any labor or other costs of removal or installation, nor shall American Standard
be responsible for any other incidental or consequential damages attributable to a
product defect or to the repair or exchange of a defective product, all of which are
expressly excluded from this warranty. (Some states or provinces do not allow the
exclusion or limitation of implied warranties, so this exclusion may not apply to you.)
Corian® Care &
Maintenance Tips
This warranty gives you specific legal rights. You may have other statutory rights that
vary from state to state of from province to province, in which case this warranty does not
affect such statutory rights.
In the United States:
American Standard Inc.,
P. O. Box 6820
Piscataway, NJ 08855
Attention: Director of Consumer Affairs
In Mexico:
Customer Service Manager
Ideal Standard, S.A. de C.V.
Via Morelos #330
Col. Santa Clara
Ecatepec 55540 Edo. Mexico
Cleaning
For residents of the United States,
warranty information may also be
obtained by calling the following
toll free number: (800) 223-0068
In Canada:
American-Standard,
2480 Stanfield Road,
Mississauga, Ontario
Canada L4Y 1S2
Toll free: (800) 387-0369
Toronto Area: (905) 949-4800
Most dirt
and stains
Use soapy water or
ammonia-based cleaner.
Water
marks
Wipe with damp cloth; towel dry.
Difficult
stains
Use an abrasive cleanser and
a green Scotch-Brite* pad.
Disinfecting
Occasionally wipe surface with
diluted household bleach
(1 part water/1 part bleach).
Maintenance
Rub with Scotch-Brite* pad alone.
*Registered trademark of the 3M Company
790760-100
B
A
2