1
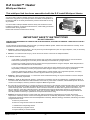
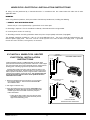
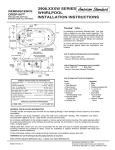
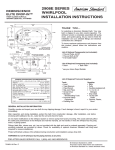
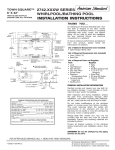
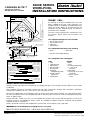
6060E SERIES
WHIRLPOOL
INSTALLATION INSTRUCTIONS
CADENZA ELITE™
HIGH GLOSS ACRYLIC
SHOWN LESS ALL FITTINGS
1949mm
(76-3/4 REF.)
m
m 6)
05 /1
16 3-3
(6
m
m )
84 1/2
13 54(
C/L
OUTLINE OF
CUTOUT
PROVIDE ACCESS TO PUMP FOR SERVICE
ON ALL INSTALLATIONS
NOTE: APRON ASSEMBLY WILL PROVIDE REQUIRED
ACCESS FOR SERVICING
975mm
(38-3/8)
SEAT AREA
1661mm
(65-3/8)
PUMP
178mm x 381mm
(7 x 15) CUTOUT
346mm
(13-5/8)
ON/OFF SWITCH
● RECOMMENDED FITTING
143mm
(5-5/8)
LOCATION 64 X 381mm (2-1/2 X 15)
C/L OF
DRAIN
254mm
(10)
114mm
(4-1/2)
C/L OF OVERFLOW
89mm
(3-1/2)
■ LEVELING STRINGER
NOT FOR SUPPORT
E-Z INSTALL WHIRLPOOL
HEATER
495mm
(19-1/2)
51mm
(2)
546mm
(21-1/2)
83mm
(3-1/4)
38mm
(1-1/2)
INTEGRAL FEET
SUPPORT
1-1/2 N.P.T. THREAD
To insure maximum performance and pleasure from
this product, please follow the instructions and
cautions.
List of Optional Components (not included):
• Flex-Jet Pulse Jet Kit*
• Flex-Jet Soft Jet Kit*
• Apron Kit*
• Tile Bead Kit*
List of Required Components (not included):
• Drain*
• Bath Filler*
* see your Home Depot Retailer
List of Required Tools and Supplies:
GENERAL SPECIFICATIONS FOR 6060E WHIRLPOOL
76-3/4 x 65-3/8 x 21-1/2 In. (1949 x 1661 x 546mm)
INSTALLED SIZE
105 Lbs. (48 Kg.)
WEIGHT
822 Lbs. (370 Kg.)
WEIGHT w/WATER
86 Gal. (326 L)
GAL. TO OVERFLOW
71 Gal. (269 L)
WHIRLPOOL MIN. OPERATING VOL.
45 x 40 In. (1143 x 1016mm)
BATHING WELL AT SUMP
49 x 43 In. (1245 x 1092mm)
BATHING WELL AT RIM
15-3/8 In. (391mm)
WATER DEPTH TO OVERFLOW
24 Lbs./Sq.Ft. (114 Kgs./Sq.m)
FLOOR LOADING
(PROJECTED AREA)
41.7
PTS.
CUBE (FT 3 )
68.4
WHIRLPOOL ELECTRICAL SPECIFICATIONS
E-Z INSTALL WHIRLPOOL HEATER
for selecting an American Standard bath. Your new
bath is shipped to you after careful inspection. The
whirlpool version is completely assembled with pump,
motor, and system piping. All you need to finish the
installation are your selected fittings and electrical
connections for a whirlpool.
ROUGH FLOOR
1-1/2 O.D. TAILPIECE
PUMP
THANK YOU...
Tools
• Level
• Tape Measure
• Pipe Wrench
• Slip Joint Pliers
• Screw Driver
• Standard
Woodworking Tools
• Personal Safety
Equipment
• Caulking Gun
Supplies
• Nails
• Putty
• Caulking (waterproof)
• 1 x 3 or 2 x 2
Stringers
• Drop Cloth
• 15 amp GFI & 20 amp
GFI Outlet
• Cement, Plaster,
Grout
2.1 HP, 14.4 AMPS,120V.
12.0 AMPS,120V.
GENERAL INSTALLATION INFORMATION
Carefully uncrate and inspect your new bath for any shipping damage. If such damage is found, report it to your vendor
immediately.
After inspection and during installation, protect the bath from construction damage. After installation, and before
enclosing with wallboard, tile, etc., water test the unit and check for leaks.
Do not make modifications to the whirlpool system or remove pump from factory mounting. This could adversely affect
the safety and performance of the whirlpool and void the warranty. Do not handle or move the whirlpool by the pump,
motor, or piping system.
Fittings (bath filler, shower arm, etc.) are not provided with the bath and must be ordered separately. Framing and
enclosing materials are provided by others. Check for availability of optional American Standard wall tiling bead
(required for recess installations).
Protect all finished surfaces of the whirlpool during construction and installation using a drop cloth.
WARNING! Do not lift whirlpool by the piping harness at any time.
FOR AFTER-SALES SERVICE CALL 1 (800) 442-1902 WEEKDAYS.
752864-100 Rev. C
© American Standard Inc. 2003
All product names listed herein are trademarks
of American Standard Inc. unless otherwise noted.
INSTALLATION AND FRAMING INSTRUCTIONS
The variety of installations possible for this whirlpool may require framing procedures other than those shown. Locate studs
as required. Ensure roughing-in dimensions are proper, plumb and square. Provisions must be made in all installations for an
access opening for servicing the pump and controls. It is strongly recommended that an additional opening be provided for
access to the drain components.
NOTE: The apron should not be used as the primary access opening.
1. Position the whirlpool into the installation opening and level the deck, shimming the integral support feet as necessary.
Mark the final position of the underside of the deck by tracing a line on to the studs (see Figure 1).
2. Remove the whirlpool and attach a 2 x 4 stringer to the studs, with the top of the stringer touching the traced line.
3. Install drain components to the whirlpool following the manufacturers instructions. Before replacing your whirlpool for final
installation, be certain that an opening has been provided in the sub-floor for the drain. See the roughing-in drawing for
suggested opening size and location dimensions.
4. Replace whirlpool and re-shim the integral support feet, shimming the entire length of the support feet. Secure the shims
using construction adhesive, silicone, mortar or equivalent materials. While not a necessity, the use of a foundation base
consisting of cement (e.g. Sakrete), mortar, or grout will help provide a solid and secure installation.
FIG. 1
TILE
WALLBOARD
TILE
BEAD
STRIP
SEALANT
BATH
ADHESIVE
495mm
(19-1/2)
LEVELING
STRINGER
NOTE: Tile bead kit not included and must be
purchased separately.
TYPICAL INSTALLATION
TRACED OUTLINE
CUTOUT*
19-1/2
(495mm)
WHIRLPOOL
ACCESS
PANEL
*SEE CUTOUT TEMPLATE PROVIDED. FOR UNITS WITH
OPTIONAL APRON PANEL, SEE APRON INSTALLATION
INSTRUCTION 751680-100.
UNLESS AN ACCESS OPENING OF AT LEAST
12" X 24" (305 X 610MM) IS PROVIDED,
WARRANTY SERVICE WILL NOT BE PERFORMED.
752864-100 Rev. C
(2)
E-Z Install™ Heater
Whirlpool Heater
This whirlpool tub has been assembled with the E-Z Install Whirlpool Heater
Your E-Z-Install™ whirlpool bathtub heater has been specifically designed to
enhance the enjoyment of your whirlpool bath. Once filled, the temperature of
the whirlpool bath is constantly maintained by a built-in thermostat for as long
as you desire.
Your E-Z-Install™ whirlpool bathtub heater is totally self contained to insure
trouble free operation. As with all electrical devices, certain safety precautions
should be taken during operation.
OVERHE
AT
PROTEC
TION
HEATER
ON
RESET
E-Z IN
STALL
WHIR
OOL
HEALPTE
R
Please read and follow all instructions carefully.
IMPORTANT SAFETY INSTRUCTIONS
- DO NOT DISCARD INSTRUCTIONS PERTAINING TO A RISK OF FIRE, ELECTRIC SHOCK, OR INJURY TO PERSONS – READ AND FOLLOW ALL
INSTRUCTIONS
You should have received safety instructions with your whirlpool bathtub system. Please read and follow them carefully. Those
instructions will include the following warnings:
1. WARNING – Risk of Electrical Shock – Do not permit any electrical appliances (such as a light, telephone, radio, or television)
within five feet of the whirlpool bathtub.
2. DANGER – To reduce the risk of injury, do not remove the suction cover from the whirlpool bathtub.
3. To Reduce the Risk of Injury:
a. The water in your whirlpool should not exceed 104 Fahrenheit. Lower water temperatures are recommended for
extended use (exceeding 10-15 minutes) and are definitely recommended for younger children.
b. Pregnant or possibly pregnant women should consult a physician before using the whirlpool. Water temperatures in
excess of 100 Fahrenheit are not recommended.
b. The use of alcohol, drugs or medication before or during the use of the whirlpool may lead to unconsciousness with
the possibility of drowning. Consult your physician before using the whirlpool if you are using any medication.
d. Persons suffering from obesity or with a medical history of heart disease, low or high blood pressure, circulatory
system problems or diabetes should consult a physician before using the whirlpool.
4. WARNING – Risk of Child Drowning – To reduce the risk of accidental drowning, do not permit children to use the whirlpool
unless they are closely supervised.
5. WARNING – RISK OF ELECTRICAL SHOCK – All electrical connections must be accomplished by a qualified electrician in
accordance with Article 680 of the National Electric Code and any local codes. In addition, a GFCI MUST protect all branch
circuits to the whirlpool, and every electrical component MUST be grounded.
6. The unit must be connected only to a supply circuit that is protected by a ground-fault circuit-interrupter (GFCI). Such as GFCI
should be provided by the installer and should be tested on a routine basis. To test the GFCI, push the test button. The GFCI
should interrupt power. Push the reset button. Power should be restored. If the GFCI fails to operate in this manner, the
GFCI is defective. If the GFCI interrupts power to the bathtub without the test button being pushed, a ground current is
flowing, indicating the possibility of an electric shock. Do not use this bathtub. Disconnect the hydromassge bathtub and
have the problem corrected by a qualified service representative before using.
7. WARNING -Prolonged immersion in hotter water may induce hyperthermia. Hyperthermia occurs when the internal
temperature of the body reaches a level several degrees above the normal body temperature of 98.6 F. The symptoms of
hyperthermia include an increase in the internal temperature of the body, dizziness, lethargy, drowsiness, and fainting. The effect
of hyperthermia include:
a. Failure to perceive heat
b. Failure to recognize the need to exit the bathtub
c. Unawareness of impending hazard
d. Fetal damage in pregnant women
e. Physical inability to exit the bathtub
752864-100 Rev. C
(3)
WHIRLPOOL ELECTRICAL INSTALLATION INSTRUCTIONS
All wiring must be performed by a licensed electrician in accordance with the national electrical code and all other
applicable codes.
WARNING:
When using electrical products, basic precautions should always be observed, including the following:
1. DANGER: RISK OF ELECTRIC SHOCK
Connect only to a circuit protected by a ground-fault circuit interrupter.
2. Grounding is required. The unit should be installed by a licensed electrician and grounded.
3. Install to permit access for servicing.
4. All building materials and wiring should be routed away from the pump body and heater (if equipped).
The whirlpool should be installed on a 120 vac, 20 amp dedicated circuit. The circuit should be hard-wired from the
electrical power supply panel. The circuit must be a three (3) wire circuit from the electrical supply panel. A grounded
neutral wire and a third wire, earth ground, are essential.
E-Z INSTALL WHIRLPOOL HEATER
ELECTRICAL INSTALLATION
INSTRUCTIONS
SEPARATE
15 AMP GFCI OUTLET
ELECTRICAL INSTALLATION
OVERHE
PROTEC AT
TION
HEATER
ON
RESET
At initial start-up with power ON, push the GFCI test button. The
reset button should pop out. Push this button in to reset. If the GFCI
fails to operate in this manner, there is a ground fault or malfunction,
indicating the possibility of electrical shock. Turn off the power and
do not use the bath until the source of the problem has been
identified and corrected.
1. Route two separate branch circuits (figure 1) to the junction
box near the whirlpool. *Each branch circuit MUST BE
GFCI PROTECTED.
BLACK
Install a separate 120VAC / 15AMP dedicated circuit with GFCI
(Ground Fault Circuit Interrupter) protection. With a No. 8 solid copper
wire, bond the heater to the homes electrical panel or approved local
bonding point. A bonding lug has been provided on the heater.
WHITE
120 VAC
E-Z IN
STALL
WHIRLP
HEATOOL
ER
GND.
HEATER
SEPARATE 20 AMP GFCI OUTLET
for2.1 H.P. PUMP
Fig. 1
120 VAC
3. Insure the heater and pump are properly GROUNDED and
BONDED as required. Bonding connectors suitable for No.
8 AWG copper wire are located on both the pump and
heater assemblies.
a. Using No. 8 AWG copper wire, bond each of these
assemblies together to the homes electrical panel or
approved local bonding point.
BLACK
WHITE
2. Use copper conductors only.
PUMP/MOTOR
GND.
ELECTRICAL DIAGRAM
READ AND FOLLOW ALL INSTRUCTIONS
752864-100 Rev. C
(4)
WIRE SELECTION GUIDE
Maximum distance from
fusebox to motor
Motor
Hi Performance
Rating
2.1
50'
100'
150'
200'
115V Power Line
12
10
8
8
The sizes shown on this
chart are recommendations
for copper conductors
only. Always follow
local and national
electrical codes
DRAIN CONNECTION AND SYSTEM TEST
Using recommended drain opening, connect whirlpool drain to waste line. Tighten all drain joints securely. Check the
pump couplings and make sure they are hand-tight. Clean the whirlpool and fill with water to a point 2" above the top of
the highest jet. Recheck the pump couplings and make certain that they are not leaking. (Although the pump couplings
are factory tightened and inspected, some loosening may have occured during transit.) Make sure the whirlpool is
connected to the electrical supply and turn the whirlpool on. Check for leaks around all piping connections while the
whirlpool is running.
E-Z INSTALL WHIRLPOOL HEATER OPERATION
WARNING: Prior to operation, review the Important Safety Instructions listed in this instruction manual.
Once the heater is installed and the whirlpool pump is operating, the heater is totally automatic. The heater will help maintain the
temperature of the water in the bath.
Pressure Switch
The heater is equipped with a preset pressure switch. The pump must be running with water flowing in the whirlpool to allow the heater
to turn on.
Indicator Light
This light turns on whenever the heater is operating. See Fig. 2.
High-Limit Switch
The heater includes an exclusive "Intelligent High-Limit". This safety circuit will not "false trip" from hot tap water. It will only turn the
heater off if the thermostat fails. To reset, simply press the button. If the high-limit trips frequently, call a service technician.
OVERHEAT
PROTECTION
HEATER ON
RESET
Fig. 2
E-Z INSTALL
WHIRLPOOL
HEATER
POST INSTALLATION CLEAN-UP
Remove all construction debris from bath. Tile grout can be removed with a wooden popsicle stick or tongue depressor.
Do not use wire brushes or any other metal implement on bath surface.
Post installation clean-up generally can be completed using warm water and liquid dishwashing detergent. Stubborn dirt or
stains may be removed using granular Spic and Span® mixed with water.
Painter's naphtha can be used to remove excess adhesives and/or wet oil-base paint.
HARSH CHEMICALS SHOULD NEVER BE USED ON ACRYLIC SURFACES.
Abrasive cleaners must not be used since they will scratch and dull the surface. Dulled areas can be restored by rubbing
with a white automotive-type polishing compound and waxing with a liquid wax.
752864-100 Rev. C
(5)
SPIC AND SPAN® IS A REGISTERED TRADEMARK OF PROCTER & GAMBLE
American Standard Limited Lifetime Warranty for the Elite Line of Acrylic Whirlpools
American Standard warrants to the original consumer purchaser that it will, at its option, repair or replace this whirlpool or any of its parts that are found by American Standard, in its
sole judgment, to be defective under normal residential use and maintenance so long as it is owned by the original consumer purchaser.
This warranty shall only become effective upon receipt by American Standard of a completely filled out Warranty Registration Card evidencing proof of purchase.
THIS WARRANTY SHALL BE VOID IF THE ACCESS PANEL TO THE WHIRLPOOL IS COVERED IN ANY MANNER CONTRARY TO THE INSTALLATION INSTRUCTIONS. In
no event will American Standard be liable for the cost of repair or replacement of any installation materials including but not limited to tiles, marble etc.
This limited warranty DOES NOT COVER the following:
1. Defects or damages arising from shipping, installation, alterations, accidents, abuse, misuse, lack of proper maintenance and cleaning as directed in the owner’s manual and use
of other than genuine American Standard replacement parts, in all cases whether caused by a plumbing contractor, service company, the owner or any other person.
2. Deterioration through normal wear and tear and the expense of normal maintenance.
3. Commercial application.
4. Options and accessories. American Standard’s limited warranty on these items is one year for parts only and excludes labor. This one year limited warranty covers accessories
manufactured by American Standard (e.g. aprons, drains, grab bars, heaters, trim kits) against defects of material or workmanship. Warranty coverage begins on the date the
accessory was originally purchased by the owner.
5. Postage or shipping costs for returning products for repairs or replacement under this limited warranty and labor or other costs incurred in connection with product removal or
installation under this limited warranty.
6. ANY LIABILITY FOR CONSEQUENTIAL OR INCIDENTAL DAMAGES, ALL OF WHICH ARE HEREBY EXPRESSLY DISCLAIMED, OR THE EXTENSION BEYOND THE
DURATION OF THIS LIMITED WARRANTY OF ANY IMPLIED WARRANTIES, INCLUDING THOSE OF MERCHANTABILITY OR FITNESS FOR AN INTENDED PURPOSE.
(Some jurisdictions do not allow limitations on how long an implied warranty lasts, or the exclusion or limitation of incidental or consequential damages, so these limitations and
exclusions may not apply to you.)
7. Responsibility for compliance with local code requirements. (Since local code requirements vary greatly distributors, retailers, dealers, installation contractors and users of
plumbing products should determine whether there are any code restrictions on the installation or use of a specific product.)
This warranty gives you specific legal rights. You may have other legal rights that vary from state to state. For service under this warranty, you should contact the following:
By Mail:
American Standard Inc.
One Centennial Avenue
Piscataway, N.J. 08855
Attention: Customer Care Center
SERVICE:
By Telephone:
1-800-442-1902
For service or repair contact the number below. The model number and
serial number for your whirlpool are located on a label near the motor.
HOTLINE FOR HELP
For toll-free information and answers to your questions, call 1 (800) 442-1902
weekdays: 8:00 a.m. to 5:00 p.m. Eastern Time
Product names listed herein are trademarks of American Standard Inc.
C
American Standard Inc. 2003
AMERICAN-STANDARD ONE YEAR LIMITED WARRANTY
FOR E-Z INSTALL WHIRLPOOL HEATER
If inspection of this American-Standard plumbing product, within one year after its initial purchase, confirms that it is defective in materials or
workmanship, American-Standard will repair or, at its option, exchange the product for a similar model.
This warranty applies only to the original purchaser and installation of these products.
This limited warranty does not apply to local building code compliance. Since local building codes vary considerably, the purchaser of this
product should check with a local building or plumbing contractor to insure local code compliance before installation.
This warranty shall be void if the product has been moved from its initial place of installation; if it has been subjected to faulty maintenance,
abuse, misuse, accident or other damages; if it was not installed in accordance with American-Standard's instructions; or if it has been modified in
a manner inconsistent with the product as shipped by American-Standard.
American-Standard's option to repair or exchange the product under this warranty does not cover any labor or other costs of removal or
installation, nor shall American-Standard be responsible for any other incidental or consequential damages attributable to a product
defect or to the repair or exchange of a defective product, all of which are expressly excluded from this warranty. (Some states or
provinces do not allow the exclusion or limitation of implied warranties, so this exclusion may not apply to you.)
This warranty gives you specific legal rights. You may have other statutory rights that vary from state to state or from province to province, in
which case this warranty does not affect such statutory rights.
For service under these warranties, it is suggested that a claim be made through the contractor or dealer from or through whom the
product was purchased, or that a service request (including a description of the product model and of the defect) be sent to the address
above.
752864-100 Rev. C
(6)