1
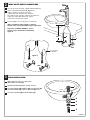
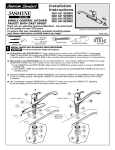
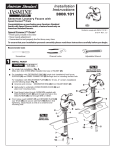
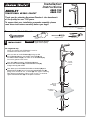
Installation
Instructions
4962.150
4962.151
ARDSLEY
TRADITIONAL VESSEL FAUCET
Thank you for selecting American-Standard...the benchmark
of fine quality for over 100 years.
To ensure that your installation proceeds smoothly--please
read these instructions carefully before you begin.
Certified to comply with ANSI A112.18.1
M968847
Recommended Tools & Materials
Plumbers' Putty or
Caulking
Adjustable Wrench
1
INSTALL FAUCET
CAUTION
Channel Locks
Regular Screwdriver
Turn off hot and cold water
supplies before beginning.
For single hole only.
NOTE; The FAUCET with EXTENSION is used for
installation with above-counter sinks.
With the collar of the EXTENSION (1) facing up slide
the EXTENSION (1) over the FAUCET SUPPLIES (2) and
the MOUNTING STUD (3). The collar of the EXTENSION (1)
fits into the groove of the faucet.
FAUCET
GROOVE
Seat SEAL (4) into groove in EXTENSION (1) base.
Feed FAUCET SUPPLIES (2) and MOUNTING STUD (3)
through mounting hole of deck.
COLLAR
From below, push RETAINING WASHER and GASKET (5) onto
MOUNTING STUD (3). Secure Faucet with MOUNTING NUT (6),
pulling faucet to front of sink, so STUD (3) rests against mounting
hole. Before final tightening, adjust faucet so that it is centered.
Tighten MOUNTING NUT (6) to complete installation.
1
4
3
GROOVE
(EXTENSION
BASE)
MOUNTING
SURFACE
5
6
2
2
MAKE WATER SUPPLY CONNECTIONS
Turn off hot and cold water supplies before beginning.
Connect FLEXIBLE SUPPLIES (1, 2) directly
to wall supplies. Connection on fitting
supplies are 3/8" compression. Connect
left supply to Hot and right supply to the Cold wall
supply. Use adjustable wrench to tighten
connections. Do not over tighten.
Faucet supplies are 10" long from faucet base.
Note: If additional supply length is required,
installer must purchase additional parts separately.
Important: If SUPPLY HOSES (1, 2) are
too long, loop as illustrated to avoid kinking.
Figure A.
2
10"
1
HOT
COLD
LOOP SUPPLIES
IF REQUIRED
Figure A.
HOT
COLD
3
DRAIN INSTALLATION
Apply a bead of PUTTY to underside of
DRAIN BODY FLANGE (1).
Feed DRAIN BODY (1) down through lavatory.
Assembly GASKET (2) WASHER (3) and LOCKNUT (4)
onto DRAIN BODY (1). Tighten LOCKNUT (4) firmly.
1
PUTTY
Assembly TAILPIECE (5) to DRAIN BODY (1).
2
3
4
5
M968847
4
TEST INSTALLED FAUCET
AND CHECK FOR LEAKS
1
With HANDLE (1) in OFF position, turn on WATER
SUPPLIES (2) and check all connections for leaks.
3
Remove AERATOR (3).
Operate HANDLE (1) to flush water lines thoroughly.
Replace AERATOR (3).
HOT
COLD
2
5
1
HOT LIMIT SAFETY STOP ADJUSTMENT
2
By restricting handle rotation and limiting the amount of hot water allowed
to mix with the cold, the HOT LIMIT SAFETY STOP reduces risk of accidental
scalding. To set the maximum hot water temperature of your faucets, all you
need to do is adjust the setting on the HOT LIMIT SAFETY STOP
.
Loosen SET SCREW (2) with 2.5mm hex wrench. Pull HANDLE (1) off valve
stem. Pull off CAP (3). Use a flat blade screwdriver or your fingers to pull up
and rotate red HOT LIMIT SAFETY STOP (4). Follow Step "A" or "B" to adjust
min./max. discharge temperature. "0" being the hottest to "7" the coldest
temperature setting. Factory set at "0".
3
"A"
PRY RED RING FORWARD
AND ROTATE COUNTERCLOCKWISE ONE CLICK
"A"
"A"
ADJUSTMENT WHEN
WATER IS TOO HOT
"B"
"B"
PRY RED RING FORWARD
AND ROTATE CLOCKWISE
5&.1&3"563&
4&55*/(/6.#&34
Replace ESCUTCHEON CAP (3), HANDLE (1), tighten
HANDLE SCREW (2).
"B"
ADJUSTMENT WHEN
WATER IS TOO COLD
4
3&%3*/()05
-*.*54"'&5:4501
6
CARE INSTRUCTIONS:
To keep your new faucet looking new, please follow
these simple care instructions:
DO:
Simply rinse the faucet clean with clear water.
Dry the faucet with a soft cotton cloth.
DO NOT:
Do not use any abrasive cleaners, cloths, or
paper towels.
Do not use any cleaning agents containing
acids, polish abrasives, or harsh cleaners or
soaps.
Regular and routine cleaning will reduce the need for
heavy cleaning and polishing. If heavy cleaning is
required, the following procedures are recommended:
Remove as much surface dirt and film using clear
water and soft cotton cloth (as described above).
Use any of the following to remove tough surface
film and build-up:
Mild liquid detergents
Clear ammonia free liquid glass cleaners
Non-acidic, non-abrasive gentle liquid or fully
dissolved powder cleansers mixed according to
manufacturers directions.
Non-abrasive liquid polishers
Once clean, rinse faucet again with clear water to
thoroughly remove cleaner or polish and blot dry with
a soft cotton cloth.
Failure to follow these care instructions may
damage the Faucet's finish.
M968847