Transcript
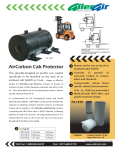
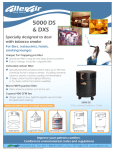
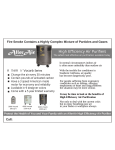
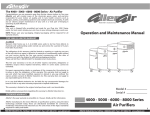
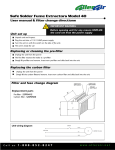
A Message for the Client
FILTER
ASSEMBLY
A Message for the Client
The model you have selected is shipped in 2 separate boxes to protect certain
components. The filter comes in one box, and the outer shell of the unit,
containing the motor and the fan, comes in another. Filters must be installed
D, DS, DX &
before turning the unit on in order for it to work. AllerAir technicians
6000 MODELS
recommend removing the base, installing the filter, and replacing the base
according to the following steps:
FILTER
ASSEMBLY
The model you have selected is shipped in 2 separate boxes to protect certain
components. The filter comes in one box, and the outer shell of the unit,
containing the motor and the fan, comes in another. Filters must be installed
D, DS, DX &
before turning the unit on in order for it to work. AllerAir technicians
6000 MODELS
recommend removing the base, installing the filter, and replacing the base
according to the following steps:
Step 1
Step 2
Step 3
Step 1
Step 2
Step 3
Make sure the unit is set to "Off,"
and unplug it. Lay the unit upside
down, so that the wheels face up.
Using a #2 Philips screwdriver,
remove the four screws that hold
the base onto the unit.
Grasp the wheels. Remove the base
by pulling gently on the wheels.
Make sure the unit is set to "Off,"
and unplug it. Lay the unit upside
down, so that the wheels face up.
Using a #2 Philips screwdriver,
remove the four screws that hold
the base onto the unit.
Grasp the wheels. Remove the base
by pulling gently on the wheels.
HEPA
HEPA
NEW
CARBON
NEW
CARBON
Step 5
Step 5
Gently insert the carbon filter
Step 4
Reach inside the unit, and remove
only 1 of the 2 felt pads.
(either a Model D, DS or DX Carbon)
into the unit, either end up.
For 6000 Carbon/Hepa Models
Insert carbon canister, then Hepa in
center
Gently insert the carbon filter
Step 6
Put back the felt pad removed in
STEP 4.
Step 4
Reach inside the unit, and remove
only 1 of the 2 felt pads.
(either a Model D, DS or DX Carbon)
into the unit, either end up.
For 6000 Carbon/Hepa Models
Insert carbon canister, then Hepa in
center
Step 6
Put back the felt pad removed in
STEP 4.
Step 7
Step 8
Step 9
Step 7
Step 8
Step 9
Replace the base, making sure the
arrow on the gold sticker lines up
with unit's rear seam.
Replace the four screws.
Turn the unit back onto its wheels.
It is now ready for use.
Replace the base, making sure the
arrow on the gold sticker lines up
with unit's rear seam.
Replace the four screws.
Turn the unit back onto its wheels.
It is now ready for use.
Docs_on_Pdf/Filter_assembly/New_with_6000 June 2007
AllerAir Industries Inc. Toll free: 1-888-852-8247 / Fax: 1-877-688-2193 www.allerair.com
AllerAir Industries Inc. Toll free: 1-888-852-8247 / Fax: 1-877-688-2193 www.allerair.com