1
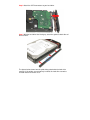
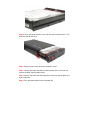
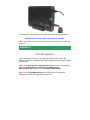
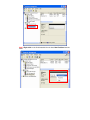
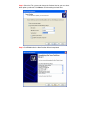
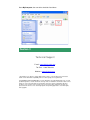
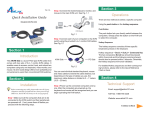
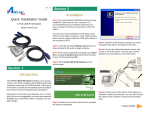
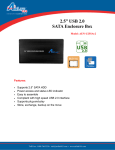
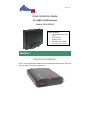
Ver. 1A
Quick Installation Guide
3.5” USB2.0 SATA Enclosure
Model # AEN-U35SAB
Package Contents:
• 3.5” SATA Enclosure with
Stand
• Power adapter
• USB 2.0 Cable
• Quick Installation Guide
• Screwdriver and screw set
Section 1
Hard Drive Installation
Step 1 Use the provided screwdriver to remove the two screws on the right side
of the enclosure. Pull out the right panel.
Step 2 Attach the SATA connectors to your hard drive.
Step 3 With the hard drive label facing up, attach the guides to both sides of
the hard drive.
The picture below shows how the guide being attached to the hard drive
correctly. If the guides are not properly installed, the hard drive cannot be
inserted into the enclosure case.
Step 4 Line up the guides with the case, and slide the hard drive back in. The
enclosure should slide shut.
Step 5 Secure the two screws that were removed in step 1.
Step 6 Connect one end of the power cord to the back of the enclosure and
connect the other end to a power outlet.
Step 7 Connect one end of the USB cable to the enclosure and the other end
to your computer.
Step 8 Press the power button to turn the power ON.
The hard drive is now ready to use and you can find it under “My Computer”.
Congratulations! The hard drive installation is complete.
Note: If you do not see your hard drive under My Computer, please continue on
Section 2.
Section 2
Disk Management
If your disk drive is brand new, you might not be able to see it under “My
Computer” before it is formatted. Please go though the following steps to format
the new drive.
Step 1 Go to Control Panel > Administrative Tools or if you are at category
view, go to Control Panel > Performance and Maintenance >
Administrative Tools, double click on Computer Management.
Step 2 Click on Disk Management on the left menu bar. The new disk
information should be displayed on the right panel.
Step 3 Right click on the Unallocated disk and select New Partition from the
menu.
Step 4 Click Next to start the New Partition Wizard.
Step 5 Select the desired Partition Type and click Next.
Step 6 Enter the desired Partition Size and click Next.
Step 7 Select Assign the following drive letter and select a letter for the new
disk drive or you can select other options preferred. Click Next.
Step 8 Select the File system and change the Volume label or you can select
other options preferred. Click Next to start formatting the hard drive.
Step 9 Click Finish after the New Partition Wizard completed.
Go to My Computer, the new drive should be listed there.
Section 3
Technical Support
E-mail: [email protected]
Toll Free: 1-888-746-3238
Website: www.airlink101.com
* Specifications are subject to change without notice. Photos of the product may not reflect the
actual content. Hard disk compatibility and accessible capacity are not guaranteed.
Copyright ©2010 AirLink101® All rights reserved. AirLink101, the stylized AirLink101 logo, specific
product designations, and all other words and logos that are identified as trademarks and/or service
marks are, unless noted otherwise, the trademarks and service marks of AirLink101. All other
product or service names are the property of their respective holders. AirLink101 products are
protected under numerous U.S. and foreign patents and pending applications, mask work rights,
and copyrights.