1
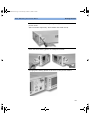
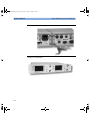
E4416-90002.book Page 1 Wednesday, October 25, 2000 6:22 PM
'2/25GTKGU
2GCMCPF#XGTCIG
2QYGT/GVGTU
+PUVCNNCVKQP)WKFG
E4416-90002.book Page 2 Wednesday, October 25, 2000 6:22 PM
)GPGTCN
Information contained in this document is
subject to change without notice. Agilent
Technologies makes no warranty of any kind
with regard to this material, including, but not
limited to, the implied warranties of
merchantability and fitness for a particular
purpose. Agilent Technologies shall not be liable
for errors contained herein or for incidental or
consequential damages in connection with the
furnishings, performance, or use of this material.
No part of this document may be photocopied,
reproduced, or translated to another language
without the prior written consent of Agilent
Technologies.
Copyright 2000 Agilent Technologies
Station Road, South Queensferry, Scotland,
EH30 9TG, UK.
Agilent Part No. E4416-90002
Printed in UK
October 2000
.GICN+PHQTOCVKQP
Certification
Agilent Technologies certifies that this product
met its published specifications at the time of
shipment from the factory. Agilent Technologies
further certifies that its calibration
measurements are traceable to the United States
National Institute of Standards and Technology,
to the extent allowed by the Institute’s
calibration facility, and to the calibration
facilities of other International Standards
Organization members.
Warranty
This Agilent Technologies instrument product is
warranted against defects in material and
workmanship for a period of three years from
date of shipment. During the warranty period,
Agilent Technologies will at its option, either
repair or replace products which prove to be
defective. For warranty service or repair, this
product must be returned to a service facility
designated by Agilent Technologies. Buyer shall
prepay shipping charges to Agilent Technologies
and Agilent Technologies shall pay shipping
charges, duties, and taxes for products returned
to Agilent Technologies from another country.
Agilent Technologies warrants that its software
and firmware designated by Agilent Technologies
for use with an instrument will execute its
programming instructions when properly
installed on that instrument. Agilent
Technologies does not warrant that the operation
of the instrument, or firmware will be
uninterrupted or error free.
Limitation of Warranty
The foregoing warranty shall not apply to defects
resulting from improper or inadequate
maintenance by Buyer, Buyer-supplied software
or interfacing, unauthorized modification or
misuse, operation outside of the environmental
specifications for the product, or improper site
preparation or maintenance. NO OTHER
WARRANTY IS EXPRESSED OR IMPLIED.
AGILENT TECHNOLOGIES SPECIFICALLY
DISCLAIMS THE IMPLIED WARRANTIES OF
MERCHANTABILITY AND FITNESS FOR A
PARTICULAR PURPOSE.
Exclusive Remedies
THE REMEDIES PROVIDED HEREIN ARE
BUYER’S SOLE AND EXCLUSIVE REMEDIES.
AGILENT TECHNOLOGIES SHALL NOT BE
LIABLE FOR ANY DIRECT, INDIRECT,
SPECIAL, INCIDENTAL, OR CONSEQUENTIAL
DAMAGES, WHETHER BASED ON CONTRACT,
TORT, OR ANY OTHER LEGAL THEORY.
E4416-90002.book Page 3 Wednesday, October 25, 2000 6:22 PM
5CHGV[5[ODQNU
5CHGV[5[ODQNU
The following symbols on the instrument and in the documentation
indicate precautions which must be taken to maintain safe operation of
the instrument.
6JG+PUVTWEVKQP&QEWOGPVCVKQP5[ODQN6JGRTQFWEV
KUOCTMGFYKVJVJKUU[ODQNYJGPKVKUPGEGUUCT[HQT
VJGWUGTVQTGHGTVQVJGKPUVTWEVKQPUKPVJGUWRRNKGF
FQEWOGPVCVKQP
#NVGTPCVKPIEWTTGPV
#%
6JKUU[ODQNKPFKECVGUVJGQRGTCVKPIUYKVEJHQT 1P OQFG
6JKUU[ODQNKPFKECVGUVJGQRGTCVKPIUYKVEJHQT
5VCPFD[ OQFG0QVGVJGKPUVTWOGPVKU016
KUQNCVGFHTQOVJGOCKPUYJGPVJGUYKVEJKURTGUUGF
6QKUQNCVGVJGKPUVTWOGPVVJGOCKPUEQWRNGT
OCKPU
KPRWVEQTFUJQWNFDGTGOQXGFHTQOVJGRQYGT
UWRRN[
5CHGV[0QVKEGU
This guide uses warnings and cautions to denote hazards
W A R N I NG
A warning calls attention to a procedure, practice or the like, which, if
not correctly performed or adhered to, could result in injury or loss of
life. Do not proceed beyond a warning until the indicated conditions are
fully understood and met.
CAUTION
A caution calls attention to a procedure, practice or the like which, if not
correctly performed or adhered to, could result in damage to or the
destruction of part or all of the equipment. Do not proceed beyond a
caution until the indicated conditions are fully understood and met.
E4416-90002.book Page 4 Wednesday, October 25, 2000 6:22 PM
5CHGV[5[ODQNU
)GPGTCN5CHGV[+PHQTOCVKQP
The following general safety precautions must be observed during all
phases of operation, service, and repair of this instrument. Failure to
comply with these precautions or with specific warnings elsewhere in
this manual violates safety standards of design, manufacture, and
intended use of the instrument. Agilent Technologies assumes no liability
for the customer’s failure to comply with these requirements.
W A RN I N G
This is a Safety Class I instrument (provided with a protective
earthing ground, incorporated in the power cord). The mains plug
shall only be inserted in a socket outlet provided with a protective
earth contact. Any interruption of the protective conductor inside
or outside of the instrument is likely to make the instrument
dangerous. Intentional interruption is prohibited.
DO NOT operate the product in an explosive atmosphere or in the
presence of flammable gasses or fumes.
DO NOT use repaired fuses or short-circuited fuseholders: For continued
protection against fire, replace the line fuse(s) only with fuse(s) of the
same voltage and current rating and type.
DO NOT perform procedures involving cover or shield removal unless
you are qualified to do so: Operating personnel must not remove
equipment covers or shields. Procedures involving the removal of covers
and shields are for use by service-trained personnel only.
DO NOT service or adjust alone: Under certain conditions, dangerous
voltages may exist even with the equipment switched off. To avoid
dangerous electrical shock, service personnel must not attempt internal
service or adjustment unless another person, capable of rendering first
aid and resuscitation, is present.
DO NOT operate damaged equipment: Whenever it is possible that the
safety protection features built into this product have been impaired,
either through physical damage, excessive moisture, or any other reason,
REMOVE POWER and do not use the product until safe operation can be
E4416-90002.book Page 5 Wednesday, October 25, 2000 6:22 PM
5CHGV[5[ODQNU
verified by service-trained personnel. If necessary, return the product to a
Agilent Sales and Service Office for service and repair to ensure the
safety features are maintained.
DO NOT substitute parts or modify equipment: Because of the danger of
introducing additional hazards, do not install substitute parts or perform
any unauthorized modification to the product. Return the product to a
Agilent Sales and Service Office for service and repair to ensure the
safety features are maintained.
E4416-90002.book Page 6 Wednesday, October 25, 2000 6:22 PM
5CHGV[5[ODQNU
E4416-90002.book Page 7 Wednesday, October 25, 2000 6:22 PM
%QPVGPVU
%QPVGPVU
Safety Symbols . . . . . . . . . . . . . . . . . . . . . . . . . . . . . . . . . . . . . . . . . . . . . . . . . . . . 3
)GVVKPI5VCTVGF
9
Welcome . . . . . . . . . . . . . . . . . . . . . . . . . . . . . . . . . . . . . . . . . . . . . . . . . . . . . . . . . 10
Initial Inspection . . . . . . . . . . . . . . . . . . . . . . . . . . . . . . . . . . . . . . . . . . . . . . . . . 10
Documentation Information . . . . . . . . . . . . . . . . . . . . . . . . . . . . . . . . . . . . . . . 11
What You’ll Find in this Guide . . . . . . . . . . . . . . . . . . . . . . . . . . . . . . . . . . . . . 12
Power Meter and Sensor Capability. . . . . . . . . . . . . . . . . . . . . . . . . . . . . . . . 14
Specifications . . . . . . . . . . . . . . . . . . . . . . . . . . . . . . . . . . . . . . . . . . . . . . . . . . . . 14
Adjusting the Carrying Handle . . . . . . . . . . . . . . . . . . . . . . . . . . . . . . . . . . . . 15
Turning the Power Meter On . . . . . . . . . . . . . . . . . . . . . . . . . . . . . . . . . . . . . . 16
Front Panel Keys and Connections . . . . . . . . . . . . . . . . . . . . . . . . . . . . . . . . 19
Connecting a Power Sensor . . . . . . . . . . . . . . . . . . . . . . . . . . . . . . . . . . . . . . . 23
Rear Panel Connections. . . . . . . . . . . . . . . . . . . . . . . . . . . . . . . . . . . . . . . . . . . 26
Remote Interface Configurations . . . . . . . . . . . . . . . . . . . . . . . . . . . . . . . . . . 28
GPIB . . . . . . . . . . . . . . . . . . . . . . . . . . . . . . . . . . . . . . . . . . . . . . . . . . . . . . . . . . . 28
RS232/RS422. . . . . . . . . . . . . . . . . . . . . . . . . . . . . . . . . . . . . . . . . . . . . . . . . . . . . 29
Rack Mounting the Power Meter. . . . . . . . . . . . . . . . . . . . . . . . . . . . . . . . . . . 30
Rack Mounting One Meter
(Using the Option 908 rack mount kit) . . . . . . . . . . . . . . . . . . . . . . . . . . . . . . . 30
Rack Mounting Two Meters Together
(Using the Option 909 rack mount kit) . . . . . . . . . . . . . . . . . . . . . . . . . . . . . . . 32
4GIWNCVQT[+PHQTOCVKQP
35
General Specifications . . . . . . . . . . . . . . . . . . . . . . . . . . . . . . . . . . . . . . . . . . . . 36
Compliance and Markings . . . . . . . . . . . . . . . . . . . . . . . . . . . . . . . . . . . . . . . . . 38
IEC61010-1 Compliance . . . . . . . . . . . . . . . . . . . . . . . . . . . . . . . . . . . . . . . . . . . 38
Electromagnetic Compatibility (EMC) . . . . . . . . . . . . . . . . . . . . . . . . . . . . . . . 38
Safety. . . . . . . . . . . . . . . . . . . . . . . . . . . . . . . . . . . . . . . . . . . . . . . . . . . . . . . . . . . 38
Markings . . . . . . . . . . . . . . . . . . . . . . . . . . . . . . . . . . . . . . . . . . . . . . . . . . . . . . . . 39
Regulatory Information . . . . . . . . . . . . . . . . . . . . . . . . . . . . . . . . . . . . . . . . . . . 40
Sound Emission . . . . . . . . . . . . . . . . . . . . . . . . . . . . . . . . . . . . . . . . . . . . . . . . . . 40
Responsibilities of the Customer . . . . . . . . . . . . . . . . . . . . . . . . . . . . . . . . . . 43
Agilent Sales and Service Offices . . . . . . . . . . . . . . . . . . . . . . . . . . . . . . . . . . 44
E4416-90002.book Page 8 Wednesday, October 25, 2000 6:22 PM
%QPVGPVU
E4416-90002.book Page 9 Wednesday, October 25, 2000 6:22 PM
)GVVKPI5VCTVGF
E4416-90002.book Page 10 Wednesday, October 25, 2000 6:22 PM
)GVVKPI5VCTVGF
9GNEQOG
9GNEQOG
Welcome to the Agilent Technologies E4416A and E4417A EPM-P series peak
and average power meters Installation Guide. This guide shows you how to:
• physically check the power meter
• adjust the carrying handle
• switch it on
• confirm the meter passes the power on self test
• connect it to a power sensor
• carry out a zero and calibration routine
• make connections to the rear panel
• configure the remote programming interfaces
• attach the rack mounting kits (supplied with option 908 or option 909)
NOTE
Both single and dual channel power meters with variety of rear panel
configurations have been used for the illustrations in this guide. Your power
meter may differ in detail to those shown.
+PKVKCN+PURGEVKQP
Please inspect the shipping container for damage. If the shipping container or
packaging material is damaged, it should be kept until the contents have been
checked mechanically and electrically. If there is mechanical damage, notify the
nearest Agilent Technologies office. Keep the damaged shipping materials (if
any) for inspection by the carrier and an Agilent representative. If required, you
can find a list of Agilent Sales and Service Offices on page 44.
Before continuing, please ensure you have read and understood the preceding
safety information.
E4416-90002.book Page 11 Wednesday, October 25, 2000 6:22 PM
&QEWOGPVCVKQP+PHQTOCVKQP
)GVVKPI5VCTVGF
&QEWOGPVCVKQP+PHQTOCVKQP
This guide is only part of the information supplied. The documentation consists
of:
• The Installation Guide (this book) - Shows you how to check your power
meter, switch it on and connect it to an Agilent power sensor. This
information is presented in English, French, German, Italian, Japanese, and
Spanish languages.
• The User’s Guide - Shows you how to operate your power meter from the
front panel interface to make measurements using the Agilent E-series
E9320, E-series E9300, E-series E4400, and 8480 series power sensors. You
can find the User’s Guide as Adobe Acrobat PDF (Portable Document
Format) files on the supplied CD-ROM in English, French, German, Italian,
Japanese, and Spanish languages.
• The Programmer’s Guide - Shows you how to operate your power meter
using the remote interfaces. You can find the Programmer’s Guide as an
Adobe Acrobat PDF file on the supplied CD-ROM in English language only.
Printed Guides available by ordering the following options:
• English language User’s Guide - Option OBK
• French language User’s Guide - Option ABF
• German language User’s Guide - Option ABD
• Italian language User’s Guide - Option ABZ
• Japanese language User’s Guide - Option ABJ
• Spanish language User’s Guide - Option ABE
NOTE
A printed Programmer’s Guide is also supplied with the above options but in
English Language only.
E4416-90002.book Page 12 Wednesday, October 25, 2000 6:22 PM
)GVVKPI5VCTVGF
9JCV;QW NN(KPFKPVJKU)WKFG
9JCV;QW NN(KPFKPVJKU)WKFG
This guide is divided into the following sections:
• Adjusting the Carrying Handle on page 15
• Turning the Power Meter On on page 16
• Front Panel Keys and Connections on page 19
• Connecting a Power Sensor on page 23
• Rear Panel Connections on page 26
• Remote Interface Configurations on page 28
• Rack Mounting the Power Meter on page 30
• General Specifications on page 36
• Compliance and Markings on page 38
• Regulatory Information on page 40
• According to ISO 7779 (Type Test). on page 40
• Responsibilities of the Customer on page 43
• Agilent Sales and Service Offices on page 44
For more detailed operating information, refer to the EPM-P series power
meters User’s Guide and Programmer’s Guide.
E4416-90002.book Page 13 Wednesday, October 25, 2000 6:22 PM
9JCV;QW NN(KPFKPVJKU)WKFG
)GVVKPI5VCTVGF
%QPXGPVKQPU7UGFKPVJKU)WKFG
The following conventions are used to show the difference between a front
panel key and a softkey.
Zero
Cal
This is used to represent a labeled key on the power meter
front panel.
5QHVMG[
This is used to represent a labeled softkey and, when used
as part of a procedure, indicates you should press the
unmarked key beside the displayed text.
/GUUCIG
This is used to represent a displayed message.
Parameter
This is used to represent a parameter, value, or title.
E4416-90002.book Page 14 Wednesday, October 25, 2000 6:22 PM
)GVVKPI5VCTVGF
2QYGT/GVGTCPF5GPUQT%CRCDKNKV[
2QYGT/GVGTCPF5GPUQT%CRCDKNKV[
Your E4416A or E4417A power meter is compatible with Agilent
E-series E9320, E-series E9300, E-series E4400, and HP 8480 series power
sensors. However, not all sensor and meter combinations have the same features
or capabilities. The main differences are:
(GCVWTGU
'5GTKGU '5GTKGU '5GTKGU ' ' ' 5GTKGU
#XGTCIG2QYGTQH%95KIPCN
•
•
•
%CN(CEVQTUQP''241/
•
•
•
4GCFKPIUUGE
•
•
•
#XGTCIG2QYGTQHOQFWNCVGFUKIPCN
•
•
2GCM2QYGT
•
4KUKPI'FIG6TKIIGT
•
(CNNKPI'FIG6TKIIGT
•
•
5RGEKHKECVKQPU
The specifications for the power meter are listed in the E4416A and E4417A
User’s Guide.
E4416-90002.book Page 15 Wednesday, October 25, 2000 6:22 PM
#FLWUVKPIVJG%CTT[KPI*CPFNG
)GVVKPI5VCTVGF
#FLWUVKPIVJG%CTT[KPI*CPFNG
Adjust the carrying handle to carry the meter or view the display.
6JGECTT[KPIJCPFNGECPDGNQEMGFKPVQVJTGGFKHHGTGPVRQUKVKQPU
2WNNVJGJCPFNGQWVYCTFUTQVCVGKVVQVJGTGSWKTGFRQUKVKQPCPF
TGNGCUGKVKPVQQPGQHVJGVJTGGNQEMU
If you want to remove the handle, refer to Rack Mounting the Power Meter on
page 30.
E4416-90002.book Page 16 Wednesday, October 25, 2000 6:22 PM
)GVVKPI5VCTVGF
6WTPKPIVJG2QYGT/GVGT1P
6WTPKPIVJG2QYGT/GVGT1P
You can turn the power meter on without connecting a power sensor or powersensor cable.
C A U T IO N
The instrument has an autoranging power supply. Ensure the supply voltage is
within the range 85 to 264 Vac and 47 - 440Hz.
%QPPGEVVJG2QYGT%QTF
%JGEMVJGQTCPIG.'&KUNKV
219'4
E4416-90002.book Page 17 Wednesday, October 25, 2000 6:22 PM
6WTPKPIVJG2QYGT/GVGT1P
)GVVKPI5VCTVGF
6WTPVJGOGVGTQPCPFEQPHKTOVJGITGGP.'&KUNKV
219'4
6JGOGVGTCWVQOCVKECNN[UVGRUVJTQWIJCUGNHVGUVTQWVKPG
CPFKUPQYTGCF[HQTWUG
NOTE
If the meter has been stored in extremely cold conditions, beyond its normal
operating range, the display may require a few minutes to warm up and operate
normally.
E4416-90002.book Page 18 Wednesday, October 25, 2000 6:22 PM
)GVVKPI5VCTVGF
6WTPKPIVJG2QYGT/GVGT1P
9JCV%CP)Q
9TQPI!
5GGVJKU
&QVJKU
1TCPIG.'&PQVNKV
%JGEMVJCVRQYGTKUUWRRNKGFVQVJG
OGVGT
%JGEMVJGRQYGTOGVGTHWUG
UGG
5VGR (CKNUUGNHVGUV
U
+HVJGTGCTGCP[UGNHVGUVHCKNWTGUVJG
OGVGTKUFGHGEVKXG%QPVCEV[QWT
PGCTGUV#IKNGPV5GTXKEG%GPVGT
4GHGTVQ
#IKNGPV5CNGUCPF5GTXKEG1HHKEGUQP
RCIG
.KPGKPRWVHWUGCPFURCTG
In-line Fuse
Spare Fuse
E4416-90002.book Page 19 Wednesday, October 25, 2000 6:22 PM
(TQPV2CPGN-G[UCPF%QPPGEVKQPU
)GVVKPI5VCTVGF
(TQPV2CPGN-G[UCPF%QPPGEVKQPU
This section briefly describes the functions of the front panel keys and
connectors. The User’s Guide shows you how to use them in more detail.
These keys are located to the left of the display.
Key
Function
Press this key to switch the meter between on and standby.
When power is supplied, the orange LED above the key is
lit. Press the key to switch the meter on. The green LED
lights.
Press this key to select the measurement window or the
individual measurement display lines. Any measurement
setup you create is implemented in the selected
measurement.
Press this key to choose windowed, expanded, or
full-screen display.
Preset
Local
Press this key to preset the power-meter when it is
operating in local mode (front panel operation). A pop-upwindow is displayed asking you to confirm the command. It
also enables you to take control of the meter from the front
panel when operating via the remote interfaces (when Local
Lock Out is not enabled).
E4416-90002.book Page 20 Wednesday, October 25, 2000 6:22 PM
)GVVKPI5VCTVGF
(TQPV2CPGN-G[UCPF%QPPGEVKQPU
These keys are located along the lower edge of the display.
Key
System
Channel
Function
Press this key to access general configuration menus, such
as GPIB address. You can also access some measurement
configuration menus. The measurement screen remains
visible.
Press this key to access the channel configuration tables
and menus. Channel parameters such as averaging and
offsets are configured from this menu.
Trigger
Press this key to access the triggering menu. Unless an
E-series E9320A sensor is connected, all the menu keys are
disabled (greyed out).
Meas
Setup
Use this key to configure the selected measurement.
Meas
Display
Use this key together with
measurement displays.
Meas
Setup
to configure
E4416-90002.book Page 21 Wednesday, October 25, 2000 6:22 PM
(TQPV2CPGN-G[UCPF%QPPGEVKQPU
)GVVKPI5VCTVGF
These keys are all associated with the menu labels and data entry. They are
located to the right of the display.
Key
More
Function
Press this key to access the next pages of a menu. For
example, QH displayed beside the
More
key indicates
page one of a two page menu is displayed. Press
access the second page. (QH is displayed.)
Prev
More
to
Press this key to access the previous pages of a menu. For
example, QH displayed beside the
More
key indicates
page two of a two page menu is displayed. Press
access the previous page. (QH is displayed.)
Prev
to
These unmarked keys are called ‘softkeys’ and are referred
to by the text on the display beside them. For example,
during a Preset, a pop-up window asks you to confirm the
command. Press %QPHKTO to continue, that is, press the
softkey beside the displayed word ‘confirm’. Similarly,
pressing %CPEGN (the softkey beside the word ‘cancel’)
stops the Preset.
The arrow keys are used to select measurement displays
and to select and change parameters such as instrument
state names and offset values. The User’s Guide shows how
these keys are used in more detail.
E4416-90002.book Page 22 Wednesday, October 25, 2000 6:22 PM
)GVVKPI5VCTVGF
(TQPV2CPGN-G[UCPF%QPPGEVKQPU
These keys and connectors are associated with the measurement channels and
are located on the right-hand side of the front panel.
Key
Frequency
Cal Fac
Press this key to access the input frequency, and sensor
calibration factor menus. Use these functions to improve
the accuracy of your measurement. Refer to the User’s
Guide for more information.
Zero
Cal
Press this key to access the zero and calibration menus. Use
these functions to improve the accuracy of your
measurement. Refer to the User’s Guide for more
information.
Connector
POWER REF
50
MHz
CHANNEL
A
B
Function
Function
The power-reference is a 1 mW (0 dBm) 50 MHz signal
available from a 50 ohm type-N connector. It is used for
calibrating the sensor and meter system. If the meter is
configured with Option 003, the connector is fitted to the
rear panel. The Green LED beside the connector is lit when
the calibrator is turned on.
The sensor input connectors (Agilent E4417A shown, the
E4416A has one input). If the meter is configured with
Option 002 or Option 003, the connectors are fitted to the
rear panel.
E4416-90002.book Page 23 Wednesday, October 25, 2000 6:22 PM
%QPPGEVKPIC2QYGT5GPUQT
)GVVKPI5VCTVGF
%QPPGEVKPIC2QYGT5GPUQT
Using the correct cable, any Agilent, or Hewlett-Packard diode based power
sensor can be connected to the E4416A or E4417A power meters. (The E9288
series cables are color coded to help distinguish them from the 11730 series.)
2QYGT5GPUQT
NOTE
'5GTKGU'
5GTKGU
5GTKGU
•
•
'5GTKGU'
•
•
'5GTKGU'
•
•
'5GTKGU'
•
The following shows the procedure for single channel meters configured with
front panel mounted POWER REF and CHANNEL connectors. The procedure
is similar for meters configured with rear panel connectors. Also, for dual
channel meters (E4417A), you should repeat the procedure for the channel B
sensor.
%QPPGEVVJGUGPUQTVQCP#IKNGPV'UGTKGUECDNG
E4416-90002.book Page 24 Wednesday, October 25, 2000 6:22 PM
)GVVKPI5VCTVGF
%QPPGEVKPIC2QYGT5GPUQT
%QPPGEVVJGQVJGTGPFQHVJG'UGTKGUECDNGVQVJG
%*#00'.#
QT%*#00'. $KPRWVEQPPGEVQT
%QPHKTOVJGOGUUCIGRQRWR 4GCFKPI5GPUQT CRRGCTUDTKGHN[
/GUUCIGFQGUPQVCRRGCTYJGP
EQPPGEVKPICP5GTKGURQYGT
UGPUQT
%QPHKTOVJGFKURNC[JCUEJCPIGFVQCOGCUWTGOGPVTGCFKPI
&KCITCOUJQYUFKURNC[YKVJ
CP'UGTKGU'RQYGT
UGPUQTEQPPGEVGF
E4416-90002.book Page 25 Wednesday, October 25, 2000 6:22 PM
%QPPGEVKPIC2QYGT5GPUQT
)GVVKPI5VCTVGF
%QPPGEVVJGUGPUQTVQVJG219'44'(EQPPGEVQT
9JGPVJGUGPUQTKUEQPPGEVGFVQVJG219'44'([QWECP\GTQ
Zero
CPFECNKDTCVGVJGOGCUWTGOGPVRCVJSWKEMN[D[RTGUUKPI Cal
<GTQCPF%CN 1PFWCNEJCPPGNOGVGTURTGUU <GTQ%CN# QT
<GTQ%CN$ 6JG <GTQKPI RQRWRKUFKURNC[GFFWTKPIVJG\GTQKPIRTQEGUUVJG
%CNKDTCVKPI RQRWRFWTKPIECNKDTCVKQP6JGOGVGTUGPUQT
OGCUWTGOGPVRCVJKUECNKDTCVGFYJGPVJG %CNKDTCVKPI RQRWR
FKUCRRGCTU
E4416-90002.book Page 26 Wednesday, October 25, 2000 6:22 PM
)GVVKPI5VCTVGF
4GCT2CPGN%QPPGEVKQPU
4GCT2CPGN%QPPGEVKQPU
The following connections are available on the rear panel. To setup the remote
interfaces, refer to Remote Interface Configurations on page 28.
)2+$
2. RS232 and RS422
2KP
45
45
&%&
%65
4Z
4Z
6Z
6Z
&64
6Z
)0&
)0&
&54
4Z
465
465
%65
%65
4+
465
E4416-90002.book Page 27 Wednesday, October 25, 2000 6:22 PM
4GCT2CPGN%QPPGEVKQPU
)GVVKPI5VCTVGF
4,
2KP %QPPGEVKQP
PQPG
)TQWPF
66.1WVRWV
66.1WVRWV
66.+PRWV
66.+PRWV
)TQWPF
)TQWPF
12345678
4GEQTFGTQWVRWV
VYQQWVRWVUCTGHKVVGFVQFWCNEJCPPGNOGVGTU
CPF6TKIIGT+PRWVCPF1WVRWVEQPPGEVKQPUCTGOCFGXKC$0%
EQPPGEVQTU
E4416-90002.book Page 28 Wednesday, October 25, 2000 6:22 PM
)GVVKPI5VCTVGF
4GOQVG+PVGTHCEG%QPHKIWTCVKQPU
4GOQVG+PVGTHCEG%QPHKIWTCVKQPU
The power meter is equipped with GPIB (IEEE488), RS232, and RS422 remote
programming interfaces. This section shows you how to change the interface
settings.
)2+$
The power meter is shipped from the factory with GPIB as the selected interface
and the address set to 13. Addresses between 0 and 30 are valid. The GPIB
address is stored in non-volatile memory. To change the address proceed as
follows:
2TGUU
System
4GOQVG+PVGTHCEG %QPHKIWTG+PVGTHCEG )2+$ )2+$#FFT 6JG)2+$CFFTGUURQRWRCRRGCTU
5GNGEVGFFKIKV
7UGVJG
CPF
MG[UVQUGNGEV
JKIJNKIJVVJGFKIKV[QWYCPV
VQEJCPIGWUGVJG CPF MG[UVQKPETGCUGQTFGETGCUGVJG
XCNWG2TGUU 'PVGT VQEQPHKTOCPFUCXGVJGPGYCFFTGUU2TGUUKPI
%CPEGN TGUVQTGUVJGRTGXKQWUXCNWG
6QGPUWTGVJG)2+$KPVGTHCEGKUUGNGEVGFRTGUU
4GOQVG+PVGTHCEG 5GNGEV+PVGTHCEG )2+$ System
E4416-90002.book Page 29 Wednesday, October 25, 2000 6:22 PM
4GOQVG+PVGTHCEG%QPHKIWTCVKQPU
)GVVKPI5VCTVGF
4545
To check the settings for the RS232 or RS422 interfaces press
System
,
4GOQVG+PVGTHCEG , %QPHKIWTG+PVGTHCEG , 5GTKCN . The settings are displayed
below the respective softkey labels. Press /QTG to access the next menu page.
To change any setting:
1 Press
System
, 4GOQVG+PVGTHCEG , %QPHKIWTG+PVGTHCEG , 5GTKCN .
2 Select the parameter you want to change by pressing the softkey.
3 Use the
and
use the
and
keys to select (highlight) the digit you want to change;
keys to increase or decrease the value. Press 'PVGT to
confirm and save the new value. Pressing %CPEGN restores the previous
value.
4 Press
More
to access the second page of the settings menu.
To configure the power meter to use the serial RS232 or RS422 interfaces press
System
, 4GOQVG+PVGTHCEG , 5GNGEV+PVGTHCEG , 45 , or 45 .
E4416-90002.book Page 30 Wednesday, October 25, 2000 6:22 PM
)GVVKPI5VCTVGF
4CEM/QWPVKPIVJG2QYGT/GVGT
4CEM/QWPVKPIVJG2QYGT/GVGT
4CEM/QWPVKPI1PG/GVGT
7UKPIVJG1RVKQP TCEMOQWPVMKV
4GOQXGVJGECTT[KPIJCPFNG
4GOQXGVJGHTQPVCPFTGCTTWDDGTDWORGTU
E4416-90002.book Page 31 Wednesday, October 25, 2000 6:22 PM
4CEM/QWPVKPIVJG2QYGT/GVGT
)GVVKPI5VCTVGF
(KVVJG4CEM/QWPV(NCPIGU
2CTVUCXCKNCDNGUGRCTCVGN[
4GCF[HQTKPUVCNNCVKQP
E4416-90002.book Page 32 Wednesday, October 25, 2000 6:22 PM
)GVVKPI5VCTVGF
4CEM/QWPVKPIVJG2QYGT/GVGT
4CEM/QWPVKPI6YQ/GVGTU6QIGVJGT
7UKPIVJG1RVKQPTCEMOQWPVMKV
4GOQXGVJGECTT[KPIJCPFNG
4GOQXGVJGHTQPVCPFTGCTTWDDGTDWORGTU
*CTFYCTGTGSWKTGFVQNKPMOGVGTUVQIGVJGT
E4416-90002.book Page 33 Wednesday, October 25, 2000 6:22 PM
4CEM/QWPVKPIVJG2QYGT/GVGT
)GVVKPI5VCTVGF
(KVQPGUOCNNTCEMOQWPVKPIHNCPIGVQQRRQUKVGUKFGUQHGCEJ
RQYGTOGVGT
2CTVUCXCKNCDNGUGRCTCVGN[CPF
(KVVYQHTQPVNKPMKPIRNCVGUVQGCEJRQYGTOGVGT
'PICIGVJGNKPMKPIRNCVGUCVVJGHTQPVQHVJGRQYGTOGVGTU
E4416-90002.book Page 34 Wednesday, October 25, 2000 6:22 PM
)GVVKPI5VCTVGF
4CEM/QWPVKPIVJG2QYGT/GVGT
#VVCEJVJGTGCTNKPMKPIDTCEMGVU
4GCF[HQTKPUVCNNCVKQP
E4416-90002.book Page 35 Wednesday, October 25, 2000 6:22 PM
4GIWNCVQT[+PHQTOCVKQP
E4416-90002.book Page 36 Wednesday, October 25, 2000 6:22 PM
4GIWNCVQT[+PHQTOCVKQP
)GPGTCN5RGEKHKECVKQPU
)GPGTCN5RGEKHKECVKQPU
'PXKTQPOGPVCN
2J[UKECN
Operating Temperature:
0 to +55°C
Storage Temperature:
−20 to +70°C
Humidity:
Up to 95% Relative Humidity to +40°C
Altitude:
3000m (9,840 ft.)
EMC:
MEETS EN55011: 1991 (GROUP 1,
CLASS A), AND EN50082-1:1992
Weight:
4.2 kg Nominal
Dimensions: (height x
width x depth)
130H x 250W x 462D mm nominal
(including handle and rubber bumpers)
88H x 212W x 363D mm nominal
(excluding handle and rubber
bumpers)
2QYGT
4GSWKTGOGPVU
%QQNKPI
4GSWKTGOGPVU
%NGCPKPI
7UG
WARNING
Operating Voltage
Range:
85 - 264 Vac
Operating Frequency
Range:
47 - 440Hz
Power Dissipation:
50 VA (maximum)
To provide adequate cooling, and air gap of approximately 75mm (3ins)
should be maintained around the vented sections of the instrument.
Use a soft, clean, damp cloth to clean the front-panel and side covers.
This instrument is designed for indoor use only.
Appliance coupler (mains input power cord) is the power disconnect
device. Do not position the instrument such that access to the coupler is
impaired.
E4416-90002.book Page 37 Wednesday, October 25, 2000 6:22 PM
)GPGTCN5RGEKHKECVKQPU
4GIWNCVQT[+PHQTOCVKQP
WARNING
For continued protection against fire hazard, replace the line fuse only
with the same type and line rating (250V, F3.15A, 20mm fast blow fuse
with high breaking capacity, Agilent Part Number 2110-0957).
The use of other fuses or materials is prohibited.
WARNING
No operator serviceable parts inside. Refer servicing to qualified
personnel. To prevent electrical shock do not remove covers.
WARNING
If this instrument is not used as specified, the protection provided by the
equipment could be impaired. This instrument must be used in a normal
condition only (in which all means for protection are intact).
CAUTION
This instrument is designed for use in Installation Category II and
Pollution Degree 2 per IEC61010 and 60664 respectively.
E4416-90002.book Page 38 Wednesday, October 25, 2000 6:22 PM
4GIWNCVQT[+PHQTOCVKQP
%QORNKCPEGCPF/CTMKPIU
%QORNKCPEGCPF/CTMKPIU
+'%%QORNKCPEG
This instrument has been designed and tested in accordance with
publication EN61010-1(1993) / IEC 61010-1(1990) +A1(1992) +A2(1995) /
CSA C22.2 No. 1010.1(1993) Safety Requirements for Electrical
Equipment for Measurement, Control and Laboratory Use, and has been
supplied in a safe condition. The instruction documentation contains
information and warnings which must be followed by the user to ensure
safe operation and to maintain the instrument in a safe condition.
'NGEVTQOCIPGVKE%QORCVKDKNKV[
'/%
This product conforms with the protection requirements of European
Council Directive 89/336/EEC for Electromagnetic Compatibility (EMC).
The conformity assessment requirements have been met using the
technical Construction file route to compliance, using EMC test
specifications EN 55011:1991 (Group 1, Class A) and
EN 50082-1:1992.
In order to preserve the EMC performance of the product, any cable
which becomes worn or damaged must be replaced with the same type
and specification.
Refer to the Declaration of Conformity on page 41.
5CHGV[
This instrument has been designed and tested in accordance with
publication EN61010-1(1993) / IEC 1010-1(1990) +A1(1992) +A2(1995) /
CSA C22.2 No. 1010.1(1993) Safety Requirements for Electrical
Equipment for Measurement, Control and Laboratory Use, and has been
supplied in a safe condition. The instruction documentation contains
information and warnings which must be followed by the user to ensure
safe operation and to maintain the instrument in a safe condition.
E4416-90002.book Page 39 Wednesday, October 25, 2000 6:22 PM
%QORNKCPEGCPF/CTMKPIU
4GIWNCVQT[+PHQTOCVKQP
/CTMKPIU
The following markings can be found on the rear panel.
6JG%'OCTMUJQYUVJCVVJGRTQFWEV
EQORNKGUYKVJCNNVJGTGNGXCPV'WTQRGCPNGICN
&KTGEVKXGU
6JG%5#OCTMKUCTGIKUVGTGFVTCFGOCTMQH
VJG%CPCFKCP5VCPFCTFU#UUQEKCVKQPCPF
KPFKECVGUEQORNKCPEGYKVJVJGUVCPFCTFUUGV
QWVD[VJGO
ISM
GROUP 1
CLASS A
6JKUKUVJGU[ODQNQHCP+PFWUVTKCN5EKGPVKHKE
CPF/GFKECN)TQWR%NCUU#RTQFWEV
6JG%6KEMOCTMKUCTGIKUVGTGFVTCFGOCTMQH
VJG#WUVTCNKCP%QOOWPKECVKQPU#WVJQTKV[
6JKUUKIPKHKGUEQORNKCPEGYKVJVJG#WUVTCNKCP
'/%(TCOGYQTM4GIWNCVKQPUWPFGTVJG
VGTOUQHVJG4CFKQEQOOWPKECVKQPU#EVQH
'ZVGTPCN2TQVGEVKXG'CTVJ6GTOKPCN
9JKNGVJKUKUC%NCUU+RTQFWEVRTQXKFGFYKVJ
CRTQVGEVKXGGCTVJKPIEQPFWEVQTKPCRQYGT
EQTFCPGZVGTPCNRTQVGEVKXGGCTVJKPI
VGTOKPCNJCUCNUQDGGPRTQXKFGF6JKU
VGTOKPCNKUHQTWUGYJGTGVJGGCTVJKPI
ECPPQVDGCUUWTGF#VNGCUVCP#9)
GCTVJKPIEQPFWEVQTUJQWNFDGWUGFKPUWEJ
CPKPUVCPEGVQITQWPFVJGKPUVTWOGPVVQCP
CUUWTGFGCTVJVGTOKPCN
E4416-90002.book Page 40 Wednesday, October 25, 2000 6:22 PM
4GIWNCVQT[+PHQTOCVKQP
4GIWNCVQT[+PHQTOCVKQP
4GIWNCVQT[+PHQTOCVKQP
5QWPF'OKUUKQP
*GTUVGNNGTDGUEJGKPKIWPI
Diese Information steht im Zusammenhang mit den Anforderungen der
Maschinenlarminformationsverordnung vom 18 Januar 1991.
• Sound Pressure LpA < 70 dB.
• Am Arbeitsplatz.
• Normaler Betrieb.
•
Nach DIN 45635 T. 19 (Typprufung).
/CPWHCEVWTGTU&GENCTCVKQP
This statement is provided to comply with the requirements of the
German Sound DIN 45635 T. 19 (Typprufung).
• Sound Pressure LpA < 70 dB.
• At operator position.
• Normal operation.
• According to ISO 7779 (Type Test).
E4416-90002.book Page 41 Wednesday, October 25, 2000 6:22 PM
4GIWNCVQT[+PHQTOCVKQP
4GIWNCVQT[+PHQTOCVKQP
&GENCTCVKQPQH%QPHQTOKV[
CEEQTFKPIVQ+51+'%)WKFGCPF%'0%'0.'%'0
/CPWHCEVWTGT U0COG
#IKNGPV6GEJPQNQIKGU7-.KOKVGF
/CPWHCEVWTGTU#FFTGUU
'NGEVTQPKEU2TQFWEVU5QNWVKQPU)TQWR3WGGPUHGTT[
5QWVJ3WGGPUHGTT[
9GUV.QVJKCP'*6)
5EQVNCPF7PKVGF-KPIFQO
&GENCTGUVJCVVJGRTQFWEV
2TQFWEV0COG
5KPING%JCPPGN'2/25GTKGU2QYGT/GVGT
/QFGN0WODGTU
'#
2TQFWEV1RVKQPU
6JKUFGENCTCVKQPEQXGTUCNNQRVKQPUQHVJGCDQXGRTQFWEVUCU
FGVCKNGFKP6%(#
'/%
%QPHQTOUYKVJVJGRTQVGEVKQPTGSWKTGOGPVUQH'WTQRGCP%QWPEKN&KTGEVKXG''%QPVJG
CRRTQZKOCVKQPQHVJGNCYUQHVJGOGODGTUVCVGUTGNCVKPIVQGNGEVTQOCIPGVKEEQORCVKDKNKV[
CICKPUV'/%VGUVURGEKHKECVKQPU'0
)TQWR%NCUU#CPF'0
#U&GVCKNGFKP
'NGEVTQOCIPGVKE%QORCVKDKNKV[
'/%
6GEJPKECN%QPUVTWEVKQP(KNG
6%(0Q#
#UUGUUGFD[
&VK#RRQKPVGF%QORGVGPV$QF[
'/%6GUV%GPVTG
)'%/CTEQPK#XKQPKEU.VF
/CZYGNN$WKNFKPI
&QPKDTKUVNG+PFWUVTKCN2CTM
-;.$
5EQVNCPF7PKVGF-KPIFQO
6GEJPKECN4GRQTV0WODGT%$4FCVGF5GRVGODGT
5CHGV[
6JGRTQFWEVEQPHQTOUVQVJGHQNNQYKPIUCHGV[UVCPFCTFU
+'%
#
#
'0
%5#%0Q
'0
+'%
6JGRTQFWEVJGTGYKVJEQORNKGUYKVJVJGTGSWKTGOGPVUQHVJG.QY8QNVCIG&KTGEVKXG''%
CPFECTTKGUVJG%'OCTMKPICEEQTFKPIN[
5QWVJ3WGGPUHGTT[5EQVNCPF
1EVQDGT
4/'XCPU3WCNKV[/CPCIGT
(QTHWTVJGTKPHQTOCVKQPRNGCUGEQPVCEV[QWTNQECN#IKNGPV6GEJPQNQIKGUUCNGUQHHKEGCIGPVQTFKUVTKDWVQT
E4416-90002.book Page 42 Wednesday, October 25, 2000 6:22 PM
4GIWNCVQT[+PHQTOCVKQP
4GIWNCVQT[+PHQTOCVKQP
&GENCTCVKQPQH%QPHQTOKV[
CEEQTFKPIVQ+51+'%)WKFGCPF%'0%'0.'%'0
/CPWHCEVWTGT U0COG
#IKNGPV6GEJPQNQIKGU7-.KOKVGF
/CPWHCEVWTGTU#FFTGUU
'NGEVTQPKEU2TQFWEVU5QNWVKQPU)TQWR3WGGPUHGTT[
5QWVJ3WGGPUHGTT[
9GUV.QVJKCP'*6)
5EQVNCPF7PKVGF-KPIFQO
&GENCTGUVJCVVJGRTQFWEV
2TQFWEV0COG
5KPING%JCPPGN'2/25GTKGU2QYGT/GVGT
/QFGN0WODGTU
'#
2TQFWEV1RVKQPU
6JKUFGENCTCVKQPEQXGTUCNNQRVKQPUQHVJGCDQXGRTQFWEVUCU
FGVCKNGFKP6%(#
'/%
%QPHQTOUYKVJVJGRTQVGEVKQPTGSWKTGOGPVUQH'WTQRGCP%QWPEKN&KTGEVKXG''%QPVJG
CRRTQZKOCVKQPQHVJGNCYUQHVJGOGODGTUVCVGUTGNCVKPIVQGNGEVTQOCIPGVKEEQORCVKDKNKV[
CICKPUV'/%VGUVURGEKHKECVKQPU'0
)TQWR%NCUU#CPF'0
#U&GVCKNGFKP
'NGEVTQOCIPGVKE%QORCVKDKNKV[
'/%
6GEJPKECN%QPUVTWEVKQP(KNG
6%(0Q#
#UUGUUGFD[
&VK#RRQKPVGF%QORGVGPV$QF[
'/%6GUV%GPVTG
)'%/CTEQPK#XKQPKEU.VF
/CZYGNN$WKNFKPI
&QPKDTKUVNG+PFWUVTKCN2CTM
-;.$
5EQVNCPF7PKVGF-KPIFQO
6GEJPKECN4GRQTV0WODGT%$4FCVGF5GRVGODGT
5CHGV[
6JGRTQFWEVEQPHQTOUVQVJGHQNNQYKPIUCHGV[UVCPFCTFU
+'%
#
#
'0
%5#%0Q
'0
+'%
6JGRTQFWEVJGTGYKVJEQORNKGUYKVJVJGTGSWKTGOGPVUQHVJG.QY8QNVCIG&KTGEVKXG''%
CPFECTTKGUVJG%'OCTMKPICEEQTFKPIN[
5QWVJ3WGGPUHGTT[5EQVNCPF
1EVQDGT
4/'XCPU3WCNKV[/CPCIGT
(QTHWTVJGTKPHQTOCVKQPRNGCUGEQPVCEV[QWTNQECN#IKNGPV6GEJPQNQIKGUUCNGUQHHKEGCIGPVQTFKUVTKDWVQT
E4416-90002.book Page 43 Wednesday, October 25, 2000 6:22 PM
4GURQPUKDKNKVKGUQHVJG%WUVQOGT
4GIWNCVQT[+PHQTOCVKQP
4GURQPUKDKNKVKGUQHVJG%WUVQOGT
The customer shall provide:
• Access to the products during the specified periods of coverage to
perform maintenance
• Adequate working space around the products for servicing by Agilent
personnel.
• Access to and use of all information and facilities determined necessary by
Agilent to service and/or maintain the products. (Insofar as these items may
contain proprietary or classified information, the customer shall assume full
responsibility for safeguarding and protection from wrongful use.)
• Routine operator maintenance and cleaning as specified in the Agilent
Operating and Service Manuals.
• Consumables such as replacement fuses, etc.
E4416-90002.book Page 44 Wednesday, October 25, 2000 6:22 PM
4GIWNCVQT[+PHQTOCVKQP
#IKNGPV5CNGUCPF5GTXKEG1HHKEGU
#IKNGPV5CNGUCPF5GTXKEG1HHKEGU
In any correspondence or telephone conversations, refer to the power
meter by its model number and full serial number. With this information,
the Agilent representative can quickly determine whether your unit is still
within its warranty period.
70+6'&56#6'5
#IKNGPV6GEJPQNQIKGU
VGN
%#0#&#
#IKNGPV6GEJPQNQIKGU%CPCFC+PE
6GUV/GCUWTGOGPV
VGN
'7412'
#IKNGPV6GEJPQNQIKGU
6GUV/GCUWTGOGPV
'WTQRGCP/CTMGVKPI1TICPK\CVKQP
VGN
,#2#0
#IKNGPV6GEJPQNQIKGU,CRCP.VF
VGN
HCZ
.#6+0#/'4+%#
#IKNGPV6GEJPQNQIKGU
.CVKP#OGTKEC4GIKQP*GCFSWCTVGTU75#
VGN
HCZ
#7564#.+#CPF
0'9<'#.#0&
#IKNGPV6GEJPQNQIKGU#WUVTCNKC2V[.VF
VGN
#WUVTCNKC
HCZ
#WUVTCNKC
VGN
0GY<GCNCPF
HCZ
0GY<GCNCPF
#5+#2#%+(+%
#IKNGPV6GEJPQNQIKGU*QPI-QPI
VGN
HCZ