1
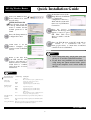
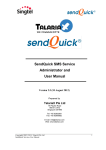
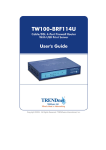
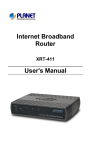
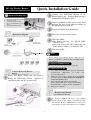
802.11g Wireless Router
Quick Installation Guide
Connect your DSL/Cable Modem to the
Internet port on the Wireless Router using a
standard RJ-45 Ethernet cable.
Check for Packing List:
1.
2.
3.
4.
5.
One Wireless G BroadBand Router
One Power Adapter
One Ethernet Network Cable
One Set-up CD-ROM with User’s
Guide
One Quick Installation Guide
Connect an Ethernet cable to one of the LAN
ports on the back of the Wireless Router to
the Ethernet port on your PC.
Turn on the DSL/Cable modem first.
Application Diagram
Then turn on your wireless router.
Check the LEDs:
• The Power, Internet, and WLAN LEDs
should be ON.
• For each active LAN (PC) connection, the
LAN Activity LEDs (1-4) should be ON.
Turn on your PC.
Notes
Before setting up the Wireless Router, make sure your
PCs are configured to "Obtain an IP (or TCP/IP) address
automatically".
For Windows 98/ME/Macintosh
Please refer to the User'
s Guide found on the CD.
For Windows 2000 & XP
Go to Start Control Panel Network and Internet
Connections (Right-click on) Local Area
Connection Properties.
2. Make sure the box next to Internet Protocol (TCP/IP)
is checked. Click the Internet Protocol (TCP/IP) and
click the Properties button.
3. Select "Obtain an IP address automatically".
Select "Obtain DNS server address automatically".
Then click OK to complete the PC configuration.
4. Restart your computer.
1.
Connect the 802.11g Wireless
Router
Before you begin, ensure that the Wireless
Router, the DSL/Cable modem supplied by
your IP Provider, and PC are turned off.
Router Configuration
(for Internet Access)
For Windows 2000 & XP users, your computer
should obtain an IP Address automatically from
the Wireless Router'
s DHCP Server, after you'
ve
done the above steps and restarted your computer.
Existing Connection
1
802.11g Wireless Router
Quick Installation Guide
On the final screen of the
Setup Wizard, click Finish
to complete the
configuration. Wait for a
while and the system will
run a test of your Internet
Connection.
Start your WEB browser.
In the Address box, enter
the following:
HTTP://192.168.1.254
The following screen will
come up. The default user
name is "admin" and the
default password is left
blank.
Once the process is
finished, the message will
appear to ask you to press
OK. Then click Close
when you wish to exit the
Wizard.
Press the Setup Wizard to
configure the router.
Start your Web Browser on the PC again and try
to connect to a well-known site (i.e.,
www.google.com.tw) to check that an Internet
connection can be established.
Click Next to let the
Wizard configure your
wireless router for Internet
Access.
Notes
• If the connection fails, check both your data
of step 4~15 and the Cable/DSL modem.
• If you have any problems or are unable to
setup using this Quick Install Guide, please
refer to the complete User'
s Guide found on
the CD.
Refer to the data from
your ISP and the table
below to select the type of
Internet Access you have.
Click Next to continue
and follow the on-screen
instructions.
Notes
Type of Internet Access
Connection Type
Data Required
Usually, none.
Cable modem
(TV-style cable)
DSL/ADSL modem
(phone-type cable)
None
But some ISP may require a particular Hostname,
Domain name, or MAC (physical) address.
PPPoE
Login name and password.
L2TP
Login name and password, Server IP Address.
PPPoE
Login name and password.
PPTP
Login name and password, Server IP Address.
L2TP
Login name and password, Server IP Address.
None
But some ISP may require a particular Hostname,
Usually, none.
Domain name, or MAC (physical) address.
Telstra Bigpond Cable
Please enter the Server IP Address, Login User Name and Login Password.
(Australia)
SingTel RAS
Please enter the Login User Name, Login Password and RAS Plan (512K or
64K).
Other (e.g. Fixed Wireless)
Please choose one of the two ways for your Internet Connection: Dynamic
IP Address assignment or Static IP Address assignment.
M73-AP009-730
2