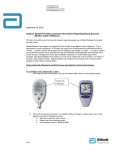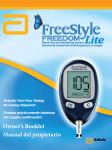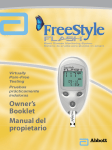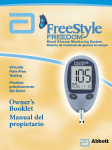
1
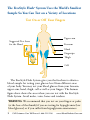
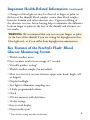
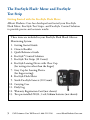
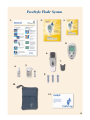
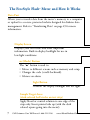
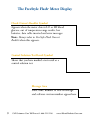
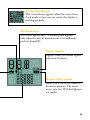
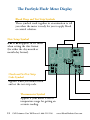
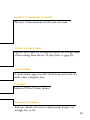
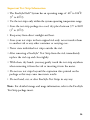
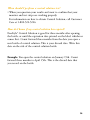
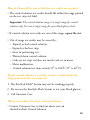
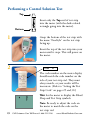
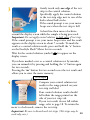
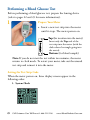
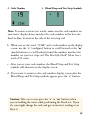
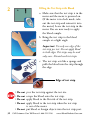
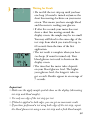
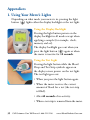
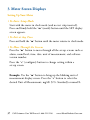
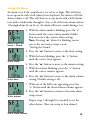
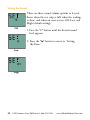
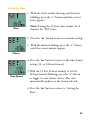
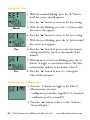
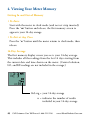
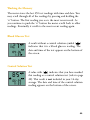
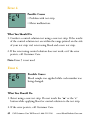
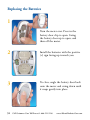
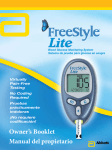
Owner’s
Booklet
B lo o d G lu c o s e M o n it o r in g S y s t e m
Table of Contents
Important Information About Your
FreeStyle Flash Blood Glucose Monitoring System................................2
Important Health Related Information............................................... 3-4
™
The FreeStyle Flash™ Meter and FreeStyle Test Strip
Getting Started With the FreeStyle Flash Meter.................................. 5-6
The FreeStyle Flash Meter and How It Works.................................... 7-8
The FreeStyle Flash Meter Display . ................................................. 9-12
The FreeStyle Test Strip.................................................................. 13-14
The FreeStyle Control Solution
All About FreeStyle Control Solution.............................................. 15-18
Performing a Control Solution Test................................................. 19-20
The FreeStyle Lancing Device
FreeStyle Lancing Device......................................................................21
Using the Lancing Device............................................................... 22-23
Lancing on Alternate Sites.....................................................................24
Lancing your Finger..............................................................................25
Removing the Lancet............................................................................26
Testing Your Blood Glucose
Blood Glucose Testing and Components........................................ 27-28
Performing a Blood Glucose Test.................................................... 29-32
LO and HI Readings....................................................................... 33-34
i
Call Customer Care Toll Free at 1-888-522-5226
www.AbbottDiabetesCare.com
Appendices
Using your Meter’s Lights.....................................................................35
Using Alarms........................................................................................36
Meter Screen Displays..................................................................... 37-42
Setting Alarms.......................................................................................38
Viewing Your Meter Memory.......................................................... 43-45
Transferring Data..................................................................................45
Error Messages................................................................................ 46-49
Batteries................................................................................................50
Replacing the Batteries..........................................................................51
Troubleshooting ............................................................................. 53-54
Caring for Your Meter...........................................................................55
Meter Specifications..............................................................................56
Index............................................................................................... 57-64
Target Range Guideline.........................................................................65
Meter Serial Number............................................................................65
Important Phone Numbers...................................................................65
ii
The FreeStyle Flash™ System Uses the World’s Smallest
Sample So You Can Test on a Variety of Locations
Test On or Off Your Fingers
Suggested Test Areas
for the Hand
Upper arm
Forearm
Hand
Fingertips
Thigh
Calf
The FreeStyle Flash System gives you the freedom to obtain a
blood sample for testing your glucose level from different areas
of your body. You may test your blood glucose from your forearm,
upper arm, hand, thigh, calf as well as your fingers. The human
figure above shows the areas where you can test with the FreeStyle
Flash System. Avoid moles, veins, bones and tendons.
WARNING: We recommend that you test on your fingers or palm
(at the base of the thumb) if you are testing for hypoglycemia (low
blood glucose) or if you suffer from hypoglycemia unawareness.
1
Call Customer Care Toll Free at 1-888-522-5226
www.AbbottDiabetesCare.com
Important Information About Your FreeStyle
Flash Blood Glucose Monitoring System
™
How the FreeStyle Flash System Should Be Used
• The FreeStyle Flash System is intended for use outside the body (in other words, in vitro diagnostic use only).
• The FreeStyle Flash System is used for measuring blood glucose
(also known as blood sugar) from samples taken from the forearm,
upper arm, hand, thigh, calf as well as your fingers (refer to page
1 for more information).
• The FreeStyle Flash Meter should only be used with FreeStyle
Test Strips and FreeStyle Control Solution. Using other brands
of test strips and control solutions with the FreeStyle Flash
Meter can produce inaccurate results.
®
Do use the FreeStyle Flash System for:
•Testing blood glucose.
•Testing only with fresh capillary whole blood samples.
Do not use the FreeStyle Flash System for:
•The diagnosis of diabetes.
•Testing on newborns.
•Testing of arterial blood.
WARNING: Keep the FreeStyle Flash System away from young
children as it contains small parts that may be dangerous if
swallowed.
Caution: Please read all the instructions provided in this Owner’s
Booklet and practice the testing procedures before using the
FreeStyle Flash System. Blood glucose monitoring should be
done with the guidance of a healthcare professional.
2
Important Health-Related Information
• Severe dehydration and excessive water loss may cause false low
results. If you believe you are suffering from severe dehydration,
consult your physician immediately.
• Test results below 60 mg/dL (3.3 mmol/L) mean low blood glucose
(hypoglycemia).
• Test results greater than 240 mg/dL (13.3 mmol/L) mean high
blood glucose (hyperglycemia).
• If you get results below 60 mg/dL or above 240 mg/dL, and do not
have symptoms of hypoglycemia or hyperglycemia (refer to pages
33 and 34), repeat the test. If you have symptoms or continue to
get results that fall below 60 mg/dL or above 240 mg/dL, follow
the treatment advice of your healthcare professional.
• If you are experiencing symptoms that are not consistent with
your blood glucose test and you have followed all instructions described in the FreeStyle Flash Owner’s Booklet, call your
healthcare professional.
™
• Physiologic differences in the circulation between the finger or
palm (at the base of the thumb) and other test sites like the fore-
arm, upper arm, hand, thigh, and calf may result in differences in blood glucose measurements from these test sites and your finger
or palm (at the base of the thumb). Differences in blood glucose
measurements between the other test sites and your finger or palm (at the base of the thumb) may be observed after eating, insulin medication, or exercise.
3
Call Customer Care Toll Free at 1-888-522-5226
www.AbbottDiabetesCare.com
Important Health-Related Information (continued)
• Changes in blood glucose may be observed in finger or palm (at
the base of the thumb) blood samples sooner than blood samples
from the forearm and other alternate sites. Vigorous rubbing of
the alternate test sites before lancing helps to minimize the difference
between finger or palm (at the base of the thumb) and alternate site
test results.
WARNING: We recommend that you test on your fingers or palm
(at the base of the thumb) if you are testing for hypoglycemia (low
blood glucose), or if you suffer from hypoglycemia unawareness.
Key Features of the FreeStyle Flash Blood
Glucose Monitoring System
™
• World’s smallest meter
• Fast, accurate results in an average of 7 seconds
• Virtually painless testing*
• World’s smallest sample (3/10 microliter)
• Most test sites (test on your forearm, upper arm, hand, thigh, calf, or fingers)
• Display backlight
• Test light to illuminate sampling area
• 4 daily, programmable alarms
• Clock
• 250-test memory with date/time
• 14-day average
• Easy-to-read display
• Data interface port
4
* Data on file: testing was done on forearm.
The FreeStyle Flash Meter and FreeStyle
Test Strip
™
®
Getting Started with the FreeStyle Flash Meter
Abbott Diabetes Care has developed and tested your FreeStyle
Flash Meter, FreeStyle Test Strips, and FreeStyle Control Solution
to provide precise and accurate results.
These items are included in your FreeStyle Flash Blood Glucose
Monitoring System:
1. Getting Started Guide
2. Owner’s Booklet
3. Quick Reference Guide
4. FreeStyle® Control Solution
5.FreeStyle Test Strips (10 Count)
6. FreeStyle Lancing Device with Clear Cap
(for testing sites other than the finger)
7. Grey Cap for Lancing Device
(for finger testing)
8.FreeStyle Flash Meter
9. Sterile FreeStyle Lancets (10 Count)
10. Carrying Case
11. Daily Log
12. Warranty Registration Card (not shown)
13. Two pre-installed #2032, 3 volt, lithium batteries (not shown)
5
Call Customer Care Toll Free at 1-888-522-5226
www.AbbottDiabetesCare.com
FreeStyle Flash System
™
1.
2.
3.
8.
6.
7.
4.
5.
9.
10.
11.
6
The FreeStyle Flash Meter and How It Works
™
Data Port
Allows you to transfer data from the meter’s memory to a computer
or upload to a secure, protected website designed for diabetes data
management. Refer to “Transferring Data” on page 45 for more
information.
Display Screen
Displays your test results and other important
information. Built-in display backlight for use in
low-light conditions.
m (Mode) Button
The “m” button is used to:
• Moves to different screens such as memory and setup.
• Changes the code (scrolls backward).
• Silences an alarm.
Light Button
Controls the display backlight and test light.
Sample Target Areas
(dark-colored half-circles on test strip)
Apply blood or control solution to one edge of the
strip only. Insert printed side up (with the dark
colored square going into the meter).
7
Call Customer Care Toll Free at 1-888-522-5226
www.AbbottDiabetesCare.com
c (Configure) Button
The “c” button is used to:
• Marks a test result as control
solution.
• Changes the test strip code
(scrolls forward), time, alarm
settings, sound options, date,
unit of measurement, and
reviews stored readings.
• Silences an alarm.
Test Strip Port
Insert the Top end of a new FreeStyle
Test Strip here. The meter powers on
when you insert the test strip. The test
strip port has a test light that can be
used to light a testing area in low-light
conditions.
Top (for insertion into meter)
FreeStyle® Test Strip
Bottom (for blood sample)
Edge of test strip
8
The FreeStyle Flash Meter Display
™
Check Owner’s Booklet Symbol
Appears when the meter detects LO or HI blood
glucose, out of temperature range results, low
batteries, data cable inserted and error messages.
Note: Always refer to FreeStyle Flash Owner’s
Booklet when this appears.
Control Solution Test Result Symbol
Shows that you have marked a test result as a
control solution test.
Message Area
Date, time, number of tests in average,
and software version number appear here.
9
Call Customer Care Toll Free at 1-888-522-5226
www.AbbottDiabetesCare.com
System Check Screen
This screen always appears when the meter leaves
clock mode so that you can ensure the display is
working properly.
Test Result Area
Test results appear here. A decimal point appears
only when the unit of measurement is in millimoles
per liter (mmol/L).
Battery Symbol
Appears when you should replace
your meter batteries.
Memory Mode Symbol
Shows you a test result stored in
the meter memory. The meter
stores your last 250 blood glucose
test results.
10
The FreeStyle Flash Meter Display
™
Blood Drop and Test Strip Symbols
These symbols work together in an animation to tell
you when the meter is ready for you to apply blood
or control solution.
Date Setup Symbol
d-m or m-d appears in Set mode
when setting the date format
(for either the day-month or
month-day format).
Check and Set Test Strip
Code Symbol
Appears when you should check
and set the test strip code.
Thermometer Symbol
Appears if your meter is out of
temperature range for getting an
accurate reading.
11
Call Customer Care Toll Free at 1-888-522-5226
www.AbbottDiabetesCare.com
mg/dL (U.S. Standard) or mmol/L
The units of measurement used for your test result.
14-Day Average Symbol
Appears with a glucose reading that equals the average value
of the readings from the last 14 days (refer to page 43).
Clock Symbol
A clock symbol appears in the Clock mode and in the Set
mode when setting the time.
P Symbol
Indicates PM in 12-hour format.
Sound Level Symbols
Indicates whether the meter sound prompt (beep) is set
to high, low, or off.
12
The FreeStyle Test Strip
®
Apply blood or control solution to only
one edge of the test strip per test.
Important: Use only one edge of the test
strip per test. Do not apply blood to both
edges. Test strips may be used only once.
Discard used test strips.
Edge of
test strip
The Test Strip Does the Work
The test strip acts like a sponge and pulls
the blood into the strip through the edge.
Edge of test strip
WARNING: Keep the test strip vial away from children. The cap
is a choking hazard. The cap or vial contains drying agents that may be harmful if inhaled or swallowed and may cause skin or
eye irritation.
13 Call Customer Care Toll Free at 1-888-522-5226
www.AbbottDiabetesCare.com
Important Test Strip Information
• The FreeStyle Flash™ System has an operating range of 40º to 104ºF
(5º to 40ºC).
• Use the test strips only within the system operating temperature range.
• Store the test strip package in a cool, dry place between 37º to 86ºF
(3º to 30ºC).
• Keep away from direct sunlight and heat.
• Store your test strips in their original vial only; never transfer them to another vial or any other container or carrying case.
• Never store individual test strips outside the vial.
•After removing a FreeStyle Test Strip from the vial, immediately
replace the vial cap and close tightly.
®
• With clean, dry hands, you may gently touch the test strip anywhere
when removing it from the vial or inserting it into the meter.
• Do not use test strips beyond the expiration date printed on the
package as this may cause inaccurate results.
• Do not bend, cut, or alter FreeStyle Test Strips in any way.
Note: For detailed storage and usage information, refer to the FreeStyle Test Strip package insert.
14
The FreeStyle Control Solution
®
All About FreeStyle Control Solution
What is FreeStyle Control Solution?
It is a red liquid that contains a fixed amount of
glucose and has three important uses:
• To practice testing without having to use your
own blood.
• To ensure that your meter and test strips are
working together properly.
• To check that you are following the correct testing procedure.
What is the best way to check my FreeStyle Flash™ Meter?
Perform a test using the FreeStyle Control Solution. A control solution
test follows the same procedure as a blood glucose test, except that you
use a sample of control solution instead of a drop of blood (refer to
pages 19 to 20 for information on performing a control solution test).
How does the control solution test tell me my meter is
working properly?
If the meter reading is within the control solution acceptable range,
the meter is working properly.
15
Call Customer Care Toll Free at 1-888-522-5226
www.AbbottDiabetesCare.com
When should I perform a control solution test?
• When you question your results and want to confirm that your
monitor and test strips are working properly.
For information on how to obtain Control Solution, call Customer
Care at 1-800-522-5226.
How do I know if my control solution has expired?
FreeStyle Control Solution is good for three months after opening
the bottle, or until the expiration date printed on the label, whichever
comes first. Count forward three months from the date you open a
new bottle of control solution. This is your discard date. Write this
date on the side of the control solution bottle.
®
Example: You open the control solution on January 15th. Count
forward three months to April 15th. This is the discard date that
you record on the bottle.
16
Ensuring Accurate Control Solution Results.
• Use only FreeStyle Control Solution with your FreeStyle Flash™
Meter. The use of other brands of control solution with the FreeStyle
Flash Meter may produce inaccurate results.
®
• Replace the cap on the control solution bottle immediately after using.
• Do not use control solution past the expiration date or you may get
inaccurate results.
• Do not add water or any liquid to control solution.
• Control solution tests are specified to be accurate only when
performed between 59º to 104ºF (15º to 40ºC).
Caution: Results from FreeStyle Control Solution tests do not
reflect your blood glucose level. 17 Call Customer Care Toll Free at 1-888-522-5226
www.AbbottDiabetesCare.com
How do I know if the control solution test results are accurate?
• The control solution test results should fall within the range printed
on the test strip vial label.
Important: The control solution range is a target range for control
solution only. It is not a target range for your blood glucose level.
• If control solution test results are out of this range, repeat the test.
• Out of range test results may be caused by:
– Expired or bad control solution.
– Expired or bad test strip.
– Error in performing test.
– Watered-down control solution.
– Code on test strip vial does not match code set in meter.
– Meter malfunction.
– Control solution test done outside 59º to 104ºF (15º to 40ºC).
If your control solution test results continue to fall outside the
range printed on the test strip vial:
1. The FreeStyle Flash™ System may not be working properly.
2. Do not use the FreeStyle Flash System to test your blood glucose.
3. Call Customer Care.
Where can I obtain FreeStyle Control Solution?
• Contact Customer Care to find out where you can
obtain FreeStyle Control Solution.
18
Performing a Control Solution Test
Top
Bottom
1
Insert only the Top end of test strip
into the meter (with the dark-colored
rectangle going into the meter).
Grasp the bottom of the test strip with the name “FreeStyle” on the test strip
facing up.
Insert the top of the test strip into your
meter until it stops. This will power on
the meter.
2
Code
27
The code number on the meter display
should match the code number on the
side of your test strip vial. They must
always match, or your results will be
inaccurate. (Refer to “Setting the Test
Strip Code” on pages 29 and 30.)
Wait for the meter to display the Blood
Drop and Test Strip symbols.
Note: Be ready to adjust the code on
the meter to match the code on the
test strip vial.
19
Call Customer Care Toll Free at 1-888-522-5226
www.AbbottDiabetesCare.com
3
Gently touch only one edge of the test
strip to the control solution. Specifically, apply the control solution
to the test strip edge next to one of the dark-colored half-circles.
If the sound prompt is on, your meter beeps once when the test strip is full.
A short line then moves clockwise
around the display screen while the sample is being processed.
Important: Do not apply control solution to both edges of test strip.
If the sound prompt is on, your meter beeps twice and the result
appears on the display screen in about 7 seconds. To mark the
result as a control solution result, press and hold the “c” button
on the FreeStyle Flash™ Meter for two seconds.
Wait for the control solution symbol ( ) to appear on the
display screen.
If you have marked a test as a control solution test by mistake,
you can unmark it by pressing and holding the “c” button again
for two seconds.
Pressing the “m” button for two seconds saves the test result and
allows you to enter the meter memory.
77-115 mg/dL
4
Compare your control solution test
results to the range printed on your
test strip vial label.
Your control solution results should
fall within the range printed on the
side of your test strip vial.
If your test results do not fall within
range, refer to page 18. To return the
meter to clock mode, remove the test strip.
Important: Be sure to discard used test strips. (Test strips may be
20
used only once.)
The FreeStyle Lancing Device
®
Cocking Handle
Depth Settings Dial
Depth Indicator Window
Release Button
Clear Cap
(for testing sites other
than the finger)
Grey Cap
(for finger testing)
21 Call Customer Care Toll Free at 1-888-522-5226
www.AbbottDiabetesCare.com
Using the Lancing Device
1
Remove Cap
2
Insert Lancet
3
Twist Off the Rounded Top
Snap off the cap on the lancing device
at an angle.
Insert a new FreeStyle Lancet firmly
into the white lancet holder cup.
(Pushing the lancet into the cup may cock the device; this is okay.)
®
Hold the lancet firmly in place with
one hand; use your other hand to
twist off the rounded top.
22
4
Replace Cap
Replace the cap until it snaps or clicks
into place. Be careful not to touch the
exposed needle on the lancet.
Important: Use the grey cap for finger
tests. Lancing with the clear cap may be
completed at the following test sites: forearm, upper arm, hand, thigh, and calf.
Page 24 shows an example of lancing on
the forearm.
5
Set the Lancing Level
The FreeStyle Lancing Device offers
four different depth settings. Move the
dial to the desired setting as shown in
the depth indicator window. Level 1
is the shallowest depth; Level 4 is the
deepest. To lance parts of the body other
than the finger, we recommend that you
start at Level (2) and use the clear cap.
To lance your finger, we recommend
that you set the depth setting to its
shallowest depth (1) and use the grey cap.
6
Cock the Handle
Pull the dark grey cocking handle out
until it clicks. (You may have already
cocked the handle in step 2; this is
okay.)
You are now ready to perform a blood
glucose test.
23
®
Lancing
Clear Cap
Lancing Your Forearm, Upper Arm,
Hand, Thigh, or Calf
Important: Use the clear cap for testing
on your forearm, upper arm, hand, thigh,
or calf.
To bring fresh blood to the surface of the
test site, rub the test site vigorously for a
few seconds until you feel it getting warm.
a. We recommend that you set the depth setting on the lancing device to (2).
b. Hold the clear cap down against the top of your test site. Depress the
release button. Do not lift up.
c. Continue to hold the lancing device and gradually increase pressure for several seconds.
d. While holding the lancing device on
your test site, look through the clear cap; the blood sample should be about the size of a pinhead (example: ).
e. Lift the lancing device straight up; be careful not to smear the blood sample on your test site.
Important: Avoid lancing areas with obvious
veins or moles to avoid excess bleeding.
Important: Avoid lancing areas where
tendons or bones stick out (for example,
hand bones and ankle bones).
24
Lancing (continued)
Lancing Your Finger
Important: Use the grey cap for finger
testing.
Grey cap
Stimulate blood flow by keeping your
hand warm or by lowering your hand
to waist level and by gently massaging
your finger.
a. We recommend that you set the
depth setting on the lancing device
to its shallowest depth (1).
b. Lightly touch the lancing device
(with the grey cap) against the side
of your finger tip.
c. Press the release button, and then
place the lancing device on the table
or desk near you.
d. Gently squeeze your finger, if needed,
until a blood drop the size of a
pinhead forms (example: ).
25 Call Customer Care Toll Free at 1-888-522-5226
www.AbbottDiabetesCare.com
Removing the Lancet
When you have finished testing, snap off
the cap from the lancing device.
Hold the lancet over a sharps container
or a puncture-proof container with a lid.
Pinch the white clip that holds the lancet
until the lancet falls out.
Potential Bruising
It is possible you may experience bruising
at the test site. If bruising does occur, you
may choose to lance your finger or another
site instead of your forearm. Refer to page
1 for information on testing other sites.
Maintenance
Use isopropyl alcohol or soap and water
to wipe the outside of the lancing device.
If you wish, remove the cap, wash it in
warm water and rinse well.
Important: Do not immerse the body of the
lancing device in water or any other liquid.
26
Testing Your Blood Glucose
Important: To ensure accurate results, wash
your hands and test site (for example, your
forearm) with soap and water. Make sure
there is no cream or lotion on the test site.
Thoroughly dry your hands and test site.
• With the FreeStyle Flash™ System, you can test your blood glucose
on your forearm, upper arm, hand, thigh, calf, as well as your fingers.
• Testing with the FreeStyle Flash System requires a very small
sample size, just 3/10th microliter of blood; about the size of a
pinhead (example: ).
• Most healthcare professionals recommend testing when blood
glucose values are stable: before meals and before bedtime. How ever, when blood glucose is changing, blood from the fingertips
or palm (at the base of the thumb) may show these changes sooner than blood from other sites.
WARNING: We recommend that you test on your fingers or palm
(at the base of the thumb) if you are testing for hypoglycemia (low
blood glucose) or if you suffer from hypoglycemia unawareness.
Times when you may be checking for low blood glucose include:
• When you are feeling symptoms such as weakness, sweating,
nervousness, headache, or confusion.
• When you have delayed a meal after taking insulin.
• When your healthcare professional advises you to do so.
27 Call Customer Care Toll Free at 1-888-522-5226
www.AbbottDiabetesCare.com
Blood Glucose Testing Components
Meter
Lancing Device
Test Strips
Lancet
Control
Solution
Clear Cap (for
testing sites
other than
the finger)
Grey Cap (for
testing on the
finger)
28
Performing a Blood Glucose Test
Before performing a blood glucose test, prepare the lancing device
(refer to pages 22 and 23 for more information).
1
Prepare Your Meter
a. Insert a new test strip into the meter
until it stops. The meter powers on.
Top (for insertion into the meter)
Insert only the Top end of the
test strip into the meter (with the
dark-colored rectangle going into
the meter).
Bottom (for blood sample)
Note: If you do not start the test within two minutes, the meter
returns to clock mode. To restart your meter, take out the unused
test strip and reinsert it into the meter.
Setting the Test Strip Code
When the meter powers on, three display screens appear in the
following order:
1. System Check
29 Call Customer Care Toll Free at 1-888-522-5226
www.AbbottDiabetesCare.com
2. Code Number
3. Blood Drop and Test Strip Symbols
Note: To ensure accurate test results, make sure the code number on
your meter display always matches the code number in the box outlined in blue, located on the side of the test strip vial.
b. When you see the word “COdE” and a code number on the display
screen, use the “c” (configure) button to scroll forward or the “m”
(mode) button to scroll backward until the number matches the
number on your test strip vial. The FreeStyle Flash™ Meter has a
total of 50 codes.
c. After you set your code number, the Blood Drop and Test Strip
symbols will alternate on the display screen.
d. If you want to return to the code number display screen after the
Blood Drop and Test Strip symbols appear, press the “c” button.
Caution: Take care to not press the “c” or “m” buttons when
you are holding the meter while performing the blood test. If you
do, you might change the code and get an incorrect reading or an
Error 6.
30
2
Filling the Test Strip with Blood
a. Make sure that the test strip is in the
meter and the meter is powered on.
(If the meter is in clock mode, take
out the test strip and reinsert it into
the meter.) Leave the test strip in the
meter. You are now ready to apply
the blood sample.
b. Bring the test strip to the blood
sample at a slight angle.
Important: Use only one edge of the test strip per test. Do not apply blood to both edges. Test strips may be used only once. Discard used test strips.
c. The test strip acts like a sponge and
pulls the blood into the strip through the edge.
Edge of test strip
• Do not
• Do not
• Do not
• Do not
• Do not
press the test strip against the test site.
scrape the blood onto the test strip.
apply blood to the flat side of the test strip.
apply blood to the test strip when the test strip
is out of the meter.
put blood or foreign objects into the test strip port.
31 Call Customer Care Toll Free at 1-888-522-5226
www.AbbottDiabetesCare.com
3
Waiting for Result
• Do not lift the test strip up until you hear
one beep (if sound is turned on) or see the
short line moving clockwise on your meter screen. This means you have enough blood
and the meter is reading your glucose.
• If after five seconds your meter does not
show a short line moving around the
display screen, the sample may be too small.
You may add blood to the same edge of the
test strip from which you started for up to
60 seconds from the time of the first
application.
• The test result is complete when you hear
two beeps (if sound is turned on). Your
blood glucose test result is shown on the
display screen.
• The time that the meter takes depends
on your blood glucose level. The higher
your glucose level, the longer it takes to
get a result. Results appear in an average of
7 seconds.
Important:
• Make sure the apply sample symbols show on the display (alternating
test strip and blood sample).
• Use only one edge of the test strip per test.
• If blood is applied to both edges, you can get an inaccurate result.
• If you have performed a test using both edges of the test strip, repeat
the blood glucose test using a new test strip and a fresh blood sample.
32
LO Readings
Important: Low or high blood glucose readings can indicate a potentially
serious medical condition. The FreeStyle Flash™ Meter displays results
from 20 to 500 mg/dL (1.1 to 27.8 mmol/L).
LO Reading
LO Reading
If your test result is lower than 20 mg/dL
(1.1 mmol/L), LO appears on the meter
display screen. This reading indicates severe
hypoglycemia (low blood glucose).
LO Reading with Symptoms
If you have a LO reading and have symptoms such
as weakness, sweating, nervousness, headache, or
confusion, then follow your doctor’s recommendations to treat hypoglycemia.
LO Reading without Symptoms
If you get a LO reading, but have no symptoms of
low blood glucose, then retest with a new test strip.
If you still get a LO reading, follow your doctor’s
recommendation to treat hypoglycemia.
33 Call Customer Care Toll Free at 1-888-522-5226
www.AbbottDiabetesCare.com
HI Readings
HI Reading
If your test is above 500 mg/dL (27.8 mmol/L),
HI appears on the display screen. This indicates
severe hyperglycemia (high blood glucose).
HI Reading
HI Reading with Symptoms
If you feel symptoms such as fatigue, thirst, excess
urination, or blurry vision, then follow your
doctor’s recommendation to treat hyperglycemia.
HI Reading without Symptoms
If you get a HI reading, but have no symptoms
of high blood glucose, then retest with a new test
strip. If you still get a HI reading, follow your
doctor’s recommendation to treat hyperglycemia.
34
Appendices
1. Using Your Meter’s Lights
Depending on what mode your meter is in, pressing the light
button ( ) lights either the display backlight or the test light.
Using the Display Backlight
Pressing the light button powers on the
display backlight in all modes except when
applying a sample (for example, clock,
memory and set).
The display backlight goes out when you
press the light button ( ) again or when
the meter is inactive for 10 seconds.
Using the Test Light
Pressing the light button while the Blood
Drop and Test Strip symbols appear on
the display screen powers on the test light.
The test light goes out:
• When you press the light button again.
• When the meter receives the correct amount of blood for a test (the test strip
is filled).
• After 60 seconds of no activity.
• When a test strip is removed from the meter.
35 Call Customer Care Toll Free at 1-888-522-5226
www.AbbottDiabetesCare.com
If you use either the backlight or the test light during the test mode,
the backlight lights again to show you the test results after the
measurement is complete.
2. Using Alarms
There are four alarms that you can set. When an alarm goes
off, you hear the sound for up to 15 seconds. You can silence
the alarms by pressing either the “m” or “c” buttons or by
inserting a test strip.
The bell ( ) icon will be displayed if any of the four alarms
has been set.
Refer to page 38 for information on setting an alarm.
36
3. Meter Screen Displays
Setting Up Your Meter
• To Enter Setup Mode
Start with the meter in clock mode (and no test strip inserted).
Press and firmly hold the “m” (mode) button until the SET display
screen appears.
• To Exit at Any Time
Press and hold the “m” button until the meter returns to clock mode.
• To Move Through the Screens
Press the “m” button to move through all the set-up screens such as
alarm, sound level, time, date, unit of measurement, and software
version number.
Press the “c” (configure) button to change setting within a
set-up screen.
Example: Use the “m” button to bring up the blinking unit of
measurement display screen. Press the “c” button to select the
desired Unit of Measurement; mg/dL (U.S. Standard) or mmol/L.
37 Call Customer Care Toll Free at 1-888-522-5226
www.AbbottDiabetesCare.com
Setting the Alarm
An alarm is set if the sound level is set to low or high. This will show
in set-up mode with a bell (alarm) icon displayed. An alarm is off if the
alarm volume is off. This will show in set-up mode with a bell (alarm)
icon with a slash/stroke through it. Any or all of the four alarms (alarm
1 through alarm 4) can be set. An alarm will never sound during a test.
1. With the alarm number blinking, press the “c”
button until the correct alarm number blinks.
You can review the current alarm setting.
Note: Pressing “m” when 0 is blinking, moves
Move to next Set you to the next meter setup screen:
screen – Sound
“Setting the Sound.”
2. Press the “m” button to move to the hour setting.
Select alarm
3. With the hour blinking, press the “c” button
until the correct hour appears.
4. Press the “m” button to move to the minute setting.
5. With the minute blinking, press the “c” button
until the correct minute appears.
Select hour
6. Press the “m” button to move to the alarm volume
setting. Default setting is off.
7. With one of the bell icons appearing, press the
“c” button until the desired alarm volume appears.
Select minute
8. Press the “m” button to return to the main alarm setup screen.
Repeat steps 1 through 8 (as needed) to set the
other alarms. (You can set up to four alarms.)
Select alarm volume
38
Setting the Sound
There are three sound volume options to let you
know when the test strip is full, when the reading
is done, and when an error occurs: Off, Low, and
High (default setting).
Off
1.Press the “c” button until the desired sound level appears.
2.Press the “m” button to move to “Setting the Time.”
Low
High
39 Call Customer Care Toll Free at 1-888-522-5226
www.AbbottDiabetesCare.com
Setting the Time
1. With the clock symbol showing and the hour
blinking, press the “c” button until the correct
hour appears.
Hour
Note: If using the 12-hour time format, the P
displays for “PM” times.
2. Press the “m” button to move to minute setting.
3. With the minute blinking, press the “c” button
until the correct minute appears.
Minute
4. Press the “m” button to move to the time format
setting (12- or 24-hour format).
Time Format
5.With the 12 (for 12-hour format) or 24 (for
24-hour format) blinking, press the “c” button
to toggle to your format choice. The time
automatically updates to the format selected.
6. Press the “m” button to move to “Setting the
Date.”
40
Setting the Date
1.With the month blinking, press the “c” button until the correct month appears.
2.Press the “m” button to move to the day setting.
Month
3.With the day blinking, press the “c” button until the correct day appears.
4.Press the “m” button to move to the year setting.
5.With the year blinking, press the “c” button until
the correct year appears.
Day
6. Press the “m” button to move to the date format
setting (month-day (m-d) or day-month (d-m)
format).
7. With the m-d or d-m icon blinking, press the “c”
button to toggle to your format choice. The date
automatically updates to the format selected.
Year
8. Press the “m” button to move to “Setting the
Unit of Measurement.”
Setting the Unit of Measurement
1. Press the “c” button to toggle to the Unit of
Measurement you want:
• milligrams per deciliter (mg/dL); U.S. Standard
• millimoles per liter (mmol/L)
2. Press the “m” button to move to the “Software
Version Display.”
41 Call Customer Care Toll Free at 1-888-522-5226
www.AbbottDiabetesCare.com
Software Version Display
This is the software version programmed in your
FreeStyle Flash™ Meter. It is for display only,
and cannot be changed.
The picture to the left is an example. Your meter
may have a different number.
Write the software version shown on your meter
display on page 65.
Customer Care may ask you to provide this number
when you call with questions
or concerns regarding your FreeStyle Flash Meter.
To exit the software version display screen, press
and hold the “m” button for a few seconds until
the meter returns to clock mode.
42
4. Viewing Your Meter Memory
Getting In and Out of Memory
• To Enter
Start with the meter in clock mode (and no test strip inserted).
Press the “m” button and release; the first memory screen to
appear is your 14-day average.
• To Exit at Any Time
Press the “m” button until the meter returns to clock mode, then release.
14-Day Average
The first memory display screen you see is your 14-day average.
This includes all the readings from the last 14 days starting from
the current date and time shown on the meter. (Control solution,
LO, and HI readings are not included in the average.)
14d avg= your 14-day average
n= indicates the number of results
included in your 14-day average
43 Call Customer Care Toll Free at 1-888-522-5226
www.AbbottDiabetesCare.com
Working the Memory
The meter stores the last 250 test readings with time and date. You
may scroll through all of the readings by pressing and holding the
“c” button. The first reading you see is the most recent result. As
you continue to push the “c” button the meter scrolls back to older
readings. Eventually it scrolls to the most recent reading again.
Blood Glucose Test
A result without a control solution symbol ( )
indicates that it is a blood glucose reading. The
date and time of the test appears on the bottom of
the screen.
Control Solution Test
A value with ( ) indicates that you have marked
this reading as a control solution test (refer to page
20). This result is not included in your 14-day
average. The date and time of the control solution
reading appears on the bottom of the screen.
44
Special Notes
Temperature: A result with a thermometer symbol
indicates that the reading was taken outside of the
meter’s specified operating temperature range and
may be less accurate. This value is included in
your 14-day average.
LO Reading: A LO reading (under 20 mg/dL
[1.1 mmol/L]) is included in the memory; it is
not included in your 14-day average. Values
under 20 mg/dL are recorded in memory as LO.
HI Reading: A HI reading (over 500 mg/dL
[27.8 mmol/L]) is included in the memory; it is
not included in your 14-day average. Values over
500 mg/dL are recorded in memory as HI.
Transferring Data
The data port allows you to download test results
from the meter’s memory to a computer or upload
to a secure, protected website designed for diabetes
data management. (Requires FreeStyle Data Cable,
and FreeStyle data management software or other
software programs that accept FreeStyle Flash data.)
You will see the word “PC” on the display screen when the FreeStyle
Data Cable is inserted into the data port. The meter will display “PC”
until the cable is removed from the data port.
For more information, please go to our website or call Customer Care.
Note: You will not be able to perform a test when the cable is inserted
in the data port.
45 Call Customer Care Toll Free at 1-888-522-5226
www.AbbottDiabetesCare.com
5. Error Messages
Error 1
Possible Causes
• Sample is too small.
• Problem with the test strip.
• Problem with the meter.
• Very low blood glucose
(less than 20 mg/dL [1.1 mmol/L]).
What You Should Do
1.If you have symptoms such as weakness, sweating, nervousness,
headache, or confusion, follow your doctor’s recommendation for treating hypoglycemia.
2.Conduct a control solution test using a new test strip. If the results of the control solution test are within the range printed on the side of your test strip vial, retest using blood and a new test strip.
3.If the retest using control solution does not work, or the error
persists, call Customer Care.
46
Error 2
Possible Causes
• Problem with the test strip.
• Problem with the meter.
• Very high glucose (above 500 mg/dL
[27.8 mmol/L]).
• HIGH control solution applied when
temperature is too cold.
(This applies only to control solution
that is labeled as HIGH.)
What You Should Do
1.If you have symptoms such as thirst, fatigue, excess urination, or
blurry vision, follow your doctor’s recommendation for treating
hyperglycemia.
2.Conduct a control solution test using a new test strip. If the results
of the control solution test are within the range printed on the side
of your test strip vial, retest using blood and a new test strip.
3.If the retest using control solution does not work, or the error
persists, call Customer Care.
47 Call Customer Care Toll Free at 1-888-522-5226
www.AbbottDiabetesCare.com
Error 3
Possible Causes
• Incorrect test procedure. For example, putting blood on the test strip before inserting the test strip into the meter, or blood applied before the Blood Drop and Test Strip symbols appear.
• Problem with the test strip.
• Problem with the meter.
What You Should Do
1.Be sure you see the Blood Drop and Test Strip symbols on the
display screen before you apply blood or control solution.
2.Conduct a control solution test using a new test strip. If the results
of the control solution test are within the range printed on the side of your test strip vial, retest using blood and a new test strip.
3.If the retest using control solution does not work, or if the error
persists, call Customer Care.
48
Error 4
Possible Causes
• Problem with test strip.
• Meter malfunction.
What You Should Do
1.Conduct a control solution test using a new test strip. If the results
of the control solution test are within the range printed on the side
of your test strip vial, retest using blood and a new test strip.
2.If the retest using control solution does not work, or if the error
persists, call Customer Care.
Note: Error 5 is not used.
Error 6
Possible Causes
Blood sample was applied while code number was being changed.
What You Should Do
1.Retest using a new test strip. Do not touch the “m” or the “c”
button while applying blood or control solution to the test strip.
2.If the error persists, call Customer Care.
49 Call Customer Care Toll Free at 1-888-522-5226
www.AbbottDiabetesCare.com
6. Batteries
Your FreeStyle Flash™ Meter comes with two preinstalled #2032,
3 volt, lithium batteries. The batteries provides enough power for the
meter to perform about 500 tests, and to power the display backlight
and test light.
Important: When the battery symbol appears or when the backlight and
test light begin to dim, you should replace your batteries immediately.
If your batteries run low, the battery symbol (
) appears on
every display screen until you change the batteries. You have enough
power for approximately 25 more tests.
• To avoid losing the time and date settings, replace the batteries
within one minute of removing the old batteries.
• If you take more than one minute to replace the batteries, you must
reset the time and date to get the correct 14-day average.
Note: If the time and date are lost, the time and date displays
flash 12:00 and 00-00 until they are reset.
• Removing the batteries does not affect the meter’s memory log or
previously stored user settings (for example, unit of measurement,
calibration code, and date format).
• If the time and date settings are not reset, test results are stored in memory with a time of 12:00 a.m. (00:00) and a date of 00-00.
50
Replacing the Batteries
1
Turn the meter over. Press in the
battery door clip to open. Swing
the battery door up to open, and
then off the meter.
2
Install the batteries with the positive
(+) sign facing up towards you.
3
To close, angle the battery door back
onto the meter and swing down until
it snaps gently into place.
51 Call Customer Care Toll Free at 1-888-522-5226
www.AbbottDiabetesCare.com
52
Troubleshooting
Meter does not enter the test mode after inserting a test strip.
Probable Cause
What to Do
The batteries are dead.
Replace the meter batteries
(refer to page 51).
The batteries are installed
incorrectly or the batteries
are not installed.
Check that batteries are installed
correctly with the positive (+)
sign facing upward, toward you
(refer to page 51).
Note: If the batteries have been
installed incorrectly or have been
out of the meter for more than
one minute, reset the date and
time (refer to page 50).
Test strip inserted upside down, Insert the test strip with the
wrong end in, or incompletely printed side up and the top of
the strip in the meter (refer to
inserted into the meter.
page 8).
Defective meter or test strips.
Call Customer Care.
Blood or foreign objects put
into test strip port.
Call Customer Care.
53 Call Customer Care Toll Free at 1-888-522-5226
www.AbbottDiabetesCare.com
Test does not start after applying the blood sample.
Probable Cause
What to Do
Blood sample too small.
Repeat the test using a new test
strip and a larger blood sample.
Defective test strip.
Repeat the test with a new test
strip.
Sample applied after meter
times out (after two minutes)
and returns to clock mode.
Repeat the test using a new test
strip. Wait until you see the
Blood Drop and Test Strip
symbols on the display screen
before you apply the blood
sample (refer to page 31).
Defective meter or test strips.
Call Customer Care.
54
Caring for Your Meter
• Avoid getting dirt, dust, blood, control solution, water, or any
other liquid in the meter’s test strip and data ports.
• Store the meter in the carrying case after each use.
Cleaning the Meter
Clean the outside of the meter using a cloth dampened with one of
the following:
• Mild detergent/mild soap and water
• 70% isopropyl alcohol
• A mix of one part household bleach, nine parts water
Important: Avoid getting water or any other liquid into the test strip
port and data port. Never immerse the meter in water or any other
liquid solution.
55 Call Customer Care Toll Free at 1-888-522-5226
www.AbbottDiabetesCare.com
Meter Specifications
Assay Method Coulometric electrochemical sensor
Automatically
Enter Clock Mode
Two minutes after last user action
Battery Life
Approximately 500 tests
Calibration
Plasma equivalent
Hematocrit
15% to 65%
Measurement Units
Either mg/dL or mmol/L
Memory
250 blood glucose and control solution
tests with date and time
Operating Relative
Humidity
5% to 90%
Operating Temperature
40º to 104º F (5º to 40º C )
Power Source
Two #2032, 3 volt, lithium batteries,
replaceable
Result Range
20 to 500 mg/dL (1.1 to 27.8 mmol/L)
Sample
Whole blood, capillary
Sample Size
300 nanoliters (3/10 microliter)
Dimensions
Width 1.6” x Length 3.0” x
0.8” (at thickest point)
Test Time
Average of 7 seconds
Weight
1.4 oz. (including batteries)
56
Index
Alarms . . . . . . . . . . . . . . . . . . . . . . . . . . . . . . . . . . . . . . . . . . . . . . . . . . . .
Apply Blood Sample . . . . . . . . . . . . . . . . . . . . . . . . . . . . . . . . . . . . . . . . . .
Applying Control Solution . . . . . . . . . . . . . . . . . . . . . . . . . . . . . . . . . . . . .
Assay Method . . . . . . . . . . . . . . . . . . . . . . . . . . . . . . . . . . . . . . . . . . . . . . .
Automatic Enter Clock Mode . . . . . . . . . . . . . . . . . . . . . . . . . . . . . . . . . .
36
31
19
56
56
Batteries . . . . . . . . . . . . . . . . . . . . . . . . . . . . . . . . . . . . . . . . 5, 10, 50-52, 56
Batteries, Replacing . . . . . . . . . . . . . . . . . . . . . . . . . . . . . . . . . . . . . . . . . . 51
Batteries, Troubleshooting . . . . . . . . . . . . . . . . . . . . . . . . . . . . . . . . . . . . . 53
Battery Life . . . . . . . . . . . . . . . . . . . . . . . . . . . . . . . . . . . . . . . . . . . . . 50, 56
Battery Symbol . . . . . . . . . . . . . . . . . . . . . . . . . . . . . . . . . . . . . . . . . . 10, 50
Blood Drop Symbol . . . . . . . . . . . . . . . . . . . . . . . . . . . . . . . . . 11, 19, 30-31
Blood Glucose Test
Performing a . . . . . . . . . . . . . . . . . . . . . . . . . . . . . . . . . . . . . . . . . . 29-32
Memory, Viewing your Meter . . . . . . . . . . . . . . . . . . . . . . . . . . . . . 43-45
Lancing Forearm, Upper Arm, Hand, Thigh, or Calf . . . . . . . . . . . . . . . . 24
Lancing On Your Finger . . . . . . . . . . . . . . . . . . . . . . . . . . . . . . . . . . . . . . 25
Blood Glucose Testing Components . . . . . . . . . . . . . . . . . . . . . . . . . . . . . 28
Blood Sample
Applying Sample After Shut Off . . . . . . . . . . . . . . . . . . . . . . . . . . . . . . 54
Size . . . . . . . . . . . . . . . . . . . . . . . . . . . . . . . . . . . . . . . . . . . . . . 24, 27, 56
Too Small . . . . . . . . . . . . . . . . . . . . . . . . . . . . . . . . . . . . . . . . . 32, 46, 54
Troubleshooting . . . . . . . . . . . . . . . . . . . . . . . . . . . . . . . . . . . . . . . 53-54
Type . . . . . . . . . . . . . . . . . . . . . . . . . . . . . . . . . . . . . . . . . . . . . . . . . . . 56
57 Call Customer Care Toll Free at 1-888-522-5226
www.AbbottDiabetesCare.com
Calibration . . . . . . . . . . . . . . . . . . . . . . . . . . . . . . . . . . . . . . . . . . . . . . . . 56
Caring for Your Meter . . . . . . . . . . . . . . . . . . . . . . . . . . . . . . . . . . . . . . . . 55
Carrying Case . . . . . . . . . . . . . . . . . . . . . . . . . . . . . . . . . . . . . . . . . . . . . 5-6
“c” Button . . . . . . . . . . . . . . . . . . . . . . . . . . . . . . . . 8, 20, 30, 36-41, 44, 49
Cleaning your Meter . . . . . . . . . . . . . . . . . . . . . . . . . . . . . . . . . . . . . . . . . 55
Code Number, Test Strip . . . . . . . . . . . . . . . . . . . . . . . . . . . . . . . . . . . . . . 19
Control Solution, FreeStyle . . . . . . . . . . . . . . . . . . . . . . . . . . . . . 5-6, 15-18
Expiration Date . . . . . . . . . . . . . . . . . . . . . . . . . . . . . . . . . . . . . . . . . . 16
Ensuring Accurate Results . . . . . . . . . . . . . . . . . . . . . . . . . . . . . . . . . . 17
Control Solution Symbol . . . . . . . . . . . . . . . . . . . . . . . . . . . . . . 9-10, 20, 44
Control Solution Test
Performing a . . . . . . . . . . . . . . . . . . . . . . . . . . . . . . . . . . . . . . . . . . 19-21
Memory, In the Meter’s . . . . . . . . . . . . . . . . . . . . . . . . . . . . . . . . . . . . 44
When Should I Perform a . . . . . . . . . . . . . . . . . . . . . . . . . . . . . . . . . . . 16
Control Solution Test Results
Target Range . . . . . . . . . . . . . . . . . . . . . . . . . . . . . . . . . . . . . . . . . 18, 20
Target Range, Out of . . . . . . . . . . . . . . . . . . . . . . . . . . . . . . . . . . . 18, 20
Accuracy of . . . . . . . . . . . . . . . . . . . . . . . . . . . . . . . . . . . . . . . . . . . 17-18
Customer Care . . . . . . . . . . . . . . . . . . . . . . . . . . . . . . . . . . 18, 46-49, 53-54
Daily Log . . . . . . . . . . . . . . . . . . . . . . . . . . . . . . . . . . . . . . . . . . . . . . . . . 5-6
Data
Data Port . . . . . . . . . . . . . . . . . . . . . . . . . . . . . . . . . . . . . . . . . . . . . . 7-8
Transferring Data . . . . . . . . . . . . . . . . . . . . . . . . . . . . . . . . . . . . . . . . . 45
Date . . . . . . . . . . . . . . . . . . . . . . . . . . . . . . . . . . . . . . . . . . . . . . . . . . . 11-12
Date, Setting the . . . . . . . . . . . . . . . . . . . . . . . . . . . . . . . . . . . . . . . . . . . . 41
Dehydration . . . . . . . . . . . . . . . . . . . . . . . . . . . . . . . . . . . . . . . . . . . . . . . . . 3
58
Display Screen . . . . . . . . . . . . . . . . . . . . . . . . . . . . . . . . . . . . . . . . . . . . 8-12
Apply Sample . . . . . . . . . . . . . . . . . . . . . . . . . . . . . . . . . . . . . . . . . . . . 31
Battery Symbol . . . . . . . . . . . . . . . . . . . . . . . . . . . . . . . . . . . . . . . . . . . 10
Blood Drop Symbol . . . . . . . . . . . . . . . . . . . . . . . . . . . . . . . . . 11-12, 30
Code Number . . . . . . . . . . . . . . . . . . . . . . . . . . . . . . . . . . . . . . . . . . . 30
Control Solution Symbol . . . . . . . . . . . . . . . . . . . . . . . . . . . . . . . . . 9-10
Date . . . . . . . . . . . . . . . . . . . . . . . . . . . . . . . . . . . . . . . . . . . . . . . . . . . 11
Memory . . . . . . . . . . . . . . . . . . . . . . . . . . . . . . . . . . . . . . . . . . . . . . 9-10
Milligrams (mg/dL) . . . . . . . . . . . . . . . . . . . . . . . . . . . . . . . . . . . . 11-12
Millimoles (mmol/L) . . . . . . . . . . . . . . . . . . . . . . . . . . . . . . . . . . . 11-12
System Check Screen . . . . . . . . . . . . . . . . . . . . . . . . . . . . . . . . . . . 10, 29
Test Result Area . . . . . . . . . . . . . . . . . . . . . . . . . . . . . . . . . . . . . . . . 9-10
Test Strip Symbol . . . . . . . . . . . . . . . . . . . . . . . . . . . . . . . . . . . . . . 11-12
Thermometer Symbol . . . . . . . . . . . . . . . . . . . . . . . . . . . . . . . . . . . 11, 45
Error Messages
Error 1 . . . . . . . . . . . . . . . . . . . . . . . . . . . . . . . . . . . . . . . . . . . . . . . . . 46
Error 2 . . . . . . . . . . . . . . . . . . . . . . . . . . . . . . . . . . . . . . . . . . . . . . . . . 47
Error 3 . . . . . . . . . . . . . . . . . . . . . . . . . . . . . . . . . . . . . . . . . . . . . . . . . 48
Error 4 . . . . . . . . . . . . . . . . . . . . . . . . . . . . . . . . . . . . . . . . . . . . . . . . . 49
Error 6 . . . . . . . . . . . . . . . . . . . . . . . . . . . . . . . . . . . . . . . . . . . . . . . . . 49
14-Day Average . . . . . . . . . . . . . . . . . . . . . . . . . . . . . . . . . . . . . . . . . . . . . 43
FreeStyle Blood Glucose Monitoring System . . . . . . . . . . . . . . . . . . . . . . . . 2
FreeStyle Control Solution
What is . . . . . . . . . . . . . . . . . . . . . . . . . . . . . . . . . . . . . . . . . . . . . . . . . 15
Ensuring Accurate Results . . . . . . . . . . . . . . . . . . . . . . . . . . . . . . . . . . 17
Expiration Date . . . . . . . . . . . . . . . . . . . . . . . . . . . . . . . . . . . . . . . . . . 16
59 Call Customer Care Toll Free at 1-888-522-5226
www.AbbottDiabetesCare.com
FreeStyle Lancets . . . . . . . . . . . . . . . . . . . . . . . . . . . . . . . . . . . . . 5-6, 22, 26
Lancing at Alternate Sites . . . . . . . . . . . . . . . . . . . . . . . . . . . . . . . . . . 24
Lancing Your Finger . . . . . . . . . . . . . . . . . . . . . . . . . . . . . . . . . . . . . . . 25
Disposing of . . . . . . . . . . . . . . . . . . . . . . . . . . . . . . . . . . . . . . . . . . . . 26
FreeStyle Lancing Device . . . . . . . . . . . . . . . . . . . . . . . . . . . . . . . 5-6, 21-26
Clear Cap . . . . . . . . . . . . . . . . . . . . . . . . . . . . . . . . . . . . . . . . . . . . 21-24
Grey Cap . . . . . . . . . . . . . . . . . . . . . . . . . . . . . . . . . . . . . . . . . . . 21, 25
Cocking Handle . . . . . . . . . . . . . . . . . . . . . . . . . . . . . . . . . . . . . . . . . 23
Depth Settings Dial . . . . . . . . . . . . . . . . . . . . . . . . . . . . . 21, 23, 24, 25
Using the Lancing Device . . . . . . . . . . . . . . . . . . . . . . . . . . . . . . . . 22-25
Lancing On Your Forearm,
Upper Arm, Hand, Thigh, or Calf . . . . . . . . . . . . . . . . . . . . . . . . . . . 24
Lancing Your Finger . . . . . . . . . . . . . . . . . . . . . . . . . . . . . . . . . . . . . . 25
Maintenance . . . . . . . . . . . . . . . . . . . . . . . . . . . . . . . . . . . . . . . . . . . . 26
Release Button . . . . . . . . . . . . . . . . . . . . . . . . . . . . . . . . . . . . . . . . . . 21
FreeStyle Flash Meter
Batteries . . . . . . . . . . . . . . . . . . . . . . . . . . . . . . . . . . . . . . . . 5, 51-53, 56
“c” Button . . . . . . . . . . . . . . . . . . . . . . . . . . . . . . . . . . . 8, 30, 36-41, 44
Caring for Your . . . . . . . . . . . . . . . . . . . . . . . . . . . . . . . . . . . . . . . . . . .55
Carrying Case . . . . . . . . . . . . . . . . . . . . . . . . . . . . . . . . . . . . . . . . . . . 5-6
Cleaning the . . . . . . . . . . . . . . . . . . . . . . . . . . . . . . . . . . . . . . . . . . . . . 55
Control Solution . . . . . . . . . . . . . . . . . . . . . . . . . . . . . . . . . . . 5-6, 15-20
Data Port . . . . . . . . . . . . . . . . . . . . . . . . . . . . . . . . . . . . . . . . . . . 7-8, 45
Dimensions . . . . . . . . . . . . . . . . . . . . . . . . . . . . . . . . . . . . . . . . . . . . . 56
Display Screen . . . . . . . . . . . . . . . . . . . . . . . . . . . . . . . . . . . . . . . . . 7-12
Getting Started . . . . . . . . . . . . . . . . . . . . . . . . . . . . . . . . . . . . . . . . . . 5-6
Hematocrit . . . . . . . . . . . . . . . . . . . . . . . . . . . . . . . . . . . . . . . . . . . . . . 56
60
Important Information About Your FreeStyle Flash System . . . . . . . . . . 2
Lancets . . . . . . . . . . . . . . . . . . . . . . . . . . . . . . . . . . . . . . . . . . 5-6, 22, 26
Lancing Device . . . . . . . . . . . . . . . . . . . . . . . . . . . . . . . . . . . . . 5-6, 21-26
Light Button . . . . . . . . . . . . . . . . . . . . . . . . . . . . . . . . . . . . . . . . . 7-8, 35
“m” Button . . . . . . . . . . . . . . . . . . . . . . . . . . . . . . . . . . . . 7-8, 30, 37-43
Operating Relative Humidity . . . . . . . . . . . . . . . . . . . . . . . . . . . . . . . . 56
Operating Temperature . . . . . . . . . . . . . . . . . . . . . . . . . . . . . . . . . . . . . 56
Quick Reference Guide . . . . . . . . . . . . . . . . . . . . . . . . . . . . . . . . . . . 5-6
Readings, LO and HI . . . . . . . . . . . . . . . . . . . . . . . . . . . . . . . . 33-34, 45
Serial Number . . . . . . . . . . . . . . . . . . . . . . . . . . . . . . . . . . . . . . . . . . . 65
Setting Up Your Meter . . . . . . . . . . . . . . . . . . . . . . . . . . . . . . . . . . 37-42
Specifications . . . . . . . . . . . . . . . . . . . . . . . . . . . . . . . . . . . . . . . . . . . . 56
Memory . . . . . . . . . . . . . . . . . . . . . . . . . . . . . . . . . . . . . . . . . . . 9-10, 56
Test Strip Code . . . . . . . . . . . . . . . . . . . . . . . . . . . . . . . . . . . . . . . . 19, 28
Test Strip Port . . . . . . . . . . . . . . . . . . . . . . . . . . . . . . . . . . . . . . . . . . . . .8
Test Time . . . . . . . . . . . . . . . . . . . . . . . . . . . . . . . . . . . . . . . . . . . . 32, 56
Troubleshooting . . . . . . . . . . . . . . . . . . . . . . . . . . . . . . . . . . . . . . . 53-54
Warranty Registration Card . . . . . . . . . . . . . . . . . . . . . . . . . . . . . . . . . . 5
Weight . . . . . . . . . . . . . . . . . . . . . . . . . . . . . . . . . . . . . . . . . . . . . . . . . 56
FreeStyle Test Strips . . . . . . . . . . . . . . . . . . . . . . . 5-6, 7-8, 13-14, 19, 27-28
Code Number, Setting the Test Strip . . . . . . . . . . . . . . . . . . . . 19, 29-30
Important Information . . . . . . . . . . . . . . . . . . . . . . . . . . . . . . . . . . 13-14
Storage and Usage . . . . . . . . . . . . . . . . . . . . . . . . . . . . . . . . . . . . . . . . . 14
Target Areas, Sample . . . . . . . . . . . . . . . . . . . . . . . . . . . . . . . . . . . . . . 7-8
Troubleshooting . . . . . . . . . . . . . . . . . . . . . . . . . . . . . . . . . . . . . . . 53-54
Health Related Information, Important
Dehydration . . . . . . . . . . . . . . . . . . . . . . . . . . . . . . . . . . . . . . . . . . . . . . 3
Hyperglycemia . . . . . . . . . . . . . . . . . . . . . . . . . . . . . . . . . . . . . . . . . 3, 34
Hypoglycemia . . . . . . . . . . . . . . . . . . . . . . . . . . . . . . . . . . . . . . . . . . 3, 33
Water Loss, Excessive . . . . . . . . . . . . . . . . . . . . . . . . . . . . . . . . . . . . . . . 3
61 Call Customer Care Toll Free at 1-888-522-5226
www.AbbottDiabetesCare.com
Hematocrit . . . . . . . . . . . . . . . . . . . . . . . . . . . . . . . . . . . . . . . . . . . . . . . . . 56
HI Reading . . . . . . . . . . . . . . . . . . . . . . . . . . . . . . . . . . . . . . . . . . . . . 34, 45
Lancets, FreeStyle . . . . . . . . . . . . . . . . . . . . . . . . . . . . . . . . . . . . . 5-6, 22, 26
Lancets, Disposing of . . . . . . . . . . . . . . . . . . . . . . . . . . . . . . . . . . . . . . . . . 26
Lancing Device, FreeStyle . . . . . . . . . . . . . . . . . . . . . . . . . . . . . . . 5-6, 21-26
Lancing Your Arm . . . . . . . . . . . . . . . . . . . . . . . . . . . . . . . . . . . . . . . . . . . 24
Lancing Your Finger . . . . . . . . . . . . . . . . . . . . . . . . . . . . . . . . . . . . . . . . . . 25
Lancing Locations . . . . . . . . . . . . . . . . . . . . . . . . . . . . . . . . . . . . . . . . . . . . 1
LO Reading . . . . . . . . . . . . . . . . . . . . . . . . . . . . . . . . . . . . . . . . . . . . . 33, 45
Maintenance
FreeStyle Lancing Device . . . . . . . . . . . . . . . . . . . . . . . . . . . . . . . . . . . 26
FreeStyle Flash Meter . . . . . . . . . . . . . . . . . . . . . . . . . . . . . . . . . . . . . . 55
“m” Button . . . . . . . . . . . . . . . . . . . . . . . . . . . . . . . . . . . . . . . 7-8, 30, 37-43
Measurement Units . . . . . . . . . . . . . . . . . . . . . . . . . . . . . . . . . . . . . . . . . . 56
Memory, FreeStyle Flash Meter
Blood Glucose Test . . . . . . . . . . . . . . . . . . . . . . . . . . . . . . . . . . . . . . . . 44
Control Solution Test . . . . . . . . . . . . . . . . . . . . . . . . . . . . . . . . . . . . . . 44
14-Day Average . . . . . . . . . . . . . . . . . . . . . . . . . . . . . . . . . . . . . . . . . . 43
Getting In and Out of . . . . . . . . . . . . . . . . . . . . . . . . . . . . . . . . . . . . . 43
Size . . . . . . . . . . . . . . . . . . . . . . . . . . . . . . . . . . . . . . . . . . . . . . . . . 10, 56
Working the . . . . . . . . . . . . . . . . . . . . . . . . . . . . . . . . . . . . . . . . . . . . . 44
Temperature . . . . . . . . . . . . . . . . . . . . . . . . . . . . . . . . . . . . . . . . . . . . . 45
Memory, Viewing Your Meter’s . . . . . . . . . . . . . . . . . . . . . . . . . . . . . . 43-45
Meter, Setting Up your
Date . . . . . . . . . . . . . . . . . . . . . . . . . . . . . . . . . . . . . . . . . . . . . . . . . . . 41
Date Format . . . . . . . . . . . . . . . . . . . . . . . . . . . . . . . . . . . . . . . . . . . . . 41
Sound . . . . . . . . . . . . . . . . . . . . . . . . . . . . . . . . . . . . . . . . . . . . . . . . . . 39
62
Time . . . . . . . . . . . . . . . . . . . . . . . . . . . . . . . . . . . . . . . . . . . . . . . . . . . 40
Time Format . . . . . . . . . . . . . . . . . . . . . . . . . . . . . . . . . . . . . . . . . . . . . . 40
Unit of Measurement . . . . . . . . . . . . . . . . . . . . . . . . . . . . . . . . . . . . . . 41
Alarms . . . . . . . . . . . . . . . . . . . . . . . . . . . . . . . . . . . . . . . . . . . . . . . . . 38
Meter Memory
To Enter/Exit . . . . . . . . . . . . . . . . . . . . . . . . . . . . . . . . . . . . . . . . . . . . 43
Meter Settings
To Enter/Exit . . . . . . . . . . . . . . . . . . . . . . . . . . . . . . . . . . . . . . . . . . . . 37
Operating Temperature . . . . . . . . . . . . . . . . . . . . . . . . . . . . . . . . . . . . . . . 56
Operating Relative Humidity . . . . . . . . . . . . . . . . . . . . . . . . . . . . . . . . . . . 56
Power Source . . . . . . . . . . . . . . . . . . . . . . . . . . . . . . . . . . . . . . . . . . . . . . . 56
Result Range . . . . . . . . . . . . . . . . . . . . . . . . . . . . . . . . . . . . . . . . . . . . . . . 56
Sample Size, Blood Glucose . . . . . . . . . . . . . . . . . . . . . . . . . . . . . . 24, 27, 56
Serial Number . . . . . . . . . . . . . . . . . . . . . . . . . . . . . . . . . . . . . . . . . . . . . . 65
Sharps Container . . . . . . . . . . . . . . . . . . . . . . . . . . . . . . . . . . . . . . . . . . . . 26
Size . . . . . . . . . . . . . . . . . . . . . . . . . . . . . . . . . . . . . . . . . . . . . . . . . . . . . . .56
Software Version Display . . . . . . . . . . . . . . . . . . . . . . . . . . . . . . . . . . . . . . 42
Sound, Setting the . . . . . . . . . . . . . . . . . . . . . . . . . . . . . . . . . . . . . . . . . . . 39
Specifications, FreeStyle Flash Meter . . . . . . . . . . . . . . . . . . . . . . . . . . . . . 56
Symbols, General
Battery . . . . . . . . . . . . . . . . . . . . . . . . . . . . . . . . . . . . . . . . . . . . . . 10, 50
Blood Drop . . . . . . . . . . . . . . . . . . . . . . . . . . . . . . . . . . . . 11, 19, 30-31
Control Solution . . . . . . . . . . . . . . . . . . . . . . . . . . . . . . . . . 9-10, 20, 44
Thermometer . . . . . . . . . . . . . . . . . . . . . . . . . . . . . . . . . . . . . . . . . 11, 45
63 Call Customer Care Toll Free at 1-888-522-5226
www.AbbottDiabetesCare.com
Symbols, Error . . . . . . . . . . . . . . . . . . . . . . . . . . . . . . . . . . . . . . . . . . . 46-49
System Check . . . . . . . . . . . . . . . . . . . . . . . . . . . . . . . . . . . . . . . . . . . . 10, 29
Target Areas, Sample . . . . . . . . . . . . . . . . . . . . . . . . . . . . . . . . . . . . . . . . 7-8
Target Range, Control Solution Test . . . . . . . . . . . . . . . . . . . . . . . . . . 18, 20
Temperature . . . . . . . . . . . . . . . . . . . . . . . . . . . . . . . . . . . . . . . . . . 11, 45, 56
Testing Blood Glucose
On Your Forearm, Upper Arm,
Hand, Thigh, or Calf . . . . . . . . . . . . . . . . . . . . . . . . . . . . . . . . . . . . 1, 24
On Your Finger . . . . . . . . . . . . . . . . . . . . . . . . . . . . . . . . . . . . . . . . 1, 25
Test Result Area . . . . . . . . . . . . . . . . . . . . . . . . . . . . . . . . . . . . . . . . . . . . . 10
Test Strip Code, Setting the . . . . . . . . . . . . . . . . . . . . . . . . . . . . . . 19, 29-30
Test Strip Port . . . . . . . . . . . . . . . . . . . . . . . . . . . . . . . . . . . . . . . . . . . . . 7-8
Test Strips, FreeStyle . . . . . . . . . . . . . . . . . . . . . . 5-6, 7-8, 13-14, 19, 27-28
Important Information . . . . . . . . . . . . . . . . . . . . . . . . . . . . . . . . . . 13-14
Troubleshooting . . . . . . . . . . . . . . . . . . . . . . . . . . . . . . . . . . . . . . . 53-54
Test Time . . . . . . . . . . . . . . . . . . . . . . . . . . . . . . . . . . . . . . . . . . . . . . . . . . 56
Thermometer Symbol . . . . . . . . . . . . . . . . . . . . . . . . . . . . . . . . . . . . . 11, 45
Time Format, Setting the . . . . . . . . . . . . . . . . . . . . . . . . . . . . . . . . . . . . . . 40
Troubleshooting . . . . . . . . . . . . . . . . . . . . . . . . . . . . . . . . . . . . . . . . . . 53-54
Unit of Measurement
Milligrams per Deciliter (mg/dL) . . . . . . . . . . . . . . . . . . . . . . . 11-12, 56
Millimoles per Liter (mmol/L) . . . . . . . . . . . . . . . . . . . . . . . . . 11-12, 56
Setting the . . . . . . . . . . . . . . . . . . . . . . . . . . . . . . . . . . . . . . . . . . . . . . 41
Water Loss, Excessive . . . . . . . . . . . . . . . . . . . . . . . . . . . . . . . . . . . . . . . . . . 3
Weight . . . . . . . . . . . . . . . . . . . . . . . . . . . . . . . . . . . . . . . . . . . . . . . . . . . . 56
64
Time of Day
Plasma glucose range (mg/dL) for people without diabetes
Your target range
(mg/dL)
Fasting and before meal
Less than 110
__________________ mg/dL
2 hours
after meals
Less than 140
__________________ mg/dL
Bedtime
Not specified
__________________ mg/dL
Between
2am and 4am
Not specified
__________________ mg/dL
Source: ADA Clinical Practice Recommendations 2003
Meter Serial No. (
) –(
) _______ –_______________
(Found on the back of your meter)
Software Version No. ______________________________ Important phone numbers:
Customer Care: Toll Free 1-888-522-5226
(24-hours a day, 7-days a week)
Physician
Pharmacist
Diabetes Educator
Other
65 Call Customer Care Toll Free at 1-888-522-5226
www.AbbottDiabetesCare.com
Abbott Diabetes Care Inc.
1360 South Loop Road
Alameda, CA 94502
www.AbbottDiabetesCare.com
Call Customer Care
Toll Free at 1-888-522-5226
Covered by one or more of the following U.S. Patents:
D424,696 and D426,638 and 6,071,391 and 6,120,676 and 6,143,164 and 6,299,757 and 6,338,790 and
6,071,391 and 6,120,676 and 6,143,164 and 6,299,757 and 6,338,790 and 6,461,496 and 6,503,381 and
6,591,125 and 6,592,745 and 6,616,819 and 6,618,934 and 6,676,816 and 6,749,740 and 6,893,545.
© 2005 Abbott Printed in U.S.A.
ART03992 Rev B 10/05