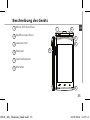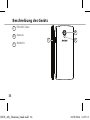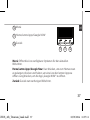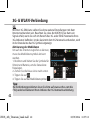
1
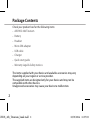
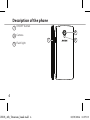
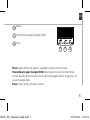
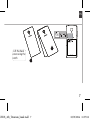
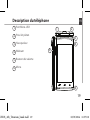
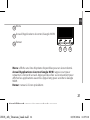
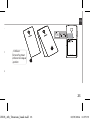
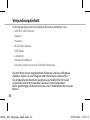
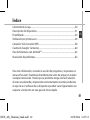
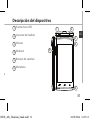
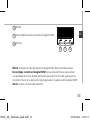
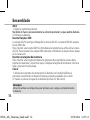
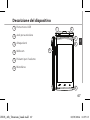
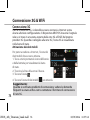
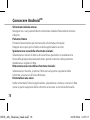
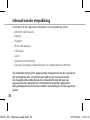
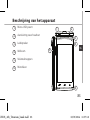
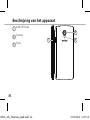
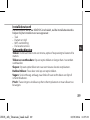
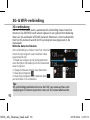
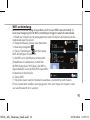
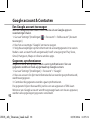
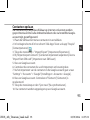
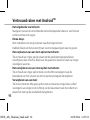
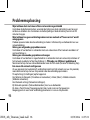
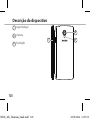
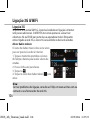
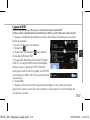
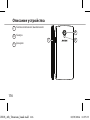
EN
Table of contents
Package contents..........................................................................................................2
Description of the phone...........................................................................................3
Assembling......................................................................................................................6
Getting started...............................................................................................................8
3G & WiFi connection...................................................................................................10
Google account & Contacts........................................................................................12
Hints & tips with AndroidTM................................................................................ 14
Troubleshooting.............................................................................................................16
For more information, please consult the FAQs on www.archos.com.
Make sure to read them before considering any product return. As we
are often updating and improving our products, your device’s software
may have a slightly different appearance or modified functionality than
presented in this Quick Start Guide.
CHOS_40b_Titanium_book.indd 1
10/03/2014 11:57:00
Package Contents
Check your product box for the following items:
-- ARCHOS 40b Titanium
-- Battery
-- Headset
-- Micro SIM adaptor
-- USB cable
-- Charger
-- Quick start guide
-- Warranty Legal & Safety notices
The items supplied with your device and available accessories may vary
depending on your region or service provider.
The supplied items are designed only for your device and may not be
compatible with other devices.
Unapproved accessories may cause your device to malfunction.
2
CHOS_40b_Titanium_book.indd 2
10/03/2014 11:57:00
EN
Description of the phone
1 Micro-USB port
1
2
2 Headset jack
3
3 Phone speaker
4 Camera
CONFID
AC40 S
4
DRAW
scale 1:1
Rev
5
2
mm
0
last modi
5 Volume buttons
6 Microphone
CHOS_40b_Titanium_book.indd 3
6
3
CONFIDENTIAL
AC40 Suround
DRAWING
scale 1:1
Rev
2
mm
07-01-2014
last modification:
CONFID
AC40 S
DRAW
scale 1:1
Rev 2
10/03/2014 11:57:02
mm
0
last modi
Description of the phone
7 ON/OFF button
8 Camera
9 Flash light
8
7
9
4
CHOS_40b_Titanium_book.indd 4
sca
Re
10/03/2014 11:57:03
EN
10 Menu
11 Home/Recent apps/Google NOW
12 Back
10 11
12
CONFIDENT
AC40 Surou
DRAWING
Menu: open the list of options available on the current screen.
Home/Recent apps/Google NOW: short press to return to the Home
screen; double press to open the list of recent applications; long press to
access Google Now.
Back: return to the previous screen.
CHOS_40b_Titanium_book.indd 5
scale 1:1
Rev
2
mm
07-01-2
last modificatio
5
10/03/2014 11:57:04
Assembling
Opening
1.Use the notch to remove the back cover.
Do not bend or twist the back cover excessively. Doing so may damage
the cover.
2.Remove the battery.
Inserting SIM cards
The 2G/3G slot is below the 2G slot. The 2G slot accepts micro SIMs only.
For your 3G SIM card, slide it facing upwards in the 2G/3G slot.
For your standard SIM card, slide it facing downwards in the 2G slot.
Inserting a Memory card
Push upwards the memory card slot and lift the cover. Place the Memory
card. Close the cover and push it downwards.
Closing
1.Align the battery’s 4 contact points with those of the phone and gently
press the battery down into place.
2.Replace the back cover clicking it back into position.
Tip:
Before using your device for the first time, charge completely its battery.
6
CHOS_40b_Titanium_book.indd 6
10/03/2014 11:57:04
EN
w to removed the bottom casing
Picture to show how to insert the battery pack
Picture toPicture
show how
to show
to removed
how to removed
the bottom
thecasing
bottom casing
Picture to show the scards position
Picture t
Picture toPicture
show how
to show
to insert
how the
to insert
battery
thepack
battery pack
SIM2
2G
SIM1
2G/3G
TF
Lift the back
cover using the
notch
CHOS_40b_Titanium_book.indd 7
7
10/03/2014 11:57:06
Getting started
Turn ON
1.Press and hold the ON/OFF button to turn on the device.
When you turn on your device, a PIN code may be requested.
2.Type the PIN code supplied with your SIM card.
Beware of typing a wrong PIN code.
3.Select ‘OK’.
Turn OFF
To turn off your device, press and hold the ON/OFF button, and then
select Power off > OK.
Sound & Notification profiles
1.When the device is turned on, press
and hold the ON/OFF button.
2.Select an option.
Silent
Vibrate
Sound
Tip:
Your device goes in standby mode when you do not use it for a specified
period of time. To wake up your device, press the ON/OFF button.
To set the duration, go to Settings > Display > Sleep.
8
CHOS_40b_Titanium_book.indd 8
10/03/2014 11:57:06
EN
Through the wizard
The first time you start up your ARCHOS, the installation wizard will help
you set up your device:
-- Language
-- Date & time
-- WiFi connection
-- Location service options
Touch screen actions:
Tap: touch once to select or launch a menu, option, or application.
Tap and hold: tap an item and hold it for more than 2 seconds.
Drag: tap an item and move it to a new location.
Double-tap: tap an item twice quickly.
Flick: briskly scroll up, down, left, or right to move through lists or screens.
Pinch: place two of your fingers far apart, and then pinch them together.
CHOS_40b_Titanium_book.indd 9
9
10/03/2014 11:57:06
3G & WiFi connection
3G connection
With your 3G SIM card, you should be connected to the Internet without
any further setup. The ARCHOS will only have signal if you are in an area
covered by your 3G provider’s 3G or EDGE network. When connected to
the 3G network, the 3G icon is displayed in the status bar.
Activating the mobile data
To be able to access Internet, the mobile data icon must be activated.
1.Touch and hold the time & battery icons
to reveal the status bar.
2.Pull the blue line down to display the
status dashboard.
3.Touch the status dashboard icon .
4.Touch the mobile data icon
to activate it.
=>
Tip:
When you encounter connection problem’s, see the FAQs on www.
archos.com or contact your 3G network connection provider.
10
CHOS_40b_Titanium_book.indd 10
10/03/2014 11:57:07
EN
WiFi connection
WARNING: Make sure that you are in a WiFi zone. You can access the WiFi
settings quickly from the status bar.
1.Touch and hold the time & battery icons to reveal the status bar.
2.Pull the blue line down to display the
status dashboard.
3.Touch the status dashboard icon .
4.Touch the “Settings” icon to open the
settings menu.
5.In the “Wireless & networks”section, if the
WiFi is off, slide the WiFi switch to the “ON”
position. Once the WiFi is on, the ARCHOS
will scan for WiFi networks in range.
6.Touch “WiFi” to display available
networks.
7.Touch the name of network you want to connect to.
Private networks are shown with a lock icon and will require you to enter
your password.
CHOS_40b_Titanium_book.indd 11
11
10/03/2014 11:57:07
Google & Contacts
Adding a Google account
A Google account lets you take full advantage of any Google apps and
services that you may want to use.
> “Accounts” > “Add account”.
1.Go to “Settings”
2.Select the account type “Google” to add.
3.Follow the onscreen instructions to enter information about the account.
Once the account is created, you can access Play Store, Gmail, Hangouts,
Maps and many other apps.
Synchronizing info
Information must be sync to be saved. Your data are backed up on
Google servers.
1.Go to “Settings” > “Accounts” > “Google”.
2.Select your account.
The list of information that can be sync are displayed.
3.Check all information in order to sync them.
You can get them back in case of loss of your device or SIM card.
When your Google account is added to a new device, all your saved
information are collected.
12
CHOS_40b_Titanium_book.indd 12
10/03/2014 11:57:08
EN
Saving your contacts
When your contacts are saved, they are always available on the web
and can be synced to any Android phone that’s set up with your Google
account.
1.Install the SIM card with your contacts in your phone.
2.From a Home or All Apps screen, select the People app .
3.Touch the Menu button > “Import/Export”.
4.In Import/export contacts, select “Import from SIM card”.
5.Select your Google account.
6.Check contacts to be imported and validate.
7.Once the contacts are imported in the Google account, go to “Settings” >
“Accounts” > “Google”.
8.Select you Google account. Make sure “Contacts” is checked.
9.Select the Menu button, then “Sync now”.
Your contacts are saved to via your Google account.
CHOS_40b_Titanium_book.indd 13
13
10/03/2014 11:57:08
Hints & tips with AndroidTM
The extended home screen:
Navigate between different home screen panels by swiping left and
right.
Home button
Short press the Home button to go back to the main screen.
Double press the Home button to display all the apps you have opened.
Swipe any app left or right to close it.
Moving a home screen item:
Touch and hold your finger onto it until the positioning gridlines appear,
then slide it to the desired location, and release your finger.
Removing a home screen item:
Touch and hold it, slide your finger towards the top of the screen and
drop it over the "Remove" icon.
Uninstalling an item:
From the "All apps" screens, touch and hold it, slide your finger towards
the top of the screen and drop it over "Uninstall" bin.
14
CHOS_40b_Titanium_book.indd 14
10/03/2014 11:57:08
EN
Creating application folders:
Drop one app icon over another on a home screen and the two icons will
be combined.
Widgets:
Touch the “All Apps” icon on your home screen. Touch “Widgets” at the
top of the screen. From the main Widget screen, you can move around
widgets just as you do for app icons.
Changing your wallpaper:
Hold your finger on a home screen at an empty location, then choose
from the list.
Locking the touchscreen:
From the quick settings dashboard in the status bar, touch “Settings”. In
“Settings”, scroll down and touch “Security”. Touch “Screen lock”. Touch
the type of lock you would like to use. After you set a lock, a lock screen
is displayed whenever your screen wakes up, requesting the pattern, pin
or other specified key.
CHOS_40b_Titanium_book.indd 15
15
10/03/2014 11:57:08
Troubleshooting
16
My phone is frozen or cannot switch on
Check the battery contacts, remove and reinstall your battery, then turn
your phone on. Check the battery power level, charge for at least 20
minutes.
My phone cannot connect to a network or “No service” is displayed
Try connecting in another location. Verify the network coverage with
your operator.
Unable to make outgoing calls
Make sure your phone is connected to a network, and the network is not
overloaded or unavailable.
Unable to receive incoming calls
Make sure your phone is switched on and connected to a network
(check for overloaded or unavailable network).
SIM card PIN locked
Contact your network operator to obtain the PUK code (Personal
Unblocking Key).
To configure a new 3G network:
On your device, tap Settings.
Select Wireless & networks > More... > Mobile networks.
Select Network settings. In Network operators, select your operator. In
Access Point Names, select the correct access point name and enter the
exact connection parameters provided by your 3G provider.
CHOS_40b_Titanium_book.indd 16
10/03/2014 11:57:08
Table des matières
FR
Contenu de la boîte.....................................................................................................18
Description du téléphone.........................................................................................19
Assemblage....................................................................................................................22
Mise en route.................................................................................................................24
Connexion 3G & WiFi...................................................................................................26
Compte Google & Contacts......................................................................................28
Trucs & Astuces avec AndroidTM................................................................................30
Dépannage.....................................................................................................................32
Pour plus d’informations, consultez-les FAQs sur www.archos.com.
Consultez-les avant d’envisager un éventuel retour du produit. Le
problème que vous rencontrez peut être résolu facilement. Comme nous
mettons à jour et améliorons régulièrement nos produits, le logiciel
de votre appareil peut présenter une interface ou des fonctionnalités
légèrement différentes de celles décrites dans ce guide.
CHOS_40b_Titanium_book.indd 17
10/03/2014 11:57:08
Contenu de la boîte
Vérifiez que les éléments ci-dessous sont présents dans la boîte :
-- ARCHOS 40b Titanium
-- Batterie
-- Kit piéton
-- Adaptateur pour Micro SIM
-- Câble USB
-- Chargeur
-- Guide d’utilisation rapide
-- Guide des garanties et des mentions légales
Il se peut que les éléments fournis, de même que les accessoires, varient
en fonction de votre localité ou de votre opérateur.
Les éléments fournis sont conçus uniquement pour votre appareil et ils
pourraient ne pas être compatibles avec d’autres appareils.
Des accessoires non conformes peuvent être la source d’un mauvais
fonctionnement.
18
CHOS_40b_Titanium_book.indd 18
10/03/2014 11:57:08
Description du téléphone
FR
1 Port Micro-USB
1
2
2 Prise kit piéton
3
3 Haut-parleur
4 Webcam
CONFID
AC40 S
4
DRAW
scale 1:1
Rev
5
2
mm
0
last modi
5 Boutons de volume
6 Micro
CHOS_40b_Titanium_book.indd 19
6
19
CONFIDENTIAL
AC40 Suround
DRAWING
scale 1:1
Rev
2
mm
07-01-2014
last modification:
CONFID
AC40 S
DRAW
scale 1:1
Rev 2
10/03/2014 11:57:08
mm
0
last modi
Description du téléphone
7 Bouton ON/OFF
8 Caméra
9 Flash
8
7
9
20
CHOS_40b_Titanium_book.indd 20
Google
Re
l’énonc
sca
10/03/2014 11:57:08
FR
10 Menu
11 Accueil/Applications récentes/Google NOW
12 Retour
10 11
12
CONFIDENT
AC40 Surou
DRAWING
Menu : affiche une liste d’options disponibles pour un écran donné.
Accueil/Applications récentes/Google NOW : appui court pour
retourner à l’écran d’accueil. Appuyez deux fois successivement pour
afficher les applications ouvertes. Appui long pour accéder à Google
NOW.
Retour : retour à l’écran précédent.
scale 1:1
Rev
2
mm
07-01-2
last modificatio
21
Google Search : pour saisir votre recherche ou pour
l’énoncer et pour accéder à Google NowTM.
TM
CHOS_40b_Titanium_book.indd 21
10/03/2014 11:57:08
Assemblage
Ouvrir
1.Utilisez l’encoche pour enlever la coque arrière. Ne pas déformer ou plier
la coque arrière excessivement au risque de l’endommager.
2.Enlevez la batterie.
Insérer les cartes SIM
L’emplacement 2G/3G est en-dessous de l’emplacement 2G.
L’emplacement 2G n’accepte que des micro SIMs. Pour la carte SIM 3G,
glissez-la dans l’emplacement 2G/3G en orientant la face magnétique vers
le haut. Pour la carte SIM standard, glissez-la dans l’emplacement SIM 2G en
orientant la face magnétique vers le bas.
Insérer une carte mémoire
Pour insérer la carte mémoire, poussez vers le haut le clip puis soulevez-le.
Placez la carte mémoire. Fermez le clip et poussez-le vers le bas.
Fermer
1.Alignez les 4 points de contact de la batterie avec ceux du téléphone puis
appuyez doucement pour insérer la batterie.
2.Remettez en place la coque arrière.
Astuce :
Avant la première utilisation, chargez complètement la batterie.
22
CHOS_40b_Titanium_book.indd 22
10/03/2014 11:57:09
w to removed the bottom casing
Picture to show how to insert the battery pack
Picture toPicture
show how
to show
to removed
how to removed
the bottom
thecasing
bottom casing
plier
,
vers
2G en
z-le.
Picture to show the scards position
FR
Picture t
Picture toPicture
show how
to show
to insert
how the
to insert
battery
thepack
battery pack
SIM2
2G
SIM1
2G/3G
TF
Utilisez
l’encoche pour
enlever la coque
arrière
e puis
CHOS_40b_Titanium_book.indd 23
23
10/03/2014 11:57:09
Mise en route
Allumer
1.Faites un appui long sur le bouton ON/OFF pour allumer votre appareil.
Lorsque vous allumez votre appareil, il se peut qu’un code PIN vous soit
demandé.
2.Saisissez le code PIN de votre carte SIM.
Attention : assurez-vous de saisir le bon code PIN.
3.Sélectionnez ‘OK’.
Eteindre
Pour éteindre votre téléphone, faites un appui long sur le bouton ON/OFF,
puis sélectionnez Eteindre > OK.
Profile sonore & de notification
Silence
Vibreur
Sonnerie
1.Lorsque le téléphone est allumé,
faites un appui long sur le bouton
ON/OFF.
2.Sélectionnez une option.
ASTUCE :
L’écran tactile s’éteint après une certaine période d’inactivité. Pour
rallumer l’écran, faites un appui court sur le bouton ON/OFF. Pour définir
la mise en veille, allez sur Paramètres>Affichage>Veille.
24
CHOS_40b_Titanium_book.indd 24
10/03/2014 11:57:09
areil.
oit
OFF,
FR
Assistant de démarrage
La première fois que vous allumez votre téléphone, l’assistant de
démarrage vous permet de le paramétrer :
-- Langue
-- Date & heure
-- Connexion WiFi
-- Les options du service de localisation
Utilisation de l’écran tactil
Appuyer: appuyez une fois pour sélectionner ou lancer un menu, une
option ou une application.
Appuyer et maintenir: sélectionnez un élément et maintenez votre
doigt appuyé plus de 2 secondes.
Déplacer: sélectionnez un élément, maintenez votre doigt appuyé et
déplacez-le.
Tapoter: tapotez un élément deux fois rapidement.
Défiler: faites défiler rapidemlent vers le haut, vers le bas, vers la gauche,
vers la droite pour parcourir des listes ou des écrans.
Zoomer: placez deux doigts sur l’écran et les écarter pour zoomer ou les
rapprocher dans un mouvement de pincement pour dézoomer.
CHOS_40b_Titanium_book.indd 25
25
10/03/2014 11:57:09
Connexions 3G & WiFi
Connexion 3G
Avec votre carte SIM 3G, vous devrez pouvoir vous connecter à Internet
sans aucun paramètrage supplémentaire. Votre téléphone n’aura de
signal que si vous êtes dans une zone de réseau 3G/EDGE couverte par
votre opérateur 3G. Lorsque vous êtes connectés au réseau 3G, l’icône
3G est affichée dans la barre de statuts.
Activer les données mobiles
Pour accéder à Internet, l’icône Données
mobiles doit être activée.
1.Sélectionnez les icônes Heure et
Batterie en maintenant votre doigt
appuyé afin d’afficher la barre de statuts.
2.Tirez vers le bas la barre bleue.
3.Sélectionnez l’icône
du panneau des
=>
statuts.
4.Sélectionnez l’icône
Données mobiles
pour l’activer.
Astuce :
Des difficultés pour vous connecter? Consultez la foire aux questions sur
www.archos.com ou contactez votre opérateur mobile.
26
CHOS_40b_Titanium_book.indd 26
10/03/2014 11:57:09
FR
Connexion WiFi
ATTENTION : assurez-vous d’être dans une zone WiFi. Vous pouvez
accéder rapidement aux paramètres WiFi à partir de la barre de statuts.
1.Sélectionnez les icônes Heure et Batterie en maintenant votre doigt
appuyé afin d’afficher la barre de statuts.
2.Tirez vers le bas la barre bleue.
3.Sélectionnez l’icône
du panneau des
statuts.
4.Sélectionnez “Paramètres” pour
afficher la page des paramètres WiFi.
5.Dans la section “Sans fil & réseaux”, si le
WiFi est éteint, faites-glisser l’interrupteur
WiFi sur la position “OUI”. Une fois que le
WiFi est activé, le téléphone recherche des
réseaux WiFi à portée.
6.Sélectionnez le nom du réseau auquel vous voulez vous connecter.
Les réseaux privés sont affichés avec un cadenas. Ils nécessitent un mot
de passe.
CHOS_40b_Titanium_book.indd 27
27
10/03/2014 11:57:10
Compte Google & Contacts
Ajouter un compte Google
Un compte Google vous permet de profiter au maximum des
applications et des services Google que vous pourriez utiliser.
> “Comptes” > “Ajouter compte”.
1.Sélectionnez “Paramètres”
2.Sélectionnez “Google” pour le type de compte à ajouter.
3.Suivez les instructions à l’écran pour saisir les informations demandées.
Une fois que le compte est créé, accédez aux applications Play Store,
Gmail, Hangouts, Maps et beaucoup d’autres.
Synchroniser des informations
Vos informations doivent être synchronisées afin d’être sauvegardées.
Vos données sont enregistrées sur les serveurs Google.
1.Sélectionnez “Paramètres” > “Comptes” > “Google”.
2.Sélectionnez votre compte. La liste des informations qu’on peut
synchroniser est affichée.
3.Cochez les cases de toutes les informations afin de les synchroniser.
Vous pouvez les récupérer en cas de perte de votre téléphone ou de
votre carte SIM. Lorsque vous ajoutez votre compte Google à un nouvel
appareil, toutes les informations sauvegardées sont collectées.
28
CHOS_40b_Titanium_book.indd 28
10/03/2014 11:57:10
FR
Sauvegarder vos contacts
Tous vos contacts sont disponibles sur le Web et peuvent être
synchronisés sur n’importe quel téléphone Android paramétré avec votre
compte Google.
1.Insérer votre carte SIM incluant vos contacts dans votre téléphone.
2.A partir de l’écran d’Accueil ou de l’écran Toutes les applications,
sélectionnez l’application Contacts .
3.Appuyez sur le bouton de Menu puis sélectionnez “Importer/Exporter”.
4.Dans “Importer/exporter contacts”, sélectionnez “Importer à partir de la
carte SIM”.
5.Sélectionnez votre compte Google.
6.Sélectionnez les contacts à importer puis validez.
7.Une fois les contacts importés sur votre compte Google, sélectionnez
“Paramètres” > “Comptes” > “Google”.
8.Sélectionnez votre compte Google. Assurez-vous que “Contacts” est coché.
9.Appuyez sur le bouton de Menu, puis sélectionnez “Synchroniser
maintenant”. Vos contacts sont sauvegardés via votre compte Google.
CHOS_40b_Titanium_book.indd 29
29
10/03/2014 11:57:10
Trucs & Astuces avec AndroidTM
L’écran d’accueil étendu :
Naviguez entre les différents écrans d’accueil en faisant glisser votre
doigt vers la gauche ou vers la droite.
Bouton Accueil
Appui court pour retourner à l’écran d’accueil.
Appuyez deux fois successivement pour afficher les applications
ouvertes. Faites glisser une application vers la gauche ou vers la droite
pour la fermer.
Déplacer une icône de l’écran d’accueil :
Maintenez votre doigt appuyé sur l’icône jusqu’à ce que s’affichent
les lignes de positionnement, puis faites-la glisser vers l’emplacement
souhaité, et relâchez.
Supprimer une icône de l’écran d’accueil :
Maintenez votre doigt appuyé sur l’icône, puis faites-la glisser vers le
haut de l’écran, et déposez-la sur l’icône Supprimer.
Désinstaller une application :
A partir de l’écran Toutes les applications, maintenez votre doigt appuyé
sur l’icône, puis faites-la glisser vers le haut de l’écran et déposez-la sur
l’icône Désinstaller.
30
CHOS_40b_Titanium_book.indd 30
10/03/2014 11:57:10
FR
Créer des dossiers d’applications :
A partir d’un écran d’accueil, déposez une icône sur une autre pour les
rassembler.
Widgets :
Sélectionnez l’icône Toutes les applications. Sélectionnez Widgets en
haut de l’écran. A partir de l’écran d’accueil des widgets, vous pouvez
déplacer les widgets de la même façon que vous procédez avec les
applications.
Changer le fond d’écran :
Maintenez votre doigt appuyé sur un emplacement vide de l’écran, puis
choisissez parmi la liste d’options.
Verrouiller votre tablette :
A partir du panneau des réglages rapides dans la barre de statuts,
sélectionnez paramètres. Faites défiler l’écran vers le bas, puis
sélectionnez Sécurité. Sélectionnez Verrouillage de l’écran. Sélectionnez
le type de verrouillage que vous voulez utiliser. Une fois que vous avez
sélectionné une option, un écran de verrouillage s’affiche chaque fois
que votre écran est réactivé. Vous êtes alors invité à saisir le schéma, le
code PIN ou tout autre code spécifié.
CHOS_40b_Titanium_book.indd 31
31
10/03/2014 11:57:10
Dépannage
32
Mon téléphone ne répond pas ou ne s’allume pas
Vérifiez que la batterie est bien en place. Enlevez la batterie puis
remettez-la en place et rallumez le téléphone. Vérifiez la charge de la
batterie et chargez le téléphone pendant 20 minutes minimum.
Mon téléphone ne se connecte pas au réseau ou affiche “Pas de
service”
Tentez de vous connecter à partir d’un autre endroit. Vérifiez la
couverture réseau avec votre opérateur.
Impossible de passer des appels
Assurez-vous que votre téléphone est connecté au réseau et que le
réseau n’est ni saturé, ni indisponible.
Impossible de recevoir des appels
Assurez-vous que le téléphone est allumé et connecté au réseau.
Carte SIM bloquée (mauvais code PIN)
Contactez votre opérateur réseau afin d’obtenir le code PUK.
Configurer votre connexion 3G
Contactez votre opérateur 3G pour obtenir les paramètres de connexion.
Sélectionnez l’application Paramètres. Sélectionnez Sans fil et réseaux >
Plus... > Réseaux mobiles.
Dans Opérateur de réseau, sélectionnez votre opérateur.
Dans Noms des points d’accès, entrez le nom du point d’accès et
saisissez les paramètres de connexion.
CHOS_40b_Titanium_book.indd 32
10/03/2014 11:57:10
Inhaltsverzeichnis
Verpackungsinhalt........................................................................................................34 DE
Beschreibung des Geräts............................................................................................35
Montage...........................................................................................................................38
Erste Schritte....................................................................................................................40
WLAN-Verbindung & 3G-Verbindung.....................................................................42
Google-Konten & Kontakte.........................................................................................44
AndroidTM kennenlernen .............................................................................................46
Fehlerbehebung.............................................................................................................48
Weitere Informationen finden Sie unter den FAQs auf www.archos.com.
Diese unbedingt durchlesen, bevor Sie eine Rückgabe des Produkts in
Erwägung ziehen. Es könnte ein geringfügiges Problem vorliegen. Da
unsere Produkte kontinuierlich aktualisiert und weiterentwickelt werden,
kann die Software Ihres Gerätes in Erscheinung und Funktionalität
geringfügige Abweichungen zu den Darstellungen in dieser
Schnellstartanleitung aufweisen.
CHOS_40b_Titanium_book.indd 33
10/03/2014 11:57:10
Verpackungsinhalt
In der Verpackung müssen folgende Elemente enthalten sein:
-- ARCHOS 40b Titanium
-- Batterie
-- Headset
-- Micro-SIM-Adapter
-- USB-Kabel
-- Ladegerät
-- Benutzerhandbuch
-- Garantie, Impressum und Sicherheitshinweise
Die mit Ihrem Gerät mitgelieferten Elemente und das verfügbare
Zubehör können je nach Region oder Dienstleister abweichen.
Die mitgelieferten Elemente wurden ausschließlich für Ihr Gerät
entwickelt und sind mit anderen Geräten nicht kompatibel.
Nicht genehmigtes Zubehör kann zu einer Fehlfunktion Ihres Geräts
führen.
34
CHOS_40b_Titanium_book.indd 34
10/03/2014 11:57:11
Beschreibung des Geräts
1 Micro-USB-Anschluss
1
3
3 Lautsprecher
4 Webcam
DE
2
2 Kopfhöreranschluss
CONFID
AC40 S
4
DRAW
scale 1:1
Rev
5
2
mm
0
last modi
5 Lautstärketasten
6 Mikrofon
CHOS_40b_Titanium_book.indd 35
6
35
CONFIDENTIAL
AC40 Suround
DRAWING
scale 1:1
Rev
2
mm
07-01-2014
last modification:
CONFID
AC40 S
DRAW
scale 1:1
Rev 2
10/03/2014 11:57:11
mm
0
last modi
Beschreibung des Geräts
7 EIN/AUS-Taste
8 Kamera
9 Bliztlicht
8
7
9
36
CHOS_40b_Titanium_book.indd 36
sca
Re
10/03/2014 11:57:11
10 Menü
DE
11 Home/Letzte Apps/Google NOW
12 Zurück
10 11
12
Menü: Öffnet die Liste verfügbarer Optionen für den aktuellen
Bildschirm.
Home/Letzte Apps/Google Now: Kurz drücken, um zum Homescreen
zu gelangen; drücken und halten, um eine Liste der letzten Apps zu
öffnen. Lang drücken, um die App „Google NOW“ zu öffnen.
Zurück: Zurück zum vorherigen Bildschirm.
CHOS_40b_Titanium_book.indd 37
CONFIDENT
AC40 Surou
DRAWING
scale 1:1
Rev
2
mm
07-01-2
last modificatio
37
10/03/2014 11:57:11
Montage
Öffnen
1.Entfernen Sie die Rückseitenabdeckung.
Die Rückseitenabdeckung nicht übermäßig biegen oder verdrehen. Die
Abdeckung kann sonst beschädigt werden.
2.Entfernen Sie den Akku.
Einlegen von SIM-Karten
Der 2G/3G Slot ist unter den 2G-Slot. Der 2G-Slot nimmt Micro-SIM-Karten
nur. Um Ihre 3G SIM-Karte einzuführen, diese mit der Vorderseite nach oben
in den 2G/3G-Slot schieben. Um Ihre Standard-SIM-Karte einzuführen, diese
mit der Vorderseite nach unten in den 2G-Slot schieben.
Einlegen einer Speicherkarte
Um eine Speicherkarte einzuführen, schieben Sie den Speicherkartenslot
nach unten und heben die Abdeckung an. Die Speicherkarte jetzt einlegen.
Die Abdeckung schließen und nach unten drücken.
Schließen
1.Richten Sie die 4 Kontaktpunkte des Akkus mit denen des Telefons aus
und drücken Sie den Akku leicht in seine Position.
2.Die Akkuabdeckung wieder anbringen und einrasten.
38
Tipp:
Vor der erstmaligen Benutzung des Geräts sollte der Akku vollständig
aufgeladen werden.
CHOS_40b_Titanium_book.indd 38
10/03/2014 11:57:11
w to removed the bottom casing
Picture to show how to insert the battery pack
Picture toPicture
show how
to show
to removed
how to removed
the bottom
thecasing
bottom casing
DE
ie
rten
h oben
diese
lot
egen.
Picture to show the scards position
Picture t
Picture toPicture
show how
to show
to insert
how the
to insert
battery
thepack
battery pack
SIM2
2G
SIM1
2G/3G
TF
Heben Sie die
Rückabdeckung
mithilfe der
Einkerbung an
aus
CHOS_40b_Titanium_book.indd 39
39
10/03/2014 11:57:11
Erste Schritte
Einschalten
1.Drücken und halten Sie die EIN/AUS-Taste, um das Gerät einzuschalten.
Beim Einschalten des Geräts muss eine PIN-Nummer eingegeben werden.
2.Geben Sie die mit Ihrer SIM-Karte erhaltene PIN-Nummer ein.
3.Wählen Sie ‘OK’.
Ausschalten
Um das Gerät auszuschalten, drücken und halten Sie die EIN/AUS-Taste
und wählen dann Power off (Ausschalten) > OK.
Ton- und Benachrichtigungsprofile
1.Bei eingeschaltetem Gerät drücken und halten Sie die EIN/AUS-Taste.
Still
Vibration
Ton
2.Wählen Sie eine Option aus.
40
Tipp:
Wird der Touchscreen über einen bestimmten Zeitraum hinweg nicht
benutzt, wird dieser vom Gerät abgeschaltet. Um den Bildschirm wieder
einzuschalten, drücken Sie die EIN/AUS-Taste. Für die Einstellung der
Dauer gehen Sie zu Einstellungen > Anzeige > Display-Timeout.
TIPP:
Definieren Sie die Parameter des Gerätes für das WiFi (WLAN) Netzwerk, das Sie reg
CHOS_40b_Titanium_book.indd 40
10/03/2014 11:57:11
Installationsassistent
Wenn Sie Ihren ARCHOS das erste Mal in Betrieb nehmen, leitet Sie der
Installationsassistent durch einige Bildschirme, um Ihnen dabei zu helfen,
die grundlegenden Einstellungen vorzunehmen:
-- Sprache
-- Datum & Uhrzeit
-- WLAN Verbindung
-- Standortdienst
DE
Touchscreen-Funktionen
Tippen: Einmal tippen für Auswahl oder starten von Menüs, Optionen
oder Anwendungen.
Tippen und halten: Auf ein Element tippen und länger als 2 Sekunden
halten.
Ziehen: Auf ein Element tippen und zu einer neuen Position verschieben.
Doppeltippen: Ein Element zweimal hintereinander kurz antippen.
Blättern: Schnelles scrollen nach oben, unten, links oder rechts für das
Blättern durch Listen oder Bildschirme.
Drücken: Platzieren Sie zwei Finger etwas auseinander und dann
zusammendrücken.
zwerk, das Sie regelmäßig verwenden.
CHOS_40b_Titanium_book.indd 41
41
10/03/2014 11:57:11
3G- & WLAN-Verbindung
3G
Mit Ihrer 3G-SIM-Karte sollten Sie ohne weitere Einstellungen mit dem
Internet verbunden sein. Beachten Sie, dass der ARCH