1
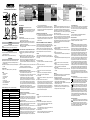
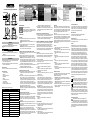
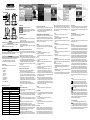
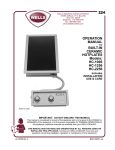
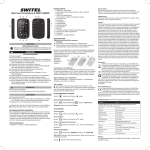
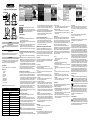
BSW 100 Easy Cam Ferngesteuerte Video-Überwachungskamera Abb. 1 Abb. 2 Abb. 3 INBETRIEBNAHME Laden Sie die App Easy iCAM auf Ihr Smartphone. Geben Sie dazu „Easy iCAM“ in die Suchleiste ein und laden Sie die App aus dem Apple App Store (iPhone/iPad) oder Google Play Store (Android) herunter. KAMERA EINRICHTEN DEUTSCH Bedienungsanleitung Bitte lesen und beachten Sie die nachfolgenden Informationen und bewahren Sie diese Bedienungsanleitung zum Nachschlagen auf! WARNUNG! Sicherheitshinweise Erstickungsgefahr durch Kleinteile, Verpackungs- und Schutzfolien! Halten Sie Kinder vom Produkt und dessen Verpackung fern! ACHTUNG! Umwelteinflüsse wie z. B. Rauch, Staub, Erschütterungen, Chemikali- en, Feuchtigkeit, Hitze oder direkte Sonneneinstrahlung vermeiden. Reparaturen nur von Fachpersonal durchführen lassen. Verpackungsinhalt 1 x Kamera, 1 x Netzteil (6 V 800 mA), 1 x Bedienungsanleitung Bedienelemente 1 Lichtsensor 2 Mikrofon 3 Kameralinse 4 Infrarot LEDs 5 Antenne 6 Betriebsanzeige 7 Netzteilanschluss 8 Reset-Schalter 9 Ein- / Aus-Schalter Technische Daten (Technische Änderungen vorbehalten) Merkmal Wert Kamera Frequenz 2.4 GHz Antenne Zweipol Antenne Modulation DBPSK, DQPSK, CCK and OFDM Bildsensor Color CMOS Linse f 3.0mm, F 2.4 IR LED 8 pcs Video compression MJPEG (Motion JPEG) Audio Einweg audio Maße 8.5 (B) x 10.6 (H) x 8.5 (T) cm Gewicht 137g Netzteil DC 6V, 800mA Temperaturbereich 0°C – 40°C (32°F – 104°F) Stromversorgung Stecken Sie das mitgelieferte Netzteil in eine Steckdose und das Kabel in den Netzteilanschluss (7) ein. Hinweis: Verwenden Sie den Adapter mit der Bezeichnung OUTPUT: 6V DC für die Kamera. Schieben Sie den Power ON / OFF-Schalter auf die Position ON. Die LED an der Kamera sollte nun aufleuchten (rotes Licht). Hinweis: Wenn die Stromversorgung der Kamera eingeschaltet wird, braucht die Kamera etwa 30 bis 60 Sekunden für die Ersteinrichtung. iPhone/iPad oder Android Smartphone mit der Kamera verbinden Aktivieren Sie die Wi-Fi-Funktion ihres iPhone/iPad oder Android Smart phones (Abb. 1) Wählen Sie “Easy_iCAM_XXXXXX” aus den Wi-Fi Netzwerken aus. (Abb. 1) Geben Sie das Passwort für “Easy_iCAM_XXXXXX” ein. Siehe Abb. 2. Hinweis: Das Passwort ist “easyXXXXXX”, das “XXXXXX” steht für die letzten sechs Zeichen des Wi-Fi-Kamera Namens. Zum Beispiel, wenn der Kameraname “Easy_iCAM_4DC0D6” ist, lautet das Passwort “easy4DC0D6”. Hinweis: Das Passwort „easy“ ist in Kleinbuchstaben und „XXXXXX“ enthält sowohl numerische als auch Großbuchstaben. Tippen Sie auf das „Easy iCAM“-Symbol auf dem Startbildschirm oder in der Apps Liste, um die App von Easy-iCAM zu öffnen. Sie sehen den Willkommens-Bildschirm, wie in Abb. 3 abgebildet. Einrichten der Kamera oder des Passworts Auf dem Bildschirm erscheint eine Erinnerungsnachricht, dass Sie den Namen der Wi-Fi-Kamera oder das Passwort ändern sollten (Abb. 4). Wenn Sie „Ja“ wählen, können Sie den Wi-Fi-Kamera Namen oder das Passwort ändern (Abb. 5). Wenn Sie das Setup abschließen wollen und den Namen der Kamera oder das Passwort geändert haben, tippen Sie auf das OK-Symbol. Die App fragt Sie nun, ob Sie die Internet Verbindung einrichten möchten. Wenn Sie „Ja“ wählen, wird die Einrich tung des Internets gestartet. Wenn Sie „Nein“ wählen, wird die Kamera zurückgesetzt, um die Änderung automatisch vorzunehmen. Bitte stellen Sie sicher, dass die Wi-Fi-Verbindung zwischen Ihrem iPhone, iPad oder Android-Handy mit der Kamera noch besteht. Hinweis: Das Passwort muss mindestens acht Zeichen lang sein. Wenn Sie „Nein“ wählen, wird die App Sie fragen, ob Sie die Internet Verbindung einrichten möchten Einrichten der Internetverbindung Auf dem Bildschirm erscheint eine Abfrage, ob Sie die Internet Verbindung einrichten wollen. Wenn Sie „Ja“ wählen, wird die Kamera nach verfügbaren Wi-Fi Netzwerken in Reichweite suchen. Tippen Sie auf den Namen Ihres Wi-Fi-Netzwerk, und geben Sie das Kennwort Ihres AP oder Routers ein, wenn nötig. Damit sind alle Ersteinstellungen erfolgt. Hinweis: Wenn die Kamera das Wi-Fi-Netzwerk, zu dem Sie eine Ver bindung herstellen möchten, nicht findet, tippen Sie auf das Scan Symbol, um nach verfügbaren Wi-Fi-Netzwerken in Reichweite zu suchen. Hinweis: Wenn Sie die Internet Einstellungen erfolgreich abgeschlos- sen haben, leuchtet nach 1 bis 2 Minuten die Netz / Status LED in grün auf. Hinweis: Während Sie die Internet Einstellung abschließen, erscheint auf dem Bildschirm eine Nachricht. Wenn Sie das Meldungs- Abb. 4 Abb. 5 Abb. 6 fenster nicht entfernen können, klicken Sie bitte auf die Home-Taste auf Ihrem iPhone, iPad oder Android, und doppelklicken Sie dann auf die Home-Taste, um die App zu löschen. Dann starten Sie die App erneut. (Die App wird im App Store regelmäßig aktualisiert) Wenn Sie „Nein“ wählen, sind alle ursprünglichen Einstellung gemacht. Hinweis:Wenn Sie die Internet-Verbindung nicht einrichten, kann man einfach das Bild durch die direkte Verbindung der Kamera mit Ihrem iPhone, iPad oder Android sehen. Kamera auf Werkseinstellungen zurücksetzen Während die Kamera eingeschaltet ist, drücken Sie die Reset-Taste mit einem kleinen Objekt oder Stift für mindestens 3 Sekunden. Die Power / Status-LED beginnt dann zu blinken. Die Kamera wird auf Werkseinstellungen zurückgesetzt, das ist sinnvoll, wenn Sie das Passwort der Kamera vergessen haben. BETRIEBSMODUS – LOKALE ANSICHT / INTERNET ANSICHT: Easy-iCAM ist eine Wireless-Netzwerk-Kamera. Sie kann mit Ihrem iPhone, iPad oder Android-Handy durch Wireless-Technologie direkt verbunden werden. Sie können das Bild auf Ihrem Handy im lokaler Modus sehen. Darüber hinaus kann sie über Wireless-AP oder Router mit dem Internet verbunden werden, und Sie können über Ihr Handy die Kamera überwachen (im Internet-Modus von überall in der Welt). Lokale Ansicht Wenn die Kamera mit Ihrem iPhone, iPad oder Android-Handy über Wi-Fi verbunden ist, können Sie die App von Easy iCAM im lokalen AnischtsModus betreiben. Siehe Abb. 6. Betriebsmodus Diese Spalte zeigt den aktuellen Betriebsmodus der App. Kameraname / W-Fi Netzwerk Diese Spalte zeigt den Namen der Kamera sowie das Wi-Fi-Netzwerk. Foto Tippen Sie auf das Symbol, um alle aufgenommen Fotos zu sehen. Momentaufnahme Tippen Sie auf das Symbol, um einen Schnappschuss von der Kamera auf Ihrem iPhone, iPad oder Android-Handy zu speichern. Ton ON/OFF Tippen Sie auf das Symbol, um den Ton abzuschalten, tippen Sie erneut, um den Ton wieder einzuschalten. Sprachgesteuerte Übertragung Tippen Sie auf das Symbol Sprachsteuerungsfunktion, um diese zu aktivieren, tippen Sie erneut um sie auszuschalten. Wenn sich das Gerät in der Sprachsteuerungsfunktion befindet, und Sie die Home Taste auf Ihrem iPhone, iPad oder Android-Handy drücken, um die App zu verlassen, erscheint auf dem Bildschirm eine Meldung, die Sie daran erinnert, dass die Lautstärke der Kamera-Einheit höher ist als die der Einstellungsebene. Tippen oder streichen der Nachricht startet die App direkt. Hinweis: Wenn sich das Gerät in der Sprachsteuerungsfunktion befindet und Sie drücken die Home-Taste auf Ihrem iPhone, iPad oder Android-Handy, um die App zu verlassen, kann die Sprachsteuerungs funktion weiter arbeiten. Wenn Sie die App vollständig beenden möch ten, doppelklicken Sie auf die Home-Taste auf Ihrem iPhone oder iPad. Wenn Sie die App komplett beenden wollen, wird die Sprachsteue rungsfunktion nicht funktionieren. Einstellungen Tippen Sie auf das Symbol, um die Funktionen der Kamera einzurichten. Siehe Abb. 7. Internet Einstellungen Wenn Sie die Kamera mit einem anderen AP oder Router verbinden wollen oder Sie noch keine Internetverbindung eingerichtet haben, können Sie hier die Internetverbindung einrichten. Abb. 7 Abb. 8 WIFI Einstellungen Wenn Sie den Namen der Kamera (Wi-Fi-Netzwerk-Name) oder das Kennwort ändern möchten, können Sie dies hier einrichten. Erweiterte Einstellungen Tippen Sie auf „Erweiterte Einstellungen“, um die Empfindlichkeit der Sprachsteuerungsfunktion durch verschieben des Punktes auf der Leiste einzustellen. Internet Ansicht Wenn die Internet-Verbindung der Kamera eingerichtet wurde und die Power / Status-LED grün leuchtet, kann die Kamera mit dem Internet verbunden werden und Sie können die Kamera von überall auf der Welt auf Ihrem Handy überwachen. Bitte stellen Sie sicher, dass Ihr Handy auf vorhandene Internet-AP, Router oder 3G-Netzwerk zugreifen kann, und starten Sie dann die Easy iCAM-App neu. Siehe Abb. 8. Wenn Sie die App starten, wird die Kameraliste auf dem Bildschirm angezeigt. Alle Kameras, die Sie hinzugefügt haben, werden in dieser Liste aufgeführt. Wenn die Kameras online sind, können Sie das Bild-Symbol tippen, um das Bild der ausgewählten Kamera zu sehen. Siehe Abb. 9. Sie können auch auf den Pfeil neben dem Namen der Kamera tippen, und dann per „Reconnect“-Spalte wieder die Internet-Verbindung herstellen, wenn die Kamera offline ist. Zurück Tippen Sie auf das Zurück-Symbol, um zurück zum Kamera- Bildschirm zu kommen. Betriebsmodus Diese Spalte zeigt den aktuellen Betriebsmodus der App. Kamera Name / Wi-Fi Netzwerk Diese Spalte zeigt den Namen der Kamera (gleich wie Wi-Fi-Netzwerk.) Online Nummer Diese Spalte zeigt, wie viele Menschen online sind, um die Kamera zu sehen. Foto Tippen Sie auf das Symbol, um alle aufgenommen Fotos zu sehen. Momentaufnahme Tippen Sie auf das Symbol, um einen Schnappschuss von der Kamera auf Ihrem iPhone, iPad oder Android-Handy zu speichern. Ton ON/OFF Tippen Sie auf das Symbol, um den Ton abzuschalten, tippen Sie erneut, um den Ton wieder einzuschalten. Fehlerbehebung Wenn es irgendein Problem während des Betriebs gibt, verlassen Sie bitte die App komplett und dann starten Sie die App erneut. Die App vollständig beenden iPhone/iPad: Doppelklicken Sie auf die Home-Taste, um alle aktiven Apps anzuzeigen. Tippen Sie dann auf das Easy iCAM Symbol, um die App komplett zu beenden. Android mobile: Unter Einstellungen > Anwendungen > Anwendungen verwalten > Easy iCAM > Stop erzwingen Die App wird kontinuierlich verbessert. Wenn für die App ein neues Update zur Verfügung steht, informieren wir Sie und Sie können es aus dem App Store herunterladen. Abb. 9 Service-Hotline Bei technischen Problemen wenden Sie sich an unsere Service-Hotline. Schweiz: Tel. 0900 00 1675 (Kosten national, Swisscom bei Drucklegung: CHF 2,60/min). Bei Garantieansprüchen wenden Sie sich an Ihren Fachhändler. Netzteil Diesem Produkt liegt das energieeffiziente Netzteil SSW-2256EU bei. Input 100-240 V, 0.2A / Output: 6V, 800 mA Pflegehinweise Gehäuseoberflächen mit einem weichen und fusselfreien Tuch reinigen. Keine Reinigungs- oder Lösungsmittel verwenden. Garantie SWITEL-Geräte werden nach den modernsten Produktionsverfahren hergestellt und geprüft. Ausgesuchte Materialien und hoch entwickelte Technologien sorgen für einwandfreie Funktion und lange Lebensdauer. Die Garantie gilt nicht für die in den Produkten verwendeten Batterien, Akkus oder Akkupacks. Die Garantiezeit beträgt 24 Monate, gerechnet vom Tage des Kaufs. Innerhalb der Garantiezeit werden alle Mängel, die auf Materialoder Herstellungsfehler zurückzuführen sind, kostenlos beseitigt. Der Garantieanspruch erlischt bei Eingriffen durch den Käufer oder durch Dritte. Schäden, die durch unsachgemäße Behandlung oder Bedienung, natürliche Abnutzung, durch falsches Aufstellen oder Aufbewahren, durch unsachgemäßen Anschluss oder Installation sowie durch höhere Gewalt oder sonstige äußere Einflüsse entstehen, fallen nicht unter die Garantieleistung. Wir behalten uns vor, bei Reklamationen die defekten Teile auszubessern, zu ersetzen oder das Gerät auszutauschen. Ausgetauschte Teile oder ausgetauschte Geräte gehen in unser Eigentum über. Schadenersatzansprüche sind ausgeschlossen, soweit sie nicht auf Vorsatz oder grober Fahrlässigkeit des Herstellers beruhen. Sollte Ihr Gerät dennoch einen Defekt innerhalb der Garantiezeit aufweisen, wenden Sie sich bitte unter Vorlage Ihrer Kaufquittung ausschließlich an das Geschäft, in dem Sie Ihr SWITEL-Gerät gekauft haben. Alle Gewährleistungsansprüche nach diesen Bestimmungen sind ausschließlich gegenüber Ihrem Fachhändler geltend zu machen. Nach Ablauf von zwei Jahren nach Kauf und Übergabe unserer Produkte können Gewährleistungsrechte nicht mehr geltend gemacht werden. Entsorgung Wollen Sie Ihr Gerät entsorgen, bringen Sie es zur Sammelstelle Ihres kommunalen Entsorgungsträgers (z. B. Wertstoffhof). Nach dem Elektro- und Elektronikgerätegesetz sind Besitzer von Altgeräten gesetzlich verpflichtet, alte Elektro- und Elektronikgeräte einer getrennten Abfallerfassung zuzuführen. Das nebenstehende Symbol bedeutet, dass Sie das Gerät auf keinen Fall in den Hausmüll werfen dürfen! Sie sind gesetzlich verpflichtet, Akkus und Batterien beim batterievertreibenden Handel sowie bei zuständigen Sammelstellen, die entsprechende Behälter bereitstellen sicher zu entsorgen. Die Entsorgung ist unentgeltlich. Die Symbole bedeuten, dass Sie Akkus und Batterien auf keinen Fall in den Hausmüll werfen dürfen und sie über Sammelstellen der Entsorgung zugeführt werden müssen. Verpackungsmaterialien entsorgen Sie entsprechend den lokalen Vorschriften. Konformitätserklärung Dieses Gerät erfüllt die Anforderungen der Richtlinie 1999/5/EG über Funkanlagen und Telekommunikationsendeinrichtungen und die gegenseitige Anerkennung ihrer Konformität. Die Konformität mit der o. a. Richtlinie wird durch das CE-Zeichen auf dem Gerät bestätigt. Für die komplette Konformitätserklärung nutzen Sie bitte den kostenlosen Download von unserer Website www.switel.com. BSW 100 Easy Cam Caméra de surveillance vidéo à distance Fig. 1 Fig. 2 Fig. 3 MISE EN SERVICE Téléchargez l‘application Easy iCAM. Pour commencer, entrez „iCAM facile“ dans la barre de recherche et télécharger l‘application sur l‘Apple App Store (iPhone / iPad) ou Google Play (Android) CAMERA SETUP FRANÇAIS Mode d’emploi Veuillez lire et observer les informations suivantes et conserver ce mode d‘emploi afin de pouvoir le consulter en cas de besoin! AVERTISSEMENT! Consignes de sécurité Risque d‘étouffement lié à des éléments de petite taille, des films d‘emballage et de protection ! Tenez les enfants à l‘écart du produit et de son emballage ! ATTENTION ! Évitez des influences provenant de l‘environnement telles que fumée, poussière, vibrations, produits chimiques, humidité, grande chaleur ou ensoleillement direct. Faire exécuter les réparations uniquement par du personnel spécialisé et qualifié. Contenu du coffret 1 x Caméra 100, 1 x adaptateur (6 V 800 mA), 1 x Mode d‘emploi Controls 1 Capteur de lumière 2 Microphone 3 Lentille de la caméra 4 LEDs infrarouge 5 Antenne 6 Puissance LED 7 Prise alimentation bloc secteur 8 Bouton de réinitialisation 9 Interrupteur ON / OFF Données techniques (Sous réserve de modifications techniques) Caractéristique Valeur Caméra Frequenz 2.4 GHz Antenne Dipole antenne Modulation DBPSK, DQPSK, CCK and OFDM Capteur d‘image Color CMOS Lentille f 3.0mm, F 2.4 IR LED 8 pcs Compression vidéo MJPEG (Motion JPEG) Audio Disposable audio Dimensions 8.5 (B) x 10.6 (H) x 8.5 (T) cm Poids 137g Bloc secteur DC 6V, 800mA Plage de températures 0°C – 40°C (32°F – 104°F) Source de courant Branchez l‘adaptateur d‘alimentation fourni sur une prise murale et l‘autre fiche dans le dos de l‘appareil. Référence: Utilisez l‘adaptateur étiqueté: DC 6V pour la caméra. Faites glisser le Power ON / OFF sur la position ON. Le DEL de la caméra doit s‘allumer (lumière rouge). Référence: Lorsque l‘appareil est allumé, il faut env. 30 à 60 secondes pour la configuration initiale. Connectez iPad / iPhone ou smartphone Android avec la caméra Activer le Wi-Fi de votre iPhone / iPad ou mobile Android (Voir Fig. 1) Sélectionnez „Easy_iCAM_XXXXXX“ des réseaux Wi-Fi gratuite. Voir Fig. 1. Entrez le mot de passe „Easy_iCAM_XXXXXX“ un. Voir Fig. 2. Référence: Le mot de passe est „easyXXXXXX“, le „XXXXXX“ repré sente l‘six derniers caractères du nom de la caméra Wi-Fi. Par exemple, si le nom de la caméra est „Easy_iCAM_4DC0D6“, le mot de passe est „easy4DC0D6“. Référence: Le mot de passe „eaysy“ est en minuscules et „XXXXXX“ contient des lettres numériques et majus cules. Tapez sur l‘icône „iCAM Easy“ sur l‘écran d‘accueil ou dans la liste des applications pour ouvrir l‘application Easy-iCAM Vous verrez l‘écran d‘accueil, comme le montre la figure 3. Configuration de la caméra ou du mot de passe Un message de rappel s‘affiche sur l‘écran que vous devez changer le nom de la caméra Wi-Fi ou mot de passe. Voir Fig. 4. Si vous sélectionnez «Oui», vous pouvez modifier le nom de la caméra ou mot de passe Wi-Fi. Voir Fig. 5. Lorsque vous effectuez l‘installation et changé le nom de la caméra ou le mot de passe, appuyez sur le bouton OK. L‘application vous demandera si vous souhaitez configurer votre connexion Internet. Si vous sélectionnez «Oui», la connexion de l‘Internet commence. Si vous sélectionnez „Non“, la caméra se remet à faire le changement automatiquement. S‘il vous plaît assurez-vous que le réseau Wi-Fi de votre iPhone, iPad ou mobile Android est toujours connecté à la caméra. Référence: Le mot de passe doit comporter au moins huit caractères. Si vous sélectionnez «Non», l‘application vous demandera si vous souhaitez configurer votre connexion Internet Configuration de votre connexion Internet L‘écran affiche un message de confirmation que vous souhaitez confi gurer la connexion Internet.. Si vous sélectionnez „Oui“, la caméra va scanner les réseaux Wi-Fi à portée. Tapez le nom de votre réseau Wi-Fi et entrez le mot de passe de votre point d‘accès ou routeur si nécessaire. Cela signifie que tout réglage initial est effectué. Référence: Si la caméra pour laquelle vous souhaitez vous connecter ne trouve pas le réseau Wi-Fi, appuyez sur le bouton de numérisation pour scanner les réseaux Wi-Fi à portée. Référence: Si vous terminez le connexion à l‘internet avec succès, le DEL d‘état s‘allume en vert après 1 à 2 minutes. Référence: Alors que vous avez terminé la mise en ligne, un message apparaît sur l‘écran. Si vous ne pouvez pas supprimer la fenêtre de message, cliquez sur le bouton d‘accueil de votre iPhone, iPad ou An droid, puis double-cliquez sur le bouton Home pour supprimer l‘application et démarrer l‘application à nouveau. (L‘application sera Fig. 4 Fig. 5 Fig. 6 mise à jour sur l‘App Store régulièrement) Si vous sélectionnez „Non“, tous les réglages initiaux sont effectués. Référence: Si vous n‘avez pas configuré la connexion à Internet, vous pouvez simplement voir l‘image en branchant l‘appareil directement sur votre iPhone, iPad ou Android. Réinitialiser la caméra aux réglages d‘usine Lorsque l‘appareil est allumé, appuyez sur le bouton de réinitialisation un petit objet ou une broche pendant au moins 3 secondes, puis le DEL alimentation / état commence clignoter. La caméra sera réinitialisé aux réglages par défaut. Ceci est utile si vous avez oublié le mot de passe de la caméra. MODE DE FONCTIONNEMENT – VUE LOCALE / INTERNET VUE: Easy-ICAM est une caméra réseau sans fil. Il peut être connecté directement à votre iPhone, iPad ou Android téléphone grâce à la technologie sans fil. Vous pouvez utiliser l‘image sur votre téléphone dans une perspective locale à voir au-delà, il peut être connecté à AP ou routeur sans fil à l‘Internet, et vous pouvez contrôler l‘image de la caméra de votre téléphone mobile (internet en vue de n‘importe où dans le monde). Vue locale Lorsque la caméra est connecté via Wi-Fi avec votre iPhone, iPad ou téléphone Android, vous pouvez exécuter l‘application Easy iCAM en mode local. Voir Fig. 6. Mode de fonctionnement Cette colonne indique le mode de fonctionnement actuel de ‘applica tion. Nom de la caméra / réseau Wi-Fi Cette colonne indique le nom de la caméra ainsi que le réseau Wi-Fi gratuite. Photo Appuyez sur l‘icône, vous pouvez voir toutes les photos prises. Snapshot Appuyez sur l‘icône, vous pouvez enregistrer un instantané de la caméra sur votre iPhone, iPad ou téléphone Android. Volume ON/OFF Appuyez sur l‘icône pour désactiver le son, appuyez à nouveau, le son est rallumé. Échange à commande vocale - fonction VOX Appuyez sur l‘icône pour activer la fonction VOX, appuyez de nouveau pour mettre la fonction VOX. Si vous activez la fonction VOX, puis appuyez sur le bouton d‘accueil sur votre iPhone, iPad ou mobile And roid pour quitter l‘application, l‘écran affiche un message rappelant l orsque le niveau sonore de l‘unité de la caméra est plus élevé que le niveau de réglage. Appuyez ou faites glisser l‘icône de message rappelant à lancer directement l‘application. . Réglages Appuyez sur l‘icône, vous pouvez définir les fonctions de l‘appareil. Voir Fig. 7. Paramètres Internet Si vous souhaitez connecter l‘appareil à un autre point d‘accès ou routeur, ou si vous n‘avez jamais mis en place la connexion Internet, vous pouvez configurer la connexion Internet ici. Paramètres WIFI Si vous souhaitez modifier le nom de la caméra (nom du réseau Wi-Fi) ou mot de passe, vous pouvez en créer un ici. Paramètres avancés Appuyez sur „Paramètres avancés“ et d‘ajuster la finesse de la fonction de commande vocale en déplaçant le point sur la barre. Fig. 7 Fig. 8 Internet vue Si la connexion Internet de l‘appareil a été mis en place et que le voyant Alimentation / Etat est vert, l‘appareil peut être connecté à Internet et vous pouvez contrôler la caméra à partir de n‘importe où dans le monde sur votre téléphone. S‘il vous plaît assurez-vous que votre téléphone peut accéder à d‘autres Internet-AP, routeur ou réseau 3G, puis lancer l‘application facile iCAM nouveau. Voir Fig. 8. Lorsque vous démarrez l‘application, la liste des caméras s‘affiche sur l‘écran. Toutes les caméras que vous avez ajoutés seront exposées dans cette liste. Si l‘appareil photo est en ligne, vous pouvez appuyer sur l‘icône de l‘image pour voir l‘image de la caméra sélectionnée. Voir Fig. 9 Vous pouvez également appuyer sur la flèche à côté du nom de la caméra, puis restaurer via la colonne „Reconnect“ la connexion internet lorsque l‘appareil est déconnecté. Retour Appuyez sur l‘icône Retour pour revenir à l‘écran de l‘appareil. Mode de fonctionnement Cette colonne indique le mode de fonctionnement actuel de ‘applica tion. Nom de la caméra / réseau Wi-Fi Cette colonne indique le nom de la caméra ainsi que le réseau Wi-Fi gratuite. numéro en ligne Cette colonne indique combien de personnes sont en ligne pour voir la caméra. Photo Appuyez sur l‘icône, vous pouvez voir toutes les photos prises. Snapshot Appuyez sur l‘icône, vous pouvez enregistrer un instantané de la caméra sur votre iPhone, iPad ou téléphone Android. Volume ON/OFF Appuyez sur l‘icône pour désactiver le son, appuyez à nouveau, le son est rallumé. Dépannage S‘il ya un problème pendant l‘opération, s‘il vous plaît quitter l‘application complètement et puis démarrer l‘application à nouveau. Complètement quitter l‘application iPhone/iPad: Double-cliquez sur le bouton principal et il montre toutes les applications que vous avez ouvertes. Ensuite, appuyez sur l‘icône iCAM Facile à quitter l‘application complètement. Android mobile: Sous Paramètres > Applications > Gérer les applica tions > Easy iCAM > Force arrêt L‘application sera mise à jour sur l‘App Store régulièrement. Si l‘application est mis à jour, nous vous informerons, et vous pouvez télécharger la version mise à jour de l‘app store Fig. 9 Ligne d‘assistance directe En cas de problèmes techniques, adressez-vous à notre ligne d‘assistance directe. Suisse : Tél. 0900 00 1675 (frais Swisscom à l‘impression de ce mode d‘emploi : CHF 2,60/min). En cas de recours en garantie, adressezvous à votre revendeur. Bloc secteur Ce produit est l‘alimentation la plus éconergétique SSW-2256EU. Input 100-240 V, 0.2A / Output: 6V, 800 mA Remarques d‘entretien Nettoyez les surfaces du boîtier avec un chiffon doux et non pelucheux. N‘utilisez pas de produits d‘entretien ou de solvants. Garantie Les appareils SWITEL sont contrôlés et fabriqués suivant les meilleurs procédés. Des matériaux sélectionnés et des technologies de pointe leur garantissent un fonctionnement irréprochable et une longue durée de vie. La garantie ne s‘applique pas aux piles et piles rechargeables utilisées dans les produits. La durée de la garantie est de 24 mois à partir de la date d‘achat. Pendant la durée de la garantie, tous les défauts dus à des vices de matériel ou de fabrication seront éliminés gratuitement. Le droit à la garantie expire en cas d‘intervention de l‘acheteur ou de tiers. Les dommages provenant d‘un maniement ou d‘une manipulation incorrects, d‘une usure naturelle, d‘une mauvaise mise en place ou d‘une mauvaise conservation, d‘un raccordement ou d‘une installation incorrects ainsi que d‘un cas de force majeure ou autres influences extérieures sont exclus de la garantie. En cas de réclamations, nous nous réservons le droit de réparer, de remplacer les pièces défectueuses ou d‘échanger l‘appareil. Les composants remplacés ou les appareils échangés deviennent notre propriété. Les demandes de dommages et intérêts sont exclues tant que les défauts ne reposent pas sur une faute intentionnelle ou une négligence grossière du fabricant. Si votre appareil SWITEL présente cependant un défaut pendant la période de garantie, veuillez vous adresser exclusivement au magasin où vous l‘avez acheté en présentant votre bon d‘achat. Vous ne pouvez faire valoir vos droits à la garantie répondant à ces dispositions qu‘exclusivement auprès de votre revendeur. Deux ans après l‘achat et la remise de nos produits, il n‘est plus possible de faire valoir les droits à la garantie. Mettre l‘appareil au rebut Si vous ne voulez plus servir de votre appareil, veuillez l‘apporter au centre de collecte de l‘organisme de traitement des déchets de votre commune (par ex. centre de recyclage). D‘après la loi relative aux appareils électriques et électroniques, les propriétaires d‘appareils usagés sont tenus de mettre tous les appareils électriques et électroniques usagés dans un collecteur séparé. L‘icône ci-contre signifie que vous ne devez en aucun cas jeter votre appareil dans les ordures ménagères ! Vous êtes tenus par la loi d‘éliminer vos piles et piles rechargeables auprès d‘un revendeur de piles ainsi qu‘auprès de centres de collecte responsables de leur élimination qui mettent à disposition des conteneurs adéquats. Leur élimination est gratuite. L‘icône ci-contre signifie que vous ne devez en aucun cas jeter les piles et piles rechargeables dans les ordures ménagères, mais que vous devez les apporter à un centre de collecte. Éliminez les fournitures d‘emballage selon les règlements locaux. Déclaration de conformité Cet appareil est en conformité avec la directive 1999/5/CE sur les installations de radio et de télécommunication et la reconnaissance réciproque de leur conformité. La conformité avec la directive mentionnée ci-dessus est confirmée sur l‘appareil par la marqe CE. Vous avez la possibilité de télécharger gratuitement la déclaration intégrale de conformité sur notre site Internet www.switel.com. BSW 100 Easy Cam Telecamera di video sorveglianza a distanza Fig. 1 Fig. 2 Fig. 3 MESSA IN SERVIZIO Ricarica giù l‘app Facile iCAM. Per iniziare, immettere „Easy iCAM“ nella barra di ricerca e di scaricare l‘applicazione da App Store (iPhone / iPad) o Google Play (Android) verso il basso. CAMERA SETUP Alimentatore Collegare l‘adattatore CA in dotazione in una presa di corrente e l‘altra estremità alla parte posteriore della camera. Riferimento: Utilizzare l‘adattatore di output etichettato: DC 6V per la camera. Far scorrere l‘alimentazione ON / OFF su ON. Il LED sulla camera dovrebbe accendersi (luce rossa). Riferimento: Quando si accende l‘alimentazione, la camera scatta circa 30 a 60 secondi per la configurazione iniziale. ITALIANO Istruzioni per l’uso Leggere e osservare le seguenti informazioni e conservare le istruzioni per l’uso per consultazione futura! AVVERTENZA! Indicazioni di sicurezza Rischio di soffocamento dovuto a minuteria, pellicole protettive e di imballaggio! Tenere lontano tale imballaggio dalla portata dei bambini! ATTENZIONE! Evitare un’esposizione a fumo, polvere, vibrazioni, sostanze chimiche, umidità, calore e raggi solari diretti. Le riparazioni vanno affidate esclusivamente al personale qualificato del servizio di assistenza tecnica. Oggetto di fornitura 1 x Camera, 1 x Adattatore di alimentazione (6 V 800 mA), Istruzioni. Elementi di comando 1 Sensore di luminosità 2 Microfono 3 Obiettivo della fotocamera 4 LED infrarossi 5 Antenna 6 Alimentazione / stato LED 7 Power adattatore 8 Pulsante di ripristino 9 Interruttore di accensione ON / OFF Dati tecnici (Con riserva di modifiche tecniche) Caratteristica Valore Camera Frequenza 2.4 GHz Antenna Dipole antenna Modulation DBPSK, DQPSK, CCK and OFDM Sensore di immagine Color CMOS Lens f 3.0mm, F 2.4 IR LED 8 pcs Compressione video MJPEG (Motion JPEG) Audio Solo andata audio Dimensioni 8.5 x 10.6 x 8.5 cm Peso 137g Alimentatore di rete DC 6V, 800mA Intervallo di temperatura 0°C – 40°C (32°F – 104°F) Collegare iPad / iPhone o per smartphone Android con camera Selezionare la connessione Wi-Fi per il loro iPhone / iPad o smartphone Android (Vedere Fig. 1) Selezionare „Easy_iCAM_XXXXXX“ dalle reti Wi-Fi. Vedere Fig. 1. Immettere la password per „Easy_iCAM_XXXXXX“. Vedere Fig. 2. Riferimento: La parola d‘ordine è „easyXXXXXX“, il „xxxxxx“ rappre senta le ultime sei caratteri del nome della camera Wi-Fi. Ad esempio, se il nome della camera è „Easy_iCAM_4DC0D6“ la parola d‘ordine è „easy4DC0D6“. Riferimento: La parola d‘ordine è „facile“ è in minusco lo e „XXXXXX“ contiene lettere sia numerici e maiuscole. Toccare l‘icona „Easy iCAM“ nella schermata iniziale o nell‘elenco delle applicazioni per aprire l‘applicazione Easy-iCAM. Si vedrà la schermata di benvenuto, come mostrato in Fig. 3. Impostazione della camera o la password Viene visualizzato un messaggio di promemoria sullo schermo che si dovrebbe cambiare il nome della camera Wi-Fi o la password. Vedere Fig. 4. Se si seleziona „Sì“, è possibile modificare il nome della camera Wi-Fi o la password. Vedere Fig. 5. Una volta completata la configurazione e cambiato il nome della camera o la password, toccare il pulsante OK. L‘applicazione vi chiederà se si desidera impostare la connessione a Internet. Se si seleziona „Sì“, l‘istituzione di Internet inizia. Se si seleziona „No“, si resetta la camera per fare automaticamente la modifi ca. Fare in modo che la connessione Wi-Fi è ancora collegato al vostro iPhone, iPad o telefono Android con la camera. Riferimento: La password deve essere lunga almeno otto caratteri. Se si seleziona „No“, l‘applicazione vi chiederà se si desidera impostare la connessione a Internet. Impostazione della connessione a Internet Consente di visualizzare un messaggio di conferma sullo schermo se si desidera impostare la connessione a Internet. Se si seleziona „Sì“, la camera esegue la scansione di reti Wi-Fi dispo nibili. Toccare il nome della rete Wi-Fi e di inserire la password del vostro AP o router, se necessario. Ciò significa che tutte impostazione iniziale è fatto. Riferimento: Se la camera per la quale si desidera connettersi non trova la rete Wi-Fi, toccare il pulsante di scansione per la ricerca di reti Wi-Fi disponibili. Riferimento: Se si completano con successo le impostazioni Internet, le luci dopo 1 o 2 minuti, il LED potere/di stato di colore verde. Riferimento: Mentre si completa l‘impostazione della linea, viene visualizzato un messaggio sullo schermo. Se non è possibile rimuovere la finestra del messaggio, fare clic sul pulsante Home sul tuo iPhone, iPad o Android, e quindi fare doppio clic sul pulsante Home per elimina re l‘applicazione e avviare di nuovo l‘applicazione. Fig. 4 Fig. 5 Fig. 6 (L‘applicazione sarà aggiornato su App Store regolarmente) Se si seleziona „No“, tutte le impostazioni iniziali sono fatto. Riferimento: Se non si imposta la connessione a Internet, si può solo vedere l‘immagine collegando la camera direttamente sul tuo iPhone, iPad o Android. Ripristinare la camera alle impostazioni di fabbrica Mentre la fotocamera è accesa, premere il tasto RESET con un oggetto o un elemento per almeno 3 secondi. LED Power/di stato inizia a lampeggiare. La camera sarà ripristinato alle impostazioni di fabbrica, il che è utile se hai dimenticato la password della telecamera. MODALITÀ DI FUNZIONAMENTO – VISTA LOCALE / VISTA INTERNET: Easy-iCAM è una camera di rete wireless. Può essere collegato direttamente al telefono cellulare iPhone, iPad o Android tramite la tecnologia wireless. È possibile utilizzare l‘immagine sul vostro telefono in una prospettiva locale di vedere al di là di esso può essere collegato al punto di accesso wireless o router a Internet, ed è possibile controllare la camera dal vostro cellulare (internet in vista da qualsiasi parte del mondo). Vista locale Quando la telecamera si collega con il vostro iPhone, iPad o Android cellulare direttamente tramite Wi-Fi, è possibile lanciare l‘applicazione di Easy iCAM di operare in modalità di visualizzazione locale.. Vedere Fig. 6. Modalità di funzionamento Questa colonna indica la modalità di funzionamento corrente delle app. Nome di Camera / rete Wi-Fi Questa colonna mostra il nome della camera e la rete Wi-Fi. Foto Toccare l‘icona, è possibile vedere tutte le immagini scattate. Snapshot Toccare l‘icona, è possibile salvare un‘istantanea della macchina fotografica sul vostro iPhone, iPad o Android. Volume ON/OFF Toccare l‘icona per disattivare l‘audio, premere di nuovo, il suono viene nuovamente acceso. Cambio a comando vocale Toccare la funzione di controllo vocale per attivare questa icona, toccare di nuovo per disattivarla. Se il dispositivo è in funzione di con trollo vocale, quindi premere il tasto Home sul tuo iPhone, iPad o Android per uscire compare l‘app sullo schermo un messaggio che vi ricorda che il volume delle unità di ripresa superiore a quella del livello di regolazione. Toccare o scorrere del messaggio può avviare diret tamente l‘applicazione. Riferimento: Se si attiva la funzione VOX e premere il tasto Home sul il vostro iPhone, iPad o cellulare Android per uscire dalla app, la funzio ne VOX in grado di lavorare e vi ricorderà l‘evento audio della camera. Se si desidera uscire dalla app completamente, fai doppio clic sul tasto Home sul vostro iPhone o iPad quando si è in uno stato di schermata iniziale. Quando si esce dalla app completamente, la funzione VOX non può funzionare. Impostazioni Toccare l‘icona, è possibile impostare le funzioni della camera. Vedere Fig. 7. Impostazioni Internet Se si desidera collegare la camera a un altro AP o router, o non avete mai impostare la connessione a Internet, è possibile configurare la connessione a Internet qui. Impostazioni WIFI Se si desidera modificare il nome della camera (nome della rete Wi-Fi) o la password, è possibile crearne uno qui. Impostazioni avanzate Toccare „Impostazioni avanzate“ e regolare la finezza della funzione di controllo di voce spostando il punto sulla barra. Fig. 7 Fig. 8 Vista Internet Se la connessione a Internet della camera è stato impostato e il LED di alimentazione / stato è verde, la camera può essere collegata a Internet e si può controllare la camera da qualsiasi parte del mondo sul tuo cellulare. Fare in modo che il telefono può accedere a Internet altri-AP, router o rete 3G e poi lanciare l‘applicazione facile iCAM nuovo per favore. Vedere Fig. 8 Quando si avvia l‘applicazione, l‘elenco camera sarà visualizzato sullo schermo. Tutte le telecamere che sono stati aggiunti saranno in mostra in questa lista. Se la camera è in linea, è possibile toccare l‘icona di immagine per vedere l‘immagine della camera selezionata. Vedi Figura 9 È anche possibile toccare la freccia accanto al nome della camera, e quindi ripristinare tramite colonna „Riconnetti“ la connessione a Internet quando la camera non è in linea. Indietro Premere il tasto Indietro per tornare alla schermata della camera. Modalità di funzionamento Questa colonna indica la modalità di funzionamento corrente delle app. Nome di camera / rete Wi-Fi Questa colonna mostra il nome della camera (proprio come rete Wi-Fi.) Numero online Questa colonna indica quante persone sono online per vedere la camera. Foto Toccare l‘icona, è possibile vedere tutte le immagini scattate. Snapshot Toccare l‘icona, è possibile salvare un‘istantanea della camera sul vostro iPhone, iPad o Android. Volume ON/OFF Toccare l‘icona per disattivare l‘audio, premere di nuovo, il suono viene nuovamente acceso. Risoluzione dei problemi Se c‘è qualche problema durante il funzionamento, si prega di uscire dalla app completamente e quindi avviare di nuovo l‘applicazione. Uscire completamente l‘app iPhone/iPad: Fare doppio clic sul pulsante Home e mostra tutte le applicazioni che avete iniziato. Poi tocca l‘icona Facile iCAM per uscire dalla app completamente. Android mobile: In Impostazioni > Applicazioni > Gestisci applicazioni > Easy iCAM > Forza di arresto L‘applicazione viene continuamente modificato. Se l‘applicazione viene aggiornata, vi informeremo te, in modo da poter scaricare la versione aggiornata da App Store. Fig. 9 Linea diretta di assistenza In caso di problemi tecnici, rivolgersi alla nostra linea diretta di assistenza. Svizzera: tel. 0900 00 1675 (spese da rete nazionale Swisscom alla data di stampa: CHF 2,60/min). In caso di reclami entro il periodo di garanzia commerciale, rivolgersi al rivenditore autorizzato. Alimentatore di rete Questo prodotto è l‘alimentatore più efficiente SSW-2256EU. Input 100-240 V, 0,2 A / Output: 6 V, 800 mA Indicazioni per la cura Pulire le superfici dell’involucro con un panno morbido e antipelucchi. Non utilizzare detergenti o solventi. Garanzia Gli apparecchi SWITEL sono costruiti e collaudati in osservanza dei processi di produzione più moderni. L‘impiego di materiali selezionati e tecnologie altamente sviluppate sono garanti di una perfetta funzionalità e lunga durata in vita. La garanzia non si estende a pile, batterie ricaricabili o pacchi batteria utilizzati all‘interno degli apparecchi. Il periodo di garanzia commerciale ricopre 24 mesi a partire dalla data di acquisto. Entro il periodo di garanzia si procederà all‘eliminazione gratuita di tutti i guasti dovuti a difetti di materiale o produzione. Il diritto di garanzia cessa in caso di interventi da parte dell‘acquirente o di terzi. Danni dovuti a impiego o esercizio improprio, naturale usura, errato montaggio o conservazione, collegamento o installazione impropri, forza maggiore o altri influssi esterni non sono coperti da garanzia. In qualità di produttore ci riserviamo il diritto, in caso di reclami, di riparare o sostituire le parti difettose o di rimpiazzare l‘apparecchio. Parti o apparecchi sostituiti passano di nostra proprietà. Sono esclusi diritti di risarcimento per danni se non dovuti a intenzione o colpa grave del costruttore. In caso di difetti del presente apparecchio durante il periodo di garanzia, si prega di rivolgersi esclusivamente al negozio di rivendita dell‘apparecchio SWITEL assieme al relativo scontrino di acquisto. In base alle presenti disposizioni, tutti i diritti di garanzia dovranno essere fatti valere esclusivamente nei confronti del rivenditore autorizzato. Decorso il termine di due anni dalla data di acquisto e consegna dei nostri prodotti non sarà più possibile fare valere alcun diritto di garanzia. Smaltimento Smaltire l‘apparecchio consegnandolo in uno dei punti di raccolta istituiti dalla propria società di smaltimento rifiuti comunale (ad es. centro di riciclo materiali). La legge sugli apparecchi elettrici ed elettronici prescrive ai proprietari di apparecchi esauriti la consegna di apparecchi elettrici ed elettronici in un centro di rilievo rifiuti in raccolta differenziata. Il simbolo riportato qui a lato indica che non è assolutamente consentito smaltire l‘apparecchio gettandolo nei rifiuti domestici! Per legge sussiste l‘obbligo di consegnare batterie e pile presso i rivenditori di pile utilizzando gli appositi contenitori di raccolta e provvedendo in tal modo al corretto smaltimento. Lo smaltimento è gratuito. I simboli indicano che non è assolutamente consentito gettare batterie e pile nei rifiuti domestici, consegnandoli ai fini dello smaltimento nei rispettivi punti di raccolta. Dichiarazione di conformità Questo apparecchio è conforme alla direttiva 1999/5/CE concernente le apparecchiature radio, le apparecchiature terminali di telecomunicazione il reciproco riconoscimento della loro conformità. La conformità con la direttiva di cui sopra viene confermata dal marchio CE applicato sull‘apparecchio. Per la dichiarazione di conformità completa si prega di voler usufruire del servizio gratuito di download dal nostro sito web www.switel.com. BSW 100 Easy Cam Remote video surveillance camera Fig. 1 Fig. 2 Fig. 3 STARTING UP Download the App of Easy iCAM To get started, key in the keyword “Easy iCAM” and download the App from Apple’s App Store (iPhone/iPad) or Google Play Store (Android). SETTING UP THE CAMERA ENGLISH Operating Instructions Please read and observe the following information and keep the operating manual nearby for future reference! WARNING! Safety information Risk of suffocation through small objects, packaging and protective foil! Keep children away from the product and its packaging! ATTENTION! Prevent exposure to environmental influences, e.g. smoke, dust, vibration, chemicals, moisture, heat and direct sunlight. Only allow repairs to be completed by qualified personnel. Package contents 1 Camera, 1 Power Adapter (6 V 800 mA), 1 Operating manual Operating elements 1 Light sensor 2 Microphone 3 Camera lens 4 Infrared LEDs 5 Antenna 6 Power/Status LED 7 Power adapter plug 8 Reset button 9 Power ON/OFF switch Technical data (All rights reserved) Feature Value Camera Frequency 2.4 GHz Antenna Dipole antenna Modulation DBPSK, DQPSK, CCK and OFDM Image Sensor Color CMOS Lens f 3.0mm, F 2.4 IR LED 8 pcs Video compression MJPEG (Motion JPEG) Audio One-way audio Dimensions 8.5 (W) x 10.6 (H) x 8.5 (D) cm Weight 137g Power DC 6V, 800mA Operating temperature 0°C – 40°C (32°F – 104°F) Power Supply Plug the provided power adapter into a wall outlet and the other plug into the back of the camera. Note: Use the adapter labeled OUTPUT: 6V DC with the camera. Slide the Power ON/OFF switch to the ON position. The LED on the camera should light up (red light). Note: When the camera is switched on, it needs ca. 30 to 60 seconds for initial setup. Connect iPhone/iPad or Android mobile to the camera Turn on the Wi-Fi of your iPhone/iPad or Android mobile (See Fig. 1) Tap the screen to select “Easy_iCAM_XXXXXX” under Wi-Fi Networks. See Fig. 1. Enter the password for “Easy_iCAM_XXXXXX”. See Fig. 2. Note: The password is “easyXXXXXX”, and the “XXXXXX” is the same with the last six characters of Wi-Fi camera name. For example, if the Wi-Fi camera name is “Easy_iCAM_4DC0D6”, the password is “easy4DC0D6”. Note: The password of “easy” is lowercase characters, and “XXXXXX” contains both numeric and uppercase characters. Tap the Easy iCAM icon from home screen or apps list to open the app of Easy-iCAM. You will see the welcome screen as Fig. 3. Setting up the camera name or password The screen will show a confirmation message that reminds you to change the Wi-Fi camera name or password. See Fig. 4. If you select “Yes”, you can change the Wi-Fi camera name or pass- word. See Fig. 5. When you complete the setup of camera name or password and tap the OK icon, the app will ask you if you want to setup internet connection. If you select “Yes”, the internet setup will be started. If you select “No”, the camera will reset to do the change auto- matically. Please make sure the Wi-Fi network of your iPhone, iPad or Android mobile is still connected to the camera. Note: The password must contain at least eight characters. If you select “No”, the app will ask you if you want to setup internet connection. Setting up the internet connection The screen will show a confirmation message that you want to setup the internet connection. If you select “Yes”, the camera will scan for available Wi-Fi networks in range. Tap the name of your Wi-Fi network, and enter the password of your AP or router if necessary. Then all of the initial setting has been done. Note: If the camera doesn’t find the Wi-Fi network you want to connect, please tap the scan icon to scan for available Wi-Fi networks in range again. Note: If you complete the internet setting successfully, the power/status LED will glow green after 1 to 2 minutes. Note: While you complete the internet setting, the screen will show a message. If the message window can’t be removed, please press home button on your iPhone, iPad or Android, and then double-click home button to delete the app and launch it again. (The app will be updated on the app store regularly) If you select “No”, all of the initial setting has been done. Note: Without internet connection, you can only receive the image by connecting the camera with your iPhone, iPad or Android directly. Fig. 4 Fig. 5 Fig. 6 Reset the camera to factory defaults While the camera is powered on, press the reset button by small object or pin for at least 3 seconds, and then the power/status LED starts blinking. The camera will be reset to factory default. This is useful, if you forgot the password of the camera. OPERATION MODE – LOCAL VIEW / INTERNET VIEW: Easy-iCAM is a wireless network camera. It can connect with your iPhone, iPad or Android mobile by wireless technology directly, and you can see the image on your mobile in local view. Also, it can link to internet through wireless AP or router, and you can monitor your camera on your mobile in internet view from anywhere in the world. Local view When the camera connects with your iPhone, iPad or Android mobile directly through Wi-Fi, you can launch the app of Easy iCAM to operate it in local view mode. See. Fig 6. Operation mode This column displays the operation mode of the app now. Camera name/W-Fi Network This column displays the camera name and it is the same with Wi-Fi Network. Photo Tap the icon to see all photos you have taken. Snapshot Tapping the icon will save a snapshot of the camera image on your iPhone, iPad, or Android mobile. Audio ON/OFF Tap the icon to turn off audio, tap it again to turn the audio on again. VOX activation alert message Tap the icon to turn on the VOX function, tap it again to turn the VOX off. If you turn on the VOX function and then press the home button on your iPhone, iPad or Android mobile to exit the app, the screen will show a reminding message when the audio level of camera unit is higher than the setting level. Tap or slide the reminding message icon to launch the app directly. Note: If you turn on the VOX function and press the home button on your iPhone, iPad or Android mobile to exit the app, the VOX function can work and remind you of the audio event of camera. If you want to exit the app completely, please double-click the home button on your iPhone or iPad when it is at home screen status. When you exit the app completely, the VOX function can’t work. Setting Tap the icon to setup several functions of the camera. See Fig. 7. Internet Setting If you want to change the camera connection with another AP or router or you did not setup an internet connection, you can setup the internet connection here. WIFI Setting If you want to change the camera name (Wi-Fi network name) or password, you can setup it here. Advanced Setting Tap the “Advanced Setting” column, and then slide the VOX level bar to adjust the VOX trigger level. Internet View If the internet connection of your camera has been setup and the Power/ Status LED glows green light, the camera can link to the internet and you can monitor the camera on your mobile in internet view from anywhere in the world. Please make sure your mobile can link to internet by other AP, router or 3G network, and then launch the app of Easy iCAM. See Fig. 8. When you launch the app, the camera list screen will be shown. All of the Fig. 7 Fig. 8 Fig. 9 cameras you added will list on this screen, and if the cameras status is online, you can tap the image icon to see the image of the camera. See Fig. 9. You also can tap the arrow icon next to the camera name, and then tape the “Reconnect” column to re-confirm the internet connection, if the camera status is off-line. Service hotline In the case of technical problems, contact our Service hotline. Switzerland: Tel. 0900 00 1675 (national charges, Swisscom at time of going to print: CHF 2.60/min). In the case of claims under the terms of guarantee, contact your sales outlet. Back Tap the back icon to go back to the camera list screen. Operation mode This column displays the operation mode of the working app. Camera name/Wi-Fi Network This column displays the camera name and it is the same with Wi-Fi Power adapter plug Using the energy-efficient power adapter plug SSW-2256EU. Input 100-240 V, 0.2A / Output: 6V, 800 mA Network. Online Number This column displays how many people are connected online to the camera. Photo Tap the icon to see all of the photos you have taken before. Snapshot Tap the icon to save a snapshot of the camera on your iPhone, iPad or Android mobile. Audio ON/OFF Tap the icon to turn off audio, tap it again to turn the audio on again. Troubleshooting Because the app is under constant development, in case of any problems during the operation, please exit the app completely and then launch the app again. How to exit the app completely iPhone/iPad: Double-click the home button and it shows all of apps you launched, and then tap the Easy iCAM icon to exit the app completely. Android mobile: From Settings > Applications > Manage applications > Easy iCAM > Force stop The app is continuously modified. If the app is updated, we will inform you, so you can download the updated version from the app store. Maintenance Clean the surface of the housing with a soft, fluff-free cloth. Do not use any cleaning agents or solvents. Guarantee SWITEL equipment is produced and tested according to the latest production methods. The implementation of carefully chosen materials and highly developed technologies ensure trouble-free functioning and a long service life. The terms of guarantee do not apply to the batteries or power packs used in the products. The period of guarantee is 24 months from the date of purchase. All deficiencies related to material or manufacturing errors within the period of guarantee will be redressed free of charge. Rights to claims under the terms of guarantee are annulled following tampering by the purchaser or third parties. Damage caused as the result of improper handling or operation, normal wear and tear, incorrect positioning or storage, improper connection or installation or Acts of God and other external influences are excluded from the terms of guarantee. In the case of complaints, we reserve the right to repair defective parts, replace them or replace the entire device. Replaced parts or devices become our property. Rights to compensation in the case of damage are excluded where there is no evidence of intent or gross negligence by the manufacturer. If your device does show signs of a defect within the period of guarantee, please contact the sales outlet where you purchased the SWITEL device, producing the purchase receipt as evidence. All claims under the terms of guarantee in accordance with this agreement can only be asserted at the sales outlet. No claims under the terms of guarantee can be asserted after a period of two years from the date of purchase and hand-over of the product. Disposal In order to dispose of your device, take it to a collection point provided by your local public waste authorities (e.g. recycling centre). According to the laws on the disposal of electronic and electrical devices, owners are obliged to dispose of old electronic and electrical devices in a separate waste container. The adjacent symbol indicates that the device must not be disposed of in normal domestic waste! You are legally obliged to dispose of power packs and batteries at the point of sale or in the corresponding containers provided at collection points by local public waste authorities. Disposal is free of charge. The symbols indicate that the batteries must not be disposed of in normal domestic waste and that they must be brought to collection points provided by local public waste authorities. Packaging materials must be disposed of according to local regulations. Declaration of Conformity This device fulfils the requirements stipulated in the Directive 1999/5/EC on radio equipment and telecommunications terminal equipment and the mutual recognition of their conformity. Conformity with the above mentioned directive is confirmed by the CE mark on the device. To view the complete Declaration of Conformity, please refer to the free download available on our web site www.switel.com.