1
BOSD,
AUDIO
PS88
Owner s Manual
e © ©)
POWER LOW LEVEL
INPUT
(1)Volume Control ® VOLUME Le
MIN MAX O (5)Line Level RCA Inputs
B S 60Hz e © 80Hz
e 100Hz R
AUDIO FREQ
(2)50HZ-160HZ | 50Hz Ars
т . .
Frequency Adjustment 40Hz 160Hz (6)Sub Operation Switch
B LFE
(3)0-180° Phase Shift PHASE AUTO
ГП (7)Auto/ON/OFF
© © 0° 180° OFF ON
- LEFT +
@. CONFORMS TO
ANSI/UL STD 60065
Intertek
4001463
mz HIGH LEVEL
= INPUT —-@- (8)High Level Inputs
HIGH LEVEL
OUTPUTe
(9)High Level Outputs
© ©
TO REDUCE THE RISK OF FIRE OR ELECTRIC SHOCK,DO NOT EXPOSE
THIS APPLIANCE TO RAIN OR MOISTURE NO USER SERVICEABLE
PARTS INSIDE REFER SERVICING TO QUALIFIED SERVICE PERSONNEL.
AEE
De
WARNING:SHOCK HAZARD-DO NOT OPEN
AVIS:RISQUE DE CHOC ELECTRIQUE-NE PAS OUVRIR
ROHS —
WARNING © oN
OFF
POWER CONSUMPTION: 180WATTS
(4)Power Status LED
e (11)ICE Mains Power Connector
/Fuse Location
FUSE: T 3A 250V
(figure A)
e
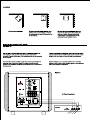
Explanation of Features and Controls
see(figure A)
(1) Volume Control
Manual volume control to regulate your subwoofers power output, to prevent
clipping and distortions caused by overpowering.
(2) 50Hz-160Hz Frequency Adjustment
This controls the high frequency cut off point. With the control set to the middle,
the subwoofer will reproduce frequencies up to 105Hz.If the control is set fully
clockwise, the crossover is bypassed and the subwoofer will reproduce a wide
frequency range. With the control fully counter-clockwise the subwoofer
reproduces a narrow range, up to 50Hz. Rotate the control unit the bass sound
natural. If the mid-bass sounds natural but you want more low bass, turn the
control down a little.
(3) 0°-180‘Phase Shift
This control is used to acoustically match the subwoofer’s output to your main
speakers, Select the position, either 0 or 180, in which your subwoofer has
more output at the listening position.
(10)Manual ON/OFF Switch
(4) Power Status LED
PS88 powered subwoofers have an LED on the panel that indicates the status
of the build-in amplifier. The LED will light red when the amplifiers is in standy
mode and green when the amplifier is on and receiving a signal.
(5) Line Level RCA Inputs
Connect with RCA type patch cords to the line Level output of your receiver or
preamp. If your Pre-amplifier or receiver has a single sub/LFE output, connect
it to the subwoofer’s left input jack. There is no need to use subwoofers
right input jack. If you want to run your main/satellite speakers full range, use
a “y” adapter at the pre-amplifer output in this way, you can send the
pre-amplifiers output signal to your main amplifier and to the subwoofer at the
same time.
(6) Sub Operation Switch
In LFE position, the Frequency adjustment becomes disabled and the
subwoofer runs in a full range mode, from 20hz-2kHz. While in sub position the
subwoofer reverts to the manual frequency adjustment, allowing the user to
operate and fine tune the subwoofer to their personal taste.
(7) Auto/ON/OFF
When the main “POWER” ON/OFF switch is in the “OFF” position, this switch
has no affect on the subwoofer . When the main “POWER ON/OFF” switch is in
the “ON” position, this switch allows the auto circuit to be engaged. When this
switch is in the “AUTO” position, the subwoofer will automatically turn “off”
after 20 minutes with no signal. When this switch is in the “ON” position, the
subwoofer will remain “on” as long as the “POWER” ON/OFF switch is in the
“ON” position.
(8) High Level Inputs
Under normal conditions, the preferred connection is through the Line Level
inputs. If this is difficult or not possible in your system, then you can use the
speaker Level inputs. Also if you experience excessive noise or hum with the
Line level input will result in a lower background noise level. Connect the
Speaker Level inputs to the speaker-level outputs of your amplifier or receiver
using speaker wire. The binding posts can accept bare wire connections
only.
(9) High Level Outputs
(10) Manual ON/OFF Switch
In the “ON” position, the subwoofer will remain “on” constantly or can turn “on”
and “off” automatically when the “AUTO/ON-” circuit is engaged. In the “OFF”
position, the subwoofer will remain off until the switch is manually turned back
to the “on” position. “AUTO” position, the subwoofer will automatically turn “off”
after 20 minutes with no signal. When this switch is in the “on” position, the
subwoofer will remain “on” as long as the “POWER ON/OFF” switch is in the
“ON” position.
(11) IEC Main Power Connector/Fuse Location
The amplifier is supplied with a two-pin mains inputs supply. Use only the
appropriate IEC mains lead provided with the product. Also fitted an external
main fuse. If a fuse blows during operation a spare fuse is provided within the
fuse holder for replacement. to reduce the risk of fire, replace the fuse the same
type rating.
High Level: Connecting the Subwoofer using the high level speaker connections: On the rear of your PS88 Subwoofer are two pairs of red and black binding
posts. One set is marked “input” and one set is marked “output” with each pair designated as left or right. Each post is color-coded black/red. These terminals
will accept up to 16-guage quality speaker wire. The inputs should be connected to the left and right speaker terminals of your amplifer or receiver. The
Outputs should run from the subwoofer to the left and right satellite speakers. Remember always connect red-to-red and black-to-black when making connec-
tions between an amplifier/receiver to the subwoofer. If you inadvertently reverse on the connections ( l.e, red-to-black ), you will notice a lack of bass from your
subwoofer.
Connections
see(figure B)
Please Consider the following when setting up your new system:
Before making or changing any connections, always make sure that the
subwoofer use unplugged from the wall and your other components are turned
OFF. Also, turn down the volume control of the subwoofer and your
pre-amplifier or receiver.
This diagram shows all the low power components sharing a power strip which is
connected to the same outlet used by the amplifier. The subwoofer is connected to
an outlet on the same circuit breaker, provided that the total system current draw
does not exceed the breaker current rating. This arrangement will reduce the
possibility of an audible hum in you system caused by a ground loop. Whenever
possible, keep the power cords away from the signal cable or speaker wired to
prevent any hum or inference being heard in speakers.
Choose reliable,high quality interconnect cables, also called patch cords or RCA
cables. They should be fully shielded and as short as possible for the job. The
longest cable in your system will likely be to the subwoofer, so choose a good
brand.
Some patch cords can be very tight fit and there is usually a preferred method of
getting them off. Some have to be removed with a twisting action. Be gentle or you
may damage the connection of your subwoofer or other components.
Speaker Level Connections
The subwoofer’s Speaker Level inputs can accept stripped speaker wires only.
Make sure that negative speaker wires never touch the positive wires as this will
short out and possibly damage your amplifier or receiver.
| Tape Deck
J
—{ DD |
и n в
Pre-amplifier
J
O O O O O | Power strip
Amplifier
AC outlets on the same circuit breaker
4 \
Ne
Subwoofer
figure B
Locations
B
< m
A
#1 is very good positioning. #2 is also excellent but may shake the back #3 Move the woofer approximately three feet
wall too much and cause things on or along away from the right wall and place it along the
the walls to rattle too much. If this occurs, use back wall as shown. This will substantially
the #3 positions.
Using the line speaker-level inputs
see(figure C)
If you are using a receiver which does not have a subwoofer output or line
level output (pre-outs), you can connect its speaker outputs to the
subwoofer's speaker-Level inputs. The front speakers can still be connected
to your receiver.
The subwoofer's internal amplifier supplies the power to reproduce the low
frequency range. lt receives a sample of the signal going to your front
speakers. (An insignificant fraction of your receiver's poweris transferred to
the subwoofer).
o O)
POWER LOW LEVEL
INPUT
| (О | 6
N
so e so MAX
e100Hz R
FREQ
50Hz° *e120Hz
+ .
40Hz 160Hz
alo
gj HIGH LEVEL
OUTPUT
reduce rattling of the black wall and will still
pressurize the room with lots of bass.
There is no need to use the Speakers Level inputs if you are using a
separte amplifier and pre-amplifier. Such systems are best connect
using the Line Level Inputs as shown in the previous Diagrams.
If you are using the Line Level inputs and there is an excessive
amount of noise or hum present, using the speaker Level inputs may
yield a lower background noise level.
figure C
re
due rie
"> es :
‘ини он ‘алии
To Front Speakers
aa
TE : : : : : :
de nl he nee od Be pte nd a he Be ah a Be a nd Be Tale nd ae ne pS aE Se aR Be a
LLL ae a a a a a ae a
HA RE TE RE Toh TE A EN EE TRE TEE Tih
TARA AAA AN AAA
of BSE
2
|= 3
в
e,
|
—
on me TE
Caaf ot
= afl oi
> 1=
HR ru
LA
с
L R
Receiver + | +
MAIN :
OUTPUTS 09
77/77
a
FEE
„ли
Ee AEE
e
RUE
RME HER
"mer
Re a
CE
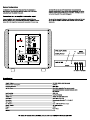
System Configurations
The following pages show typical connections that you might make in
your installation. They show how inputs and outputs of the Ps88 sub are
connected to your pre-amplifier or receiver.
Connections to a pre-amplifier's subwoofer output
If your pre-amplifier has a subwoofer output(often labeled LFE for Low
frequency effects) it can be connected to the subwoofer's Left(Mono) input as
shown. This is the simplest and recommended connected in the same way.
©
©
BOS
AUDIO
© ©
©
4001483
ee — HIGH LEVEL
ZII
==="
— -— Г
= = == HIGH LEVEL
— HN || OUTPUT
The subwoofer will play the low frequency range and an independent
subwoofer volume control. Make sure this is correctly adjusted, and that the
Ps88 subwoofer's crossover frequency is set to 100Hz. This is by no means
an iron-clad rule, rather it is a good starting point.
You can set the subwoofer's Bass Level control on your receiver to 0 dB, and
then use the pre-amplifier's subwoofer level control for normal and routine
adjustments.
PRE-AMPLIFIER | R MAIN
SUB/FEOUT / / OUTPUTS
® ® 110-240VAC 50/60 Hz
WARNING © ON
Am
53 X POWER CONSUMPTION:ABOWATTS FUSE: T 3A 250V / /
© AMPLIFIER | R
INPUTS
| | TO FRONT SPEAKERS
Specification
Amplifier Output:....................._eereeeereeiii eee e eeeeeenereceeennnerrrreCeEeeUareCEE E =nTTVUEEEE CERO UUENE ere eUarECENO 100 Watts RMS (4 ohms Impedance)
Maximum Power Consumption:...............................eeeeeeeeeeeeceeee earn eereneeeErennneeenrnnrrrrrrNENENE CORR RTTTNA 180 Watts
Frequency Response:.....................eeeeeeeseeeceeecieree reee nene ener enano reenrenenene nn eneneeeeen nene rNENE e nEaNENE CER TANANEEEEEECN—e 25Hz-160Hz
High Cut Filter:.…..….................reressssssenmenerneeeeeeeeee nana as eseserre nee ee cernes mena esse se nee een eee e eee n near cran eee 50Hz-160Hz adjustable. The crossover can be
bypassed by rotating the crossover frequency control
fully clockwise.
LS reee aran eeeereaen enana ene rnANRenenreRaNE een Rea raRaNAnanaENENEReRR Re rnnUnENENUEe 20MV-1.5V
Signal t0 1 (ET aan ane nee an ee ane Eee 0 0000000 ee 000 eee 83(LFE) 8484(SUB)
Typical THD:...................eee.ee. ee eeee inner RRRRRRRRRKRRRREREREERRRRRRRRRRREREREERERRRRARERRKRERREREEERRRRAREREERERREREEEERRRRARERKKEEKEEEEE Typical THD: 0.4(LFE) 0.3(SUB)
Input SIGnal:.…..............rercerereesesssseererrrrre cree eee e sn a as eees rene nee eee e ete mena ass ere een n eee e eee meme are enr en e eee Input Signal: RCA JACK
(1 <] Dimensions: (HxWxD) 10% x11 5” x10 %”
Total Weight:........................eeeeeeeeerrr rare nenereeeneneneeernNerererereNENECeRO Ren nnRnnnErNRNENENEE CERRO ONO nRRNANANAFENEENENEEe 16lbs
Box Materialien RRRRRKKRRRRRRERRRRRRRRERRRRKRRRRERRRRRREERERRRREERRARARRERRARARRERERRRRKRERERERRKEEEKERRRKKEEERUHG 15mm MDF Board+Piano Lacquer
Среакег бесйоп:...........енннннненнесынннннснынекнннеыесыысеенсееннсеныысеыеаыннненынноннынсскнесеыенсыеннненнненнннее. 180 Watts Subwoofer
Magnet:.…..….....................eeeeeeesssseeere eee eeeeee eee ee eee e eee eee eee eee A eee eee eee eee EEE ee 42 OZ
CONE!....................ecccccccceeeeeenece rares seeeeeeeeeeeee eee ce rase aeea eee nana ee eee eee eee een eee een nas een annee eee eme Paper+Foam
CUT TT 2 Yrs
OSD Audio./75 Columbia St.Brea.CA.92821.www.osdaudio.com.Yel(888)//9-4968.Fax(/14)256-8300