1
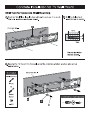
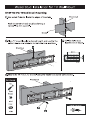
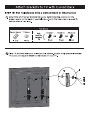
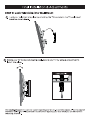
 5000000000000
——C20000000000 5
Ey
|
Ш
0 EZ
|
al
> — AMD CD
Installation Instructions
Ematic TV Wall Mount
EMWE6101
Max Load: 110lbs (50 KG)
For 307-70” Televisions
== —) 7]
— oO CC > oO CC | > о
| _ >) oOo — — II — ©
Component Checklist
TV Requirements:
Max Weight TVS и VESA . ©
110lbs 307-70”
700x400 |* *
IMPORTANT: Verify all parts are included and undamaged before assembling. If any parts
are missing or damaged, contact the seller for a replacement
TV Brackets (x2)
|
a
Wall Plate (x1)
O
O
O
O
O
O
O
O
O
O
O
O
O
O
O
O
O
O
O
O
O О
© oll TV Screws
O
M5x16mm Moxlomm M8x16mm M5x35mM Mox35mm M8x35mm
IN(x4) El 2) (€ (x4) PJ (x4) 3x4) 2)
M8 Plastic Anchor Square Washer Washer
Level TV Spacer
и / Y O D ©
[e] (4) [a] (x4) E 4) Bil (x4) J2/04) Га сх)
Tools Required:
Marker
Screwdriver @
FA
Electric Drill x с
Tape Measure 3
/\ WARNING
Do not begin installation of the product before you have read and understood the instructions in this manual
Please contact your distributor if you have any questions regarding this product
Concrete Installation for TV Wall Mount
STEP 1A: For Concrete Wall Mounting
Position Wall Plate level at desired height and use it to mark (2) Drill the holes to at
the hole locations as shown below. least 50 mm in depth.
Concrete Wall
50mm
10mm
Do not drill into
mortar joints.
(3) Secure the TV mount to the wall using the concrete anchor, washer, and screw
combination.
Parts Needed
M8 Plastic Anchor
7
re] (x4)
Concrete Wall
M8
7
(x4)
Washer
©
Bil (x4)
Wood Stud Installation for TV Wall Mount
STEP 1B: For Wood Stud Mounting
(1) Use a stud finder to locate the edges of the studs. Wood Stud
Mark the center of each stud by drawing a
vertical line with a pencil.
Drywall
(2) Place TV mount level at a desired height, and use the the (3) Drill the holes to at
pattern below as a template to mark the hole locations. least 60 mm in depth.
Wood Stud
60mm
- 5mm
(4) Secure the TV mount to the wall using the washer and screw combination.
M8
7
(x4)
Washer
©
Nil (x4)
Cover
Washer and screw
<<
(==)
TO
Attach Brackets to TV with Flat Back
STEP 2A: For Televisions with a Flat Back
Determine which screw diameter to use by hand threading screws into the proper
inserts on the back of your television. Verify that the screw is a good fit, not too short
or too long.
Parts Needed
|
Square Washer 1 Pick M5x16mm M6x16mm M8x16mm
) i
“e , Best Fit a OR a OR a
© | for your
mos ТУ No) E) (9x4)
I
Place TV brackets over your television hole pattern. Attach using appropriate screw
and square washer combination for your TV.
200
[e] E] E
eve
alle
ceo
alle
SOUTO
еее
mm
0.0
>
Attach Brackets to TV with Curved Back
STEP 1B: For Televisions with a Curved Back or Obstruction
(1) Determine which screw diameter to use by hand threading screws into the
proper inserts on the back of your television. Verify that the screw is a good fit,
not too short or too long.
Parts Needed
|
Square Washer TV Spacer | Pick M5x35mm M6x35mm M8x35mm
О) | Best Fit & &
OR OR
(© | for your
ШП сх KC | IB) (x4) [A (x4) (4)
2) Place TV brackets over your television hole pattern. Attach using appropriate screw,
TV spacer, and square washer combination for your TV.
I
Al
oH e ON A: bl PD
000
+
eee
abe
Final Installation & Adjustments
STEP 3: Lock Television into Wall Mount
(1.) Lock your television into place by attaching the TV brackets to the TV wall mount
mount as shown below.
(2) Rotate your TV to desired viewing angle. Secure your TV by using a screwdriver to
lock it into place.
12°
Locking into Place
р) O CUD) oO
Visit ematic.us/support for customer support regarding your mount. To submit a request, fill out the required
information online. You will be provided a ticket number regarding your issue which you can refer to when
contacting us further.