1
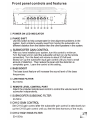
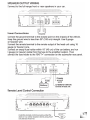
PYLE
Sarid
PLBASS2.8
2.1CH 8” Super Slim
Active Subwoofer
OWNER’S MANUAL
Congratulations on you purchase of a PYLE PLBASS2.8 2.1CH Slim
Amplified Subwoofer
It has been designed,engineered and manufactured to bring you the
highest level of performance and quality, and will afford you years of
listening pleasure.
Thank you for making a PYLE your choice for car audio entertainment!
PLBASS2.8
8" Slim Woofer
RCA Low Level Input
High Level Input
Green & Red LED Power Status Indicator
Phase shift Switch: 0 or 180°
Soft delay remote Turn-On
Thermal, Short And Overload Protection Circuits
Fuse: 2x15A
RMS Power: 150W=2 + 300\//х 1
MXA Power: 300W=x2 + 600W=x1
- Subwooofer Gain Control
- Subsonic Filter (20-50Hz)
- 0 to +12dB Variable Bass Boost (@45HZ)
- Low Pass Filter (50-150 Hz)
- Subwoofer Gain Remote Control
- CH 1/2 Gain Control
- High Pass Filter (50-150 Hz)
Dimension: 14.5%(L) x 9.5" (W) x 3*(H)
Weight: 11.6 LBS
Introduction
With the PLBASS?.8,we are introducing a low-profile 2.1CH amplified
subwoofer.Low enough to easily fit below the seat of you car, This
system offers you a quick and easy way to add a high-powered 2CH
amplifier and subwoofer system to your audio system.
The PLBASS2.8 contins a 2CH fullrange amplifier and an amplifiered
subwoofer
Both high level (speaker level) and low level (RCA type ) inputs are
present, making this a universal solution for use with any head unit
or other input source.
For further flexibility in the use of a subwoofer, a variable bass boost
control has been included. You can control the subwoofer level with
the remote level control module.
What is included?
When first unpacking your new amplified subwoofer, please
check first that the package contains all of the items below. If
something is missing, contact the store where you purchased
the product.
« PLBASS2.8 2.1CH amplified subwoofer
* Remote subwoofer level control
« Remote subwoofer control cable
* High level input wire
« 2CH speaker output wire
e Mounting hardware
Front panel controls and features
(1) POWER ON LED INDICATOR
2) PHASE SHIFT
Use this switch to help compensate for time alignment problems in the
system. Such problems usually result from having the subwoofer at a
different distance from the listener than the other speakers in the system.
a SUBWOOFER GAIN CONTROL
After you have installed your system, turn this control to minimum.
Turn the head unit on (and the subwoofer will turn on via the remote
connection). Tum the head unit volume to about 2/3 full level.
Slowly turn up the subwoofer input gain control until you hear a small
amount of distortion . Then reduce the level until the distortion is
completely gone . Leave the control at this setting .
4) BASS BOOST
The bass boost feature will increase the sound level of the bass
frequencies.
5) LOW PASS FILTTER
50-150Hz
(€) REMOTE LEVEL CONTROL PORT
Attach the included remote level control to control the volume level of the
subwoofer independently.
@ SUBWOOFER SUBSONIC FILTER
20-50Hz
® CH1/2 GAIN CONTROL
Set CH1/2 gain control after the subwoofer gain control is sets slowly turn
up the CH1/2 gain control until you feel the best harmony of the music.
© CH1/2 HIGH PASS FILTER »
50-150Hz В:
Rear panel controls and features
Le
— ——
ht ay Fu POWER 0
© © =tfs ó №
o | ii
O" EJ UY Pa?
o o 1 о o
С
E
о >Ee 5 ©
(1) LOW LEVEL RCA INPUTS
Low level inputs are the recommended way to introduce the audio signal
to the subwoofer if RCA outputs are present on your head unit or other
signal source (such as a sound processor).
2) HIGH LEVEL (speaker level) INPUTS
If your head unit does not have RCA outputs, you can use the speaker
outputs for the audio source for the PLBASS2.8 Use the supplied cable
and connect the outputs properly as shown in the connection diagram
in this maunal.
E CH1/2 SPEAKER OUTPUTS
Connect to the full-range front or rear speakers in your car.
@ FUSE
The fuse is rated at 15A . Do not use a fuse with a different value and
NEVER replace the fuse with a wire or coin.
SPOWER TERMINALS
Low Level Input Wiring
Low-level (RCA) input wiring is preferred for best audio performance. Most
trunk or hatchback installations will require a 15-20 foot RCA cable, while
pickup trucks and under-seat installations will require a 6-12 foot RCA cable.
Always use a high-quality cable.
NOTE: Do not connect BOTH the high level and low level inputs
from your receiver to your amplifier at the same time!
= To Audio
LTT Outuputs of head
unit or signal
High Level Input Wiring
The high level input(s) should only be used when your receiver lacks RCA
outputs. If the RCA outputs are not present, connect the speaker outputs from
the receiver to the high level input connector of the amplifier. Be sure to
observe polarity to avoid audio phase problems.
NOTE: Do not connect BOTH the high level and low level inputs
from your receiver to your amplifier at the same time!
‘i= TO Speaker Terminals ти
of head unit 6.
SPEAKER OUTPUT WIRING
Connect to the full-range front or rear speakers in your car.
SOTA e. ae ea. ды > ado FE
o CH Hi He Ro HH sE He
MB K
|
PE]
Power Connections SPEAKERS
Connect the ground terminal to the closest point on the chassis of the vehicle.
Keep this ground wire to less than 39" (100 cm) inlength. Use 8 gauge
(or heavier) wire.
Connect the remote terminal to the remote output of the head unit using 16
gauge (or heavier) wire.
Connect an empty fuse holder within 18" (45 cm) of the car battery, and run
8 gauge (or heavier) cable from this fuse to the amplifier location. Then
connect the fuse holder to the “BATT+" connection on the subwoofer rear panel.
AE me Tn ЧН ВНЕ HA ЗЫ E =
D ©. | FHNER o
O. 0
o" EEE Oe
Oo o o D
qd Chassis
+ ground
= FUSE point
Battery | _ to REMOTE TURN-ON
terninal of head unit
Remote Level Control Connection
rH TE TT A A
¿LOTE TEE оя =
% = rai Jj
D
o ]. i — a «i oli
= aA à @
ir
M ds Th a es БЫ: В | «ый Ба An
о
©
= BERET LAS oT 7"
Instal the remote control securely under the часе 7.
dash or in a similar location where using It will в
not distract the driver.
Mounting the subwoofer
1. Find a suitable location in the vehicle in which to mount the amplifier.
A typical location is shown below:
2. Make sure there is sufficient air circulation around the intended mounting location,
3. Mark the location for mounting hole screws by positioning the cabinet where you
wish to inst all it. Make a small mark to identify the position and remove the unit.
Thoroughly clean the area you plan to attach the subwoofer, using a vacuum cleaner.
Then attach the supplied double adhesive tape, and put the subwoofer in the place
and press down on it securely,
Troubleshooting
If you experience operation or performance problems with this product, compare your
installation with the electrical wiring diagram on the previous pages. If problems
persist, read the following troubleshooting tips which may help eliminate the problems.
PROBLEM POSSIBLE REASON SOLUTION
* NO+12v lo power wie Check fuses and connections to battery
Mot switching on. Power * No power fo remote wie * Check remote on connections to head unit
LED not ‘on’ . но * Replace fuse with correct type and
y “= J
* Replace fuse with comect type and
* Fuss blown
Not working, but status amperage
LED ‘on + Move unit to vented area
* Ape kx; hal « Tum head unit down
№ « Head Unit * Check heed unit volume level
* Gain contol not set yp © ENSure you have set up the amplifier
gain level control
Connecions * Check all power, remote on and ground
" connections
PYLE
www.pyleaudio.com