1
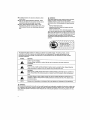
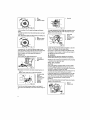
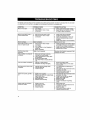
 y PE
A de A A
GB BENCH GRINDER
Instruction manual
F Touet
Manuel d'instructions
D Tischchieifer
Betriebsanleitung
I Smerigliatrice da banco
Istruzioni per Puso
NL Tafelslijpmachine
Gebruiksaanwijzing
E Amoladora de banco
Manual de instrucciones
GB602
GB602W
GB801
ENGLISH
PRODUCT SPECIFICATIONS
Model GB602 GB602W GB801
Wheels:
Diameter 6 in. (150 mm) 6 in. (150 mm) 6 in. (150 mm) 8 in. (205 mm)
Width 5/8 in. (16 mm) 1/4 in. (6.4 mm) 5/8 in. (16 mm) 3/4 in. (19 mm)
Arbor Hole 1/2 in. (12.7 mm) 1/2 in. (12.7 mm) 1/2 in. (12.7 mm) 5/8 in. (15.88 mm)
No load speed 2,850 (50Hz) 2,850 (50Hz) 2,850 (50Hz)
(min!) 3,450 (60Hz) 3,450 (60Hz) 3,450 (60Hz)
Power Input 250W 250W 550W
Overall length 375 mm 375 mm 395 mm
Net Weight 9.4 kg 9.5 kg 20.5 kg
A eereacearreóe Look for this symbol to point out important safety precautions.
It means attention!! Your safety is involved.
RULES FOR SAFE OPERATION
Safe operation of this power tool requires you read and
understand this operator's manual and all labels affixed to
the tool. Safety is a combination of common sense,
staying alert, and knowing how your bench grinder works.
READ ALL INSTRICTIONS
E KNOW YOUR POWER TOOL. Read the operator's
manual carefully. Learn the applications and limitations
as well as specific potential hazards related to this tool.
E GUARD AGAINST ELECTRICAL SHOCK by
preventing body contact with grounded surfaces. For
example: pipes, radiators, ranges, and refrigerator
enclosures.
№ KEEP GUARDS IN PLACE and in working order.
Never operate the tool with any guard or over removed.
Make sure all guards are operating properly before
each use.
@ REMOVE ADJUSTING KEYS AND WRENCHES.
Form habit of checking to see keys and adjusting
wrenches are removed from tool before turning it on.
E KEEP THE WORK AREA CLEAN. Cluttered work
areas and workbenches invite accidents.
EH AVOID DANGEROUS ENVIRONMENTS. Do not use
power tools near gasoline or other flammable liquids, in
damp or wet locations or expose them to rain. Keep
work area well lighted.
E KEEP CHILDREN AND VISITORS AWAY. All visitors
should wear safety glasses and be kept a safe distance
from work area.
E MAKE WORKSHOP CHILD PROOF with padlocks,
master switches, or by removing starter keys.
E DONT FORCE THE TOOL. It wilt do the job better and
safer at the rate for which it was designed.
№ USE THE RIGHT TOOL. Do not force the tool or
attachment to do a job for which it was not designed.
@ USE THE PROPER EXTENSION CORD. Make sure
your extension cord is in good condition. When using
an extension cord, be sure to use one heavy enough to
carry the current your product will draw. An undersized
cord will cause a drop in line voltage resulting in loss of
power and overheating. A wire gauge size (A.W.G) of
at least 16 is recommended for an extension cord
8 meters or less in length. if in doubt, use the next
heavier gauge. The smaller the gauge number, the
heavier the cord.
HM INSPECT EXTENSION CORDS PERIODICALLY and
replace if damaged.
B WEAR PROPER APPAREL. Do not wear loose
clothing, neckties. Or jewelry that can get caught in the
tool's moving parts and cause personal injury, Non-
solid footwear is recommended when working
outdoors. Wear protective hair covering to contain long
hair.
E ALWAYS WEAR SAFETY GLASSES WITH SIDE
SHIELDS. Everyday eyeglasses are NOT safety
glasses.
ll PROTECT YOUR LUNGS. Wear a face or dust mask if
the cutting operation is dusty.
B PROTECT YOUR HEARING. Wear heating protection
during extended periods of operation.
BM DON'T ABUSE CORD. Never carry tool by the cord or
yank it to disconnect from receptacle. Keep cord away
from heat, oil, and sharp edges.
@ DO NOT OVERREACH. Keep proper footing and
balance at all times.
B MAINTAIN TOOLS WITH CARE. Keep tools sharp and
clean for best and safest performance. Follow
instructions for lubricating and changing accessories.
E NEVER LEAVE TOOL RUNNING UNATTENDED.
TURN POWER OFF. Disconnect all tools when not in
use, before servicing, or when changing attachments,
wheels, etc.
Wm AVOID ACCIDENTAL STARTING.
E USE RECOMMENDED ACCESSORIES. The use of
improper accessories may cause risk of injury.
№ DO NOT use wheels with incorrect size bore. NEVER
use wheel washers or wheel that are defective or
incorrect and NEVER touch grinding wheel or other
moving parts.
E NEVER STAND ON TOOL. Serious injury could occur
if the tool is tipped or if the wheel is unintentionally
contacted.
M DIRECTION OF FEED, Be aware of wheel rotation
direction; never grind without the work rest being
properly set. NEVER grind more than one workpiece at
a time.
Á WARNING
Wheel coasts after turn off.
B CHECK DAMAGED PARTS. Before further use of the
tool, a guard or other part that is damaged should be
carefully checked to determine that it will operate
properly and perform its intended function. Check for
alignment of moving parts, binding of moving parts,
breakage of parts, mounting and any other conditions
that may affect its operation. A guard or other part that
is damage must be properly repaired or replaced by an
authorized service center to avoid risk of personal
injury.
E KEEP TOOL DRY, CLEAN, AND FREE FROM OIL
AND GREASE. Always use a clean cloth when
cleaning. Never use brake fluids, gasoline, petroleum-
based products, or any solvents to clean tool.
HE INSPECT POWER SUPPLY AND EXTENSION
CORDS PERIODICARY and, if damaged, have
repaired by a qualified service technician. Stay
constantly aware of cord location and keep it well away
from the rotating wheel.
Ш NEVER USE IN AN EXPLOSIVE ATMOSPHERE.
Normal sparking of the motor or sparking from grinding
metal could ignite fumes.
@ USE OUTDOOR EXTENSION CORDS. Use only
extension cords with approved ground connection that
are intended for use outdoors and so marked.
№ NEVER reach to pick up a workpiece, a piece of scrap,
or anything else that is in or near the grinding path of
the wheel.
HB AVOID AWKWARD OPERATIONS AND HAND
POSITIONS where a sudden slip could cause your
hand to move into the wheel. ALWAYS make sure you
have good balance.
EH NEVER stand or have any part of your body in line with
the path of the wheel.
EH DO NOT USE TOOL IF SWITCH DOES NOT TURN IT
ON AND OFF. Have defective switches replaced by an
authorized service center.
E DO NOT TURN THE MOTOR SWITCH ON AND OFF
RAPIDLY. This could cause the wheel to loosen and
could create a hazard. Should this ever occur, stand
clear and allow the wheel to come to a complete stop.
Disconnect your grinder from the power supply and
securely retighten the wheel nut.
A\ WARNING:
When servicing use only identical replacement parts. Use
of any other parts may create a hazard or cause product
damage.
@ USE ONLY FLANGES furnished with this bench
grinder.
IF ANY PART OF THIS GRINDER IS MISSING or
should break, bend, or fail in any way, or shouid any
electrical component fail to perform properly, shut off
the power switch, remove the machine plug from the
power source and have damaged, missing, or failed
parts replaced before resuming operation.
E MAKE SURE THE GRINDING IS SECURELY
MOUNTED as described in the operating instructions
before connecting the tool to a power supply.
E DO NOT OVERTIGHTEN THE WHEEL NUT,
excessive tightening cause the wheel to crack during
operation.
E INSPECT GRINDING WHEEL for visible defects.
Check the wheel for fissures and cracks, and test for
normal operation prior to use.
mM ADJUST distance between wheel and work rest to
maintain 1.6 mm. or less separation as the diameter of
the wheel decreases with use. The value of separation
used in the marking is to be the separation
recommended by the manufacturer but shall not be
more than 3.2 mm.
BW ALWAYS EASE THE WORKPIECE AGAINST THE
ABRASIVE WHEEL. When starting to grind. A harsh
impact can break the wheel. Use light pressure when
starting to grind; too much pressure on a cold wheel
can cause the wheel to crack.
HE RISK OF INJURY DUE TO ACCIDENTAL STARTING.
Do not use in an area where children may be present.
M NEVER START THE GRINDER when the wheel is
contact with the workpiece.
№ SECURE WORK. Always hold workpiece firmly against
the work rest.
E DO NOT USE THE BENCH GRINDER if the flange nut
or clamp nut is missing or if the spindle shaft is bent.
mM FREQUENTLY clean grinding dust from beneath
grinder.
@ DO NOT OPERATE THIS TOOL WHILE UNDER THE
INFLUENCE OF DRUGS, ALCOHOL, OR ANY
MEDICATION.
E ALWAYS STAY ALERT. Do not allow familiarity
(gained from frequent use of grinder) to cause
complacency.
H A careless fraction of a second is sufficient to inflict A WARNING:
severe injury.
Some dust created by power sanding, sawing, grinding,
MN STAY ALERT AND EXERCISE CONTROL. Watch drilling, and other construction activities contains
what you are doing and use common sense. Do not chemicals known to cause cancer, birth defects or other
operate tool when you are tired. Do not rush. reproductive harm. Some examples of these chemicals
E SAVE THESE INSTRUCTIONS. Refer to them are:
frequently and use them to instruct other users. If you - lead from lead-based paints.
loan someone this tool, loan them these instructions - crystalline silica from bricks and cement and other
also. masonry products, and
- arsenic and chromium from chemically treated timber.
Your risk from these exposures varies, depending on how
often you do this type of work. To reduce your exposure to
these chemicals: work in a well ventilated area, and work
with approved safety equipment, such as those dust
masks that are specially designed to filter out microscopic
particles.
DO NOT ЕХРОЗЕ |
1 TO RAIN OR USE IN Y
| DAMP LOCATIONS
SYMBOL
The purpose of safety symbols is to attract your attention to possible dangers. The safety symbols, and the
explanations with them, deserve your careful attention and understanding. The safety warning does not by
themselves eliminate any danger. The instructions or warning they give are not substitutes for proper accident
prevention measures.
MEANING
SAFETY ALERT SYMBOL:
Indicates danger, warning, or caution. May be used in conjunction with other symbols or
pictographs.
DANGER:
Failure to obey a safety warning will result in serious injury to yourself to other. Always follow the
safety precautions to reduce the risk fire, electric shock and personal injury.
WARNING:
Failure to obey a safety warning may result in property damage or personal injury to yourself or to
others. Always follow the safety precautions to reduce the risk of file, electric shock and personal
injury.
CAUTION: Failure to obey a safety warning may result in property damage or personal injury to
yourself or to others. Always follow the safety precautions to reduce the risk of fire, electric shock
and personal injury.
| |
Advises you of information or instructions vital to the operation or maintenance of the equipment.
ÁN WARNING:
Do not attempt to operate this tool until you have read thoroughly and understand completely all instructions, safety rules,
etc. contained in this manual, Failure to compiy can result in accidents involving fire, electric shock, or serious personal
injury. Save this operator's manual and review frequently for continuing safe operation and instructing others who may
use this tool.
A WARNING:
WEAR YOUR
SAFETY GOGGLES |}
glasses with side shields.
The operation of any grinding can result in foreign objects being thrown into your eyes,
which can result in severe eye damage. Before beginning power tool operation, always
wear safety goggles or safety glasses with side shields and a full-face shield when needed.
We recommend Wide Vision Safety Mask for use over eyeglasses or standard safety
UNPACKING
mM Carefully remove all parts from the shipping carton.
M Lift the bench grinder from the carton and place it on a
work surface.
BW Do not discard the packing materials until you have
carefully inspected the machine, identified all loose
parts, and satisfactorily operated your bench grinder.
BM Examine all parts to make sure no breakage ог
damage has occurred during shipping.
E If all parts have been included, proceed to assembly.
BW !f any parts are damaged or missing, do not attempt to
plug in the tool or turn it on until the damaged or
missing parts are obtained and installed correctly.
B Contact your nearest dealer for assistance if parts are
missing or damage.
A WARNING:
If any parts are missing do not operate this machine until
the missing parts are replaced. Failure to do so could
result in possible serious injury.
STANDARD EQUIPMENT
GB602
EH Wrench 8-19 ..
MN Wrench 10-13...........
№ Safety goggles... eee 1
GB801
M Wrench 8-24..........................0000meimier e DD 1
BB Wrench 10-13-17 ..................eeremeneni ere 1
E Safety goggles........................eeeiireie ere eee 1
GB602W
WB Wrench 8-19 ..........….………urercrcrerrcrcresansanearerenanenassraansaues 1
E Wrench 10-13 oon eer, 1
E Left Work Rest...................— mireia reee 1
BW Safety goggles...........................61....0e EEE 1
FEATURES
KNOW YOUR BENCH GRINDER
See Fig. 3.
Before attempting to use your new tool, familiarize
yourself with all operating features and safety
requirements.
Carefully read this operator's manual before using your
grinder.
POWER SWITCH
An easy access On/Off switch convenience and safety.
MOTOR
Powered by a precision-built electric induction motor, your
bench grinder has sufficient power to handle tough
grinding jobs.
GRINDING WHEEL
Equipped with coarse and fine grinding wheels to suit
most applications.
NOTE:
New wheels sometimes require dressing to true up the
face of the wheel.
SAFETY EYE SHIELD AND SPARK DEFLECTOR
The safety shields and spark deflectors are adjustable for
operator convenience. Operating the grinder without
these features attached could result in serious injury. Do
not grind with the safety shield raised; always wear safety
glasses for personal protection.
WORK REST
The work rests are independently adjustable to
compensate for wheel wear. Before grinding, make
certain the work rests are adjusted properly. Generally the
object being ground is done slightly above center of the
grinding wheel.
Adjust the distance between the wheel and work rest to
maintain 1.6 mm. or less separation as diameter of the
wheel decreases with use.
O
With a permanently mounted work light that automatically COOLANT TRAY
lights the work area for safer, more accurate grinding and When grinding, metal objects become heated quickly. It is
sharpening. important to keep moving the object back and forth across
the grinding wheel and to cool the object frequently using
the grinder's Coolant Tray.
GB602/GB801 (Fig. 3)
Adjustable knob
Safety eye shield
Work rest (left)
Adjustment bolts
Coolant tray
Auto-ON (work light)
Spark deflector (left)
Spark deflector (right)
Lamp cover
10. Safety eye shield with magnifying glass
11. Work rest (right)
12. Power switch
© © чо в о №ю
Adjustable knob
Safety eye shield
Saw blade sharpening kit
Adjustment bolts
Coolant tray
Auto-ON (work light)
Spark deflector (left)
Spark deflector (right)
Lamp cover
10. Safety eye shield with magnifying glass
11. Work rest (right)
12. Power switch
ASSEMBLY
CONOR LON =
MOUNTING SAFETY EYE SHIELDS 1. Eye shield
See Fig. 5-6. mounting arm
1. Safety eye shield Hex bolt
Adjustable knob
Safety eye shield
2. Eye shield
mounting arm
Adjustable knob
Washer
Hex bolt
hob
о >
Mount the left and right eye shield-mounting arm To the
inside of the wheel guards using the clamp Brackets, hex
bolts (M6 X 30 mm), and washers (6 mm).
Use the illustration as a guide to determine which eyes
Shield mounting arm is mounted on the left and which eye
shield mounting arm is mounted on the right of the
grinder.
Once eye shield mounting arms are firmly in place, slide
the shield bracket onto the eye shield-mounting arm.
Tighten the adjustable knob leaving it loose enough to
allow the safety eye shield to be raised and lowered
easily.
Á WARNING:
To prevent personal injury, never operate the bench
grinder unless the safety eye shields and spark deflectors
are properly installed and in place.
WORK REST
GB602/GB801/GB602W
See Fig. 7.
1. Work rest
bracket
2. Hex bolt
BASIC OPERATION
Á WARNING:
Always wear safety goggles or safety glasses with side
shields during power tool operation or when blowing dust.
If operation is dusty, wear a dust mask.
To be efficient and work as designed, your tools should be
kept sharp. Dull tools can and will cause accidents.
Bench Grinders are ideal for sharpening tools such as
chisels, planer blades, scissors, etc., and for removing
rust or corrosion.
A. WARNING:
Never sharpen or grind anything made of aluminum.
Grinders remove material rapidly so pressure is the key to
efficient grinding.
The proper way to sharpen a tool and avoid overheating
is:
E Keep a tool on the work rest firmly at the correct the
wheel.
№ Keep the object in constant motion, moving it at an
even pace.
E Never force a tool against the grinding wheel.
mM Keep the tool cool by using either a cooling tray, or a
pan of water.
EM The grinding wheel should rotate “into” the object being
sharpened.
Mount the work rests to the work rest bracket using the
two hex bolts.
Before tightening the bolts, adjust the gap between the
Grinding wheel and work rest to a maximum of 1.6 mm.
Tighten securely.
GB602W only
1. Work rest
2. Hex bolt
Fig. 8
OPERATION
Mount the blade work rest to the work rest bracket using
the two hex bolts.
Before tightening the bolts, adjust the gap between the
Grinding wheel and work rest to a maximum of 1.6 mm.
Tighten securely.
NOTE:
Excessive pressure may damage the tool, cause the
motor to overheat, and prematurely wear down the
grinding wheel.
Á WARNING:
Excessive pressure on a cold wheel cause the wheel to
crack.
GB801 only
Balancing the grinding wheel
Fig. 9
When the grinding wheel only is mounted, the heaviest
section will assume the lowest Position. Mark this section
as in the Fig. 9.
1. Nut
2. Flange
3. Balance weight
Fig. 10
In this condition (Fig. 9) install the flange and balance
weight.
The balance weight should be positioned above as Seen
in the Fig. 10.
Then, temporarily tighten the flange with the installing nut.
1. Nut
2. Balance weight
3. Stopper screw
Fig. 11
In condition Fig. 10, move the balance weight so that
when the wheel is turned it will not stop at the same place
but at random. Then fasten the stop screws on the
balance weight and firmly tighten the flange nut.
GB602W only
How to attach saw blade-sharpening kit
1. Saw blade
sharpening kit
2. Bolt
EH Assembly and attach saw blade sharpening kit as in
Fig. 12.
Before using, make sure it is securely fastened.
1. Grinding wheel
Screw
Wing nut A
Tool rest holder
Wing nut B
Stopper
Holder B
Too! rest
юм ос Ко ю
45 Fig. 13
Place the saw blade between holder A and holder B.
Then secure the assembly on the screw with the wing nut
A.
1. Hex bolt
Fig. 14
The angle adjustment can be made by loosening the hex
bolts on the bevel scale plate. After adjusting the angle,
tighten the hex bolts securely.
Saw blade
Screw
Grinding wheel
Wing nut A
Holder A
ANN
Loosen the wing nut B and slide the holder B so that the
“gullet” or slot between the saw blade Teeth
just comes in contact with the edge of the Wheel. Slide
the stopper so that it comes in contact with the holder B
and tighten the wing nut B securely.
Á WARNING:
Always disconnect the bench grinder from the power
source before performing any assembly or adjustment.
Failure to do so could result in accidental starting resulting
in possible serious personal injury.
WHEEL REPLACEMENT
See Fig. 16.
If you must replace a grinding wheel, be sure to obtain
one with a safe rated speed at least as high as the “no
load speed” RPM marked on the data plate of the grinder
and which is marked to comply with SAA.
To replace the grinding wheel, remove the wheel cover by
loosening the screws with holding the nut wrench.
Loosen the wheel nut in a clockwise direction for the left
side and a counterclockwise direction for the right side
using. Remove the outer flange and grinding wheel. To
install a new grinding wheel, reverse the above
procedure.
Be sure the grinding wheel and outer flange are properly
seated on the spindle shaft.
1. Wrench
2. Wheel cover
1. Wrench 8
2. Wrench 10
Á WARNING:
When servicing, using only replacement parts. Use of
other part may create a hazard of cause product damage.
GENERAL
Keep the bench grinder clean. Remove dust from working
parts and beneath the grinder frequently.
Make sure the bench grinder operates properly. Check
screws, nuts, and bolts for tightness.
EXTENSION CORDS
The use of any extension cord will cause some loss of
power. To keep the loss to a minimum and to prevent tool
overheating, use an extension cord that is heavy enough
to carry the current the too! will draw.
A wire gauge size (A.W.G) of at least 16 is recommended
for an extension cord 8 meters or less in length. When
working outdoors, use an extension cord that is suitable
for outdoor use. The cord's jacket will be marked WA.
À WARNING:
Check extension cords before each use. If damaged,
replace immediately. Never use tool with damaged cord
since touching the damaged area could cause electrical
shock resulting in serious injury.
WORKLIGHT BULB REPLACEMENT
1. Light bulb
When the light bulb is worn out and no longer working,
unfasten the screws which fix the lamp cover, then gently
remove the bulb from the holder by pushing in and turning
anticlockwise. Contact your dealer for replacement part.
To replace, gently push the light bulb into the insert and
turn clockwise, then fix the lamp cover in the revise order.
MAINTENANCE
WHEEL DRESSING TOOL (Accessory)
Dressing a wheel is done to renew sharpness or to true up
the face of the wheel.
Set the work rest of the bench grinder at a slight angle
and brace the wheel-dressing tool against it. Do not make
contact with the grinding wheel until after you have turned
on the motor and the wheel is rotating at full speed. Press
the dressing tool slightly against the rotating wheel until
you get a bite, then move slowly from side across the
wheel. A small bite and many passes are better than a big
bite and one pass. Work cautiously; hold the dresser with
force on the work rest. Do not use excessive pressure
against the grinding wheel. Proceed solely until you
master the technique.
TROUBLESHOOTING
This section covers the most common problems encountered during operation and what to do about them. Do not make
any adjustments until machine is unplugged and moving parts have come to a complete stop.
SYMPTOM POSSIBLE CAUSE CORRECTIVE ACTION
Motor will not start. 1. Low voltage. 1. Check power line for proper voltage.
2. Open circuit in motor or loose 2. Inspect all lead connections on motor
connections. for loose or open connections.
Motor will not start; fuses or 1. Short circuit inline cord or plug. 1. Inspect cord plug for damaged
circuit breakers blow 2. Short circuit in motor or loose insulation and shorted wires.
connections. 2. Inspect all connections on motor for
loose or shorted terminals or worn
insulation.
3. Install correct fuses or circuit breakers.
Motor overheats. Motor overloaded. Reduce load on motor.
Motor stalls (resulting in blown | 1. Short circuit in motor or loose 1. Inspect connections on motor for loose
fuses or tripped circuit) connections. or shorted terminals or worn insulation.
2. Low voltage. 2. Correct the low voltage conditions.
3. Incorrect fuses or circuit breakers in 3. Install correct fuses or circuit breakers.
power line. 4. Reduce load on motor.
4. Motor overloaded.
Machine slows when
Depth of cut is too great.
Slow down the of rate of movement of the
operating. workpiece into wheel.
Wavy condition on surface of | 1. Make sure machines is securely
workpiece. mounted on a solid surface.
2. Use a holding device to firmly retain
the workpiece.
3. Dress the grinding wheel.
4. Use softer wheel, or reduce the feed
rate.
Lines on surface of workpiece. | 1. Impurity on wheel surface. 1. Dress the grinding wheel.
2. Workpiece not being held tightly. 2. Use a holding device to firmly retain
the workpiece.
Burning spots or cracks inthe | 1. Improper type of grinding wheel. 1. Try a wheel which is softer style or
workpiece. 2. Improper feed rate. coarser grit.
3. Coolant required. 2. Slow down the rate of movement of the
workpiece into wheel.
3. Add optional coolant system or
introduce coolant by hand.
Wheel dulls quickly, grit falls 1. Depth of cut too great. 1. Slow down the rate of movement of the
off. 2. Wheel is too soft for the material being. workpiece into wheel.
Select harder bond. 2. Wheel is too hard for the material
3. Wheel diameter too small. being. Select softer bond.
4. Bad wheel dress. 3. Replace the wheel.
5. Defective wheel bonding. 4. Dress the wheel.
5. Consult manufacturer of grinding
wheel.
Wheel clogs and workpiece 1. Wheel is too hard. 1. Select softer bond.
shows burn marks. 2. Feed rate is too siow. 2. Increase the rate of movement of the
3. Bad wheel dress. workpiece into wheel.
4. Coolant required. 3. Dress the wheel.
4. Add optional coolant system or
introduce coolant by hand.
10
Makita Corporation