1
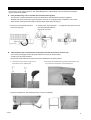
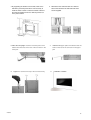
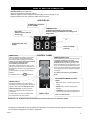
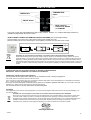
EN
ELECTRIC CONVECTOR HEATER
WITH GLASS PANEL
IP24
OPERATING INSTRUCTIONS
Read the instructions carefully before installing and operating the appliance or performing
maintenance operations. Observe all the safety instructions; failure to observe the instructions may
cause accidents and/or damages. Store these instructions for future reference.
V 05/13
9
GENERAL SAFETY INFORMATION
x Use this convector only as outlined in this manual. Any other use not recommended by the manufacturer may cause fire,
electric shock or injury to people.
x Ensure that the mains power complies with the voltage specified on the convector data plate (220-240V~/50Hz).
x This product is not a toy. Children should be adequately supervised to ensure that they do not play with the appliance.
x This appliance is not suitable for use by people (including children) with reduced physical, sensory or mental abilities, or
without the necessary experience and knowledge, unless they have been adequately supervised and instructed
concerning use of the appliance by a person responsible for their safety.
x Do not restrict the air inlet and outlet grilles.
x The appliance heats up slightly when in use. In order to avoid burns, do not let bare skin touch hot surfaces.
x Ensure that all objects are at least 1 meter from the front and sides of the appliance.
x Disconnect the mains power when the appliance is not used or for cleaning operations.
x Avoid using the convector in dusty environments or in the presence of inflammable vapours (e.g. in workshops or
garages) or paint vapours.
x Do not place anything on the appliance, use the appliance to dry clothing.
x Use the appliance in a well-ventilated area.
x Avoid placing fingers or foreign objects in the air inlet/outlet grilles, as this may lead to electric shock or fire and may
damage the appliance.
x To avoid the risk of fire, do not block the grilles or tamper with them in any way while the convector operates.
x Do not use the appliance if the cord or plug are damaged. If the power supply cord is damaged, it must be replaced
by the manufacturer, dealer or a similarly qualified person so as to avoid any safety risks.
x Do not operate the appliance if it has fallen from a height or has suffered damage in any way. Contact qualified technical
personnel to examine the appliance or perform any electrical or mechanical repairs.
x The most common cause of overheating is the build-up of dust in the appliance. Remove dust deposits by unplugging the
appliance and cleaning the air outlets and grilles with the aid of a vacuum cleaner.
x Do not use abrasive detergents for cleaning this appliance. Clean the appliance with the aid of a damp (not wet) cloth
rinsed in hot soapy water. Always remove the plug from the mains socket before cleaning.
x To disconnect the convector, push the switch to OFF and remove the plug from the socket. Pull on the plug only. Avoid
pulling on the cord when disconnecting the convector.
x Do not place any objects on the cord and do not bend it.
x It is not advisable to use extension cords, as these may overheat and cause the risk of fire. Do not use a single extension
cord to operate multiple appliances.
x Do not immerse the cord, plug or any other element of the appliance in water or other liquids.
x Do not touch the plug with wet hands.
x Do not place the convector above or near another heat source.
WARNING: AVOID COVERING THE CONVECTOR TO PREVENT IT FROM OVERHEATING.
The symbol below signals the above warning:
x The convector may cause the risk of fire if, while in operation, is covered by or comes into contact with inflammable
material including curtains, drapery, blankets, etc. KEEP THE CONVECTOR AWAY FROM THESE MATERIALS.
x Do not connect the appliance to the mains power before it has been properly assembled and positioned.
x Do not run the cord under carpets. Do not cover the cord with blankets, carpets or similar materials. Place the cord far
away from busy areas or where it cannot be accidentally pulled-out.
x Do not operate the convector in close proximity to bathtubs, showers, washbasins or pools.
x The appliance is equipped with an IP24 degree of protection and can be used in private bathrooms in zone 2.
The convector must not be touched by people that use bath tubs and showers.
V 05/13
10
x Do not position the convector below a socket outlet.
x Do not operate the appliance outdoors.
WARNING: do not use the convector with a controller or any other external device that activates the appliance
automatically, as there may be a risk of fire if the convector is covered or incorrectly positioned.
x Upon initial start-up, the convector may emit a slight, harmless smell. This smell is a normal effect of the initial heating up
of the internal heating elements, and should not recur later on.
WARNING: DO NOT DEPEND ON THE ON/OFF BUTTON SWITCH AS THE SOLE MEANS OF DISCONNECTING
POWER. WHEN SERVICING OR MOVING THE CONVECTOR, ALWAYS UNPLUG THE POWER CORD.
x A convector has hot and arcing or sparkling parts inside. It must not be used in potentially dangerous locations such as
flammable, explosive, chemical-laden or wet atmosphere.
x Do not place the convector on soft surfaces, like a bed, where openings may become blocked. Always place the
convector on a stable, flat, level surface when operating, to avoid the chance of the convector overturning. Locate the
power cord so the convector or other objects are not resting on it.
x Always unplug the convector when not in use. In order to avoid accidents turn unit off if unattended.
x In the event of any problems (abnormal noise or a strange smell) switch off the appliance immediately, do not
attempt to repair it and take it to your local after sales service.
DESCRIPTION OF PARTS
FRONT VIEW
SIDE VIEW
A
REAR VIEW
E
D
B
C
A. Delivery/intake grille
B. Feet with wheels
C. ON/OFF switch
V 05/13
F
D. Side Control panel
E. Rear holes for wall mounting
F. Rear brackets for wall mounting
11
HOW TO INSTALL THE APPLIANCE
The convector can be used on the floor, after assembling the feet, or alternatively it can be wall-mounted using the
specific accessories supplied.
MONTARE I PIEDINI IN DOTAZIONE
A. Floor portable using: how to assemble the feet with wheels supplied
The convector is packed without feet. These must therefore be assembled before using the appliance.
Assemble the feet as shown in the figure and put the convector in an upright position. Position the unit on a flat,
stable surface and stop the wheels with the proper wheels locks before turning it on.
1. Turn the convector upside down and
loosen the wing nuts.
B.
2. Insert the feet. The longest part
must be positioned behind on
the rear the convector.
3. Tighten the wing nuts on the feet.
Wall-mounting: how to assemble the rear bracket and mount the convector onto the wall
The convector packaging contains all the accessories necessary for wall-mounting.
To wall-mount, proceed as follows:
Remove the rear bracket from the back of the unit as described in the pictures below.
1. Unscrew the two screws on top of the 2
vertical bars of the wall bracket.
2. Pull down the wall bracket by pressing downward on the
top of the two vertical bars of the wall bracket.
3. Remove the bracket for wall mounting from the convector completely.
V 05/13
12
4. By supporting the bracket onto the wall, mark on the
wall with a pencil the points where it is necessary to
make the holes in order to insert the Fishers. Observe
the minimum distances from the walls as pointed out
in the picture below.
6. Place the unit upright. Insert the two lower parts of the
bracket into the holes on the rear of the convector in the
lower part.
8.
V 05/13
Tighten the screws at the top of the convector firmly.
5. Drill holes in the wall and insert the 4 Fishers.
Secure the bracket to the wall and insert the 4
screws supplied.
7.
9.
Insert the two upper parts of the bracket into the
holes on the rear of the convector in the upper
part.
Installation complete.
13
HOW TO USE THE CONVECTOR
Connect the power cord to a suitable electric socket (220-240V~/50Hz).
ON/OFF switch (on the right side)
Bring the on/off switch to the “ON” position.
When the appliance emits a beep this means that the convector is ready for use.
Bring the switch to the “0FF” position to switch off the convector.
LED DISPLAY
SUPER mode: maximum
power (1500W)
ECO mode:
750 W, reduced power to
save energy
COMFORT mode:
it adjusts automatically heat output and
therefore energy consumption, according to set
temperature.
°C
Temperature and timer
display
Timer on setting/
timer set
CONTROL PANEL
TIMER button
TEMPERATURE button
When the appliance is operating, the operating
time can be set by touching this button: the
timer display shows a flashing 0 and pressing
TIMER you can set the desired time, between
0,5 and 8 hours, with each touch
corresponding to half and hour.
The display shows the set time: wait 5” for the
setting to be confirmed. The unit will switch off
automatically at the end of the programmed time
(stand by).
In order to switch it on again press the button
ON/OFF.
If a TIMER is set the LED
When COMFORT mode has been set, touching
this button will allow you to set the
temperature: the display will show ambient
temperature and, by pressing this button, the
desired temperature can be set between 15 and
35°C. Once the desired temperature has been
set, wait 5” for the setting to be confirmed. After
5” the display will show the ambient temperature
once again.
This function is active only in COMFORT
mode.
remains on.
ECO/SUPER/COMFORT selection
button
ON/OFF buttons
- ECO mode: 750 W, reduced power to save
energy
Touching the ON/OFF button will cause the
ECO LED to light and the appliance will begin to
operate in ECO mode. The display will show
- SUPER mode: maximum heating power
(1500W)
ambient temperature. Touching the button
ON/OFF once again the LED will show room
temperature.
To switch off the convector completely, place
the on/off switch in the “0FF” position.
ON/OFF switch
- COMFORT mode: automatic adjustment of
heat emission according to set temperature
ECO is the default mode.
WARNING: THE TEMPERATURE SELECTION BUTTON IS ACTIVE ONLY IN COMFORT MODE.
The appliance is fitted with an anti tip-up device that prevents it from operating when it detects that the product is inclined.
Do not position the appliance on its side or upside down.
V 05/13
14
REMOTE CONTROL
TIMER button
TEMPERATURE
button
ON/OFF button
Mode selection
button ECO, SUPER
or COMFORT
The remote control uses Lithium/Manganese button cells, model no. CR2032 -3 V, compliant with Battery Directive no.
2006/66/CE (supplied with the remote control).
HOW TO INSERT / REMOVE THE REMOTE CONTROL BATTERIES (refer to the diagram below)
Open the battery cover at the rear of the remote control (press and pull the cover).
Place the battery into the cover, observing the correct polarity. Insert the cover onto the remote control.
Information for correct disposal of the battery in accordance with the European Directive 2006/66/EC
Please replace battery when its electricity charge is used up: please do not eliminate this battery together with normal
household waste. It must be taken to special local community waste collection centres or to a dealer providing this service.
Disposing of a battery separately avoids possible negative effects on the environment and human health deriving from an
inappropriate disposal and enables its components to be recovered and recycled to obtain significant savings in energy and
resources. In order to underline the duty to dispose of this equipment separately, the battery is marked with a crossed-out
dustbin.
MAINTENANCE AND STORAGE
ALWAYS UNPLUG THE APPLIANCE BEFORE CLEANING OR MAINTENANCE.
IMPORTANT: DO NOT SUBMERGE THE CONVECTOR IN WATER.
Cleaning the outside surface of the appliance
Turn the switch off and unplug before carrying out any maintenance work or moving the appliance.
Use a soft cloth to remove any dust from the convector.
If the convector is excessively dirty, use a soft cloth moistened with water and a mild detergent at a temperature lower than
50°C. Let the convector dry completely before use.
Do not use corrosive detergents or solvents such as petrol. Do not wash the appliance with water. Do not use oils, chemical
substances or other items to clean that may damage the surface.
Use a vacuum cleaner to remove dust from the air inlet/outlet grilles.
STORAGE
If the appliance is not used for prolonged periods, it must be stored together with this manual in its original packaging, in a
cool and dry place.
Information for correct disposal of the product in accordance with the European Directive 2002/96/EC
At the end of its working life this equipment must not be disposed of as an household waste. It must be taken to special local
community waste collection centres or to a dealer providing this service. Disposing of electrical and electronic equipment
separately avoids possible negative effects on the environment and human health deriving from an inappropriate disposal and
enables its components to be recovered and recycled to obtain significant savings in energy and resources. In order to
underline the duty to dispose of this equipment separately, the product is marked with a crossed-out dustbin.
www.argoclima.com
V 05/13
15