1
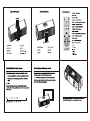
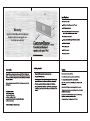
 Warranty
Cygnett 12 Month Manufacturers Warranty
Register online at www.cygnett.com
to activate your warranty.
GrooveBase -.....
Powerful full featured
speakers for your iPod
OPERATING INSTRUCTIONS
Specifications:
m Output Power : 36W
m Builtin 2x4" Bass driver and 2 x 1" Tweeter
m AM/FM alarm clock radio
m Choose from different alarm modes to wake up to;
iPod, FM Radio, AM Radio or pre-set chimes
m Full function remote control
m Charges, syncs and plays your iPod at the same time
m Battery or AC powered
m Treble / Bass option
m AV/S-Video outputs
m AC adapter included
User Guide
Congratulations on the purchase of your new iPod Clock Radio Speaker
System. To get the most from your new speaker system, please take a few
minutes to read the following instructions and familiarize yourself with the
operation of the unit.
Before setting up the unit, check that the following items are contained
within the box:
1. iPod speaker system.
2. AC/DC power adaptor.
3. Remote control handset.
4. Adaptor cartridges for iPod.
5. 3.5mm stereo jack connector cable for auxiliary input.
6. USB connection cable.
* Adaptor cartridges are subject to change.
Getting started
1. Plug the AC/DC adaptor into a mains power outlet.
2. Press the POWER button (A1).
3. Ifyou require your iPod to synchronize with your PC's iTunes library,
plug the USB connection cable into the USB connection port (B4).
д. Slot the appropriate iPod adaptor cartridge into the iPod dock.
Place your iPod into the iPod dock. Your iPod will begin to charge (if
not fully charged) and synchronize with your computer (if connected
via USB).
Caution
Observe electrical safety at all times.
Do not allow the system to come into contact with water.
Do not operate the system with wet or damp hands.
When not in use, disconnect the AC/DC power adaptor from the
mains supply.
Only use the AC/DC power adaptor supplied with the system.
This system contains no user-serviceable parts. Do not attempt to
modify the unit in any way.
The system uses delicate electronic components. Avoid strong
impacts or dropping any part of the system.
Avoid placing the system adjacent to a CRT TV set.
Alarm and Al mode setting
1: Make sure the GrooveBase is switched off (in standby mode). You will
know its in standby mode because the Blue LEDs under the buttons are
off.
2: Plug your ipod into the top of the GrooveBase.
3: Push the FUNCTION button to select the icon of your desired mode:
iPod/Radio/Clock Sound on the top right of the display at the front of the
GrooveBase.
4: Turn the GrooveBase On by pushing the POWER button (top left button).
The Blue LEDs under the buttons will come on.
You are now ready to set the Alarm Time
5: Push the ALARM button. The Hour digit will flash.
6: Push the UP/DOWN buttons to set the hour for the alarm to come on.
(Note: if you are too slow and the Hour digit has stopped flashing, go
back to STEP 5).
7: Push the ALARM button. The Minute digit will flash. (Note: if you are too
slow and the Minute digit has stopped flashing, go back to STEP 5).
8: Push the UP/DOWN buttons to set the minutes for the alarm to come on
Alarm and Al mode setting - continued
Tuning the radio
9: Push the ALARM button. The display should say “A ON”. If not, push the
UP button until it does.
10: Push the ALARM button to exit the Alarm Setting mode.
You are now ready to set the Alarm Volume
11: Push the ALARM button. The Hour digit will flash. (Note: if you are too
slow and the Hour digit has stopped flashing, go back to STEP 5).
12: Hold down the ALARM button and the +/- buttons at the same time to
adjust the volume to a suitable volume for your Alarm to switch on to.
(eg) 6, then release the buttons. The Minute digit will flash.
13: Push the ALARM button twice to exit Alarm Setting mode.
14: Put the iPod to the song you wish to wake up to.
15: Turn off the iPod (it will enter Charging mode).
Your alarm is now set and the GrooveBase will come on and play your iPod
at the right volume to wake up to.
1. Press the FUNCTION button to select the desired FM or AM
radio band.
2. Use the UP and DOWN buttons to tune the radio to the
desired frequency.
3. To auto-jump to the next radio station with clear reception,
press and hold down either the UP or DOWN button for
approximately 1 second.
4. To increase/decrease the frequency by 0.1MHz/0.1kHz, press
and release the UP/DOWN button.
5. Press the MEMORY button to Auto- search the channel and
save them, the unit will return to 1* channel after finish
search, press M and W to choose the saved channel.
Sleep Operation
When listening to your ipod or the radio ,press the sleep button to
enter sleep mode, the unit will automatically turn off after the
selected time (15/30/45/60/75/90/120)
Snooze Operation
Press the snooze button on the unit after the alarm sounds, the
alarm will go off and will come on again in approx 9 minutes.
Time Setting
Entering the Time and Alarm button to set the Daily Time,
Alarm time.
1. Press the TIME button for 3 seconds. The HOUR setting of the clock
will be shown flashing. (If no button is pressed within 5 seconds,
the unit will return to its previous mode. If this occurs, simply
press the TIME button again.)
2. Use the UP and DOWN buttons to adjust the hours to the
correct time.
3. Press the TIME button again. The MINUTE setting of the clock will
be shown flashing.
4. Use the UP and DOWN buttons to adjust the minutes to the
correct time.
5. Press the TIME button again. The unit will exit Time Setting Mode.
LCD display
Depending on which audio source is selected, the LCD display will
show the following information:
IPOD and AUX: Volume level from o to 40 by default.
FM and AM Radio: Display will show the frequency selected
Pressing the TIME and ALARM button and cycling through the Time
and Alarm Setting mode will display the time in any mode.
AL MODE: Press the AL MODE button, display will show
IPOD/RADIO or Je - whichever is selected.
Sleep: Display will show Sleep.
In Standby Mode, the speaker will display the time.
A. Speaker Unit (front) B. Speaker Unit (rear)
C. Remote Control STANDBY : Power On / Off
MUTE : Mute
a TIME: Time Setting
standby mute AL MODE: Set Alarm Clock Mode
time almode alarm
ALARM: To Set Alarm Time and Alarm On / Off
tre/bass sleep function TRE/BASS: Treble/Bass Adjustment
SLEEP: Timer 15/30/45/60/75/90/120
E
a TA « menu memory t .
a ERA =" FUNCTION: Select Audio Source
A OOO
ARO TAL MENU: MENU Function
La E Po e AOL A snooze
cer a ES AS © RAT
, 3 | КО ose НЫ PI = MP MEMORY: Radio Channel Auto-Search and Save
ETA HE › | AOL
y \ I CC CR OH LL IA volume - volume + .
С ATA ADS re ENTER: Go to function you choose
IRD ЧН Са © OT wa 0 AA
e Ai mo
yes e Loa pl CO
KO 002208; A A
"e
LD
SNOOZE: Snooze
ES
VOL- : To turn the volume down
@ DE) O VOL+: To turn the volume Up
A1.Power A5.Down A :Up
Ao. Alarm A6.Up B1.Video out B2. DC in 18V С ° V :Down
, B3.Aux B4 .USB ygnett: M4: Prev
A3.Time A6.Volume - N
As Funct | B5.FM B6. AM P = Next
4.Function A7.Volume + b|| : Play/pause
Selecting different audio sources Connecting to auxiliary equipment
The speaker system can select between the follow audio sources: The speaker system can output audio and video outputs to other SI
ui . . . . . CEOS :
1. iPod audio output (only if an iPod is connected via the iPod dock). audio-visual equipment via the following connections: 3 TRIO
re . . . 1. ToalVorvideo display via the composite video RCA output. 8 23
2. Auxilliary stereo audio input via 3.5mm jack connection (at rear ES
of unit). This feature is only available on iPods able to output a video signal. _ LER y
Radi Use an RCA to RCA cable (not supplied). <<
3. Radio.
To select the desired audio source, select the FUNCTION button
repeatedly. The audio input will cycle between different sources in the
following order:
iPod —) Aux — Radio
|
Take two covers off at the bottom of the speaker. Put 12 size-C 1.5V
batteries into the speaker as an alternative power source.
LCD display will show: iPod ==) AUX — Radio