1
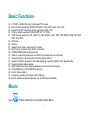
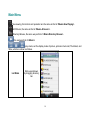
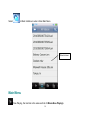
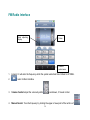
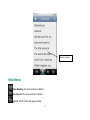
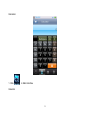
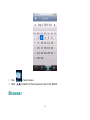
MP4 Player User Manual Thank you for your purchase. Please read this manual carefully Before using the new player Basic Functions .......................................................................................................................... 3 Music ............................................................................................................................................ 3 Main Menu ............................................................................................................................................................ 4 Music Interface ................................................................................................................................................... 6 Submenu ............................................................................................................................................................... 7 Pictures ........................................................................................................................................ 9 Main Menu .......................................................................................................................................................... 10 Submenu ............................................................................................................................................................. 12 Video .......................................................................................................................................... 13 Main Menu .......................................................................................................................................................... 14 Video Interface .................................................................................................................................................... 15 Submenu ............................................................................................................................................................. 16 Menu ................................................................................................................................................................... 16 Camera ...................................................................................................................................... 18 Take photo ........................................................................................................................................................... 18 Video recording ................................................................................................................................................... 19 PC Camera .......................................................................................................................................................... 21 Record ........................................................................................................................................ 21 Record Interface ................................................................................................................................................. 22 Menu ................................................................................................................................................................... 23 FM Radio ................................................................................................................................... 23 1 FM Radio Interface ............................................................................................................................................. 24 Submenu ............................................................................................................................................................. 25 E-book ....................................................................................................................................... 26 Main Menu .......................................................................................................................................................... 27 Text Browser ........................................................................................................................................................ 28 Submenu ............................................................................................................................................................. 29 Browser ..................................................................................................................................... 32 Main Menu .......................................................................................................................................................... 33 Settings ..................................................................................................................................... 34 Display ................................................................................................................................................................. 35 Calibrate .............................................................................................................................................................. 36 Off Time ............................................................................................................................................................... 36 Date and Time..................................................................................................................................................... 37 Setup Sound ....................................................................................................................................................... 37 Set as Desktop .................................................................................................................................................... 38 Advanced ............................................................................................................................................................. 38 Specification ............................................................................................................................ 39 2 Basic Functions 400*240 , 260,000 full-color, high-speed TFT screen Music formats supported: WMA, DRM WMA , OGG, APE, FLAC, WAV, AAC Support FM, MIC recording; format supported: WMA, WAV Picture formats supported: JPEG, BMP, GIF, TIF, PNG Video formats supported: AVI, WMV, FLV, RM, RMVB, H.264 , MP4, 3GP, MPEG, VOB, DAT, SWF, MKV, VP6, MOV FM Radio E-book Support photo taken, video and PC camera. Built in tools: Calendar, Stop Watch, Calculator SD/MMC/SDHC/MS cards supported Settings: supporting displaying and setting of properties for each function Supporting picture browsing and interface display effects Supporting ADFU restoration and USB upgrading; supporting DRM of the upgrading file Supporting Multi-task operation Data transmission (file exchange between card and internal memory) UNICODE library (TTF, BITMAP) supported Built-in lithium battery Supporting operating the player while charging Built-in speaker, Earphone/Speaker can be shifted automatically Music Select in Main Interface to enter Music Main Menu. 3 Music list area . Main Menu : Play; icon is marked after now-playing or previously played music in the now-playing music list, click the file name to select one and begin to play. It shows “No files” if no music file exists. 4 : All Music; list all the music files stored under Music Directory in the player’s internal memory. : Artist; list out all the music by artists; Unknown Artist saved the music by unidentified artist; it will not be available if no such kinds of music exists. : Album: select one album, the next level is the list of music in the album; the function of Unknown Album is as same as Unknown Artist. : Genre: it lists all the music files by genre. : My Music List: totally five lists available; the user can classify the music as desired. : Directory Browse: Internal Memory, External Memory; Internal Memory contains all music files in the player; External Memory lists all the music files in cards and this list will not be displayed if no card inserted. : Record File: list all FM and voice record files. : My rating: five ratings (1~5 stars); music of the same rating are listed correspondingly. The user can rate music according to the favorites. : Tag List: list all the music tag set by user, support up to 32 tag lists. : Search: search music files by entering music file name in handwriting or . : return to the upper directory from subdirectory; or turn to Main Menu from root directory. 5 Music Interface Battery Exit Settings Elapsed time Total time length Rating Progress bar Play mode EQ AB Repeat Spectrum/Lyric display area Volume Spectrum/lyric/Album display area: click here to shift among spectrum, lyric (if any) and album (if any). 1. Play & Pause: click / to switch between Play and Pause. 2. Forward/Rewind: when music is played or paused, fast forward or fast rewind can take place by 6 dragging the progress bar. 3. Change Music: press / to switch to the previous or next music. 4. Progress Bar: it will get concealed after 10 seconds entering the music playing interface; and it will appear again clicking the area where it displays. 5. Background Playback: music will play background when is pressed during the playing process; applications that are compatible with Music now can be operated (except Video, Capture, Flash Game, and FM). 6. Volume adjustment: adjust the volume by sliding . Submenu In Music playing interface, click to enter the submenu, options include: <Variable Speed Playback>, <Add Tag>, <Delete>, <Information>, <Set Rating>, <Add to My Play List>, <User EQ>, <SRS User Mode>, <Advanced>, <DRM Information>. Submenu Operation: enter the next level menu by clicking one option; slide the menu can switch between options; click to confirm; adjust the setting by dragging the value bar; then press ‘return’ button to return to the upper level. or 1. AB Repeat: select in progress bar and click ; is shown, indicating point A( the time point of now playing music) is confirmed; click , now is shown, indicating point B is confirmed. Then A-B repeat starts. If is pressed, the repeat icon will change into , which means AB repeat is cancelled. 2. Play Mode: Sequence, Repeat One, Repeat All, Shuffle, Shuffle + Repeat and Intro. 7 3. Select EQ: Normal, Rock, Pop, Classic, Soft, Jazz, DBB, SRS WOW, SRS WOW HD, SRS, User Mode and User EQ. 4. Variable Speed Playback: adjust music playback speed from -4 to 4. 5. Display Mode: set display modes on music playback interface, which includes album information, lyrics and spectrum. 6. Set Rating: set the rating for the current music (rating 1-5). 7. Add Tag: click Add Tag, the current music and its current time point can be added to tag list, then it returns to playing interface. You may find the music in the corresponding list in <Tag list> 8. Delete Tag: enter and touch the screen to slide from right to left, upon which appears; select one tag and click; it pops out a window for confirmation; now click to confirm or cancel tag deletion. 9. Add to My Play List: enter < Add to My Play List > to select one list desired and then return to the previous menu; now the music has been added to the list and you may find the music in the corresponding list in <my music list>. A file can be added to more than one list. 10. Delete from My Play List: the same as delete tag. The music deleted from play list will not be deleted from the player. 11. Delete: delete the current music from the player, click in music playing interface, select <Delete>, you can confirm or cancel the deletion. 12. Advanced Setting 1) Repeat Times: drag the value bar, value: 1 -10, or Infinite. 2) Repeat Intervals: rang from 1-7 seconds. 3) Scan Speed: ×2,×4,×8,×16,×32。 4) Fade In/Out: On or off. 13. EQ Setting 1) User EQ: 5 bands: 80, 200, 1k, 4k, 8k; range: -6db ~ +6db. Drag the value bar to change the value. 2) SRS User Mode: parameters: SRS 3D (0 ~ 10), TruBass (0 ~ 10), Focus (0 ~ 10), Center (1 ~ 10), Definition (0 ~ 10), Speaker (60Hz, 100Hz, 150Hz), Limiter (ON/OFF). 14. Information: display the detailed information of the current music. 8 15. DRM Information: display the DRM information of the current music. Pictures Select in Main Interface to enter Picture Main Menu. Switch between List, Thumbnail and Slide Picture list area 9 Main Menu : Now viewing, the function and operation are the same as that of <Music-Now Playing>. : All Pictures, the same as that of <Music-All music>. : Directory Browse, the same way as that of <Music-Directory Browse>. : the same as that of <Music>. / / : play mode, set the display mode of picture, options include List, Thumbnail, and Slide, which are shown as follows. List Mode Slide up and down by dragging directory bar 10 Thumbnail Move up/down by sliding the screen up/down. Slide Move left/right by sliding the screen left/right 11 Submenu When browsing a picture manually, click it, the submenu and operation bar are shown as below: Scale bar : Setting, options include <Effect>, <Delete>, <Information>, <Display Mode> 1. Effect: options for picture playback effects: Move page, Louver, Fade Display 2. Delete: the same as that of <Music>. 12 3. Information: display picture name, resolution, Created Date. 4. Screen Size: options include Full Screen, Original Size, and Scale 5. / : switch between manual and auto playing. Slide the current picture left/right to display the previous/next picture in manual mode. 6. : set the current picture as the desktop picture for Main Interface and Standby interface. 7. Scale: click the Scale Bar on the right of the picture to zoom in/out the picture; when the picture is zoomed in, you may drag it up/down/left/right correspondingly; to exit Scale mode, click previous or next file cannot be selected in Zoom-In state). 8. : Rotate: options for rotation: 90°, 180°, 270° clockwise. 9. Slide Interval: options include 1, 5, 10, 15, 20 seconds. Video 13 (note: the Select in Main Interface to enter Video Main Menu. Video list area Main Menu : Now Playing, the function is the same as that of <Music-Now Playing>. 14 : All Video, the same way that of <Music-All music>. : Directory Browse, the same as that of <Music-Directory Browse>. : Tag List, the same as that of <Music-Tag list>. : Search: search video by inputting file name. : the same as that of <Music> Video Interface Settings Progress bar Previous Next Volume control 15 Play/Pause Click video playback interface, upper and lower bars in black appear to display information regarding the now-playing video with corresponding buttons for operation. They disappear automatically if no operation is done within three seconds. 1. Play & Pause: click to switch between Play and pause. 2. Forward/Rewind: slide the progress bar to fast forward/fast rewind. 3. Change File: press or pause. / to switch to the previous or next file, during video playback Submenu In playing interface, click , options in the submenu includes <Playback Mode>, <Scan Speed>, <Add Tag>, <Display Size>, <Resume>, <Delete> and <Information>. 1. 2. 3. 4. 5. 6. 7. Playback Mode: Sequence, Repeat One, Repeat All, Shuffle, Shuffle + Repeat Scan Speed: 2, 4, 8, 16, 32. Add Tag: the same as that of <Music-Add tag>. Display Size: Full Screen, Original Size, Scale Resume: start playing from the time point at which it exited. Delete: the same as that of <Music-Delete>. Information: Check the information of the current video file. Menu Enter submenu by clicking , in which options include <White Balance>, <Exposure Mode>, 16 <Face Detection >, <Special Effect>, <Save Path>, <Resolution>, <Memory Free Space>, <Self-timer>, <Cont. Shooting>, <Shutter Sound> and <Date Stamp>. 1. White Balance: Auto, Fine, Cloudy, Filament Lamp, and Fluorescent Lamp. 2. Exposure Mode: Auto, Indoor, Outdoor; default: Auto. 3. Face Detection: on or off 4. Effects: options include: Off, Black & White, Sepia, Negative; default setting: Off. 5. Save Path: options include Internal Memory, Card Device. It just shows Internal Memory in case no card is plugged in. 6. Resolution: 2048*1536, 1600*1200, 1280*960 (default), 1024*768, 640*480 7. Memory Free Space: space available for storing photos 8. Self-timer: options include off (default), 5s, 10s, 15s, 20s. 9. Cont. Shooting: Off (default), 5s, 10s, 15s, and 30s. 10. Shutter Sound: options include Off, Effect 1/2/3; default: Effect 1. 11. Date Stamp: options include Off (default), Date, Date and Time 17 Camera Under main menu to choose<camera> and enter camera menu. Total three function for it: <take photo><video recording><PC camera> Take photo 1. Choose<take photo> to enter finding a view status. Brightness Resolution Storage medium 2. Press 3. Press Available numbers button to take the photo. / to adjust focal distance. 18 Focal distance 4. Press button to enter sub-menu of taking photo, submenu includes:<Preview><white balance><brightness><exposure mode><special effective><save route><resolution><residue space><autodyne setting><shutter sound><date mark><display mode><face examine><parameter preview> 1) Preview: preview all photos have token. 2) White balance: Auto(default ), Indoor and Outdoor. 3) Brightness: scope from -3 to +3; default is 0. 4) Exposure: Auto (default ), Indoor and Outdoor. 5) Special effective: no(default), white-black, restore ancient and negative film. 6) Save route: Built-in storage and outlay storage(if there is no card, it will not display). 7) Resolution: 2048*1536、1600*1200、1280*960(default)、1024*768、640*480、320*240。 8) Residue space: show residue space of current storage device directly. 9) Autodyne setting: shut(default),5sec,10sec,15sec,and 20sec. 10) Shutter sound: Shut, sound effect 1(default), sound effect 2, and sound effect 3. 11) Display mode: full screen, original size and equal proportion. 12) Face examine: Identify people face to sharp focusing automatically. 13) Parameter preview: Preview all the setting parameter. 14) Date mark: shut(default), date and time. Video recording 1. Choose<video>to enter finding view mode. 19 Storage medium Brightness Recorded time 2. Press Available time button to start or record, meanwhile timing; then press again to pause recording. Press ×button to exit. It will save your recorded file automatically before exit. 3. Press button to enter submenu of taking photo, submenu include: <Preview><white balance><brightness><exposure mode ><special effective><save route><resolution><recording quality><recording tone-up><parameter preview> 1) Preview: preview all the recorded video. 2) Resolution: 320*240,640*480(default). 3) Recording quality: High(default), middle, low and self-adaptation. 4) Recording tone-up: Adjust volume 1~5 while recording. Remark: Other description for menu, please reference<Camera> 20 PC Camera 1. Choose <PC camera> to enter, system will check whether connect with USB, interface as below: 2. There will be a USB video icon display at C disk in the PC. Click the icon and open, it can be used. Record Select in Main interface to enter Record interface. 21 Record Interface Elapsed time Time available External sound energy value 1. Switch between Start/Pause/Continue by clicking or . 2. Click during recording, it pops out “Stop Record” window, choosing <Yes>/<No> to continue/stop recording. If <Yes> is chosen, the system will save the current record to <Music-Record File-MIC> automatically. 3. : Real-time indication of external sound energy value. 22 4. / / : Record Quality: Low, Mid, High 5. : in Stop mode, click it to exit. In recording or pause mode, click it to pop out “Stop Record” window, now select <Yes>/<No> to continue/stop recording. 6. : Record Gain: adjust the volume; options:1~5. Menu Click in Stop mode, items in submenu includes <Record Format>, <Record Mode>, <Save Path>. 1. Record Format: set the format of record files, wav/mp3/wma. 2. Record Mode: options include Mic Recording, FM Record. 3. Save Path: options include Internal Memory, Card Device. It just shows Internal Memory in case no card is plugged in. FM Radio Click in Main Interface, it enters FM Radio interface. It will prompt if there is no earphone plugged in. 23 FM Radio Interface Band adjusting display Volum e Channel control area 1. 2. Listen In: it will enter the frequency which the system exited last time. Default is 87.5MHz. : return to Main Interface 3. Volume Control: adjust the volume by sliding up and down, 31 levels in total. 4. Manual Search: Tune the frequency by clicking the upper or lower part of the red line of 24 . 5. : Auto Search: click to start auto search. When the search finishes, it will automatically saves the channels searched and play the first one. If no channel is found, it will stop at the first frequency point. During searching, exit by clicking , the system stops at the last channel. 6. : FM Record: enter FM Record interface, options are the same as <Record>. Files will be automatically saved to <Browser-RECORD-FM>. 7. Channel List: list. 8. Save/Remove Channel: click to save the current channel; if a channel is broadcasting, it functions as Delete; otherwise, it functions as Save. 9. , three lists, up to 9 channels can be saved in each : Click to switch between Play and Mute. Submenu In normal Radio mode, click to enter submenu, the options include <Channel List>, <Tuner Region>, <FM Sensitivity>, <Record Quality>, <Record Gain>, <Save Path>. 1. 2. 3. 4. Tuner Region: 1) Band USA/China: 87.5-108MHZ, Step: 0.1MHz 2) Band Japan: 76-90MHZ, Step: 0.1MHz 3) Band Japan: 87.5-108MHZ, Step: 0.05MHz FM Sensitivity: High, Mid, Low Record Quality: High, Mid, Low Record Gain: Level 1-5 25 5. 6. Save Path: options include Internal Memory Device, Card Device. It just shows Internal Memory in case no card is plugged in. Channel List: Channel list can be defined on a PC by the user according to his likes and dislikes. Default.ini (for the user’s channel list) will be created after auto channel search and saved in Udisk\SYSTEM\FM; it can be opened and modified on PC, by which the users may define the name of channels instead of CH01, CH02 etc, or the users can self-define .ini file. E-book Select in Main Interface to enter E-book Main Menu. 26 E-book list area Main Menu : Now Reading, the same as that of <Music> Directory List: the same as that of <Music> Tag List: list all txt files with page number. 27 : returning to previous directory or Main Menu, the same as that of <Music> : Search, the same as that of <Music>. Text Browser Progress bar Current page/ total page / : Manual/Auto Page Turning. The text will stop in manual mode; slide left/right to turn to the previous or next page. Auto mode means timed Auto Page Down, and the timing range is 3s, 6s, 9s, 12s, and 15s. 28 : create tag with this button and add the tag to Tag List automatically. Up to 32 tags supported. : font size: Small (12)/Mid (16)/Big (24) : font color, options include Pure White, Blue, Dark Grey, Pure Black. : Page Progress Bar; turn to certain page quickly by sliding the Progress Bar. : return to E-book Main Interface Submenu Click in Text Browser interface to enter submenu, in which options include <Select Coding>, <Effect Setting>, <Delete> 1. <Select Coding>: support up to 22 languages 2. <Effect Setting>: page turning effects; options include Pan, Roll, Wave 3. <Delete>: the same as that for <Music>. 29 Stop Watch Click in Main Interface; it shows below 1. Click or Click in Main Interface. 2. Click Start to start timing; click to “count” save counts and continue to time. 3. When timing is stopped, click Reset to clear the records. 30 Calculator 1. Click in Main Interface Calendar 31 1. Click 2. Click in Main Interface. / to switch to the previous or next Year, Month. Browser 32 Select in Main Interface to enter Browser Main Menu. Main Menu 1. 2. If no external card plugged in, it shows Internal Memory only, which includes EBOOK, FLASH, MUSIC, PICTURES, RECORD, SYSTEM, VIDEO and other files. Select the folder to be browsed and enter by clicking it. All the files under the folder will be listed. 3. Click a file and enter, Click to exit. Operations of external card are the same as Internal Memory. 33 : Switch between Internal Memory and External card. 4. 5. : Click to select the file/ folder to be copied, and then click or folder to external card. 6. 7. : Click to copy the selected file to select the file/folder to be deleted; it pops out the confirmation box. : select all files/folders under the current folder/dir. Once selected, a red √ will show on the small icon before the file/folder. Click it again to cancel the Select All. Settings Click in Main Application Menu to enter the settings menu. 34 Display 1.Backlight 0S means Off; 0~60s; step: 5s. If backlight time is set as Off, the screen will not shut down automatically; if it is not set as Off, the player will shut down in case no operation during the set backlight time. 35 In picture display interface, Camera/DV Framing interface, Video Playing interface, E-book Reading interface, Flash Game Playing Interface (including Pause), Stop Watch Operation interface, FM Auto Search interface, Backlight Time are ineffective. 2. Backlight brightness: Options: level 1~5. Calibrate 1. Calibrate the touch screen. Off Time 1. Idle Time 0Min means Off, 0~60Min; Step: 2Min. The player will not be shut down automatically if it is set as Off; otherwise, the player is shut down automatically if no operation is done during the set power saving time. In Now-playing music mode (including foreground and background playing, excluding Pause/Stop Mode), picture viewing interface (excluding manual browsing mode), now-recording interface (excluding Stop mode), now-listening radio mode (including foreground and background, excluding Stop mode), Now-recording DV interface (excluding Stop mode), video playing interface, E-book reading interface (excluding manual reading mode), now-playing Flash game interface, stop watch operation interface, now-charging (including foreground and background charging), Idle time set are ineffective. 2. Sleep Time 0Min means Off, setting range:: 0~120Min; Step: 5Min; the player will shutdown automatically after the set time period. 36 Date and Time 1. Set Date Set system date, including Year, Month, and Date; slide the three value bars up or down, and click to confirm and exit. 2. Adjust Date &Time Set system time, including Hour, Min, AM/PM, slide the three value bars up or down to choose, and click to confirm and exit. 3. DRM Date View the secure date of the music downloaded from Internet. 4. DRM Time View the secure time of the files downloaded from Internet. Setup Sound 1. Switch, turn on or off sound. 2. Select Key Tone: the user can turn off key tone or choose his favorite one; four key tones are available. 3. Select Touch Tone: the user can turn off touch tone or choose his favorite one; four touch tones are available. 4. Select Prompt Tone: the user can turn off prompt tone or set his one; four prompt tones are available. 37 Set as Desktop 1. Default, turn on/off user define function. 2. User define, set the user’s favorite desktop. Advanced Player Info. For displaying information the player’s: Owner, Firmware Version, Total Space, Free Space, Total Card Space, Free Card Space, All Music, All Pictures, All Video, All E-books, Flash Game. Connection Type 1. Udisk Select it and connect the player to a PC with the USB cable; the interface will include options <Power and Data >, <USB Charge>, <Charge and Play> 1) Power and data: Udisk mode. 2) Charge and Play: used it while charging. 3) USB Charge: charging. 2. MTP device Select it and connect the player to a PC with the USB cable; the interface will include options include <MTP Device>, <Charge and Play>, <USB Charge>. 1) MTP device: Select it to enter MTP mode; now MTP Media Player selection window pops out on PC. Operations of other options are the same as those under Udisk mode. Select Font System default font library can be replaced with the font library file in folder SYSTEM-FONTS in Udisk. System default settings can be resumed by deleting the font library file in the folder. Set User Name Enter user name by handwriting. Delete by clicking Format Internal Memory and confirm by clicking 38 . The player’s memory can be formatted; make sure to copy the data necessary before formatting. Format Card Card can be formatted; make sure to copy the data necessary before formatting. Clear DRM HDS Select it to enter confirmation dialog box “Confirm to delete all DRM” select Yes or No to confirm or cancel. Check System Click and enter, dialog box “May require a few minutes” pops out; now select Yes, the system starts checking and prompts “Self-checking…” Reset Settings The system prompts whether to recover factory setting; settings of each application will be recovered to factory setting if Yes is selected. Specification Memory capacity 512M or above Battery 3.7V lithium battery Operation voltage >3.45V S/N ratio 90db FM sensitivity 30dB Display 400×240 WQVGA 260,000 colors, TFT screen Size 39