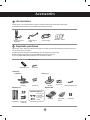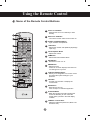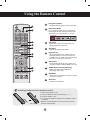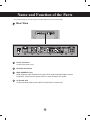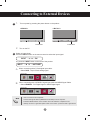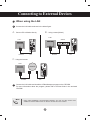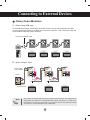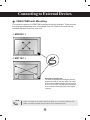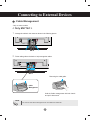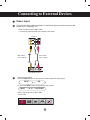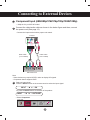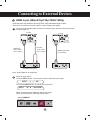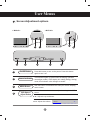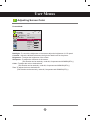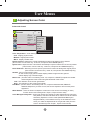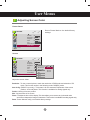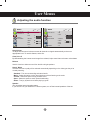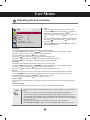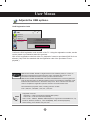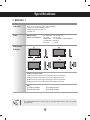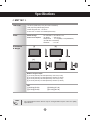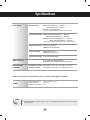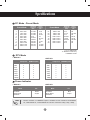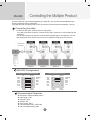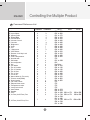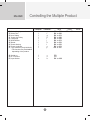
1
ENGLISH OWNER’S MANUAL MONITOR SIGNAGE Please read this manual carefully before operating your set and retain it for future reference. MONITOR SIGNAGE MODELS M3204C M4716C www.lg.com Table of Contents Accessories Connecting the stand Connecting the Speakers To install Portrait Using the Remote Control Name and Function of the Parts Connecting to External Devices 3 4 6 7 8 10 12 When Connecting to your PC.............................................................................................12 When using the LAN............................................................................................................14 Daisy Chain Monitors..........................................................................................................15 VESA FDMI wall Mounting..................................................................................................16 Cable Management..............................................................................................................17 Video Input............................................................................................................................18 Component Input (480i/480p/576i/576p/720p/1080i/1080p)...........................................19 HDMI Input (480p/576p/720p/1080i/1080p).......................................................................20 User Menus 21 Screen Adjustment options................................................................................................21 OSD Menu ............................................................................................................................23 How to adjust the OSD (On Screen Display) screen......................................................24 How to adjust the screen automatically...........................................................................24 Adjusting Screen Color.......................................................................................................25 Adjusting the audio function..............................................................................................31 Adjusting the timer function...............................................................................................32 Selecting the options . ........................................................................................................33 Adjusts the tile options.......................................................................................................35 Adjusts the USB options.....................................................................................................37 Troubleshooting Specifications Controlling the Multiple Product 2 51 54 A1 Accessories Accessories Thank you for your purchase. Please check the product as well as the accessories shown below ❖ Note that the accessories may look different from those shown here. Remote Control / Batteries D-Sub Signal Cable Power Cable CD-ROM / Cards Separate purchase Without prior notice, optional accessories are subject to change to improve the performance of the product, and new accessories may be added. ❖ Optional accessories (purchased separately) may vary depending on the model. ❖ Note that optional accessories may look different from those shown here. ❖ You can obtain additional accessories from most electronics stores. Stand hole cover Kit < M4716C Only > Stand hole cover Screws (2) Stand Kit < M3204C > Stand (2) < M4716C > Stand(1) Screws (4) Speaker Kit Screws (4) Cable management (1) NC2000 Kit Cable holder/Cable tie They may not be available in some areas or for some models. Speaker(2) NC2000 Screws (4) / Cable (2) 3 CD-ROM / Cards Screws (2) Connecting the stand - Only on some models. < M3204C > 1. Take the parts for the stand out of the box and assemble them as shown in the picture. Parts First, check if the following parts are all present. Screws (4) Stand (2) 2. lace a soft cloth on the table and put the product with the screen facing P downward. Connect the stand as shown in the following picture. 3. Use the screws to secure the stand on the rear side of the product as shown in the diagram. 4 Connecting the stand - Only on some models. < M4716C > 1. Take the parts for the stand out of the box and assemble them as shown in the picture. Parts First, check if the following parts are all present. Screws (4) Stand (1) Cable management (1) 2. lace a soft cloth on the table and put the product with the screen facing P downward. Connect the stand as shown in the following picture. 3. Use the screws to secure the stand on the rear side of the product as shown in the diagram. 5 Connecting the Speakers - Only on some models. Mount the product onto the speaker by using a screw as shown in the following connect the speaker cable. After installing your speakers, use holders and cable ties to organize the speaker cables. Cable holder Remove the paper. * This feature is not available in all model. Cable tie When the speaker is installed. *Connect the input terminal with a proper color match. * This feature is not available in all model. 6 To install Portrait - Only on some models. "When installing Portrait, rotate it clockwise based on its front." Note < Only M4716C > • When using the wall mounting bracket or the portrait scene mode, the opening can be covered by the stand hole cover. 7 Using the Remote Control Name of the Remote Control Buttons 1 2 3 ENERGY MONITOR INPUT .,! GHI 1/a/A SAVING TUV -*# CLEAR ABC JKL DEF MNO PSM P BRIGHT A NESS G Number and Alphabet Buttons - Type numbers and alphabets. 4 1/a/A Button - Selects the number and alphabet.(SuperSign input only) 5 Volume Up/Down Button - Adjusts the volume. 6 PSM Button - Selects the Picture Status Mode. 7 MUTE Button - Switches the sound on or off. 8 MENU Button - Selects a menu. - Clears all on-screen displays and returns to TV viewing from any menu. 9 Up/Down/Left/Right Buttons - Allows you to navigate the on-screen menus and adjust the system settings to your preferenc. E MUTE MENU 9 AUTO S.MENU OK 10 13 3 WXYZ ARC 7 12 Monitor On / Off Button - Turn off the monitor and then turn it back on. MARK 6 11 2 OFF ON 5 8 Power On / Off Button - Switches the set on from standby or off to standby. POWER PQRS 4 1 BACK TILE ID ON OFF EXIT 10 OK Button - Accepts your selection or displays the current mode. 11 BACK button - Allows the user to move return one step in an interactive application. 12 ID ON/OFF Button - When the number of input ID is equal to the number of ID Mode, you can control the monitor which you want in the multi display condition. 13 USB Menu control buttons - Adjust the USB menu(Photo List, Music List and Movie List ). 8 Using the Remote Control POWER 14 ENERGY MONITOR INPUT 15 OFF ON .,! GHI PQRS 1/a/A TUV -*# CLEAR ABC JKL PSM AUTO Input List AV WXYZ 16 P BRIGHT A NESS G TILE EXIT RGB HDMI/DVI SuperSign Clear button - Delete the numbers and alphabets you typed.(SuperSign input only) 18 17 ARC Button - Selects the Aspect Ratio Mode 19 18 Brightness Key - Adjust the brightness by pressing the Up and Down buttons on the remote control. - In USB mode, the OSD menu has the Page function to move to the next file list. 19 AUTO Button - Automatically adjusts picture position and minimizes image instability.(RGB input only) 20 S.MENU Button (SuperSign Menu Key) - Selects the SuperSign OSD Menu. (SuperSign input only) 21 EXIT Button - Clears all on-screen displays and returns to monitor viewing from any menu. 22 TILE button - Selects the TILE Mode E S.MENU Component 16 17 20 OK ID INPUT Select Button If you press the button once, the following Input Signal Window will appear. Select the signal type you want using the < > button. MNO MUTE ON 15 DEF ARC BACK Energy Saving Button - Adjust the Energy Saving mode of the SET. SAVING MARK MENU 14 21 22 OFF Inserting batteries into remote control. AAA Type 1. Slide off the battery cover. 2. Insert the batteries with correct polarity ( + / - ). 3. Close the battery cover. 4. To remove the batteries, perform the installation actions in reverse. • Dispose of used batteries in the recycle bin to prevent environmental pollution. 9 Name and Function of the Parts * The product image in the user's guide could be different from the actual image. Rear View 1 2 3 4 5 6 7 8 1 Power Connector Connect the power cord 2 RS-232C Serial Ports 3 RGB, HDMI/DVI Ports HDMI Supports High Definition input and HDCP (High-bandwidth Digital Content Protection). Some devices require HDCP in order to display HD signals. 4 PC Sound Jack Connect the audio cable to the *LINE OUT jack of the PC sound card. 10 Name and Function of the Parts 1 2 3 5 Component, AV Ports 6 USB Port 7 LAN Port 8 Speaker Ports 4 5 6 7 8 * LINE OUT A terminal used to connect to the speaker including a built-in amplifier (Amp). Make sure that the connecting terminal of the PC sound card is checked before connecting. If the Audio Out of PC sound card has only Speaker Out, reduce the PC volume. If the Audio Out of the PC sound card supports both Speaker Out and Line Out, convert to Line Out using the card jumper of the program (Refer to the Sound Card Manual). 11 Connecting to External Devices When Connecting to your PC 1 First of all, see if the computer, product and the peripherals are turned off. Then, connect the signal input cable. A. B. When connecting with the D-Sub signal input cable. When connecting with the HDMI-DVI signal input cable (not included). * When HDMI PC is used, a compatiblity problem might occur. A. PC Rear back of the set. PC/MAC MAC Macintosh Adapter (not included) Use the standard Macintosh adapter since an incompatible adapter is available in the market. (Different signaling system) B. (not included) Rear back of the set. PC *U ser must use shielded signal interface cables (D-sub 15 pin cable, HDMI-DVI cable) with ferrite cores to maintain standard compliance for the product. 2 Connect the Audio cable. Rear back of the set. 3 (not included) PC Connect the power cord. Rear back of the set. 12 Connecting to External Devices 4 1. Turn on power by pressing the power button on the product. < M3204C > < M4716C > On/Off button 2. On/Off button Turn on the PC. 5 Select an input signal. Press the INPUT button on the remote control to select the input signal. INPUT → → OK Or, press the INPUT button on the back of the product. INPUT →◄ ► → AUTO/SET A. When connecting with a D-Sub signal input cable. • Select RGB : 15-pin D-Sub analog signal. Input List AV B. Component RGB HDMI/DVI SuperSign When connecting with a HDMI-DVI signal input cable and HDMI Signal Cable. • Select HDMI/DVI : DVI Digital signal or HDMI Digital signal. Input List AV Note Component RGB HDMI/DVI SuperSign • How to connect to two computers. Connect the signal cables (HDMI-DVI and D-Sub) to each computer. Press the INPUT button on the remote control to select the computer to use. • Directly connect to a grounded power outlet on the wall or a power bar with a ground wire. 13 Connecting to External Devices When using the LAN 1 A. Connect the LAN cable as shown in the below figure . B. Connect PC to Monitor directly. Using a router(Switch) LAN LAN Switch Product Product PC PC C. Using the Internet. Network LAN Network Product 2 PC Network Connect the LAN cable and install the eZ-Net Manager program on the CD-ROM. For more information about the program, please refer to eZ-Net Guide in the enclosed CD-ROM. Note • Using LAN establishes communication between your PC and the monitor and enables to use the OSD menus on the PC as well as on the monitor. 14 Connecting to External Devices Daisy Chain Monitors A. When using RGB input To use different products connected to each other Connect one end of the signal input cable (15-pin D-Sub Signal Cable) to the RGB OUT connector of product 1 and connect the other end to the RGB IN connector of other products. 15-pin D-Sub Signal Cable PC PC Product 1 B. Product 2 Product 3 Product 4 When using AV input Audio Cable (not included) Video BNC Cable (not included) Product 1 Note Product 2 Product 3 • The number of monitors that can be connected to one output may vary depending on signal status and cable loss. If the signal status is good, and there is no cable loss, it is possible to connect up to 9 monitors. If you want to connect more than this number of monitors, it is recommended to use a distributor. 15 Connecting to External Devices VESA FDMI wall Mounting This product supports a VESA FDMI compliant mounting interface. These mounts are purchased separately and not available from LG. Refer to the instructions included with wall mount for more info. < M3204C > < M4716C > Kensington Security Slot The Set is equipped with a kensington Security System connector on the back panel. The cable and lock are available separate and are not sold by LG. For more info, visit http://www.kensington. com, the internet home page of the Kensington company. Note • T here is a switch on the lower side of the back. You can set the switch to "On" before connecting a power cord to make it more convenient for use. 16 Connecting to External Devices Cable Management - Only on some models. < Only M4716C > 1. Arrange the cables in the center as shown in the following picture. 2. Fit the cable guide to the back to help manage the cables. Removing the cable guide. Cable Management Hold the Cable management with both hands and pull it downward. Note • Do not use the cable management as a handle for the Monitor. 17 Connecting to External Devices Video Input 1 Connect the video cable as shown in the below figure and then connect the power cord. (See page 12). When connecting with a BNC cable. •C onnect the input terminal with a proper color match. Product Audio Cable (not included) BNC Cable (not included) VCR/DVD Receiver 2 Select an input signal. Press the INPUT button on the remote control to select the input signal. INPUT → → OK Or, press the INPUT button on the back of the product. INPUT →◄ ► → AUTO/SET When connecting with an BNC cable. • Select AV. Input List AV Component RGB HDMI/DVI SuperSign 18 Connecting to External Devices Component Input (480i/480p/576i/576p/720p/1080i/1080p) • 1080p is Only on M4716C model. 1 Connect the video/audio cable as shown in the below figure and then, connect the power cord (See page 12). • Connect the input terminal with a proper color match. Product BNC Cable (not included) Audio Cable (not included) HDTV Receiver Note - Some devices may require HDCP in order to display HD signals. - Component doesn't support HDCP. 2 Select an input signal. Press the INPUT button on the remote control to select the input signal. INPUT → → OK Or, press the INPUT button on the back of the product. INPUT →◄ ► → AUTO/SET • Select Component. Input List AV Component RGB HDMI/DVI SuperSign 19 Connecting to External Devices HDMI Input (480p/576p/720p/1080i/1080p) HDMI Supports High Definition input and HDCP (High-bandwidth Digital Content Protection). Some devices require HDCP in order to display HD signals. 1 Connect the video/audio cable as shown in the below figure and then connect the power cord (See page 12). Product Product RCA-PC Audio Cable (not included) HDMI-DVI Signal Cable (not included) HDMI Signal Cable (not included) VCR/DVD/Set-top Box VCR/DVD/Set-top Box Note : Dolby Digital is not supported. 2 Select an input signal. Press the INPUT button on the remote control to select the input signal. INPUT → → OK Or, press the INPUT button on the back of the product. INPUT →◄ ► → AUTO/SET When connecting with a HDMI-DVI signal input cable. When connecting with a HDMI signal input cable. • Select HDMI/DVI Input List AV Component RGB HDMI/DVI SuperSign 20 User Menus Screen Adjustment options < M3204C > < M4716C > 2 6 3 1 On/Off Button 2 Power Indicator 3 MENU Button 4 OSD Select / Adjust Button 7 7 4 5 2 1 Press this button to turn on the power. Press this button again to turn it off. This Indicator lights up green when the display operates normally(on mode). If the display is in sleep (Energy Saving) mode, this indicator color changes to amber. Use this button to show/hide the OSD (On Screen Display) menu screen. Use this button to select an icon or adjust the setting in the OSD screen. ▲ ▼ Adjust the up and down. ◄ ► Adjust the volume. 21 Volume 35 User Menus Screen Adjustment options 5 AUTO/SET Button < M3204C > [For PC Analog signal] Auto in progress For optimal display change resolution to 1360 x 768 [When XGA Mode is active and 1360 x 768 is selected] Auto in progress < M4716C > [For PC Analog signal] Auto in progress For optimal display change resolution to 1920 x 1080 [When XGA Mode is active and 1920 x 1080 is selected] Auto in progress 6 INPUT Button INPUT →◄ ► → AUTO/SET - Toggles between inputs V A Component RGB HDMI/DVI SuperSign Composite Video HDTV, DVD 15-pin D-Sub analog signal Digital signal SuperSign Input List AV 7 IR Receiver Component RGB HDMI/DVI SuperSign This is where the unit receives signals from the remote control. 22 User Menus OSD Menu Icon Function Description Adjusts screen brightness, contrast and color that you prefer. Picture Adjusts the audio options. Audio Adjusts the timer options. Time Adjusts the screen status according to the circumstances. Option Adjusts the tile options. Tile Adjusts the USB options. USB Note OSD(On Screen Display) • The OSD function enables you to adjust the screen status conveniently since it provides graphical presentation. 23 User Menus How to adjust the OSD (On Screen Display) screen MENU ➩ ➩ Move where you want to adjust Pops up the menu screen ➩ Select a menu icon ➩ ➩ Select a menu list Move where you want to adjust ➩ Adjust the status ➩ Save adjustment Exit from the menu screen. • Use the remote control to adjust the OSD screen. 1 Press the MENU Button, then the main menu of the OSD appears. 2 To access a control, use the 3 When the icon you want becomes highlighted, press the OK Button. 4 To access a control, use the 5 When the list you want becomes highlighted, press the OK Button. 6 Use the 7 Accept the changes by pressing the OK Button. 8 Exit the OSD by pressing the EXIT Button. Buttons. Buttons. Buttons to adjust the item to the desired level. How to adjust the screen automatically Press the AUTO/SET button (AUTO button on a remote Control) in the PC analog signal. Then optimal screen settings will be selected that fit into the current mode. If adjustment is not satisfactory, you can adjust the screen manually. < M3204C > < M4716C > [When XGA mode is active and 1360 x 768 is selected.] [When XGA mode is active and 1920 x 1080 is selected.] Auto in progress Auto in progress 24 User Menus Adjusting Screen Color Aspect Ratio PICTURE Move Aspect 16:9 AspectRatio Ratio :: 16:9 Energy Saving : Off Picture Mode : Standard • Backlight 70 • Contrast • Brightness 50 • Sharpness 70 • Color 90 OK 16:9 16:9 Just scan Original 4:3 14:9 Zoom Cinena Zoom 1 Full Wide 60 ▼ To select the image size of the screen. 16:9 : Widescreen mode. Just Scan : A llows you to enjoy the transmitted data fully without any images cut off. (*This menu is activated only in 720p,1080p,1080i (HDMI/DVI-DTV, Component mode) Original : T he aspect ratio is not adjusted from the original. It is set by the program being watched. 4:3 : This picture format is 4:3 aspect ratio. 1:1 : The aspect ratio is not adjusted from the original. Used in PC mode. (Only HDMI/ DVI PC, RGB PC) 14:9 : 14:9 programs are viewed normally in 14:9 with black bars added to the top and bottom. 4:3 programs are magnified on the top/bottom and left/right sides. Zoom : 4:3 programs are magnified until they fill the 16:9 screen. The top and bottom will be cut off. Cinena Zoom 1 : C hoose Cinema Zoom when you wish the picture to be altered, both horizontally extended and vertically cropped. The picture adopting a compromise between alteration and screen coverage. Full Wide : W hen TV receives the wide screen signal,it will lead you to adjust the picture horizontally or vertically, in a linear proportion,to fill the entire screen fully. H - 80 ENG ARC MODE AV Component AV Component RGB HDMI / DVI RGB HDMI / DVI SuperSign 16 : 9 Just Scan Original 4:3 1:1 14 : 9 Zoom Cinema Zoom 1 Full Wide KOR ᬱᅙ⪵໕እ ᯱ࠺⪵໕እ ᵭ SuperSign 25 User Menus Adjusting Screen Color Energy Saving PICTURE Aspect Ratio Move OK : 16:9 Off Off ꕫ Energy Energy Saving Saving :: Off Off Level 1 Picture Mode : Standard • Backlight 70 • Contrast • Brightness 50 • Sharpness 70 • Color 90 Level 2 Level 3 60 ▼ This screen brightness adjusting menu helps you save energy. Level : Total 4 screen brightness levels are provided. - Off: 100% light - Level 1: 80% light - Level 2: 60% light - Level 3: 40% light Note • If the 'Picture Mode' is set to 'Cinema', the 'Energy saving' mode is disabled. 26 User Menus Adjusting Screen Color Picture Mode PICTURE Aspect Ratio Move OK : 16:9 Energy Saving : Off Vivid Picture PictureMode Mode Standard :: Standard • Backlight 70 Standard Standard • Contrast Sport • Brightness 50 Game • Sharpness 70 Expert 1 • Color Expert 2 90 60 Cinema ▼ Toggles between screen presets. Standard : The most general and natural screen display status. Vivid : Select this option to display with a sharp image. Cinema : Select this option to lower brightness by one level. Sport : Select this option to display with a soft image. Game : To enjoy dynamic image when playing a game. Expert1,2 : Select this option to use the user-defined settings. Note • If the 'Picture Mode' setting in the Picture menu is set to Vivid, Standard, Cinema, Sport or Game the subsequent menus will be automatically set. 27 User Menus Adjusting Screen Color Picture Mode PICTURE Aspect Ratio Move OK : 16:9 Energy Saving : Off Picture Mode : Standard (User) Backlight 70 70 •• Backlight • Contrast • Brightness 50 • Sharpness 70 • Color 90 60 ▼ Backlight : To control the brightness of the screen,adjust the brightness of LCD panel. Contrast : Adjust the difference between the light and dark levels in the picture. Brightness : To adjust the brightness of the screen. Sharpness : To adjust the clearness of the screen. (This function can be used only under AV, Component and HDMI/DVI(DTV).) Color : To adjust the color to desired level. (This function can be used only under AV, Component and HDMI/DVI(DTV).) Tint :To adjust the tint to desired level. (This function can be used only under AV, Component and HDMI/DVI(DTV).) 28 User Menus Adjusting Screen Color Advanced Control PICTURE Move OK • Contrast • Brightness 50 • Tint • Advanced Control • Picture Reset Screen 90 Color Temperature ◄ Medium ► • Sharpness 70 Dynamic Contrast High • Color Dynamic Color 60 0 High Noise Reduction Medium Gamma Medium Black Level High Film Mode Off Close Color Temperature : Color Settings Cool : Slightly purplish white. Medium : Slightly bluish white. Warm : Slightly reddish white. Dynamic Contrast : Optimizes the contrast automatically according to the brightness of the reflection. (This function can be used only under AV, Component and HDMI/DVI(DTV).) Dynamic Color : Adjusts the Color of the reflection automatically to reproduce natural colurs as close as possible. (This function can be used only under AV, Component and HDMI/DVI(DTV).) Noise Reduction : R emoving the noise up to the point where it does not damage the original picture. (This function can be used only under AV, Component and HDMI/DVI(DTV).) Gamma : Set your own gamma value. O n the monitor, high gamma values display whitish images and low gamma values display high contrast images. Black Level : ( Function works in the following mode - AV, Component, HDMI-DTV) adjusts the contrast and the brightness of the screen using the black level of the screen. Low : The reflection of the screen gets darker. High : The reflection of the screen gets brighter. Film Mode : (Function works in the following mode - AV, Component 480i/576i/1080i, HDMI/DTV 480i/576i/1080i) When you watch a movie, this function adjusts the set to the best picture appearance. White Balance : This is the function to adjust the overall colour of the screen to the feeling you want. ( Function works in the following mode - Expert 1, Expert 2 Picture mode) Color Management System : As the tool used by the experts to make adjustments by using the test patterns, this does not affect other colours but can be used to selectively adjust the 6 colour areas (Red/Green/Blue/Cyan/ Magenta/Yellow). Colour difference may not be distinctive even when you make the adjustments for the general video.(Function works in the following mode - Expert 1, Expert 2 Picture mode) 29 User Menus Adjusting Screen Color Picture Reset PICTURE Move OK • Contrast • Brightness 50 • Sharpness 70 • Color • Tint • Advanced Control • Picture Reset Return Picture Mode to the default factory settings. 90 60 0 Screen Screen PICTURE Move OK • Contrast • Brightness 50 • Sharpness 70 SCREEN • Color 60 Resolution ► • Tint 0 • Advanced Control Auto Config. • Picture Reset Screen Screen 90 Move Prev. 1024 768 1360 xx 768 1280 x 768 1360 x 768 1366 x 768 Position Size Phase Reset Adjust the screen video. Resolution : To view a normal picture, match the resolution of RGB mode and selection of PC mode. This function works in the following mode: RGB[PC] mode. Auto Config. (RGB PC input only) : This button is for the automatic adjustment of the screen position, clock and phase. This function is available for analog signals only. Position : Moving the screen position. Size : Adjust the size of the screen. Phase : T o adjust the focus of the display. This item allows you to remove any horizontal noise and clear or sharpen the image of characters. This function is available for analog signals only. Reset : Return Manual config. to the default factory settings. 30 User Menus Adjusting the audio function AUDIO Move Auto Auto Volume Volume Off :: Off Clear Voice II : Off • Level Balance AUDIO OK 3 : Standard • Treble 50 • Bass 50 Clear Voice II : Off • Level OK 3 Balance 0 Sound Mode Move 0 Sound Mode : Standard • Treble 50 • Bass 50 Speaker : On • Reset • Reset ▼ Auto Volume To adjust uneven sound volumes across all channels or signals automatically to the most appropriate level. To use this feature, select On. Clear Voice II By differentiating the human sound range from others,it helps users listen to human voices better. Balance Use this function to balance sound from the left and right speakers. Sound Mode The best sound tone quality will be selected automatically depending on the video type that you're currently watching. Standard : The most commanding and natural audio. Music : Select this option to enjoy the original sound when listening to the music. Cinema : Select this option to enjoy sublime sound. Sport : Select this option to watch sports broadcasting. Game : To enjoy dynamic sound when playing a game. Speaker You can adjust internal speaker status. If you want to use your external hi-fi stereo system, turn off the internal speakers of the set. 31 User Menus Adjusting the timer function TIME Move Clock Clock : −− : −− −−−− Off Time : Off On Time : Off Sleep Timer : Off Auto Off : On Power On Delay : Off Automatic Standby : On(4 hours) OK Clock If the current time is incorrect, reset the clock manually. 1) Press the MENU button and then use button to select the Time menu,input OK button to enter. 2) Press the button and then use button to select clock menu. 3) Press the button and then use button to select date. 4) Press the button and then use button to set the hour(00h to 23h). 5) Press the button and then use button to set the minutes(00 min to 59 min). On/Off time The off time automatically switches the set to standby at the pre-set time. 1) Press the MENU button and then use button to select the Time menu,input OK button to enter. 2) Press the button and then use button to select On/Off Timer. 3) Press the button and then use button to select date 4) Press the button and then use button to set the hour(00h to 23h). 5) Press the button and then use button to set the minutes(00 min to 59 min). 6) Press the button ,According to the personal needs, choose to add button. Sleep timer The power is automatically turned off when the time set by a user is passed. 1) Press the MENU button and then use button to select the Time menu,input OK button to enter 2) Press the button and then use button to select Sleep timer menu. 3) Press the button and then use button to select the minutes(Off to 240 min). Auto off If Auto off is active and there is no input signal, the set switches to off mode automatically after 15 minutes. 1) Press the MENU button and then use button to select the Timer menu, input OK button to enter. 2) Press the button and then use button to select the Auto off menu. 3) Press the button and then use button to select On or Off. Power on delay When connecting multiple monitors and turning the power on, the monitors are turned on individually to prevent overload. Automatic Standby If you do not use the monitor for more than 4 hours, it will be in standby mode automatically. Note • In the event of power interruption (disconnection or power failure), the clock must be reset. • Once the on or off time is set, these functions operate daily at the preset time. • The scheduled power-off function works properly only when the device time is set correctly. When the scheduled power-on and power-off times are the same, the power-off time has priority over the power-on time if the set is turned on, and vice versa if the set is turned off. • When On time is operated, input screen is turned on as it was turned off. • The Automatic Standby function may not be available depending on the country. 32 User Menus Selecting the options OPTION Language Language Input Label Move OK English ::English Key Lock : Off Set ID : Off ISM Method : Normal DPM Select : On Power Indicator : ON Interface Select : RS232C ▼ Language To choose the language in which the control names are displayed. Input Label Selects a label for each input source. For example, when connecting to PC in RGB mode, * Select "PC" for the connecting device field. Otherwise, the screen may not display properly. Key Lock Use the buttons to select On or Off. The monitor can be set up so that it can only be used with the remote control. This feature can prevent unauthorized viewing. In order to lock the OSD screen adjustment, set the Key Lock tab to the 'On' position. In order to unlock it, do the following : Push the MENU button on the remote control and set Key Lock to the 'Off' position. Set ID You can assign a unique Set ID NO (name assignment) to each product when several products are connected for display. Specify the number (1 to 99) using the button and exit. Use the assigned Set ID to individually control each product using the Product Control Program. ISM Method Leaving a fixed image on the screen for a long time may cause damage to the screen and cause image burn-in. To use the product for a long period of time, use a screen saver on the PC or utilize the residual image prevention function on the product, and when the product is not used, turn off the power. Burn-in and related problems are not covered by the warranty on this product. Normal : Leave on normal if you don't foresee image burn in being a problem. Orbiter : M ay help prevent ghost images. However, it is best not to allow any fixed image to remain on the screen. To avoid a permanent image on the screen, the screen will move every 2 minutes. Inversion : T his function inverts the panel color of the screen. The panel color is automatically inverted every 30 minutes. White wash : W hite wash fills the screen with solid white. This helps removes permanent images burned into the screen. A permanent image may be impossible to clear entirely with white wash. 33 User Menus Selecting the options < M3204C > < M4716C > OPTION Move OPTION OK ▲ Move ▲ ISM Method : Normal ISM Method : Normal DPM Select Power Indicator : On : ON DPM Select Power Indicator : On : ON Interface Select : RS232C Interface Select : RS232C Network Setup Network Setup Information Information Factory Reset Logo Light OK Factory Reset : ON DPM Select A user can choose to turn the power saving mode on / off. Power Indicator Use this function to set the power indicator on the front side of the product to On or Off. If you set Off, i will go Off. If you set On at any time, the power indicator will automatically be turned on. Interface Select Sets up network connections. - Network : LAN - Enables communication via Ethernet. - RS-232C : Enables communication via Serial. Network Setup - DHCP : Allocates and sets up IP automatically. - Manual : Sets up IP address, Gateway, Subnet Mask, Primary DNS and Secondary DNS. The setup process is complete when you select Execute, and "IP Setup Completed" is displayed at the bottom of the screen. While "Wait for IP Setup" is displayed, you cannot use the local keys and remote control. "Wait for IP Setup" is displayed for up to 40 seconds. *If Interface select is set to RS232C.DHCP and Manual are disabled. Information You can find informations about Serial No, F/W version, IP Address and MAC Address. Factory Reset Select this option to return to the default factory settings. Logo Light (Only M3204C) Use this function to reset the Logo Display Lamp On the front side of the product to On or Off. If you set On, the lamp will automatically be turned on. * The function may be disabled depending of the product. See the table below. Product color Logo Light Black x Silver o White o 34 User Menus Adjusts the tile options. Tile Mode TILE Move Tile Mode : 2x2 Off Tile ID :0 Natural Mode : Off H Size :0 V Size :0 H Position : 0 V Position : 0 OK - Must be displayed with various other products. - Must be in a function that can be connected to RS-232C or RGB Out. - It is used to enlarge the screen and also used with several products to view screen. Reset Tile mode and choose Tile alignment and set the ID of the current product to set location. Only after pressing the SET button the adjustments made to the settings will be saved. - Tile mode : column x row ( c = 1, 2, 3, 4, 5 r = 1, 2, 3, 4, 5 ) - 5 x 5 available. - Configuration of an integration screen is also available as well as configuration of One by one Display. - Tile mode (product 1 ~ 4) : c(2) x r(2) column ID 2 ID1 row ID 3 ID4 35 User Menus Adjusts the tile options. - Tile mode (product 1 ~ 9) : c(3) x r(3) column ID 3 ID1 ID2 ID4 ID5 ID6 ID7 ID8 ID9 row - Tile mode (product 1 ~ 2) : c(2) x r(1) column ID2 ID1 row - Tile mode (product 1 ~16) : c(4) x r(4) column ID 1 ID 2 ID 3 ID 4 ID 5 ID 6 ID 7 ID 8 ID 9 ID10 ID 11 ID 12 ID 13 ID 14 ID 15 ID 16 row Tile ID : Select the location of the Tile by setting an ID. Natural : T he image is omitted by the distance between the screens to be naturally shown. H-Size : A djust the horizontal size of the screen taking into account the size of the bezel. V-Size : Adjust the vertical size of the screen taking into account the size of the bezel. H-Position : Moving the screen position horizontally. V-Position : Moving the screen position vertically. Reset : Function to initialize and release Tile. All Tile setting are released when selecting Tile recall and the screen returns to Full screen. 36 User Menus Adjusts the USB options. When connecting the USB device When you connect a USB device, this pop up menu is displayed, automatically. “POP UP MENU” will not be displayed while the OSD including Menu, EPG or Schedule list is activated. When the Pop Up menu appears, you can select Music List, Photo List or Movie List in the MY MEDIA menu. In USB device, you can not add a new folder or delete the existing folder. 1. Connect the USB device to the USB jack on the product. USB 메모리 스틱 2. Select PHOTO LIST, MUSIC LIST or MOVIE LIST. PHOTO LIST MUSIC LIST MOVIE LIST 37 User Menus Adjusts the USB options. Precautions when using the USB device • • • • • • • • • • • • • • • • • • • • Only a USB storage device is recognizable. If the USB storage device is connected through a USB hub, the device is not recognizable. A USB storage device using an automatic recognition programme may not be recognized. A USB storage device which uses its own driver may not be recognized. The recognition speed of a USB storage device may depend on each device. Please do not turn off the TV or unplug the USB device when the connected USB storage device is working. When such device is suddenly separated or unplugged, the stored files or the USB storage device may be damaged. Please do not connect the USB storage device which was artificially maneuvered on the PC. The device may cause the product to malfunction or fail to be played. Never forget to use only a USB storage device which has normal music files or image files. Please use only a USB storage device which was formatted as a FAT16, FAT32, NTFS file system provided with the Windows operating system. In case of a storage device formatted as a different utility programme which is not supported by Windows, it may not be recognized. Data in a USB storage device cannot be deleted in the NTFS file system. Please connect power to a USB storage device which requires an external power supply. If not, the device may not be recognized. Please connect a USB storage device with cable is offered by USB maker. If connected with cable is not offered by USB maker or an excessively long cable, the device may not be recognized. Some USB storage devices may not be supported or operated smoothly. Maximum of 999 files and folders can be recognized. Data in a USB storage device cannot be aligned. Up to 128 English characters can be recognized as a file name. Please back up the important file because a data of USB device may be damaged. Data management is consumer's responsibility and in consequence the manufactures does not cover the product bearing data damage. If the USB is connected in Standby Mode, specific hard disk will automatically be loaded when the TV is turned on. The recommended capacity is 1TB or less for a USB external hard disk and 32GB or less for USB memory. Any device with more than the recommended capacity may not work properly. If a USB external hard disk with a “Power Saving” function does not work, turn the hard disk off and on again to make it work properly. Names and subtitles of some language files may not display properly.(Korean, Chinese, Japanese) When using Korean, Japanese or Chinese subtitles or file names, it is recommended to set the language to the corresponding one. 38 User Menus Adjusts the USB options. Photo List You can view photo files on USB storage device. The On Screen Display may be different from your product. Images are an example to assist with the product operation. PHOTO(*.JPEG) supporting file Baseline: 15360 x 8640 Progressive : 1024 x 768 • You can play JPEG files only. • Non-supported files are displayed in the form of bitmap. Screen Components Photo List 2 Page 2/3 Drive1 JMJ001 Up Folder Navigation USB Device No Marked Free Space 150 MB Up Folder 1366x768, 125KB 1 4 3 KY103 02/12/2010 KY101 02/12/2010 KY104 02/12/2010 KY102 02/12/2010 KY105 02/12/2010 JMJ001 02/12/2010 JMJ005 02/12/2010 JMJ002 02/12/2010 JMJ006 02/12/2010 JMJ003 02/12/2010 JMJ007 02/12/2010 JMJ004 02/12/2010 JMJ008 02/12/2010 Option 5 Page Change 1 Moves to upper level folder 2 Current page / Total pages 3 Total number of marked photos 4 Usable USB memory 5 Corresponding buttons on the remote control MARK 39 Mark EXIT Exit User Menus Adjusts the USB options. Photo Selection and PopUp Menu USB Device Photo List Page 2/3 Drive1 JMJ001 1366x768, 125KB Up Folder Navigation No Marked Free Space 150 MB Up Folder KY103 02/12/2010 02/12/2010 KY101 02/12/2010 KY104 KY102 02/12/2010 KY105 02/12/2010 JMJ001 02/12/2010 JMJ005 02/12/2010 JMJ002 02/12/2010 JMJ006 02/12/2010 JMJ003 02/12/2010 JMJ007 02/12/2010 JMJ004 02/12/2010 JMJ008 02/12/2010 Option Page Change MARK Mark EXIT Exit ➩ View : Display the selected item. Mark All : Mark all photos on the screen. Unmark All : Deselect all marked photos. Delete : Delete the selected photo item. Close : Close the pop-up menu. USB Device Photo List Page 2/3 Drive1 JMJ001 Free Space 150 MB Up Folder 1366x768, 125KB Up Folder Navigation No Marked Option KY103 02/12/2010 KY104 02/12/2010 KY101 02/12/2010 KY102 JMJ001 02/12/2010 KY105 1366x768, 125KB 02/12/2010 JMJ005 02/12/2010 JMJ002 02/12/2010 JMJ006 02/12/2010 JMJ003 02/12/2010 JMJ007 02/12/2010 JMJ004 02/12/2010 JMJ008 View Mark All Delete Close Page Change MARK Mark 02/12/2010 02/12/2010 EXIT Exit 40 User Menus Adjusts the USB options. How to view photo Detailed operations are available on full-sized photo view screen. The aspect ratio of a photo may change the size of the photo displayed on the screen in full size. Press the EXIT button to move to the previous menu screen. ◄ Slideshow ◘ BGM ◘ 1/17 ꘤ ► Delete Option Hide ►► Slideshow When no picture is selected, all photos in the current folder are displayed during slide show. If some photos are selected, those photos are displayed in a slide show. • Set the time interval of the slide show in Option. ►► BGM (Background Music) Listen to music while viewing photos in full size. • Set the Music Folder for BGM in Options before using this function. ►► ꘤ (Rotate) • Rotate photos. Rotates the photo 90°, 180°, 270°, 360° clockwise. ►► Delete Delete photos. ►► Option Set values for Sl ide Speed and Music Folder for BGM. • Use < > button and OK button to set values. Press OK to save the settings. • You cannot change Music Folder while BGM is playing. ►► Hide Hide the menu on the full-sized screen. To see the menu again on the full-sized screen, press OK button to display. 41 User Menus Adjusts the USB options. Music List You can play music files on USB storage device. Purchased music files(*.MP3) may contain copyright restrictions. Playback of these files may not be supported by this model. Music file on your USB device can be played by this unit. The On Screen Display may be different from your TV. Images are an example to assist with the TV operation. MUSIC (*.MP3) supporting file Bit rate 32 to 320kbps • Sampling rate MPEG1 layer 3: 32 kHz, 44.1 kHz, 48 kHz. Screen Components Music List 2 Page 2/3 Music S003 Up Folder Navigation USB Device No Marked Free Space 150 MB Title 00:00/01:34 1 4 3 Duration Up Folder Up Folder S001 03:33 S002 04:45 S003 01:30 S004 02:37 S005 01:58 Option 5 Page Change 1 Moves to upper level folder 2 Current page / Total pages 3 Total number of marked music title 4 Usable USB memory 5 Corresponding buttons on the remote control MARK 42 Mark EXIT Exit User Menus Adjusts the USB options. Music Selection and PopUp Menu As shown, up to 6 music titles are listed per page. Play (During stop) : Play the selected music titles. One playback of a piece of music finishes, the next selected one will be played. When there are no selected music titles to play, the next one in the current folder will be played. If you go to a different folder and press the OK button, the current music in playback will stop. Play Marked: Play the selected music titles. Once a music finishes playing, the next selected one will be played automatically. Stop Play (During playback): Stop the playing music titles. Play with Photo: Start playing the selected music titles and then move to the Photo List. Mark All : Mark all music titles in the folder. Unmark All : Deselect all marked music titles. Delete : Delete the selected music titles. Close : Close the pop-up menu. USB Device Music List Page 2/3 00:00/01:34 Free Space 150 MB Duration Up Folder Up Folder S001 03:33 S002 04:45 S003 01:30 S004 02:37 S005 Up Folder Navigation No Marked Title Music S003 Option 01:58 Page Change Mark MARK EXIT Exit ➩ USB Device Music List Page 2/3 Free Space 150 MB Up Folder S001 S002 S003 00:00/01:34 S004 S005 Up Folder Navigation No Marked Title Music S003 Option Duration 4395KB 1Kbps Play Play with Photo Mark All Delete Close Page Change MARK Mark Up Folder 03:33 04:45 01:30 02:37 01:58 EXIT Exit 43 User Menus Adjusts the USB options. If you don't press any button for a while during the playing, the play information box (as shown in the below) will float as a screen saver. The ‘Screen Saver’? S creen saver is to prevent screen pixel damage due to an fixed image remaining on the screen for a extended period of time. Music S003 0:27 / 3:67 Note • A damaged or corrupted music does not play but displays 00:00 in playtime. • A music downloaded from a paid service with copyright protection does not start but displays inappropriate information in playtime. • If you press OK, ■ buttons, screen saver is stopped. • The PLAY(►), Pause(II), ■ , ►►, ◄◄ buttons on the remote control are also available in this mode. • You can use the ►► button to select the next music and the ◄◄ button to select the previous music. 44 User Menus Adjusts the USB options. Movie List The movie list is activated once USB is detected. It is used when playing movie files on TV. Displays the movies in the USB folder and supports Play. Allows playback of all movies in the folder and user desired files. Video editing is not supported but files can be deleted. It is a movie list that displays folder information and DivX file. Supports up to four drives. MOVIE(*.avi/*.DivX) supporting file Video format : MPEG1, MPEG2, MPEG4(Doesn’t support Microsoft MPEG 4-V2, V3), DivX 3.xx, DivX 4.xx, DivX 5.xx, DivX VOD(DRM), XviD, DivX 6.xx(Playback) Audio format : Mpeg, Mp3, PCM, Dolby Digital Sampling frequency : within 32k to 48 khz Bit rate : 32k to 320 kbps Subtitle format : *.smi/ *.srt/ *.sub(MicroDVD, SubViewer 2.0)/ *.ass/ *.ssa/*.txt(DVD Subtitle System) • DivX may not be played depending on its types or recording methods. • If the video and audio structure of recorded file is not interleaved, either video or audio is outputted. • Maximum FPS (Frame Per Second) can be reached only at SD level. FPS is 25 FPS (720*576) or 30 FPS (720*480) depending on Resolution. • Max bitrate of playable DivX is 4Mbps. • Files more than 25 FPS or 30 FPS or higher may not be played properly. • A DivX movie file and its subtitle file must be located in the same folder. • A video file name and its subtitle file name must be identical for it to be displayed. • Playing a video via a USB connection that doesn’t support high speed may not work properly. • USB storage devices below USB 2.0 are supported as well. But they may not work properly in the movie list. • Files encoded with GMC(Global Motion Compensation) may not be played. Extension name Video Decoder Audio Codec mpg, mpeg, vob, dat MPEG1, MPEG2 AC3,MPEG,MP3,PCM 720x576@25p MPEG4-SP, MPEG4-ASP, DivX3.xx, Avi, DivX, m4v Max Resolution DivX4.xx, DivX5.xx AC3,MPEG,MP3,PCM DivX6.xx(Playback), XviD 45 720x480@30p User Menus Adjusts the USB options. Screen Components 2 Movie List Page 2/3 Movie M002 4 3 USB Device No Marked Free Space 150 MB Title Duration Up Folder Favorite Music M001 640x480, 720KB 1 Up Folder Navigation M002 01:34:15 M001 01:35:30 M001 01:30:20 Option 5 Page Change 1 Moves to upper level folder 2 Current page / Total pages 3 Total number of marked movie title 4 Usable USB memory 5 Corresponding buttons on the remote control Note MARK Mark EXIT Exit • Use the left/right (< / >) keys to move to a specific frame forward or backward while playing a movie. (The left/right (< / >) keys may not work properly for some files while playing a movie.) 46 User Menus Adjusts the USB options. Movie Selection and PopUp Menu USB Device Movie List Page 2/3 No Marked Free Space 150 MB Title Movie M002 Duration Up Folder Favorite Music M001 640x480, 720KB 01:34:15 M001 01:35:30 01:30:20 M001 Up Folder Navigation M002 Option Page Change MARK Mark EXIT Exit ➩ Page 2/3 No Marked Free Space 150 MB Title Movie M002 Duration Up Folder 640x480, 720KB 1366x768, 125KB Favorite Music Play M001 Mark All M002 Delete 01:34:15 M001 Close 01:35:30 Mark EXIT 01:30:20 M001 Up Folder Navigation Play: Plays the selected movie. DivXplay is executed while the screen changes. Mark All: Marks all movies in the folder. Unmark All : Deselect all marked movies. Delete: Deletes the selected movie. Close: Closes the pop-up menu. USB Device Movie List Option Page Change MARK Exit Using the remote control ◄◄ / ►► When playing, repeatedly, press REW (◄◄) to speed up ◄◄(x2) -> ◄◄◄ (x4) -> ◄◄◄◄(x8) -> ◄◄◄◄◄(x16) ->◄◄◄◄◄◄(x32). Repeatedly, press FF (►►) to speed up ►►(x2)-> ►►► (x4) -> ►►►► (x8) -> ►►►►►(x16) -> ►►►►►►(x32). Pressing these buttons repeatedly increases the fast forward/reverse speed. II During playback, press Pause (II) and the still screen is displayed. ■ During playback, stops the screen. ► Press Play(►) to return to normal playback. Note • In the case of files not supported, a message regarding non-supported file is displayed. 47 User Menus Adjusts the USB options. When you select the Set Video Play, Picture Size ◀ Subtitle Language 1/6 Audio Language 1/6 Subtitle File Off ● Language Latin 1 ● Sync +0.5 ● Position Option Full Screen ▶ 15 OK Picture Size : Sets to [Full Screen] or [Original Size]. Subtitle Language : Allows to select the language you want for the file with multiple subtitle tracks. This option is not available if the file has only one subtitle track. Audio Language : Allows to select the language you want for the file with multiple audio tracks. This option is not available if the file has only one audio track. Subtitle File : Sets to On or Off. Language : Sets to one of Latin1, Latin2, Latin4, Latin5, Cyrillic, Greek, Hebrew, Chinese, Japanese and Korean. Sync : Adjusts the subtitle delay from 0 and +5.0 in 0.5 second increments. Position : Moves the subtitle position from 0 to 16. * You can move the video back or forward by clicking < or > key. 48 User Menus Adjusts the USB options. DivX Registration Code USB Move OK Photo List Music List Movie List DivX DivXReg. Reg.Code Code Deactivation DivX(R) Video On Demand ꔉ Your registration Code is: xxxxxxxxxx To learn more visit www.divx.com/vod. Close Confirm the DivX registration code number of the TV. Using the registration number, movies can be rented or purchased at www.divx.com/vod. With a DivX registration code from other TV, playback of rented or purchased DivX file is not allowed. (Only DivX files matched with the registration code of the purchased TV are playable.) ABOUT DivX VIDEO: DivX® is a digital video format created by DivX,Inc. This is an official DivX Certified device that plays DivX video. Visit www.divx.com for more information and software tools to convert your files into DivX video. ABOUT DivX VIDEO-ON-DEMAND: This DivX Certified® device must be registered in order to play DivX Video-on-Demand (VOD) content. To generate the registration code, locate the DivX VOD section in the device setup menu. Go to vod.DivX.com with this code to complete the registration process and learn more about DivX VOD. “DivX Certified to play DivX video, including premium content” “Pat. 7,295,673; 7,460,668; 7,515,710; 7,519,274” Note • Supported movie file Resolution : under 25 frames/sec(720x576 WxH pixels). Frame rate : under 30 frames/sec(720x480) • Video Codec : MPEG1, MPEG2, MPEG4(Doesn’t support Microsoft MPEG4-V2, V3), DivX3.xx, DivX4.xx, DivX5.xx, , DivX VOD(DRM), XviD, DivX6.xx(Playback). • When loading, some buttons may not work. 49 User Menus Adjusts the USB options. Deactivation USB Move OK Photo List Music List Movie List DivX Reg. Code Deactivation Deactivation DivX(R) Video On Demand ꔉ Do you want to deactivate your device? Yes No ➩ DivX(R) Video On Demand This device is deactivated. Your deactivation code is: xxxxxxxx To learn more visit www.divx.com/vod. Close The purpose of deactivation is to allow deactivation of devices for users who have activated all the available devices through the web_server and are blocked from activating more devices. DivX VOD allowed the consumer to activate up to 6 devices under one account, but to replace or deactivate any of those devices, the consumer had to contact DivX Support and request deletion. Now with this added feature, consumers will be able to deactivate the device themselves and hence better manage their DivX VOD devices. 50 Troubleshooting No image is displayed ● Is the power cord connected? • See if the power cord is properly connected to the outlet. ● Is the power indicator light on? • See if the power switch is turned on. • May need service. <M3204C> ● Power is on, power indicator is Green but the screen appears extremely dark. <M4716C> ● Power is on, power indicator is Blue but the screen appears extremely dark. • Adjust brightness and contrast again. • Backlight may need repair. ● Is the power indicator amber? • If the set is in power saving mode, move the mouse or press any key. • Turn both devices off and then back on. ●D oes the 'Out of range' message appear? • T he signal from the PC (video card) is out of the vertical or horizontal frequency range of the set. Adjust the frequency range by referring to the specifications in this manual. * Maximum Resolution RGB: 1600x1200 @ 60 Hz < M3204C > 1920x1080 @ 60 Hz < M4716C > HDMI/DVI: 1920x1080 @ 60 Hz ●D oes the 'Check signal cable' message appear? • T he signal cable between PC and set is not connected. Check the signal cable. • Press INPUT on the remote control to check the input signal. 'UnknownProduct'messageappearswhentheproductisconnected. ● Did you install the driver? • Install the product driver, which is provided with the product, or download it from the web site. (http://www.lg.com) • S ee if the plug&play function is supported by referring to the video card user manual. 'Key Lock On' message appears. ●T he 'Key Lock On' message appears when pressing the Menu button. • The Lock function prevents the OSD settings from being changed inadvertently. To release the lock, go to Menu and Option and disable the Key Lock option. 51 Troubleshooting The screen image looks abnormal. ● Is the screen position wrong? • D-Sub analog signal - Press the "AUTO" button in the remote control to automatically select the optimal screen status that fits into the current mode. If adjustment is not satisfactory, use the Position OSD menu. • See if the video card resolution and frequency are supported by the product. If the frequency is out of range, set to the recommended resolution in the Control Panel "Display" Setting menu. ●D o thin lines appear on the background screen? • D-Sub analog signal - Press the "AUTO" button in the remote control to automatically select an optimal screen status that fits into the current mode. If adjustment is not satisfactory, use the Clock OSD menu. ●H orizontal noise appears or the characters look blurred. • D-Sub analog signal - Press the "AUTO" button in the remote control to automatically select an optimal screen status that fits into the current mode. If adjustment is not satisfactory, use the Phase OSD menu. ● The screen is displayed abnormally. • The proper input signal is not connected to the signal port. Connect the signal cable that matches with the source input signal. After-image appears on the product. ●A fter-image appears when the product is turned off. Note • If you use a fixed image for a long time, the pixels may be damaged quickly. Use the screen-saver function. • V ertical frequency: To enable the user to watch the product display, screen image should be changed tens of times every second like a fluorescent lamp. The vertical frequency or refresh rate is the times of image display per second. The unit is Hz. • Horizontal frequency: The horizontal interval is the time to display one vertical line. When 1 is divided by the horizontal interval, the number of horizontal lines displayed every second can be tabulated as the horizontal frequency. The unit is kHz. 52 Troubleshooting The audio function does not work. ● No sound? • See if the audio cable is connected properly. • Adjust the volume. • See if the sound is set properly. ● Sound is too dull. • Select the appropriate equalize sound. ● Sound is too low. • Adjust the volume. Screen color is abnormal. ●S creen has poor color resolution (16 colors). • Set the number of colors to more than 24 bits (true color) Select Control Panel - Display - Settings - Color Table menu in Windows. ●S creen color is unstable or monocolored. • Check the connection status of the signal cable. Or, re-insert the PC video card. ●D o black spots appear on the screen? • S everal pixels (red, green, white or black color) may appear on the screen, which can be attributable to the unique characteristics of the LCD panel. It is not a malfunction of the LCD. The operation does not work normally. ● The power suddenly turned off. • Is the sleep timer set? • C heck the power control settings. Power interrupted. • "CAUTION! FAN STOP!" If the power is turned off after this message appears, it means that the fan is out of order. In this case, contact your local service center. 53 Specifications < M3204C > LCD Panel 80.0 cm (31.5 inch) TFT (Thin Film Transistor) LCD (Liquid Crystal Display) Panel Visible diagonal size: 80.0 cm 0.51075 mm Power Rated Voltage Power Consumption Dimensions & Weight AC 100-240 V~ 50 / 60 Hz 1.6 A On Mode : 100 W Typ. Sleep Mode : ≤ 1 W (RGB) / 2 W (HDMI/DVI) (If LAN OFF is selected) Off Mode : ≤ 0.5 W [2] [1] H W H D W D [4] [3] H H W D W D Width x Height x Depth [1] 80.29 cm (31.61 inch) x 53.18 cm (20.93 inch) x 30.19 cm (11.88 inch) [2] 80.29 cm (31.61 inch) x 49.30 cm (19.41 inch) x 9.98 cm (3.93 inch) [3] 80.29 cm (31.61 inch) x 53.18 cm (20.93 inch) x 30.19 cm (11.88 inch) [4] 80.29 cm (31.61 inch) x 49.30 cm (19.41 inch) x 9.98 cm (3.93 inch) Net [1] 14.02 kg (30.90 lb) [3] 14.80 kg (32.62 lb) Note [2] 13.20 kg (29.10 lb) [4] 13.98 kg (30.82 lb) • The specifications shown above may be changed without prior notice for quality improvement. 54 Specifications < M4716C > LCD Panel 119.28 cm (46.96 inch) TFT (Thin Film Transistor) LCD (Liquid Crystal Display) Panel Visible diagonal size : 119.28 cm 0.5415 mm x 0.5415 mm x RGB (Pixel Pitch) Power Rated Voltage Power Consumption Dimensions & Weight AC 100-240 V~ 50 / 60 Hz 3.3 A On Mode : 240 W Typ. Sleep Mode : ≤ 1 W (RGB) / 2 W (HDMI/DVI) (If LAN OFF is selected) Off Mode : ≤ 0.5 W [1] [2] H H W D [3] W D [4] H W H D W D Width x Height x Depth [1] 111.70 cm (44.0 inch) x 66.10cm (26.0 inch) x 11.87 cm (4.7 inch) [2] 111.70 cm (44.0 inch) x 75.78cm (29.8 inch) x 30.26 cm (11.9 inch) [3] 111.70 cm (44.0 inch) x 66.10cm (26.0 inch) x 11.87 cm (4.7 inch) [4] 111.70 cm (44.0 inch) x 75.78cm (29.8 inch) x 30.26 cm (11.9 inch) Net [1] 26.42 kg (58.2 lb) [3] 27.16 kg (59.9 lb) Note [2] 30.44 kg (67.1 lb) [4] 31.18 kg (68.7 lb) • The specifications shown above may be changed without prior notice for quality improvement. 55 Specifications Video Signal Max. Resolution RGB: 1600x1200 @ 60 Hz < M3204C > 1920x1080 @ 60 Hz < M4716C > HDMI/DVI: 1 920x1080 @ 60 Hz - It may not be supported depending on the OS or video card type. Recommended Resolution RGB: WXGA 1360x768 @ 60 Hz < M3204C > WXGA 1920x1080 @ 60 Hz < M4716C > HDMI/DVI: WXGA 1360x768 @ 60 Hz < M3204C > WXGA 1920x1080 @ 60 Hz < M4716C > - It may not be supported depending on the OS or video card type. Horizontal Frequency RGB: 30 kHz to 83 kHz HDMI/DVI: 30 kHz to 83 kHz Vertical Frequency Input Connector Environmental Conditions RGB: 56 Hz to 75 Hz HDMI/DVI: 56 Hz to 60 Hz Synchronization Type Composite/Separate/Digital 15-pin D-Sub type, HDMI/DVI(digital) Composite Video, Component, RS-232C, LAN, USB Operational Condition Temperature: 0 °C to 40 °C , Humidity: 10 % to 80 % Storage Condition Temperature: -20 °C to 60 °C , Humidity: 5 % to 95 % Audio specification are applicable only for models that support speakers. Audio Note RMS Audio Output Input Sensitivity Speaker Impedance 10 W + 10 W ( R + L ) 0.7 Vrms 8Ω • The specifications shown above may be changed without prior notice for quality improvement. 56 Specifications PC Mode - Preset Mode Preset Mode Horizontal Frequency (kHz) Vertical Frequency (Hz) 640 x 350 720 x 400 640 x 480 640 x 480 800 x 600 800 x 600 832 x 624 1024 x 768 1024 x 768 1280 x 720 31.469 31.468 31.469 37.5 37.879 46.875 49.725 48.363 60.123 44.772 70.8 70.8 59.94 75 60.317 75 74.55 60 75.029 59.855 1 2 *3 4 *5 6 7 *8 9 *10 Preset Mode *11 *12 *13 *14 15 *16 17 *18 1280 x 768 1360 x 768 1366 x 768 1280 x 1024 1280 x 1024 1680 x 1050 1600 x 1200 1920 x 1080 Horizontal Frequency (kHz) Vertical Frequency (Hz) 47.7 47.72 47.7 63.981 79.98 65.290 75.0 67.5 60 59.799 60 60.02 75.02 59.954 60 60 1 to 17: RGB mode 17: M3204C model only *: HDMI/DVI mode DTV Mode < M3204C > < M4716C > Component HDMI/DVI (DTV) o o o o o o x x x o o o o o 480i 576i 480p 576p 720p 1080i 1080p Component HDMI/DVI (DTV) o o o o o o o x x o o o o o 480i 576i 480p 576p 720p 1080i 1080p Power Indicator < M3204C > < M4716C > Mode On Mode Sleep Mode Off Mode Note Mode Set Green Amber - On Mode Sleep Mode Off Mode Set Blue Amber - • DTV/PC selection on HDMI/DVI inputs is available for PC resolutions: 640x480/60 Hz, 1280x720/60 Hz, 1920x1080/60 Hz and DTV resolutions: 480p, 720p, 1080p. 57 RS-232C Controlling the Multiple Product Use this method to connect several products to a single PC. You can control several products at a time by connecting them to a single PC. If the [Set ID] menu in [Option] is set to OFF, the monitor ID value should be set between 1 and 99. Connecting the cable Connect the RS-232C cable as shown in the picture. You need to purchase a cable to connect the RS-232C socket as it is not provided as the accessory. The RS-232C protocol is used for communication between the PC and product. You can turn the product on/off, select an input source or adjust the OSD menu from your PC. RS-232C Cable (not included) PC monitor 1 monitor 3 monitor 2 monitor 4 RS-232C Configurations 3-Wire Configurations (Not Standard) 7-Wire Configurations (Standard RS-232C cable) PC RXD TXD GND DTR DSR RTS CTS 2 3 5 4 6 7 8 D-Sub 9 (Female) PC Monitor 3 2 5 6 4 8 7 RXD TXD GND DTR DSR RTS CTS TXDRXD GND DSR DTR CTS RTS 2 3 5 4 6 7 8 D-Sub 9 (Female) D-Sub 9 (Female) Communication Parameter ► Baud Rate : 9600 buad Rate (UART) ► Data Length : 8 bit ► Parity Bit : None ► Stop Bit : 1bit ► Flow Control : None ► Communication Code : ASCII code ► Use a crossed (reverse) cable A1 Monitor 3 2 5 6 4 7 8 D-Sub 9 (Female) TXDRXD GND DTR DSR RTS CTS RS-232C Controlling the Multiple Product Command Reference List COMMAND 1 COMMAND 2 01. Power 02. Input Select 03. Aspect Ratio 04. Screen Mute 05. Volume Mute 06. Volume Control 07. Contrast 08. Brightness 09. Color 10. Tint 11. Sharpness 12. OSD Select 13. Remote Lock/ key Lock 14. Balance 15. Color Temperature 16. Abnomal state 17. ISM mode 18. Auto configuration 19. Key 20. Tile Mode 21. Tile H Position 22. Tile V Position 23. Tile H Size 24. Tile V Size 25. Tile ID Set 26. Natural Mode (In Tile mode) 27. Picture mode(PSM) 28. Sound mode 29. Fan Fault check 30. Elapsed time return 31. Temperature value 32. Lamp fault check 33. Auto Volume 34. Speaker 35. Time 36. On Timer (On/Off Timer) Time k k k k k k k k k k k k k k k k j j m d d d d d d d d d d d d d d d f f a b c d e f g h i j k l m t u z p u c d e f g h i j x y w l n p u v a d 37. Off Timer (On/zOff Timer) Time f e A2 DATA1 00H to 01H 02H to 09H 01H to 1FH 00H to 01H 00H to 01H 00H to 64H 00H to 64H 00H to 64H 00H to 64H 00H to 64H 00H to 64H 00H to 01H 00H to 01H 00H to 64H 00H to 02H FFH 01H to 08H 01H Key Code 00H to 55H 00H to 14H 00H to 14H 00H to 64H 00H to 64H 00H to 19H 00H to 01H 00H to 06H 01H to 05H FFH FFH FFH FFH 00H to 01H 00H to 01H 00H to 06H F1H to F4H E0H to E4H 01H to 80H F1H to F4H E0H to E4H 01H to 80H DATA2 DATA3 00H to 17H 00H to 17H 00H to 3BH 00H to 3BH 00H to 17H 00H to 3BH RS-232C Controlling the Multiple Product COMMAND 1 COMMAND 2 DATA1 38. Scheduling input select 39. Sleep Time 40. Auto Sleep 41. Power On Delay 42. Language 43. DPM Select 44. Reset 45. Power Saving 46. Power Indicator 47. Logo Indicator (Only M3204C) * The function may be disabled depending of the product. f f f f f f f f f f u f g h i j k l o p F1H 00H 00H 00H 00H 00H 00H 00H 00H 00H 48. Serial no. 49. S / W Version 50. Input Select f f x y z b FFH FFH 20H to A0H A3 to to to to to to to to to to F4H 08H 01H 64H 09H 01H 02H 03H 01H 01H DATA2 02H to 09H DATA3 RS-232C Controlling the Multiple Product Transmission / Receiving Protocol Transmission [Command1][Command2][ ][Set ID][ ][Data][Cr] * [Command 1]: First command. (k, j, m, d, f, x) * [Command 2]: Second command.(a to u) * [Set ID]: Set up the Set ID number of product. range : 01H to 63H. by setting '0', server can control all products. * In case of operating with more than 2 sets using set ID as '0' at the same time, it should not be checked the ack message. Because all sets will send the ack message, so it's impossible the check the whole ack messages. * [DATA]: To transmit command data. Transmit 'FF' data to read status of command. * [Cr]: Carriage Return ASCII code '0 x 0 D' * [ ]: ASCII code Space (0 x 20) OK Acknowledgement [Command2][ ][Set ID][ ][OK][Data][x] * The Product transmits ACK (acknowledgement) based on this format when receiving normal data. At this time, if the data is data read mode, it indicates present status data. If the data is data write mode, it returns the data of the PC computer. Error Acknowledgement [Command2][ ][Set ID][ ][NG][Data][x] * If there is error, it returns NG A4 RS-232C Controlling the Multiple Product Transmission / Receiving Protocol 01. Power(Command : a) ► To control Power On / Off of the Set. Transmission [k][a][ ][Set ID][ ][Data][Cr] Data 0 : Power Off 1 : Power On Acknowledgement [a][ ][Set ID][ ][OK][Data][x] ► To show the status of Power On / Off. Transmission [k][a][ ][Set ID][ ][FF][Cr] Acknowledgement [a][ ][Set ID][ ][OK][Data][x] Data 0 : Power Off 1 : Power On 02. Input Select (Command : b) (Main Picture Input) ► To select input source for the Set. You can also select an input source using the INPUT button on the remote control. Transmission [k][b][ ][Set ID][ ][Data][Cr] Data 2 : AV 4 : Component 7 : RGB (PC) 8 : HDMI (DTV) 9 : HDMI (PC) Acknowledgement [b][ ][Set ID][ ][OK][Data][x] Data 2 : AV 4 : Component 7 : RGB (PC) 8 : HDMI (DTV) 9 : HDMI (PC) A5 RS-232C Controlling the Multiple Product Transmission / Receiving Protocol 03. Aspect Ratio(Command : c) (Main picture format) ► To adjust the screen format. You can also adjust the screen format using the ARC (Aspect Ratio Control) button on remote control or in the Screen menu. Transmission [k][c][ ][Set ID][ ][Data][Cr] Data 1 : Normal Screen (4 : 3) 2 : Wide Scran (16 : 9) 4 : Zoom (AV) 6 : Original (AV) 7 : 14 : 9 (AV) 9 : Just Scan (HD DTV) * When the RGB, HDMI / DVI PC mode(1:1) 10 to 1F : Cinema Zoom 1 to 16 B : Full Wide Acknowledgement [c][ ][Set ID][ ][OK][Data][x] 04. Screen Mute(Command : d) ► To select screen mute on / off. Transmission [k][d][ ][Set ID][ ][Data][Cr] Data 0 : Screen mute off (Picture on) 1 : Screen mute on (Picture off) Acknowledgement [d][ ][Set ID][ ][OK][Data][x] A6 RS-232C Controlling the Multiple Product Transmission / Receiving Protocol 05. Volume Mute(Command : e) ► To control On/Off of the Volume Mute. Transmission [k][e][ ][Set ID][ ][Data][Cr] Data 0 : Volume Mute On (Volume Off) 1 : Volume Mute Off (Volume On) Acknowledgement [e][ ][Set ID][ ][OK][Data][x] Data 0 : Volume Mute On (Volume Off) 1 : Volume Mute Off (Volume On) 06. Volume Control(Command : f) ► To adjust Volume Transmission [k][f][ ][Set ID][ ][Data][Cr] Data Min : 00H to Max : 64H (Hexadecimal code) Acknowledgement Data [f][ ][Set ID][ ][OK][Data][x] Min : 00H to Max : 64H * Real Data Mapping 0 : STEP 0 : A : STEP 10 : F : STEP 15 10 : STEP 16 : 64 : STEP 100 A7 RS-232C Controlling the Multiple Product Transmission / Receiving Protocol 07. Contrast(Command : g) ► To adjust screen contrast. You can also adjust the contrast in the Picture menu. Transmission [k][g][ ][Set ID][ ][Data][Cr] Data Min : 00H to Max : 64H Acknowledgement [g][ ][Set ID][ ][OK][Data][x] * Refer to 'Real data mapping' page A7. 08. Brightness(Command : h) ► To adjust screen brightness. You can also adjust the brightness in the Picture menu. Transmission [k][h][ ][Set ID][ ][Data][Cr] Data Min : 00H to Max : 64H * Refer to 'Real data mapping' as shown below. Acknowledgement [h][ ][Set ID][ ][OK][Data][x] * Refer to 'Real data mapping' page A7. A8 RS-232C Controlling the Multiple Product Transmission / Receiving Protocol 09. Color(Command : i) (Video Timing only) ► To adjust the screen color. You can also adjust the color in the Picture menu. Transmission [k][i][ ][Set ID][ ][Data][Cr] Data Min : 00H to Max : 64H (Hexadecimal code) * Refer to 'Real data mapping' page A7. Acknowledgement [i][ ][Set ID][ ][OK][Data][x] Data Min : 00H to Max : 64H 10. Tint(Command : j) (Video Timing only) ► To adjust the screen tint. You can also adjust the tint in the Picture menu. Transmission [k][j][ ][Set ID][ ][Data][Cr] Data Red : 00H to Green: 64H (Hexadecimal code) * Refer to 'Real data mapping' page A7. Acknowledgement [j][ ][Set ID][ ][OK][Data][x] Data Red : 00H to Green : 64H * Tint Real data mapping 0 : Step 0 to Red : 64 : Step 100 to Green A9 RS-232C Controlling the Multiple Product Transmission / Receiving Protocol 11. Sharpness(Command : k) (Video Timing only) ► To adjust the screen Sharpness. You can also adjust the sharpness in the Picture menu. Transmission [k][k][ ][Set ID][ ][Data][Cr] Data Min : 00H to Max : 64H (Hexadecimal code) * Refer to 'Real data mapping' page A7. Acknowledgement Data [k][ ][Set ID][ ][OK][Data][x] Min : 00H to Max : 64H 12. OSD Select(Command : l) ► To control OSD on/off to the set. Transmission [k][l][ ][Set ID][ ][Data][Cr] Data 0 : OSD Off 1 : OSD On Acknowledgement [l][ ][Set ID][ ][OK][Data][x] Data 0 : OSD Off 1 : OSD On 13. Remote Lock /Key Lock (Command : m) ► To control Remote Lock on/off to the set. This function, when controlling RS-232C, locks the remote control and the local keys. Transmission [k][m][ ][Set ID][ ][Data][Cr] Data 0 : Off 1 : On Acknowledgement [m][ ][Set ID][ ][OK][Data][x] Data 0 : Off 1 : On A10 RS-232C Controlling the Multiple Product Transmission / Receiving Protocol 14 Balance(Command : t) ► To adjust the sound balance. Transmission [k][t][ ][Set ID][ ][Data][Cr] Data Min : 00H to Max : 64H (Hexadecimal code) 00H : Step L50 64H : Step R50 Acknowledgement [t][ ][Set ID][ ][OK][Data][x] Data Min : 00H to Max : 64H 00H : Step 0 to L50 64H : Step 100 to R50 * Balance : L50 to R50 15. Color Temperature (Command : u) ► To adjust the screen color temperature. Transmission [k][u][ ][Set ID][ ][Data][Cr] Data 0 : Medium 1 : Cool 2 : Warm Acknowledgement [u][ ][Set ID][ ][OK][Data][x] Data 0 : Medium 1 : Cool 2 : Warm A11 RS-232C Controlling the Multiple Product Transmission / Receiving Protocol 16. Abnormal state (Command : z) ► Abnormal State : Used to Read the power off status when Stand-by mode. Transmission [k][z][ ][Set ID][ ][Data][Cr] Data FF : Read Acknowledgement [z][ ][Set ID][ ][OK][Data][x] 0 : Normal (Power on and signal exist) 1 : No signal (Power on) 2 : Turn the monitor off by remote control 3 : Turn the monitor off by sleep time function 4 : Turn the monitor off by RS-232C function 8 : Turn the monitor off by off time function 9 : Turn the monitor off by auto off function 17. ISM mode(Command: j p) ► Used to select the afterimage preventing function. Transmission [j][p][ ][Set ID][ ][Data][Cr] Data 1H : Inversion 2H : Orbiter 4H : White Wash 8H : Normal Acknowledgement [p][ ][Set ID][ ][OK][Data][x] A12 RS-232C Controlling the Multiple Product Transmission / Receiving Protocol 18. Auto Configure(Command: j u) ► To adjust picture position and minimize image shaking automatically. it works only in RGB(PC) mode. Transmission [j][u][ ][Set ID][ ][Data][Cr] Data 1 : To set Acknowledgement [u][ ][Set ID][ ][OK][Data][x] 19. Key(Command : m c) ► To send IR remote key code. Transmission [m][c][ ][Set ID][ ][Data][Cr] Data Key code : Refer to page A 32. Acknowledgement [c][ ][Set ID][ ][OK][Data][x] A13 RS-232C Controlling the Multiple Product Transmission / Receiving Protocol 20. Tile Mode(Command : d d) ► Change a Tile Mode. Transmission [d][d][ ][Set ID][ ][Data][x] Data 00 or 11 12 13 14 ... 55 Description Tile mode is off. 1 x 2 mode(column x row) 1 x 3 mode 1 x 4 mode ... 5 x 5 mode * The data can not be set to 0X or X0 except 00. Acknowledgement [d][ ][00][ ][OK/NG][Data][x] A14 RS-232C Controlling the Multiple Product Transmission / Receiving Protocol 21. Tile H Position(Command : d e) ► To set the Horizontal position. Transmission [d][e][ ][Set ID][ ][Data][x] Data Min : 00H to Max : 14H 00H : Step -10(Left) 14H : Step 10(Right) Acknowledgement [e][ ][Set ID][ ][OK/NG][Data][x] 22. Tile V Position(Command : d f) ► To set the Vertical position. Transmission Data [d][f][ ][Set ID][ ][Data][x] Min : 00H to Max : 14H 00H : Step -10(Down) 14H : Step 10(Up) Acknowledgement [f][ ][Set ID][ ][OK/NG][Data][x] A15 RS-232C Controlling the Multiple Product Transmission / Receiving Protocol 23. Tile H Size(Command : d g) ► To set the Horizontal size. Transmission [d][g][ ][Set ID][ ][Data][x] Data Min : 00H to Max : 64H * Refer to 'Real data mapping' page A7. Acknowledgement [g][ ][Set ID][ ][OK/NG][Data][x] 24. Tile V Size(Command : d h) ► To set the Vertical size. Transmission [d][h][ ][Set ID][ ][Data][x] Data Min : 00H to Max : 64H * Refer to 'Real data mapping' page A7 Acknowledgement [h][ ][Set ID][ ][OK/NG][Data][x] A16 RS-232C Controlling the Multiple Product Transmission / Receiving Protocol 25. Tile ID Set(Command : d i) ► To assign the Tile ID for Tiling function . Transmission [d][i][ ][Set ID][ ][Data][x] Data Min : 00H to Max : 19H (Hexadecimal code) Acknowledgement [i][ ][Set ID][ ][OK/NG][Data][x] 26 Natural Mode (In Tile mode) (Command : d j) ► To assign the Tile Natural mode for Tiling function . Transmission [d][j][ ][Set ID][ ][Data][x] Data 0 : Natural Off 1 : Natural On ff : Read Status Acknowledgement [j][ ][Set ID][ ][OK/NG][Data][x] 27. Picture Mode (Command : d x) ► To adjust the picture mode. Transmission [d][x][][Set ID][][Data][x] Data Structure Data(Hex) 00 01 02 03 04 05 06 MODE Vivid Standard Cinema Sport Game Export 1 Export 2 Acknowledgement [x][][Set ID][][OK/NG][Data][x] A17 RS-232C Controlling the Multiple Product Transmission / Receiving Protocol 28. Sound Mode (Command : d y ) ► To adjust the Sound mode. Transmission [d][y][][Set ID][][Data][X] Data Structure Data(Hex) 01 02 03 04 05 Mode Standard Music Cinema sport Game Acknowledgement [y][][Set ID][][OK/NG][Data][x] 29. Fan Fault check (Command : d w ) ► To check the Fan fault of the TV. Transmission [d][w][][Set ID][][Data][x] * The data is always FF(in Hex). Data ff: Read Status Acknowledgement [w][][Set ID][][OK/NG][Data][x] * Data is the status value of the Fan fault. Data 0: Fan fault 1: Fan OK 2: N/A(Not Avaliable) A18 RS-232C Controlling Controllingthe theMultiple MultipleProduct Product Transmission / Receiving Protocol 30. Elapsed time return(Command : d l) ► To read the elapsed time. Transmission [d][l][ ][Set ID][ ][Data][x] * The data is always FF(in Hex). Acknowledgement [l][ ][Set ID][ ][OK/NG][Data][x] * The data means used hours. (Hexadecimal code) 31. Temperature value (Command : d n) ► To read the inside temperature value. Transmission [d][n][ ][Set ID][ ][Data][x] * The data is always FF(in Hex). Acknowledgement [n][ ][Set ID][ ][OK/NG][Data][x] * The data is 1 byte long in Hexadecimal. 32. Lamp fault Check(Command : d p) ► To check lamp fault. Transmission [d][p][ ][Set ID][ ][Data][x] * The data is always FF(in Hex). Acknowledgement [p][ ][Set ID][ ][OK/NG][Data][x] Data 0 : Lamp Fault 1 : Lamp OK 2 : N/A(DPM/Power Off) A19 RS-232C Controllingthe theMultiple MultipleProduct Product Controlling Transmission / Receiving Protocol 33. Auto volume (Command : d u) ► Automatically adjust the volume level. Transmission [d][u][][Set ID][][Data][x] Data 0 : Off 1 : On Acknowledgement [u][][Set ID][][OK/NG][Data][x] 34. Speaker (Command : d v) ► Turn the speaker on or off. Transmission [d][v][][Set ID][][Data][x] Data 0 : Off 1 : On Acknowledgement [v][][Set ID][][OK/NG][Data][x] A20 RS-232C Controlling the Multiple Product Transmission / Receiving Protocol 35. Time (Command : f a) ► Set the current time. Transmission [f][a][][Set ID][][Data1][][Data2][][Data3][Cr] [Data1] 0 : Monday 1 : Tuesday 2 : Wednesday 3 : Thursday 4 : Friday 5 : Saturday 6 : Sunday [Data2] 0H to 17H (Hours) [Data3] 00H to 3BH (Minutes) Acknowledgement [a][][Set ID][][OK/NG][Data1][Data2][Data3][x] *When reading data, FFH is inputted for [Data1], [Data2] and [Data3]. In other cases, all are treated as NG. A21 RS-232C Controlling the Multiple Product Transmission / Receiving Protocol 36. On Timer (On/Off Timer) Time (Command : f d) ► Set On Timer. Transmission [f][d][][Set ID][][Data1][][Data2][][Data3][Cr] [Data1] 1. f1h to f4h(read one index) f1: read 1st index of On Time List, f2: read 2nd index of On Time List f3: read 3rd index of On Time List f4: read 4th index of On Time List 2. e1h~e4h(delete one index), e0h(delete all indexes) e0: delete all indexes of On Time List e1: delete 1st index of On Time List e2: delete 2nd index of On Time List e3: delete 3rd index of On Time List e4: delete 4th index of On Time List 3. 01h to 80h (write) (Day of Week) bit0 (01h) : Monday bit1 (02h) : Tuesday bit2 (04h) : Wednesday bit3 (08h) : Thursday bit4 (10h) : Friday bit5 (20h) : Saturday bit6 (40h) : Sunday bit7 (80h) : Everyday (1fh) : Monday to Friday (3fh) : Monday to Saturday (60h) : Saturday to Sunday [Data 2] 00h to 17h (Hours) [Data 3] 00h to 3bh (Minutes) *When you read/delete the current on time list, all of [Data2][Data3] are have to be FFH. (ex1: fd 01 f1 ff ff - when you read 1st index of On Time List ex2: fd 01 e1 ff ff - when you delete 1st index of On Time List ex3: fd 01 3f 02 03 - when you write one On Time Data, "Monday to Saturday, 02:03" Acknowledgement [d][][Set ID][][OK][Data1][Data2][Data3][x] A22 RS-232C Controlling the Multiple Product Transmission / Receiving Protocol 37. Off Timer (On/Off Timer) Time (Command : f e) ► Set Off Timer. Transmission [f][e][][Set ID][][Data1][][Data2][][Data3][Cr] [Data 1] 1. f1h to f4h(read one index) f1: read 1st index of Off Time List, f2: read 2nd index of Off Time List f3: read 3rd index of Off Time List f4: read 4th index of Off Time List 2. e1h to e4h(delete one index), e0h(delete all indexes) e0: delete all indexes of Off Time List e1: delete 1st index of Off Time List e2: delete 2nd index of Off Time List e3: delete 3rd index of Off Time List e4: delete 4th index of Off Time List 3. 01h to 80h (write) (Day of Week) bit0 (01h) : Monday bit1 (02h) : Tuesday bit2 (04h) : Wednesday bit3 (08h) : Thursday bit4 (10h) : Friday bit5 (20h) : Saturday bit6 (40h) : Sunday bit7 (80h) : Everyday (1fh) : Monday to Friday (3fh) : Monday to Saturday (60h) : Saturday to Sunday [Data 2] 00h to 17h (Hours) [Data 3] 00h to 3bh (Minutes) *When you read/delete the current on time list, all of [Data2][Data3] are have to be FFH. (ex1: fd 01 f1 ff ff - when you read 1st index of Off Time List ex2: fd 01 e1 ff ff - when you delete 1st index of Off Time List ex3: fd 01 3f 02 03 - when you write one Off Time Data, "Monday to Saturday, 02:03") Acknowledgement [e][][Set ID][][OK][Data1][Data2][Data3][x] A23 RS-232C Controlling the Multiple Product Transmission / Receiving Protocol 38. Scheduling Input select (Command : f u) (Main Picture Input) ► To select input source for TV depending on day. Transmission [f][u][][Set ID][][Data1][][Data2][Cr] [Data 1] 1. f1h to f4h(write/read one index) f1: read 1st index of On Time Input f2: read 2nd index of On Time Input f3: read 3rd index of On Time Input f4: read 4th index of On Time Input [Data 2] Input Data(Hex) 02 04 07 08 09 INPUT AV Component RGB - PC HDMI/DVI - HD-DVD HDMI/DVI - PC *When you read/delete the current On Time Input, [Data2] needs to be FFH. (ex1: fu 01 f1 ff - when you read 1st index of On Time Input ex2: fu 01 f3 02 - when you write one On Time Input Data in to 3rd index, "AV") Acknowledgement [u][][Set ID][][OK][Data1][Data2][x] A24 RS-232C Controlling the Multiple Product Transmission / Receiving Protocol 39. Sleep Time (Command : f f) ► Set Sleep Time. Transmission [f][f][][Set ID][][Data][Cr] Data 0 : Off 1 : 10 2 : 20 3 : 30 4 : 60 5 : 90 6 : 120 7 : 180 8 : 240 Acknowledgement [f][][Set ID][][OK/NG][Data][x] 40. Auto Sleep (Command : f g) ► Set Auto Sleep. Transmission Data 0 : Off 1: On [f][g][][Set ID][][Data][Cr] Acknowledgement [g][][Set ID][][OK/NG][Data][x] A25 RS-232C Controlling the Multiple Product Transmission / Receiving Protocol 41. Power On Delay (Command : f h) ► Set the schedule delay when the power is turned on (Unit: second). Transmission [f][h][][Set ID][][Data][Cr] Data : 00H to 64H (Data value) * Refer to 'Real data mapping' page A7 Acknowledgement [h][][Set ID][][OK/NG][Data][x] 42. Language (Command : f i) ► Set the OSD language. Transmission [f][i][][Set ID][][Data][Cr] Data 0 : English 1 : French 2 : German 3 : Spanish 4 : Italian 5 : Portuguese 6 : Chinese 7 : Japanese 8 : Korean 9 : Russian Acknowledgemen [i][][Set ID][][OK/NG][Data][x] A26 RS-232C Controlling the Multiple Product Transmission / Receiving Protocol 43. DPM Select (Command : f j) ► Set the DPM (Display Power Management) function. Transmission [f][j][][Set ID][][Data][Cr] Data 0 : Off 1: On Acknowledgement [j][][Set ID][][OK/NG][Data][x] 44. Reset (Command : f k) ► Execute the Picture, Screen and Factory Reset functions. Transmission [f][k][][Set ID][][Data][Cr] Data 0 : Picture Reset 1 : Screen Reset 2 : Factory Reset Acknowledgement [k][][Set ID][][OK/NG][Data][x] A27 RS-232C Controlling the Multiple Product Transmission / Receiving Protocol 45. Power saving(Command : f I) ► To set the Power saving mode. Transmission [f][I][][Set ID][][Data][Cr] Data 0 : Off 1: (static level 1) 2: (static level 2) 3: (static level 3) Acknowledgement [I][][Set ID][][OK/NG][Data][x] 46. Power Indicator (Command : f o) ► To set the LED for Power Indicator Transmission [f][o][][Set ID][][Data][Cr] Data 0 : Off 1: On Acknowledgement [o][][Set ID][][OK/NG][Data][x] A28 RS-232C Controlling the Multiple Product Transmission / Receiving Protocol 47. logo Indicator (Command : f p) (Only M3204C) ► To set the LED for Power Indicator Transmission [f][p][][Set ID][][Data][Cr] Data 0 : Off 1: On Acknowledgement [p][][Set ID][][OK/NG][Data][x] * The function may be disabled depending of the product. 48. Serial no.Check (Command : f y) ► To read the serial numbers Transmission [f][y][][Set ID][][Data][Cr] Data FF (to read the serial numbers) Acknowledgement [y][][Set ID][][OK/NG][Data1] ~ [Data13] [x] * The data format is ASCII Code. A29 RS-232C Controlling the Multiple Product Transmission / Receiving Protocol 49. S/W Version (Command : f z) ► Check the software version. Transmission [f][z][][Set ID][][Data][Cr] Data FFH : Read Acknowledgement [z][][Set ID][][OK/NG][Data][x] 50. Input Select (Command : x b) ► To select input source for the Set. Transmission [x][b][][Set ID][][Data][Cr] Data 20H : AV 40H : Component 60H : RGB (PC) 90H : HDMI/DVI (DTV) A0H : HDMI/DVI (PC) Acknowledgement [b][ ][Set ID][ ][OK][Data][x] Data 20H : AV 40H : Component 60H : RGB (PC) 90H : HDMI/DVI (DTV) A0H : HDMI/DVI (PC) A30 IR Codes RS-232C Remote Control IR Code Output waveform single pulse, modulated with 37.917kHz signal at 455kHz Tc Carrier frequency FCAR = 1 / Tc = fosc / 12 Duty ratio = T1 / Tc = 1 / 3 T1 ► Configuration of frame ▪ 1st frame Lead code Low custom code High custom code Data code Data code C0 C1 C2 C3 C4 C5 C6 C7 C0 C1 C2 C3 C4 C5 C6 C7 D0 D1 D2 D3 D4 D5 D6 D7 D0 D1 D2 D3 D4 D5 D6 D7 ▪ Repeat frame Repeat code Tf ► Lead code 9 ms 4.5 ms 0.55ms ► Repeat code 9 ms 2.25 ms ► Bit description ▪ Bit "0" ▪ Bit "1" 0.56 ms 0.56 ms 1.12 ms 2.24 ms ► Frame interval : Tf ▪ The waveform is transmitted as long as a key is depressed. Tf Tf Tf = 108 ms @ 455 kHz A31 IR Codes RS-232C Code(Hex) Function 40 41 06 07 08 C4 UP ( ) DOWN ( ) RIGHT ( ) LEFT ( ) POWER ON/OFF MONITOR ON C5 MONITOR OFF 09 95 0B 43 5B 4D 44 10 11 12 13 14 15 16 17 18 19 79 MUTE Energy Saving INPUT MENU EXIT PSM OK Number Key 0 Number Key 1 Number Key 2 Number Key 3 Number Key 4 Number Key 5 Number Key 6 Number Key 7 Number Key 8 Number Key 9 ARC(MARK) 02 03 Vol+ Vol- Note R/C Button R/C Button R/C Button R/C Button R/C Button R/C Button (Discrete IR Code) R/C Button (Discrete IR Code) R/C Button R/C Button R/C Button R/C Button R/C Button R/C Button R/C Button R/C Button R/C Button R/C Button R/C Button R/C Button R/C Button R/C Button R/C Button R/C Button R/C Button R/C Button (Discrete IR Code) R/C Button R/C Button A32 IR Codes RS-232C Code(Hex) Function E0 E1 28 99 Bright∧(Page UP) Bright∨(Page Down) BACK AUTO CONFIC 72 71 63 61 7B B0 B1 BA 8F 8E 5A ID ON(Red Color) ID OFF(Green Color) (Yellow Color) (Blue Color ) TILE ► ■ II ◄◄ ►► AV BF COMPONENT D5 RGB PC C6 HDMI/DVI 76 ARC (4:3) 77 ARC (16:9) AF ARC (ZOOM) Note R/C Button R/C Button R/C Button R/C Button (Discrete IR Code) R/C Button R/C Button R/C Button R/C Button R/C Button R/C Button R/C Button R/C Button R/C Button R/C Button Discrete IR Code (Input AV Selection) Discrete IR Code(Input COMPONENT Selection) Discrete IR Code (Input RGB PC Selection) Discrete IR Code (Input HDMI/DVI Selection) Discrete IR Code (Only 4 : 3 mode) Discrete IR Code (Only 16 : 9 mode) Discrete IR Code (Only ZOOM, Cinena ZOOM mode) A33 LICENSES Supported licenses may differ by model. For more information of the licenses, visit www. lg.com. HDMI, the HDMI logo and High-Definition Multimedia Interface are trademarks or registered trademarks of HDMI Licensing LLC. E N E RGY STA R i s a s et of p owe rsaving guidelines issued by the U.S. Environmental Protection Agency(EPA). As an ENERGY STAR Partner LGE U. S. A.,Inc. has determined that this product meets the ENERGY STAR guidelines for energy efficiency. M a ke s u re to re a d t h e I m p o r t a n t Precautions before using the product. Keep the Owner's Manual(CD) in an accessible place for future reference. The model and serial number of the SET is located on the back and one side of the SET. Record it below should you ever need service. MODEL SERIAL Important WARRANTY VOID IF REMOVED 3850TAZ209Y Warranty void if removed. WARNING -This is a class A product. In a domestic environment this product may cause radio interference in which case the user may be required to take adequate measures. Temporary noise is normal when powering ON or OFF this device.