1
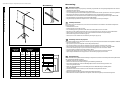
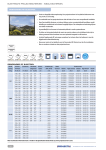
Picture King
Montage-instructie
Mounting instruction
Montageanleitung
Préscription de montage
Mounting instruction
3.1.2
Specifications are subject to change without prior notice. Version 11/2000
Mounting
Ac c e s s o r y
3.1.2
NL Montagevoorschrift
N.B.: Zet het scherm tijdig voor projectie op zodat het projectiedoek aan de omgevingstemperatuur kan wennen.
- Ga achter het scherm staan.
- Druk met de voet op de vergrendeling van de driepoot (A).
- Voor overheadprojectie moet de OHP-beugel (B) uit de binnenbuis worden geschoven en naar voren gedraaid.
- Rol het projectiedoek uit en bevestig de bovenbalkring aan de ophanghaak of de OHP-beugel.
- De binnenbuis zover uitschuiven tot de bovenkant van het projectiedoek de gewenste hoogte heeft bereikt.
- Met de handgreep (C) het gewenste projectieformaat instellen.
- Na gebruik het projectiedoek ontspannen door de handgreep (C) omhoog te bewegen.
B
Mounting instruction
E
Assembly instructions
Note: Set up the screen ahead of time, so that the screen material can acclimatise to the ambient temperature
prior to projection.
- Stand behind the screen.
- Press the tripod lock (A) with your foot.
- For overhead projection, pull out the OHP extension bracket (B) out of the inner tube.
- Roll out the screen material and mount the ring on the upper bar to the catch hook or to the OHP bracket.
- Slide out the inner tube until the top of the screen material has reached the required height.
- Set the desired projection size with the grip (C).
- After use, the screen material can be released by moving the grip (C) up.
C
A
Screen size
(in cm)
F
Dimensions
(in mm)
A
min.
B
min.
C
max.
D
length
152x152cm
510
2170
2820
1670
178x178cm
510
2430
3250
1920
213x213cm
510
2780
3250
2390
244x244cm
510
3070
3250
2670
114x152cm
510
1730
2540
1670
137x178cm
510
1850
3000
1920
163x213cm
510
2130
3250
2390
183x244cm
510
2390
3250
2670
Assemblage de l’écran de projection
N.B.: Pensez à installer l’écran de projection à l’avance pour que la toile puisse s’acclimater à la température ambiante.
- Placez-vous derrière l’écran.
- Appuyez avec le pied sur le dispositif de verrouillage du trépied (A).
- Pour la rétroprojection, tirez l’équerre OHP (B) hors du tube intérieur et inclinez-la vers l’avant.
- Déroulez l’écran de projection et fixez l’anneau de la barre supérieure au crochet ou à l’équerre OHP.
- Tirez le tube intérieur jusqu’à ce que le haut de la toile de projection soit à la hauteur désirée.
- Avec la poignée (C), réglez le format de projection désiré.
- Tendez la toile de projection avec le bouton de tension (D). Tournez vers la gauche et enfoncez.
- Après emploi, détendez la toile de projection en actionnant la poignée (C) vers le haut.
1:1 format
C
B
4:3 format
A
D
D Montageanleitung
Anm.: Stellen Sie die Projektionswand rechtzeitig zur Projektion auf, damit sich die Temperatur des Projektionstuches
der Umgebungstemperatur angleicht.
- Stellen Sie sich hinter die Projektionswand.
- Drücken Sie mit dem Fuß auf die Verriegelung des dreibeinigen Stativs (A).
- Für Overhead-Projektionen muß der OHP-Bügel (B) aus dem Innenrohr herausgeschoben und
nach vorne gedreht werden.
- Rollen Sie das Projektionstuch aus und befestigen Sie den Oberbalkenring am Aufhänghaken
oder am OHP-Bügel.
- Schieben Sie das Innenrohr soweit aus, bis die Oberkante des Projektionstuches die
gewünschte Höhe erreicht hat.
- Mit dem Handgriff (C) stellen Sie das gewünschte Projektionsformat ein.
- Nach Gebrauch wird das Projektionstuch entspannt, indem der Handgriff (C) nach oben bewegt wird.