1
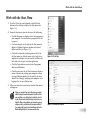
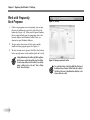
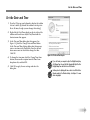
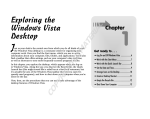
RI
Chapter
TE
J
➟
AL
Exploring the
Windows 7 Desktop
D
MA
ust as your desk is the central area from which you do all kinds of
work, the Windows 7 desktop is a command center for organizing your
computer work. Here you find the Start menu, which you use to access
information about your computer, files, folders, and applications. You’ll
also find a taskbar that offers settings, such as your computer’s date and
time, as well as shortcuts to your most frequently accessed programs or files.
GH
TE
In this chapter, you explore the desktop, which appears when you log on
to Windows 7. Along the way, you discover the Recycle Bin, the area of
the Windows 7 taskbar that lets you open frequently used programs, the
notification area, and how to shut down your computer when you’re done
for the day.
CO
PY
RI
Here, then, are the procedures that you can use to take advantage of the
desktop features of Windows 7.
Get ready to . . .
#1
➟ Log On and Off Windows 7 .......................... 6
➟ Work with the Start Menu............................ 7
➟ Work with Frequently Used Programs .......... 8
➟ Set the Date and Time ................................. 9
➟ Arrange Icons on the Desktop .................... 10
➟ Create a Desktop Shortcut ......................... 11
➟ Empty the Recycle Bin ............................... 12
➟ Shut Down Your Computer......................... 13
Chapter 1: Exploring the Windows 7 Desktop
Log On and Off Windows 7
1. Turn on your computer to begin the Windows 7 start-up
sequence.
2. In the resulting Windows 7 Welcome screen, enter your
password, if you’ve set one, and click the arrow button
(or click Switch User and choose another user to log on
as). Windows 7 verifies your password and displays the
Windows 7 desktop, as shown in Figure 1-1. (Note: If
you haven’t set up the password protection feature or
more than one user, you’re taken directly to the
Windows 7 desktop. For more on adding and changing
passwords, see Chapter 14.)
3. To change to another user account, first save any open
documents, close any open applications, and then
choose Start. Then click the arrow next to the Shut
Down button in the bottom-right corner of the Start
menu and choose Log Off. Windows 7 logs off and displays a list of users. To log on again, click a user icon.
To create another user, choose Start➪Control Panel, and under the
User Accounts and Family Safety heading, click Add or Remove User
Accounts. Then click Create a New Account. Follow the instructions to
enter a name for the account and set a password for it, if you like.
See Chapter 14 for more detailed information about creating and
managing user accounts.
➟
6
Figure 1-1: The Windows 7 desktop
After you set up more than one user, before you get to the password
screen, you have to click the icon for the user you wish to log on as.
Work with the Start Menu
Work with the Start Menu
1. Press the Q key on your keyboard or click the Start
button on the desktop to display the Start menu (see
Figure 1-2).
2. From the Start menu, you can do any of the following:
• Click All Programs to display a list of all programs on
your computer. You can click any program in the list
to open it.
• Click any category on the right of the Start menu to
display a Windows Explorer window with related
folders and files (see Figure 1-3).
• Click either frequently used programs at the left of
the Start menu, or click the arrow to the right of an
application to display a list of recently used files and
then click a file to open it in that application.
Figure 1-2: The Start Menu
• Click the Power button icon to close all programs
and turn off Windows.
• Click the arrow next to the Power button to display a
menu of choices for putting your computer to sleep
or using Hibernate mode (see the next Tip for more
about these settings), restarting your computer, or for
logging off or on as a different user.
3. When you move your cursor away from the Start menu,
it disappears.
Putting your computer in Sleep mode is like pausing your computer
without closing open documents and programs. Sleep still uses a bit of
power and allows you to quickly get back to work after only a few
seconds. Hibernate mode is mainly for laptops because it saves your
battery life. When you choose Hibernate, open documents or program
settings are saved to your hard drive, and your computer switches off.
Your computer takes longer to boot up from Hibernate and have the
Windows desktop display, but it saves more power than Sleep.
Figure 1-3: A Windows Explorer window
➟
7
Chapter 1: Exploring the Windows 7 Desktop
Work with Frequently
Used Programs
Figure 1-4: The taskbar
1. If there are programs you use frequently, you can pin
them to the taskbar area just to the right of the Start
button (see Figure 1-4). When you first open Windows,
this area may include icons for programs, such as the
Internet Explorer and Windows Media Player, or a
shortcut to open Windows Explorer.
2. To open any of these items, click its icon, and the
window for that program opens. See Figure 1-5.
3. To close an item you’ve opened, click the Close button
in the top-right corner of the window (with an X on it).
To display additional items in the taskbar, right-click the application
in the Start menu or on the desktop and then choose Pin to Taskbar.
You can also drag a desktop icon to the taskbar. (If you want help
creating a desktop shortcut, see the task, “Create a Desktop
Shortcut,” later in this chapter.)
➟
8
Figure 1-5: Opening a program from the taskbar
You can add other functions to the taskbar. Right-click a blank area of
the taskbar and choose Properties. Click the Toolbars tab to display it.
Select the check box for any of the additional items listed there, such as
a browser Address bar, or Links.
Set the Date and Time
Set the Date and Time
1. Press the Q key on your keyboard to display the taskbar
if it isn’t visible. (By default the taskbar is not kept visible at all times, though you can change that setting.)
2. Right-click the Date/Time display on the far right of the
taskbar and then choose Adjust Date/Time from the
shortcut menu that appears.
3. In the Date and Time dialog box that appears (see
Figure 1-6), click the Change Date and Time button.
In the Date and Time Settings dialog box that appears,
enter a new time in the Time field or use the up and
down arrows next to that field to change the time.
Click OK.
4. To change the time zone, click the Change Time Zone
button, choose another option from the Time Zone
drop-down list, and click OK.
5. Click OK to apply the new settings and close the
dialog box.
Figure 1-6: The Date and Time dialog box
If you don’t want your computer to adjust for Daylight Saving Time,
click Change Time Zone and click the Automatically Adjust Clock for
Daylight Saving Time check box to turn off this feature.
Another option for displaying the time or date is to add the Clock or
Calendar gadgets to the Windows desktop. See Chapter 5 for more
about using gadgets.
➟
9
Chapter 1: Exploring the Windows 7 Desktop
Arrange Icons on the Desktop
1. Right-click the desktop and choose View in the resulting
shortcut menu; be sure that Auto Arrange Icons isn’t
selected, as shown in Figure 1-7. (If it is selected, deselect it before proceeding to the next step.)
2. Right-click the Windows 7 desktop. In the resulting
shortcut menu, choose Sort By and then click the criteria for sorting your desktop shortcuts (see Figure 1-8).
Figure 1-7: The Desktop shortcut menu,
View submenu
3. You can also click any icon and drag it to another loca-
tion on the desktop — for example, to separate it from
other desktop icons so you can find it easily.
If you’ve rearranged your desktop by moving items hither, thither,
and yon and you want your icons in orderly rows along the
left side of your desktop, snap them into place with the Auto
Arrange feature. Right-click the desktop and then choose View➪
Auto Arrange Icons.
To change the size of desktop icons, use the shortcut menu in Step
1 and choose Large Icons, Medium Icons, or Small Icons.
➟
10
Figure 1-8: The Desktop shortcut menu,
Sort By submenu
Create a Desktop Shortcut
Create a Desktop Shortcut
1. Choose Start➪All Programs and locate the program on
the list of programs that appears.
2. Right-click an item, FreeCell for example, and choose
Send To➪Desktop (Create Shortcut) (see Figure 1-9).
3. The shortcut appears on the desktop (see Figure 1-10).
Double-click the icon to open the application.
Occasionally, Windows 7 offers to delete desktop icons that you
haven’t used in a long time. Let it. The desktop should be reserved
for frequently used programs, files, and folders. You can always
re-create shortcuts easily if you need them again.
To clean up your desktop manually, right-click the desktop and
choose Personalize. Click the Change Desktop Icons link to the left.
In the Desktop Icon Setting dialog box that appears, click the
Restore Default button, which returns to the original desktop shortcuts set up on your computer.
Figure 1-9: The Send To shortcut menu
You can create a shortcut for a brand new item by right-clicking the
desktop, choosing New, and then choosing an item to place there,
such as a text document, bitmap image, or contact. Then doubleclick the shortcut that appears and begin working on the file in the
associated application.
Figure 1-10: A new shortcut on the desktop
➟
11
Chapter 1: Exploring the Windows 7 Desktop
Empty the Recycle Bin
1. Right-click the Recycle Bin icon on the Windows 7 desk-
top and choose Empty Recycle Bin from the menu that
appears (see Figure 1-11).
2. In the confirmation dialog box that appears (see Figure
1-12), click Yes. A progress dialog box appears indicating the contents are being deleted. Remember that after
you empty the Recycle Bin, all the files in it are unavailable to you.
Up until the moment you permanently delete items by performing
the preceding steps, you can retrieve items in the Recycle Bin by
right-clicking the desktop icon and choosing Open. Select the item
you want to retrieve and then click the Restore This Item link near
the top of the Recycle Bin window.
Figure 1-11: The Recycle Bin shortcut menu
You can modify the Recycle Bin properties by right-clicking it and
choosing Properties. In the dialog box that appears, you can change
the maximum size for the Recycle Bin and determine whether to
immediately delete files you move to the Recycle Bin. You can also
deselect the option of having a confirmation dialog box appear
when you delete Recycle Bin contents.
➟
12
Figure 1-12: Confirming the Empty Recycle Bin command
Shut Down Your Computer
Shut Down Your Computer
1. Choose Start and then click the arrow to the right of the
Shut Down button.
2. In the resulting shortcut menu, shown in Figure 1-13,
choose Hibernate to shut down the computer completely; if you want to reboot (turn off and turn back on)
your computer, choose Restart.
If you’re going away for a while but don’t want to have to go
through the whole booting up sequence complete with Windows 7
music when you return, you don’t have to turn off your computer.
Just click the Sleep command instead (in Step 2) to put your computer into a kind of sleeping state where the screen goes black and
the fan shuts down. When you get back, just click your mouse button or press Enter, or in some cases (especially on some laptops),
press the Power button; your computer springs to life, and whatever
programs and documents you had open are still open.
If your computer freezes up for some reason, you can turn it off in
a couple of ways. Press Ctrl+Alt+Delete twice in a row, or press the
power button on your CPU and hold it until the computer shuts
down.
Figure 1-13: The menu used to turn off or restart
your computer
Don’t simply turn off your computer at the power source unless you
have to because of a computer dysfunction. Windows might not start up
properly the next time you turn it on if you don’t follow the proper
shutdown procedure.
➟
13
Chapter 1: Exploring the Windows 7 Desktop
➟
14


![j:j_"Xt$l"j:]:":,lg]:"r/Human Resources have been duty - e](http://vs1.manualzilla.com/store/data/005657435_1-26d97049bf04f0fd92265d73e45a9ab3-150x150.png)