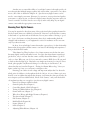
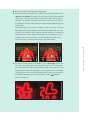
1
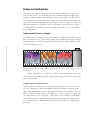
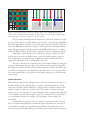
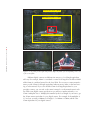
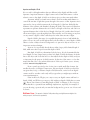
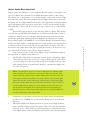
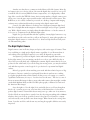
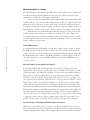
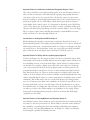
D
TE
GH
RI
PY
CO
RI
TE
MA
AL
Before You Shoot
You’ll increase the odds of making great digital
photos if you take a few moments to ground
yourself in some basics. It’s useful, for example,
to understand why shooting digital is inherently
different from shooting film. And even if you
already own a digital camera, you should know
whether the camera you are using—or the one
Mikkel Aaland
right digital camera for your needs. This chapter
will get you started on the road to making great
photos with your digital camera.
Chapter Contents
Bridging the Film/Digital Gap
The Right Digital Camera
Knowing Your Digital Camera
Software Solutions
Accessories That Make a Difference
Finding Up-to-Date Information
and Support
1
■ BEFORE YOU SHOOT
1
you are thinking about upgrading to—is the
Bridging the Film/Digital Gap
Since many of us remember the world of film (whether as skilled photographers or
point-and-shoot users), it’s comforting that much of the nomenclature of digital photography is similar. Digital cameras have lenses, f-stops, and shutters just like the old
cameras. Light is captured and recorded. Images are stored and shared. However, it is
important to know that the differences are also great, and if you apply your old knowledge indiscriminately to the digital world, you are likely to get unsatisfactory results or
not fully utilize the capabilities of the new medium. Let’s look at some of the similarities and differences.
Capturing Light: Electronic vs. Chemical
Both digital cameras and film cameras capture and record light. However, film cameras
rely on a chemical process. Silver halide crystals change when struck by light, forming a
latent image that is revealed upon development with a chemical agent. Figure 1.1 summarizes this familiar process.
CHAPTER
1:
BEFORE YOU SHOOT ■
2
Figure 1.1: Film is both a capture and a storage device. The image is revealed upon chemical
development.
Digital cameras rely on a much more complex system that includes several interconnected electronic components and sophisticated image processing. Let’s look at this
system in more detail.
The Digital Capture and Storage Process
Digital capture starts with the sensor chip. This chip contains an array of photoreceptors, each capturing one pixel of the ultimate image. The number of receptors in the
chip is what determines the camera’s maximum resolution. In most systems, a layer of
filters is applied over these receptors (see Figure 1.2), so that each one can capture only
one of the primary colors—red, green, or blue. These colors are the basis of the RGB
color model used in all computer imaging. Electronic processing, either in the camera
or in a computer, then combines these separate R, G, and B values into RGB pixels in
the image.
Figure 1.2: In a typical sensor, red, green, or blue filters cover individual pixels (photoreceptors) in a tiled mosaic pattern (left). The filters allow one wavelength of light to pass,
and a given pixel therefore records only one color (right).
Comparing Resolution
Film resolution, expressed as resolving power, is a function of the size and structure of
the silver halide particles (Fine, Medium, or Coarse), the emulsion thickness, and the
actual size of the film (35mm, 120mm, etc.). Digital camera resolution is based on the
number of pixels contained in a particular sensor. The number of pixels is expressed
either as an “A × B” form with “A” representing the number of pixels in the width and
“B” the number of pixels in the height of a sensor (for example, 2576 × 1932 pixels) or
as a total number of pixels (for example, 4,976,832 pixels, or more simply, 5.0
megapixels).
In general, the more pixels a sensor is capable of capturing, the finer the detail
that is recorded. I must qualify this statement, though, because there are some sensors
on the market—notably ones created by Foveon and Fuji—that squeeze more color
data from each pixel, thereby making a side-by-side, pixel-to-pixel comparison between
3
■ B R I D G I N G T H E F I L M / D I G I TA L G A P
The processing of the digital data from the sensor is the most complex part of the
process, and also the most variable. Unless you’ve chosen to save the image in the RAW
file format, the camera’s onboard processor will organize the separate R, G, and B pixel
values into RGB data and perform a variety of other steps before assembling the final
image. This processing may include compression (in the JPEG file format) or no compression (in the TIF file format). You’ll learn more about these formats in subsequent chapters.
After light is captured by the sensors and the processing is complete, the information (data) is passed on in digital form to some sort of built-in memory system or,
more commonly, to an external storage medium such as the commonly used Smart
Digital (SD), xD-Picture Card, or CompactFlash (CF) card.
The sensor and electronic system that carry out the task of digital processing and
storage are built entirely into the camera and cannot be easily swapped and upgraded.
By comparison, film has individual characteristics dependent on brand and manufacturer, and those characteristics are independent of the camera itself. You can easily switch
from a fine-grained film to a fast, grainy one by simply replacing one roll with another
in the camera.
sensors less meaningful. (Read more about this in the “Zooming In” appendix under
“Sensors Expanded.”) Sometimes the documented number of pixels may include pixels
that aren’t even actively used, introducing yet another variable.
Some of the earliest digital cameras captured only 640 × 480 pixels (.3 megapixels)—just enough pixels to fill a small computer monitor, and barely enough to produce
a decent 3" × 4" print. Nowadays a typical 5-megapixel consumer digital camera captures around 2576 × 1932 pixels, which is plenty enough resolution to produce a
decent 11" × 14" print. Table 1.1 shows what size prints you can reasonably expect to
produce from various resolutions. Note that these are general guidelines and actual
results will vary depending on the type of digital camera and output device used and
other qualities of an image such as sharpness, color, and content.
Need at least
3'' × 5''
.6 megapixels (900 × 675 pixels)
5'' × 7''
1.3 megapixels (1280 × 960 pixels)
8'' × 10''
3.2 megapixels (2048 × 1536 pixels)
11'' × 14''
6.1 megapixels (3008 × 2000 pixels)
16'' × 20''
11 megapixels (4064 × 2704 pixels)
Table 1.1: Optimal pixel resolutions needed for desired output specifications (assuming
200 dpi print resolution)
CHAPTER
1:
BEFORE YOU SHOOT ■
4
Print Size (inches)
N o te : Roughly speaking, it requires a digital camera capable of capturing approximately 6
megapixels to match the print quality produced with medium-grain 35mm film. Other digital
camera variables such as lens quality, sensor characteristics, and image-processing capabilities make a difference as well.
Considering Exposure Latitude
Most point-and-shoot digital cameras pack lots of pixels into physically small sensors
with a trade-off in quality. Exposure latitude between light and dark, for example, may
not be nearly as good as film provides. Low-light situations may result in extremely
“noisy” images. On the other hand, digital single lens reflex (SLR) cameras generally
use larger sensors with better exposure latitude and low-light capabilities. Why do larger sensors give better latitude? Larger sensors (in general) have larger photo receptors
for each pixel and can capture more light and generate more photo electrons. In addition, all sensors have some level of electronic noise.
In subsequent chapters I’ll get more into the subject of extending exposure latitude and shooting successfully in low-light situations.
B o tto m l i n e : Unlike film cameras, digital cameras depend on a complex array of electronic
components, all of which contribute to image quality—or lack thereof.
Lenses: Getting the Numbers Right
Digital cameras, just like film cameras, rely on lenses to collect and focus light onto the
sensors. If you’ve used a 35mm film camera, you are probably familiar with how lenses
are numerically differentiated in terms of focal length. (The stated focal length is the
distance between the optical center of a lens and the medium that captures the image—
either the film or sensor surface—when the lens is focused at infinity.) For example, a
lens with a focal length between 40mm and 55mm is considered “normal” and covers a
field of view similar to human vision, about 50 degrees. Focal lengths less than 40mm
are considered wide angle and focal lengths over 55mm are considered telephoto, with
a narrower field of view. A lens designated as wide angle will expand the field of view,
and long telephoto lenses narrow the field of view and appear to bring far objects
close. Zoom lenses provide a range of fields of view, often going from wide angle to
telephoto. A versatile zoom lens might provide a range of focal lengths, say from 28mm
to 200mm. And so on.
N o te : Because the sensor of a digital camera is physically different and responds to
When shopping for a digital camera it’s natural to want to compare focal lengths
of digital camera lenses with those of familiar 35mm film cameras. But although a digital camera’s “normal” lens will capture approximately the same field of view as a film
camera’s “normal” lens, the physical focal length considered normal is usually much
shorter. (Because of this difference, it’s typical to refer to “35mm equivalent” focal
length when discussing lenses for digital cameras, and I’ll use that term throughout this
book.) A 50mm lens that is considered “normal” for a 35mm film camera would be
considered a telephoto lens for many digital cameras.
Why? Because most digital cameras use sensors that are smaller than 35mm
film—sometimes only a quarter of the size—and the smaller the sensor, the shorter the
normal focal length. Figure 1.3 illustrates this point. With the same physical focal
length, a 35mm film camera (which has a 24mm × 36mm frame size) would show a
somewhat larger field of view, with less magnification, than a digital camera with a relatively large sensor (such as the Nikon D200, with a 23.7 × 15.6mm sensor). With the
8.8 × 6.6mm sensor on the Sony DSC F828, we have a much smaller field of view and
more magnification.
5
■ B R I D G I N G T H E F I L M / D I G I TA L G A P
light differently than film, digital camera lenses are often designed from the ground up to
take into account these differences. Some camera manufacturers are more successful than
others in producing lens/sensor combinations that contribute to overall image quality. If
you use a digital camera that accepts interchangeable lenses, it is important that you choose
lenses carefully. Not all lenses will give you optimal quality. A lens that works fine with a
film camera can produce color aberrations, flare, and lack of sharpness when used with
a digital camera.
35mm film frame (36mm × 24mm)
Nikon D200 frame (23.67 × 15.6mm)
Sony DSC F828 frame (8.8mm × 6.64mm)
CHAPTER
1:
BEFORE YOU SHOOT ■
6
Figure 1.3: The same focal length will produce different fields of view depending on the size
of the sensor/film.
Different digital cameras use different size sensors, so focal-length equivalents
will vary. For example, 30mm is considered a normal focal length for the Nikon D200
while 12mm is considered normal for the Sony F828. For now, most camera manufacturers provide 35mm focal-length equivalents when necessary, either on the lens housing or in the manual. If you can’t find the 35mm focal-length equivalent for your
particular camera, you can refer to the owner’s manual or to the manufacturer’s website. With some digital camera specifications you will see a number referred to as a
35mm “multiplier factor.” Multiply this number by the focal length of your lens to get
the 35mm camera equivalent for your digital camera. For example, if the multiplier is
1.5 and you are using a 100mm focal length, 1.5 × 100mm = 150mm, which is the
35mm equivalent for your digital camera.
N o te : Because digital camera manufacturers calculate 35mm equivalents using different
criteria, allow for up to a 15 percent variation when comparing one digital camera’s equivalent
focal length with another’s.
If all else fails, there is a relatively straightforward relationship between the diagonal dimension of a sensor (or film) and what is considered a normal focal length. If,
for example, the diagonal measurement of a sensor is 12mm (as it is for the sensor used
in the Nikon Coolpix 990), then the normal focal length is 12mm. (The Nikon actually
comes with an 8mm–24mm zoom lens, which translates to 38mm–115mm in 35mm
film equivalence.) The diagonal measurement for the sensor in the Canon EOS-5D is
the same as 35mm film—about 43mm—which explains why a 50mm “normal” lens on
a Canon camera will provide the same field of view on a 35mm film camera. (Many
people have been taught that a 50mm lens is a normal lens for a 35mm camera, but as
you can see by the math, 50mm doesn’t fully represent the normal human field of view.
Many pros consider a 35mm lens “normal” for a 35mm film camera.) Some manufacturers list the diagonal measure of a sensor with the camera’s specifications.
7
Knowing what you do now, you’ll better understand why it’s more difficult to
find a digital camera equipped with a lens that has less than a 30mm focal-length equivalent. Until recently, it was only the more expensive digital cameras with larger sensors
that gave you the option of wider lenses. Even then, if you place a 12mm fisheye lens
on, say, a Nikon D 200, it will still be equivalent to only about 20mm on a 35mm camera—which is wide, but not super wide. (Accessory, add-on lenses can extend the wideangle capabilities of many digital cameras to a degree; however, there is some trade-off
in quality.) Camera manufacturers are getting around this limitation by designing lenses
specifically for smaller sensors. The Nikon DX lens series, for example, includes a relatively affordable 10.5mm F2.8 fisheye, with an equivalent field of view of 15.75mm.
Kodak also offers a clever solution to the wide-angle conundrum: a digital camera with
two lenses and two sensors. The Kodak EasyShare V570 boasts a 23mm equivalent lens
and a 37mm–117mm equivalent zoom lens built into one body.
B o tto m l i n e : Focal-length equivalents will vary between different digital cameras with differently sized sensors. Don’t expect a 1:1 relationship between the angle of view of a lens used on a digital camera and the lens used on a 35mm film camera. Finally, the smaller the sensor, the less chance
your camera will provide an effective wide-angle view.
■ B R I D G I N G T H E F I L M / D I G I TA L G A P
N o te : Lens zoom capabilities are sometimes expressed in multiplication style, such as 3x
or 6x. This refers to zoom range, starting at the widest angle. A 40mm, 4x lens, therefore, has
a range of 40mm–160mm. A 35mm, 10x lens has a very large range, from 35mm to 350mm.
Digital zoom is something altogether different. It has nothing to do with the lens itself, but
refers to software interpolation that occurs after an image has been captured.
Aperture and Depth of Field
CHAPTER
1:
BEFORE YOU SHOOT ■
8
It’s not only focal-length numbers that are different in the digital and film worlds.
Aperture comparisons between a digital camera and a 35mm film camera—at least
when it comes to the depth of field—won’t always give you the same results either.
Apertures, which are found in most lenses, work in tandem with shutters to
control the amount of light that passes through to the sensor or film. Aperture size is
expressed as f-stops, which represent the focal length (f) of the lens divided by the
diameter of the aperture (the number following the slash). The notation f/2 therefore
represents an aperture diameter that is 1/2 the focal length of the lens, and f/16 is an
aperture diameter that is 1/16 the focal length of the lens. f/2 is wider than f/16 and
allows more light to pass through the lens. Theoretically, an f/5.6 setting on any lens,
on any camera—digital or film—will always let in the same amount of light.
Depth of field is the range of acceptable sharpness in front of and behind the
plane of focus. As you’ll see throughout the book, the ability to control depth of field—
either to isolate a subject from its background or to put more objects in focus—is an
important creative technique.
As most of you probably already know, wider f-stops yield a limited depth of
field, while narrower f-stops increase the depth of field.
But depth of field is not determined only by f-stop. It’s also determined by the
focal length of a lens (longer lenses produce less depth of field); the distance from the
lens to the object (the closer the lens is to the subject the less depth of field); and, just
as important for the purpose of this discussion, by the size of the sensor—or for that
matter, the film. (For a very technical discussion of this topic I invite you to visit my
website: www.shooting-digital.com.)
From a purely practical point of view, just as with small film formats, the
smaller the sensor your digital camera uses, the more depth of field is produced for
any given lens, f-stop, or distance. Depth of field, therefore, varies from one digital
camera model to another—and rarely will you get what you might expect without
some experimentation.
Later in the book, I’ll give you a way to test your digital camera and lens for
depth of field, and I’ll show you ways to deal with more depth of field than you want
“Know Your Camera: Controlling Depth of Field” in Chapter 3). For now, just
(
know that this is a potential issue with huge implications, especially, for example, if
you are shooting a portrait and you want the background to go more out of focus and
it doesn’t.
B o tto m l i n e : The amount of depth of field produced by your digital camera might not be
what you expect. You’ll need to experiment.
Shutters: Another Way to Control Light
N o te : Throughout the book you’ll see reference to digital cameras as consumer, professional, or prosumer. These distinctions are rough, and some digital camera models overlap
categories. Generally speaking, however, consumer digital cameras are tailored to users who
prefer mostly point-and-shoot capabilities. Prices range from $100 to $400. Prosumer digital
cameras offer more user control, a wider variety of features, and to a certain degree, higher
pixel counts. Prosumer digital cameras generally start at around $600 and go to about $2000.
Professional digital cameras combine user control and higher pixel count with speed of use
and responsiveness and durability. These cameras typically have interchangeable lenses,
although this feature is found in many prosumer models. Prices for professional digital cameras start at about $2500, and the sky is the limit.
•
•
At this time, most prosumer and professional digital cameras feature shutter
speeds in excess 1/1000th of a second, which is plenty fast for most shooting
situations.
Although extremely slow shutter speeds are an option on most digital cameras,
keep in mind that shutter speeds slower than 1/15th of a second often introduce
electronic “noise,” which shows up as blotchy patterns in continuous-tone areas.
Some digital cameras offer noise reduction modes, with some trade-off in quality.
9
■ B R I D G I N G T H E F I L M / D I G I TA L G A P
Digital cameras need shutters to control light just like film cameras. Some digital cameras use a shutter that is mechanical, not unlike the shutters used in a film camera.
The shutter—be it a leaf shutter or a focal plane shutter—controls the amount of light
that strikes the sensor. The faster the shutter, the less light is allowed past; the slower
the shutter, the more light. Remember from basic photography that varying the shutter
speed and changing the f-stop is how you get more control over the amount of light
hitting the film or sensor, and also how you can stop or blur action or control depth
of field.
Theoretically, digital cameras can use the sensor itself as a shutter. This requires
a special sensor in which the pixels themselves are told electronically when to turn on
and when to turn off. As you can imagine, using this electronic method can produce
much faster speeds than anything mechanical. Engineers for Olympus, for example,
have produced speeds of 1/18,000th of a second. Speeds like this are inherently impractical because they require so much light (and such a wide aperture). Also, using sensors
as shutters in this way has its trade-off: it lowers the effective resolution of the sensor
because the sensor must devote half of the possible photoreceptor cell locations to storage, and thus those locations can’t generate image information.
From a practical point of view, the key things to keep in mind when looking at
the capabilities of a digital camera shutter are:
•
Just like with a film camera, an important creative option can be using a digital
camera that provides some control over a range of shutter speeds—especially if
you are shooting action. Most prosumer and professional digital cameras come
with a shutter priority or manual mode. Rarely do consumer-level digital cameras offer such options.
N o te : What exactly is “noise” in a digital photo? All sensors have some level of electronic
noise caused by the random motion of electrons in the silicon. In high light, the ratio of image
electrons to noise electrons is high, and the noise is hardly seen. In low light, the ratio of
image electrons to noise electrons is low and when the image signal must be amplified to create a useful image, the amplification affects both the image and noise. This makes the noise
very visible in such images. The film equivalent of electronic noise is grain. Just as with film,
where going to higher speed films produces more grain, with digital cameras, as you increase
the ISO sensitivity, you will see more electronic noise in your images.
•
Some mechanical shutters provide faster synch speeds when used with electronic
flash. This can be important if you are trying to balance flash with bright daylight.
B o tto m l i n e : Just about everything you know about film cameras and shutter speeds will
apply to shooting digital.
CHAPTER
1:
BEFORE YOU SHOOT ■
10
Metadata
One of the biggest differences between film cameras and digital cameras is the amount of
metadata that can be generated. Metadata is information encoded onto the film or into
the digital file. Some film cameras embed the date and time a picture was taken, and with
a special data back you might be able to encode some other type-based information. This
is nothing compared to the data that is typically encoded by a digital camera.
Digital camera manufacturers have standardized the way this metadata is saved
into a format called Exchangeable Image File, or EXIF for short. To read this EXIF
data, you’ll need imaging software such as Photoshop or Photoshop Elements, or the
imaging software that often comes with a digital camera.
Not only can you use EXIF data to see what type of digital camera was used,
but you can also see the date, f-stop, shutter speed, ISO, and whether a flash was on or
off. Some of the higher-end prosumer and professional cameras even allow you to hook
up a global positioning system (GPS) to your camera so you can encode in the EXIF
metadata the exact spot in the world where you shot a particular image.
Metadata can be used by printing software to determine print resolution. It can
help you organize your digital images and even make you a better photographer by giving you a handy reference to your camera settings.
Beyond Film
There is a point where the electronic and chemical worlds completely diverge. For
example, most digital cameras are equipped with an LCD screen that provides nearinstant image playback. This may sound like a small thing, but in reality preview ability
has important significance. As you’ll see throughout the book, LCD previews can be
used in a variety of ways, from displaying technical data on the quality of an image to
precise framing, to icebreakers that help your subjects relax as you photograph them.
Another area that has no counterpart in the film world is file formats. Most digital cameras give you a choice of how you want the digital data saved. You can opt for
a small file size via various JPEG file format compressions, or for high quality—albeit
large files—saved in the TIFF file format. An increasing number of digital cameras even
allow you to save the pure, unprocessed data that comes directly from the sensor. This
RAW data, as it is called, can then be processed on a desktop computer with imaging
software more sophisticated than the processing in the digital camera itself.
Control over white balance is another point of divergence between digital and
film. Shoot daylight film under tungsten or fluorescent lights and you’ll get a greenish
cast. With a digital camera you simply adjust the white balance—or let the camera do
it for you—to compensate for the different light values.
Digital also goes beyond film with the capability of many digital cameras to capture full-motion video and sound. As you’ll see in Chapter 11, many photographers are
using their digital cameras to create short 15- to 30-second clips that have both practical and entertaining value.
The Right Digital Camera
11
■ T H E R I G H T D I G I TA L C A M E R A
Digital cameras come in all sizes, shapes, and prices, with various types of features. There
is no such thing as a single perfect digital camera, regardless of cost. However, there is
such a thing as the right digital camera for you, and it all depends on your needs.
An expensive, professional digital camera with interchangeable lenses may not
be the right camera if you are running out the door to shoot your child’s first day at
school and you really need only a lightweight consumer digital camera that fits in your
pocket. On the other hand, if you are shooting fast-moving action, you may be satisfied
only with the responsive controls typical of a professional or prosumer-level digital
camera.
Before I get specific about matching your needs with the technical aspects of digital cameras, I want to remind you (and myself) that there is much more to making
good photographs than the technical details. In the process of focusing on a camera’s
capabilities and features, it’s easy to “lose the forest for the trees.” The fact is, some of
the most memorable images in history were taken with cameras that we might consider
crude: think Mathew Brady and his Civil War photographs, or Edward S. Curtis and
his American West images.
Sure, the right tool for the right job is preferable, but as you’ll see throughout
this book, a creative person can overcome many of the limitations of a less-thanperfect digital camera. I learned this lesson many years ago, when one of my mentors,
Gordon Clark, encouraged me to spend a few days shooting everything with a 200mm
telephoto lens, even close-up portraits. It wasn’t easy, but I soon learned to compensate and actually came up with some decent images. When I went back to using other
lenses, I saw the world in a whole new way and my photographic abilities were vastly
improved.
Matching Your Needs to a Camera
The following section matches the desirable features and specifications of a digital camera with several general photographic shooting categories. (These categories are the
subject matter of Chapters 3 through 10 of this book.)
I hope—in lieu of recommending actual camera models and manufacturers—this
summary will give you a start toward learning what to look for in a digital camera and
ultimately you won’t buy more or less camera than you need. For readers with needs
not met by a single digital camera, I suggest considering acquiring multiple cameras. As
digital cameras continue to drop in price, this becomes an increasingly realistic option.
With the exception of the landscape/architecture category, I don’t get into pixel
resolution. Sure, pixel resolution is an important criterion in choosing a digital camera—and for that reason I address it elsewhere in the book—but the amount of pixels
you need depends on what you are doing with the final image, and not so much on the
subject of what you are shooting.
Shooting RAW—Chapter 2
CHAPTER
1:
BEFORE YOU SHOOT ■
12
For maximum quality and flexibility you will want a digital camera capable of saving
the RAW data that comes off the sensor. Most, if not all, prosumer and professional
cameras offer this option. Increasingly more consumer-level digital cameras, such as the
Kodak EasyShare series cameras, offer RAW capabilities as well. In Chapter 2 I’ll discuss when and when not to shoot RAW, and how to work with the RAW data once
you have saved it.
Important Features for Shooting Portraits—Chapter 3
Portraits generally benefit from using longer-than-normal focal lengths. The focal
length need not be too long: a typical portrait lens is anywhere from 85mm to 135mm
(35mm equivalent), well within the capability of most zoom lenses included with most
digital cameras. Accessory add-on lenses can extend less-than-optimal lens capability
but with a trade-off in quality. Another important feature to look for in a digital camera is aperture priority metering. With the choice of f-stops comes the ability to control
depth of focus, which, as you will see in Chapter 3, is useful. (Some consumer digital
cameras lack this option but include a so-called portrait-shooting mode, which essentially selects the widest possible aperture to diminish the sharpness of the background.)
LCD preview capability is absolutely a must when shooting portraits. Most digital cameras come with this feature, but some LCDs are bigger and more easily viewed than
others. If you choose to use external electronic strobes for your portraits, and you need
to trigger the strobe from the camera, a digital camera with a PC synch outlet is convenient. (There are ways around this, which you’ll see in the appropriate chapters.)
Important Features for Photographing Children and Events—Chapter 4
Children move constantly, and so do guests at weddings, birthday parties, and other
events. Many times they move very quickly. Some digital cameras are more responsive
and better equipped than others to shoot subjects that move. Anyone who has digital
folders full of out-of-focus shots or just-missed moments knows very well what I am
talking about. (I go into a lot of detail about digital camera shutter release lag in
Chapter 4.) Camera response is therefore a very important thing to consider when
looking at the specs of a digital camera. Another factor is an effective built-in flash.
Some built-in strobes are more powerful than others. Some are more accurate than
others. If the built-in strobe isn’t enough, does the camera have the capability to
accept an external dedicated strobe? Not all do.
You’ll definitely want a wide-angle lens capability if you are shooting groups.
Most digital cameras feature wider-than-normal focal lengths, but are they wide
enough? (This is where going to a camera store and picking up the camera to test it is
invaluable.) As you will see in Chapter 4, some photographers find it handy to frame
difficult-to-get shots with LCDs that swivel and move independently of the camera lens.
Important Features for Shooting Fast-Moving Action—Chapter 5
Important Features for Travel Photography—Chapter 6
Travel photography includes just about every photographic category you can imagine,
such as portraits, landscapes, and action. This makes selecting an appropriate digital camera all the more difficult. You will need an extremely versatile camera—for example, one
that includes a zoom lens with a wide range of focal lengths. (Add-on lenses are just one
more thing you have to carry and they can be easily lost.) You’ll also want a digital camera with reasonable power consumption. It’s nice if it uses commonly available batteries.
An on-the-road digital camera is also ideally durable and lightweight. If you are
traveling to certain parts of the globe, you don’t want a flashy camera that says, “Hey,
look at me!” Making backups of your digital images is always important but when you
are on the road it is particularly challenging. Some digital cameras store data on
durable mini-CDs; others have dual memory slots so you can make backup copies from
within your camera. (Digital wallet-like devices are always an option, but again, they
mean one more thing to lug around and possibly lose.)
13
■ T H E R I G H T D I G I TA L C A M E R A
Shooting things that move really fast—cars, horses, athletes, etc.—is very challenging,
and nearly impossible if your digital camera is not up to it. An ideal action digital
camera will first of all be extremely responsive. There are lots of tests for this, but
here’s the bottom line: when you turn on the camera, does it respond immediately?
When you press the shutter release does the camera respond quickly, and continue to
respond? The camera should have shutter speeds in excess of 1/1000th of a second
and a shutter priority mode. It should have a burst mode capable of capturing three or
more frames per second. (More is better, of course.) It should have a fast zoom lens
capable of 200mm (35mm equivalent) or longer focal length and a fast autofocus with
assist. Ideally, it will have some type of image stabilization option to minimize camera
or movement shake. (Usually this capability is built into the lens, but not always.) It
should have higher ISO option settings (up to 1600 ISO) to enable fast shutter speeds.
And last of all, an ideal action digital camera should be lightweight and have a sturdy
and durable body construction. Yeah, I know, you are going to pay more for these features. But they really make a difference.
Important Features for Architecture and Landscape Photography—Chapters 7 and 8
Up to this point I have not brought up image quality as an issue. However, when you
turn your lens to landscapes and architecture photography, image quality becomes a
critical part of the success of your work. Not only does the camera you use need to
have the capability to produce high-quality images, but you also need to know how to
get the most quality out of it. This subject is dealt with in great detail in Chapters 7
and 8. Higher pixel counts in excess of 5 megapixels are definitely a plus. World-class
optics are also important. You’ll want more camera controls—including, ideally, both
exposure and white-balance bracketing. You’ll also want the ability to save your image
files in a variety of file formats, including the extremely versatile RAW data format,
which you’ll hear a lot about throughout the book.
Considerations for Shooting Black and White—Chapter 9
CHAPTER
1:
BEFORE YOU SHOOT ■
14
Black-and-white photography is experiencing a renaissance. Beyond the obvious—a
black-and-white picture is often simply more beautiful than a color version—black-andwhite images stand out in a world saturated with color images; even though some digital cameras boast a “black and white” mode, you can produce great black-and-white
photos with just about any digital camera. In Chapter 9 I’ll show you how.
Important Features for Tabletop and Close-up Photography—Chapter 10
You’ll see in Chapter 10, “Shooting Your Stuff,” that shots of inanimate objects under
natural light can be made successfully with just about any digital camera. However, for
more flexibility and ease of use with studio lights, certain features in a digital camera
are desirable. For example, a digital camera with a PC synch outlet for a strobe trip
cord is very handy. Nearly all professional digital cameras and many (but not all)
prosumer-level digital cameras have one. Not so with consumer-level digital cameras—
they almost never have one. There are workarounds if your digital camera lacks this
outlet, as we see in Chapter 10. An accurate viewfinder is always helpful when shooting
objects. Only SLR digital cameras or cameras with electronic viewfinders have accurate
viewfinders. The workaround to this is to use the LCD display for framing, but this
uses a lot of battery power. Macro lens capabilities can be critical, especially if you are
shooting small objects such as coins and stamps. Close-up attachments are an option,
but sometimes they are cumbersome and not nearly as effortless to use as a digital camera with a good macro lens. Wide-ranging zoom capabilities are also useful. Longerthan-normal focal lengths flatten perspective, which is often desirable. Wide-angle
capabilities are also useful.
Important Features for Shooting Minimovies and Panoramas—Chapter 11
Not all digital cameras offer a minimovie option. Ironically, the more expensive the digital camera or the more professional it is, the less likely it is that the camera will have
the capabilities of capturing these short but extremely useful full-motion sequences.
After you read, “Shooting Digital Minimovies” in Chapter 11, I think you will agree
that having this capability is extremely attractive.
Another way to extend the ability of your digital camera is through special software that stitches multiple images together and creates either a panorama or an object
movie. (All of this is detailed in Chapter 11.) Just about any digital camera can be
used to create simple panoramas. However, if you want to create professional quality
panoramas or object movies, you’ll need a digital camera that has exposure and focus
control overrides. You’ll also need to use a tripod, and it really helps if your digital
camera comes with the appropriate screw mount.
Knowing Your Digital Camera
15
■ K N O W I N G Y O U R D I G I TA L C A M E R A
You may be surprised to hear that many of the professional photographers featured in
this book used cameras not labeled “professional.” But even a point-and-shoot camera
in the hands of a professional can be effective. It’s not just a matter of having a “good
eye.” A pro also knows one thing that many others don’t: understanding both the
strengths and weaknesses or your equipment is critical. A weakness can be overcome
only if you know it exists.
In short, it’s not the digital camera that makes a great photo; it’s the relationship
between the photographer and the camera—one based on knowledge and experience—
that produces the best results.
Take shutter lag. There has been a lot of improvement over the last few years,
but many digital cameras still suffer from it. You press the release button expecting to
get the shot, only to see later that the camera actually released the shutter a good second or so later. What can you do if you own such a camera? Well, first of all you need
to find out how bad the lag is. I learned a very simple test from my Los Angeles Times
friend, photographer Tony Barnard. Sitting at a coffee shop in San Francisco, he
showed me the test found in Chapter 4, “Testing for Shutter Release Lag.” Once you
figure out the lag, if any, you can learn to anticipate a shot.
Knowing your camera is such a huge and important subject that I’ve devoted a
whole series of sidebars to it throughout the book. (In fact, it’s one of three topic areas
that I’ll cover in sidebars throughout the chapters; you’ll meet the other two shortly.) In
most chapters you’ll see sidebars titled, “Know Your Camera,” and you’ll find technical explanations that you can apply to just about any digital camera.
Know Your Camera sidebars include:
•
General Quality Test (Chapter 1)
•
Controlling Depth of Field (Chapter 3)
•
Testing for Shutter Release Lag (Chapter 4)
•
Frame and Focus (Chapter 5)
•
What Goes Wrong with Digital Cameras (Chapter 6)
•
The Sensor Inside (Chapter 7)
•
File Formats (Chapter 8)
•
Built-In Flash (Chapter 10)
•
Lenses (Chapter 9)
•
LCDs (Chapter 9)
•
Adjusting White Balance (Chapter 11)
Know Your Camera: General Quality Test
There are many things to consider when determining the overall performance of your digital
camera. How does it perform in low light? How well does it handle a wide dynamic range of
light? Are the colors accurate? How well does the autofocus work? How well does the exposure system work? Is the camera responsive? Increasingly, camera reviewers are establishing
standardized tests that answer these and other questions and publishing their findings on the
Web and in print.
You can easily test for yourself at least two important quality issues: image sharpness and
color fringing. (You’ll need an image-processing program such as Photoshop, Photoshop
Elements, Paint Shop Pro, Microsoft Digital Image Suite, or proprietary software that comes
bundled with many digital cameras.)
To start:
1. Pick a scene that includes a lot of color and detail, such as the one shown here.
CHAPTER
1:
BEFORE YOU SHOOT ■
16
2. Use your camera’s controls to select the highest resolution setting. If you can, set your
camera to save your file in the TIFF format. If you must save your image as a JPEG, use
the best quality setting, meaning less compression. (Since this is a test of the imaging
capabilities of your digital camera, saving your data in RAW data format isn’t as useful.
RAW data, an option in mostly higher-end digital cameras, generally isn’t touched by a
digital camera signal processor, and therefore doesn’t suffer or benefit from onboard, onthe-fly image processing.)
3. Place your camera on a tripod and make an exposure. Since this is a general test, it’s
okay to use your camera’s autoexposure settings.
4. Now open your image with an image-processing program.
5. Using magnification and navigation tools, zoom into the areas with most detail. Look for
sharpness or lack thereof. For example, look at the image on the left. When magnified it
appears sharp, a result of both good optics and appropriate camera image sharpening.
The image on the right may at first glance look “sharper” than the one on the left. But
it’s actually been oversharpened by camera processing, and upon magnification appears
quite pixelated.
An image that appears soft or out of focus might be a result of poor optics, or it may not.
Many digital cameras apply a slight blur to the image during onboard image processing
to prevent color fringing. Also keep in mind that sometimes what you see as sharpness is
really just increased contrast, again produced by image processing. Don’t panic if your
test image looks too sharp (contrasty) or too soft. Many digital cameras allow you to
select from a variety of sharpness settings. Refer to your camera manual.
17
■ K N O W I N G Y O U R D I G I TA L C A M E R A
6. Now find an area with an abrupt color transition. Look for color fringing, which is often
found at the color transition areas where interpolation can lead to color artifacts and
loss of image detail. The image on the left below, for example, suffers from a lot of color
fringing, while the image on the right displays a more acceptable level of color fringing.
There isn’t much you can do about color fringing except, if possible, save your images in
“RAW Data
the RAW data format and process the images outside the camera (
Revealed,” in Chapter 2).
Software Solutions
CHAPTER
1:
BEFORE YOU SHOOT ■
18
The potential of imaging software is something to always keep in mind while shooting.
Knowing what can and can’t be fixed will streamline the way you shoot, and ultimately
make you a better photographer.
Several commercial imaging software applications are available; among the more
popular ones are Photoshop, Photoshop Elements, Paint Shop Pro, Apple Aperture, Adobe
Lightroom, and Microsoft’s Digital Image Suite. Many digital cameras come bundled with
one of these software packages, or a manufacturer’s own basic imaging software. I’ve written books on using Photoshop and Photoshop Elements, so I am partial to those programs.
Throughout the book, I’ve devoted a second series of sidebars to many of the
most common photographic issues that imaging software can address. These sidebars
are titled “Software Solutions” and are marked with an icon like the one in the following sidebar, and they cover a wide range of software-related issues, including:
•
Changing Pixel Count (Chapter 1)
•
Blurring a Background (Chapter 3)
•
Digital Fill Flash, Red Eye Removal, and Sharpening an Out-of-Focus Image
(Chapter 4)
•
Changing a Background and Adding Motion Blur (Chapter 5)
•
Grabbing Stills from a Minimovie (Chapter 5)
•
Changing the Quality of Light (Chapter 6)
•
Fixing Keystoning (Chapter 7)
•
Fixing Exposure (Chapter 8)
•
Changing an Object’s Color or Texture (Chapter 10)
•
Removing Noise and Other Artifacts (Chapter 11)
Having noted what can be fixed with software, it’s equally important to know
that sometimes it is difficult or impossible to fix an image with software, such as times
when you have:
•
Radically distorted images caused by a wide-angle lens or faulty optics, although
software such as DxO Optics Pro can help
•
Radically overexposed or underexposed images
•
Bad facial expressions or other subject-induced problems
•
A blank image, as in leaving a lens cap on (you’d be surprised…)
•
A totally out-of-focus image (software sharpening works only to a degree)
•
Not enough resolution (software interpolation adds only pixels, not details)
Software Solutions: Changing Pixel Count
You can use software such as Photoshop, Photoshop Elements, and Genuine Fractals to
increase or decrease the number of pixels generated by your digital camera. This is useful
when you want to make an image smaller for the Web or for e-mail, or if you want to increase
the perceived resolution. Remember, when you increase resolution this way, you are adding
only pixels, not detail. Also keep in mind that when you interpolate data up or down, your
image invariably “softens.” I suggest that when you’re using Photoshop, for example, you
apply a slight Unsharp Mask filter when you finish resizing.
Accessories That Make a Difference
Finding Up-to-Date Information and Support
Hardly a day goes by without a new digital camera or accessory hitting the market. We
are in an explosive and exciting time and it’s hard to keep up. The information presented in this book is meant to be timeless (within reason), giving you solid tips and advice
on the process of shooting digital. For up-to-date information on specific cameras,
printers, and other products related to digital photography, I suggest you visit the companion website for this book, www.shooting-digital.com. There you’ll find links to websites that offer timely information. You’ll also find links to user forums and camera
clubs where you can read what other impartial users have to say, and links to workshops and classes that I’ve found particularly useful. I’ll update the links as need be.
You’ll also find links to many of the sources mentioned throughout the book. Although
websites are very useful for comparing prices and specifications, ultimately you’ll want
to see or touch a piece of digital photography equipment. It’s especially important to
hold a digital camera and gauge how it fits and feels and to see whether or not the controls are intuitive, or if the LCD is bright or big enough. National store chains such as
Ritz Camera and CompUSA are good places to start for so-called consumer and prosumer digital cameras. Stores that offer professional digital cameras are rarer, but you
can find them by checking local Yellow Pages listings under “Photography.” I’ve provided links to stores around the country at www.shooting-digital.com. Trade shows are
another excellent venue for viewing and touching equipment, so I’ve also included links
to trade shows such as the Photo Marketing Association International (PMAI) and
PhotoPlus Expo.
19
■ F I N D I N G U P - T O - D AT E I N F O R M AT I O N A N D S U P P O RT
Accessories extend the capabilities of digital cameras, sometimes quite profoundly.
Custom-fitted underwater casings, for example, open a new world of visual exploration. Wide-angle lens attachments help overcome many of the optical limitations of
digital cameras. Special LCD shades make it possible to review images even in the
bright sun.
Important accessories are mentioned throughout the main text of the book, but
whenever you see a sidebar with this icon (
) you’ll find additional information on
accessories that I feel make a difference. These include:
•
Add-On Lenses (Chapter 3)
•
Removable Memory Storage (Chapter 4)
•
From the Kitchen Drawer (Chapter 5)
•
Backup Devices (Chapter 6)
•
Tripods (Chapter 7)
•
External Light Meters (Chapter 8)
•
External Artificial Lights (Chapter 10)
•
Batteries (Chapter 5)
•
Underwater Casings (Chapter 11)