1
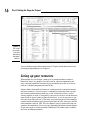
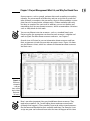
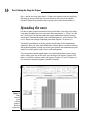
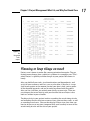
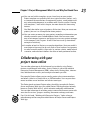
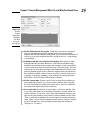
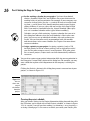
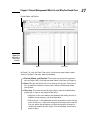
Chapter 1
RI
AL
Project Management: What It Is,
and Why You Should Care
TE
In This Chapter
▶ Discovering how traditional project management makes the move to software
▶ Understanding the project manager’s role
MA
▶ Understanding what elements of a project are managed in Project
▶ Exploring the role of the Internet in project management
D
▶ Using a template to start a new project
▶ Saving a project file
GH
W
TE
▶ Finding help in Project
PY
RI
elcome to the world of computerized project management with
Microsoft Project. If you’ve never used project management software,
you’re entering a brave, new world. It’s like walking from the office of 25
years ago — with no fax, voicemail, or e-mail — into the office of today with
its wealth of high-tech devices.
CO
Everything you used to do with handwritten to-do lists, word processors, and
spreadsheets all magically comes together in Project. However, this transition won’t come in a moment, and you need a basic understanding of what
project management software can do to get you up to speed. If you’ve used
previous versions of Project, this little overview can help you refresh your
memory as well as ease you into a few of the new features of Project 2010.
So, even if you’re a seasoned project manager, take a minute to review this
chapter. It provides the foundation for how you’ll work with Project from
here on.
10
Part I: Setting the Stage for Project
The ABCs of Project Management
You probably handle projects day in and day out. Some are obvious, because
your boss named them so that any fool would know that they’re projects:
the Acme Drilling Project or the Network Expansion IT Project, for example. Others are less obvious, such as that speech thing you have to do on
Saturday for your professional association or washing the dog.
If you need to organize a company holiday party, it’s a project. If you were
handed a three-year Earth-exploration initiative to find oil in Iowa, coordinate
subcontractors and government permits, and work with a team of 300 people,
that’s definitely a project. Yes, even that speech you have to present is a
project because it has certain characteristics.
Understanding what your projects, large or small, have in common is the
basis of understanding what Project can do for you. All projects have
✓ An overall goal and unique deliverables
✓ A project manager
✓ Individual tasks to be performed between a specific starting point and
ending point
✓ Timing for those tasks to be completed (such as three hours, three days,
or three months)
✓ Timing relationships between those tasks (for example, you can’t put a
new manufacturing process in place until you train people in how to use
the process)
✓ Resources (people, equipment, facilities, and supplies, for example) to
accomplish the work
✓ A budget (the costs associated with those people, equipment, facilities,
and supplies)
Project management is simply the process of managing all the elements of a
project, whether that project is large or small.
The three Ts: Tasks, timing, and
dependencies (well, two Ts and a D)
As Lewis Carroll said, “If you don’t know where you’re going, any road will
get you there.” So, first things first: You have to understand the goal of your
project so that you can begin to build the tasks that have to be performed to
get you there.
Chapter 1: Project Management: What It Is, and Why You Should Care
A task is simply one of those items you used to scribble on your handwritten
to-do lists, such as Write final report or Apply for permits. Tasks are typically
organized into phases (appropriate stages) in Project, arranged in an outlinelike structure, as you can see in the project shown in Figure 1-1. Because
timing is essential in any project, Project helps you set up and view the
timing relationships among tasks.
Figure 1-1:
You’ll probably spend
most of
your time in
Project in
outline-like
Gantt Chart
view.
Becoming a task master
A task can be as broad or as detailed as you like. For example, you can create
a single task to research your competition, or you can create a project phase
that consists of a summary task and subtasks below it. For example, the summary task may be Competitive Research, with the subtasks Researching
Online Business Databases, Assembling Company Annual Reports, and
Reviewing Competitive Product Lines.
Adding tasks to a Project file doesn’t cost you a thing (except a nanobit of
memory), so a project can have as many tasks and as many phases as you like.
You simply use the outlining structure in Project to indent various levels of
tasks. The more deeply indented in an outline a task is, the more detailed the
task.
11
12
Part I: Setting the Stage for Project
One handy thing about this outlining structure is that you can roll up all the
timing and cost data from the subtasks within your phases into summarylevel tasks. Three sequential subtasks that take a day each to complete and
cost you $200 apiece result in a summary task that spans three days and
costs $600. You can view your project at various levels of detail or get automatic tallies of timing and costs if you prefer to simply view the summary
level of tasks.
For more about defining and creating tasks, check out Chapter 4.
All in the timing
They say that timing is everything: Rome wasn’t built in a day, a stitch in time
saves nine, and don’t even ask me about how long it takes to get to retirement. The importance of timing applies to Project tasks, too. Almost all tasks
have timing — referred to as duration — which is the amount of time needed
to complete the task.
The only tasks without duration are milestones. A milestone — in most
cases — is a task of zero duration. In essence, it simply marks a moment in
time that must be reflected in your Project outline. Typical milestones are the
approval of a brochure design and flipping the switch to start up an assembly
line. Such tasks don’t involve any real work or effort, but they must be completed for the project to move ahead.
Project doesn’t provide magic formulas for duration: You assign duration
based on your own experience and judgment. Does designing a product package take three days or three weeks? Will obtaining a building permit happen
in a day or a month? (Remember that you’re dealing with city hall, so think
before you answer!) Project isn’t an oracle: You have to provide facts, figures,
and educated guesses to build your Project schedule. After that information is
entered, though, Project can do some wonderful things to help you maintain
your schedule and monitor your progress.
Task dependencies
The final piece in the puzzle of how long your project will take is the concept
of dependencies, or the timing relationships among tasks. If you have a schedule that includes ten tasks that all begin at the same time, your entire project
will take as long as the longest task (see Figure 1-2).
After you define and implement timing relationships among tasks, your
schedule can stretch over time like a long rubber band. For example, one
task may begin only after another is finished. Another task can start halfway
through the preceding task. The second task cannot start until a week after
the first task is finished. Only after you start to assign these relationships can
you begin to see a project’s timing as related to not just each task’s duration
but also the specific ways in which the tasks relate to each other.
Chapter 1: Project Management: What It Is, and Why You Should Care
Figure 1-2:
This schedule includes
tasks with
timing but
no dependencies.
Here are some examples of dependencies:
✓ You can’t begin to use a new piece of equipment until you install it.
✓ You must wait for a freshly poured concrete foundation to dry before
you can begin to build on it.
✓ You can’t start to ship a new drug product until the FDA approves it.
Figure 1-3 shows a project plan where each task’s duration and the dependencies among tasks have been established, enabling Project to calculate the
resulting overall timing of the project.
One other brief note about the timing of tasks: In addition to applying dependencies to tasks, you can apply constraints. For example, say that you don’t
want to start shipping your new cake flavor until you get the ad for it in your
holiday catalog, so you set a dependency between those two events. You can
also set a constraint that says that you must start producing the cakes no
later than November 3. In this case, if you don’t make the catalog deadline,
the product will still ship on November 3; that task will not be allowed to slip
its constraint because of this dependency relationship.
13
14
Part I: Setting the Stage for Project
Figure 1-3:
This schedule includes
tasks with
both timing
and dependencies.
You can find out more about constraints in Chapter 4 and about the fine art
of managing dependencies in Chapter 6.
Lining up your resources
When people first use Project, some get a bit confused about resources.
Resources aren’t just people: A resource can be a piece of equipment you
rent, a meeting room that you have to pay an hourly fee to use, or a box of
nails or a software program you have to buy.
Project allows three kinds of resources: work resources, material resources,
and cost resources. A work resource is charged by how many hours or days
the resource (often human) works on a task. A material resource, such as
sewing supplies or steel, is charged by a per-use cost or by a unit of measurement (such as square yards or linear feet or tons). A cost resource has a specific cost each time you use it. That may vary from task to task. For example,
a professional conference pass for one event may be $250, and a pass for the
next conference may be $500. This cost doesn’t vary by how much time you
spend at the conference, but it may vary depending on other external factors.
So you can create a resource named Conference Pass and assign it to different tasks at different amounts.
Chapter 1: Project Management: What It Is, and Why You Should Care
Some resources, such as people, perform their work according to a working
calendar. If a person works an 8-hour day and you assign him to a task that
takes 24 hours to complete, that person has to put in three workdays to complete the task. In comparison, someone with a 12-hour workday takes only
two days to complete the same task. In addition, you can set working and
nonworking days for your human resources, which accommodates variations
such as 4-day weeks or shift work.
You can set different rates for resources, such as a standard hourly rate.
Project applies the appropriate rate based on each resource’s calendar and
work assigned. For more about resources and costs, see Chapter 7.
Several views in Project let you see information about resources and how
their assignments to tasks have an effect on project costs. Figure 1-4 shows
you the Resource sheet, which has columns of information about resources
and their costs.
Figure 1-4:
Resources
charged at
a rate per
hour are the
basis of how
Project tallies costs.
Here’s one other important thing you should know about resources: They
tend to have conflicts. No, I’m not talking about conference room brawls
(although that happens). These conflicts have to do with assigned resources
that become overallocated for their available work time. For example, if you
assign one poor soul to three 8-hour tasks that must all happen on the same
15
16
Part I: Setting the Stage for Project
day — and in the same eight hours — Project has features that do everything
but jump up on your desk and set off an alarm to warn you of the conflict.
(Luckily, Project also provides tools that help you resolve those conflicts.)
Spreading the news
I’m one of those people who need instant gratification. One of the first things
I ask about learning how to use any new software product is, “What’s in it for
me?” Until now, I’ve told you about the type of information you have to put
into Project: information about tasks, task dependencies, and resources. But
isn’t it about time you got something back from Project? Of course it is.
You finally reached one of the big payoffs for entering all that information:
reporting. After you enter your information, Project offers a wealth of viewing
and reporting options to help you review your project and communicate your
progress to your project team, clients, and management.
You can generate predesigned reports based on information in your schedule or simply print any of the views you can display in Project. Project 2010
offers a set of basic reports and visual reports. Figures 1-5 and 1-6 show you
just two of the reporting options available in Project.
Figure 1-5:
Study
resource
usage
with the
graphical
Resource
Graph view.
Chapter 1: Project Management: What It Is, and Why You Should Care
Figure 1-6:
An
Unstarted
Tasks
report.
Planning to keep things on track
Projects aren’t frozen in amber like some organizational mosquito: They go
through more changes than a politician’s platform in a campaign year. That’s
where Project’s capability to make changes to your project data comes in
handy.
After you build all your tasks, give them durations and dependencies, and
assign all your resources and costs, you set a baseline. A baseline is a snapshot of your project at the moment you feel your plan is final, you’ve gotten
all the required approvals, and you’re ready to proceed with the project.
After you set a baseline, you record some activity on your tasks. Then you
can compare that actual activity with your baseline because Project saves
both sets of data in your schedule.
Tracking activity in your project involves recording the actual timing of tasks
and recording the time that your resources have spent on those tasks, as well
as recording actual costs. You can then display Project views that show you
how far off you are at any time (compared with your baseline) in terms of the
actual timing of tasks and the cost of your project.
17
18
Part I: Setting the Stage for Project
Whether you have good news or bad, you can use reports to show your boss
how things are going compared with how you thought they would go. Then,
after you peel your boss off the ceiling, you can use many more Project tools
to make adjustments to get everything back on track.
The Role of the Project Manager
Although understanding the role (let alone the usefulness) of some managers isn’t always easy, it’s always easy to spot the value of a project manager.
This person creates the master plan for a project and tries to ensure that it
gets implemented successfully. Along the way, this key person uses skills and
methods that have evolved over time, always seeking to manage how things
get done and generally keeping schedules on track.
A real pro project manager may have a degree in project management or
a professional certification. For example, if you see the initials PMP beside
someone’s name, that person has achieved the Project Management
Professional certification from the Project Management Institute, the leading
global organization establishing project management standards and credentials and offering educational and other resources in the field.
What exactly does a project manager do?
A project manager isn’t always the highest authority in a project; often that
role belongs to whomever manages the project manager, up to and including
members of senior management. Rather, the project manager is the person
on the front lines who makes sure that the parts of the project come together
and assumes hands-on responsibility for successes as well as failures.
In project management parlance, the person who champions (and has the ultimate responsibility for) a project is the project sponsor.
A project manager manages these essential pieces of a project:
✓ The project plan or schedule: This is what you create with Microsoft
Project. It includes the estimated steps and associated timing and costs
involved in reaching the project goal.
✓ Resources: Managing resources involves resolving resource conflicts
and building consensus as well as assigning resources and tracking their
activities on the project. This part of the job also involves managing
nonhuman resources, such as materials and equipment.
✓ Communication with the project team, management, and customers:
Communicating the project’s status to everyone who has a legitimate
stake in its success (stakeholders) is a key responsibility.
Chapter 1: Project Management: What It Is, and Why You Should Care
Although a project manager may work for a project sponsor, the project often
also has a customer for whom the end product is produced. That customer can
be outside the project manager’s own company, or within.
Understanding the dreaded
triple constraint
You’ve seen the signs at the copy store or the auto repair place: You can
have it fast, cheap, or done well; pick two. That, my friend, is the triple constraint of project management in a nutshell.
In a project, you have timing, resources (which are essentially costs),
and quality of the product or service produced at the end of the project.
Microsoft Project helps you manage the resources and timing of your project.
The quality of your project is often affected directly by how well you manage
them. If you add time, costs increase because resources are working longer
hours at a certain wage. If you take away resources, you save money, but this
can affect quality — and so on.
Coming to a logical balance of time, money, and quality is at the core of what
a good project manager does throughout the life of a project.
Applying tried-and-true methodologies
Microsoft Project incorporates some scheduling and tracking tools that are
the result of many years of developing project management methods. A few
of these are worth noting:
✓ The Gantt chart (shown in Gantt Chart view of Figure 1-7), which is the
main view of Project, shows you a spreadsheet with columns of data along
with a graphical representation of the tasks in the project arranged along
a horizontal timeline. By reviewing the data in the columns (such as task
name, start date, finish date, and resources assigned to tasks), you can
understand the parameters of each task and see its timing in the graphical
area. Being able to view all this information on one page helps you understand what’s happening in your project in terms of time and costs.
✓ The Network Diagram (also called a logic diagram), shown in Figure
1-8, is essentially the Microsoft version of a PERT chart. PERT (Program
Evaluation and Review Technique) was developed during the construction of the Polaris submarine in the 1950s. This mostly graphical representation of the tasks in your project reflects the flow of work in your project
rather than the literal timing of tasks. This view helps you to see how
one task flows into another and to get a sense of where you are — not so
much in time, but rather in terms of the work you have to accomplish.
19
20
Part I: Setting the Stage for Project
Figure 1-7:
The Gantt
chart
method
of project
scheduling as it
appears in
Microsoft
Project.
Figure 1-8:
A kissin’
cousin to
the original
PERT chart,
the Network
Diagram
focuses on
work, not
on time.
Chapter 1: Project Management: What It Is, and Why You Should Care
✓ Risk management is a central part of project management because,
frankly, projects are chock-full of risk. You run the risk that your
resources won’t perform, that materials will arrive late, that your customer will change all the parameters of the project halfway through —
well, you get the picture.
Risk management is the art of anticipating risks, ranking them from most
to least likely, and determining strategies to prevent the most likely ones
from occurring. Project helps you with risk management by allowing
you to try out what-if scenarios: You can change the start date or length
of a task or phase of tasks (for example) and see just what that change
does to your schedule, such as the delays, cost overruns, and resource
conflicts that might occur in such a scenario, down to the last hour and
penny. Having this kind of information at your fingertips makes risk management easier and (almost) painless.
✓ Resource management consists of using resources wisely. A good project
manager finds the right resource for the job, assigns that person a reasonable workload, stays alert for shifts in the schedule that cause that resource
to be overbooked, and during the life of the project makes adjustments that
keep all resources most productive. In Project, tools are available, such as
a resource graph (traditionally called a histogram) and the resource usage
chart (shown in Figure 1-9), which reflects resource workload.
Figure 1-9:
A resource
usage
chart helps
you spot
resourcescheduling
problems.
This icon indicates a resource that needs help
21
22
Part I: Setting the Stage for Project
Figure 1-9 also shows an exclamation point icon (indicator) that tells you
that one resource needs help, which might involve using resource leveling, a calculation that automatically reschedules resources to resolve
overbooking. Resource leveling can enable you to manage resources
much more effectively. You can see how overbooked the PR Manager is
on two dates.
You can use codes for resources that designate skill levels or abilities so that
finding the right resource for each job is as simple as performing a search.
From To-Do List to Hard Drive
If you’re reading from start to finish in this chapter, you’re probably shaking
your head and saying, “Boy, handwritten to-do lists look pretty good right
now. Beats creating hundreds of tasks, assigning them durations, establishing
dependencies among them, creating resources, entering resource calendar
and rate information, assigning resources and costs to tasks, entering activity
performed on tasks . . .” and so on.
Well, you’re right and wrong about that. You do have to enter a lot of information into Project to get the benefit of its features. But you can also get a lot
out of Project.
Getting up to speed with Project
Take a moment to look at some of the wonderful things Project can do for
you. This list describes why you (or your company) bought it and why you’re
investing your time to read this book.
With Project, you enjoy the following benefits:
✓ Project automatically calculates costs and timing for you based on your
input. You can quickly recalculate what-if scenarios to solve resource
conflicts, get your costs within budget, or meet your final deadline.
✓ Project offers views and reports that, with the click of a button, make a
wealth of information available to you and those you report to. You no
longer have to manually build a report on total costs to date to meet a
last-minute request from your boss. If she wants to know total costs to
date, you can just print your Tracking Gantt view with the Cost table displayed or print the Budget report. See Chapter 16 for information about
reporting.
Chapter 1: Project Management: What It Is, and Why You Should Care
✓ You can use built-in templates to get a head start on your project.
Project templates are prebuilt plans for a typical business project, such
as commercial construction, an engineering project, a new product rollout, software development, or an office move. See the section “Starting
with templates,” later in this chapter, for more about this time-saving
feature.
You likely do similar types of projects all the time. After you create one
project, you use it as a template for future projects.
✓ You can create resources for your project according to information you
already created in your Outlook Address Book. You can even create
one set of company resources and give access to every project manager
in the company (see Chapters 18 and 19 for how to set up centralized
enterprise resources).
✓ A number of tools in Project use complex algorithms (that you couldn’t
even begin to figure out) to do such tasks as level resource assignments
to solve resource conflicts, filter tasks by various criteria, model what-if
scenarios, and calculate in dollars the value of work performed to date.
Collaborating with your
project team online
You can take advantage of all the Internet has to offer by using Project
features to collaborate with others. In fact, Project is part of the world of
Enterprise Project Management (EPM), where easily sharing ideas, information, and documents across your enterprise becomes possible.
For example, Project allows you to e-mail a project plan to team members
and others, either as a Project file or as PDF document. You can post documents to online server locations and ask for team input.
The Professional version of Project offers the ability to work with Project
Server and Project Web App (also called Project Web Application; formerly
known as Project Web Access), which enhance workgroup collaboration.
You can take advantage of an online project center and resource center with
areas for discussions, progress tracking, document exchange, and more.
Part V of this book, “Working with Enterprise Projects,” looks at how to
take advantage of the enterprise-wide features of Project Server and Project
Web App.
23
24
Part I: Setting the Stage for Project
Getting Started
As Shakespeare said, “In delay there lies no plenty.” I don’t know about
you, but I need all the plenty I can get, so it’s time to jump in and start using
Project.
You have two choices when starting a new project. You can build a project
from scratch by entering individual task and resource details, or you can use
a project template that already contains data related to your industry or the
type of project you’re doing.
Starting from scratch
When you open Project 2010, you see a blank project file on-screen. You can
start building your new project directly in this blank schedule. Starting to
create a new project usually involves entering some general project information and then adding some task information.
You can open a new, blank project schedule at any time by choosing File➪
New, clicking the Blank Project icon under Available Templates, and then
clicking Create. (The File tab is located in the upper-left corner of the Project
screen.)
You need to enter much more information in addition to general project information and tasks to build a complete project, as you discover in the next few
chapters. Entering general project information and task information is your
usual starting point, however.
Tell Project about your project
With a blank project open, a logical first step is to enter some general project
information, such as the project start date. To do so, click the Project tab on
the Ribbon and click Project Information in the Properties group. (You find
out more about the Ribbon in the next chapter.) The Project Information
dialog box appears, as shown in Figure 1-10.
Here’s what you can do in this dialog box:
✓ Set the start date for the project. Good project managers always plan in
advance. If you’re not sure when the project will start, set the start date
about a month from today. Then, after you build some tasks and have
a better handle on the entire length of your project, you can come back
and set a real start date. Project automatically recalculates dates for all
tasks with dependencies when you do.
Chapter 1: Project Management: What It Is, and Why You Should Care
Figure 1-10:
Use the
Project
Information
dialog box
for some
basic project settings.
✓ Set the finish date for the project. Especially if you have a drop-dead
date (an attention-getting term!) beyond which the project cannot
wander and still reach on-time completion, you can set the finish date. In
such a case, be sure to look at the next setting in this list — and change
it accordingly.
✓ Schedule from the start or finish of the project. Most projects work
forward from the start date. However, if you have an absolute dropdead date for the end of your project (for example, if you’re organizing
a sports event that must occur on New Year’s Day next year), you may
want to set the finish date and then work backward to fit all your tasks
into the allotted length of time. (Because under certain circumstances
this method schedules tasks as late as possible, it can be tricky to use
it and get an accurate schedule.) If you change this setting to Project
Finish Date, the Finish Date field becomes available.
✓ Set the current date. Project can fill in the current date according to
your computer calendar. Or, you can choose another date if you like,
but that usually doesn’t make much sense unless you’re in a different
time zone from where the project will occur.
✓ Set a status date. By default, no status date is set for the project. You
use a status date when you’re tracking the progress of your project at
regular intervals. If you set a status date, your computer assumes that
any activity you record in your project is being tracked as of this date.
(This is particularly important to ensure Project accurately calculates
some values, such as the ultra-wonky earned value, a statistic I explain
to you in Chapter 14.) You can find out more about this feature in
Chapters 12, 13, and 14.
25
26
Part I: Setting the Stage for Project
✓ Set the working calendar for your project. You have three default
choices: Standard, Night Shift, and 24 Hours. Base your choice on the
working habits of your organization. For example, if your company uses
resources in three shifts per day — a total of 24 hours of straight working time — and all those shifts would contribute work to your project,
choose 24 Hours. If you use a day shift and a night shift, choose Night
Shift. If you work a standard 8-hour day, choose Standard. (Most projects use a standard calendar with a typical 8-hour workday.)
Calendars can get a little confusing. A project calendar that you set in
this dialog box indicates what the usual workday is like in your company, but you can set up individual calendars for each resource you
create. You can then more easily accommodate both shift workers
and nine-to-fivers in the same schedule. See Chapter 3 for more about
resource calendars.
✓ Assign a priority to your project. Assigning a priority (such as 500
for high priority or 100 for a lower priority) can be especially useful if
you use the same resources across several projects. With your priorities set on all projects, Project tools can then automatically reallocate
resources.
You can also create custom project information fields for your organization in
the Enterprise Custom Fields section of this dialog box. For example, you may
want a field that explains which department in the company is running the
project.
Clicking the Statistics button in this dialog box presents an overview of your
project, as shown in Figure 1-11.
Figure 1-11:
You can
view a summary of
calculations
about the
project.
Perusing the project schedule
After you choose settings in the Project Information dialog box and then click
the OK button, you’re faced with a blank Project schedule, as shown in Figure
1-12. As a writer, I can tell you that nothing is as daunting — or as inspiring —
as facing a blank page. It’s the canvas on which you create your Project plan.
Chapter 1: Project Management: What It Is, and Why You Should Care
File tab, Ribbon, and Timeline
Figure 1-12:
Begin with a
new Project
schedule.
Sheet
Chart area
In Figure 1-12, you see Gantt Chart view. You discover more about various
views in Chapter 2. For now, note the following:
✓ File tab, Ribbon, and Timeline: These tools are part of the new interface for Project 2010. You find out more about using them in Chapter 2.
✓ Sheet: The left side of the view is the sheet or sheet pane. You can use
this spreadsheet interface to enter, edit, and view information about
your project.
✓ Chart area: The chart area on the right reflects your task information
graphically as soon as you begin to add tasks:
• Gantt bars in this area indicate the duration and timing of tasks in
addition to the progress you record on them.
• The timescale — the indications of time increments across the top
of the chart area — helps you interpret the timing of each task bar.
You can adjust the increments to show your project in larger or
smaller increments of time. Figure 1-12, for example, shows increments in days.
27
28
Part I: Setting the Stage for Project
You start building a project by entering tasks. Simply click a cell in the Task
Name column of the sheet section and then type the name. You can enter and
edit details of a task by entering information directly into various columns
(which you can display in many views) or by double-clicking the task name
in the sheet to access the Task Information dialog box (see Figure 1-13). I get
into more detail about entering task information in Chapter 2.
Figure 1-13:
The various tabs in
this dialog
box hold a
wealth of
information
about a
single task
in your
project.
Starting with templates
Reinventing the wheel has never been one of my favorite sports, so I’m grateful that Microsoft provides some convenient project templates through the
online site Office.com. These include projects by type, for example, an engineering project or office move. Templates already have many tasks appropriate to the task type created for you.
Templates typically contain sample tasks broken into logical phases, with
task durations and dependencies in place. The templates from Microsoft
often include resources, but you can create your own resources as well as
use, edit, or delete the ones provided.
You can open a template from the Backstage view, a new location in Project
2010 where you create and manage Project files. To do so, follow these steps:
1. Choose File➪New.
The Available Templates screen appears, as shown in Figure 1-14.
2. Click the a category icon in the Office.com Templates section, then
click a category icon if necessary. Or, click More Templates and
then click a category.
The templates in that category appear.
Chapter 1: Project Management: What It Is, and Why You Should Care
Figure 1-14:
Open a
template
from the
Available
Templates
screen
in the
Backstage.
3. Click a template to display a preview.
As shown in Figure 1-15, a preview of the selected template appears at
the far right.
4. When you find the template you want to use, click Download.
The template opens in Project template format (MPT). You can then use
the Save As command on the File tab to save the file as a regular Project
file (the correct type will be selected automatically) with a new name.
From there, you can delete tasks, move tasks around, or add tasks as
necessary for your project.
After opening a template, be sure to check its project information
(choose Project➪Project Information) to make sure that the Start Date
and Calendar options are set as you want.
If you modify a file and think that you might use that set of tasks again for
future projects, consider saving the file as a custom template. Just choose
File➪Save As, and then select Project Template in the Save as Type list.
Note that after you download a template, you can select it without downloading it again. To do so, choose File➪New, click My Templates at the top of
the Available Templates screen, and then double-click the template in the
Personal Templates tab of the New dialog box.
29
30
Part I: Setting the Stage for Project
Figure 1-15:
The
Backstage
view previews the
selected
template.
Saving a Project for Posterity
Saving Project files works just as saving does in most other software you’ve
used. Here’s a reminder.
To save a Project file that you haven’t saved before, follow these steps:
1. Choose File➪Save As.
You can choose Save instead if you created the project from scratch
rather than from a template.
2. Use the navigation pane at the left (Windows 7 and Vista) or the Save
In list (Windows XP) to locate the folder where you want to save the
file; then click to select it.
3. In the File Name text box, type a name for the project.
4. Click the Save button.
It’s good organizational practice to create a folder for your project where you
save in one place not only your Project files but also supporting documents,
e-mails, and other items. You can create a new folder from within the Save As
dialog box by clicking the New Folder button.
Chapter 1: Project Management: What It Is, and Why You Should Care
Getting Help from Project
If you can get to work without mishap and turn on your computer, you
probably know how to use a help system in software, too. Table 1-1 offers a
rundown of the types of help you can find in Project 2010 when you click the
Help button just above the right end of the Ribbon or when you press F1.
Table 1-1
Project Help Features
Help Feature
How to Use It
Browse Project Help
The main part of the Project Help window displays
a list of overall help categories. Click a category,
and then browse to a subcategory if needed before
clicking the topic to view.
Back, Forward, Stop, and
Refresh buttons
These buttons on the Project Help window toolbar
enable you to move between screens and stop and
refresh downloaded help as needed.
Home button
Redisplays the initial Help contents.
Print button
Prints the current document.
Change Font Size button
Enables you to change the size of the text in the
Project Help window.
Show/Hide Table of
Contents button
Enables you to display (or hide) a Table of Contents
pane at the left so you can drill down a “tree” of help
contents.
Keep On Top/Not On Top
button
Enables you to specify whether or not the Project
Help window should stay open in front of other
windows.
Search
Enter a term or phrase to search for in the text box
and then click the magnifying glass to perform the
search. To control what locations are searched,
click the arrow at the right side of the word Search
and click a selection.
Offline/Connected to
Office.com button
Click this button in the lower-right corner of the
Project Help window and then click a choice in
the menu to control whether you are viewing help
installed on your computer or the online help from
Office.com.
As you can see, you could spend a year just working your way through all the
help topics in Project. Don’t worry; they’re there when you need them.
31
32
Part I: Setting the Stage for Project