1
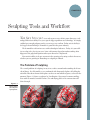
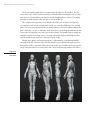
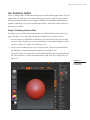
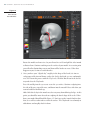
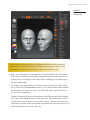
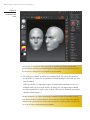
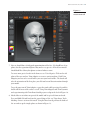
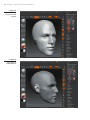
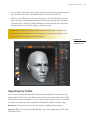
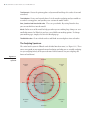
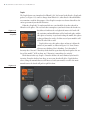
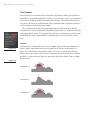
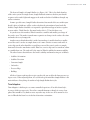
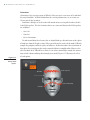
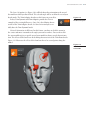
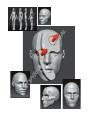
D TE GH RI PY CO RI TE MA AL Chapter 1 Sculpting Tools and Workflow You face two core issues when you create realistic game characters: technology and artistic ability. Five years ago the biggest problem was technology. We simply couldn’t put enough polygons on the screen to get true realism. Today, artistic ability is the biggest factor limiting a 3D modeler’s growth in the game industry. The demand for realism increases with technological advances. Today, it is your ability to sculpt a face, but in two years’ time realism may depend on understanding what happens to the palpebral ligament when your character is frightened. Your artistic ability is the one constant in the equation of creating realistic characters, whether you are painting in Photoshop or sculpting in ZBrush. The Problem of Sculpting The central problem of sculpting, in my view, revolves around understanding the hierarchy of planes. In a life model, we are confronted with thousands of planes all calling for attention. How do we know which planes to focus on and which to ignore, at least for the moment? Figure 1.1 shows a sculpture by Jean-Baptiste Carpeaux of a woman smiling. Even with its smooth, beautiful surface, the underlying planes of its construction still shine through. Figure 1.1 Planes define the sculpture by Carpeaux. 2 ■ Chapter 1: Sculpting Tools and Workflow The key to working with planes is to move from the largest to the smallest. You, the artist, must create inside of your own brain a 3D model that has multiple levels of resolution. On level 1, it should have the most basic and simplistic planes. On level 5, it might have planes small enough to describe the caruncula of the eye. The sculpture by Carpeaux reveals that the side of the nose is a plane, the lips have several planes, and even the round surface of the eye can be distilled into a few essential planes. As we get more detailed with our model, though, we focus on smaller and smaller planes. In Figure 1.2 you see Anatomy Tool’s artist busts, which helps break down the different stages of sculpting a face into easy-to-digest forms. The human body is simply too complex to tackle everything at once. Creating a hierarchy of planes will help you solve only the problems you need to at each stage of your sculpt. Finding these planes and organizing them is, unfortunately, a task through which I can only guide you. You must enter the dark woods by yourself and find your own way through the endless variations of form that come before you. I will do my best to provide a map, arm you with the necessary tools, and send you on your way with my best advice. Figure 1.2 Anatomy Tool’s artist busts Our Sculpting Toolkit Our Sculpting Toolkit There are many features in ZBrush and many ways to work with the application. The goal of this book is to guide you in creating realistic game characters, and so in this section, I will present what I consider to be a sculptor’s workflow. This workflow should help you organize complexity, create your own hierarchy of planes, and sculpt realistic characters faster than ever before. Project: Sculpting a Human Face To really get a sense of how tools work together, we will look at them in the context of a project. In this case, we will sculpt a human face and look at each tool in its turn: 1. Our first goal is to establish the overall shape of a head with the Move brush so that we can use other brushes to create the internal forms. Start with a PolySphere on the canvas (see Figure 1.3). Make sure Symmetry is on. 2. Set Draw Size to 200 to increase the size of your brush. Click on the bottom half of the PolySphere and drag downward to form the jaw and lower face. Lower your Draw Size to somewhere around 50 and pull the nose outward and to the left. Then push the eye socket inward toward the right. Note the S-shaped curve in Figure 1.4. Figure 1.3 A PolySphere on the canvas ■ 3 4 ■ Chapter 1: Sculpting Tools and Workflow Figure 1.4 Side view with the S curve of the side of face Rotate the model to a front view. Set your Draw Size to 256 and pull the sides inward to flatten them. Continue working over the surface of your model. At a certain point you will suffer diminishing returns and form will be harder to create. When that happens to you, it’s time to switch brushes. 3. Once you have your “digital clay” roughly in the shape of the head, it is time to sculpt some of the internal forms, such as the cheeks, forehead, eye area, and mouth area. We’ll start this process with the Clay brush. Click the Brush icon in the far left tray and select the Clay brush. Press Alt and dig into the eye area to create the eye cavities. Continue sculpting into the side of the nose, top of the nose, and down into the mouth. Release Alt when you want to build the form back up. Add a little bit of clay in the mouth area, but stay away from defining the lips. At this point, you should be more focused on sculpting the barrel shape of the teeth. When done, your model should look like Figure 1.5. Don’t try to take it much further than that, as we will use other tools to refine the surface. The Clay brush is used mostly to add volume and roughly sketch in form. Our Sculpting Toolkit ■ 5 Figure 1.5 Results after using the Clay brush The Clay brush is an important part of our sculpting workflow because of its unique algorithm. ZBrush 4 has added newer brushes that build upon this and give us greater control, but the Clay brush remains an important part of the process in the early stages. 4. Make sure to add geometry to your model as needed by choosing Tool ➔ Geometry ➔ Divide. In fact, with the newer topology-independent brushes such as Clay, we can begin to increase our polygon count earlier in the sculpting process without worrying about muddy form. 5. Eventually, your sculpt will have a lot of the form you want, but it will be a little messy. This is where Trim Dynamic comes in. Select Trim Dynamic from the Brush palette and use it the same way you use the Clay brush. Notice how the form it creates is very clean and planar. Continue developing the form, switching between the Clay brush and Trim Dynamic. When you need to add more form, use the Clay brush. Then immediately switch to Trim Dynamic and create the necessary planes. Figure 1.6 shows you how far you should take your work with Trim Dynamic. Again, don’t take your model too far. We will keep looking at new tools for each stage. 6 ■ Chapter 1: Sculpting Tools and Workflow Figure 1.6 Results after using the Trim Dynamic brush Trim Dynamic is an extension of the Clay brush. Its algorithm goes further than the Clay brush, however, and allows you to build up planes with a loose freehand stroke that cannot be achieved any other way. It is an essential tool in your toolkit. 6. To create precise forms, we will need a sculpting knife. We can use the Standard brush for this. Set Draw Size to somewhere around 10 and press Alt while you carve into the model. When you do this, it’s important to proceed with caution and maybe even to use multiple strokes to carve in the surface. As always, it’s very important to smooth out any irregularities as soon as you see them. When you are finished, your model should resemble Figure 1.7. The Standard brush is one of the oldest brushes in ZBrush and still considered by many artists to be the workhorse of all the brushes. You can also try a variation of the Standard brush called the Dam_Standard brush, named after the artist who created it, Damien Canderle. You can access the Dam_Standard brush from Lightbox. Our Sculpting Toolkit ■ 7 Figure 1.7 Results after using the Standard brush 7. Now we should have a fairly good approximation of the face. We should have clear planes, but the separation of planes may not be very precise. All in all, our model should look like a blurry but planar version of what we want. To create more precise breaks in the form, we use Trim Adaptive. Click on the side plane of the nose and use Trim Adaptive to create a consistent plane. With Trim Adaptive you have to be careful where you start your brush stroke. The brush will take the orientation of the first place you click and extend that orientation through your model. To get the most out of Trim Adaptive, repeat the stroke while pressing Alt, and the brush will lift areas of the surface as well. Using Trim Adaptive and Trim Dynamic and experimenting with Trim Front should get your sculpt to the level of Figure 1.8. 8. Masks allow us to isolate one part of the model and keep it safe from our brush. Press and hold Ctrl and brush on the general shape of the ear. Then choose Tool ➔ Masking ➔ Inverse to invert this mask. Using the Move brush, pull out the backs of the ear and set up the simple planes as shown in Figure 1.9. 8 ■ Chapter 1: Sculpting Tools and Workflow Figure 1.8 Results after using various Trim brushes Figure 1.9 Using masks to establish the ear Unpacking Our Toolkit ■ 9 9. After you have worked the surface of your model, you may want to smooth out some areas and refine the surface. The Polish brushes are great tools to do this. I like to use H_Polish because it respects hard edges very well. This allows me to be looser and more freehand without worrying about messing up the clean edge work I created earlier. Consider H_Polish a finishing tool. The form has to be in place for this brush to do its job right. Use Figure 1.10 as your guide. Polish brushes are similar to the Flatten brushes. They are the finishing tools of ZBrush. You can smooth out surfaces with a bit more control than you can with the Smooth brush, as well as grind areas down as though you’re using sandpaper. Figure 1.10 Results after using the Polish brush Unpacking Our Toolkit Let’s review our toolkit and make sure that you understand what is in it and what each tool is good for. This section is the largest lecture-based section of the book. There will be a lot of reference-style descriptions. Use this section as you would any reference book and come back to it when you need an explanation of things like ZBrush’s Depth setting. Move brush Our first tool; it creates the largest planes and biggest form changes. Clay brush Blocks in areas of the model and adds “clay” to the model that you will refine with other brushes. 10 ■ Chapter 1: Sculpting Tools and Workflow Trim Dynamic Creates the primary planes of your model and keeps the surface clean and structured. Trim Adaptive Creates and extends planes. It is the wooden sculpting tool you would use to enforce a strong plane, and you may even cut into the model with it. Dam_Standard and Standard brushes These are great knifes. By setting DrawSize low, you can cut thin lines into the model. Masks Isolate areas of the model to help you when you are making large changes or even small adjustments. In ZBrush 4, you have several different masking options: To change your masking type, simply select it in the Brush pop-up. The Polish brushes Create refined surfaces and blend structured planes into each other. The Sculpting Spectrum The entire brush system in ZBrush can be divided into four zones (see Figure 1.11). These zones correspond to your approach toward sculpting and what you are actually sculpting. Are you sculpting loosely or do you need more refined control? Are you sculpting soft forms or hard forms? Figure 1.11 Brush system spectrum Freehand Freehand – Hard Freehand – Soft Polish Trim Dynamic Standard Stabilize Trim Adaptive Automasking Preserve Edge Hard Planar Flatten Depth Once Ori Planar Line Alphas Trails Zadd Zsub Edit Curve DrawSize Wrap Mode Noise Blob Soft Samples Lazy Mouse Skin Backtrack Planar Spline Controlled – Hard Clay Scales Planar Cut Controlled Controlled – Soft Unpacking Our Toolkit Along the outside of this spectrum are the brush types. Every brush was created to fit a specific need. Some brushes, like the Blob brush, can create amazingly random concrete surfaces with just a few simple modifications. Other brushes, like the Planar brushes, create hard-edged and mechanical details but require some complicated brush modifications to work. Some brushes blend magically between these two opposites and, with only a few modifications, can create both hard and soft forms. The Clay brush is a good example of this. At the center of these two axes are core features of the sculpting system, features like Zadd/Zsub, DrawSize, and Z Intensity. These features are the same no matter what you are sculpting. Between the brush types and the core features are all the brush modifiers, which are as basic as Alphas and Stroke Type and as specific as BackTrack, Samples, Depth Imbed, and Tablet Pressure. These modifiers can have a profound effect on your brush and completely alter its behavior. As we look at each part of the brush system, try to place each feature somewhere in the spectrum. The Brush Algorithm At the core of every brush is the algorithm that it uses to affect the surface. The algorithm is the 1s and 0s, the very foundation of a brush’s behavior, and Pixologic excels in finding and exploiting new algorithms. We call this algorithm the brush type. ZBrush contains close to a hundred brushes, but most of them are derivatives of other brushes. For example, the Polish brushes appear to be derived from the Flatten brush. Some brushes are different by just a few settings. Some brushes are a variation on the algorithm of the brush type itself. The Magnify and the Inflate brushes are good examples of variations on an algorithm, while brushes like the Rake brush use the same algorithm but have preset modifications that alter its behavior. First, we’ll unpack the Clay brush and see what makes this brush so special for blocking in form. Clay Brush The Clay brush was definitely created to work with soft surfaces in a freehand way. However, with a little finesse it can also block out harder surface objects. The algorithm of the Clay brush was an important step toward sculpting brushes that are topology independent; that is, they behave the same regardless of whether your model is an organized mesh or decimated scan data. Its specific behavior is such that it fills up the lowest areas of the surface before it affects the higher areas of the surface. This allows you to quickly build up form without worrying about all the interpenetration and artifacting that the Standard brush might introduce. An important part of the Clay brush is the Depth:Imbed setting. Let’s take a good look at Depth to be sure you have a solid understanding of how to use it. ■ 11 12 ■ Chapter 1: Sculpting Tools and Workflow Depth Figure 1.12 The Depth subpalette Figure 1.13 The Depth feature was introduced in ZBrush 3.5r3. It is located in the Brush ➔ Depth subpalette (see Figure 1.12) and is a change from ZBrush 3.1, where Brush ➔ Brush Modifier was sometimes used for this purpose. Now Depth is a major new feature that affects the entire spectrum of your brush’s behavior. What does Depth do? To understand it better, you should be clear that a brush in ZBrush is a 3D sphere. The red circle that encompasses your brush shows the brush size, but it doesn’t indicate the real spherical nature of a brush. All the variations and modifications of the brush take place within this sphere of activity. As you brush along the model, this sphere is dragged along the surface. In thin areas of your model it will affect the other side as well. Depth either raises this sphere above or lowers it below the surface of your model, as shown in Figure 1.13. Now, I know what you are thinking. You’re thinking, “Isn’t that what Z Intensity does? Doesn’t Z Intensity decide how far up or down my brush pushes the surface of the model?” Well, in short, no. Z Intensity is something else entirely! Think about it this way. Depth + DrawSize defines the outer limits of your brush’s intensity. DrawSize defines how large an area your brush will affect. Depth defines where, along the normal that area will intersect with your model, as well as the maximum distance the brush will push or pull the form. The effects of Depth Depth = 0 Depth = 15 Depth = 15 Unpacking Our Toolkit Z Intensity controls how fast you will reach those limits. If you set Z Intensity to 100, then your brush will be at full intensity right from the start. If you set Z Intensity to 5, then it will take some time to reach full intensity, and you can be more subtle about it. A lot of other factors determine the maximum distance the brush will push or pull the form, such as Alphas, Tablet Pressure, Zadd, Zsub, Samples, and Stroke Type. Depth, though, could be considered über-Depth. It controls where the center of your brush’s power is coming from. A good example of the use of Depth is in the Skin brush. Its depth is set to –74. In combination with the Alpha and small circular strokes, the Skin brush will lay down an amazingly detailed skin texture without destroying your form or adding too much new volume. Try lowering and raising the Depth value to understand the effect better. If Depth is über-Depth, Depth Mask is the squash and stretch of your brush’s outer limits. While DrawSize controls the circumference of your brush, Depth Mask allows you to narrow in on a specific slice of the sphere for your brush to take effect. A great example of Depth Mask is the PlanarCutThin brush. Try setting Depth to 14 and turning off MRGB to get some interesting results. This brush also does wonders for creating rock striations when used with the Spray stroke. So how does Depth relate to the Clay brush? It determines how far outward or inward the Clay brush will push form. To see it in action, set Brush ➔ Depth ➔ Imbed to 100 and make one stroke. Set it to 3 and make another stroke. In general, I leave Imbed at default settings unless I am creating softer forms. In that case, I set Imbed to 3. If you feel the need to increase it above 10, consider using the Move brush instead. ■ 13 Figure 1.14 Depth Mask limits your effect to a cross section of your model. Area of influence Depth = 15 OuterDepth = .2 InnerDepth = .2 14 ■ Chapter 1: Sculpting Tools and Workflow Trim Dynamic Trim Dynamic is an extension of the Clay brush’s algorithm; it allows you to work freehand while creating both hard and soft surfaces. To create softer surfaces, you must lower the DrawSize and make smaller and smaller plane changes. To work with hard surfaces, you can use this brush to establish broad strokes and major planes and then switch over to Trim Adaptive for more localized control. The Trim Dynamic brush gives you an opportunity to understand how ZBrush responds to the surface of your model. By default, most brushes are designed to feel light and snappy in your hands. Yes, designed. The experience each brush gives you when you brush along the surface of your model is something that is as designed as the car you drive. Samples Figure 1.15 Samples subpalette Figure 1.16 Speaking of cars, if the brush system is a car, Samples is part of the suspension mechanism. Samples control how your brush responds to the surface of your model (see Figure 1.15). Think about your model’s surface as if it were a road. Driving through Kansas, there isn’t much need for a robust suspension system. Except for the occasional pot hole, it’s a pretty flat state. However, going four-wheeling in Moab, Utah, is a whole different story. The sampled area Sample Radius = .7 Sample Radius = .1 Sample Radius = 2 Unpacking Our Toolkit The heart of Samples is Sample Radius (see Figure 1.16). This is the shock absorber of the entire system. In simple terms, Sample Radius determines whether your brush’s response to the road is light and snappy to the road or whether it bulldozes through any surface variation. In more specific terms, Sample Radius determines how much of the area within your brush’s sphere of influence will be used to calculate the orientation of your brush. By default, Sample Radius should be set to provide a quick but not hypersensitive response to your surface. Think Porsche. For most brushes this is .75, but this does vary. As you decrease this number, ZBrush considers a smaller and smaller percentage of the surface area. This makes it much more responsive to changes in the surface direction and makes for a very bumpy ride. Another way to think about this is with a boat analogy. A smaller boat has a smaller area of the water’s surface to sample from, so it is more sensitive to waves and swells. A cruise ship, on the other hand, has a vastly larger area of the water’s surface to sample from and is therefore much more stable. However, a cruise ship can’t be turned on a dime as a smaller boat can. The trade-off is the same in ZBrush: stability for maneuverability. The other features that influence the brush’s stability and maneuvering are as follows: • Stabilize Orientation • Stabilize Direction • Constant Sample • OnSurface • Preserve Edge • Buildup All these features work together to give you the ride you need for the form you are trying to create. When adjusting them, it is useful to keep in mind that Sample Radius is the main influence. Everything else works to help Sample Radius do its job. Trim Adaptive Trim Adaptive is built to give us a more controlled experience. If used freehand style, it can get a little too aggressive. If used in a controlled manner, though, it creates clean planes that would be very hard to create any other way. At the core of its control is a feature in ZBrush that hasn’t received a lot of attention: orientation. ■ 15 16 ■ Chapter 1: Sculpting Tools and Workflow Orientation Orientation is the steering system in ZBrush. Often you aren’t even aware of it, and that’s the way it should be. We don’t think about the steering column once we are in our car. We just put the key in and go. Sometimes, though, we need to take full control of our steering wheel and we do this in the Picker palette. The three buttons that we are concerned about in the Picker palette are as follows: • Once Ori • Cont Ori • Select Orientation Figure 1.17 To understand what these features do, we should back up a bit and return to the sphere of influence from the Depth section. When you click on the surface of the model, ZBrush samples the polygons within its sphere of influence. It then determines the orientation of that sphere by averaging out the surface normal within its sampled radius. However, the job is not done there. ZBrush has a choice. It can either continually resample the orientation or lock it down and drag that through your model. Figure 1.17 illustrates the effect of each option. The effect of the Picker palette options Once Ori Picks only once First point clicked Picks continuously Cont Ori Unpacking Our Toolkit The Once Ori option (see Figure 1.18) will lock down the orientation to the area of the model on which you first clicked. The selected angle will be used for the rest of your brush stroke. The Trim Adaptive brush uses this feature to great effect. In fact, Trim Dynamic and Trim Adaptive provide the clearest example of the steering differences. Once Ori is the defining characteristic of the Trim Adaptive brush. Set Cont Ori on and you essentially have the Trim Dynamic brush. Selected Orientation is different. In this feature, you have to click the arrow in the center and move it around to the angle you want to enforce. You can also click the arrow and drag it to a specific area of your model to choose exactly that orientation. The effects of this brush are the defining characteristic of the Trim Front brush. Figure 1.19 illustrates the effect of the front brush used at several points along the model. ■ 17 Figure 1.18 The Once Ori option Figure 1.19 The effects of Selected Ori 18 ■ Chapter 1: Sculpting Tools and Workflow Dam_Standard Brush and Brush Modifier Figure 1.20 Interface: BrushMod The Dam_Standard brush is amazingly smooth and cuts through your model as if it were butter! The secret of its power comes in the Brush ➔ Modifiers ➔ Brush Modifier slider. This slider behaves differently for each brush, but for the Standard brush it works to combine either the Pinch brush or the Magnify brush. The Dam_Standard brush combines the Pinch brush with the Standard brush by setting the slider to 32. The effect is to bring more polygons into the valley while you are sculpting it and create smoother, cleaner lines. Figure 1.20 illustrates the location of this feature in the Brush palette. H_Polish Brush and Preserve Edge Figure 1.21 Preserve Edge The H_Polish brush makes great use of the new Preserve Edge feature in the Brush ➔ Samples palette, shown in Figure 1.21. The goal of Preserve Edge is to do exactly what it says: preserve edges. A great way to see the difference is to run the M_Polish brush over an edge and then repeat that same stroke with the H_Polish brush. H_Polish will work to keep hard edges while still smoothing out the other areas of the model. Working with Masks Masks are essential for controlling effect on specific areas of your model. You can work with masks through the Tool ➔Masking subpalette or by using the hotkeys as follows: • To create a mask, press Ctrl+LMB and click and drag on the surface. • To erase part of a mask, press Ctrl+Alt+LMB and click and drag on the surface. • To clear a mask, press Ctrl+LMB and click and drag outside of the model. • To invert a mask, press Ctrl+LMB and click outside of the model • To blur a mask, press Ctrl+LMB and click on the model. If you want to make a lasso selection of a mask or drag out a selection rectangle to mask off an area, then just select the MaskLasso or the MaskRect brush in the Brush pop-up. The Road Ahead While unpacking our toolkit, we have looked at a few features that I want to keep on your radar as we continue learning about ZBrush. Once you understand how ZBrush’s brush system works, you can create your own Rake brush, custom stitch brushes, and a whole host of other customized tools. The Road Ahead It’s important to keep in mind that learning an art form is a lot like learning a new language. You cannot rush it. Your brain will change only so fast, and you can retain only so much information. Be patient with yourself. Learn to turn frustration into success, not by overcoming it but by outlasting it. Frustration is part of the learning process. Whatever you do, though, don’t give in. ■ 19