1
AL
Chapter 1: A User Interface
for Adding Hotels and
Using the Address Book
✓ Creating a user interface to add a hotel
RI
In This Chapter
TE
✓ Accessing the Address Book to use exiting information
MA
✓ Adding a hotel address to the Address Book
A
TE
D
lthough the ability to add hotels that you want to stay in is obviously
important (staying in the hard-coded default hotel San Francisco is
a bit awkward if you’re in Needles, California, for example), it’s also really
helpful to integrate your Address Book with your application to avoid the
annoying “double” entry.
RI
GH
In this chapter, I show you how to create a view that allows the user to both
enter a hotel as well as add that hotel to his or her Address Book. I also
show you how to take a hotel already in the Address Book and add it as a
hotel in the RoadTrip application.
CO
PY
Being able to do that becomes even more important when you realize that,
even though the title of the view says “Hotels,” a hotel can really be any
place you’re planning to stay. This includes the couch at your best friend’s
former girl- or boyfriend’s cousin’s.
Add AddHotelController
As you might expect, the first thing you need to do is add a view controller
to manage the data entry view, like so:
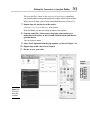
1. In the RoadTrip project window, select the Classes folder and then
choose File➪New from the main menu (or press Ô+N) to get the New
File window.
2. In the left column of the dialog, select Cocoa Touch Classes under the
iPhone OS heading, select the UIViewController subclass template
in the top-right pane and then click Next.
742
Add AddHotelController
Be sure the UITableViewController subclass is not selected and the
With XIB for User Interface is selected.
You see a new dialog asking for some more information.
3. Enter AddHotelController.m in the File Name field and then click
Finish.
To make things easier to find, I keep my AddHotelController.m and .h
classes in the Classes folder. I also move the AddHotelController.xib to
the Resources folder.
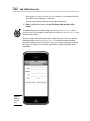
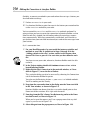
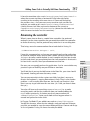
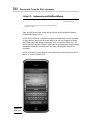
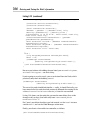
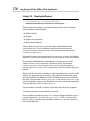
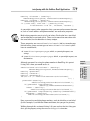
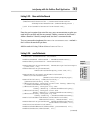
The first thing I want to have you do is create the entry screen, so start by
double-clicking AddHotelController.xib to launch Interface Builder
and start laying out the user interface. Just so you know what you’re aiming
for, Figure 1-1 shows what the final application is going to look like in the
Simulator.
Figure 1-1:
Adding a
place to
stay.
Add AddHotelController
743
Isn’t it a beauty? Well, okay, the aesthetics do leave a bit to be desired, but
I’ll leave that up to you after I show you how to take care of all the plumbing
you need behind it.
Adding controls to the view
The first pipes you want to lay involve adding controls to the view. Here’s
what you need to do:
1. In the Resources folder (if that’s where you placed it), double-click the
AddHotelController.xib file.
2. Make sure the Library window is open. If it isn’t, open it by choosing
Tools➪Library or pressing Ô+Shift+L. Make sure Objects is selected in
the mode selector at the top of the Library window and that Library is
selected in the drop-down menu below the mode selector.
To refresh your memory, the Library has all the components you can
use to build a user interface. These include the things you see on the
iPhone screen, such as labels, buttons, and text fields; and those you
need in order to create the “plumbing” to support the views (and your
model), such as the view controllers.
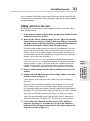
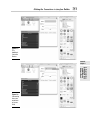
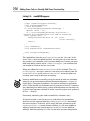
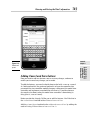
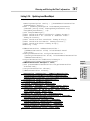
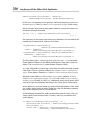
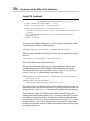
3. Drag five Label elements from the Library window over to the View
window.
4. Double-click each label and enter the text Name, Address, City State,
and Zip as I have in Figure 1-2.
Labels display static text in the view. (Static text can’t be edited by
the user.)
You may notice a rectangle around the label in Figure 1-2. I’ve turned
on this feature so you can see the labels more clearly. (You can turn
this particular feature on or off by choosing Layout➪Show/Hide Bounds
Rectangle.) This rectangle won’t show onscreen when the app is running.
Your View should look something like Figure 1-2 when you’re done.
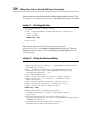
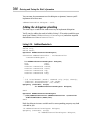
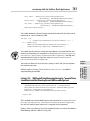
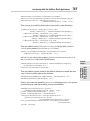
You’ll also want the labels to be right justified, which is done on the
Attributes Inspector. (See Figure 1-3.) The next step shows you how.
5. Click to select the Label text and then choose Tools➪Attributes
Inspector. (Pressing Ô+1 is another way to call up the Attributes
Inspector.) Click the Right Justified icon in the Layout section of the
Inspector, as I have in Figure 1-3.
Book VII
Chapter 1
A User Interface
for Adding Hotels
and Using the
Address Book
AddHotelController.xib was created by Xcode when I created
AddHotelController.m from the template. As you can see, the file
already contains a view — all I have to do here is add the static text,
images, and text fields. If you drag one of these objects to the View
window, it will create that object when your application is launched.
744
Add AddHotelController
Figure 1-2:
The labels.
Figure 1-3:
Right
justifying
text in a
label.
Add AddHotelController
745
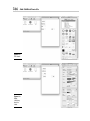
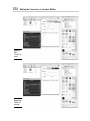
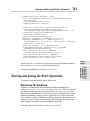
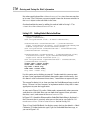
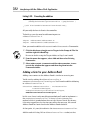
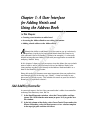
6. To add blank text fields for each label, drag in five of them from the
Library window, as shown in Figure 1-4.
While it’s not shown in any of the figures, I have Appears While Editing
selected in the Clear Button drop-down menu and, I have Clear When
Editing Begins deselected. These are my preferences; you should feel
free to use them or experiment with your own settings.
Finally, you need to add the buttons that will enable the user to either
get the hotel info from his or her contacts or save the information he or
she just entered to their contacts.
7. Drag in two Round Rect Buttons from the Library window and add
titles, as shown in Figure 1-5. (Keep the text right justified.)
8. Choose File➪Save to save what you’ve done.
You can also save your work by pressing Ô+S.
Be sure to save your work. Forgetting to save your work has caused many
developers (including yours truly) to waste prodigious amounts of time
trying to figure out why something “doesn’t work.”
Ready to admire your work? For that, you’ll need to build and run your
application.
9. Choose File➪Simulate Interface.
Admire away. (See Figure 1-6.)
Book VII
Chapter 1
A User Interface
for Adding Hotels
and Using the
Address Book
Figure 1-4:
The Text
fields.
746
Add AddHotelController
Figure 1-5:
The buttons.
Figure 1-6:
The
simulated
interface.
Add AddHotelController
747
10. Make your Xcode window the active window again.
If you can’t find it, or you minimized it, just click the Xcode icon in the
Dock. The RoadTrip project should still be the active one. (You can
always tell the active project by looking at the project name at the top of
the Groups & Files list.)
This is the general pattern I use as I build my interface — add stuff, and then
simulate it to see how it really looks.
Setting up the controller
Now that you have the view set up, you need to set up the controller so that
you can
1. Get the input by first creating outlets and then connecting the outlets to
Text fields in the nib file.
2. Code methods to execute when the user selects a button and connect
them to the Round Rect Buttons — I just call them Buttons henceforth —
in the nib file.
To refresh your memory, the view controller can refer to objects created
from the nib file by using a special kind of instance variable referred to as an
outlet. If I want (for example) to be able to access the Text Field object in my
RoadTrip application, I take two steps:
IBOutlet is a keyword that tags an instance-variable declaration so the
Interface Builder application knows that a particular instance variable is an
outlet — and can then enable the connection to it with Xcode. The fact that
a connection between an object and its outlets exists is actually stored in
a nib file. When the nib file is loaded, each connection is reconstituted and
reestablished — thus enabling you to send messages to the object.
In my code, it turns out I need to create five outlets — one to point to each
of the text fields I just set up in Interface Builder.
Then, when my application is initialized, the Text Field outlet is automatically initialized with a pointer to the text field. I can then use that outlet from
within my code to get the text the user entered in the text field.
Similarly, Buttons in the nib file can be connected to methods in the view
controller by using IBAction as a return type of the method you otherwise
declare in the usual way.
A User Interface
for Adding Hotels
and Using the
Address Book
1. Declare an outlet in my code by using the IBOutlet keyword.
2. Use Interface Builder to point the outlet to the text field I created earlier.
Book VII
Chapter 1
748
Add AddHotelController
IBAction is one of those cool little techniques, like IBOutlet, that does
nothing in the code but provide a way to inform Interface Builder (hence,
the IB in both of them) that this method can be used as an action for TargetAction connections. All IBAction does is act as a tag for Interface Builder —
identifying this method (action) as one you can connect to an object
(namely, the Button) in a nib file. In this respect, this whole IBAction trick
is similar to the IBOutlet. In that case, however, you were tagging instance
variables, in this case, methods. Same difference.
I need to declare two methods — one to execute when the user taps the
Get from Contacts button, and the other for when the user taps the Save to
Contacts button.
To do that, add the bolded code in Listing 1-1 to AddHotelController.h.
Listing 1-1: AddHotelController.h
@class Trip;
@class Hotel;
@interface AddHotelController : UIViewController
<UITextFieldDelegate> {
Trip
Hotel
IBOutlet
IBOutlet
IBOutlet
IBOutlet
IBOutlet
UITextField
UITextField
UITextField
UITextField
UITextField
*trip;
*hotel;
*street;
*state;
*zip;
*name;
*city;
}
- (id) initWithHotel:(Hotel*) theHotel
trip:(Trip*) theTrip;
- (IBAction) getFromContacts:(id) sender;
- (IBAction) saveToContacts:(id) sender;
@end
You start by making the AddHotelController a UITextFieldDelegate —
it will be handing the entry of text into the text fields. As you can see, I
have had you add seven instance variables. One of them holds a reference
to Trip, and the second will hold a reference to a new Hotel object when
you do finally create one. The other five are the outlets I explained earlier.
The outlets will automatically be initialized with a pointer to the text fields
(street, state, zip, name, and city), when the application is launched
and will enable you to access the text the user has entered in those fields.
Making the Connections in Interface Builder
749
I’ve also had you declare two new methods (and the usual initialization
method), getFromContacts: and saveToContacts:, each with the
keyword IBAction as the return type. IBAction is actually defined as a
void, so if you think about it, all you’ve done is declare a new method with a
return type of void.
- (IBAction)getFromContacts:(id)sender;
is the same as
- (void) getFromContacts:(id)sender;
This simply means that you’ve declared a method that doesn’t return anything when it’s sent a message.
The actual name you give the method can be anything you want, but it must
have a return type of IBAction. Usually the action method takes one argument — typically defined as id, a pointer to the instance variables of an
object — which is given the name sender. The control that triggers your
action will use the sender argument to pass a reference to itself. So, for
example, if your action method was invoked as the result of a button tap, the
argument sender would contain a reference to the specific button that was
tapped.
But even though all these connects will happen automatically, it won’t automatically happen automatically. You need to do some work back in Interface
Builder first. So put aside Xcode and return to Interface Builder.
Be sure to save AddHotelController.h or you won’t see the outlets or
methods in Interface Builder.
Making the Connections in Interface Builder
In the previous section, I mentioned that if you want to be able to access the
text fields (street, state, zip, name, and city) you’ve set up in RoadTrip,
you had to take two steps:
1. Declare an IBOutlet in your code.
2. Use Interface Builder to point the outlet to the text fields you created
earlier in Interface Builder.
Book VII
Chapter 1
A User Interface
for Adding Hotels
and Using the
Address Book
A word to the wise — having the sender argument contain a reference
to the specific button that was tapped is a very handy mechanism, even if
you’re not going to take advantage of that in the RoadTrip application. With
that reference in hand, you can access the variables of the control that was
tapped.
750
Making the Connections in Interface Builder
Similarly, to execute a method in your code when the user taps a button, you
also had to do two things:
1. Declare an IBAction in your code.
2. Use Interface Builder to point the event in the button you created earlier
to the IBAction method in your code.
You’ve created the IBOutlets and the IBAction methods and now I’m
going to show you how to create the connection in Interface Builder so that
when the nib file is loaded, the nib loading code will create these connections automatically. With these connections established, you’ll be able to
get the data from your text field interface objects and receive messages from
your buttons.
So, it’s connection time.
1. For your RoadTrip project, be sure to add the instance variables and
methods to your code as spelled out in Steps 1 through 10 in the
“Adding controls to the view” section, earlier in this chapter; then
choose File➪Save or press Ô+S to save what you have done for each
file.
You have to save your code; otherwise, Interface Builder won’t be able
to find it.
2. In the Project window, double-click AddHotelController.xib to
launch Interface Builder.
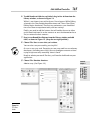
3. Right-click the File’s Owner icon in the main nib window, as I have
done in Figure 1-7, to see the list of Outlets.
This particular dialog can also be accessed by choosing the Connections
tab in the Interface Builder Inspector.
You also see the Receiving Actions — your IBAction labeled methods.
You’ll be working on that shortly.
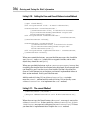
4. Drag from the name outlet item in the dialog onto the Name text field
in the View window, as shown in Figure 1-8.
Interface Builder now knows that the name outlet should point to that
Name text field at runtime. All is right with the world.
5. Now drag from the File’s Owner New Referencing outlet to the Name
text field as well, as I have in Figure 1-9.
When you let go of the mouse, you’ll see a pop-up menu that says delegate, as you can see in Figure 1-10.
6. Select delegate from the pop-up menu, as I have in Figure 1-10.
Making the Connections in Interface Builder
751
Figure 1-7:
The
AddHotelController
Outlets.
Book VII
Chapter 1
A User Interface
for Adding Hotels
and Using the
Address Book
Figure 1-8:
Connecting
the name
outlet item
to its text
field.
752
Making the Connections in Interface Builder
Figure 1-9:
Add a
referencing
outlet.
Figure 1-10:
Setting the
delegate.
Making the Connections in Interface Builder
753
This sets the File’s Owner as the UITextFieldDelegate, something
you’ll need to do to manage the keyboard. I explain that in a later section.
When you’re all done, your screen should look like mine in Figure 1-11.
7. Repeat Steps 4–6 for the rest of the outlets.
address, city, state, and zip, to be precise.
With that done, you are now ready to connect the buttons.
8. From the same File’s Owner menu, drag from getFromContacts
under Received Actions, to the Get from Contacts button and then let
go of the mouse.
You see a pop-up menu.
9. Select Touch Up Inside from the pop-up menu, as I have in Figure 1-12.
10. Repeat Steps 8 and 9 for Save to Contacts.
11. Be sure to save your work.
Book VII
Chapter 1
A User Interface
for Adding Hotels
and Using the
Address Book
Figure 1-11:
The first of
the outlets
complete.
754
Adding Some Code to Actually Add Some Functionality
Figure 1-12:
Connecting
the button
to the action
method.
Adding Some Code to Actually
Add Some Functionality
Making all the necessary connections Interface Builder, as spelled out in
the last section, ensures that your code will compile and run (and give you
a few choice warnings about unimplemented methods in the bargain), but
RoadTrip really won’t do anything different now as opposed to what it could
do at the start of this chapter. What you have done, however, is gotten yourself ready to add the code to enable you to enter the hotel information.
If you’re like me, you’re probably impatient to actually see something
work, so first add the initWithHotel:trip: method in Listing 1-2 to
AddHotelController.m.
Listing 1-2: InitWithHotel:trip
#import “AddHotelController.h”
#import “Hotel.h”
#import “Trip.h”
@implementation AddHotelController
Adding Some Code to Actually Add Some Functionality
755
- (id) initWithHotel:(Hotel*) theHotel trip:(Trip*) theTrip
{
if (self = [super initWithNibName:@”AddHotelController”
bundle:nil]) {
hotel = theHotel;
trip = theTrip;
}
return self;
}
This is your run-of-the-mill initialization method, and there really isn’t anything left to say about it, other than you’d better not forget the #import
statements, because the compiler will be happy to indirectly point out to
you that they’re missing. In this particular initialization method, you save a
reference to the Trip (which you won’t be using, but I have you do it now
because as you build out the application, you’re likely to need it), and you
also save a reference to the Hotel object that was created and added to
the Managed Object Context in the HotelController object’s insert
NewObject method and which you’ll update based on what the user enters.
To actually display the AddHotelController, you need to add some code
to HotelController. So, go ahead and add the bolded code in Listing 1-3
to the aforementioned HotelController that will create and then push the
AddHotelController.
- (void)insertNewObject {
NSEntityDescription *entity = [[fetchedResultsController
fetchRequest] entity];
hotel = [NSEntityDescription insertNewObjectForEntit
yForName:[entity name] inManagedObjectContext:trip.
managedObjectContext]; //$$
[self setUpUndoManager];
[hotel setValue:@”Hotel California” forKey:@”name”];
[hotel setValue:@”1 Dr. Carlton B. Goodlett Place”
forKey:@”street”];
[hotel setValue:@”San Francisco” forKey:@”city”];
[hotel setValue:@”California” forKey:@”state”];
[hotel setValue:@”94102” forKey:@”zip”];
AddHotelController *addHotelController =
[[AddHotelController alloc] initWithHotel:hotel
trip:trip];
UINavigationController *navigationController =
[[UINavigationController alloc] initWithRootViewController
:addHotelController];
navigationController.modalTransitionStyle =
UIModalTransitionStyleFlipHorizontal;
(continued)
A User Interface
for Adding Hotels
and Using the
Address Book
Listing 1-3: Modifying InsertNewObject
Book VII
Chapter 1
756
Adding Some Code to Actually Add Some Functionality
Listing 1-3 (continued)
//addHotelController.delegate = self;
[self presentModalViewController:navigationController
animated:YES];
[navigationController release];
[addHotelController release];
Annotation *annotation = [NSEntityDescription ins
ertNewObjectForEntityForName:@”Annotation”
inManagedObjectContext:trip.managedObjectContext]; //$$
[annotation setTitle:@”Annotation”];
[annotation setHotel:hotel];
[hotel setAnnotation:annotation];
Geocoder * geocoder = [[Geocoder alloc] init];
NSString* geocodeString = [[NSString alloc ]
initWithFormat: @” %@ %@ %@ %@”, hotel.street, hotel.city,
hotel.state, hotel.zip];
NSLog (@” finding = %@”, geocodeString);
CLLocationCoordinate2D theCoordinate = [geocoder
geocodeLocation:geocodeString];
hotel.annotation.latitude = [NSNumber numberWithDouble:
theCoordinate.latitude];
hotel.annotation.longitude = [NSNumber numberWithDouble:
theCoordinate.longitude];
hotel.annotation.title = hotel.name;
}
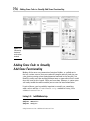
Most of this code is pretty straightforward. This is the way you created view
controllers in the tableView:didSelectRowAtIndexPath: methods
in both the SightListController and RootViewController back in
Books V and VI. In this case, however, you’re using presentModalView
Controller.
Modal view controllers are used in applications to allow the user to enter
the information it needs. A modal view controller is not a subclass of
UIViewController, and any view controller can be presented modally by
your application. You use them when you want to show that there is a special relationship between the previous screen and the new one.
Modal controllers are used in two ways:
✦ To get information needed by the presenting controller from the user
✦ To temporarily display some content or force a change to what the user
is currently doing (like the Info button you often see)
Modal view controllers are about redirecting the user’s workflow temporarily in order to gather or display some information. After you have the information you need (or after you’ve presented the user with the appropriate
information), you dismiss the modal view controller to return the application’s previous state.
Adding Some Code to Actually Add Some Functionality
757
I chose the transition style UIModalTransitionStyleFlipHorizontal —
where the current view does a horizontal 3D flip from right-to-left,
resulting in the revealing of the new view as if it were on the back of
the previous view — but you can use any transition style you like. For
example, you could go for UIModalTransitionStyleCoverVertical
(where the new view slides up from the bottom of the screen) or
UIModalTransitionStyleCrossDissolve (where the view fades out
while the new view fades in at the same time).
Dismissing the controller
When it comes time to dismiss a modal view controller, the preferred
method is for the view controller that presented the modal view controller
to do the dismissing. And the preferred way to do that is to use delegation.
That brings me to the commented-out line of code back in Listing 1-3:
//addHotelController.delegate = self;
I have this commented out so that you can compile and run the application
to check for compiler errors and see how it works. Because I don’t have the
delegate instance variable defined, it won’t compile with that line of code
in there, and when I get to explaining how the view controller is dismissed a
bit later in this section, I have you uncomment out that line.
You’ll find that if you tap the Add button in the Hotel list, your view should
flip around, showing your new data entry screen.
You can even enter data in the various text fields, but there’s no way to
dismiss the keyboard — tapping Return doesn’t help. There’s also another
problem — well, actually more than one, but the one you’ll notice is that
there’s no way to get back from this new view. (As I said, you haven’t done
that yet.)
You also still have to do some things to HotelController to make
everything work, and that has to do with how you handled adding the
Hotel object previously. So, before you do any more work on the
addHotelController, I want you to look at what happens when it’s
created and pushed on to the stack.
In Chapter 5 of Book VI, you added some code to viewWillDisappear:.
You did this because, when the view unloads, undo and redo are no longer
possible; you needed to save the current Managed Object Context and resign
as first responder. Listing 1-4 shows the code you added.
A User Interface
for Adding Hotels
and Using the
Address Book
For now, you can compile and run the application. Just be sure to delete any
previous copies of RoadTrip on your iPhone or simulator.
Book VII
Chapter 1
758
Adding Some Code to Actually Add Some Functionality
Listing 1-4: viewWillDisappear:
- (void)viewWillDisappear:(BOOL)animated {
[super viewWillDisappear:animated];
[self cleanUpUndoManager];
// Save the context.
if (trip.managedObjectContext.hasChanges) {
NSError *error = nil;
if (![trip.managedObjectContext save:&error]) {
/*Replace this implementation with code to handle the
error appropriately. */
NSLog(@”Unresolved error %@, %@”, error,
[error userInfo]);
abort();
}
}
[trip loadHotels];
[trip.mapController refreshAnnotations];
[self resignFirstResponder];
}
This worked fine when the HotelController was the “last stop” in the
chain. That is, after you added the hotel, the only place to go was back to
the previous view controller, and if you were doing that, it meant you were
done with adding a hotel, and in viewWillDisapper: you could do what
you needed to based on the last user action.
When you added the AddHotelController, all this changed. The viewWillDisappear: message is now also sent when you’re moving from the
HotelController to the AddHotelController, and at that point you
certainly aren’t ready to do much of anything.
Having a modification essentially gum up the works of what was laid down
before is not an uncommon occurrence during development — in fact, it’s
highly likely. (The general guideline is to count on writing any application
twice.) What you did (just to demonstrate to yourself, of course) is evidence
that something that works during a phase of development may not necessarily be the best long-term solution. In reality, very few projects ever go from A
to B to . . . directly.
Fortunately, enhancing your code to handle this situation is easy.
All you have to do is save the new Hotel and refresh the annotations
after the user has returned from the AddHotelController and entered
the necessary data. To do that, you’ll simply add state information to the
HotelController — it needs to know whether it’s still in the middle of
adding a hotel when the view disappears, or not. If it’s in the middle of
adding it, don’t do anything. If it’s not, just do what you were doing before.
Adding Some Code to Actually Add Some Functionality
759
Start with adding the state information it needs — a Boolean amEditing —
to HotelController.h, as shown in bold in Listing 1-5.
Listing 1-5: Adding State Information to HotelController.h
@class Trip;
@class Hotel;
#import “AddHotelController.h”
@interface HotelController : UITableViewController
<NSFetchedResultsControllerDelegate,
AddHotelControllerDelegate>{
NSFetchedResultsController *fetchedResultsController;
Trip
*trip;
Hotel
*hotel;
NSUndoManager
*undoManager;
BOOL
amEditing;
}
@property (nonatomic, retain) NSFetchedResultsController
*fetchedResultsController;
@property (nonatomic, retain) NSUndoManager *undoManager;
- (void)setUpUndoManager;
- (void)cleanUpUndoManager;
@end
Listing 1-6: Checking the State
- (void)viewWillDisappear:(BOOL)animated {
[super viewWillDisappear:animated];
if (!amEditing) {
[self cleanUpUndoManager];
// Save the context.
if (trip.managedObjectContext.hasChanges) {
NSError *error = nil;
if (![trip.managedObjectContext save:&error]) {
/* Replace this implementation with code to handle the
error appropriately. */
NSLog(@”Unresolved error %@, %@”, error,
[error userInfo]);
abort();
}
}
[trip loadHotels];
[trip.mapController refreshAnnotations];
[self resignFirstResponder];
}
}
A User Interface
for Adding Hotels
and Using the
Address Book
In viewWillDisappear:, check the state by adding the code in bold in
Listing 1-6 to viewWillDisappear: in HotelController.m.
Book VII
Chapter 1
760
Adding Some Code to Actually Add Some Functionality
Because you can never be too careful, add the code in bold in Listing 1-7 to
initWithTrip: in HotelController.m to initialize the amEditing state.
Listing 1-7: Initializing the State
- (id) initWithTrip: (Trip*) aTrip{
if (self =
[super initWithNibName:@”HotelController” bundle:nil]) {
trip = aTrip;
[trip retain];
amEditing = NO;
}
return self;
}
Next, set the state to amEditing in insertNewObject in
HotelController.m by adding the bolded code in Listing 1-8. That way,
when the AddHotelController is presented, you’ll do nothing in viewDidDisappear:.
Listing 1-8: Setting the State to amEditing
- (void)insertNewObject {
NSEntityDescription *entity = [[fetchedResultsController
fetchRequest] entity];
hotel = [NSEntityDescription insertNewObjectForEntit
yForName:[entity name] inManagedObjectContext:trip.
managedObjectContext]; //$$
[self setUpUndoManager];
[hotel setValue:@”Hotel California” forKey:@”name”];
[hotel setValue:@”1 Dr. Carlton B. Goodlett Place”
forKey:@”street”];
[hotel setValue:@”San Francisco” forKey:@”city”];
[hotel setValue:@”California” forKey:@”state”];
[hotel setValue:@”94102” forKey:@”zip”];
amEditing = YES;
AddHotelController *addHotelController =
[[AddHotelController alloc] initWithHotel:hotel
trip:trip];
UINavigationController *navigationController =
[[UINavigationController alloc] initWithRootViewController
:addHotelController];
navigationController.modalTransitionStyle =
UIModalTransitionStyleFlipHorizontal;
Entering and Saving the Hotel Information
761
//addHotelController.delegate = self;
[self presentModalViewController:navigationController
animated:YES];
[navigationController release];
[addHotelController release];
Annotation *annotation = [NSEntityDescription ins
ertNewObjectForEntityForName:@”Annotation”
inManagedObjectContext:trip.managedObjectContext]; //$$
[annotation setTitle:@”Annotation”];
[annotation setHotel:hotel];
[hotel setAnnotation:annotation];
Geocoder * geocoder = [[Geocoder alloc] init];
NSString* geocodeString = [[NSString alloc ]
initWithFormat: @” %@ %@ %@ %@”, hotel.street, hotel.city,
hotel.state, hotel.zip];
NSLog (@” finding = %@”, geocodeString);
CLLocationCoordinate2D theCoordinate = [geocoder
geocodeLocation:geocodeString];
hotel.annotation.latitude = [NSNumber
numberWithDouble:theCoordinate.latitude];
hotel.annotation.longitude = [NSNumber
numberWithDouble:theCoordinate.longitude];
hotel.annotation.title = hotel.name;
}
You’ll set amEditing back to NO when you return for the entering data in
the AddHotelController, but you’re not there yet.
Entering and Saving the Hotel Information
I’m going to start you off with some simple stuff.
Dismissing the keyboard
To dismiss the keyboard, you need to add another method to the
AddHotelController — textFieldShouldReturn:. With that method,
you have to send a message to the text field to resignFirstResponder.
When the text field receives that message, it lowers the keyboard. (I cover
lowering keyboards, as well as how to scroll the view so that a text field
isn’t covered, in exquisite detail in my iPhone Application Development For
Dummies; if you’re dying to find out more about lowering keyboards and
keeping fields uncovered, you should look at that book.)
Enter the code in Listing 1-9 to AddHotelController.
A User Interface
for Adding Hotels
and Using the
Address Book
Continue on building the AddHotelController.
Book VII
Chapter 1
762
Entering and Saving the Hotel Information
Listing 1-9: Implementing textFieldShouldReturn:
-(BOOL)textFieldShouldReturn:(UITextField *)
theTextField {
[theTextField resignFirstResponder];
return YES;
}
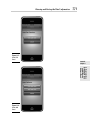
Now, you’ll discover that, when you tap Return on the keyboard, the keyboard kindly lowers itself.
You’ll also be aware of a couple of features that come with using a text field.
If, after the user enters text in a text field, he or she just happens to shake
the iPhone, the Undo dialog will present itself, as shown in Figure 1-13. To
do this on the Simulator (which is what you see in the figure), simply choose
Hardware➪Shake Gesture and you’ll see what’s displayed in Figure 1-13
firsthand.
You’ll also notice that pressing in a text field brings up the Select and Paste
menu, as shown in Figure 1-14.
Figure 1-13:
Undo typing.
Entering and Saving the Hotel Information
763
Book VII
Chapter 1
Adding Cancel and Save buttons
Now you need to add two buttons: one to save any changes, and one to
enable you to cancel any changes you’ve made.
To add the buttons, you need to decide how to deal with a save or a cancel.
As I indicated earlier, the preferred method is to have the controller that
presented the view controller modally become a delegate of the modal view
controller and implement a method that will dismiss it (and do whatever
else needs to be done) when the modal view controller is done doing its
thing (that is, save or cancel).
Before you do that, though, I’d like you to add the buttons. You’ll do that in
the viewDidLoad method of the AddHotelController.
Add the viewDidLoad method to the AddHotelController by adding the
code in Listing 1-10 to AddHotelController.h.
A User Interface
for Adding Hotels
and Using the
Address Book
Figure 1-14:
Select and
paste.
764
Entering and Saving the Hotel Information
Listing 1-10: Adding the Save and Cancel Buttons in viewDidLoad
- (void)viewDidLoad {
[super viewDidLoad];
self.navigationItem.title = @”Hotel Information”;
UIBarButtonItem *cancelButtonItem =
[[UIBarButtonItem alloc] initWithTitle:@”Cancel”
style:UIBarButtonItemStyleBordered target:self
action:@selector(cancel:)];
self.navigationItem.leftBarButtonItem =
cancelButtonItem;
[cancelButtonItem release];
UIBarButtonItem *saveButtonItem =
[[UIBarButtonItem alloc] initWithTitle:@”Save”
style:UIBarButtonItemStyleDone target:self
action:@selector(save:)];
self.navigationItem.rightBarButtonItem = saveButtonItem;
[saveButtonItem release];
}
When you created the buttons, you specified the messages that should be
sent (cancel: and save:) when the user tapped a button, and to what
object they should be sent (self).
When you specified the button style as UIBarButtonItemStyleDone, that
resulted in the familiar blue Save button being displayed. If you compile and
run RoadTrip, you’ll see that trusty Save button, but don’t tap either the
Save or Cancel button just yet because you haven’t implemented either of
their action methods. In fact, you’ll do that next.
Add the code in Listing 1-11 to AddHotelController.m to implement the cancel: method and the code in Listing 1-12 to the very same
AddHotelController.m to implement the save: method.
Listing 1-11: The cancel: Method
- (IBAction)cancel:(id)sender {
[delegate addHotelController:self didFinishWithSave:NO];
}
When the user taps the Cancel button, the cancel: message is sent to the
AddHotelController. It then sends the addHotelController;didFin
ishWithSave: message to its delegate (the HotelController). I’ll show
you how that is implemented after I explain the save: method.
765
Entering and Saving the Hotel Information
Listing 1-12: The save: Method
- (IBAction)save:(id)sender {
hotel.street = street.text ;
hotel.state = state.text;
hotel.zip = zip.text;
hotel.name = name.text;
hotel.city = city.text;
[delegate addHotelController:self
didFinishWithSave:YES];
}
As you might expect, the save: message updates the Hotel object you created in the HotelController earlier and then also sends the addHotel
Controller;didFinishWithSave: message. The difference, as you will
notice, is that, in the case of cancel, the argument is NO, and in the case of
save, the argument is YES.
Setting up the AddHotelController delegate
Here’s the deal: When it comes time to dismiss a modal view controller, the
preferred method is for the view controller that presented the modal view
controller to do the dismissing. And the preferred way to do that is delegation.
Listing 1-13 shows the implementation of the addHotelController:did
FinishWithSave: method. Add it to HotelController.m.
Listing 1-13: addHotelController:didFinishWithSave
- (void)addHotelController:
(AddHotelController *)controller
didFinishWithSave:(BOOL)save {
amEditing = NO;
if (save) {
[undoManager setActionName:
[NSString stringWithString:@”Edit Hotel”]];
Annotation *annotation = [NSEntityDescription
insertNewObjectForEntityForName:@”Annotation”
(continued)
A User Interface
for Adding Hotels
and Using the
Address Book
To implement that, the view controller being presented modally must define
a protocol for its delegate to implement. Stored away in this newly defined
protocol are the messages(s) that the modal view controller will send in
response to specific actions, such as taps in the Save or Cancel buttons.
The delegate needs to implement the methods and do what it needs to do to
handle either a save or a cancel, which would include — in this example —
dismissing the modal view controller.
Book VII
Chapter 1
766
Entering and Saving the Hotel Information
Listing 1-13 (continued)
inManagedObjectContext:trip.managedObjectContext];
[annotation setTitle:@”Annotation”];
[annotation setHotel:hotel];
[hotel setAnnotation:annotation];
Geocoder * geocoder = [[Geocoder alloc] init];
NSString* geocodeString = [[NSString alloc ]
initWithFormat: @” %@ %@ %@ %@”, hotel.street, hotel.city,
hotel.state, hotel.zip];
CLLocationCoordinate2D theCoordinate = [geocoder
geocodeLocation:geocodeString];
hotel.annotation.latitude = [NSNumber numberWithDouble:
theCoordinate.latitude];
hotel.annotation.longitude = [NSNumber numberWithDouble:
theCoordinate.longitude];
hotel.annotation.title = hotel.name;
}
else {
[trip.managedObjectContext deleteObject:hotel];
hotel = nil;
[undoManager setActionName:
[NSString stringWithString:@”Cancel Hotel”]];
}
[self dismissModalViewControllerAnimated:YES];
}
Because you’re done with adding the new hotel, you set amEditing to NO,
so viewWillDisappear: can do its thing.
If you’re going to save the result, you set an Action Name for Undo, which
previously only dealt with adding a Hotel.
[undoManager setActionName:
[NSString stringWithString:@”Edit Hotel”]];
The rest of the code should look familiar — really, it should. Basically, you
have moved all of the code that had previously followed the creating of the
AddHotelController in insertNewObejct into this new method.
Listing 1-14 shows you the code that you need to now delete (that strikethrough stuff) or copy (that bold stuff) from insertNewObject in
HotelController.m.
For Cancel, you delete the object you had created, set the hotel instance
variable to nil, and set the Undo Manager action name.
Finally, you dismiss the modal view controller, as follows:
[self dismissModalViewControllerAnimated:YES];
Entering and Saving the Hotel Information
767
Listing 1-14: Updating insertNewObject
- (void)insertNewObject {
NSEntityDescription *entity = [[fetchedResultsController
fetchRequest] entity];
hotel = [NSEntityDescription insertNewObjectForEntit
yForName:[entity name] inManagedObjectContext:trip.
managedObjectContext]; //$$
[self setUpUndoManager];
[hotel setValue:@”Hotel California” forKey:@”name”];
[hotel setValue:@”1 Dr. Carlton B. Goodlett Place”
forKey:@”street”];
[hotel setValue:@”San Francisco” forKey:@”city”];
[hotel setValue:@”California” forKey:@”state”];
[hotel setValue:@”94102” forKey:@”zip”];
amEditing = YES;
//Annotation *annotation = [NSEntityDescription
insertNewObjectForEntityForName:@”Annotation”
inManagedObjectContext:trip.managedObjectContext]; //$$
//[annotation setTitle:@”Annotation”];
//[annotation setHotel:hotel];
// [hotel setAnnotation:annotation];
// Geocoder * geocoder = [[Geocoder alloc] init];
// NSString* geocodeString = [[NSString alloc ]
initWithFormat: @” %@ %@ %@ %@”, hotel.street, hotel.
city, hotel.state, hotel.zip];
// NSLog (@” finding = %@”, geocodeString);
// CLLocationCoordinate2D theCoordinate = [geocoder
geocodeLocation:geocodeString];
// hotel.annotation.latitude = [NSNumber
numberWithDouble:theCoordinate.latitude];
// hotel.annotation.longitude = [NSNumber
numberWithDouble:theCoordinate.longitude];
/// hotel.annotation.title = hotel.name;
}
Book VII
Chapter 1
A User Interface
for Adding Hotels
and Using the
Address Book
AddHotelController *addHotelController =
[[AddHotelController alloc] initWithHotel:hotel
trip:trip];
UINavigationController *navigationController =
[[UINavigationController alloc] initWithRootViewController
:addHotelController];
navigationController.modalTransitionStyle =
UIModalTransitionStyleFlipHorizontal;
addHotelController.delegate = self;
[self presentModalViewController:navigationController
animated:YES];
[navigationController release];
[addHotelController release];
768
Entering and Saving the Hotel Information
You can now also uncomment out the delegate assignment, because you’ll
implement all of that next:
addHotelController.delegate = self;
Adding the delegation plumbing
The final step is to add all the code necessary to implement delegation
You’ll start by adding the code in bold in Listing 1-15 in order to add the protocol (you’ll name it AddHotelControllerDelegate) and other required
declarations to AddHotelController.h.
Listing 1-15: AddHotelController.h
#import <UIKit/UIKit.h>
@class Trip;
@class Hotel;
@protocol AddHotelControllerDelegate;
@interface AddHotelController : UIViewController
<UITextFieldDelegate> {
id <AddHotelControllerDelegate> delegate;
Trip
*trip;
Hotel
*hotel;
IBOutlet UITextField *street;
IBOutlet UITextField *state;
IBOutlet UITextField *zip;
IBOutlet UITextField *name;
IBOutlet UITextField *city;
}
- (id) initWithHotel:(Hotel*) theHotel trip:(Trip*) theTrip;
- (IBAction) getFromContacts: (id) sender;
- (IBAction) saveToContacts: (id) sender;
@property (nonatomic, assign)
id <AddHotelControllerDelegate> delegate;
@end
@protocol AddHotelControllerDelegate
- (void)addHotelController:(AddHotelController *)controller
didFinishWithSave:(BOOL)save;
@end
Both the delegate instance variable and its corresponding property may look
a bit odd to you.
id <AddHotelControllerDelegate> delegate;
@property (nonatomic, assign)
id <AddHotelControllerDelegate> delegate;
Entering and Saving the Hotel Information
769
id <AddHotelControllerDelegate> tells the compiler to do type checking for any class assigned to this instance variable or property. The idea
here is for the compiler to check to make sure that the class has adopted the
AddHotelControllerDelegate protocol. This is one of the advantages of
using formal protocols.
You also need to add the following @synthesize statement to
AddHotelController.m.
@synthesize delegate;
Then follow up by making the changes in bold in Listing 1-16 to
HotelController.h to have it adopt the protocol.
Listing 1-16: Making Hotel Controller a Delegate
@class Trip;
@class Hotel;
#import “AddHotelController.h”
@interface HotelController : UITableViewController
<NSFetchedResultsControllerDelegate,
AddHotelControllerDelegate> {
*fetchedResultsController;
*trip;
*hotel;
*undoManager;
}
@property (nonatomic, retain)
NSFetchedResultsController *fetchedResultsController;
@property (nonatomic, retain) NSUndoManager *undoManager;
- (void)setUpUndoManager;
- (void)cleanUpUndoManager;
@end
Using default data
You might have noticed that, when I created the hotel object in insertNewObject, I added some default data:
[hotel setValue:@”Hotel California” forKey:@”name”];
[hotel setValue:@”1 Dr. Carlton B. Goodlett Place”
forKey:@”street”];
[hotel setValue:@”San Francisco” forKey:@”city”];
[hotel setValue:@”California” forKey:@”state”];
[hotel setValue:@”94102” forKey:@”zip”];
A User Interface
for Adding Hotels
and Using the
Address Book
NSFetchedResultsController
Trip
Hotel
NSUndoManager
Book VII
Chapter 1
770
Entering and Saving the Hotel Information
But when you displayed the AddHotelController view, there was no data
to be seen. That’s because you never copied it from the instance variables in
the hotel object to the text fields in the view.
Go ahead and do that now by adding the code in bold in Listing 1-17 to
viewDidLoad in AddHotelController.m.
Listing 1-17: Adding Default Data to the View
- (void)viewDidLoad {
[super viewDidLoad];
self.navigationItem.title = @”Hotel Information”;
UIBarButtonItem *cancelButtonItem = [[UIBarButtonItem
alloc] initWithTitle:@”Cancel” style:UIBarButtonItemStyleB
ordered target:self action:@selector(cancel:)];
self.navigationItem.leftBarButtonItem = cancelButtonItem;
[cancelButtonItem release];
UIBarButtonItem *saveButtonItem = [[UIBarButtonItem alloc]
initWithTitle:@”Save” style:UIBarButtonItemStyleDone
target:self action:@selector(save:)];
self.navigationItem.rightBarButtonItem = saveButtonItem;
[saveButtonItem release];
street.text = hotel.street;
state.text = hotel.state;
zip.text = hotel.zip;
name.text = hotel.name;
city.text = hotel.city;
If at this point you’re thinking to yourself “I understand why you may want
to have a view populated with default data under some circumstances, but
this doesn’t seem to be one of those times,” I would have to agree with you.
The reason I’m doing it is to show you how the Undo Manager keeps track of
things. I’ll leave it to you, however, to implement undo in a way that is more
appropriate to your own application.
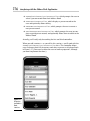
As you saw in Figure 1-13 earlier, Undo works automatically when you enter
some data in a text field. Now you can look what happens when you enter
the data, save it, and return to the HotelController.
In Figure 1-15, I shook the iPhone and the Undo Edit Hotel dialog is displayed —
that’s because that is precisely what you set the text to say earlier in add
HotelController:didFinishWithSave: back in Listing 1-13.
Then, if I tap Undo Edit Hotel, the display reverts back to the default — Hotel
California. If I shake the device again, I get the Undo Add Hotel message, as
you see in Figure 1-16.
Entering and Saving the Hotel Information
771
Figure 1-15:
Undo Edit
Hotel.
Book VII
Chapter 1
A User Interface
for Adding Hotels
and Using the
Address Book
Figure 1-16:
Undo Add
Hotel.
772
Entering and Saving the Hotel Information
Don’t tell me what to do!
If you find autocorrecting annoying, as I do, you can shut it off programmatically.
- (void)viewDidLoad {
[super viewDidLoad];
self.navigationItem.title = @”Hotel Information”;
UIBarButtonItem *cancelButtonItem =
[[UIBarButtonItem alloc] initWithTitle:@”Cancel”
style:UIBarButtonItemStyleBordered target:self
action:@selector(cancel:)];
self.navigationItem.leftBarButtonItem =
cancelButtonItem;
[cancelButtonItem release];
UIBarButtonItem *saveButtonItem =
[[UIBarButtonItem alloc] initWithTitle:@”Save”
style:UIBarButtonItemStyleDone target:self
action:@selector(save:)];
self.navigationItem.rightBarButtonItem = saveButtonItem;
[saveButtonItem release];
street.text = hotel.street;
state.text = hotel.state;
zip.text = hotel.zip;
name.text = hotel.name;
city.text = hotel.city;
name.autocorrectionType = UITextAutocorrectionTypeNo;
street.autocorrectionType = UITextAutocorrectionTypeNo;
city.autocorrectionType = UITextAutocorrectionTypeNo;
state.autocorrectionType = UITextAutocorrectionTypeNo;
zip.autocorrectionType = UITextAutocorrectionTypeNo;
}
You can also set all the other keyboard traits as well, including what keyboard is being used.
These properties are part of the UITextInputTraits protocol, which defines features that
are associated with keyboard input. To work correctly with the text input management system,
an object must adopt this protocol. The UITextField and UITextView classes already
support this protocol.
If you compile and run this code at this point, it will work, but you still get
two warnings, due to the fact that you haven’t implemented either of the
methods you declared as IBActions to support the contacts buttons.
You’ll do that next.
Interfacing with the Address Book Application
773
Interfacing with the Address Book Application
I started this chapter off by musing about how nice it would be to be able to
add an existing contact in your Address Book to your Hotels list. Actually,
doing that is easy, but in doing so you’re sure to come across some concepts
and record types that may seem a little alien. But no worries. Soon you’ll be
making your way through them like an old hand.
As you recall, you connected the Get from Contacts button to an IBAction
method back in the “Setting up the controller” section, earlier in the chapter. Now, you have a chance to implement that method — and get rid
of one pesky compiler warning to boot. Add the code in Listing 1-18 to
AddHotelController.m.
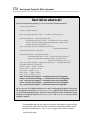
Listing 1-18: getFromContacts:
#pragma mark #pragma mark Get from contacts
- (IBAction) getFromContacts:(id)sender {
ABPeoplePickerNavigationController *picker =
[[ABPeoplePickerNavigationController alloc] init];
picker.peoplePickerDelegate = self;
}
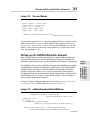
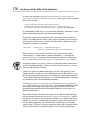
Entering this little bit of code results in displaying the Address Book interface that you see in Figure 1-17.
As you can see, all you really do is present a modal view controller. The one
you’ll be using here is one of the standard system view controllers that are
part of the iPhone OS.
In most ways, presenting these standard view controllers works the same
as for your custom view controllers. However, because your application
doesn’t have access to the views used in these controllers — surprise, surprise — all interactions with the system view controllers must take place
through a delegate object.
To enable that, you’ll find each system view controller defines a corresponding protocol, whose methods you implement in your delegate object. And,
as with your own modal controllers, one of the most important things the
delegate must do is dismiss the presented view controller by calling the
dismissModalViewControllerAnimated: method of the view controller that did the presenting. In this chapter, you’ll be working with the
AddressBook UI controllers, which include
A User Interface
for Adding Hotels
and Using the
Address Book
[self presentModalViewController:picker animated:YES];
[picker release];
Book VII
Chapter 1
774
Interfacing with the Address Book Application
✦ ABPeoplePickerNavigationController, which prompts the user to
select a person record from their Address Book
✦ ABPersonViewController, which displays a person record to the
user and optionally allows editing
✦ ABNewPersonViewController, which prompts the user to create a
new person record
✦ ABUnknownPersonViewController, which prompts the user to complete a partial person record, and optionally allows them to add it to the
Address Book
Actually, you’ll really only be working the first and third controllers.
When you add a contact — as you will in this section — you’ll work with the
ABPeoplePickerNavigationController class. This controller allows
users to browse their list of contacts and select a person, as displayed back
in Figure 1-17. (You can also allow the user to browse properties, although
you won’t implement that here.)
Figure 1-17:
Displaying
the Address
Book
interface.
Interfacing with the Address Book Application
775
The general outline for using ABPeoplePickerNavigationController is
as follows:
1. Create and initialize an instance of the class.
2. Set the delegate, which must adopt the
ABPeoplePickerNavigationControllerDelegate protocol.
3. Present the People Picker as a modal view controller by using the present
ModalViewController:animated: method.
4. The ABPeoplePickerNavigationController then sends a message
to your delegate based upon a user’s action:
You’ll need to implement three separate delegate methods:
✦ peoplePickerNavigationController:shouldContinueAfter
SelectingPerson:
✦ peoplePickerNavigationController:shouldContinueAfter
SelectingPerson: property:identifier:
✦ peoplePickerNavigationControllerDidCancel:
If the user cancels, the ABPeoplePickerNavigationController sends
the peoplePickerNavigationControllerDidCancel: message to your
delegate, which should dismiss the controller.
If the user selects a property, the ABPeoplePickerNavigation
Controller sends the peoplePickerNavigationController:should
ContinueAfterSelectingPerson: property:identifier: message
to the delegate to determine whether it should continue. To perform the
default action for the selected property (dialing a phone number, starting
a new e-mail, and so on), return YES. Otherwise return NO and dismiss the
picker. In this case, you’ll return NO.
You’ll start by having the AddHotelController adopt the
ABPeoplePickerNavigationControllerDelegate protocol. Make the
changes shown in bold in Listing 1-19 to AddHotelController.h.
A User Interface
for Adding Hotels
and Using the
Address Book
If the user selects a contact, the ABPeoplePickerNavigationController
sends the peoplePickerNavigationController:shouldContinue
AfterSelectingPerson: message of the delegate to determine if it should
allow the user to choose a specific property of the selected person. You can
either return YES or NO, although in this case you will return NO.
Book VII
Chapter 1
776
Interfacing with the Address Book Application
Listing 1-19: Adopting the Protocol
@interface AddHotelController :
UIViewController <UITextFieldDelegate,
ABPeoplePickerNavigationControllerDelegate> {
There are four basic objects you need to understand in order to interact
with the Address Book database:
✦ Address Books
✦ Records
✦ Single-value properties
✦ Multi-value properties
Address Books let you interact with the Address Book database and
save changes to it. To use an Address Book, declare an instance of
ABAddressBookRef and set it to the value returned from the function
ABAddressBookCreate.
You won’t declare an instance of ABAddressBookRef to access the Address
Book in this section, but you will when you add a contact in the next section.
In the Address Book database, information is stored in records. Each
record (ABRecordRef) represents a person or group. The function
ABRecordGetRecordType returns kABPersonType if the record is a
person, and kABGroupType if it’s a group. Here, you’ll be working only with
persons.
Within a record, the data is stored as a collection of properties (similar to the
Objective-C properties you’re used to). The properties available for group
and person objects are different, but the functions used to access them are
the same. The functions ABRecordCopyValue and ABRecordSetValue get
and set properties, respectively. Properties can also be removed completely,
using the function ABRecordRemoveValue.
Person records are made up of both single-value and multi-value properties.
I’ll explain properties in great detail in a moment.
Start by adding the code in Listing 1-20 — the key delegate method as far as
you are concerned — to AddHotelController.m. That’s because when
the user selects a person from the Address Book, this is the message that’s
sent to your delegate.
Interfacing with the Address Book Application
777
Listing 1-20: peoplePickerNavigationController:
shouldContinueAfterSelectingPerson:
- (BOOL)peoplePickerNavigationController:
(ABPeoplePickerNavigationController *)peoplePicker
shouldContinueAfterSelectingPerson:(ABRecordRef)person {
name.text = (NSString*) ABRecordCopyValue(person,
kABPersonOrganizationProperty);
NSString *firstName = (NSString*)
ABRecordCopyValue(person, kABPersonFirstNameProperty);
NSString *lastName = (NSString*)
ABRecordCopyValue(person, kABPersonLastNameProperty);
if (!name.text) name.text = [[NSString alloc]
initWithFormat: @”%@ %@”, firstName, lastName ];
ABMultiValueRef multiValueRef = (NSString*)
ABRecordCopyValue(person,kABPersonPhoneProperty);
NSString* phoneLabel;
NSString* iPhone=@””;
NSString* homePhone=@””;
for (int i=0;i <
ABMultiValueGetCount(multiValueRef);i++) {
}
multiValueRef = ABRecordCopyValue
(person, kABPersonAddressProperty);
if (ABMultiValueGetCount(multiValueRef) > 0) {
CFDictionaryRef dictionary = ABMultiValueCopyValueAtIndex
(multiValueRef, 0);
street.text = (NSString*) CFDictionaryGetValue
(dictionary,
kABPersonAddressStreetKey);
city.text = (NSString*)CFDictionaryGetValue
(dictionary, kABPersonAddressCityKey);
state.text = (NSString*)CFDictionaryGetValue
(dictionary, kABPersonAddressStateKey);
zip.text = (NSString*)CFDictionaryGetValue
dictionary, kABPersonAddressZIPKey);
CFRelease(dictionary);
}
CFRelease(multiValueRef);
[self dismissModalViewControllerAnimated:YES];
return NO;
}
Book VII
Chapter 1
A User Interface
for Adding Hotels
and Using the
Address Book
phoneLabel = (NSString*) ABMultiValueCopyLabelAtIndex(mul
tiValueRef, i);
if([phoneLabel isEqualToString:
(NSString*)kABPersonPhoneIPhoneLabel])
iPhone = (NSString*) ABMultiValueCopyValueAtIndex(multi
ValueRef,i);
if([phoneLabel isEqualToString:(NSString*)kABHomeLabel])
homePhone = (NSString*) ABMultiValueCopyValueAtIndex(mu
ltiValueRef,i);
778
Interfacing with the Address Book Application
As one of the arguments of peoplePickerNavigationController:
shouldContinueAfterSelectingPerson:, you are passed the record of
the person selected:
- (BOOL)peoplePickerNavigationController:
(ABPeoplePickerNavigationController *)peoplePicker
shouldContinueAfterSelectingPerson:(ABRecordRef)person {
As I mentioned, inside the person record are properties, and there are two
kinds: single-value properties and multi-value properties.
Single-value properties are properties that a person can have only one of,
such as first name and last name. (Okay, maybe I should say you only have
one legal first and last name.) You’ll start things off by taking care of your
single-value properties, as follows:
name.text = (NSString*) ABRecordCopyValue
(person, kABPersonOrganizationProperty);
When you’re passed a person record, the way you access the singlevalue property — organization or name, for example — is through the
ABRecordCopyValue function, which returns the value of a record property — in this case, kABPersonOrganizationProperty — as a string.
It actually returns a CFTypeRef, which is an untyped generic reference to
any Core Foundation object. You cast it in the ABRecordCopyValue function to avoid compiler warnings.
I know this syntax may look weird to you, but that’s because this is not
iPhone specific. It comes from Core Foundation (on the Mac) which is a set
of C-based programming interfaces that implement simple object models in
C that encapsulate data and functions as system-managed objects and operate seamlessly with Cocoa Foundation interfaces.
kABPersonOrganizationProperty, and kABPersonFirstNameProperty, and kABPersonLastNameProperty are constants defined by Apple
that specify which fields you’re accessing. They’re listed in the XCode
documentation under Personal Information Properties in the ABPerson
Reference document.
Here I have to make a few decisions. Hotels in my Address Book will have
the name of the hotel in the kABPersonOrganizationProperty, and I’ll
use that for the name in my view display and the hotel object. But for my
friend’s first cousin’s ex-boyfriend, there won’t be one, so I’ll take the first
and last name properties, concatenate them, and display it as the hotel
name instead. (I’ll leave it to you to figure out what to do if the joker finally
did find a job and his new company name is in his contact information.)
Interfacing with the Address Book Application
779
NSString *firstName = (NSString*)
ABRecordCopyValue(person, kABPersonFirstNameProperty);
NSString *lastName = (NSString*)
ABRecordCopyValue(person, kABPersonLastNameProperty);
if (!(name.text)) name.text = [[NSString alloc]
initWithFormat: @”%@ %@”, firstName, lastName ];
As you might expect, other properties that a person can have more than one
of, such as street address and phone number, are multi-value properties.
Multi-value properties consist of a list of values. Each value has a text label
and an identifier associated with it. There can be more than one value with
the same label, but the identifier is always unique.
These properties are ABMutableMultiValueRefs. And just to make your
life interesting, there are two types of ABMutableMultiValueRefs you’ll
have to contend with;
✦ kABMultiStringPropertyType, which, as you might expect, are
strings.
✦ kABMultiDictionaryPropertyType, which, as you might expect, are
dictionaries.
Although you won’t be using the phone number in RoadTrip, this part of
Listing 1-20 is how you would access it:
Book VII
Chapter 1
ABMultiValueRef multiValueRef = (NSString*)
ABRecordCopyValue(person,kABPersonPhoneProperty);
NSString *phoneLabel;
NSString *iPhone=@””;
NSString *homePhone=@””;
for(int i=0 ;i < ABMultiValueGetCount(multiValueRef);
i++) {
phoneLabel=(NSString*)
ABMultiValueCopyLabelAtIndex(multiValueRef,i);
if([phoneLabel isEqualToString:
(NSString*)kABPersonPhoneIPhoneLabel])
iPhone = (NSString*)
ABMultiValueCopyValueAtIndex(multiValueRef,i);
if([phoneLabel isEqualToString:(NSString*)kABHomeLabel])
homePhone = (NSString*)
ABMultiValueCopyValueAtIndex(multiValueRef,i);
}
A User Interface
for Adding Hotels
and Using the
Address Book
Here, a person has multiple phone numbers, each of which has a text label.
(In this example, I just look for iPhone and home, but you get the picture.)
Walking through this section of Listing 1-20, you see that the first thing you
do is get the property using the ABRecordCopyValue function.
780
Interfacing with the Address Book Application
ABMultiValueRef multiValueRef = (NSString*)
ABRecordCopyValue(person, kABPersonPhoneProperty);
In this case, the property you’re getting is the Phone property (kABPersonPhoneProperty) and is a kABMultiStringPropertyType (think string).
Because there can be zero or many phone numbers, you get the count and
enumerate through the record.
for(int i=0; i < ABMultiValueGetCount(multiValueRef);
i++) {
For each entry in the record, you check to see whether it has the label of the
number you’re interested in, and save it if it does.
if([phoneLabel isEqualToString:
(NSString*)kABPersonPhoneIPhoneLabel])
iPhone = (NSString*)
ABMultiValueCopyValueAtIndex(multiValueRef,i);
if([phoneLabel isEqualToString:(NSString*)kABHomeLabel])
homePhone = (NSString*)
ABMultiValueCopyValueAtIndex(multiValueRef,i);
The first phone type — kABPersonPhoneIPhoneLabel — is listed under
Phone Number Property in the ABPerson Reference, along with a bunch of
others. The kABHomeLabel is under Generic Property Labels.
As I said, what makes it interesting is that there are really two kinds of mulitvalue labels. The first (phone number) was a kABMultiStringPropertyType. Street address however is a kABMultiDictionaryPropertyType.
Although street address is still an ABMultiValueRef property, it isn’t a
kABMultiStringPropertyType — it’s, as I said, kABMultiDictionaryPropertyType instead. As such, it is a dictionary entry, which means you’ll
have to first get the dictionary and then get the values you’re interested in.
Street addresses are represented as a multi-value of dictionaries. Each value
has a label, such as home or work. Within the value, the dictionary contains
keys for the different parts of a street address.
In the following section of the code you entered as part of Listing 1-20, you
simply check to see whether there’s an entry, and if so, you take the first
street address.
if (ABMultiValueGetCount(multiValueRef) > 0) {
CFDictionaryRef dictionary = ABMultiValueCopyValueAtIndex
(multiValueRef, 0);
street.text = (NSString*) CFDictionaryGetValue
(dictionary, kABPersonAddressStreetKey);
Interfacing with the Address Book Application
781
city.text = (NSString*)CFDictionaryGetValue
(dictionary, kABPersonAddressCityKey);
state.text = (NSString*)CFDictionaryGetValue
(dictionary, kABPersonAddressStateKey);
zip.text = (NSString*)CFDictionaryGetValue
(dictionary, kABPersonAddressZIPKey);
CFRelease(dictionary);
}
You could, however, iterate through and find the one with the label you’re
interested in, such as home or work.
for(int i=0;
i < ABMultiValueGetCount(multiValueRef); i++) {
if ([(NSString*)
ABMultiValueCopyLabelAtIndex(multiValueRef, i)
isEqualToString:(NSString*)kABHomeLabel])
...
You could also let the user select the right address (or name field for that
matter) by returning YES instead of NO in the peoplePickerNavigation
Controller:shouldContinueAfterSelectingPerson: method and
implementing the logic to copy the values in peoplePickershould
ContinueAfterSelectingPerson:.
You also can allow the user to access groups as well, but you can explore
that one on your own.
Listing 1-21: (ABPeoplePickerNavigationController *)peoplePicker
shouldContinueAfterSelectingPerson:(ABRecordRef)person
- (BOOL)peoplePickerNavigationController:
(ABPeoplePickerNavigationController *)peoplePicker
shouldContinueAfterSelectingPerson:(ABRecordRef)person
property:(ABPropertyID)property
identifier:(ABMultiValueIdentifier)identifier{
return NO;
}
This method won’t be invoked because you returned NO in peoplePicker
NavigationController:shouldContinueAfterSelectingPerson:,
but you still need it there because it is required by the protocol.
Finally, if the user changes his or her mind and wants to cancel the Address
Book lookup, add the code in Listing 1-22.
A User Interface
for Adding Hotels
and Using the
Address Book
Add the code in Listing 1-21 to AddHotelController.m to add the
required delegate method.
Book VII
Chapter 1
782
Interfacing with the Address Book Application
Listing 1-22: Canceling the addition
- (void)peoplePickerNavigationControllerDidCancel:
(ABPeoplePickerNavigationController *)peoplePicker {
[self dismissModalViewControllerAnimated:YES];
}
All you really do here is dismiss the controller.
To finish up, you also need to add some imports to
AddHotelController.h.
#import <AddressBook/AddressBook.h>
#import <AddressBookUI/AddressBookUI.h>
Next, you need to add the AddressBook and AddressBookUI Frameworks.
1. Click the disclosure triangle next to Targets in the Groups & Files list
and then right-click RoadTrip.
Be sure to do this using the Targets folder, or Step 3 won’t work!
2. From the menu that appears, select Add and then select Existing
Frameworks.
3. Select AddressBook.framework and the AddressBookUI.framework in the window that appears and then drag them into the
Frameworks folder.
Adding a hotel to your Address Book
Adding a new contact to the Address Book is similar to accessing one.
You’d start by making the AddHotelController a
ABNewPersonViewControllerDelegate. You’ll need to add the following
to AddHotelController.h.
@interface AddHotelController : UIViewController
<UITextFieldDelegate,
ABPeoplePickerNavigationControllerDelegate,
ABNewPersonViewControllerDelegate> {
In this case, there is only one delegate method you’ll need to implement —
the newPersonViewController:didCompleteWithNewPerson:
method, which is invoked when the user taps Save or Cancel. By the way,
if the user tapped Save, by the time you receive the message, the current
Address Book has been saved to the Address Book database.
At that point, it’s your job to dismiss the AbNewPersonViewController.
Add the code in Listing 1-23 to AddHotelController.m to do just that.
783
Interfacing with the Address Book Application
Listing 1-23: Done with the Record
- (void)newPersonViewController:
(ABNewPersonViewController *)newPersonViewController
didCompleteWithNewPerson:(ABRecordRef)person {
[self dismissModalViewControllerAnimated:YES];
}
Now they you’ve gotten that out of the way, you can concentrate on what you
need to do to actually add the new contact. Adding a contact to the iPhone’s
Address Book isn’t horribly complicated, but there’s some work to do.
To start, you need to implement the IBAction saveToContacts: method —
that’s where the work will get done.
Add the code in Listing 1-24 to AddHotelController.m.
Listing 1-24: saveToContacts:
- (IBAction) saveToContacts:(id)sender{
ABAddressBookRef addressBook = ABAddressBookCreate();
ABRecordRef personRecord = ABPersonCreate();
ABMutableMultiValueRef mutableMultiValueRef =
ABMultiValueCreateMutable
(kABMultiDictionaryPropertyType);
NSMutableDictionary *addressDictionary =
[[NSMutableDictionary alloc] init];
[addressDictionary setObject:street.text forKey:(NSString
*) kABPersonAddressStreetKey];
[addressDictionary setObject:city.text
forKey:(NSString *)kABPersonAddressCityKey];
[addressDictionary setObject:state.text
forKey:(NSString *)kABPersonAddressStateKey];
[addressDictionary setObject:zip.text
forKey:(NSString *)kABPersonAddressZIPKey];
ABMultiValueAddValueAndLabel(mutableMultiValueRef,
addressDictionary, kABWorkLabel, nil);
ABRecordSetValue(personRecord, kABPersonAddressProperty,
mutableMultiValueRef, nil);
CFRelease(mutableMultiValueRef);
ABAddressBookAddRecord(addressBook, personRecord, nil);
ABAddressBookSave(addressBook, nil);
(continued)
A User Interface
for Adding Hotels
and Using the
Address Book
ABRecordSetValue(personRecord, kABPersonOrganizationPropert
y,name.text, nil);
ABRecordSetValue(personRecord,
kABPersonLastNameProperty,name.text,nil);
Book VII
Chapter 1
784
Interfacing with the Address Book Application
Listing 1-24 (continued)
ABNewPersonViewController *picker =
[[ABNewPersonViewController alloc] init];
picker.newPersonViewDelegate = self;
picker.displayedPerson = personRecord;
UINavigationController* navigationController =
[[UINavigationController alloc] initWithRootViewController
:picker];
[self presentModalViewController:navigationController
animated:YES];
[picker release];
}
To create a new Address Book entry, start by creating a new Address Book
with data from the Address Book database.
ABAddressBookRef addressBook = ABAddressBookCreate();
When you have the Address Book, you’ll create the new record you want to
add to it.
ABRecordRef personRecord = ABPersonCreate();
Then you’ll add the data to the new record.
For single-value rewords, like name, you’ll do something similar to what
you did when you accessed the Address Book information back in the
last section. But in this case, instead of ABRecordCopyValue you’ll use
ABRecordSetValue. (Kind of makes sense doesn’t it?)
ABRecordSetValue(personRecord, kABPersonOrganizationProperty,
name.text, nil);
ABRecordSetValue(personRecord,
kABPersonLastNameProperty,name.text, nil);
This code sets the Organization and Last Name fields with the text from the
Name field in the view. The last argument is a place to return any errors, but
throughout this code I use nil — but feel free to explore that on your own.
Next in line in Listing 1-24 is adding a new address record. (I’ll skip the
phone number multi-value property type — but you get the drift.) To add a
new address record, you create a new dictionary property type and then a
new dictionary. In this case, you’re creating an ABMutableMultiValueRef
instead of the multiValueRef you used when you read the contact information in the previous section. It needs to be mutable because you’re going
to making changes to it.
Interfacing with the Address Book Application
785
ABMutableMultiValueRef mutableMultiValueRef =
ABMultiValueCreateMutable(kABMultiDictionaryPropertyType);
NSMutableDictionary *addressDictionary =
[[NSMutableDictionary alloc] init];
Then, you go on to add the fields you’re interested in to the dictionary:
[addressDictionary setObject:street.text
forKey:(NSString *) kABPersonAddressStreetKey];
[addressDictionary setObject:city.text
forKey:(NSString *)kABPersonAddressCityKey];
[addressDictionary setObject:state.text
forKey:(NSString *)kABPersonAddressStateKey];
[addressDictionary setObject:zip.text
forKey:(NSString *)kABPersonAddressZIPKey];
Then you add the value (addressDictionary) and the label (kABWork
Label) to the property (mutableMultiValueRef):
ABMultiValueAddValueAndLabel(mutableMultiValueRef,
addressDictionary, kABWorkLabel, nil);
and set it as the value of the property (kABPersonAddressProperty) in
the personRecord and release the dictionary:
Then you add the person record to the Address Book you created and then
save it, which actually updates the database:
ABAddressBookAddRecord(addressBook, personRecord, nil);
ABAddressBookSave(addressBook, nil);
Finally, you create the controller, set self as the delegate, give it the person
record to display, and then modally present the controller:
ABNewPersonViewController *picker =
[[ABNewPersonViewController alloc] init];
picker.newPersonViewDelegate = self;
picker.displayedPerson = personRecord;
UINavigationController* navigationController =
[[UINavigationController alloc]
initWithRootViewController:picker];
self presentModalViewController:navigationController
animated:YES];
[picker release];
Book VII
Chapter 1
A User Interface
for Adding Hotels
and Using the
Address Book
ABRecordSetValue(personRecord, kABPersonAddressProperty,
mutableMultiValueRef,nil);
CFRelease(mutableMultiValueRef);
786
Interfacing with the Address Book Application
There’s a lot more functionality here that I haven’t coverd — updating an
existing records comes to mind, as well as the ability for your application to
be notified when another application makes changes to the Address Book
database. I’ll leave it up to you to explore that on your own.