1
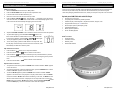
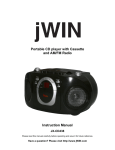
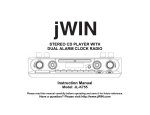
SPLASH PROOF AM/FM Radio with CD Player V10M10_IM_EN_08132007 Splash-Proof AM / FM Radio with CD Player TEL: 516-626-7188 FAX: 516-626-7105 Website: www.jwin.com JX-M89 INSTRUCTION MANUAL © 2007 jWIN Electronics Corp. All rights reserved. No portion of this printed material or product enclosed herewith including design, shape and graphics, may be reproduced or transmitted in any form without the expressed written consent of jWIN Electronics Corp. by any means, electronic or mechanical, including photocopying, recording or use of an information storage and retrieval system. Any unauthorized distribution or reproduction of this printed material or product, or any portion there of, will be prosecuted to the fullest possible extent of the law. 11 www.jWIN.com Please read this manual carefully before operating and save it for future reference. HAVE A QUESTION? PLEASE VISIT WWW.jWIN.COM SPLASH PROOF AM/FM Radio with CD Player V10M10_IM_EN_08132007 SPLASH PROOF AM/FM Radio with CD Player V10M10_IM_EN_08132007 USER SAFETY GUIDE TROUBLESHOOTING GUIDE AND SPECIFICATIONS IMPORTANT SAFETY PRECAUTIONS If you experience difficulties in the use of this unit, please check the following before calling for 1. Customer Service. This unit has been constructed to resist mild steam and light splashes from the shower or bath only. It should not be operated under running water and under no circumstances • should it be fully immersed in water. 2. Noise or distorted sound when playing the radio. o If the unit is not to be used for a long period of time, make sure that all power sources are Radio station may not be properly tuned. Tune to desired radio frequency again. disconnected from the unit. Remove all batteries from the battery compartment. o • The radio signal is weak. Reposition the unit for better reception. No radio sound o Radio may not be turned on, Turn the VOLUME/ON/OFF knob clockwise until you hear a click. Dispose of old batteries safely. Do not throw them into a fire. o Batteries may not be installed. Install four (4) fresh AA batteries in the battery compartment. • CD does not play o IMPORTANT SAFETY INSTRUCTIONS 1. o READ INSTRUCTIONS - All the safety and operating instructions should be read before the appliance is operated. 2. secure place for future reference. 3. The disc may not be inserted properly. Place the disc in the disc tray with the label side facing up. • RETAIN INSTRUCTIONS - The safety and operating instructions should be retained in a The unit may not be set to CD mode. Make sure the mode switch is on CD. CD skips while playing o The disc may be dirty or scratched. Wipe disc with a soft, dry cloth or replace with a new disc. HEED WARNINGS - All warnings on the appliance and in the operating instructions should be observed. 4. FOLLOW INSTRUCTIONS - All operating and use instructions should be followed. 5. HEAT - The appliance should be situated away from heat sources such as radiators, heat 6. POWER SOURCES - The appliance should be connected to a power supply only of the 7. CLEANING - The appliance should be cleaned with a dry cloth. 8. OBJECT AND LIQUID ENTRY - Care should be taken so that objects do not fall and registers, stoves, or other appliances (including amplifiers) that produce heat. Specifications • Frequency Range o AM: 530kHz – 1710kHz o FM: 88MHz – 108MHz • Power Requirement o DC 9V, 6 C” or UM-2 size batteries (Batteries is not included) type described in the operating instructions or as marked on the appliance. liquids are not spilled into the device’s openings. 9. CARTS AND STANDS - The appliance should be used only with a cart or stand that is recommended by the manufacturer. An appliance and cart combination should be moved with care. Quick stops, excessive force, and uneven surfaces may cause the appliance and cart combination to overturn 10. DAMAGE REQUIRING SERVICE - The appliance should be serviced by qualified service professional when: a. Objects have fallen into, or liquid has been spilled into the appliance’s apertures. b. The appliance has been exposed to rain. c. The appliance has been dropped and suffered damage. d. The appliance does not appear to operate normally, or exhibits a change in performance. 1 www.jWIN.com 10 www.jWIN.com SPLASH PROOF AM/FM Radio with CD Player V10M10_IM_EN_08132007 SPLASH PROOF AM/FM Radio with CD Player OPERATIONAL INSTRUCTIONS USER SAFETY GUIDE Tips for Getting Better Reception IMPORTANT SAFETY INSTRUCTIONS – CONTINUED 1. This unit has the built-in AM/FM antennas. Thus, an external FM wire antenna isn’t required to be installed on this unit to receive the FM radio. However, if you reside in the poor reception area and want to enhance the FM radio reception more, you might attach the pigtail wire antenna at the external FM antenna terminal located on the back of the unit. 2. To get better AM radio reception, be sure to place the unit horizontally and reposition it if there are noises on the AM station. Cleaning the Unit 1. To prevent fire or shock hazard, disconnect your unit from the AC power source when cleaning. 2. The finish on the unit may be cleaned with a dust cloth and cared for as other furniture, Use caution when cleaning and wiping the plastic parts. 3. If the cabinets become dusty, wipe them with a soft dry dust cloth. Do not use any wax or polish sprays on the cabinets. 4. If the front panel becomes dirty or smudged with fingerprints, it may be cleaned with a soft cloth slightly dampened with a mild soap and water solution. Never use abrasive cloths or polishes as these will damage the finish of your unit. V10M10_IM_EN_08132007 11. SERVICING - The user should not attempt to service the appliance beyond that described in the user's operating instructions. All other servicing should be referred to qualified service professional. 12. BATTERY USAGE – To prevent battery leakage, which may result in bodily injury, property damage or damage to the unit, follow these instructions: a. Install all batteries correctly according to the polarity (+ -) as marked on the unit. b. Do not mix old and new batteries, carbon and alkaline, etc. c. Remove batteries from the unit when the device will not be used for an extended period of time. 13. LEAD AND MERCURY - This product may contain lead and/or mercury. Disposal of these materials may be regulated by your local authorities due to environmental considerations. For more detailed disposal or recycling information, please contact your local authorities or the EIA (Electronic Industries Alliance) – http://www.eiae.org IMPORTANT NOTES 1. Do not attempt to clean the unit with chemical solvents as this might damage the finish. Use a clean, dry cloth. Caution: never allow any water or other liquids to get inside the unit while cleaning. Cleaning the Disc 1. Treat the disc carefully. Handle the disc only by its edges. Never allow your fingers to contact with the shiny, unprinted side of the disc. 2. Do not attach adhesive tape, stickers etc., to the disc label. 3. Clean the disc periodically with soft, lint-free, dry cloth. Never use detergents or adhesive cleaners to clean the disc. If necessary, use a CD cleaning kit. 4. If disc skips or gets stuck on a section of the disc, it is probably dirty or damaged (scratched). 5. When cleaning the disc, wipe in straight lines from the centre of the disc to the edge of the disc. Never wipe in circular motions. 6. To remove a disc from its storage case, press down on the centre of the case and lift the disc outs, holding it carefully by the edges. 7. Fingerprints and dust should be carefully wiped off the disc's recorded surface with a soft cloth. Unlike conventional records. compact disc have no groove to collect dust and microscopic debris, so gently wiping with a soft cloth should remove most particles. 2. Keep this manual in a safe place for future reference. You can help to protect the environment! Please remember to respect the local regulations: Hand in the non-working electrical equipment to an appropriate waste disposal center. TO A USER IN USA This equipment has been tested and found to comply with the limits for a Radio Receiver, pursuant to Part 15 of the FCC Rules. These limits are designed to provide reasonable protection against harmful interference in a residential installation. This equipment generates, uses, and can radiate radio frequency energy and, if not installed and used in accordance with the instructions, may cause harmful interference to radio communications. However, there is no guarantee that interference will not occur in a particular installation. If this equipment does cause harmful interference to radio or television reception, which can be determined by turning the equipment off and on, the user is encouraged to try to correct the interference by one or more of the following measures: - Reorient or relocate the receiving antenna. - Increase the separation between the equipment and receiver. Note: Do not use solvents such as benzine petrol, thinner, commercially available cleaners or anti-static spray intended for analogue discs. Connect the equipment into an outlet on a circuit different from that to which the receiver is connected. - If necessary, consult the dealer or an experienced radio / TV technician for additional suggestions. 9 www.jWIN.com 2 www.jWIN.com SPLASH PROOF AM/FM Radio with CD Player V10M10_IM_EN_08132007 USER SAFETY GUIDE SPLASH PROOF AM/FM Radio with CD Player V10M10_IM_EN_08132007 OPERATIONAL INSTRUCTIONS Repeat and Intro Functions-continued 4. To play the audio tracks in the random order, press the P.MODE button until the indication COMPLIANCE OF FCC RULE This device complies with Part 15 of the FCC Rules. Operation is subject to the condition that “RDM” appears on the LCD screen. The random function is disabled in the programmed this device does not cause harmful interference. play mode. Note: Changes or modifications not expressly approved by the party responsible for compliance could void the user’s authority to operate the equipment. Programmed Playback SPLASH RESISTANCE The PROGRAM function allows your favorite tracks to be played in a programmed sequence. This unit has been constructed to resist mild steam and light splashes from the shower or bath This feature can be set in the stop mode or normal play mode. only. It should not be operated under running water and under no circumstances should it be 1. Press the PROGRAM button to start programming. The indication “PGM” and track number “01” start blinking on the LCD screen. fully immersed in water. This unit isn’t a water-resistant device. / ) buttons to select your desired track. 2. Use the SKIP ( 3. After selecting the track, press the PROGRAM button to save the selected track in the memory. The indications “PGM” and “02” will appear on the screen and blink while waiting Compatibility for the next input. AUDIO CD 1. Disc Size: 12cm / 8cm 2. Disc Type: CD 4. DISC ERROR Repeat step 2 and 3 to program more tracks. You can program up to 20 tracks into the memory in any sequence order. 5. This compact disc player has built-in error compensation circuits to correct for minor defects in To check the programmed tracks, press the STOP button and then PROGRAM button. Each press of the PROGRAM button will show the programmed track accordingly on the a disc. There are limits, however, to the amount of correction available. In some cases, the CD LCD screen. player may skip some tracks, or parts of tracks, on a disc during disc play. This problem may be 6. Press the PLAY / PAUSE ( caused by defects (such as scratches) in the disc being played, which are too large for the error 7. To cancel the programmed play, press the STOP button twice. ) button to start the programmed playback. compensation circuits to handle. If you encounter this problem, try a new disc before having the unit serviced. If the CD player operates normally, the skipping problem is probably due to a defective disc. Listening to Radio 1. Set the FUNCTION select switch to the "RADIO" position. Note: Only the above types of discs can be played on this unit. Some CD-R, CD-RW discs cannot be played depending on the condition of the player and the disc. 2. Set the BAND select switch to either "AM" or “FM”. 3. Adjust the TUNING knob to obtain the desired radio station. 4. Adjust the VOLUME control knob to obtain the desired sound level. 5. To turn off the radio, set the FUNCTION select switch to the "CD" position. 3 www.jWIN.com 8 www.jWIN.com SPLASH PROOF AM/FM Radio with CD Player V10M10_IM_EN_08132007 SPLASH PROOF AM/FM Radio with CD Player V10M10_IM_EN_08132007 OPERATIONAL INSTRUCTIONS GETTING STARTED Playing an audio CD Thank you for purchasing JX-M89. Unpack the package and make sure all the accessories and 1. Set the FUNCTION select switch to the "CD" position. main unit are put aside so they will not be lost. We recommend that you retain the original 2. Press the PUSH OPEN button to open the CD compartment cover. carton and packaging materials for future use, should you transport or ship the unit in the future. 3. Load an audio CD with the label side facing out. 4. Close the cover. Ensure that the cover is firmly locked. 5. Press the PLAY / PAUSE ( 6. 7. Splash-proof AM / FM radio with CD Player ) button. The indication “- -” will appear on the LCD screen. • Circular mirror on the front A few seconds later, the total number of audio tracks on the CD will briefly appear on the • Completely self-contained for portable operation LCD screen and then automatically start playing from the first track. • Variable CD play modes: Repeat 1, Repeat All, Random, Program, Intro • Programmable memory for 19 audio tracks • Round-shape Liquid Crystal Display (LCD) • Integrated AM/FM tuner • Built-in powerful speakers • CD-R / CD-RW playback Adjust the VOLUME CONTROL knob to obtain the desired sound level from the speakers. To pause while playing, press the PLAY / PAUSE ( ) button. The What’s Included track number will flash to indicate that the unit is in the pause mode. • Audio CD player 8. To stop the playback, press the STOP () button. • Instruction manual 9. To turn off the player, press the STOP button in the stop mode. Or if • Warranty Card the CD player is left in the stop mode for more than 30 seconds, it will • External FM antenna To resume the playback, press the PLAY / PAUSE ( ) button again. automatically turn itself off to save the power. Skip and Search Functions ) button once to skip a track forward. 1. Press the SKIP + ( 2. Press and hold the SKIP + ( 3. Press the SKIP – ( ) button to search a track forward. ) button twice consecutively to skip a track backward. If pressed once, it will skip to the beginning of the current track, not to the beginning of the previous track. 4. Press and hold the SKIP – ( ) button to search a track backward. Repeat and Intro Functions 1. To repeat the current track, press the P.MODE button until the indication “RPT1” appears on the LCD screen. 2. To repeat the entire CD or all the programmed tracks, press the P.MODE button until the indication “RPT ALL” appears on the LCD screen. 3. To start the INTRO playback, press the P.MODE button until the indication “INTRO” appears on the LCD screen. If the player is in the play mode when it is set to the INTRO mode, the indication “INTRO” will be shown but blinking. In this case, the INTRO function will be in effect with the next track. If the player is in the stop mode when it is set to the INTRO mode, the indication “INTRO” will be shown. Press the PLAY / PAUSE ( ) button to start the INTRO play. The first 10 seconds of each track will be played. 7 www.jWIN.com 4 www.jWIN.com SPLASH PROOF AM/FM Radio with CD Player V10M10_IM_EN_08132007 SPLASH PROOF AM/FM Radio with CD Player GETTING STARTED GETTING STARTED Location of Controls on the Main Unit Using an AC Adapter to Supply the Power to the Unit V10M10_IM_EN_08132007 Before connecting the AC adapter (not included), make sure that the input voltage of the AC adapter corresponds to your local AC outlet voltage. It is recommended to use an AC adapter, which outputs DC 9V / 600mA / , for this unit. 1. Connect the plug of the AC adapter to the DC 9V socket of JXM89. 2. Connect the other end of the AC adapter to the wall outlet. Important Note: To avoid the electric shock or fire, do not use the AC adapter where lots of water particles exist in the air. Use the AC adapter with caution. 1. 2. 3. 4. 5. 6. 7. 8. 9. LCD screen (CD mode). Circular mirror. TUNER dial pointer. PUSH OPEN button for CD compartment cover. CD compartment cover. RELEASE button for circular mirror. VOLUME CONTROL knob. TUNING knob (Radio mode). BAND select switch (Radio mode) Used to select the radio band (AM or FM). 10. FUNCTION select switch. Used to select the CD mode or the RADIO mode. 11. PROGRAM. button (CD mode). Used to program audio tracks to play in a preferred playback order. 12. P.MODE button (CD mode). Used to change to the specific playback mode (Repeat 1 / Repeat All / Intro / RDM). 13. SKIP – ( ) button (CD mode). a. Used to skip to the previous audio track by pressing it while playing a CD. b. Used to search an audio track by pressing and holding it while playing a CD. 14. SKIP + ( ) button (CD mode). a. Used to skip to the next audio track by pressing it while playing a CD. b. Used to search an audio track by pressing and holding it while playing a CD. 15. STOP () button (CD mode). a. Used to stop the playback while playing. b. Used to power off the unit in the stop mode. 16. PLAY / PAUSE ( ) button (CD mode). a. Used to start the playback or pause while playing. b. Used to power on the unit in the power-off mode. 17. DC 9V socket. 18. Terminal for the external FM radio antenna. 19. LOCK for battery compartment cover. 20. Hanging rope. 5 www.jWIN.com Installing batteries for the portable use This unit operates on 6 “C” (or UM-2) batteries (not included) for the portable use. 1. Open the BATTERY COMPARTMENT cover. The BATTERY COMPARTMENT is located on the back of the unit. 2. Insert 6 “C” alkaline batteries, following the polarity as indicated in the BATTERY COMPARTMENT. 3. Close the BATTERY COMPARTMENT cover. Important Note: Please protect the environment. Dispose of old batteries properly throw the according to your local regulations. 6 www.jWIN.com