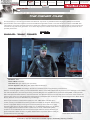
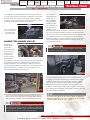
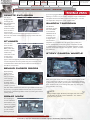
1
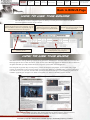
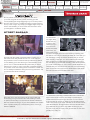
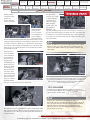
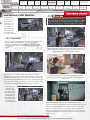
How to Use
This Guide
The Fisher
Files
Training
P.E.C.
Challenges
Walkthrough
Co-op Story
Deniable
Ops
Achievements
The Art of Splinter
Cell Conviction
Back to BONUS Page
How to Use This eGuide
This eGuide has a custom navigation system to allow you to easily find content within the eGuide
and move between sections as you choose.
The main menu puts all of the eGuide sections for
Splinter Cell Conviction at your fingertips. You can
select the Menu button from any eGuide page to
return to the main menu at any time.
Enter keywords to find a specific
word or phrase.
Of course, you can also use the “page
forward” and “return to beginning”
icons to navigate through the eGuide.
For any other questions about your
Splinter Cell Conviction eGuide, check
out the help button.
Within each eGuide section, all sub-sections
are displayed for easy navigation.
How to Use This Guide
Sam Fisher wants revenge. Revenge against the organization—Third Echelon—that has taken too much from him.
Revenge against the man who forced him to kill his best friend. Revenge against the wheelman who ran down his
daughter. And with your help, Fisher will lay his vengeance upon all who have wronged him.
Use this guide to get the drop on every enemy, master all weapons and gadgets, and complete every single
mission in both Fisher’s main mission and the co-op campaign. With our full walkthroughs, you will survive every
trial and come out not just alive, but laden with special points (earned through in-game challenges) that can be
traded to upgrade guns and gear. You will be unstoppable. You will be as feared as Fisher himself.
The Fisher Files: Just who is Sam Fisher? This dossier details Fisher’s previous missions
so you know what drives Fisher and what is at stake in his latest mission.
Prima Official Game Guide
4
Protected by copyright. Unauthorized or unlawful copying or downloading expressly prohibited.
How to Use
This Guide
The Fisher
Files
Training
P.E.C.
Challenges
Walkthrough
Co-op Story
Samuel “Sam” Fisher
Tom Clancy’s Splinter Cell Chaos Theory ™
Achievements
The Art of Splinter
Cell Conviction
Downl
oadeGui
de
Intel
Tom Clancy’s Splinter Cell®
Deniable
Ops
Tom Clancy’s Splinter Cell Pandora Tomorrow ™
Tom Clancy’s Splinter Cell Double Agent ™
The Fisher Files
The information you are about to read has been deemed “top secret” by the National Security Agency (NSA). The classified
personnel files and mission reports of former Third Echelon agent Sam Fisher must never leave the confines of the NSA. This
information is to remain “eyes-only” because if a hard copy of Fisher’s operations fell into the wrong hands, it could compromise
national security and cause great harm to our allies. Any suspicion of leaks could result in the loss of security clearances and
possible prosecution.
Intel
Samuel “Sam” Fisher
Birthdate: 1957
Place of Birth: Classified
Last Rank: NOC (non-official cover operative)
Former Agencies: USN (Navy), CIA, JSOC, NSA, Third Echelon
Combat Specialities: Krav Maga, demolitions, standard military issue weaponry and ordnance
Fisher is a former agent of the top secret Third Echelon division of the NSA. He was the very first recruit for field agent status within
the new Third Echelon, promoted by Col. Irving Lambert (Ret). Prior to his NSA career, Fisher was a Navy SEAL, a CIA operative
within the Special Activities Division, and active with the Joint Special Forces Command. Over the course of his career, Fisher has
served in hot spots such as Iraq (Operation Desert Storm) and Afghanistan as well as taking special assignments in North Korea,
Russia, Panama, the former East Germany, and Georgia.
Fisher’s personal life is marked with tragedy from the 1989 death of his wife (from
ovarian cancer) to the 2007 drunk driving accident that killed his daughter, Sarah. These
events, coupled with Fisher’s training and combat experience, have made him a highly
effective agent, able to see the world for what it is, not what Fisher wishes it to be. Fisher
values loyalty and honor above all. He is ruthless but not cruel, understanding when
situations can be talked down versus those that require extreme violence. However, his
grief over Sarah’s death has led many within Third Echelon to question Fisher’s ability to
pull himself back from the edge.
Prima Official Game Guide
Victor Coste, known associate
8
Protected by copyright. Unauthorized or unlawful copying or downloading expressly prohibited.
How to Use
This Guide
The Fisher
Files
Training
The Essentials
Aiming
Weapons
Detection
Cover
P.E.C.
Challenges
Combat
Walkthrough
Stealth
Hand-to-Hand Kills
in the direction you will face when you advance. If you decide
to move, press the prompted button to advance. You stay low
and rush to the next cover spot and slam flush to it. When
moving, you can be seen or shot, unless the screen is in blackand-white, which indicates that you are invisible.
Gear
Co-op Story
Deniable
Ops
The Art of Splinter
Cell Conviction
Downl
oadeGui
de
Enemy Intel
Mark and Execute
Achievements
Doors
Environmental Kills
If you hold the
hand-to-hand kill
button, you do
not immediately
kill your target.
Instead, you pull
him close and use
him as a human
shield. You have
the enemy by his neck, so he does not make any noise. You
can move around the shadows and still not be detected. The
obvious benefit of a human shield is that it absorbs bullets while
you engage the enemy. A human shield can absorb several
bullets from pistols, but gets chewed up by machine guns and
assault rifles. When a human shield is no longer useful, you
automatically discard it.
You can also lean
out of cover to fire
on enemies, but
this exposes you.
Hand-to-Hand Kills
In addition to
shooting them,
you can kill
enemies with your
bare hands. You
must be close
enough to an
enemy to strike,
though. When
you are within range, the button prompt for a close kill appears
onscreen. These kills are unstoppable. Once initiated, your
target is helpless as you grab their gun and turn it on them
or snap their neck with a quick twist of the skull. Hand-to-hand
kills are silent, but if you perform one in plain sight, you are
immediately detected by other enemies.
You can use only your pistol while holding a human shield.
You cannot use any gear either.
However, pulling an enemy into a human shield and then
dragging him into the shadows lets you decide where exactly
to drop the body. If you want to hide your presence, sneak
up on an enemy and then grab him while nobody is looking.
Retreat into the darkness and then press the same button
to kill him and release the body. Unless an enemy moves into
the shadows with a flashlight and discovers the body, you have
effectively hidden the evidence.
You can initiate hand-to-hand kills while facing an enemy,
but the safest use of the attack is from the side or behind.
The element of surprise makes submission much easier.
If you are moving when you kill a human shield, you throw the
body directly ahead of you. This is a good way to “toss” a body
into the shadows when you are in a hurry.
Be mindful of where you use a hand-to-hand kill. If you snap
the neck of a mercenary while he’s standing in a pool of light,
you leave obvious evidence of your presence. Enemies will be
on their toes and have an easier time spotting you.
15
Protected by copyright. Unauthorized or unlawful copying or downloading expressly prohibited.
www.primagames.com
Downl
oadeGui
de
How to Use
This Guide
The Fisher
Files
Challenge and Reward
Death from Above
Remote Explosion
Training
Prepare and Execute
Grab from Ledge
Stunned
P.E.C.
Challenges
5x Predator
Behind Closed Doors
Walkthrough
Vanish
Splinter Cell
Stealth Headshot
Sonar Mark
Deniable
Ops
Co-op Story
Achievements
The Art of Splinter
Cell Conviction
P.E.C. Challenge Rewards
Mark Proficiency
Shadow Takedown
3x Frag Grenade
Sticky Camera Whistle
Downl
oadeGui
de
Remote Explosion
your sonar goggles. Marking targets behind two walls or just
below you counts. You just need to keep the target marked and
complete the execution without ever unmarking him. You are
not required to stay in the sonar goggles view.
Like the 3x
Frag grenade
challenge, the
Remote Explosion
challenge is
fulfilled when you
kill at least three
enemies with a
single remote
mine or sticky camera detonation. Place these devices in
doors or near other chokepoints to notch your kills and earn
this award.
Shadow Takedown
The Shadow
Takedown shares
the same DNA
as the Stealth
Headshot P.E.C.
Challenge. You
must eliminate
a target with a
hand-to-hand
kill (either an immediate kill or drag the enemy away as a
human shield) without ever being seen or heard. If an LKP
is established, the challenge is not fulfilled. However, if other
enemies locate the body from the kill later, it does not affect
the fulfillment.
Stunned
You can stun
enemies with
flashbangs or
EMP pulses. The
reaction is plainly
visible. They
raise their hands
to their faces
to shield their
eyes or ears and typically buckle at the knees while trying to
recover. Dispatch the enemy while they are stunned to notch
a kill toward this award. The kill can either be hand-to-hand,
headshot, or execution.
Sticky Camera Whistle
Behind Closed Doors
While peeking
under a door
with your snake
cam or a mirror,
mark a target
for execution
and then follow
through. It doesn’t
matter if you kick
the door down and execute, flank through a different entrance,
and scurry up a pipe and deliver the kill shot. You just need to
execute the marked target without ever unmarking him before
making the kill.
After placing the sticky cam on a surface and using the “make
noise” interaction to draw an enemy in to investigate, kill them
by detonating the camera, shooting them with a weapon, killing
them hand-to-hand, or eliminating them with any other gear
(frag grenade, mine, etc.).
N NOTE
Killing multiple targets while they investigate the same sticky
camera does not result in extra fulfillments. This award is
given per sticky camera.
Sonar Mark
This challenge is
similar to Behind
Closed Doors, but
instead of marking
and executing with
the snake cam,
you do so while
peering through
Prima Official Game Guide
28
Protected by copyright. Unauthorized or unlawful copying or downloading expressly prohibited.
Downl
oadeGui
de
How to Use
This Guide
Mission 01:
Marketplace
Mission 02:
Kobin’s
Mansion
Overview
Mission 03:
Price
Airfield
The Fisher
Files
Mission 04:
Diwaniya,
Iraq
Training
Mission 05:
Washington
Monument
MARKETPLACE—VALLETTA, MALTA
P.E.C.
Challenges
Walkthrough
Mission 06: Mission 07:
White box
Lincoln
Technologies Memorial
Strategy
Street Bazaar
Co-op Story
Mission 08:
Third Echelon
HQ
Marking for Death
Deniable
Ops
Achievements
Mission 09:
Michigan Ave.
Reservoir
Mission 10:
Downtown
District
The art of Splinter
Cell Conviction
Mission 11:
White House
Gramkos’s Interrogation
Downl
oadeGui
de
Mission 01: Marketplace
Overview
When Sam Fisher doesn’t want to be found, you don’t find him. Not unless your name is Anna “Grim” Grimsdottir, one of the
smartest intelligence agents at Third Echelon. Using state-of-the-art eye-in-the-sky technology and a good ol’ fashioned hunch,
Grim tracked Fisher down in Valletta, the capital of Malta. Apparently, Fisher had picked up a whisper that somebody in the
Mediterranean metropolis knew his daughter’s death wasn’t really an accident. It was an assassination designed to cause
maximum damage to Fisher.
Grim has a
waiter deliver a
mobile phone and
earpiece to Fisher
as he observes
the downtown
Valletta scene
from a sidewalk
cafe. Fisher takes the earpiece and listens to the voice on the
other end. He is not amused to hear Grim—he should be harder
to find than this. But Grim tells Fisher that she’s not the only
person who knows his whereabouts. Armed men are en route to
the cafe. Grim says she will guide him out of the cafe and through the nearby marketplace. They can talk more about why she found
him later. For right now, Fisher just needs to get out of that chair and start moving before a bloodbath occurs in a civilian area.
MARKETPLACE—VALLETTA, MALTA
Legend
N NOTE
Enemy
Enemy placement on all maps is as close to their starting
position as possible. However, almost every enemy moves
around. Some have patrol routes. Some like to group up when
they encounter other enemies in a room. Others burst through
doors when you are detected. They can be very unpredictable.
But so can you, and that’s how you’ll win the day.
Gramkos
Start
This mission acts as an in-game tutorial, teaching you the
ropes of being an agent of Third Echelon. By the end of the
mission, you will have all of the basics down. However, if you
read our Training chapter, you’ll have advance intel on how
to do a lot more right out of the gate, such as shadow kills,
flashbang escapes, and the always-fun “death from above.”
35
Protected by copyright. Unauthorized or unlawful copying or downloading expressly prohibited.
www.primagames.com
How to Use
This Guide
Mission 01:
Marketplace
Mission 02:
Kobin’s
Mansion
Mission 03:
Price
Airfield
The Fisher
Files
Mission 04:
Diwaniya,
Iraq
Training
Mission 05:
Washington
Monument
MARKETPLACE—VALLETTA, MALTA
Overview
P.E.C.
Challenges
Walkthrough
Mission 06: Mission 07:
White box
Lincoln
Technologies Memorial
Strategy
Street Bazaar
Co-op Story
Mission 08:
Third Echelon
HQ
Marking for Death
Deniable
Ops
Achievements
Mission 09:
Michigan Ave.
Reservoir
Mission 10:
Downtown
District
The art of Splinter
Cell Conviction
Mission 11:
White House
Gramkos’s Interrogation
Downl
oadeGui
de
Strategy
Do not hesitate to follow Grim’s directions. She will be
your inner ear guide for this mission, assisting you with
outmaneuvering the thugs swarming on your current position.
This is a short mission, but there are plenty of opportunities to
end up in the morgue. If you keep your trigger finger frosty and
stick to the shadows, you’ll soon have vital information about
your daughter’s “accidental” death.
Street Bazaar
You remember
one night, when
Sarah was just
a little girl, she
called out to you
from her room.
Sarah was afraid
of the dark. You
entered her room,
turned on the lights, and calmed her down by explaining that
the dark isn’t as scary as she thought. After all, in the dark, you
can see things moving around the shadows that you cannot
when standing in the light. You also told Sarah about how the
dark can give you an advantage over whatever is scaring you.
For example, if a monster were standing under Sarah’s mobile,
you could sneakily drop it on the monster’s head. Sarah was so
pleased with your assurances. But then the sound of breaking
glass in another room of the house shattered the spell. Sarah
was about to learn that monsters were real.
Push through the crowd of panicked civilians rushing out of
the booths in the alley behind the cafe. You must enter the
alley and take out the armed men who spooked the crowd. Of
course, walking up to them with a gun outstretched is not an
option—nor is it the Third Echelon way. Grim tells you how to
advance from cover to cover up the alley, quickly darting from
one position to the next. Taking cover is critical for survival. You
are not bulletproof. Advance along the cover opportunities until
you see the first two armed thugs.
You flash back to the alley in Valletta. Memories of Sarah will
have to wait. The armed men are initially surprised by the
sudden darkness. But that’s your element. You can see the
thugs but they do not see you while you are still hiding behind
cover. Lean out from the cover and take aim at the men. Go for
clean-kill headshots. A single bullet to the brain will take these
guys down. But as you shoot, stay hidden. A third gun joins
the pair just as they crumple to the ground. Give him the hard
goodbye of a bullet, too.
Grim does you a favor by hacking into the city’s power grid
and causing a surge. Transformers blow, sending a curtain
of sparks into the alley. You now have the benefit of darkness,
which is as lethal as the gun in your hand. However, the sudden
flash of sparks sends your mind careening into a memory of
Sarah’s childhood.
Prima Official Game Guide
36
Protected by copyright. Unauthorized or unlawful copying or downloading expressly prohibited.
How to Use
This Guide
Mission 01:
Marketplace
Mission 02:
Kobin’s
Mansion
Overview
Mission 03:
Price
Airfield
The Fisher
Files
Mission 04:
Diwaniya,
Iraq
Training
Mission 05:
Washington
Monument
MARKETPLACE—VALLETTA, MALTA
P.E.C.
Challenges
Walkthrough
Mission 06: Mission 07:
White box
Lincoln
Technologies Memorial
Strategy
Street Bazaar
Co-op Story
Mission 08:
Third Echelon
HQ
Marking for Death
Deniable
Ops
Achievements
Mission 09:
Michigan Ave.
Reservoir
Mission 10:
Downtown
District
The art of Splinter
Cell Conviction
Mission 11:
White House
Gramkos’s Interrogation
Downl
oadeGui
de
Putting a bullet
into those thugs
flashes you
back to that old
memory of Sarah.
Enough of that
memory. You need
to put it away for
now. Grim can
see more thugs
filling the alley
ahead of you. The
gang leader is
with them. You
can ask him why he and his men are hunting you as soon as
you slice through the gang, one bullet at a time. The alley is still
in shadows, so you have the advantage. Try to keep it that way
as long as you can. Remember that you always have the upper
hand in the dark.
After telling her
to stay in her
room, you went
to investigate the
noise. Burglars
had entered the
house. They were disappointed with the potential haul, but one
luridly said that perhaps they could still get a good score...when
your wife came home. Before you could attack, a third burglar
jumped out of the shadows and lunged for you. He had no idea
what hit him. You ripped the pistol out of his hand and carved
his head like a canoe.
There’s no better time to practice moving from cover to cover.
Even if no thugs are in the alley with you right now, you can
still dart from booth to booth to get a better handle on how
cover works.
Instincts took
over. The whole
room slowed as
you scoped out
the remaining
burglars and
marked them for
death. Once you
drew your sights
across them, it
was time for the
execution. They
deserved nothing
less. Just like the
guy who tried to
jump you, neither
of these lowlifes
saw you coming. Pop. Pop. One bullet apiece.
The next thug you encounter has his back to you. You can shoot
him, but it’s much better to sneak up behind him and drop him
with a hand-to-hand kill. Next, mark at least two of the next
batch of thugs for execution.
P.E.C. Challenge
Sneaking up on this gang member and snapping his neck gives you
your first Shadow Takedown. Start earning these right away so you can
upgrade weapons and gear ASAP.
Always take a hand-to-hand kill opportunity when it is
presented. Having a “banked” execution can often save you in
tricky situations when you find yourself terribly outnumbered.
With the ability to take down at least two enemies per
execution, you can “thin the herd” before moving closer to
danger spots on the map.
But that was also the night Sarah found out exactly what daddy
was capable of when pushed. You tried to avert her eyes from
the dead men, but it was too late. She knew. And there was no
taking that back.
37
Protected by copyright. Unauthorized or unlawful copying or downloading expressly prohibited.
www.primagames.com
How to Use
This Guide
Mission 01:
Marketplace
Mission 02:
Kobin’s
Mansion
Mission 03:
Price
Airfield
The Fisher
Files
Mission 04:
Diwaniya,
Iraq
Training
Mission 05:
Washington
Monument
MARKETPLACE—VALLETTA, MALTA
Overview
P.E.C.
Challenges
Walkthrough
Mission 06: Mission 07:
White box
Lincoln
Technologies Memorial
Strategy
Street Bazaar
Co-op Story
Mission 08:
Third Echelon
HQ
Marking for Death
Deniable
Ops
Achievements
Mission 09:
Michigan Ave.
Reservoir
Mission 10:
Downtown
District
The art of Splinter
Cell Conviction
Mission 11:
White House
Gramkos’s Interrogation
Downl
oadeGui
de
Marking for Death
A little farther
up the alley, you
discover two
more thugs. You
must again use
your Mark and
Execute ability to
take them both
out. Follow the
on-screen prompts.
Do not get too greedy with human shields. A human torso
can only withstand a few basic pistol shots before it is ripped
meat that bullets pass through. A human shield withstands
even less abuse from an automatic weapon, like an AK-47.
P.E.C. Challenge
Can you mark for execution right now? If you mark and kill your targets
five times without any complications, you score your first Mark
Proficiency. You fulfill this P.E.C. Challenge every time you mark all
available execution targets and then take them out with a single series
of shots.
Execute the two closest gang members. While holding your
shield, advance into the intersection and drop the rest of the
crew. Headshots make for the quickest kills.
As you slink up through the stalls, Grim tells you the gang
leader’s name is Gramkos. He is surrounded by his men in the
intersection ahead. Inch up to the table next to the intersection.
One of the thugs will break from the pack to check the alley. Let
him come to you. When you get the cue that he is within range
(the button assigned to hand-to-hand kills pops up), strike.
Gramkos breaks from the shootout and ducks into the
Sema Bar. As the tip painted on the side of the building says,
“Follow him.”
Take the thug’s
weapon, but
instead of killing
him right away,
draw him close to
use as a human
shield. Now you
can execute two
of the thugs and
not worry about
incoming fire for a few seconds.
Prima Official Game Guide
Inside the bar, Gramkos locks himself in the men’s room.
Approach the door. It’s locked. Smash through the door to send
Gramkos reeling backward. He’s dazed but not out. He raises
his gun, but he’s too slow. You snatch his pistol and eject the
clip, tossing it aside. No guns. This needs to be messy. It’s time
to interrogate Gramkos and find out why he and his thugs were
trying to kill you.
38
Protected by copyright. Unauthorized or unlawful copying or downloading expressly prohibited.
How to Use
This Guide
Mission 01:
Marketplace
Mission 02:
Kobin’s
Mansion
Overview
Mission 03:
Price
Airfield
The Fisher
Files
Mission 04:
Diwaniya,
Iraq
Training
Mission 05:
Washington
Monument
MARKETPLACE—VALLETTA, MALTA
P.E.C.
Challenges
Walkthrough
Mission 06: Mission 07:
White box
Lincoln
Technologies Memorial
Strategy
Street Bazaar
Co-op Story
Mission 08:
Third Echelon
HQ
Marking for Death
Deniable
Ops
Achievements
Mission 09:
Michigan Ave.
Reservoir
Mission 10:
Downtown
District
The art of Splinter
Cell Conviction
Mission 11:
White House
Gramkos’s Interrogation
Downl
oadeGui
de
Gramkos’s Interrogation
Gramkos’s interrogation starts out exactly as you might expect. Even though your hand is wrapped around his neck, Gramkos
refuses to cooperate. Drag Gramkos around the bathroom between each question. You can mash his head into a urinal or a sink,
and even toss him through the door to one of the stalls, freaking out a bar patron inside. Each time you rough Gramkos up, his lips
loosen. He was sent by Andriy Kobin to kill you. Who’s Kobin? Besides being a gangster, gunrunner, and smuggler, Kobin was also
behind the wheel of the car that killed Sarah.
Known Intel
N NOTE
Each time you play the game, experiment with interrogations.
Pressing your quarry against different objects—or just holding
them in the middle of a room—causes different actions with
each new round of questioning.
Eluding police and the NSA after foiling the red mercury plot, Fisher
dropped completely off the grid. How did Grim find Fisher all the
way in Malta—and why now? Surely it is for a reason other than just
missing his gruff mug around the office. Fisher also now has a lead
on who killed his daughter: Andriy Kobin. However, there has to be a
heavier client behind Kobin. Smugglers don’t randomly take out the
family members of Third Echelon agents. Fisher needs to go to Kobin’s
converted museum and question him to find the next person up the
ladder. After all, there is always a bigger fish.
P.E.C. Challenge
Slam Gramko into three different objects during the interrogation to
complete the Effective Interrogation challenge and earn 500 points!
One last memory jog for Gramkos gives you a lead on Kobin.
He’s holed up at the old museum in Valletta, on King George
Street. It’s his joint now. You crush Gramkos’s windpipe.
His body crumples to the sticky floor. If you want any more
answers, you must go to the museum and beat them out of
Kobin. Maybe he’ll give them up easier than Gramkos. Hopefully,
though, he won’t.
39
Protected by copyright. Unauthorized or unlawful copying or downloading expressly prohibited.
www.primagames.com
How to Use
This Guide
Co-op
The Fisher
Files
Training
St. Petersburg Banya
P.E.C.
Challenges
Walkthrough
Russian Embassy
Co-op Story
Yastreb Complex
Deniable
Ops
Achievements
Mozdok Grounds
St. Petersburg Banya—Sector 1
Sector 1 STRATEGY
St. Petersburg Banya—Sector 2
Sector 2 STRATEGY
St. Petersburg Banya—Sector 3
Sector 3 STRATEGY
St. Petersburg Banya—Sector 4
Sector 4 STRATEGY
St. Petersburg Banya—Sector 5
Sector 5 STRATEGY
The Art of Splinter
Cell Conviction
Downl
oadeGui
de
Sector 1 STRATEGY
When you approach the banya, you must take down the drunk
pounding on the outer gate in order to score an execution.
As you enter the grounds, use a co-op execution as a test so
both of you are comfortable with the timing of sharing marked
targets and taking them down. After sweeping through the
courtyard, enter the banya.
Split up. One of you enters through the ground level door
while the other shimmies up the pipe and enters through the
window. Work together to clear targets and converge in the
room visible through the window.
Once inside the banya, cross the empty circular lobby and
move up to the second floor. A room on the far side of the
balcony is bathed in blue light. Enter this room and use your
EMPs together to fry the lights in the banya. Make sure the
thug guarding the EMP spot is dead and then pump your EMPs
together. This extinguishes all of the lights.
Now, backtrack to the circular foyer. Enemies are crowding the
foyer, looking for who killed the lights. Drop the chandelier on
their heads by shooting the chain that holds it up. Hang over
the edge of the balcony and shoot the thugs as they mill below
and when the coast is clear, move on to the first weapons
stash, which is your checkpoint.
Communicate! Talk over strategies and routes with your co-op
partner. Splitting up lets you cover more ground. However,
there are definitely going to be situations where you can use
double the firepower on the same enemies.
Lob frags down on the thugs in the foyer. And even though
the lights are out, EMP grenades or the generator pulses are
still effective at stunning hostiles, giving you breathing room to
either escape or close in for a hand-to-hand kill.
143
Protected by copyright. Unauthorized or unlawful copying or downloading expressly prohibited.
www.primagames.com
How to Use
This Guide
Co-op
The Fisher
Files
Training
St. Petersburg Banya
P.E.C.
Challenges
Russian Embassy
Walkthrough
Co-op Story
Yastreb Complex
Deniable
Ops
Achievements
Mozdok Grounds
St. Petersburg Banya—Sector 1
Sector 1 STRATEGY
St. Petersburg Banya—Sector 2
Sector 2 STRATEGY
St. Petersburg Banya—Sector 3
Sector 3 STRATEGY
St. Petersburg Banya—Sector 4
Sector 4 STRATEGY
St. Petersburg Banya—Sector 5
Sector 5 STRATEGY
Downl
oadeGui
de
St. Petersburg Banya—Sector 2
Exit
Start
Legend
Possible enemy location
Interrogation
Prima Official Game Guide
The Art of Splinter
Cell Conviction
144
Protected by copyright. Unauthorized or unlawful copying or downloading expressly prohibited.
How to Use
This Guide
The Fisher
Files
Training
P.E.C.
Challenges
Deniable Ops
St. Petersburg Banya 1
St. Petersburg Banya 1
Russian Embassy 2
Lumber Mill 1
Lumber Mill 1
Russian Embassy 2
Lumber Mill 2
Last Stand
St. Petersburg Banya 2
Yastreb Complex 1
Lumber Mill 2
Walkthrough
Co-op Story
St. Petersburg Banya 2
Lumber Mill 3
Achievements
The Art of Splinter
Cell Conviction
Downl
oadeGui
de
Hunter
Yastreb Complex 1
Deniable
Ops
Russian Embassy 1
Mozdok Grounds 1
Lumber Mill 3
Russian Embassy 1
Mozdok Grounds 1
Printing Press 1
Printing Press 1
Last Stand
Hostile forces are converging on fragile EMP technology. You are the last line of defense. You must repel multiple waves of enemy
thugs and soldiers so they cannot destroy the EMP generator at the center of the map. Each shot chisels away a little of the
generator’s armor plating. However, the generator is equipped with a self-repair mechanism that undoes the damage done to it up
to the last threshold passed (100%, 50%, 25%) between waves of attack.
Each wave of enemies is more aggressive than the last. At first, you must repel only basic criminal lowlifes and thugs. Soon, though,
you must deal with guards and soldiers who have weapons training. And as the training and aggression of the soldiers increase, so
does the quality of their weapons. Thugs with pistols don’t do too much damage to the generator. But an elite agent with an assault
rifle and deadly aim? You better figure out exactly who is targeting the generator and bring them down ASAP.
St. Petersburg Banya 1
The EMP generator is in the middle of a grand foyer, surrounded by alcoves. A balcony circles above it. Enemies approach from all
four halls that stretch away from the EMP on the bottom floor as well as the rooms that line the upstairs balcony. With so many
angles to cover, you better stay central and use your sonar goggles to keep track of incoming thugs and agents. Stray too far from
the generator and you will lose it.
St. Petersburg Banya 1
Legend
EMP Device
Possible enemy location
Prima Official Game Guide
180
Protected by copyright. Unauthorized or unlawful copying or downloading expressly prohibited.
How to Use
This Guide
The Fisher
Files
Training
P.E.C.
Challenges
Deniable Ops
St. Petersburg Banya 1
St. Petersburg Banya 1
Russian Embassy 2
Lumber Mill 1
Lumber Mill 1
Russian Embassy 2
Lumber Mill 2
Last Stand
Yastreb Complex 1
Achievements
The Art of Splinter
Cell Conviction
Russian Embassy 1
Mozdok Grounds 1
Lumber Mill 3
Russian Embassy 1
Mozdok Grounds 1
Printing Press 1
Printing Press 1
Dropping the
chandelier not only
crushes enemies
below, but also
cuts the amount
of light in the foyer,
increasing your
shadow opportunities.
Though there are many shadows to use in this map, the best
place to watch for incoming foes is the balcony overlooking the
generator. From up here, you can fire on the chandelier that
crashes down on enemies in the middle of the foyer, and use
your sonar goggles to get a good look at every direction. One of
the best places to hide is hanging off the balcony interior. You
get clean shots at incoming foes and can slide left and right to
change your view if you need to move to target your prey.
The balcony
view is great for
shooting enemies
attempting to
use the planters
as cover. You
can also spy the
incoming enemies
from the four
hallways and
cut them down
with gadgets
such as frag
grenades. Prevent
them from even
reaching the
center of the
foyer!
Frags are always a great weapon to have in game modes that
do not rely on stealth, such as Last Stand.
Hear gunshots
but don’t see the
shooter? Activate
the sonar goggles
and look around
to spot the next
target.
Deniable
Ops
Downl
oadeGui
de
Hunter
Yastreb Complex 1
Lumber Mill 3
Strategy
Co-op Story
St. Petersburg Banya 2
St. Petersburg Banya 2
Lumber Mill 2
Walkthrough
Many enemies
approach not
just from the
ground level, but
also the second
floor. Track
enemies coming
up from the stairs at the end of the four hallways on the ground
floor. If multiple hostiles appear on the second floor, hang from
a ledge and watch them circle the generator. When you have
your shot, take it. This can reveal your LKP, so be prepared
to either drop down and escape detection or slide away to
avoid a flashlight beam. Some enemies come to the edge of
the balcony and look down. Grab them and pull them to their
deaths or jump up and take them down with an execution. If you
see an enemy on the ground floor below, fling the body off the
second story either to smash the foe below or at least cause a
distraction and disrupt their firing.
Do not ignore the
rooms around
the center of the
foyer. Stairs at
the end of each
hallway lead to the
second floor, and
as you progress
in the match, the
smarter hostiles will use these rooms to flank you or draw you
away from the generator. Watch for groupings in the room.
Don’t stick your neck out for solo enemies. They will come to
you (or the generator). But if you have a group in a room, roll a
frag in there or stun them with a flashbang. As they recoil from
the grenade, you can either shoot them up or systematically
execute until they recover.
181
Protected by copyright. Unauthorized or unlawful copying or downloading expressly prohibited.
www.primagames.com
Downl
oadeGui
de
How to Use
This Guide
The Fisher
Files
Training
P.E.C.
Challenges
Walkthrough
Co-op Story
Deniable
Ops
Achievements
The Art of Splinter
Cell Conviction
Prima Games
An Imprint of Random House, Inc.
3000 Lava Ridge Court, Suite 100
Roseville, CA 95661
www.primagames.com
PRIMA Official Game Guide
atherine
it ten by C
Wr
Browne
The Prima Games logo is a registered trademark of Random House, Inc., registered in
the United States and other countries. Primagames.com is a registered trademark of
Random House, Inc., registered in the United States.
© 2010 by Prima Games. All rights reserved. No part of this book may be reproduced or
transmitted in any form or by any means, electronic or mechanical, including photocopying, recording,
or by any information storage or retrieval system without written permission from Prima Games.
Prima Games is an imprint of Random House, Inc.
Product Manager: Todd Manning
Associate Product Managers: Sean Scheuble & John Browning
Copyeditor: Asha Johnson
Design & Layout: In Color Design
Map Design: Marc Riegel
Manufacturing: Stephanie Sanchez
eProduction: Suzanne Goodwin
Splinter Cell, Splinter Cell Conviction, Sam Fisher, the Soldier Icon, Ubisoft, Ubi.com and
the Ubisoft logo are trademarks of Ubisoft Entertainment in the U.S. and/or other
countries. © 2010 Ubisoft Entertainment. All Rights Reserved.
All products and characters mentioned in this book are trademarks of their
respective companies.
Please be advised that the ESRB Ratings icons, “EC,” “E,” “E10+,” “T,” “M,” “AO,” and
“RP” are trademarks owned by the Entertainment Software Association, and may
only be used with their permission and authority. For information regarding whether
a product has been rated by the ESRB, please visit www.esrb.org. For permission to
use the Rating icons, please contact marketing at esrb.org.
Important:
Prima Games has made every effort to determine that the information contained in
this book is accurate. However, the publisher makes no warranty, either expressed or
implied, as to the accuracy, effectiveness, or completeness of the material in this book; nor
does the publisher assume liability for damages, either incidental or consequential, that may
result from using the information in this book. The publisher cannot provide any additional
information or support regarding gameplay, hints and strategies, or problems with hardware
or software. Such questions should be directed to the support numbers provided by the game
and/or device manufacturers as set forth in their documentation. Some game tricks require
precise timing and may require repeated attempts before the desired result is achieved.
Catherine Browne
Catherine grew up in a small town, loving the proverbial “great outdoors.” While she still enjoys
hiking, camping, and just getting out under the big sky, Catherine also appreciates the fine art
of blasting the Covenant in Halo as well as arranging a perfect little village in Animal Crossing.
(Seriously, you cannot just plant apple trees all willy-nilly. Neat rows, people!)
We want to hear from you! E-mail comments and feedback to [email protected]
ISBN: 978-0-7615-5765-4
Back to BONUS Page
INTRODUCTION
THE FISHER FILES
TRAINING
P.E.C. CHALLENGES
WALKTHROUGH
CO-OP STORY
DENIABLE OPS
ACHIEVEMENTS
MARKETPLACE
GRAMKOS’S INTERROGATION
Gramkos’s interrogation starts out exactly as you might expect. Even though your hand is wrapped around his neck, Gramkos
refuses to cooperate. Drag Gramkos around the bathroom between each question. You can mash his head into a urinal or a sink,
and even toss him through the door to one of the stalls, freaking out a bar patron inside. Each time you rough Gramkos up, his lips
loosen. He was sent by Andriy Kobin to kill you. Who’s Kobin? Besides being a gangster, gunrunner, and smuggler, Kobin was also
behind the wheel of the car that killed Sarah.
N NOTE
Each time you play the game, experiment with interrogations.
Pressing your quarry against different objects—or just holding
them in the middle of a room—causes different actions with
each new round of questioning.
P.E.C. CHALLENGE
P.E.C. Challenges are skill-based actions that result in point awards
which you can use to upgrade Fisher’s gear in the single-player
campaign, or your agent’s gear in multiplayer/Deniable Ops. In the
full version of the game, this interrogation presents an opportunity to
complete the Effective Interrogation challenge, which is when you slam
a target in three different objects during a round of rough questioning.
Our full guide is full of P.E.C. Challenge tips and tricks so you can
upgrade Fisher’s loadout as soon as possible.
Third Echelon Director Tom Reed is not happy that Sam
Fisher is back in his life and threatening his plans. While we
cannot tell you exactly what Reed has up his sleeve right now,
rest assured it is something so nefarious that it requires an
agent like Sam Fisher to stop him. After peeking in on Reed’s
machinations, the demo fast-forwards to a reservoir on the
outskirts of Washington D.C. Here, the demo takes you through
some of the basics of Fisher’s impressive skill set, such as the
ability to neutralize enemies with hand-to-hand kills and Mark
and Execute.
One last memory jog for Gramkos gives you a lead on Kobin.
He’s holed up at the old museum in Valletta, on King George
Street. It’s his joint now. You crush Gramkos’s windpipe.
His body crumples to the sticky floor. If you want any more
answers, you must go to the museum and beat them out of
Kobin. Maybe he’ll give them up easier than Gramkos. Hopefully,
though, he won’t.
1
www.primagames.com
MICHIGAN AVE. RESERVOIR
OVERVIEW
After Gramkos’ interrogation, the demo spirits you to the
Michigan Ave. Reservoir just outside the nation’s capital. Fisher
must infiltrate this warehouse to neutralize an EMP weapon
that is intended to be used against the homeland and save one
of the scientists that helped develop it. It’s not going to be an
easy task, as there are dozens of private military contractors
(PMC) between Fisher and the scientist.
MICHIGAN AVE. RESERVOIR (A)
LEGEND
ENEMY
START
Prima Official Game Guide
2
INTRODUCTION
THE FISHER FILES
TRAINING
P.E.C. CHALLENGES
WALKTHROUGH
CO-OP STORY
DENIABLE OPS
ACHIEVEMENTS
MICHIGAN AVE. RESERVOIR
STRATEGY
INFILTRATE WAREHOUSE AND DISABLE EMP WEAPON
Using hand-to-hand
kills grants you
Mark and Execute
moves. You only
get one Mark
and Execute per
hand-to-hand kill
and you cannot
bank these. To use
your Mark and Execute, look at the two PMC agents and press
the R bumper while the target cursor is over each of them. This
places a chevron over their heads, which means Fisher has a
“lock” on them. Now, when these chevrons are red, pressing Y
performs the execution. Fisher unloads with such speed that
the marked agents cannot react. These are instant kills. If the
chevrons are gray at any point, that means the target it too
far out of range for Fisher to shoot. However, marking targets
is also just a good way to keep track of enemies as you gather
intel on a particular location or scene.
Because this is a demo, you receive on-screen tutorial
information as you approach your first potential firefight with the
PMC agents outside the warehouse. You must first use cover to
advance on the agents. Follow the on-screen directions to slink
up to the concrete blocks along the side of the road, keeping out
of sight. Fisher’s greatest weapon is the element of surprise, so
keep low and move with speed and stealth.
Now that you
have eliminated
the guards on
the street, you
need to repeat
this process
to close in on
the warehouse itself. Sneak up and pull the next agent into a
hand-to-hand kill so you can Mark and Execute the two PMC
thugs in the yard just beyond the chain-link fence. You can
engage them directly, but Fisher is not invincible. A few direct
shots will bring him down. Using Mark and Execute is the best
way for Fisher to flex his talents and retain a strong advantage
over his enemies.
When you arrive at this block, you are close enough to strike
with a hand-to-hand kill. Press the B button to surprise the
PMC thug and kill him. If you hold the B button, you can pull
him into human shield position and hold him while targeting
his comrades.
3
www.primagames.com
WAREHOUSE
There are two ways into the warehouse behind you: a door
to the right and a window on the left. There is no immediate
resistance at either entrance, but the window will allow you to
take the entire room by stealth.
Mark the other mercs on the far side of the room so when they
run to check out the fallen EMP, they run right into range for
an execution.
If there are
survivors in the
room following the
EMP drop, hit one
with a Death from
Above and then
immediately seek
cover near one of
the plated railings
or crates and hunt them one-by-one. The chemical lights flood
the walkways with light, but you can still hide in the shadows
created by walls and cover.
Jump through
the window and
shimmy up the
nearby pipe. From
the pipe, you can
survey the room.
Multiple mercs
patrol the floor.
Watch for three
to coalesce to the right. You should have an execution ready
from the interrogation with the officer. Mark the three mercs
for execution...
There are underground pits with tunnels under this warehouse.
Feel free to use them to vanish and sneak up on your
opponents.
...or look above them. There is an EMP device hanging over
them. Shoot the chain holding up the EMP to drop it on the
mercs. This puts the entire room in a panic, but it is unlikely
that any of them will look up at the pipes to see if there a super
spy crawling around the ceiling.
Prima Official Game Guide
If you choose to take the warehouse by force, use the door
on the exterior of the building to enter a small room. Then,
creep up to the openings that look inside the chamber with
the hanging EMP. Mark targets for execution or fall back and
devise a strategy for bringing them to you.
4
INTRODUCTION
THE FISHER FILES
TRAINING
P.E.C. CHALLENGES
WALKTHROUGH
CO-OP STORY
DENIABLE OPS
ACHIEVEMENTS
MICHIGAN AVE. RESERVOIR
There is a light
inside the small
room. It is not
chemical. Shoot
it out to get
attention from a
single merc. He
enters the room
to investigate.
Take him hostage as a human shield if you want to move into
the warehouse and start shooting. Otherwise, dump him in a
dark corner so he is not seen by the other mercs.
Once the warehouse is clear, enter the back room beneath the
chemical light. There are frags and flashbangs on the crate in
the back office. After collecting the weapons, jump up to the
pipe along the ceiling and shimmy over the wall to the right. The
pipe extends down a vertical shaft. The scientist is in the sewer
tunnels beneath the warehouse. Drop down to find her.
SCIENTIST
Going hard on the warehouse? Execute to thin the herd
and give away your position. The other mercs will seek out
your position.
At the bottom of the pipe, drop down to the tunnels and then
follow the long corridor until you hear chatter. Peek through the
space between some of the water pipes to see the Black Arrow
thugs harassing the kidnapped scientist. You cannot shoot
them from here. That would put the scientist at risk. But her
time is limited. You must rush to her rescue before the Black
Arrow thugs kill her.
Use your LKP as a lure to get the mercs to concentrate on one
of the openings in the small room. When you see their flashlight
beams approach one of the openings, circle around to shoot
them from behind as they investigate the LKP.
5
www.primagames.com
There are mercs
dead ahead. Sneak
up to the corner
looking into the
clearing where the
trio is discussing
their next move.
If you have an
execution, mark
and kill. If not, set a
trap to kill all three
within seconds.
Drop a remote
mine in the narrow
opening between
you and the mercs.
Then, lean out and
shoot one. The mercs spot your LKP and start to move on
you. Run to the nearby pipe and climb it. When the mercs step
too close to the remote mine, blow it up. Hopefully, both were
flattened, but if not, use the pipe as a vantage point to take out
the third merc.
When you round the corner and close in on the scientist, the
clock starts ticking. You have just one minute to kill the mercs
around the scientist and save her from execution. There are
stairs for dropping in on the mercs or you can slink along the
ground floor and attack from the doors.
The stairs provide
the best killing
angle on the
mercs holding the
scientist. While
they look for you
on the ground
floor, you can
target at least
two of them from
above before they get wise to your position.
Explosions attract attention. Stay on the pipe. Reinforcements
are on the way. From the pipe, you can cut down any additional
mercs that inspect the carnage.
Use the pipe
extending across
the ceiling to slide
over the next room.
Additional mercs
are looking for you.
Mark them for
execution and then
drop down for a
Death from Above
on the closest
merc. Now you
have the execution
needed to finish off
the other mercs
before they turn
their machine guns on you.
Prima Official Game Guide
Get spotted at one of the doors on the ground floor. While the
merc looks at your LKP, use another door to flank.
fter eliminating all
of the enemies in
rooms beneath the
warehouse, you
must rescue the
scientist. Follow
the pipe at the
end of the room to
locate the missing
scientist, held at gunpoint by one of the PMC’s top men. He
taunts Fisher while holding the scientist at gunpoint. But Fisher
teaches him that nothing says goodbye like a bullet.
6
The Tom Clancy’s Splinter Cell Conviction Official Game Guide, eGuide,
or Strategy Website will help you get the drop on every enemy, master
all weapons and gadgets, and complete every single mission in both
Fisher’s main mission and the co-op campaign. With our full walkthroughs, you will survive every trial and come out not just alive, but
laden with special points that can be traded to upgrade guns and gear.
You will be unstoppable. You will be as feared as Fisher himself.
CLICK HERE
TO LEARN MORE
ABOUT THE EGUIDE
For more information about the Tom Clancy’s Splinter Cell Conviction
Official Strategy Website*, visit www.splintercellwalkthoughs.com
*website does not go live until the game release date
Back to BONUS Page