1
AL
MA
TE
RI
Workflow Programming
Principles
RI
GH
TE
D
Business process modeling has many of the same characteristics as the traditional procedural
programming model such as C#. However, it also exhibits characteristics that are fundamentally
different from the traditional procedural programming model. This mismatch between the two
models has always been the main stumbling block in workflow programming. This chapter first
covers those characteristics that business process modeling has in common with the traditional
procedural programming model such as C#. Then it dives into their main differences. Finally, the
chapter discusses different types of custom activities that you can develop and shows you how to
implement each type of custom activity.
PY
Workflow Programming Language
CO
A traditional procedural program such as a C# program consists of program statements, which are
executed in a certain prescribed order. A business process or workflow also consists of activities
that are executed in a certain prescribed order. For example, consider a vacation request processing
workflow, which consists of the following activities:
1.
2.
Employee activity: An employee makes a vacation request.
3.
Personnel activity: The personnel staff approves or denies the vacation request. For
example, the personnel staff may deny the request if the employee does not have any
more vacation days left.
Section manager activity: The employee’s section manager approves or denies the
request.
These activities must be executed in the correct order. You wouldn’t want the personnel staff to
approve the vacation request before the section manager approves it.
Chapter 1: Workflow Programming Principles
Therefore, you can think of a business process or workflow as a logical program, just like a traditional
procedural program such as a C# program, and its constituent activities as logical program statements,
just like such traditional procedural program statements such as C# program statements.
The order in which the program statements are executed in a traditional procedural program such as a
C# program is determined at design time — that is, when the developer is writing the program. The
same concept applies to both a business process and a logical program. That is, the order in which the
activities or logical program statements of a business process or a logical program are executed is
determined at design time when the workflow developer is designing the workflow.
In a traditional procedural program such as a C# program, we normally think in terms of the concept of
program control. When the program control reaches a program statement, the statement executes. We
can also envision a logical program control that passes from one activity to another just like a traditional
procedural program control. When the logical program control reaches an activity or logical program
statement in a business process or workflow or logical program, the logical program statement executes.
There are two types of program statements in a traditional procedural programming model such as C#:
flow controls and non-flow controls. A flow control program statement is a composite program statement,
which executes its constituent program statements in a certain order. For example, the C# { } flow control
program statement executes its constituent program statements in sequential linear order. The { } flow
control program statement is also the fundamental flow control program statement, which is used to
define other C# flow controls. For example, the C# “for” flow control program statement contains a
single { } flow control program statement and executes this { } flow control program statement repeatedly
for a specified number of times. The C# “while” flow control program statement also contains a single { }
flow control program statement and executes this { } flow control program statement repeatedly as long
as a specified condition is met. The C# “if” flow control program statement also contains a single { } flow
control program statement and executes this { } flow control program statement once only if a specified
condition is met.
Business processes or workflows exhibit the same characteristics. For example, it is quite common in
a business process or workflow for the same set of activities to execute repeatedly for a specified number
of times. A good example of this scenario is the approval process whereby the approval activity must be
repeated several times, once for each approver. It is also quite common in a business process or
workflow for a set of activities to execute only if a certain business condition is met. A good example of
this scenario is the vacation request process whereby the personnel department approves or disapproves
a vacation request only if the employee’s section manager has already approved the request.
Therefore, you can envision the following: a logical { } flow control program statement that executes its
constituent activities or logical program statements in sequential linear order; a logical “for” flow control
program statement that contains a single logical { } flow control program statement and executes it
repeatedly for a specified number of times; a logical “while” flow control program statement that contains
a single logical { } flow control program statement and executes it repeatedly as long as a specified
condition is met; and a logical “if” flow control program statement that contains a single logical { } flow
control program statement and executes it once only if a specified condition is met.
As you can see, you can envision a logical workflow programming language that exhibits many of the
same characteristics of a traditional procedural programming language such as C#. This logical workflow
programming language is known as Windows Workflow Foundation (WF). The WF logical
workflow programming language exposes many of the same types of traditional procedural flow
control constructs such as “for,” “while,” “if,” “{ },” and so on.
2
Chapter 1: Workflow Programming Principles
So far, I’ve discussed the characteristics that WF workflow programming has in common with traditional
programming such as C#. Next, I’ll discuss the characteristics that make workflow programming
fundamentally different from a traditional programming such as C#.
When the program control in a single-threaded C# program reaches a program statement, the program
statement executes continuously in synchronous fashion until it completes its execution. This concept is
so obvious and rudimentary in traditional programming models that we never think about it.
When the logical program control in a logical program (business process or workflow) reaches a logical
program statement (activity), the logical program statement may or may not execute continuously in
synchronous fashion. For example, consider the section manager activity in the aforementioned vacation
request workflow. After an employee makes a vacation request — that is, after the employee activity
or logical program statement completes its execution — the execution of the section manager activity or
logical program statement begins. However, the section manager may be stuck in meetings for several
days and may not be able to respond to the vacation request immediately. In the meantime, the section
manager logical program statement cannot continue its execution because it is waiting for the
section manager to approve or deny the vacation request.
This is a common characteristic of business activities or logical program statements. They execute for a
very short while and then suspend their execution, waiting for an indefinite period of time for an
external entity to deposit the required data before they resume their execution.
This introduces a huge challenge. What should a business activity or logical program statement do when
it suspends its execution and waits for an indefinite period of time for an external entity to deposit the
required data? Should it hold on to the thread on which it is running?
Holding on to the thread for an indefinite period of time is not a viable solution for two main reasons:
❑
Threads are expensive resources and should not be wasted.
❑
Threads and the processes owning the threads would not stay around for an indefinite period of
time. For one thing, Windows processes do crash.
Therefore, the activity must let go of the thread when it suspends its execution and waits for an
indefinite period of time for an external entity to deposit the data.
Another resource-related issue is the fact that activities consume memory. It would not make sense to let
an activity remain in memory while waiting indefinitely for external input. This would waste a lot of
server resources, especially when too many inactive activities are sitting in memory waiting for external
inputs. A better solution is to serialize these inactive activities into a durable storage.
When the required data is finally deposited in the appropriate location, the activity or logical program
statement can then be brought back to memory to retrieve the required data and resume its execution
where it left off. However, there is no guarantee that the activity or logical program statement will
resume its execution on the same Windows process, let alone the same thread, because by the time
the external entity deposits the data — which could be days or weeks later — the process on which the
activity or logical program statement was running when it suspended its execution is long gone! There is
no guarantee even that the activity or logical program statement will resume its execution on the same
machine!
3
Chapter 1: Workflow Programming Principles
Clearly, the execution model of an activity or logical program statement is fundamentally different from
that of a C# program statement. A C# program statement does not suspend its execution and resume it
later on a different thread, process, or machine. A C# program statement cannot be resumed. That is why
when a C# program crashes, you have to rerun the program. When a C# program is rerun, it does not
resume its execution from the last program statement that was executing. That’s because a C# program
relies on the thread on which it is running to maintain its execution context. This execution context is
gone when the thread is gone.
A business activity or logical program statement must be resumable. As such, a business process or
workflow or logical program must not rely on the thread on which it is running to maintain its execution
context. Instead, it must explicitly allocate memory for its execution context on the heap so it can
serialize its execution context into a durable storage such as a database when it suspends its execution
and waits indefinitely for an external entity to deposit data. This enables the logical program to
deserialize its execution context from the durable storage and resume its execution where it left off when
the external data finally arrives.
Now you can see the type of challenges you face when you’re implementing a workflow or logical
program. If you were to handle all these challenges on your own, you would end up writing a
tremendous amount of infrastructural code that has nothing to do with the specifics of your application
requirements. This is where Windows Workflow Foundation (WF) comes into play. WF provides you
with a comprehensive workflow programming framework that enables you to implement workflows or
logical programs with minimal time and effort.
Custom Activities
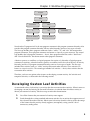
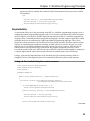
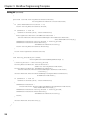
A traditional procedural program such as a C# program is a hierarchy, or tree, of program statements.
For example, consider the following C# program:
public class Program
{
public static void Main (string[] args)
{
bool bcontinue = bool.Parse(Console.ReadLine());
while (bcontinue)
{
if (args[0] == “String1”)
Console.WriteLine(“String one was entered”);
else
Console.WriteLine(“String one was not entered”);
bcontinue = bool.Parse(Console.ReadLine());
}
}
}
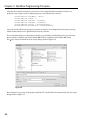
Figure 1-1 presents the program statement hierarchy, or tree, for this C# program.
4
Chapter 1: Workflow Programming Principles
Program
Main
bool.Parse
while
if
else
Console. WriteLine
Console. WriteLine
bool.Parse
Figure 1-1
Note that the C# program itself is the root program statement in this program statement hierarchy. Also
note that this program statement hierarchy, like any other hierarchy, consists of two types of nodes.
The first type includes those program statements such as “while,” “if,” and “else” that contain other
program statements. These program statements are known as composite program statements. The second
type includes the leaf program statements — that is, those program statements such as “bool.Parse”
and “Console.WriteLine” that do not contain other program statements.
A business process or workflow as a logical program also consists of a hierarchy of logical program
statements or activities, where the business process or workflow itself is the root of the tree. An activity
hierarchy, just like a C# program statement hierarchy, consists of two types of nodes. The first type
includes those activities such as a “while” activity that contain other activities. These activities are
known as composite activities. The second type includes leaf activities — that is, those activities that do
not contain other activities.
Therefore, you have two options when it comes to developing a custom activity: leaf activities and
composite activities, as discussed in the following sections.
Developing Custom Leaf Activities
As mentioned earlier, a leaf activity is an activity that does not contain other activities. When it comes to
developing a custom leaf activity, the first order of business is to decide from which base activity to
inherit your custom leaf activity. Take these steps to make this determination:
1.
2.
List all the features that your custom leaf activity must support.
Search through the existing standard and custom activities for an activity that supports more of
these features than other activities. Inherit your leaf activity from this activity to take advantage
of the features that this activity already supports, consequently saving yourself a lot of
unnecessary coding effort.
5
Chapter 1: Workflow Programming Principles
One of the base classes from which you can inherit your leaf activity is the standard Activity base class,
which is discussed thoroughly in this section. Every activity in Windows Workflow Foundation inherits
from the Activity base class directly or indirectly. Listing 1-1 presents some of the methods, properties,
and events of this base class.
Listing 1-1: The Activity base class
public class Activity : DependencyObject
{
// Events
public event EventHandler<ActivityExecutionStatusChangedEventArgs>
Canceling;
public event EventHandler<ActivityExecutionStatusChangedEventArgs>
Closed;
public event EventHandler<ActivityExecutionStatusChangedEventArgs>
Compensating;
public event EventHandler<ActivityExecutionStatusChangedEventArgs>
Executing;
public event EventHandler<ActivityExecutionStatusChangedEventArgs>
Faulting;
// Methods
protected internal virtual ActivityExecutionStatus
Cancel(ActivityExecutionContext executionContext);
protected internal virtual ActivityExecutionStatus
Execute(ActivityExecutionContext executionContext);
protected internal virtual ActivityExecutionStatus
HandleFault(ActivityExecutionContext executionContext, Exception exception);
protected internal virtual void Initialize(IServiceProvider provider);
protected internal virtual void Uninitialize(IServiceProvider provider);
// Properties
public string Description { get; set; }
public bool Enabled { get; set; }
public ActivityExecutionResult ExecutionResult { get; }
public ActivityExecutionStatus ExecutionStatus { get; }
public bool IsDynamicActivity { get; }
public string Name { get; set; }
public CompositeActivity Parent { get; }
}
I discuss the members of the Activity base class in the following sections. You need to have a thorough
understanding of these members if you’re going to inherit from this base class to implement your
custom activity, because your custom activity must override the appropriate methods of this base class.
Activity Initialization
The Initialize method of an activity is the first method of the activity to execute. An activity overrides
this method to initialize itself. Note that when this method is invoked, an activity has not yet started its
execution because the Execute method of the activity has not yet been invoked. When the Initialize
6
Chapter 1: Workflow Programming Principles
method of an activity returns, the activity is in a state known as Initialized, which is different from
another state known as Executing, the state an activity enters when its Execute method is scheduled for
execution.
It is very important to understand when the Initialize and Execute methods of the activities making up a
workflow are invoked. The Initialize methods are invoked when the CreateWorkflow method is invoked
on the workflow run time. This method loads the workflow into memory and synchronously invokes the
Initialize methods of the activities making up the workflow. Because this is done synchronously, you can
rest assured that when the CreateWorkflow method returns, the Initialize methods of all activities have
returned and all activities are in Initialized state.
This shows one of the main differences between the Execute and Initialize methods of the activities
making up a workflow. The Initialize methods are all invoked in one shot before the workflow instance
begins its execution. The Execute method of an activity is invoked only when the logical program control
reaches the activity, which could be days, months, or years after the workflow instance has begun its
execution. In other words, in principle, there is an indefinite time lag between when the Initialize
method of an activity is invoked and when its Execute method is invoked.
The Initialize method of an activity is a good place to perform initialization that must be done once
in the lifetime of an activity, which could be days, months, or even years. It is also a good place to perform
one-time initialization that must be performed to avoid possible problems caused by the indefinite time
lag between the executions of the Initialize and Execute methods. Following is an example of such a
scenario.
As discussed earlier, an activity may need to suspend its execution for an indefinite period of time
waiting for external input. The execution logic of the activity, which is contained inside the Execute
method of the activity, must create what is known as a workflow queue, whereby an external entity
deposits the data that the activity needs to resume its execution. Creating the workflow queue inside the
Execute method could cause problems because of the indefinite time lag between when the workflow
instance starts and when the Execute method of the activity is invoked. This is because the external
entity may attempt to deposit the data long before the Execute method of the activity is invoked. To
tackle this problem, the Initialize method of the activity should create the required workflow queues to
enable the external entities to deposit the required data even before the activity actually starts it
execution.
An activity normally needs to use one or more local services to initialize itself. These local services are
registered with the workflow “run time” and are made available to an activity through an
IServiceProvider object that is passed into the Initialize method of the activity when this method is
invoked. The next chapter discusses the local services that SharePoint registers with the workflow run
time. The Initialize method of your custom activity can access these SharePoint local services through the
IServiceProvider object passed into it as its argument.
The workflow run time automatically registers some basic standard services that every activity needs.
One of these standard services is a service named WorkflowQueuingService. As the name suggests, the
WorkflowQueuingService service provides workflow queuing services such as creating, deleting, and
accessing workflow queues.
Your implementation of the Initialize method can use the IServiceProvider object passed into it as its
argument to access the WorkflowQueingService service and use this service to create the workflow
queues whereby external entities must deposit the data that the execution logic of your activity needs.
7
Chapter 1: Workflow Programming Principles
Listing 1-2 presents an example of the implementation of the Initialize method of an activity whereby the
activity creates a workflow queue.
Listing 1-2: A typical implementation of the Initialize method
Using System;
using System.Workflow.ComponentModel;
using System.Workflow.Runtime;
namespace Chapter1
{
public class CustomActivity : Activity
{
protected override void Initialize(IServiceProvider provider)
{
WorkflowQueuingService workflowQueuingService =
provider.GetService(typeof(WorkflowQueuingService))
as WorkflowQueuingService;
if (!workflowQueuingService.Exists(this.Name))
workflowQueuingService.CreateWorkflowQueue(this.Name, true);
}
}
}
Follow these steps to create a workflow queue:
1.
Invoke the GetService method on the IServiceProvider object, passing in the Type object that
represents the type of workflow queuing service to access the WorkflowQueuingService service:
WorkflowQueuingService workflowQueuingService =
provider.GetService(typeof(WorkflowQueuingService))
as WorkflowQueuingService;
2.
Invoke the Exists method on the WorkflowQueuingService service, passing in the workflow
queue name to ensure that the service does not already contain a workflow queue with the same
name. If your custom activity needs to create only a single workflow queue, use the name of
your activity as the workflow queue name. The name of your activity is set by the workflow
designer that uses your activity. You can access this name through the Name property of your
activity:
if (!workflowQueuingService.Exists(this.Name))
3.
If the workflow queuing service does not already contain a workflow queue with the same
name, then invoke the CreateWorkflowQueue method on the WorkflowQueuingService service,
passing in the workflow queue name to create the workflow queue:
workflowQueuingService.CreateWorkflowQueue(this.Name, true);
You will see throughout this book that you don’t need to create workflow queues when programming
SharePoint activities, because SharePoint workflow programming abstracts you away from workflow
queues. That said, you still need to have a solid understanding of workflow queues to understand
SharePoint workflow programming, which is thoroughly covered throughout this book.
8
Chapter 1: Workflow Programming Principles
Keep in mind that the Initialize method of an activity is invoked only once in the lifetime of the activity.
This is important considering the fact that the lifetime of an activity could span multiple threads,
processes, or machine boundaries and could last an indefinitely long period of time.
Also keep in mind that initializing an activity as a logic program statement in a workflow as a logical
program is different from initializing the Common Language Runtime (CLR) object that transiently
represents the activity in memory. Object initialization is a CLR concept, whereas activity initialization is
a WF concept. The same activity or logical program statement may be represented by numerous CLR
objects during its lifetime, whereby each CLR object is initialized when it springs into life. While
numerous CLR initializations could be associated with the same activity or logical program statement,
only one WF initialization is associated with the activity.
This has an important consequence. You must not contain one-time initialization logic of your activity
in the constructor of your activity class, because the contructor of your activity class is invoked every
time a new CLR object springs into life — that is, every time your activity resumes its execution after an
external entity deposits data. If you include the one-time initialization logic of your activity inside the
constructor of your activity class, your activity will be initialized multiple times during its lifetime.
That being the case, you must contain all your activity’s one-time initialization logic inside the Initialize
method.
At this point, you may be wondering how an external entity accesses a workflow queue. As mentioned,
you can think of a workflow as a logical program, somewhat like a C# program, and its constituent
activities as logical program statements, somewhat like C# program statements. Just as you can have
multiple instances of the same C# program running in memory, you can also have multiple instances of
the same logical program running. Every running instance of a logical program in WF is represented by
an instance of a class named WorkflowInstance.
The WorkflowInstance class exposes a method named EnqueueItem, which an external entity can use to
deposit data into a workflow queue with the specified name:
public sealed class WorkflowInstance
{
public void EnqueueItem(IComparable queueName, object item,
IPendingWork pendingWork, object workItem);
}
The external entity simply passes the workflow queue name as the first argument of the EnqueueItem
method, and the data that needs to be deposited as the second argument of this method.
Note that workflow queue names are treated as IComparable objects in WF. This means that you can use
any IComparable object as the workflow queue name. However, a string generally does the job.
As you can see, the external entity needs to know the name of the workflow queue in which it needs to
deposit the data. It also needs access to the WorkflowInstance object on which it needs to invoke the
EnqueueItem method. You do not have to worry about this in SharePoint because SharePoint provides
you with a convenient layer on top of WorkflowInstance that enables you to deposit data into the
appropriate workflow queue much more conveniently. This will all be clear later in the book.
9
Chapter 1: Workflow Programming Principles
Activity Uninitialization
If your custom activity overrides the Initialize method of the Activity base class, it must also override the
UnInitialize method to uninitialize itself. The UnIntialize method undoes what the Initialize method does.
For example, if the Initialize method creates and adds a new workflow queue to the workflow queuing
service, the UnInitialize method must remove the same workflow queue from the workflow queuing service.
Listing 1-3 shows a typical implementation of the Uninitialize method of a custom activity.
Listing 1-3: A typical implementation of the Uninitialize method
Using System;
using System.Workflow.ComponentModel;
using System.Workflow.Runtime;
namespace Chapter1
{
public class CustomActivity : Activity
{
. . .
protected override void Uninitialize(IServiceProvider provider)
{
WorkflowQueuingService workflowQueuingService =
provider.GetService(typeof(WorkflowQueuingService))
as WorkflowQueuingService;
if (workflowQueuingService.Exists(this.Name))
workflowQueuingService.DeleteWorkflowQueue(this.Name);
}
}
}
The Uninitialize method takes these steps to remove the workflow queue:
1.
It accesses the WorkflowQueuingService service:
WorkflowQueuingService workflowQueuingService =
provider.GetService(typeof(WorkflowQueuingService))
as WorkflowQueuingService;
2.
It checks whether the WorkflowQueuingService service contains the workflow queue with the
specified name. If so, it invokes the DeleteWorkflowQueue method on the
WorkflowQueuingService service to remove the workflow queue:
if (workflowQueuingService.Exists(this.Name))
workflowQueuingService.DeleteWorkflowQueue(this.Name);
Keep in mind that the Uninitialize method of an activity, just like its Initialize method, is invoked only
once during the lifetime of an activity, which could last an indefinitely long time and span multiple
thread, process, or machine boundaries.
10
Chapter 1: Workflow Programming Principles
The Uninitialize method, which is a WF concept, is very different from the Dispose method, which is a
CLR concept. You mustn’t include one-time uninitialization logic of your activity in the Dispose method
because the Dispose method is invoked every time the CLR object that represents your activity is about
to be disposed of — that is, every time your activity suspends its execution and is serialized into the
durable storage. You must include one-time uninitialization logic of your activity in the Uninitialize
method because WF guarantees that this method is invoked only once during the lifetime of your
activity.
Activity Execution
As the name suggests, the Execute method is where the execution logic of your activity should go. Every
activity inherits this method from the Activity base class:
protected void ActivityExecutionStatus Execute(
ActivityExecutionContext executionContext)
When the logical program control reaches an activity or logical program statement, the Execute method
of the activity is automatically scheduled for execution. It is very important to realize that the Execute
method is not invoked immediately. Instead, it is scheduled for execution. When an execution method
such as Execute is scheduled for execution, a work item is added to the WF scheduler ’s work queue.
This work item is basically a delegate that wraps the method. The WF scheduler uses a strict FIFO (First
in-First out) algorithm to run scheduled work items.
When the WF scheduler invokes a work item and consequently the method that it encapsulates, it passes
an instance of a class named ActivityExecutionContext into the method. The ActivityExecutionContext
class plays several important roles in Windows Workflow Foundation:
❑
It represents the execution context within which the method must run. Recall from earlier that
the execution context of an activity is allocated on the heap because an activity cannot rely
on the thread on which it is running to maintain its execution context. When a method of an
activity is invoked, an object that represents its execution context is explicitly passed into it as an
argument. This is very different from method invocation in traditional programming models
such as C#, where the execution context is implicit and is maintained in the thread’s stack.
❑
The ActivityExecutionContext class implements the IServiceProvider interface, which is the
standard interface that every .NET service provider implements. Your activity’s implementation
of the Execute method can use the ActivityExecutionContext object passed into it as its
argument to access the services that its execution logic needs. As you’ll see in the next chapter,
SharePoint registers several services with the workflow run time. The Execute method of your
custom activity can use the ActivityExecutionContext object to access these services.
❑
The ActivityExecutionContext enables you to create subordinate activity execution contexts.
This is discussed later in this chapter.
The Execute method of activities that expect data from external entities must check whether the
workflow queues they created during their initialization phase (inside the Initialize method) contain the
data they need. If not, then they should return ActivityExecutionStatus.Executing and let go of the
thread on which they’re running. Listing 1-4 presents an example of an Execute method.
11
Chapter 1: Workflow Programming Principles
Listing 1-4: An example implementation of the Execute method
Using System;
using System.Workflow.ComponentModel;
using System.Workflow.Runtime;
namespace Chapter1
{
public class CustomActivity : Activity
{
protected override ActivityExecutionStatus Execute(
ActivityExecutionContext executionContext)
{
WorkflowQueuingService workflowQueuingService =
executionContext.GetService<WorkflowQueuingService>();
WorkflowQueue workflowQueue =
workflowQueuingService.GetWorkflowQueue(
this.Name);
if (workflowQueue.Count > 0)
{
object data = workflowQueue.Dequeue();
// Consume the data here
return ActivityExecutionStatus.Closed;
}
workflowQueue.QueueItemAvailable +=
new EventHandler<QueueEventArgs>(
WorkflowQueue_QueueItemAvailable);
return ActivityExecutionStatus.Executing;
}
}
}
As shown in the preceding code, the Execute method takes these steps:
1.
The ActivityExecutionContext class exposes a generic GetService method in addition to the
standard GetService method that returns a strongly typed service. Execute invokes this generic
method to access the WorkflowQueuingService service:
WorkflowQueuingService workflowQueuingService =
executionContext.GetService<WorkflowQueuingService>();
2.
Execute invokes the GetWorkflowQueue method on the WorkflowQueuingService service,
passing in the workflow queue name, to access the WorkflowQueue object that represents the
workflow queue that the activity created in its initialization phase inside its Initialize method:
WorkflowQueue workflowQueue =
workflowQueuingService.GetWorkflowQueue(this.Name);
3.
12
Execute then checks whether the external entity has deposited the data in the workflow queue.
If so, it invokes the Dequeue method on the WorkflowQueue object to dequeue the data,
consumes the data, and returns ActivityExecutionStatus.Closed to inform the workflow run
time that it has completed its execution.
Chapter 1: Workflow Programming Principles
If not, it first registers a method named WorkflowQueue_QueueItemAvailable as event
handler for the QueueItemAvailable event of the WorkflowQueue object and then returns
ActivityExecutionStatus.Executing to inform the workflow run time that it hasn’t completed its
execution because it needs to wait indefinitely for the external entity to deposit the data into the
workflow queue.
When the external entity finally deposits the data in the workflow queue, the WorkflowQueue_
QueueItemAvailable event handler is scheduled for execution. This means that a work item (a delegate
that wraps this event handler) is added to the WF scheduler ’s work queue. When the WF scheduler
finally invokes the event handler, it passes an instance of the ActivityExecutionContext object into the
method as its first argument. Listing 1-5 presents the implementation of the WorkflowQueue_
QueueItemAvailable event handler.
Listing 1-5: The WorkflowQueue_QueueItem event handler
using System.Workflow.ComponentModel;
using System.Workflow.Runtime;
using System;
namespace Chapter1
{
public class CustomActivity : Activity
{
void WorkflowQueue_QueueItemAvailable(object sender,
QueueEventArgs e)
{
ActivityExecutionContext activityExecutionContext =
sender as ActivityExecutionContext;
WorkflowQueuingService workflowQueuingService =
activityExecutionContext.GetService<WorkflowQueuingService>();
WorkflowQueue workflowQueue =
workflowQueuingService.GetWorkflowQueue(
e.QueueName);
object data = workflowQueue.Dequeue();
// Consume the data
activityExecutionContext.CloseActivity();
}
}
}
This method takes the following steps:
1.
As just mentioned, the WF scheduler passes an ActivityExecutionContext object as the first
argument of this method when it invokes the method. Therefore, this method first casts its
first argument to the ActivityExecutionContext type:
ActivityExecutionContext activityExecutionContext =
sender as ActivityExecutionContext;
2.
The method then invokes the GetService generic method on this ActivityExecutionContext
object to access the WorkflowQueuingService service:
WorkflowQueuingService workflowQueuingService =
activityExecutionContext.GetService<WorkflowQueuingService>();
13
Chapter 1: Workflow Programming Principles
3.
It then invokes the GetWorkflowQueue method to access the WorkflowQueue object that
represents the workflow queue that the activity created in its initialization phase. Note
that the method passes the QueueName property of its second argument into the
GetWorkflowQueue method. This is not important in our case because this activity creates a
single workflow queue in its initialization phase. However, in cases where the activity creates
more than one workflow queue in its initialization phase, you should use the QueueName
property to ensure that you’re accessing the right workflow queue.
WorkflowQueue workflowQueue =
workflowQueuingService.GetWorkflowQueue(e.QueueName);
4.
The method then invokes the Dequeue method on the WorkflowQueue object to access the
deposited data, and consumes it:
object data = workflowQueue.Dequeue();
5.
The WorkflowQueue_QueueItemAvailable method is part of the execution logic of our activity
because it was the Execute method of our activity that registered this method as an event
handler for the QueueItemAvailable event of the workflow queue. Once the event handler is
registered, our activity can resume its execution where it left off when the external entity finally
deposits the data into the workflow queue. The workflow run time expects every execution
method to notify it when the execution status of the activity changes. Such notification can occur
in two different forms.
If the method returns a value of the ActivityExecutionStatus type, then it must return the appropriate ActivityExecutionStatus enumeration value. Otherwise, it must invoke the appropriate
method on the ActivityExecutionContext to inform the workflow run time of the execution status change. Execution methods such as Execute, Cancel, and HandleFault return a value of the
ActivityExecutionStatus type. Execution methods such as event handlers do not. In this case, the
WorkflowQueue_QueueItemAvailable method invokes the CloseActivity method on the ActivityExecutionContext to inform the workflow run time that the execution logic of the current activity is now completed:
activityExecutionContext.CloseActivity();
The following example presents the complete code for the custom activity that we’ve been developing in
last few sections:
using System.Workflow.ComponentModel;
using System.Workflow.Runtime;
using System;
namespace Chapter1
{
public class CustomActivity : Activity
{
protected override void Initialize(IServiceProvider provider)
{
WorkflowQueuingService workflowQueuingService =
provider.GetService(typeof(WorkflowQueuingService))
as WorkflowQueuingService;
14
Chapter 1: Workflow Programming Principles
if (!workflowQueuingService.Exists(this.Name))
workflowQueuingService.CreateWorkflowQueue(this.Name, true);
}
protected override void Uninitialize(System.IServiceProvider provider)
{
WorkflowQueuingService workflowQueuingService =
provider.GetService(typeof(WorkflowQueuingService))
as WorkflowQueuingService;
if (workflowQueuingService.Exists(this.Name))
workflowQueuingService.DeleteWorkflowQueue(this.Name);
}
protected override ActivityExecutionStatus Execute(
ActivityExecutionContext executionContext)
{
WorkflowQueuingService workflowQueuingService =
executionContext.GetService<WorkflowQueuingService>();
WorkflowQueue workflowQueue =
workflowQueuingService.GetWorkflowQueue(this.Name);
if (workflowQueue.Count > 0)
{
object data = workflowQueue.Dequeue();
// Consume the data here
return ActivityExecutionStatus.Closed;
}
workflowQueue.QueueItemAvailable +=
new EventHandler<QueueEventArgs>(WorkflowQueue_QueueItemAvailable);
return ActivityExecutionStatus.Executing;
}
void WorkflowQueue_QueueItemAvailable(object sender, QueueEventArgs e)
{
ActivityExecutionContext activityExecutionContext =
sender as ActivityExecutionContext;
WorkflowQueuingService workflowQueuingService =
activityExecutionContext.GetService<WorkflowQueuingService>();
WorkflowQueue workflowQueue =
workflowQueuingService.GetWorkflowQueue(e.QueueName);
object data = workflowQueue.Dequeue();
// Consume the data
activityExecutionContext.CloseActivity();
}
}
}
As mentioned earlier, you will not directly use lower-level objects such as workflow queues and
WorkflowQueuingService to implement custom activities in SharePoint. However, you do need a solid
understanding of these lower-level objects and the fundamental role they play in WF in order to be a
successful activity developer. Such an understanding is the key to understanding standard SharePoint
workflow activities and workflow programming discussed throughout this book.
15
Chapter 1: Workflow Programming Principles
Developing Custom Composite Activities
A composite activity or logical program statement, just like a C# composite program statement such as
“{ },” “for,”“while,” and so on, is a logical program statement that contains other logical program
statements or activities. In general, there are two types of composite activities. The first type includes flow
control constructs such as “{ },” “for,” and “while.” The second type includes those composite activities
that inherit from the flow control constructs but do not change the flow control logic implemented in the
flow control constructs from which they inherit. The main purpose behind implementing this second type
of composite activity is to assemble a custom activity from other composite or leaf activities. This enables
you to reuse the functionality implemented in other composite or leaf activities when you’re building
your own custom activity.
Both types of composite activity directly or indirectly inherit from a base activity named
CompositeActivity, which in turn inherits from the Activity base class and exposes the members shown
in Listing 1-6.
Listing 1-6: The CompositeActivity activity
public class CompositeActivity : Activity
{
// Methods
protected internal override void Initialize(
IServiceProvider provider);
protected internal override void Uninitialize(
IServiceProvider provider);
// Properties
public ActivityCollection Activities { get; }
protected internal bool CanModifyActivities { get; set; }
public ReadOnlyCollection<Activity> EnabledActivities { get; }
}
Note that the CompositeActivity activity does not override the Execute method. It is the responsibility of
the flow control constructs that inherit from the CompositeActivity activity to override this method to
include the logic that determines in which order the child activities of the composite activity should be
executed. You’ll see examples of this later in this chapter.
CompositeActivity does override the Initialize method where it invokes the Initialize method of all its
containing child activities. CompositeActivity also overrides the Uninitialize method where it invokes
the Uninitialize methods of all its containing child activities.
Note that the CompositeActivity activity exposes a collection property named Activities, which is of the
ActivityCollection type. This is where the CompositeActivity activity maintains its child activities. The
CompositeActivity activity also exposes a read-only collection property named EnabledActivities, which
is of the ReadOnlyCollection<Activity> type. This collection contains references to all enabled activities
of the composite activity. An enabled activity is an activity whose Enabled property is set to true.
Disabling an activity or logical program statement is like commenting out a C# program statement.
A disabled activity does not participate in the execution of the composite activity. It is like dead code.
16
Chapter 1: Workflow Programming Principles
As Listing 1-6 shows, the CompositeActivity activity exposes a Boolean property named
CanModifyActivities. As the name suggests, you must set this property to true before you can add child
activities to the Activities collection property of the composite activity or before you can modify any
child activity in the Activities collection property. Note that this property is marked as protected. This
means that only the subclasses of the CompositeActivity class can set this property, and consequently
only the subclasses of the CompositeActivity class can add child activities to its Activities collection
property or modify child activities in this collection.
To put it differently, only a composite activity itself is allowed to add child activities to its own Activities
collection property or to modify its own child activities. No outsider is allowed to add child activities to
it or modify any of its child activities. This puts a composite activity in complete control of its child
activities. This is very similar to C# composite program statements. For example, it would not make
sense for the code outside of a C# { } composite program statement to add new program statements to
this composite program statement or to modify any of its child program statements. You’ll see numerous
examples of custom composite activities throughout this book.
Developing Custom Flow Control Activities
As discussed earlier, workflows as logical programs, just like C# programs, need control flow program
statements such as “if,” “while,”“for,” “{ },” and so on. Just as you cannot write a useful C# program
without using these control flow program statements, you cannot implement useful workflows without
using logical “if,” “while,”“for,” “{ },” and other control flow program statements.
One big difference between WF as a logical workflow programming language and a standard procedural
programming language such as C# is that the set of control flow program statements in WF is extensible.
This means that you can implement your own custom control flow program statements and use them in
your workflows just like standard control flow contructs that ship with WF. This section provides several
examples to help you gain the skills you need to implement your own custom flow control activities.
A traditional procedural programming language such as C# comes with two types of flow control
constructs: iterative and non-iterative. Thus, “for” and “while” are examples of iterative flow
control constructs whereby the flow control program statement repeatedly executes its child program
statement, which is a { } program statement. Conversely, “if,” “else if,” “{ },” and “else” are examples of
non-iterative flow control constructs whereby the flow control program statement executes its child
program statements once in the prescribed order.
Developing Non-Iterative Flow Control Constructs
This section explains how to implement non-iterative flow control constructs that execute their child
program statements once in the prescribed order.
17
Chapter 1: Workflow Programming Principles
SequenceActivity
Here, I’ll walk you through the implementation of the logical { } control flow construct, which does
exactly what the C# { } flow control construct does. That is, it executes its constituent child activities in
sequential linear fashion. This implementation provides you with a simplified duplicate of the standard
WF SequenceActivity activity, as shown in Listing 1-7.
Listing 1-7: The SequenceActivity activity
using System.Workflow.ComponentModel;
using System.Workflow.Runtime;
using System;
namespace Chapter1
{
public class SequenceActivity : CompositeActivity
{
protected override ActivityExecutionStatus Execute(
ActivityExecutionContext executionContext)
{
if (this.EnabledActivities.Count == 0)
return ActivityExecutionStatus.Closed;
Activity activity = this.EnabledActivities[0];
activity.Closed += Activity_Closed;
executionContext.ExecuteActivity(activity);
return ActivityExecutionStatus.Executing;
}
void Activity_Closed(object sender,
ActivityExecutionStatusChangedEventArgs e)
{
e.Activity.Closed -= this.Activity_Closed;
ActivityExecutionContext executionContext =
sender as ActivityExecutionContext;
int index = this.EnabledActivities.IndexOf(e.Activity);
index++;
if (index == this.EnabledActivities.Count)
executionContext.CloseActivity();
else
{
Activity activity = this.EnabledActivities[index];
activity.Closed += this.Activity_Closed;
executionContext.ExecuteActivity(activity);
}
}
}
}
The SequenceActivity activity, just like any other control flow activity, inherits from the
CompositeActivity base class and overrides its Execute method. The SequenceActivity’s implementation
of the Execute method first checks whether the EnabledActivities collection is empty. Recall that this
collection contains the child activities of the composite activity. If the collection is empty, then the
18
Chapter 1: Workflow Programming Principles
SequenceActivity activity returns ActivityExecutionStatus.Closed to inform the workflow run time that
it has completed its execution. A SequenceActivity activity without any child activities is the WF
equivalence of an empty C# { } statement block.
If the EnabledActivities collection is not empty — that is, if the SequenceActivity activity or logical { }
flow control contains logical program statements or activities — then the Execute method takes the
following steps to execute the first child activity or logical program statement (keep in mind that
the SequenceActivity activity executes its child activities one activity at a time):
1.
It accesses the first child activity or logical program statement:
Activity activity = this.EnabledActivities[0];
2.
It registers an event handler named Activity_Closed for the Closed event of the first child
activity:
activity.Closed += Activity_Closed;
3.
It invokes the ExecuteActivity method on the ActivityExecutionContext object that represents
the execution context within which the Execute method is executing to schedule the first child
activity for execution:
executionContext.ExecuteActivity(activity);
Note that the SequenceActivity activity does not directly invoke the Execute method of its child
activity. Instead, it invokes the ExecuteActivity method to schedule the Execute method of its
child activity for execution. As discussed earlier, scheduling a method for execution basically
adds a work item to the WF scheduler. This work item is basically nothing but a delegate that
encapsulates the Execute method of the first child activity. In order to ensure that no one can directly call the Execute method of an activity, this method is marked as protected internal.
4.
Finally, the method returns ActivityExecutionStatus.Executing to inform the workflow run time
that it hasn’t completed its execution yet:
return ActivityExecutionStatus.Executing;
As just discussed, the Execute method of the SequenceActivity activity schedules the Execute method of
its first child activity with the WF scheduler for execution. At some point, the WF scheduler finally
invokes the Execute method of the first child activity. The execution logic of the first child activity may
require the activity to suspend its execution indefinitely until the required data is deposited into the
appropriate workflow queue, at which point the activity resumes its execution. This process may be
repeated any number of times until the first child activity finally completes its execution, at which point
the activity raises its Closed event and consequently the Activity_Closed event handler that the
SequenceActivity activity has registered for this event is scheduled with the WF scheduler for execution.
When the WF scheduler finally invokes the Activity_Closed event handler, it passes an
ActivityExecutionContext object as its first argument. This object basically represents the execution
context within which this event handler must execute.
19
Chapter 1: Workflow Programming Principles
As Listing 1-7 shows, this event handler takes the following steps:
1.
It unregisters the event handler:
e.Activity.Closed -= this.Activity_Closed;
2.
It casts the first argument to the ActivityExecutionContext type:
ActivityExecutionContext executionContext =
sender as ActivityExecutionContext;
3.
It determines the index of the child activity that raised the Closed event and increments the
index:
int index = this.EnabledActivities.IndexOf(e.Activity);
index++;
4.
If the child activity that raised the Closed event is the last child activity of the SequenceActivity
activity, it invokes the CloseActivity method on the ActivityExecutionContext object to inform
the workflow run time that the SequenceActivity activity has now completed its execution:
if (index == this.EnabledActivities.Count)
executionContext.CloseActivity();
The SequenceActivity activity, like any other composite activity, notifies the workflow run time
that it has completed its execution only after each and every single child activity is in either
Initialized or Closed state. In general, a composite activity mustn’t report that it has completed
its execution if one or more of its child activities are still executing. Imagine how weird it would
be if a C# { } statement block were to complete its execution while one or more program statements inside the block were still executing! If a composite activity attempts to report the
completion of its execution while one or more of its child activities is not in either Closed or
Initialized state, the workflow run time raises an exception. In other words, the workflow run
time does not allow a composite activity to transition to the Closed state until all its child
activities are either in Closed or Initialized state.
You may be wondering how it would be possible for one or more child activities of a composite
activity to remain in the Initialized state. This is very similar to the C# { } statement block that
contains “if” and “else if” flow control program statements. Obviously, only the program
statements contained in one of these flow control program statements are executed. Similarly, a
logical { } flow control program statement may contain logical “if” and “else if” flow control
program statements such that only the child activities of one of these flow control program
statements are bound to execute — that is, only the Execute methods of the child activities of
one these two flow control program statements are bound to be executed. The child activities of
the flow control program statements that are not executed will remain in the Initialized state.
Keep in mind that the Initialize methods of all activities, including those that are never executed,
are invoked when the workflow is loaded into memory. As such, all activities are initially in the
Initialized state.
5.
20
If the child activity that raised the Closed event is not the last logical program statement in the
logical { } flow control program statement, the Activity_Closed method takes the same steps
Chapter 1: Workflow Programming Principles
discussed earlier to schedule the execution of the Execute method of the next activity with the
WF scheduler:
else
{
Activity activity = this.EnabledActivities[index];
activity.Closed += this.Activity_Closed;
executionContext.ExecuteActivity(activity);
}
ParallelActivity
As mentioned earlier, one of the great things about WF as a workflow programming language versus a
standard procedural programming language such as C# is that the set of logical flow control constructs
that WF supports are extensible. Another important characteristic of WF as a workflow programming
language versus a standard procedural programming language is that WF supports logical flow control
constructs that have no counterpart in standard procedural programming languages. One of these
logical flow control constructs is the ParallelActivity flow control construct. This flow control construct
executes its containing logical program statements or child activities in parallel. The only way to run
different sets of C# program statements in parallel is to run each set on a separate .NET thread. You
cannot run these sets in parallel on the same thread. WF program statements, conversely, can be
executed in parallel on the same .NET thread. You can think of each WF execution branch as running on
a separate logical thread, where all these logical threads are running on the same .NET thread.
Listing 1-8 presents the implementation of the ParallelActivity flow control construct, which is a
simplified version of the implementation of the standard ParallelActivity flow control construct.
Listing 1-8: The ParallelActivity flow control construct
using System.Workflow.ComponentModel;
using System.Workflow.Runtime;
using System;
namespace Chapter1
{
public class ParallelActivity : CompositeActivity
{
protected override ActivityExecutionStatus Execute(
ActivityExecutionContext executionContext)
{
if (this.EnabledActivities.Count == 0)
return ActivityExecutionStatus.Closed;
foreach (Activity activity in this.EnabledActivities)
{
activity.Closed += Activity_Closed;
executionContext.ExecuteActivity(activity);
}
return ActivityExecutionStatus.Executing;
(continued)
21
Chapter 1: Workflow Programming Principles
Listing 1-8 (continued)
}
void Activity_Closed(object sender,
ActivityExecutionStatusChangedEventArgs e)
{
e.Activity.Closed -= this.Activity_Closed;
foreach (Activity activity in this.EnabledActivities)
{
if (activity.ExecutionStatus !=
ActivityExecutionStatus.Initialized ||
activity.ExecutionStatus != ActivityExecutionStatus.Closed)
return;
}
ActivityExecutionContext executionContext =
sender as ActivityExecutionContext;
executionContext.CloseActivity();
}
}
}
The ParallelActivity flow control activity, like any other flow control activity, inherits from the
CompositeActivity base class. This is because every flow control activity is a composite activity. As
shown in Listing 1-8, the Execute method of ParallelActivity takes these steps:
1.
It returns ActivityExecutionStatus.Closed to inform the workflow run time it has completed its
execution if ParallelActivity contains no child activities. As mentioned earlier, the execution
methods of an activity must inform the workflow run time every time its execution status
changes. There are two types of execution methods. The first type contains the Execute, Cancel,
and HandleFault methods, which return a value of the ActivityExecutionStatus enumeration
type. These methods must notify the workflow run time of their execution status changes by
returning the appropriate ActivityExecutionStatus enumeration value. The second type contains
event handlers that are registered for events such as the QueueItemAvailable event of a
workflow queue or the Closed event of a child activity. Because these event handlers return
void, they must use the ClosedActivity method of the ActivityExecutionContext when the
respective activity needs to transition to the Closed state. Keep in mind that the workflow run
time does not consider a workflow completed until every single activity is in either Initialized or
Closed state:
if (this.EnabledActivities.Count == 0)
return ActivityExecutionStatus.Closed;
2.
22
It iterates through the child activities of ParallelActivity, registers the Activity_Closed method as
event handler for the Closed event of each enumerated child activity, and invokes the
ExecuteActivity method on the ActivityExecutionContext object for each enumerated child
activity to schedule the child activity’s Execute method with the WF scheduler for execution:
Chapter 1: Workflow Programming Principles
foreach (Activity activity in this.EnabledActivities)
{
activity.Closed += Activity_Closed;
executionContext.ExecuteActivity(activity);
}
3.
Finally, it returns ActivityExecutionStatus.Executing to inform the workflow run time that
ParallelActivity has not completed its execution yet because it is waiting for its child activities to
complete their execution. As mentioned earlier, a composite activity is not allowed to report the
completion of its execution unless every single one of its child activities is in either Initialized or
Closed state:
return ActivityExecutionStatus.Executing;
ParallelActivity scheduled all its child activities with the WF scheduler for execution in one shot. This
means that the WF scheduler now contains one work item for each child activity of ParallelActivity.
Each work item is basically a delegate that encapsulates a reference to the Execute method of the
respective child activity. Because the WF scheduler uses the FIFO algorithm to dispatch work items, the
child activities are executed in the order in which they were scheduled, which is basically the order in
which they were added to ParallelActivity.
The Execute method of each child activity may need to suspend the execution of the child activity
waiting indefinitely for external entities to deposit data into the appropriate workflow queues before the
child activity can resume its execution. When a child activity finally completes its execution, it raises its
Closed event, which in turn triggers the scheduling of the Activity_Closed event handler for execution.
This means that each child activity will end up adding a work item to the WF scheduler, where each
work item is a delegate that references the Activity_Closed event handler. In other words, the same
Activity_Closed event handler is invoked once for each child activity in the ParallelActivity activity.
When the WF scheduler invokes the Activity_Closed event handler, it passes an
ActivityExecutionContext object into it as its first argument. This object represents the execution context
of the event handler.
Let’s walk through the implementation of this event handler (refer to Listing 1-8). The event handler first
removes itself from the list of event handlers registered for the Closed event of the child activity that
triggered the invocation of the event handler:
e.Activity.Closed -= this.Activity_Closed;
Next, the event handler iterates through the child activities to check whether all child activities are in
either Initialized or Closed state. If even one child activity is not in one of these two states, the event
handler returns without reporting any change in the execution status of ParallelActivity. This means that
as far as the workflow run time is concerned, ParallelActivity is still in the Executing state because the
last time the workflow run time heard of a change in the execution status of ParallelActivity was when
the Execute method returned the ActivityExecutionStatus.Executing enumeration value:
foreach (Activity activity in this.EnabledActivities)
{
if (activity.ExecutionStatus != ActivityExecutionStatus.Initialized ||
activity.ExecutionStatus != ActivityExecutionStatus.Closed)
return;
}
23
Chapter 1: Workflow Programming Principles
If every single child activity is in either Initialized or Closed state, the event handler calls the CloseActivity
method on the ActivityExecutionContext object to inform the workflow run time that ParallelActivity has
now completed its execution and is ready to transition from the Executing to the Closed state:
ActivityExecutionContext executionContext = sender as ActivityExecutionContext;
executionContext.CloseActivity();
Developing Iterative Flow Control Constructs
In this section, I’ll show you how to implement custom iterative flow control constructs that repeatedly
execute their constituent logical program statement, which is normally a SequenceActivity activity. First
you’ll learn some basic concepts and techniques that apply to iterative flow control constructs.
Consider the following C# “for” iterative flow control construct:
for (int i=0; i<10; i++)
{
int j = 0;
Console.WriteLine(j);
j++;
}
The Console.WriteLine in each iteration will write out 0 regardless of the fact that the previous iteration
incremented j by one. In other words, the j local variable is reset at the beginning of each iteration. This
means that what one iteration does to the local variable j is invisible to other iterations. This is because
each iteration allocates memory for its local variables on the stack, which is disposed of after the
iteration completes.
In general, each iteration of a C# iterative flow control construct such as “for” and “while” has its own
execution context, which is disposed of at the end of the iteration. This ensures that what happens in one
iteration does not affect other iterations.
Each iteration of a business or logical iterative flow control construct such as “for,” just like a C# iterative
flow control construct, must have its own execution context, which is normally disposed of at the end of
the iteration. Because each iteration uses a different execution context, no residual effects are carried
from one iteration to another.
As discussed earlier, every time the WF scheduler invokes an execution method, such as the Execute
method of an activity or an event handler registered for the Closed event of an activity, it passes an
ActivityExecutionContext object as the first parameter of the execution method. This object represents
the execution context of the execution method.
This execution context contains the states of the CLR objects that represent the enabled activities of the
current workflow instance, the state of the WF scheduler ’s work queue that contains the scheduled work
items, and so on. In other words, the execution context captures the essential data stored in the thread’s
stack in a normal C# program. Because the execution context of a C# program is stored in the stack of the
thread on which it is running, the program cannot be suspended on one thread in one process on one
machine and resumed where it left off on a different thread in a different process on a different machine.
In WF, conversely, the execution context is explicitly allocated on the heap and serialized to the
underlying durable storage together with the workflow instance.
24
Chapter 1: Workflow Programming Principles
As you’ll see in next chapter, when you initiate a workflow on a SharePoint list item, SharePoint
automatically invokes the CreateWorkflow method on the workflow run time. This method, among
other things, creates the global execution context for the workflow instance. If you do not create child
execution contexts (I’ll show you shortly how to do this), all execution methods of all activities making
up the current workflow will be executed within the global execution context.
WF allows composite activities to create child execution contexts within which the child activities of the
composite activity can execute. The ActivityExecutionContext exposes a property named
ExecutionContextManager, which is of the ActivityExecutionContextManager type. This type exposes
the methods and properties that you can use to create, access, and remove child execution contexts. The
following code listing presents these members:
public sealed class ActivityExecutionContextManager
{
public void CompleteExecutionContext(ActivityExecutionContext childContext);
public void CompleteExecutionContext(ActivityExecutionContext childContext,
bool forcePersist);
public ActivityExecutionContext CreateExecutionContext(Activity activity);
public ActivityExecutionContext GetExecutionContext(Activity activity);
public ActivityExecutionContext GetPersistedExecutionContext(Guid contextGuid);
public ReadOnlyCollection<ActivityExecutionContext> ExecutionContexts { get; }
public IEnumerable<Guid> PersistedExecutionContexts { get; }
}
The next section uses an example to show you how to use the methods and properties of the
ActivityExecutionContextManager type.
Listing 1-9 presents the implementation of the WhileActivity activity, which is the WF counterpart of the
C# “while” flow control construct.
Listing 1-9: The WhileActivity activity
using System.Workflow.ComponentModel;
using System.Workflow.Runtime;
using System;
namespace Chapter1
{
public class WhileActivity : CompositeActivity
{
public static readonly DependencyProperty ConditionProperty =
DependencyProperty.Register(“Condition”,
typeof(ActivityCondition),
typeof(WhileActivity));
public ActivityCondition Condition
{
get {
return (ActivityCondition)base.GetValue(ConditionProperty);
}
set { base.SetValue(ConditionProperty, value); }
(continued)
25
Chapter 1: Workflow Programming Principles
Listing 1-9 (continued)
}
protected override ActivityExecutionStatus Execute(
ActivityExecutionContext executionContext)
{
if (this.EnabledActivities.Count == 0)
return ActivityExecutionStatus.Closed;
if (Condition != null &&
Condition.Evaluate(this, executionContext))
{
ActivityExecutionContext childExecutionContext =
executionContext.ExecutionContextManager.CreateExecutionContext(
this.EnabledActivities[0]);
childExecutionContext.Activity.Closed += Activity_Closed;
childExecutionContext.ExecuteActivity(
childExecutionContext.Activity);
return ActivityExecutionStatus.Executing;
}
return ActivityExecutionStatus.Closed;
}
void Activity_Closed(object sender,
ActivityExecutionStatusChangedEventArgs e)
{
e.Activity.Closed -= this.Activity_Closed;
ActivityExecutionContext executionContext =
sender as ActivityExecutionContext;
ActivityExecutionContext childExecutionContext =
executionContext.ExecutionContextManager.GetExecutionContext(
e.Activity);
executionContext.ExecutionContextManager.CompleteExecutionContext(
childExecutionContext);
if (Condition != null &&
Condition.Evaluate(this, executionContext))
{
childExecutionContext =
executionContext.ExecutionContextManager.CreateExecutionContext(
this.EnabledActivities[0]);
childExecutionContext.Activity.Closed += Activity_Closed;
childExecutionContext.ExecuteActivity(
childExecutionContext.Activity);
return;
}
executionContext.CloseActivity();
}
}
}
26
Chapter 1: Workflow Programming Principles
The WhileActivity activity exposes a property named Condition, which is of the ActivityCondition type,
as defined in Listing 1-10. As you can see, this type is an abstract type that exposes a single method
named Evaluate, which takes the following two parameters and returns a Boolean value specifying
whether the condition is met:
❑
activity: Pass the C# this keyword as the value of this parameter.
❑
provider: Pass the ActivityExecutionContext object passed into your execution method as the
value of this parameter.
The subclasses of the ActivityCondition type must override the Evaluate method where they must
use the preceding two parameters and execute the required custom code to determine whether the
condition is met. A subclass’s implementation of the Evaluate method can use the IServiceProvider
object passed into it as its second argument to access whatever local services it needs. As you’ll see in the
next chapter, SharePoint registers numerous SharePoint-specific local services that the Evaluate method
can access through the IServiceProvider object.
Listing 1-10: The ActivityCondition type
public abstract class ActivityCondition : DependencyObject
{
public abstract bool Evaluate(Activity activity, IServiceProvider provider);
}
Next, I’ll walk you through the implementation of the WhileActivity activity, starting with the
implementation of its Execute method. The Execute method first checks whether the WhileActivity
activity contains a child activity. If not, then it returns ActivityExecutionStatus.Closed to inform the
workflow run time that it has completed its execution and is ready to transition to its Closed state.
If the WhileActivity activity contains a child activity, and if the condition evaluates to true, then the
Execute method takes these steps:
1.
It accesses the ActivityExecutionContextManager object referenced through the
ExecutionContextManager property of the ActivityExecutionContext object and invokes the
CreateExecutionContext method on this ActivityExecutionContextManager object, passing in a
reference to the child activity of the WhileActivity activity, to create a child execution context:
ActivityExecutionContext childExecutionContext =
executionContext.ExecutionContextManager.CreateExecutionContext(
this.EnabledActivities[0]);
Under the hood, the CreateExecutionContext method takes these steps:
❑
It deep copies the child activity of the WhileActivity activity and all its descendant
activities. In other words, it deep copies the activity branch rooted at the child activity. The
WhileActivity activity, just like the C# “while”, contains a single child activity. This
requirement is enforced through a component known as an activity validator. WF ships
with an activity validator that ensures that the WhileActivity activity does not contain
more than one child activity. However, the topic of Activity validation is beyond the scope
of this book.
27
Chapter 1: Workflow Programming Principles
2.
❑
It invokes the Initialize method on all activities in the new activity branch copy. This
basically does what a C# “while” loop does for each iteration. Recall that a C# “while” loop
resets all the local variables at the beginning of each iteration. In other words, no residual
effects are carried over from the previous iteration. The only difference is that C# resets the
same local variables, whereas WF creates a new copy of the child activity and its
descendants and calls the Initialize method on the new copy of the child activity and
its descendants.
❑
It returns an ActivityExecutionContext object that represents the child execution context.
It accesses the new copy of the child activity of the WhileActivity activity and registers the
Activity_Closed event handler for the Closed event of this child activity copy:
childExecutionContext.Activity.Closed += Activity_Closed;
The child execution context exposes a property named Activity of the Activity type, which
returns a reference to the new copy of the child activity of the WhileActivity activity.
3.
It invokes the ExecuteActivity method on the child execution context, passing in the reference to
the new copy of the child activity of the WhileActivity activity to schedule the Execute method
of the new copy of this child activity for execution:
childExecutionContext.ExecuteActivity(childExecutionContext.Activity);
Note that the Execute method of the WhileActivity activity uses the ExecuteActivity method of
the child execution context as opposed to the global execution context (keep in mind that the
global activity execution context is referenced through the ActivityExecutionContext object
passed into the Execute method of the WhileActivity activity) to schedule the Execute method
of the new copy of the child activity of the WhileActivity activity for execution. This ensures that
the new copy of the child activity is executed within the context of the child execution context as
opposed to the global execution context. This is similar to the C# while loop, where the content
of the while loop is executed in a local context as opposed to the global context:
return ActivityExecutionStatus.Executing;
At some point, the WF scheduler dispatches the work item that encapsulates the Execute method of the
new copy of the child activity of the WhileActivity activity and consequently invokes the Execute
method of the new copy of the child activity, passing in an activity execution context that represents the
new child execution context. This means that the Execute method of the new copy of the child activity
will be executed within the context of the new child execution context. This Execute method in turn may
have to suspend the execution of the new copy of the child activity waiting indefinitely for an external
input before it resumes its execution.
When the new copy of the child activity finally completes its execution and raises the Closed event, the
Activity_Closed event handler of the WhileActivity activity is scheduled for execution. At some point,
the WF scheduler finally invokes the Activity_Closed event handler, passing an
ActivityExecutionContext object that represents the global execution context because all execution
methods of the WhileActivity activity execute within the context of the global execution context. It is
only the execution methods of the new copy of the child activity of the WhileActivity activity that are
executed in the context of the new child execution context.
28
Chapter 1: Workflow Programming Principles
Now let’s walk through the implementation of the Activity_Closed event handler. This event handler
first removes itself from the list of event handlers registered for the Closed event of the new copy of the
child activity of the WhileActivity activity:
e.Activity.Closed -= this.Activity_Closed;
Next, it casts its first argument to the ActivityExecutionContext type. Keep in mind that this
ActivityExecutionContext object represents the global activity execution context:
ActivityExecutionContext executionContext =
sender as ActivityExecutionContext;
It then accesses the ActivityExecutionContextManager object that manages the child execution context
that the WhileActivity activity creates and invokes the GetExecutionContext method on this object,
passing in the reference to the new copy of the child activity of the WhileActivity activity, to return a
reference to the ActivityExecutionContext object that represents the child execution context:
ActivityExecutionContext childExecutionContext =
executionContext.ExecutionContextManager.GetExecutionContext(e.Activity);
Next, it calls the CompleteExecutionContext method on the same ActivityExecutionContextManager
object, passing in the ActivityExecutionContext object that represents the child execution context, to
complete and to consequently discard the child execution context:
executionContext.ExecutionContextManager.CompleteExecutionContext(
childExecutionContext);
Finally, it checks whether the condition is met again. If so, it repeats the same steps discussed earlier to
deep copy the child activity of the WhileActivity activity and all its descendant activities once again,
create a new child execution context, and schedule the Execute method of the new copy of the child
activity for execution.
Developing Custom Conditions
As you saw, the WhileActivity activity exposes a property named Condition, which is of the
ActivityCondition type. You must assign an ActivityCondition object to this property before executing
the WhileActivity activity. The WhileActivity activity invokes the Evaluate method on this
ActivityCondition object at the beginning of every iteration to determine whether to execute the iteration
or complete its execution. Recall that the ActivityCondition is an abstract class. Every activity condition
must inherit from this abstract base class or one of its subclasses.
In this section we’ll develop a custom condition named CustomCondition that inherits from the
ActivityCondition class and overrides its Evaluate method, as shown in Listing 1-11. My main goal in
this example is to show you that the full power of the SharePoint object model is at your disposal when
you’re developing a custom activity or condition.
29
Chapter 1: Workflow Programming Principles
Listing 1-11: The CustomCondition activity condition
using
using
using
using
System;
System.Workflow.ComponentModel;
Microsoft.SharePoint.WorkflowActions;
Microsoft.SharePoint;
namespace Chapter1
{
public class CustomCondition: ActivityCondition
{
public static readonly DependencyProperty ListNameProperty =
DependencyProperty.Register(“ListName”, typeof(string),
typeof(CustomCondition));
public string ListName
{
get { return (string)base.GetValue(ListNameProperty); }
set { base.SetValue(ListNameProperty, value); }
}
public static readonly DependencyProperty ItemIdProperty =
DependencyProperty.Register(“ItemId”, typeof(int),
typeof(CustomCondition));
public int ItemId
{
get { return (int)base.GetValue(ItemIdProperty); }
set { base.SetValue(ItemIdProperty, value); }
}
public static readonly DependencyProperty FieldNameProperty =
DependencyProperty.Register(“FieldName”, typeof(string),
typeof(CustomCondition));
public string FieldName
{
get { return (string)base.GetValue(FieldNameProperty); }
set { base.SetValue(FieldNameProperty, value); }
}
public static readonly DependencyProperty KeywordsProperty =
DependencyProperty.Register(“Keywords”, typeof(string),
typeof(CustomCondition));
public string Keywords
{
get { return (string)base.GetValue(KeywordsProperty); }
set { base.SetValue(KeywordsProperty, value); }
}
public static readonly DependencyProperty SiteUrlProperty =
DependencyProperty.Register(“SiteUrl”, typeof(string),
typeof(CustomCondition));
public string SiteUrl
{
get { return (string)base.GetValue(SiteUrlProperty); }
30
Chapter 1: Workflow Programming Principles
set { base.SetValue(SiteUrlProperty, value); }
}
public override bool Evaluate(Activity activity,
IServiceProvider provider)
{
bool success = false;
using (SPSite siteCollection = new SPSite(this.SiteUrl))
{
using( SPWeb web = siteCollection.OpenWeb())
{
SPList list = web.Lists[ListName];
SPListItem item = list.GetItemById(ItemId);
string str = item[FieldName].ToString();
success = ((str != null) && str.Contains(Keywords));
}
}
return success;
}
}
}
This custom condition basically determines whether a specified field of a specified list item of a specified
SharePoint list in the top-level site of a specified site collection contains the specified keywords. As such,
the condition exposes five properties that must be set for this condition to operate properly. As shown
in the example, your condition can expose as many properties as necessary. Next, let’s look at the
implementation of the Evaluate method. This method first instantiates an SPSite object so it can
programmatically access the site collection with the specified URL:
SPSite siteCollection = new SPSite(this.SiteUrl);
Next, it accesses the SPWeb object that represents the top-level site in this site collection:
SPWeb web = siteCollection.OpenWeb();
It then uses the list name as an index into the Lists collection property of this SPWeb object to return a
reference to the SPList object that represents the list:
SPList list = web.Lists[ListName];
Next, it invokes the GetItemById method on this SPList object, passing in the ID of the list item, to return
a reference to the SPListItem object that represents the list item:
SPListItem item = list.GetItemById(ItemId);
Then, it uses the field name as an index into this SPListItem object to return the value of the field:
string str = item[FieldName].ToString();
Finally, it returns a Boolean value that specifies whether this field value contains the specified keywords:
return ((str != null) && str.Contains(Keywords));
31
Chapter 1: Workflow Programming Principles
Listing 1-11 follows the best practice of instantiating SPSite and SPWeb objects in the context of using
statements to ensure that the Dispose methods of these objects are automatically invoked when they go
out of scope.
Next, we’ll design a workflow that uses the custom activities and condition that we’ve developed in this
chapter, as shown in Listing 1-12.
Listing 1-12: A workflow that uses the custom activities and condition developed in
this chapter
using
using
using
using
using
using
using
using
using
using
using
using
using
using
using
using
using
System;
System.ComponentModel;
System.ComponentModel.Design;
System.Collections;
System.Drawing;
System.Linq;
System.Workflow.ComponentModel.Compiler;
System.Workflow.ComponentModel.Serialization;
System.Workflow.ComponentModel;
System.Workflow.ComponentModel.Design;
System.Workflow.Runtime;
System.Workflow.Activities;
System.Workflow.Activities.Rules;
Microsoft.SharePoint;
Microsoft.SharePoint.Workflow;
Microsoft.SharePoint.WorkflowActions;
Microsoft.Office.Workflow.Utility;
namespace Chapter1
{
public sealed class Workflow1 : SequentialWorkflowActivity
{
private LogToHistoryListActivity logToHistoryListActivity2;
private LogToHistoryListActivity logToHistoryListActivity3;
private OnWorkflowActivated onWorkflowActivated1;
private WhileActivity whileActivity1;
private LogToHistoryListActivity logToHistoryListActivity1;
private LogToHistoryListActivity logToHistoryListActivity4;
private SequenceActivity sequenceActivity1;
private SequenceActivity sequenceActivity2;
public Workflow1()
{
InitializeComponent();
}
private void InitializeComponent()
{
this.CanModifyActivities = true;
Chapter1.CustomCondition customcondition1 =
new Chapter1.CustomCondition();
32
Chapter 1: Workflow Programming Principles
System.Workflow.Runtime.CorrelationToken correlationtoken1 =
new CorrelationToken();
System.Workflow.ComponentModel.ActivityBind activitybind1 =
new ActivityBind();
this.logToHistoryListActivity3 = new LogToHistoryListActivity();
this.sequenceActivity1 = new SequenceActivity();
this.sequenceActivity2 = new SequenceActivity();
this.logToHistoryListActivity2 = new LogToHistoryListActivity();
this.whileActivity1 = new Chapter1.WhileActivity();
this.logToHistoryListActivity1 = new LogToHistoryListActivity();
this.onWorkflowActivated1 = new OnWorkflowActivated();
this.logToHistoryListActivity4 = new LogToHistoryListActivity();
//
// logToHistoryListActivity3
//
this.logToHistoryListActivity3.Duration =
TimeSpan.Parse(“-10675199.02:48:05.4775808”);
this.logToHistoryListActivity3.EventId =
SPWorkflowHistoryEventType.WorkflowComment;
this.logToHistoryListActivity3.HistoryDescription =
“Condition succeeded”;
this.logToHistoryListActivity3.HistoryOutcome =
“Condition succeeded”;
this.logToHistoryListActivity3.Name =
“logToHistoryListActivity3”;
this.logToHistoryListActivity3.OtherData = “”;
this.logToHistoryListActivity3.UserId = -1;
this.logToHistoryListActivity3.MethodInvoking +=
new EventHandler(logToHistoryListActivity3_MethodInvoking);
//
// logToHistoryListActivity4
//
this.logToHistoryListActivity4.Duration =
System.TimeSpan.Parse(“-10675199.02:48:05.4775808”);
this.logToHistoryListActivity4.EventId =
SPWorkflowHistoryEventType.WorkflowComment;
this.logToHistoryListActivity4.HistoryDescription =
“Iteration completed!”;
this.logToHistoryListActivity4.HistoryOutcome =
“Iteration completed!”;
this.logToHistoryListActivity4.Name =
“logToHistoryListActivity4”;
this.logToHistoryListActivity4.OtherData = “”;
this.logToHistoryListActivity4.UserId = -1;
//
// sequenceActivity1
//
this.sequenceActivity1.Activities.Add(
this.logToHistoryListActivity3);
this.sequenceActivity1.Activities.Add(
this.logToHistoryListActivity4);
(continued)
33
Chapter 1: Workflow Programming Principles
Listing 1-12 (continued)
this.sequenceActivity1.Name = “sequenceActivity1”;
//
// logToHistoryListActivity2
//
this.logToHistoryListActivity2.Duration =
TimeSpan.Parse(“-10675199.02:48:05.4775808”);
this.logToHistoryListActivity2.EventId =
SPWorkflowHistoryEventType.WorkflowComment;
this.logToHistoryListActivity2.HistoryDescription = “Completed”;
this.logToHistoryListActivity2.HistoryOutcome = “Completed”;
this.logToHistoryListActivity2.Name =
“logToHistoryListActivity2”;
this.logToHistoryListActivity2.OtherData = “”;
this.logToHistoryListActivity2.UserId = -1;
//
// whileActivity1
//
this.whileActivity1.Activities.Add(this.sequenceActivity1);
customcondition1.FieldName = “Title”;
customcondition1.ItemId = 1;
customcondition1.Keywords = “Document”;
customcondition1.ListName = “Documents”;
customcondition1.SiteUrl = “EnterSiteURLHere”;
this.whileActivity1.Condition = customcondition1;
this.whileActivity1.Name = “whileActivity1”;
//
// logToHistoryListActivity1
//
this.logToHistoryListActivity1.Duration =
System.TimeSpan.Parse(“-10675199.02:48:05.4775808”);
this.logToHistoryListActivity1.EventId =
SPWorkflowHistoryEventType.WorkflowComment;
this.logToHistoryListActivity1.HistoryDescription = “Started”;
this.logToHistoryListActivity1.HistoryOutcome = “Started”;
this.logToHistoryListActivity1.Name =
“logToHistoryListActivity1”;
this.logToHistoryListActivity1.OtherData = “”;
this.logToHistoryListActivity1.UserId = -1;
//
// onWorkflowActivated1
//
correlationtoken1.Name = “worflowToken”;
correlationtoken1.OwnerActivityName = “Workflow1”;
this.onWorkflowActivated1.CorrelationToken = correlationtoken1;
this.onWorkflowActivated1.EventName = “OnWorkflowActivated”;
this.onWorkflowActivated1.Name = “onWorkflowActivated1”;
activitybind1.Name = “Workflow1”;
activitybind1.Path = “workflowProperties”;
this.onWorkflowActivated1.SetBinding(
OnWorkflowActivated.WorkflowPropertiesProperty,
((ActivityBind)(activitybind1)));
//
34
Chapter 1: Workflow Programming Principles
// Workflow1
//
this.Activities.Add(this.onWorkflowActivated1);
this.Activities.Add(this.logToHistoryListActivity1);
this.Activities.Add(this.whileActivity1);
this.Activities.Add(this.logToHistoryListActivity2);
this.Name = “Workflow1”;
this.CanModifyActivities = false;
}
void logToHistoryListActivity3_MethodInvoking(object sender,
EventArgs e)
{
System.Threading.Thread.Sleep(5000);
}
public Guid workflowId = default(System.Guid);
public SPWorkflowActivationProperties workflowProperties =
new SPWorkflowActivationProperties();
}
}
This workflow is a class named Workflow1, which inherits from the SequentialWorkflowActivity
activity, which is the base class for all sequential workflows. The workflow itself is nothing but a
custom activity, which is composed of other activities. In other words, the workflow itself is a custom
composite activity. Composite activities are the most common custom activities that you, as an activity
developer, will be developing, because it enables you to compose your custom activity from existing
activities, which promotes reusability (as opposed to starting from scratch and implementing the
features that existing activities already support). For example, our custom SequenceActivity activity
already contains the logic for executing a set of activities sequentially in linear fashion. By having our
custom activity use this activity, we save ourselves the effort of reimplementing this logic all over again.
Now back to the implementation of Workflow1. As you can see, the InitializeComponent method is
where the workflow instantiates and initializes its containing activities. This workflow is a sequence of
the following activities:
❑
An OnWorkflowActivated activity named onWorkflowActivated1. This activity suspends its
execution and consequently the execution of the workflow and waits for the current workflow
instance to be activated. This activity must be the first activity in every SharePoint workflow. I
discuss this activity in more detail in the next chapter.
❑
A LogToHistoryListActivity activity named logToHistoryListActivity1, which logs a workflow
history event to the workflow history list stating that the workflow has started. I also discuss the
LogToHistoryListActivity activity in the next chapter.
❑
An instance of our custom WhileActivity activity.
❑
A LogToHistoryListActivity activity named logToHistoryListActivity2, which logs a workflow
history event to the workflow history list stating that the workflow has completed.
35
Chapter 1: Workflow Programming Principles
Note that the workflow instantiates an instance of our CustomCondition condition, initializes its
properties, and assigns it to the Condition property of the WhileActivity activity:
customcondition1.FieldName = “Title”;
customcondition1.ItemId = 1;
customcondition1.Keywords = “Document”;
customcondition1.ListName = “Documents”;
customcondition1.SiteUrl = “EnterSiteUrlHere”;
this.whileActivity1.Condition = customcondition1;
Also note that the WhileActivity activity contains an instance of our SequenceActivity custom activity,
which in turn contains two LogToHistoryListActivity activities.
The next chapter discusses in detail how to deploy your workflow for SharePoint. First you will learn
how to create a workflow with Visual Studio 2008. Start by launching Visual Studio 2008. Select
File New Project to launch the New Project dialog shown in Figure 1-2.
Figure 1-2
Enter Chapter1 as the name of the project and click OK. Visual Studio will automatically take you to the
dialog shown in Figure 1-3.
36
Chapter 1: Workflow Programming Principles
Figure 1-3
Enter Chapter1 as the name of the workflow template and choose a local site for debugging. Click Next
to navigate to the dialog shown in Figure 1-4.
Figure 1-4
37
Chapter 1: Workflow Programming Principles
Leave the “Automatically associate workflow?” toggle checked because we want to have Visual Studio
automatically create the workflow association for us. The next chapter discusses workflow associations
in detail. As you can see, this dialog contains three drop-down list boxes. Select a list from the top dropdown list box to have Visual Studio associate the workflow with this SharePoint list. Select a list from the
middle drop-down list box to have Visual Studio use this list as the history list for our workflow when it
is creating the workflow association. Select a list from the bottom drop-down list box to have Visual
Studio use this list as the task list for our workflow when it’s creating the workflow association. Our
workflow does not create any tasks. SharePoint tasks are thoroughly discussed later in this book.
Click Next to navigate to the dialog shown in Figure 1-5.
Figure 1-5
This dialog enables you to choose how the workflow should be initiated. You have three options:
❑
Manually by users: In this case the user initiates a workflow manually on a list item in the list
with which the workflow is associated.
❑
When an item is created: In this case an instance of the workflow is automatically initiated
every time an item is added to the list with which the workflow is associated.
❑
When an item is changed: In this case an instance of the workflow is automatically initiated
every time an item is updated in the list with which the workflow is associated.
Check the “Manually by users” option and uncheck the other two options. Click Finish to create the
project. As Figure 1-6 shows, Visual Studio creates the following files:
38
❑
feature.xml: This file defines the feature that references the element manifest file containing the
definition of the workflow template. I discuss workflow templates in the next chapter.
❑
workflow.xml: This file is the element manifest file containing the definition of the workflow
template.
Chapter 1: Workflow Programming Principles
❑
key.snk: This is the key file that is used to sign the assembly. As you can see, Visual Studio
always compiles the workflow code-behind class into a strong-named assembly. Every time you
build this project, Visual Studio automatically compiles the workflow into a strong-named
assembly and installs this assembly in the global assembly cache (GAC). As you’ll see later in
this book, SharePoint expects the workflow code-behind class to be compiled into a strongnamed assembly and installed in the GAC.
❑
Workflow1.cs: This file contains the first portion of the workflow code-behind class. Keep in
mind that the workflow code-behind class in this file is defined as a partial class.
❑
Workflow1.designer.cs: This file contains the second portion of the workflow code-behind class.
Figure 1-6
Now go ahead and delete the Workflow1.designer.cs file and replace the contents of the Workflow1.cs
file with Listing 1-12, earlier in this chapter. Add the following files to the project:
❑
CustomConditions.cs: Add Listing 1-11 to this file.
❑
SequenceActivity.cs: Add Listing 1-7 to this file.
❑
WhileActivity.cs: Add Listing 1-9 to this file.
The Solution Explorer should now look like Figure 1-7.
Figure 1-7
39
Chapter 1: Workflow Programming Principles
Press F5 to build the project. Visual Studio will automatically take the following steps:
1.
2.
3.
It compiles all .cs files into a single strong-named assembly.
It deploys this assembly to the global assembly cache.
It creates a feature-specific subfolder named Chapter1 in the following folder in the file system
of the front-end Web server:
C:\Program Files\Common Files\microsoft shared\Web Server Extensions\12\
TEMPLATE\FEATURES
4.
It deploys the feature.xml feature file and the workflow.xml element manifest file into the
Chapter1 feature-specific folder.
5.
6.
It uses the STSADM command-line utility to install the feature.
7.
It creates a workflow association for the workflow with the history and task lists that you
specified in the middle and bottom drop-down list boxes in Figure 1-4.
8.
It adds this workflow association to the list that you specified in the top drop-down list box in
Figure 1-4.
9.
It navigates to the page displaying the list you specified in the top drop-down list box in
Figure 1-4. This page is shown in Figure 1-8.
It uses the STSADM command-line utility to activate the feature in the site that you specified
earlier (refer to Figure 1-3).
Figure 1-8
40
Chapter 1: Workflow Programming Principles
Select the Workflows options from the ECB menu of a list item in the list as shown in Figure 1-9.
Figure 1-9
This will take you to the Workflow.aspx page shown in Figure 1-10. This page shows the workflow
association added to the list. This page contains a link titled Chapter1, which is the name of the
workflow association that Visual Studio created and added to the list. This is the same name that you
specified earlier (refer to Figure 1-3).
Figure 1-10
41
Chapter 1: Workflow Programming Principles
Before you click the Chapter1 link shown in Figure 1-10, open another browser window or a new tab in
the existing browser window and navigate to the page that shows the SharePoint list whose name is
specified in the ListName property of our custom condition, which is Documents in this case. Now go
ahead and click the Chapter1 link to initiate an instance of the workflow.
Now return to the new browser window or new tab and change the value of the field whose name is
specified in the FieldName property of our custom condition in the list item whose ID is specified in the
ItemId property of our custom condition. Now, if you revisit the list item on which you initiated
the workflow instance, you should see a column named Chapter1 with the value of Completed
(see Figure 1-11), signaling that the workflow instance has completed.
Figure 1-11
Click the Completed link to navigate to the WrkStat.aspx page shown in Figure 1-12. Here, the two
LogToHistoryListActivity child activities of our custom SequenceActivity activity are executed multiple
times.
42
Chapter 1: Workflow Programming Principles
Figure 1-12
Summar y
This chapter first provided an overview of the similarities and fundamental differences between WF as a
logical workflow programming language and a procedural programming language such as C#. It then
discussed the different types of custom activities that you can implement and showed you how to
implement each type.
43