1
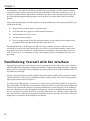
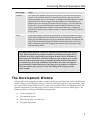
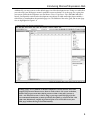
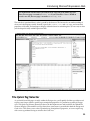
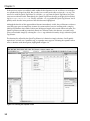
1
TE
RI
AL
Introducing Microsoft
Expression Web
D
MA
There was a time in the not-so-distant past when a designer aiming to create Web pages needed
only a basic knowledge of Hypertext Markup Language (HTML) and a robust, reliable, and
feature-rich text editor such as Notepad. Okay, so the latter is an exaggeration, but let’s face it.
Web pages were simple then, containing limited tags used purely for formatting fonts, setting
paragraph and line breaks, adding lists, placing images, and occasionally including tabular data.
PY
RI
GH
TE
The relative simplicity of creating Web pages, then, led to the increased visibility and use of the
Web. Gone are the days of adding a few tags to a blank document in Notepad, saving the file with
an .html extension, and then opening that page within a browser to see the finished product. With
increased usage came new ways of formatting and structuring content in a Cascading Style Sheet
(CSS). Scripting languages such as JavaScript were introduced in an effort to improve the usability
of Web pages, validate forms, detect browsers, create cookies, and more. As the Web became the perfect medium for sharing and disseminating information, users became much more finicky, demanding support for audio, video, and even animation.
CO
Beyond these simplicities however, Web pages grew to unbelievable proportions. The Web is no
longer a simple medium used merely for informational purposes. Rather, users can now expect to
do their banking, buy cars, shop for food, collaborate, and much more, online. We now work with
Web pages that are responsible for extracting content from databases, Extensible Markup Language
(XML) files, and more.
Developing for the Web no longer involves a simple understanding of HTML, a handy text editor,
and a browser. Instead, developers are increasingly required to learn other complex technologies
such as CSS, JavaScript, ASP.NET, VB.NET, C#, SQL, XML, and much more. But, with the introduction of so many Web technologies just over the last decade alone, how has the Web, and,
more specifically, how has developing for the Web increased beyond a level that so few could
have ever predicted during the Web’s infancy? The answer lies in visual editors such as Microsoft
Expression Web.
Microsoft Expression Web facilitates the development of Web pages visually. Even better, it fosters
visual development of Web applications. While knowledge of the aforementioned Web technologies
Chapter 1
is encouraged, it’s not required with Expression Web. Expression Web allows the developer to structure
and format content, and even connect to and interact with database/XML data visually using a series of
task panes, wizards, toolbars, and toolboxes. With Expression Web, years of learning and mastering complex authoring and programming languages are now cut down to a matter of days and 16 convenient
chapters.
Your journey through Expression Web begins here with an introduction to the product. Specifically, you
will do the following:
❑
Become familiar with the Expression Web interface
❑
Learn about the many options available within the menu bar
❑
Understand the role of Task Panes
❑
Use and customize toolbars
❑
Learn to recognize and use the Development window, the tag selector, the development area,
the tabbed file chooser, and the Design, Split, and Code views
Throughout the book, certain Expression Web Task Panes, toolbars, windows, and more will be
referenced by name. By the end of the chapter, you will have a solid understanding of where these
components are located. You’ll know which component accomplishes which task and when to use
each. This will serve as a foundation for other, more complex processes throughout the book. Let’s
get started!
Familiarizing Yourself with the Interface
Opening Expression Web for the first time reveals a program that looks and, in many cases, functions
much like other Microsoft products. Falling in line with the “familiarization through consistency” approach,
Expression Web at first glance closely resembles other Office products such as Word, Publisher, and even
its predecessor, FrontPage.
Initially, you’ll notice Expression Web’s Multiple Document Interface (MDI), where numerous windows
(otherwise known as Task Panes), the Document window, toolbars, menus, and so on, converge within a
single parent window shown in Figure 1-1.
The beauty in the MDI approach, as you may have seen by now in other Office products, is that the Task
Panes and toolbars aren’t fixed to the environment (otherwise known as docked). Instead, the toolbars and
Task Panes that facilitate the majority of property modifications for your Web pages can be undocked,
moved to a different area of the development environment, and then re-docked to that particular area.
You can also choose to not dock a Task Pane or toolbar and instead leave it floating on top of other toolbars and Task Panes within the development environment. Figure 1-2 provides an example of how you
might choose to customize the development environment.
2
Introducing Microsoft Expression Web
To get an idea of just how easy it is to dock and undock toolbars and Task Panes, try rolling your cursor
over the title bar of a particular Task Pane or toolbar. Your cursor will change to the Move cursor. Now,
click, hold, and drag the Task Pane or toolbar out of its area and move it to another area within the environment. As long as the area supports the docking of that particular Task Pane or toolbar, it should snap
automatically into place.
As you can see by the callouts in Figure 1-1, Expression Web’s user interface offers the following five
major components:
❑
The menu bar
❑
The Document window
❑
Task Panes
❑
Toolbars
❑
Context menus (not shown)
Menu bar
Document window
Toolbar
Task Panes
Figure 1-1: Multiple Document Interface (MDI)
3
Chapter 1
Figure 1-2: Customizing the development environment
While you may be surprised to learn that development of Web pages within Expression Web flows
through just these five components, it’s true! The menu bar, the Development window, the myriad of
Task Panes and toolbars, and the context-sensitive menus represent 100 percent of the Expression Web
development environment. The catch (yes, there’s a catch) is that these five components trickle down
other forms of functionality — for example, the component toolbars. However, there are 17 different
toolbars that you may decide to use to work with anything from page formatting using CSS to page
structuring using tables. Task Panes are another example. While I mentioned that Task Panes represent
core functionality within Expression Web, I have yet to mention that there are 18 Task Panes that you
can utilize based on the task at hand.
While I’ll certainly cover the myriad of Task Panes, toolbars, and so on, as the book unfolds, this chapter
is meant as a gentle introduction to the many components that make up the Expression Web development
environment. This chapter should help you identify the Folder List or Tag Properties Task Pane, identify
the Tools menu item, recognize the Document window, and even recognize what the Common toolbar is
so that, in later chapters, when you read about opening a particular toolbar, accessing a particular menu
item, or even opening a Task Pane, it will come as naturally as blinking.
4
Introducing Microsoft Expression Web
The Menu Bar
Arguably, the most crucial component included within Expression Web is the menu bar. Like most
Microsoft products, the menu bar allows for simple file-based operations such as opening a document, saving a document, printing, closing, cutting, copying, pasting, and much more. Unlike other
Office products, however, the menu bar also includes numerous other options that are specific to
Expression Web.
For example, the Task Pane menu item, which I touched on in the previous section, enables you to open
any one of the 18 Task Pane windows within Expression Web. Like the Task Pane menu item, the Site
menu item is also specific to Expression Web, enabling you to choose options for managing a Web site,
opening and creating reports, copying a Web site, and more.
In all, there are 12 menu items within the menu bar. The following table provides a basic outline of each
menu item and its common usage.
Menu Item
Usage
File
Use options within the File menu for performing common file-based operations
such as creating a new document, opening an existing document, saving a document, opening a site, closing a site, launching the Site Publishing Wizard, importing and exporting files and sites, previewing your page in the browser, printing,
opening recent files and sites, and exiting the program.
Edit
You can use options within the Edit menu to perform common word-processing
operations such as cutting, copying, pasting, deleting, selecting all, launching
the Find and Replace dialog, and more. Other non–word-processing features
offered within this menu include checking files in and out (when versioning is
enabled), accessing various code-only options (while in Code view), and undoing and redoing changes to a particular page.
View
As an Expression Web user, you can access options within the View menu for
customizing the look and feel of the development environment. For example,
you may decide to show the Design, Split, or Code views within the Document
window. Perhaps you’d like to turn on and off options for viewing Visual Aids,
Formatting Marks, Rulers, the Grid, and more. Options for showing and hiding
the Folder list, Navigation pane, and the various toolbars also reside within the
View menu.
Insert
Anything that you might want to insert into your Web pages can be found within
the Insert menu. Need to insert a particular HTML tag or ASP.NET control? Maybe
insert a Hyperlink, bookmark, picture, file, interactive button, or a symbol? All of
this and more can be inserted via this menu.
Continued
5
Chapter 1
6
Menu Item
Usage
Format
Once you’ve inserted an element into your Web page, you’ll undoubtedly want
some way of modifying its properties. While Expression Web supports a wide
variety of methods for physically editing the properties of elements that you’ll
eventually add to your Web pages (Task Panes, toolbars, and so on), the Format
menu provides a central list of options for modifying all properties for CSS,
tables, behaviors, layers, fonts, and more.
Tools
The Tools menu can be considered a central repository for functionality that will
ultimately improve the usability, accessibility, performance, and professionalism
of your Web pages. For example, options within the Tools menu include a spelling
dictionary, a thesaurus, accessibility checker, browser compatibility validation,
CSS reports, an HTML optimizer, and various options for working with add-ins
and macros.
Table
As you’ll learn, tables are a traditional approach to structuring Web pages easily,
with very little effort. When working with tables, you can access features within
the Table menu to insert or draw a table; insert columns, rows, or cells within an
existing table; delete rows, columns, or cells; split and merge cells; and more.
Site
While this topic won’t begin to reveal itself until later, the concept of Web sites is an
important one. If you’re new to Web development, habit may drive you to simply
open a file and begin editing it directly within Expression Web. While this is certainly acceptable, it’s important to understand that you’ll be missing out on many
features that make Expression Web unique. By working with Web sites, Expression
Web offers numerous management features, including file check in and check out,
versioning, automatic visual navigation, the ability to copy an entire Web site to a
Web hosting provider, site reports, and more. All of these features, including the
ability to define site settings, can be found within this menu item.
Data View
As you progress through the book, one of the topics that you’ll arrive at is that of
extracting data from a database and presenting that data within a Web page. The
set of options within the Data View menu facilitates the addition of user interface
components for working with that extracted data.
Task Panes
As mentioned earlier, Expression Web includes more than 20 different Task Panes
that facilitate a rich development workflow for the end user. Whether you want
to work with CSS, JavaScript Behaviors, or HTML Tag Properties, or browse the
folder list for your Web site, the Task Panes menu contains a Task Pane that is
right for the job. Because a large portion of Expression Web’s features stem from
the functionality offered by the various Task Panes, I cannot begin to provide
detailed coverage of all of them in this chapter. Instead, each Task Pane is covered as its related chapter unfolds.
Introducing Microsoft Expression Web
Menu Item
Usage
Window
Like other Office products, Expression Web allows you to open more than one
instance of the program at the same time. Doing so allows you to work with
numerous projects at once. You can open a new Expression Web window by simply
choosing the New Window option from the Window menu. Furthermore, the
Window menu also manages Document window instances (covered with more
detail in the next section). Rather than using the tabbed file chooser, you can
simply select the Document window of choice from this menu. Additionally,
you can close all Document window instances at once by choosing the Close All
Pages option.
Help
As the name implies, various help-related links are contained within this menu.
Other options within this menu include links for accessing the Expression Web
home page, the Microsoft contact page for submitting questions or comments, the
Web site for downloading Expression Web extensions and updates, and even a
link to a Microsoft Expression Web page that contains links to developer blogs
and community forums.
Remember that the goal here isn’t to place each and every menu item under a microscope. With hundreds of menu options available, it would be nearly impossible to
remember them all by simply reading one chapter. Instead, I discuss what most of
these menu items do when it’s relevant to the topic of a given chapter. Also, assume
that a lot of these menu items represent common operations that you’ll most likely
use shortcut keys for instead. In addition, some of these menu items are duplicate
representations of an operation that you may find easier to perform via a toolbar or
Task Pane window; thus, you can see why I’m holding off covering these menu
items in depth.
The Development Window
Quite possibly, the most important window included within Expression Web’s framework is the Document
window. Simply put, the Document window is where all of the magic happens, or more specifically, where
all of your creative energy will be focused. It’s where you’ll structure, format, and add interactivity and
dynamic components to your Web pages visually, in code, or both. As you can see from Figure 1-3, the
Document window is made up of the following components:
❑
The development area
❑
The tabbed file chooser
❑
Show Design, Split, and Code views
❑
The Quick Tag Selector
7
Chapter 1
Quick Tag Selector
Tabbed File Chooser
Development Area
Design, Show Split,
and Code views
Figure 1-3: The Document window
The Development Area
Of the four major components included with the Document window, the development area is where
you’ll focus the majority of your attention. When you create a new Web page for the first time (as you’ll
see in Chapter 2), the development area appears as a blank white page waiting for you to add structuring components, formatting components, images, animations, and more.
Of course, you can also customize whether various development aids are shown within the development
area. For example, assuming you wanted to display rulers and a grid within the development area, you’d
need only to place your cursor within the development area and select View ➪ Ruler and Grid ➪ Show
Ruler and View ➪ Ruler and Grid ➪ Show Grid, respectively. Selecting both of the options enables both a
ruler and a grid within the development area.
8
Introducing Microsoft Expression Web
Additionally, you may want to set the default page size of the development area. Doing so would allow
you to develop your Web pages around a particular screen resolution. To set the page size, again place
your cursor within the development area and choose View ➪ Page Size ➪ 760 × 420 (800 × 600, Maximized). You’ll quickly notice that the development area adjusts its width and height (represented by a
dashed line) to accommodate the particular page size. The addition of the rulers, grid, and custom page
size are highlighted in Figure 1-4.
Figure 1-4: Development area
Setting a page size is common in Web development. Current statistics show that
roughly 54 percent of Internet users browse under a 1024 × 768 screen resolution,
followed by 28 percent at 800 x 600, 10 percent at 1280 × 1024, and 4 percent at
1152 × 864. What this means is that as long as you target your Web pages for the
least common denominator, or more specifically the option we selected of 760 × 420
(800 × 600, Maximized), roughly 96 percent of your users will be able to see your
Web pages without having to scroll horizontally.
9
Chapter 1
The Tabbed File Chooser
As your Web sites grow, so will the volume of Web pages that you need to manage. In some instances,
you’ll need to work on more than one Web page at the same time. This is where the tabbed file chooser
comes into play. The tabbed file chooser allows you to open and work with numerous Web pages at once.
As you open or create files, new tabs appear within the tab strip, each representing its own Document window instance. When you have more than one file open at the same time, browsing between the files is simply a matter of choosing the particular file, represented by its individual tab.
Closing a tab/page is easy. To close the tab/page, simply choose the small Close icon (represented by the
small x) in the far right of the tab strip, or in the top-right corner of the Document window, also shown
in Figure 1-3.
Remember that there’s always more than one way to accomplish any task in Expression Web. Another way to close a page is to choose File ➪ Close. Or, if you’d like
to close all open tabs/pages at the same time, simply choose Window ➪ Close All
Pages.
Show Design, Split, and Code View
One of the nice aspects of Expression Web is that it doesn’t assume anything of its user. It doesn’t care if
you’re a designer who prefers to structure and format Web pages visually. It also doesn’t care if you’re a
developer who prefers to tinker with the code. In fact, it allows you to set what view you want to see for
a particular situation via the Show Design, Split, and Code View set of options.
As you’ll notice, the Show Design View option is shown to the user by default. For this reason, a
blank white page is shown initially when a new page is created. If you prefer to work in a code
environment, however, simply choose the Show Code View option. In this scenario, the development area changes, enabling you to manipulate the code that is produced. Furthermore, assuming
you have the ability to build Web pages visually as well as the ability to tinker with the code, you
may decide to choose the Show Split View option. Doing so splits the development area into two
halves. As you can see from Figure 1-5, the top half displays the code, whereas the bottom half
displays the visual environment.
So, why does Expression Web support two modes of development? The answer is simple. Some developers have the ability to work with HTML directly in code, while others prefer to work with the page
visually. In the end, it doesn’t matter. Even if you prefer to work with the page visually, in the end,
the result is a series of tags that is produced automatically for you by Expression Web within the Code
view. The browser, knowing nothing of the visual design, instead parses the carefully crafted tags
associated with the page and presents to the user what the developer intended.
As an example of how Expression Web writes the code for you, try choosing File ➪ New ➪ HTML to
create a new blank Web page. Immediately choose the Show Split View option. Now select Table ➪
Insert Table. The Insert Table dialog box will appear. Accept the defaults and click OK to close the
dialog box. Observe that a table is added to the page. More importantly, however, notice the code that
is generated within the Code view.
10
Introducing Microsoft Expression Web
It’s important to note that when you click the New Page icon in the Folder List Task
Pane, the new page is created as default.htm. If you select File ➪ New ➪ HTML to
create a new file, the new page is created as Untitled_1.htm.
The code that’s produced here is what’s parsed by the browser. The browser has no understanding of
what you’re developing visually. Instead, it parses the <table>, <tr>, and <td> tags, and associated
properties of the table, and attempts to display within the browser something close (if not exact) to what
you developed visually within Expression Web.
Figure 1-5: Show Split View
The Quick Tag Selector
As you build your Web pages visually within the Design view, you’ll quickly find that you either need
to place your cursor within a specific tag or manipulate properties of a particular tag while in Design
view. The Quick Tag Selector (located just above the development area and just below the Tabbed File
Chooser) displays a hierarchal list of tags from where your cursor is positioned in both the Design and
Code views. This allows you to select a particular tag, manipulate its properties, or even wrap the tag
with a new tag without having to switch to the Code view.
11
Chapter 1
In the previous section you added a table within the development area in an effort to see code that
was produced by Expression Web. But visually, how would you be able to select the <td> tag? The
answer lies with the Quick Tag Editor. To select the <td> tag from the Quick Tag Editor, first place
your cursor within the table. Immediately, the Quick Tag Selector changes to display the hierarchal
tag list <body><table><tr><td>. Finally, select the <td> tag within the Quick Tag Selector. You’ll
quickly notice that the inner portion of the table becomes highlighted.
Although the benefits of this approach don’t become immediately visible, they will become evident as
your Web pages grow in complexity. Assume for a moment that you were working with a complex
table-based structure where tables within your Web pages happen to be nested within each other. The
Quick Tag Selector would be particularly handy in a situation such as this because you could easily
select a nested table simply by selecting the <table> tag within the hierarchy of tags within the Quick
Tag Selector.
The functionality offered by the Quick Tag Selector isn’t limited to simple selections. You’ll quickly
notice that if you roll over a particular tag, an expander arrow appears. Selecting the expander arrow
offers a submenu with other options, highlighted in Figure 1-6.
Figure 1-6: Selecting the expander arrow
12
Introducing Microsoft Expression Web
The following table shows the options offered within the tag’s submenu.
Option
Description
Select Tag
Selects the particular tag, enabling you to apply properties to the tag. Does not
select the contents within the tag.
Select Tag Contents
Selects all of the content within the selected tag and not the actual tag.
Edit Tag . . .
Launches the Quick Tag Editor in Edit mode. The Quick Tag Editor enables
you to quickly manipulate the properties of the particular tag as if you were
in Code view without actually having to switch to Code view.
Remove Tag
Some HTML tags are represented by a single tag and, therefore, can be
removed by simply choosing this option. Other tags (such as the <table>,
<tr>, and <td> tags) rely on one another to function properly. Since this is the
case, removing them is not an option because it would render the tags invalid
by the browser.
Insert HTML . . .
Launches the Quick Tag Editor in Insert mode. While in this mode, the Quick
Tag Editor allows you to freely insert code within the currently selected tag.
Wrap Tag . . .
Launches the Quick Tag Editor in Wrap mode. While in this mode, the Quick
Tag Editor allows you to freely insert code that will end up wrapping the currently selected tag, as long as the resulting HTML is valid. If the HTML is not
valid, Expression Web alerts you of the invalid entry.
Positioning
Choose one of the options within this submenu to apply an inline positioning
style to the currently selected tag. Possible options include absolute, fixed,
relative, and static. Positioning properties will be covered with more detail
in Chapter 7, “Advanced Page Structuring by Using Layers and CSS.”
Tag Properties . . .
Selecting this option launches a Tag Properties dialog box for the particular
selected tag. The properties that appear within this dialog are similar to the
properties that appear within the vertical list in the Tag Properties Task Pane,
covered in the next section.
Task Panes
For the most part, all of your creative energy will be focused toward the development area within the
Document window. However, without the collection of Task Panes that Expression Web offers,
normal tasks such as quick browsing of files within a Web site, simple tag property modifications,
centralized CSS style management, and drag-and-drop of common HTML and ASP.NET controls would
consume much of the development time. To alleviate the burden Expression Web has conveniently separated all of the common functionality that developers will need the most access to into smaller user interfaces known as Task Panes.
13
Chapter 1
Out-of-the-box Expression Web displays the Folder List Task Pane in the upper left, the Tag and CSS
Properties Task Panes in the lower left, the Toolbox Task Pane in the upper right, and the CSS Styles Task
Panes in the lower right. Of course, you’re not limited to this set of Task Panes. As touched on earlier in
the chapter, Expression Web includes a collection of Task Panes all conveniently located under the Task
Panes menu item. In all, there are 18 Task Panes making up functionality that ranges from CSS property
modification to an integrated compatibility check Task Pane. The following table briefly outlines the
purpose of each Task Pane included with Expression Web.
Task Pane
Purpose
Folder List
Launches the Folder List Task Pane. Use this Task Pane to conveniently display
a list of files and folders within your Web site. The files and folders within this
list can be cut, copied, renamed, and deleted just as if you were working within
Windows Explorer.
Tag Properties
As you’ll see throughout the book, every selectable element within the development area has a set of modifiable properties. These properties are centrally
listed within the Tag Properties Task Pane.
CSS Properties
When working with CSS, the CSS Properties Task Pane can be used to quickly
manipulate properties for a class, ID, or tag redefinition quickly without having to launch the Modify Style dialog box each and every time.
Layout Tables
In addition to inserting and drawing tables within the development area,
Expression Web supports a Layout Tables mode, which provides developers
with a handy set of visual aids that make designing and working with tables
easier and more efficient.
Apply Styles
Launches the Apply Styles Task Pane. When working with Cascading Style
Sheets (CSS), the Apply Styles Task Pane is where you’ll create new styles and
apply existing ones to elements within your Web pages.
Manage Styles
Once you’ve added and applied styles to elements within your Web pages,
you need some way to manage them. The Manage Styles Task Pane does just
that. It provides a central interface for viewing a list of and modifying the
styles within your Web sites.
Behaviors
Launches the Behaviors Task Pane. As you’ll see in Chapter 8, “Adding
Interactivity with Behaviors,” behaviors are Expression Webs’ alternative to
writing JavaScript by hand. By simply inserting a behavior, functionality such
as browser and plug-in checks, jump menus, pop-up messages, pop-up windows, and more become available to you.
Layers
Launches the Layers Task Pane. Use this Task Pane as a visual way to manage
Layers within Expression Web. As you’ll see in later chapters, Layers are a forward thinking alternative to structuring Web pages using CSS.
14
Introducing Microsoft Expression Web
Task Pane
Purpose
Toolbox
All elements, whether they’re HTML tags, form controls, ASP.NET controls, or
SharePoint controls, are listed within the Toolbox Task Pane. Launching this
Task Pane reveals a broad collection of controls that you can effortlessly select
and drag out onto the development area.
Data Source
Library
Launches the Data Source Library Task Pane. Use this Task Pane as a way to
manage connections to data sources such as local or remote XML files or even
Access, SQL Server, Oracle, and so on, databases.
Data Source
Details
Once a data source has been defined, the fields/columns within the particular
data source appear as a list within this Task Pane. The Data Source Details
Task Pane makes it simple for a developer to quickly select and drag out bindings for a Web page to a data source.
Conditional
Formatting
Launches the Conditional Formatting Task Pane. Use this Task Pane as a
visual way to add server-side functionality to your Web pages. For example,
you may decide to create a login page, a search page, or even an administrative dashboard for your organization. The features offered within this Task
Pane facilitate this functionality.
Find 1
Launches the Find 1 Task Pane. Use this Task Pane as a way of searching for
and even replacing text, code, and even HTML within a page, a group of
pages, or the entire site.
Find 2
Launches the Find 2 Task Pane. Use this Task Pane as a second search when
you don’t want to clear the results of the Find 1 Task Pane.
Accessibility
Launches the Accessibility Task Pane. Use this Task Pane to perform accessibility checks against your Web pages/site. The Accessibility Checker dialog
currently supports Web Content Accessibility Guidelines (WCAG) Priority 1
and 2 and Section 508 compliance validation. You may also choose to display
errors, warnings, recommendations, or all three.
Compatibility
Launches the Compatibility Task Pane. Use this Task Pane as a way to validate
your Web page/site against a particular browser version. You can also use this
Task Pane to validate your Web page/site against a particular CSS version.
Hyperlinks
Launches the Hyperlinks Task Pane. Use this Task Pane as a way to check for
broken links within your Web pages, collection of Web pages, or your entire
Web site. This interface conveniently lists all broken links and provides a central method for editing/fixing broken links.
CSS Reports
Launches the CSS Reports Task Pane. Use this Task Pane to perform broad
CSS validation checks on your Web pages.
15
Chapter 1
Toolbars
So far, you’ve learned that the menu bar can be used when you need to insert or modify elements within
your Web pages. In the previous section, you saw that Task Panes offer specific property modification
options to particular elements that you happen to be working with within the development area. While
these options are perfectly acceptable for use, it’s important to understand that there’s an easier, more
visual way of inserting, modifying, and working with elements within your Web pages in what are
known as toolbars.
If you’re no stranger to Office applications, then there’s no doubt that you’ve used toolbars. Toolbars,
which are usually fixed under the menu bar and above the Document window, provide a visual approach
(through the use of icons) for inserting, modifying, and managing specific types of elements within the
development area. For example, if you’re working with tables, you may decide to show the Tables toolbar. Alternatively, if you’re working with CSS, you may decide to show the Style and Style Application
toolbars. Or, if you’re working within the Code view in Expression Web, you may decide to keep the
Code View toolbar floating near or around where you’re typing in code. Doing so would allow you
quick, visual access to commonly accessed features without your having to fumble around through a
massive collection of menus and submenus, which can be the case when working with the menu bar.
Out-of-the-box, Expression Web docks the Common toolbar under the menu bar and
just above the Document window. Obviously, you’re not limited to having just this
toolbar open. Furthermore, the toolbar doesn’t have to be docked in this location.
As mentioned earlier in the chapter, toolbars, like the Task Panes and the menu bar,
can be undocked and repositioned anywhere within the Expression Web interface.
Alternatively, you may decide not to re-dock a toolbar, but rather to keep it floating
for easier access.
There are numerous ways of showing a particular toolbar, but probably none easier or more straightforward than choosing the toolbar you want to use from the View ➪ Toolbars menu. As Figure 1-7 indicates,
I’ve opened and docked the Common, Style, Style Application, and Tables toolbars. I also have the Code
View toolbar open. However, this toolbar is floating, whereas the others are docked.
Once the toolbar is open and visible, a simple click of the icon performs the operation that the icon represents. For example, if I open the Tables toolbar and click the Draw Table icon (the first icon to the left
in the Tables toolbar), I should expect to immediately be able to draw a table onto my Web page.
It’s important to understand that icons won’t always be enabled within a particular
toolbar. An icon’s availability depends on the context for which you plan to use that
feature that is ultimately offered by that icon. For example, if I haven’t inserted a
Layer into my Web page, I shouldn’t expect options offered within the Positioning
toolbar to become enabled. Additionally, unless I’ve already inserted a table, I
shouldn’t expect table formatting features offered within the Tables toolbar to
become available either.
16
Introducing Microsoft Expression Web
Figure 1-7: Positioning toolbars
Once a toolbar is open, you’re not forced to use or even see the icons within the toolbar. There may be
instances where you find that you’ll never use a specific icon, and just its presence becomes a distraction.
In this situation, you can hide specific icons within the toolbar.
You can hide specific icons within a toolbar by first rolling your mouse over the expander arrow located
to the far right of the toolbar. The tool tip that appears should read “Toolbar Options.” Click it. The Add
or Remove Buttons menu option appears. Now, click the expander arrow that appears from the Add or
Remove Buttons submenu. The name of the toolbar appears just to the right of the expander arrow. Click
it. A list of available icons (representing functionality within the toolbar) appears in a list. Finally, check or
uncheck the icons, representing the functionality that you may or may not want to use. When finished,
your customized list may resemble Figure 1-8.
17
Chapter 1
Figure 1-8: Customized list
You also probably noticed the Customize option that appeared when you selected the expander arrow
from the Add or Remove Buttons submenu. Clicking this option (which is also available by choosing
View ➪ Toolbars ➪ Customize) launches the Customize dialog. It’s within this list of toolbars that you’re
presented with a complete list of 11 toolbars (minus the Menu Bar option, which enables or disables the
menu bar at the top of the page). Also, it’s important to understand that, like the Task Panes, the toolbars
are specific to the type of element you happen to be working on within the development area. The following table provides a complete list of toolbars, including a brief description of their uses.
Toolbar
Usage
Standard
Lists standard document features such as the ability to create a new document,
open an existing document, save, find, cut, copy, paste, undo, redo, and insert
a table, hyperlink, layer, and more.
Formatting
Lists standard formatting features such as the ability to quickly show the CSS
Task Pane, adding headings, fonts, font sizes, bold, italic, underline, alignments, lists, indentations, font colors, and more.
18
Introducing Microsoft Expression Web
Toolbar
Usage
Code View
Provides functionality for working with code in Code view. Features such as
adding bookmarks, selecting tags and parent tags, showing line numbers, and
more, are displayed within this toolbar.
Common
Lists the most commonly used features within Expression Web. This is essentially a streamlined list of features taken from both the Standard and Formatting
toolbars. This is one toolbar you’ll probably always want open.
Dynamic Web
Template
When working with dynamic templates, use the Dynamic Web Template toolbar to visually add and manage editable regions, region labels, and more.
Master Page
Similar to the Dynamic Web Template toolbar, the Master Page toolbar offers
features for working with ASP.NET Master pages.
Pictures
Use the Pictures toolbar to quickly add and manipulate images within your
Web pages. Options within this toolbar include the ability to rotate, crop, and
set the contrast, brightness, opacity, and color of an image. When working
with Image Maps (images that may contain multiple hyperlinks defined as
hotspots), the hotspot set of tools is also available within this toolbar.
Positioning
When working with Layers, use the Positioning toolbar to set the Layer’s position from the left, top, right, and bottom of the browser. You may also decide to
set the width and height of the Layer within this toolbar, as well as the Z-Index,
or stacking order of the Layer in relation to other Layers in your Web page.
Style
Use the Style toolbar to quickly apply classes or IDs to elements of your Web
pages. You can also initiate the process of creating a new style or attaching an
existing style sheet from this toolbar. Remember, this functionality is also
offered within the Apply Styles Task Pane.
Style Application
Use features within this toolbar to set how CSS should be applied to the page.
Options include Auto (Expression Web creates a new style whenever you manipulate formatting properties) or Manual (you are responsible for manually building styles when formatting elements within your Web pages).
Tables
Offers features for working with HTML tables. Options include the ability to
draw tables, add columns and rows, split and merge cells, align content
within cells, set background colors, auto-format a table using predefined
styles, and the ability to visually switch to Layout mode.
Context Menus
Some of the most under-used features within Office applications are the context menus. Context menus
are extended features, built into the environment, that you can access by right-clicking within a specific
area in the application. The features that are offered within these menus depend on the context in which
they are accessed, hence the name context menus.
19
Chapter 1
In Expression Web, the toolbar, the Task Panes, the title heading within a Task Pane, the tag selector,
the tabbed file chooser, and rulers all have selectable options within a context menu. However, the
most dynamic context menu that you’ll find yourself using more often than not is the context menu
that appears within the development area.
As you progress through the book, the discussions will certainly cover options that are available within
the many context menus. For now, let’s do a simple cut-and-paste example using the development area’s
context menu.
You can follow along simply by first typing some text within the development area. I’ll type Hello World.
Highlight the text by selecting one end of it and dragging over to the other end. Now, right-click onto
the selected text and choose Cut from the context menu. The text disappears. Finally, right-click onto the
development area and choose Paste. The text reappears.
Summar y
As you’ve learned in this chapter, Expression Web includes a myriad of toolbars and Task Panes, and a
feature-rich and flexible Document window within its framework. While the discussion in this chapter
has briefly highlighted the features offered by these toolbars, Task Panes, and the Document window,
the overall goal of this chapter wasn’t to provide a high-level understanding, but rather a gentle introduction and a chance of simple familiarization with some of the components that you will ultimately
end up using while building your Web pages.
As the chapters progress, you’ll undoubtedly be using the development area, the Task Panes, the toolbars, the menu bar, and even the myriad of context menus quite often. For now, at the very least, you
understand the terminology, and more important, you’ll be able to identify each component within the
Expression Web framework by name.
Now that you’ve had a formal introduction to Expression Web, let’s move forward with actually building a Web page. This is exactly what you’ll get to do in Chapter 2. The Development window, the Task
Panes, the menus, and more will begin to become clear as you begin to use them next.
20