1
03 55722x ch01.qxd
1/27/04
9:23 AM
Page 3
Getting
Started
1
C H A P T E R
✦
O
n the cover of this book, we promise that even
beginners will be able to understand it. As a
beginner, you need to know some basic things right off
the bat. For example, to understand what Windows XP
is, you first have to understand what software is. And
to understand what software is, you have to first know
what hardware is. Let’s start with first things first.
✦
✦
✦
In This Chapter
Getting to know your
computer’s hardware
Getting to know your
computer’s software
Using icons
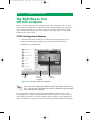
Getting to Know Your
Computer’s Hardware
Working common
controls
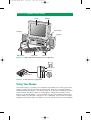
Your PC (Personal Computer) is a system consisting of
many individual components. Not everybody has exactly
the same PC or exactly the same components. But
regardless of whether you’re using a desktop computer
or a notebook, your PC will probably have most of the
components shown in Figure 1-1.
✦
Your computer probably has at least one floppy disk
drive, into which you can insert a floppy disk. You probably have a CD drive or DVD drive as well, into which
you can insert CDs and DVDs. Floppy disks, CDs, and
DVDs are often referred to as removable media, because
you can stick a disk into these drives, use the disks, and
remove them from the drives when you don’t need to
use the disks anymore.
Inside your computer is another disk drive called the
hard drive. This disk drive also goes by several other
names, including hard disk, fixed disk, primary drive, or
just C:. Your hard disk is an example of nonremovable
media, so-named because you can’t take the hard disk
out of its drive. In fact, you can’t even see the hard
drive, because it’s inside the system unit, as illustrated
in Figure 1-2.
The right way to turn
off your computer
✦
✦
✦
03 55722x ch01.qxd
1/27/04
9:23 AM
Page 4
4 Part I ✦ Beginner’s Crash Course
Screen
Monitor
System Unit
Speaker
Speaker
Microphone
Keyboard
Mouse
Figure 1-1: Major hardware components of a typical PC
Floppy drive
CD drive
Hard drive
Figure 1-2: Disk drives on a typical PC
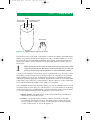
Using Your Mouse
The easiest way to operate your computer (especially if you can’t type worth
beans) is with your mouse. Most mice have two buttons; some mice have a
wheel between the buttons. The mouse button on the left is called the primary
mouse button. The mouse button on the right is called the secondary mouse
button, as shown in Figure 1-3. In a nutshell, you use the primary (left) mouse
button when you want the computer to do something. You use the secondary
(right) mouse button when you want to see your options before you do anything.
03 55722x ch01.qxd
1/27/04
9:23 AM
Page 5
Chapter 1 ✦ Getting Started
5
Wheel
Primary (left)
mouse button
Secondary (right)
mouse button
How to hold
Figure 1-3: A typical mouse and how to hold it
The idea is to rest your hand comfortably on the mouse with your index finger
lightly on (or near) the left mouse button, as is also shown in Figure 1-3. As you
move the mouse around (without holding down either of the mouse buttons),
the mouse pointer on the screen moves in the same direction that you move
the mouse.
Gotcha
When moving the mouse, keep the front of the mouse aimed toward the
screen. Don’t twist or turn the mouse. If the mouse gets out of reach, just
pick it up off the table, and set it down in a more comfortable position.
A mouse is an example of a pointing device, a gadget that lets you point to and
click things on the screen. If you’re using a notebook computer, your pointing
device might not be a mouse. It might be a touchpad or trackball. But it will
still have a primary (left) and secondary (right) mouse button. If you have difficulty using your notebook’s pointing device, the best place to look for information is the documentation that comes with your computer.
Some standard terminology describes things you can do with the mouse. You’ll
see these terms used in all sorts of instructions — not just in this book. Boring
as the terms may be, you might want to spend a little time getting to know them,
so you can understand any written instructions you come across.
✦ Mouse pointer: The little arrow on the screen that moves in whatever
direction you move the mouse.
✦ Point: To move the mouse pointer so that it’s touching some item.
For example, the phrase “point to the Start button” means move the
mouse pointer so that it’s resting on the Start button in the lower-left
corner of the screen, as shown in Figure 1-4.
03 55722x ch01.qxd
1/27/04
9:23 AM
Page 6
6 Part I ✦ Beginner’s Crash Course
Figure 1-4: Pointing to the Start button
Pointing to an item often displays its screen tip (also called a tooltip), like
the words “Click here to begin” in Figure 1-4. Whenever you’re clueless
about what some little symbol on your screen represents, point to it to see
whether it has a screen tip.
✦ Click: Point to the item and then tap (don’t hold down) the primary
(left) mouse button.
✦ Double-click: Point to the item; tap the primary (left) mouse button
twice, as quickly as you can.
✦ Right-click: Point to the item; tap the secondary (left) mouse button.
✦ Drag: Point to the item and then hold down the primary (left) mouse
button while moving the mouse.
✦ Right-drag: Point to the item and then hold down the secondary
(right) mouse button while moving the mouse.
✦ Drop: Release the mouse button after dragging or right-dragging.
Using Your Keyboard
Like the mouse, the keyboard is a means of interacting with your computer.
Most of it is laid out like a typewriter. If you already know how to type, you’re
in luck. If you don’t know how to type, I can’t help you there. But you can at
least take solace in that you need the keyboard only to type text. You can use
the mouse for everything else.
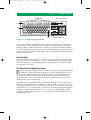
Aside from the regular typewriter keys, you need to recognize some additional
keys and areas on the keyboard. Figure 1-5 shows an example, although your
keyboard probably won’t look exactly like the one in the figure. But you should
be able to find all the keys pointed out, even if your keyboard is arranged a little
differently from the example in Figure 1-5.
Navigation Keys and Numeric Keypad
The arrow keys and keys labeled Home, End, and so forth are the navigation
keys. As you’ll discover throughout the book, you can use those keys to move
around in certain types of programs. The numeric keypad contains a set of
numbers and math symbols laid out exactly as they would be on a standard
adding machine. For people who are already quick with a standard adding
machine, the numeric keypad offers a familiar way to type lots of numeric
information into the computer.
03 55722x ch01.qxd
1/27/04
9:23 AM
Page 7
Chapter 1 ✦ Getting Started
Function keys
Esc
~
`
Tab
F1
ESC
TAB
CAPS
LOCK
SHIFT
!
1
F2
@
2
Q
F3
#
3
W
A
$
4
E
S
Z
F4
%
5
R
D
X
F5
^
6
T
F
C
&
7
Y
G
V
F6
I
J
N
F9
)
0
O
K
M
Numberic keypad
F8
(
9
*
8
U
H
B
F7
—
–
<
,
{
[
P
L
7
:
;
>
.
F10
F11
+
=
|
\
}
]
PRINT
SCRN
SCROLL
LOCK
PAUSE
INS
HOME
PAGE
UP
NUM.
LOCK
/
*
END
PAGE
DOWN
7
8
9
4
5
6
1
2
3
DEL
NUM
LOCK
CAPS
LOCK
SCROLL
LOCK
+
"
'
?
/
F12
ENTER
SHIFT
ENTER
CTRL
ALT
ALT
CTRL
Enter
0
.
Navigation keys
Figure 1-5: A sample computer keyboard
On some keyboards, the navigation keys aren’t separate; they are combined
with the keys on the numeric keypad. In that case, use the Num Lock key on
the keyboard to decide which keys you want to use. When the Num Lock key
is On, the numeric keypad acts just like an adding machine’s keypad. When the
Num Lock key is Off, the navigation keys take over, and the numeric keypad no
longer types numbers.
Function Keys
The keys labeled F1, F2, F3, and so forth on your keyboard are called function
keys. The F1 key is the Help key — you can press that key at any time for help.
The exact purposes of the remaining function keys depend on what program
you happen to be using.
The Windows and Application Keys
Some computer keyboards have a couple of extra keys specifically designed
for Windows. One, named the Windows key, shows the flying window logo
as shown at top left. If your keyboard has that key, you’ll most likely find it
between the Alt and Ctrl keys on your keyboard. If your keyboard has an
Application key, shown at bottom left, that one will likely be near one of the
Windows keys on your keyboard.
The Windows and Application keys are entirely optional, so don’t fret if your
keyboard doesn’t have them. Anything you can do with one of those keys, you
can also do with the mouse or even some other keys. For example, if you have
a Windows key on your keyboard, you can tap it to make the Start menu appear.
Whether you have a Windows key or not, you can also make the Start menu
appear by clicking the Start button or by pressing Ctrl+Esc. Which brings us to
that little plus sign. . .
03 55722x ch01.qxd
1/27/04
9:23 AM
Page 8
8 Part I ✦ Beginner’s Crash Course
Typing Those key1 + key2 Things
Often when working with computers, you’ll see an instruction to press some
combination keystroke, in the format key1+key2. When you see a combination
keystroke like that, it means “hold down key1, tap key2, and release key1.”
Here are some examples:
✦ Ctrl+Esc means “Hold down the Ctrl key, tap the Esc key, and release
the Ctrl key.”
✦ Alt+Tab means “Hold down the Alt key, tap the Tab key, and release
the Alt key.”
✦ Shift+Enter means “Hold down the Shift key, tap the Enter key, and
release the Shift key.”
✦ @winKey+D means “Hold down the Windows key, tap the D key, and
release the Windows key.”
You’ll learn about useful combination keystrokes as we go through the book.
For now, it’s sufficient to know that any time you see a plus sign (+) between
two key names, key1+key2, that means “hold down key1, tap key2, and release
key1.”
That’s about all the hardware you need to know to get started. Let’s talk about
the software next.
Getting to Know Your
Computer’s Software
Let’s say someone hands you two identical-looking video cassette tapes. You
put one tape into the VCR, press Play, and the movie Ben Hur starts playing.
You take that tape out, put in the second tape, and press Play, and the movie
Pippi Longstocking starts playing. The two cassette tapes look exactly alike. So
why does one show Ben and the other Pippi? The cassette tapes are only the
medium (hardware) on which information is stored. The movie itself is in the
software that’s recorded onto that medium.
Like a movie on a video tape, or songs on a CD, computer software is invisible.
You can’t see it or touch it, because it’s just information recorded onto some
medium. In the case of programs that are already installed on your computer,
that medium is your computer’s hard disk.
What Is Windows XP?
Windows XP is a type of software known as an operating system (abbreviated
OS). One thing that’s unique about an operating system is that it’s the only
software that a computer is required to have. If you try to start a computer
03 55722x ch01.qxd
1/27/04
9:23 AM
Page 9
Chapter 1 ✦ Getting Started
9
that has no operating system installed on it, you get nothing. If the computer
has only an operating system and nothing else, that’s fine. But it has to have
an operating system to do anything at all, even start.
The operating system is also your computer’s platform, the foundation upon
which all other programs run. To illustrate what I mean by that, you can’t go
to the store, buy any old graphics program off the shelf, and expect it to work
on your computer. It has to be a graphics program for Windows XP. A graphics
program for some other operating system, like the Mac OS, Linux, or UNIX, just
won’t work on a Windows computer. The reverse is also true. For example, to
get a graphics program for a Macintosh computer, you have to get one that
runs on the Mac OS.
Why Learn Windows XP?
Besides all that technical stuff, the operating system also determines how you
operate the computer. When you first start your computer, everything you see
on your screen is Windows XP. To use your computer, you really need to learn
how to use Windows XP.
It doesn’t matter if your long-term goal is to e-mail pictures to friends, make
your own music CDs, browse the Internet, or write the great American novel.
In order to do anything at all with your PC, you first need to learn to use
Windows XP (assuming, of course, that your computer’s operating system
is Windows XP).
Starting Windows XP
Because Windows XP is your computer’s operating system, you don’t have to
do anything special to start Windows XP. All you have to do is start the computer (also known as booting up). I imagine you already know how to do that.
But, since there is a right way, and lots of wrongs ways, to start a computer,
let’s go through the steps:
STEPS: Start Windows XP
1. Turn on any device that’s connected to the computer first (printer,
modem, monitor, scanner, whatever you have).
2. Push the eject button on the floppy disk drive, just to see whether
there’s a disk in there. If a floppy disk pops out, remove it.
3. Turn on the main power switch on the computer, and wait.
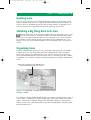
4. If you see a Welcome Screen similar to the one shown in Figure 1-6,
click whichever name or picture represents your user account. If you
don’t see the Welcome screen, don’t worry about. Just ignore this step.
03 55722x ch01.qxd
1/27/04
9:23 AM
Page 10
10 Part I ✦ Beginner’s Crash Course
Figure 1-6: The Windows XP Welcome screen
When the computer is fully booted up, you should see the Windows desktop
and taskbar. I can’t say exactly what those will look like on your computer. The
desktop is basically the entire screen and may appear as a photo, a solid color,
a pattern, or your computer manufacturer’s logo. The taskbar is the colored
strip along the bottom of the screen, as in the example shown in Figure 1-7.
Windows desktop
Start button
Figure 1-7: The Windows XP desktop
Taskbar
Notification area
03 55722x ch01.qxd
1/27/04
9:23 AM
Page 11
Chapter 1 ✦ Getting Started
Gotcha
11
If you see a message about an abnormal termination when you first start
your computer, make sure you learn the right way to shut down your computer as described near the end of this chapter. If you see a message about
an “invalid system disk,” remove any floppy disks or CDs from their drives
and then press the Enter key.
The next section briefly describes all those things pointed out in Figure 1-7.
The Start Button
Windows XP may be the only program that starts automatically when you first
turn on your computer. But it’s certainly not the only program on your system.
To start any other program, use the Start button. When you first click the Start
button, the Start menu opens. The left side of the Start menu provides access
to a few of the programs on your computer. The right side lists places (mostly
folders) you’re likely to visit often. Figure 1-8 shows an example, though yours
might not look exactly like the one in the figure.
Programs
Places
Figure 1-8: The Start menu
A menu, in the computer sense, is like a menu from a restaurant, in that it
provides a list of items for you to choose from.
The left side of the Start menu actually shows icons for only a few of the programs installed on your computer: mostly programs that you use a lot or, if
your computer is brand new, just some useful programs for beginners. As you’ll
see in a moment, you’ll use the All Programs menu to start any program that
isn’t listed down the left side of the Start menu.
03 55722x ch01.qxd
1/27/04
9:23 AM
Page 12
12 Part I ✦ Beginner’s Crash Course
The Windows Desktop
The Windows desktop gets its name from the fact that it’s roughly equivalent
to the desktop of a real desk. Your real desktop is where you do your noncomputer work. The Windows desktop is where you do your computer work. Doing
work on a computer usually means opening, and using, some program. Each
program you open sits on the desktop, like a piece of paper on a real desktop.
If you’re sitting at your computer now and want to see an example, perform the
following steps to open the Calculator program that comes with Windows XP:
STEPS: Starting Calculator
1. Click the Start button (in the lower-left corner of the screen).
2. Click the All Programs option. The All Programs menu appears.
3. In the All Programs menu, click Accessories.
4. In the Accessories menu that opens, click Calculator (Figure 1-9).
Figure 1-9: Click Start; choose All Programs ➪ Accessories ➪ Calculator
A calculator opens up on the desktop, in a window. The calculator hasn’t
replaced the desktop. It’s just sitting on top of the desktop, as a real calculator
would sit atop a real desktop.
The Taskbar
Usually, you open a program to perform a task. For example, you open
Calculator to perform a math task. If you think of each open program as a
03 55722x ch01.qxd
1/27/04
9:23 AM
Page 13
Chapter 1 ✦ Getting Started
13
task, the taskbar is the tool that lets you manage those tasks. Each program
you open has a title bar at the top, which shows the program’s icon (symbol)
and usually the name of the program as well. For each open program, you’ll find
a corresponding button on the taskbar that shows the same icon and name, as
in Figure 1-10.
Calculator's title bar
Calculator's taskbar button
Figure 1-10: Calculator on the desktop and its taskbar
button
The taskbar is especially handy when you have several open programs piled
up on the desktop at once. To bring any of those open programs to the top of
the pile, you just have to click the program’s taskbar button. You’ll learn more
about managing open program windows in Chapter 4.
You can also make an open program window disappear, and reappear, by
clicking its taskbar button.
To close an open program, click the Close (X) button (shown at left) in its
upper-right corner.
The Notification Area
The Notification Area is to the right of the taskbar. It has some weird little icons
that represent services currently running on your computer. Its name comes
from the fact that, when Windows or some other program has a suggestion
for you, a little message pops up from that area, as in the example shown in
Figure 1-11.
03 55722x ch01.qxd
1/27/04
9:23 AM
Page 14
14 Part I ✦ Beginner’s Crash Course
Figure 1-11: A sample notification message
When you see one of those notifications, you have two choices.
✦ Read the message, and, if you want to pursue what it’s offering, click
the text of the message.
✦ If you want to ignore the message, or reject what it’s offering, click
the X button inside the message.
If you don’t understand what a notification means, your best bet would be to
close it. The message will come back from time to time. You can try out whatever it’s offering after you’ve learned more. For now, that’s the gist of how some
of the items on the desktop work. You’ll be seeing, and using, all of those things
in upcoming chapters, as well as each time you use your computer.
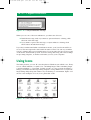
Using Icons
The little pictures you see all over the place in Windows are called icons. Every
icon is a little emblem, or symbol, for something larger. That something larger
could be anything — a program, a folder, a video, a song, a typed document —
things you’ll learn about in upcoming chapters. Using small icons to represent
larger things helps keep the clutter on your desktop to a minimum. Figure 1-12
shows some examples of icons, in no particular order.
Figure 1-12: Some sample icons in no particular order
03 55722x ch01.qxd
1/27/04
9:23 AM
Page 15
Chapter 1 ✦ Getting Started
15
Opening Icons
You can open some icons by clicking them once. But most of the time, you’ll
need to double-click an icon to open it. Remember that double-click means to
point to the icon and then tap the left mouse button twice, as quickly as you
can. If you pause too long between the clicks, the icon won’t open.
Shrinking a Big Thing Back to Its Icon
Exactly what does open depends on what the icon represents. If you open
an icon by accident, or don’t know what to do with the thing that opens,
just close it. Closing an item shrinks it to its original icon. To close, click the
Close button (shown at left) in the upper-right corner of whatever it is you
want to close. Or, if your hands happen to be on the keyboard, you can press
Alt+F4.
Organizing Icons
If you’ve already been using icons for a long time, and in fact they’re getting
pretty messy, you can easily whip them into alphabetical order. Just rightclick some empty space between any icons (but not on any icon). From the
shortcut menu that appears (shown at left), choose Arrange Icons By ➪ Name
(see Figure 1-13). The icons will be neatly arranged into (roughly) alphabetical
order.
Right-click some empty space between icons;
then choose Arrange Icons By > Name
Figure 1-13: Right-click an empty spot and choose Arrange
Icons By ➪ Name.
For example, certain built-in Windows XP icons stick to the upper-left corner of
your screen, so that they’re always in the same place. The built-in icons have
names such as My Computer, Recycle Bin, My Network Places, and Internet
Explorer. Any icons other than built-in ones will be alphabetized starting after
the last built-in icon.
03 55722x ch01.qxd
1/27/04
9:23 AM
Page 16
16 Part I ✦ Beginner’s Crash Course
Working Common Controls
Throughout your work in Windows, you’ll be presented with various controls
on the screen. A control on the screen is like a control in a car. For example,
in a car, the brake is a control you work with your foot. The steering wheel is a
control you work with your hands, as are the controls for the radio, windshield
wipers, and headlights. In Windows, the controls on your screen are things you
work with your mouse or keyboard. In this section we’ll look at some examples
of controls you’re likely to come across in Windows quite often.
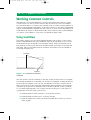
Using Scroll Bars
Scroll bars appear on your screen whenever there’s more text, or more information, than will fit in the space available. The scroll bar allows you to scroll
around and see any text that’s not currently visible. There are vertical scroll
bars that let you move up and down and horizontal scroll bars for moving left
and right. The scroll bar has buttons at either end, and a scroll box within it,
as shown in Figure 1-14.
Scroll box
Scroll bar
Figure 1-14: Horizontal and vertical
scroll bars
The size of the scroll box relative to the size of the scroll bar tells you roughly
how much information is currently out of view. For example, looking at the vertical scroll bar in Figure 1-14, you can see that the scroll box occupies about
the top 25 percent of the scroll bar. That means that currently you’re viewing
only the top 25 percent of whatever text is shown to the left of the scroll bar.
To scroll through text that’s out of view, use the scroll bar to scroll down. To
operate the scroll bar using your mouse:
✦ Click the button at the bottom to scroll down one line.
✦ Click the button at the top to scroll up one line.
✦ Click an empty area on the scroll bar, beneath the scroll box, to move
down a page.
03 55722x ch01.qxd
1/27/04
9:23 AM
Page 17
Chapter 1 ✦ Getting Started
17
✦ Click an empty area on the scroll bar above the scroll box to scroll
up a page.
✦ If your mouse has a wheel, you can click on the scroll bar; then spin
the mouse wheel to scroll up or down.
✦ Drag the scroll box to any place on the bar to go to that part of the list.
Drag means “hold down the mouse button while moving the mouse.” In a
scroll bar you want to 1) Put the mouse pointer on the scroll box, 2) Hold
down the left mouse button while dragging the scroll box along the scroll
bar; and then 3) Release the mouse button when you get to wherever you
want to go.
Working scroll bars with the mouse can be a bit more challenging, because
there might be several scroll bars on the screen at the same time. The keyboard will work only one of them. For example, to use the scroll bar in a list
box control, you first have to move the focus to that control. Anyway, here are
the keys you use to scroll around using the keyboard.
✦ ↑: Scroll down a line
✦ ↓: Scroll up a line
✦ →: Scroll right a little
✦ ←: Scroll left a little
✦ Page Down (PgDn): Scroll down a page
✦ Page Up (PgUp): Scroll up a page
✦ Home: Go to the top
✦ End: Go to the end
Hiding and Showing Details
To keep your screen from getting too cluttered, Windows often hides some
information on the screen. There are plenty of examples sprinkled throughout
Windows, and I’ll point them out as they arise. But those of you who like to
explore on your own should be aware of how these buttons work, so you can
recognize them and use them as they appear on your screen.
The button you use to show or hide information usually has some sort of
arrow on it, or < and > symbols, sometimes pointing up and down. Figure 1-15
shows some general examples of Show/Hide buttons.
The Show/Hide buttons are simple to use — just click the button. If items are
currently hidden, clicking the button will take them out of hiding. If items
are currently displayed, clicking the button will put them back into hiding.
03 55722x ch01.qxd
1/27/04
9:23 AM
Page 18
18 Part I ✦ Beginner’s Crash Course
Figure 1-15: Examples of show/hide
buttons
A similar capability exists in certain types of lists, where you can hide or show
details (list items) under a heading. Again, I’ll point out examples as they arise.
But you intrepid explorers out there should keep an eye out for these things. If
you don’t notice them, or don’t know how to use them, you’re not seeing all the
information that’s available to you. Using the + and – buttons in a list is easy:
✦ If items are currently hidden, click the + sign to expand the list.
✦ If items are currently displayed, click the – sign hide the list.
Figure 1-16 shows a general example.
Click + to see details
Details visible
Figure 1-16: Use + and – buttons in lists to show and hide details.
Using Dragging Handles
A dragging handle (sometimes called a sizing handle, or even just a handle) is a
control that allows you to move or size an item by dragging. Dragging handles
come in various shapes and sizes, but as a rule they tend to look like little nonskid areas, as in the examples shown in Figure 1-17. We’ll point out specific
examples as we go through the book. For now, when you see a little nonskid
area like one of the examples shown in the figure, know that it’s not just there
for decoration. Like everything you see on your screen, it’s a control that
serves some purpose.
03 55722x ch01.qxd
1/27/04
9:23 AM
Page 19
Chapter 1 ✦ Getting Started
19
Figure 1-17: Examples of dragging handles
About Disabled (Dimmed) Controls
As you explore your computer and start noticing controls all over the place,
you’ll probably notice that some of them appear to be dimmed, as in the examples shown in the right side if Figure 1-18. If you click one of those dimmed
controls, nothing happens. Why? Because the control is currently disabled. In
other words dimmed stands for disabled. It’s important to understand this,
especially for beginners, because they often click away madly at disabled controls, thinking the control will somehow wake up and start working, That’s not
the way it works.
Enabled
Disabled
Enabled
Disabled
Enabled
Disabled
Figure 1-18: Examples of enabled and
disabled controls
A disabled control is not indicative of something that’s broken or needs fixing.
It’s simply a control that’s not relevant at the moment. When circumstances
change such that the control becomes useful, the control will automatically
become enabled. You’ll see many examples of enabled and disabled controls
throughout this book. For now, it’s enough to know that when you see a dimmed
control, don’t bother clicking it. If it’s dimmed, it’s simply not relevant at the
moment. And no amount of clicking the disabled control will wake it up.
03 55722x ch01.qxd
1/27/04
9:23 AM
Page 20
20 Part I ✦ Beginner’s Crash Course
The Right Way to Turn
Off Your Computer
Before you get any deeper into learning about your computer, now is a good
time to learn the right way to shut down your computer when you’re ready to
call it a day. There are lots of ways to turn off a computer. But there’s really
only one right way and plenty of wrong ways. The right way is to shut down
Windows first. Here’s how:
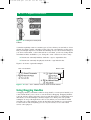
STEPS: Shutting Down Windows
1. Click the Start button and choose Turn Off Computer (Figure 1-19).
2. In the box that appears (Figure 1-19), click the Turn Off button.
3. Watch the screen and wait.
1. Click
Start
2. Click
Turn Off
Computer
3. Click
Turn Off
Figure 1-19: Shutting down your computer
Your own screen might show different options from those shown in Figure 1-19. Don’t worry about that. For now, it’s sufficient to know the right
way to turn off your computer.
Don’t expect the computer to shut down immediately. Windows has some
housekeeping to do first, and that will take a few seconds. If you see any messages asking a question, as in the example shown in Figure 1-20, waiting won’t
work. You’ll need to respond to the message before the shut down will complete.
03 55722x ch01.qxd
1/27/04
9:23 AM
Page 21
Chapter 1 ✦ Getting Started
21
Figure 1-20: Message that’s asking a question
The sample message shown in Figure 1-20 is asking whether you want to
save the document you’ve recently created or changed. For more information on saving documents, see Chapter 6.
After you’ve responded to any questions that might have appeared on the
screen, and Windows has finished its housekeeping, one of two things will happen. If you have the type of computer that Windows can shut down by itself,
the monitor will go blank, any fan noise you normally hear will stop, and the
computer will shut down. You don’t have to push any buttons to turn off the
computer.
If you have the type of computer that Windows can’t turn off by itself, you’ll
see the message It is now safe to turn off your computer on the screen. In that
case, you’ll need to turn off the computer yourself, using its main power switch.
Gotcha
On a computer that doesn’t shut down automatically, you might have to
hold the main power button in for three or four seconds before the computer shuts down. That’s to prevent the computer from being shut down
accidentally when someone just brushes up against the button.
Summary
That about wraps it up for the basic skills you need to start your computer,
use your mouse and keyboard, start programs, close programs, and turn off
your computer. The part about starting and using programs in this chapter is,
admittedly, a bit thin. There’s a lot more you can do with program windows, as
you’ll learn in Part 2. But for now, you’re off to a great start and are ready to
move to Chapter 2, where you’ll learn some more critical basic skills.
✦ Your computer hardware is the stuff that you can see and feel.
✦ The main hardware devices you use to operate the computer are the
mouse and keyboard.
✦ Your computer software is the invisible instructions that tell the
computer how to behave and what to do.
✦ All of the software in your computer is stored on your computer’s
hard disk.
✦ Windows XP is a special type of software known as an operating
system (OS).
03 55722x ch01.qxd
1/27/04
9:23 AM
Page 22
22 Part I ✦ Beginner’s Crash Course
✦ When you first start your computer, the Windows desktop will appear
on the screen, along with the Start button, taskbar, and notification
along the bottom of the screen.
✦ To start any program that’s installed on your computer, click the
Start button; then click All Programs.
✦ To close any large open object on your screen, click the Close (X)
button in its upper-right corner.
✦ To shut down Windows properly before turning off your computer,
click the Start button, and choose Turn Off Computer ➪ Turn Off.