1
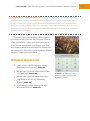
1 Windows 7 Phone Companion Chapter One D MA TE RI AL How Do I Set Up and Customize My Windows Phone 7 Device? TE In this chapter: Initial Startup and Login Screens ++ What Is the Difference Between a Hub and a Tile? ++ ++ ++ ++ Customizing the Start Screen and Tiles CO PY RI GH ++ ++ Understanding the Windows Phone 7 Start and Application Launcher Screens Configuring Basic Phone Settings Setting Up Keyboard Preferences Password Protecting Your Phone 2 Windows 7 Phone Companion M icrosoft has learned from other mobile operating systems over the past few years, and now the setup of your new Windows Phone 7 device is quick and simple. You step through a handy, self-explanatory wizard, and like magic all your email, photos, status updates, and more appear on your device within minutes. Because the user experience is vastly different on Windows Phone 7 than on previous Microsoft mobile operating systems, you need to understand some basic elements out-of-the-box so that you can start using your new device. Initial Startup and Login Screens After unboxing your Windows Phone device and connecting the charger to fully charge the battery for use, turn it on using the physical power switch. Carrier logos and startup screens may appear, but then you should see a welcome screen stating, “Let’s get started.” Let’s now walk through the initial startup: 1. At the welcome screen you should see two buttons along the bottom, one to make an emergency call and the other to get started. Don’t make an emergency call to get help setting up your device; the emergency call button is for serious emergencies only. Touch on the Get Started button to continue. 2. This next screen shows you the Windows Phone terms of use with hyperlinks to the full Terms of Use and Privacy Statement pages. Read through these if you like, but most of us never do because we pretty much know what to expect with a mobile phone. If you select the Reject option, the phone shuts down. Touch on the Accept button to continue. 3. You now have two options for setting up your Windows Phone (see Figure 1-1); either use the recommended settings or custom settings. These options actually just control the settings to send information to Microsoft to help improve its product (a fairly typical Microsoft setting on its products) and by selecting Custom you can uncheck this box. Touch on Recommended to continue setup. Chapter One: How Do I Set Up and Customize My Windows Phone 7 Device? 4. Tap your time zone if it is different than the one predicted through your carrier wireless connection. Tap Next to continue the wizard. 5. This next display is where the magic starts, and you have three options for entering your Windows Live ID (see Figure 1-2). You can sign in to an existing Live account (this includes your Xbox LIVE, Zune, Hotmail, or Messenger account, if you have one), create a new one, or select Not Now. If you choose not to sign in with or create a Windows Live ID, the device has limited functionality, which is not advised. If you purchased a Microsoft Windows Phone device, you already understand that this is a Microsoft product so there is no reason not to sign in and enjoy the full Windows Phone experience. Tap Sign In to sign in to your existing account. If you need to create a new Live ID, tap Create One and follow the couple of steps to complete this account setup. Figure 1-1 You have two available options for setting up your Windows Phone. 6. Enter your Windows Live ID (an existing one or one you just created) and password. Tap the Sign In button to continue. 7. The final display states All done. Have fun! Tap the Done button to finish the initial setup process. After following these few steps to set up and log in to your Windows Phone 7 device, you see the main Start screen while all your Windows Live information continues to sync to your new phone in the background. See Chapter 5 to set Figure 1-2 Make sure to choose Sign In or Create One for the best Windows Phone experience. 3 4 Windows 7 Phone Companion up other accounts and customize the Windows Live default account you set up during the initial startup process. Understanding the Windows Phone 7 Start and Application Launcher Screens In the past Microsoft took the Start button and Start bar experience from the desktop to the mobile device, but that association is no longer the driving force behind Start on Windows Phone 7. After completing the initial setup process, you see the main Start screen of your Windows Phone 7 device with blocks appearing on the display (see Figure 1-3). These blocks, called tiles, appear as either two across or one across the screen with a scrolling vertical design so that tiles can appear down for several screens. The Start and application launcher screens do not support landscape orientation. The number of viewable tiles on one display varies depending on the size of your Windows Phone display, but generally you can see up to four tiles high on one display. We discuss these tiles in more detail in the next sections, but they are all different with some animated and others having different colors and backgrounds. Pressing the center Start button on your Windows Phone always take you back to the top of this main Start screen, so you eventually want to place your most-used tiles at the top of the Start screen. You can slide your finger up and down on the Start screen to see all of the items on your Start screen, but if you slide your finger from right to left, you can find the other main display, the application launcher. You can also tap the right-facing arrow in the upper-right corner to go to the application launcher screen (see Figure 1-4). The application launcher screen simply shows all your applications, six hubs, and email accounts sorted in alphabetical order with small icons to the left and the name of the application/hub/email account on the right. Note that the arrow is now in the upper left and points to the left. End of the Road Animation Did you notice the animation that happens when you reach the bottom or top of the lists on the Start and application launcher screens? The icons compress slightly to let you clearly know you have reached the top or bottom of the screen. Chapter One: How Do I Set Up and Customize My Windows Phone 7 Device? Figure 1-3 Note the single and double wide tiles on the Start screen. Figure 1-4 The application launcher screen shows all your apps and accounts in alphabetical order. You cannot sort these in a different manner, organize them with folders and subfolders, or remove them from the list. The only option available to you is access by tapping and holding on one of the items to pin to Start so that you can have access to it from the main Start screen. What Is the Difference Between a Hub and a Tile? Let’s go back and look closer at the Start screen of your Windows Phone 7 device. You can notice that the Start screen is populated by several tiles by default that include tiles for utilities, apps, accounts, and hubs. You can also add tiles for specific people, Internet favorites, and more that the next section, “Customizing the Start Screen and Tiles,” discusses. Hubs appear as tiles on the Start screen but are central focal points for your Windows Phone and are doorways into a broader mix of content related to each other through the Internet, services, and applications. 5 6 Windows 7 Phone Companion The six hubs in Windows Phone 7 can all be pinned to the Start screen. Following are the hub descriptions as stated in Microsoft’s press release: ++ People: Delivers an engaging social experience by bringing together relevant content based on people, including their live feeds from social networks and photos. It also provides a central place to post updates to Facebook and Windows Live in one step. ++ Pictures: Makes it easy to share pictures and video with a social network in one step. Windows Phone 7 also brings together a user’s photos by integrating with the Web and PC, making the phone the ideal place to view a person’s entire picture and video collection. ++ Games: Delivers the first and only official Xbox LIVE experience on a phone, including Xbox LIVE games, Spotlight feed, and the capability to see a gamer’s avatar, achievements, and gamer profile. With more than 23 million active members around the world, Xbox LIVE unlocks a world of friends, games, and entertainment on Xbox 360 and now also on Windows Phone 7. ++ Music and Video: Creates an incredible media experience that brings the best of Zune, including content from a user’s PC, online music services, and even a built-in FM radio into one simple place that is all about music and video. Users can turn their media experience into a social one with Zune Social on a PC and share their media recommendations with like-minded music lovers. The playback experience is rich and easy to navigate and immerses the listener in the content. ++ Marketplace: Enables the user to easily discover and load the phone with certified applications, games, and music. ++ Office: Brings the familiar experience of the world’s leading productivity software to the Windows Phone. With access to Office, OneNote, and SharePoint Workspace all in one place, users can easily read, edit, and share documents. With the additional power of Outlook Mobile, users stay productive and up to date while on the go. Tapping one of these hubs takes you to the launch screen for that hub where you have access to services, apps, and content associated with that hub. If you tap an application tile, such as Internet Explorer Mobile, that specific application launches. You can create tiles for specific people, which Chapter One: How Do I Set Up and Customize My Windows Phone 7 Device? are detailed in Chapter 4. Tiles are also generated when you set up an email account so that you have account tiles that give you direct access to the email account. A phone tile is created and appears in the upper-left corner by default, so you can quickly make phone calls on your new smartphone. Some tiles dynamically change without any action on your part; These are known as Live Tiles. The People tile changes the faces of people as status updates appear; the calendar tile changes dates and appointments as time goes on; your email tiles pop up numbers as unread emails stack up in your inbox; and your Games tile has an active Xbox LIVE avatar entertaining you as you look at your start screen. Customizing the Start Screen and Tiles Now that you understand a bit more about what appears on your Start screen, you may be wondering if you can change any of it. Double-wide and singlewide tiles appear here. This width is controlled by Microsoft and application developers, so you cannot change a tile’s width; there are even limitations on third-party apps with double-wide tiles. Doublewide tiles are loaded be default for Pictures and Calendar information whereas single-wide tiles are the primary tile design form factor. You can add and remove apps, contacts, utilities, accounts, and more to the Start screen, you can rearrange tiles, and you can change your theme, so let’s take a closer look at each of these functions. Adding and Removing Tiles Tiles that appear on the Start screen are pinned to the Start menu. You can remove tiles and pin objects to the Start menu by simply tapping and holding on objects and selecting Pin to Start (see Figure 1-5) or tapping the Pushpin icon with the slash through it in the upper-right corner, see Figure 1-6. Figure 1-5 Note the pop-up that appears when you tap and hold on an icon. 7 8 Windows 7 Phone Companion Rearranging Tiles Unlike the alphabetical order of your application launcher screen, you do have some limited control over your Start menu tiles. To rearrange tiles, follow these steps: 1. Tap and hold on a tile. You see it pop to the front while the rest of the Start screen fades a bit into the back. A Pushpin icon with a slash through it appears in the upper-right corner. 2. To place the tile in a different location, simply hold your finger on the tile and move it around the display. Other tiles move to make room as you move the tile around so that you can see how it can fit in. 3. Tap outside the tile area (right or left) and the tile moving function turns off and takes you back to your Start screen. Figure 1-6 You can tap the crossed Pushpin icon to remove Xbox LIVE from the Start screen. Tilting placement indicators As you drag a tile around the display, the tiles underneath “tilt” up or down. If tiles tilt toward the top, your moved tile appear above the tile you are hovering over; if tiles tilt down, your moved tile will be placed on the row below the tile. As you move tiles around, you might have empty spaces adjacent to the single-width tiles, so spend some time fitting everything together so to optimize your space. Choosing a Theme You cannot add a custom background image behind the tiles or customize many other aspects of your Windows Phone, which is a bit different than what we have seen on Windows Mobile in the past. However, you can change the Chapter One: How Do I Set Up and Customize My Windows Phone 7 Device? theme, which then changes fonts throughout the platform, tile colors, signal indicator balls, and more to give you a consistent theme on the device. To change your theme, follow these steps: 1. Slide over to the application launcher page and scroll down to settings. 2. Tap Settings. 3. T ap Theme. You see options to change the background and accent color, as shown in Figure 1-7. 4. Tap Background and choose either Dark or Light. Dark make the background black whereas Light makes it white. 5. Tap the box below Accent Color; then tap a color you want to use for your theme (see Figure 1-8). The available colors for your themes change depending on the carrier and device manufacturer. Microsoft specifies that a few select basic colors must be present, but it enables carriers and manufacturers to add more colors for customers to choose from. Figure 1-7 Select from one of two background choices. Figure 1-8 Pick your favorite color for tile and accent coloring. 9 10 Windows 7 Phone Companion Configuring Basic Phone Settings Settings are sprinkled throughout your Windows Phone, you might want to customize a few basic ones as you start using your phone. These settings include turning the ringer on or off, setting display brightness, and setting up your Region and Language settings. Adjusting the Ringer Some devices have physical ring/silent switches, but on Windows Phone you simply use the volume buttons to control the ringer. It might not be as simple as a physical switch, but after you learn the process, it is quick and easy. To adjust the ringer, simply follow these steps: 1. Turn on the display by tapping the Power button. You do not need to unlock your Windows Phone device. 2. Press the volume buttons up or down. A ringer control panel slides down from the top. 3. Tap the Ring icon on the right side to switch to Vibrate mode, or tap the Vibrate icon to switch to Ringer mode. 4. To adjust the ringer volume, simply press repeatedly or hold up or down the Volume button to adjust the volume level of the ringer. Although this method is the quickest way to toggle between the ringer or vibration, you can also simply press the volume down button and hold it as the left side status goes down through the volume levels and finally ends in Vibration mode. Adjusting the Brightness Windows Phone 7 devices use various display technologies, including AMOLED (active matrix organic light emitting diode), Super AMOLED, LCD (liquid crystal display), and SLCD (Super LCD). Therefore, you may find the need to adjust the brightness setting for low light conditions or as a means to manage your battery life. To manage your brightness settings, follow these steps: 1. Turn on and unlock you Windows Phone. Chapter One: How Do I Set Up and Customize My Windows Phone 7 Device? 2. Slide over to the application launcher and tap Settings. 3. In the system settings area, tap Brightness. 4. To have Windows Phone automatically adjust the brightness, tap the right toggle switch to turn it on. 5. If you want to manage the brightness, turn the toggle switch to Off and then tap the drop-down box below Level. Select a level you want to use. 6. Press the Start button to go back to the Start screen or back arrow to access other settings. Adjusting Region and Language Settings Your device should be set up for the region in which you purchased it, but if you are traveling or want to use different date formats, you have the option to manage these settings manually. To manage your region and languages settings, follow these steps: 1. Turn on and unlock you Windows Phone. 2. Slide over to the application launcher and tap Settings. 3. In the system settings area, tap Region & Language. 4. Tap Region Format and select a language and country. 5. Tap Short Date and select a desired format. 6. Tap Long Date and select a desired format. 7. Tap First Day of the Week and select a day. 8. Tap System Locale and select a language and country. 9. Tap Browser & Search Language and select a language and country. 10. Press the Start button to go back to the Start screen or back arrow to access other settings. Setting Up Keyboard Preferences Your Windows Phone 7 device has an integrated software keyboard designed to provide you with an optimal text entry experience. Some Windows Phone 7 11 12 Windows 7 Phone Companion devices also have hardware QWERTY keyboards, but they still have software keyboards that you can use in portrait mode as well. To manage your keyboard settings, follow these steps: 1. Turn on and unlock you Windows Phone. 2. Slide over to the application launcher, and tap Settings. 3. In the system settings area, tap Keyboard. 4. You have five available options for your keyboard, assuming the English (United States) language is selected. Tap the box in front of the options you want to enable on your keyboard. These options include the following: ++ ++ ++ ++ ++ Capitalize the first letter of a sentence. Suggest text and highlight misspelled words. Correct misspelled words. Insert a period after double-spacing the spacebar. Insert a space after selecting a suggestion. 5. You can then choose to go back to adjust other settings or press the Start button to go back to the Start screen. Password Protecting Your Phone Your Windows Phone 7 device carries valuable data, so it is recommended that you password protect your phone in case it is lost or stolen. Microsoft gives you the ability to remotely wipe and even find your phone, but you still want to keep people from accessing your data in the meantime. It is easy to password protect your Windows Phone; just follow these steps: 1. Turn on and unlock your Windows Phone. 2. Slide over to the application launcher and tap Settings. 3. In the system settings area, tap Lock & Wallpaper. 4. Tap the lower-right toggle bar to enable password protection. 5. Enter a four-digit password twice in the provided boxes. 6. Tap the Done button to save the password. Chapter One: How Do I Set Up and Customize My Windows Phone 7 Device? Remember your password If you forget your password and enter it wrong five times, you need to wait at least one minute to try entering it again. If you mess it up again, the wait time extends to two minutes; then another mistake sends it to four minutes, then eight minutes, and so on. A hard reset may be the only way to wipe the device and start over, so do not forget your password. The next time your Windows Phone goes into Lock mode, you can see that you have to slide up the lock screen and enter your password to use your phone (see Figure 1-9). You also need to enter the password to disable the password lock feature on your Windows Phone, so don’t forget your password. Related Questions ++ Can I adjust specific settings for my Windows Live account? page 57 ++ Where can I find out more about Xbox LIVE gaming? page 165 ++ Where can I find out more about getting Zune music on my Windows Phone? page 69 ++ Are there any other settings for my Windows Phone? page 229 Figure 1-9 Enter your password to unlock and use your Windows Phone. 13