1
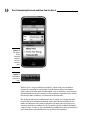
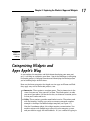
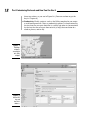
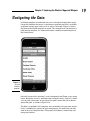
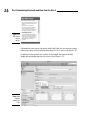
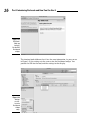
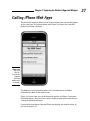
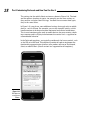
Chapter 1
RI
AL
Exploring the World of
Apps and Widgets
TE
In This Chapter
▶ Discovering Dashcode terminology
MA
▶ Getting to know apps and widgets
▶ Working with Safari Web apps
D
▶ Using iPhone Web apps
TE
F
RI
GH
rom the very beginning, the Mac has demonstrated that it doesn’t have
to hurt to use a computer. You don’t have to type some obscure command; instead, you can move a mouse to click an icon. You don’t have to
create a program with thousands of lines of obscure computer code in order
to generate a program. The folks at Apple have raised the bar higher and
higher so that building programs and using them is easier and easier.
CO
PY
And from the beginning, some people have snorted at this concept of making
computers easy to use. Talk to old-timers or read some newspaper and magazine articles from the 1980s, and you’ll understand how suspicious people
were of the mouse . . . not to mention all those pictures on the screen.
Apple and the Mac started to change all those viewpoints. Dashcode is just
the latest example of Apple’s approach to computers “for the rest of us.”
Dashcode makes it easy to build software that’s easy to use and that does
amazing things.
This chapter shows you what you can do with Dashcode and how to do it.
Developing Software for Apple Computers
Apple builds hardware — products such as the Mac itself, iPod, iPhone, and
iPad. It also builds software to make those devices work — operating systems
such as Mac OS X and iOS. (Formerly called iPhone OS, iOS is the operating
10
Part I: Introducing Dashcode and How You Can Use It
system for iPhone, iPad, and more wonders to come.) Apple also builds application programs for people to use — products such as Safari, iTunes, the
iWork suite (Numbers, Keynote, and Pages), the iLife suite (iPhoto, iMovie,
iDVD, GarageBand, and iWeb), along with applications that ship as part of
Mac OS X, such as Mail, iCal, Address Book, Preview, and utilities such as
Disk Utility, System Preferences, Terminal, and Console.
Apple encourages third-party developers to develop and distribute their own
application programs. Some are developed by large corporations such as
Adobe (Creative Suite 5, including such products as Photoshop, Illustrator,
and inDesign), Microsoft (Word, PowerPoint, and Excel), and FileMaker (which
actually is a wholly-owned but independent subsidiary of Apple). Others are
developed for in-house use by a wide variety of organizations; these applications you rarely hear about, in part because they often are part of a company’s
competitive edge. Still others are developed by individual developers for their
own use or for specific markets in which they have expertise.
All these software products — the operating systems, the Apple-built programs, and the third-party programs — are created using Apple’s robust and
powerful development environment that is built around Xcode and Interface
Builder along with powerful compilers to generate the runtime code. If you
have a Mac OS X installation disc, you find a folder of these developer tools
on it. When Mac OS X was introduced, Steve Jobs made a point of noting
that the developer tools would always be available as part of the installation
disc. The tools are an optional install, but the idea was to make it possible for
people to bring their own ideas and innovations to the Mac OS X platform.
For as long as there have been computers, the skills and knowledge needed to
develop programs have been in short supply. Various tools and strategies have
been developed to provide an alternate way of developing software that had
less of a learning curve. On the Mac, tools such as HyperCard, AppleScript, and
Automator have eased the way for people to build their own software without
needing to go through the complications of tools such as Xcode and Interface
Builder (and, before them, Macintosh Programmers Workshop —MPW).
The Web has provided a new set of tools to create sophisticated Web pages
that can function very much the way application programs do. The design
skills for the developer are much the same whether you’re writing for a Webbased application or for one based on a personal computer or other device,
but the languages are different, and learning how to use them is often easier
in the Web environment.
As with so many things, a tradeoff is involved. Traditional applications may
be harder to build, but they can be more powerful than their Web-based
counterparts. One important consideration is that traditional applications
can access specific hardware features of a computer. Web-based applications
run within a Web browser, and it’s the browser (not the Web-based application) that accesses the computer’s hardware.
Chapter 1: Exploring the World of Apps and Widgets
Apple has found a way to provide access to specific hardware features
through its Safari Web browser and to make that access available to people
who develop Web pages. On Safari, a Web page can initiate a phone call on an
iPhone; the same page when run in a browser on a Mac properly skips over
the phone call code because a Mac can’t make a phone call. The same Web
page, when run in a browser such as Firefox, can also work properly: Apple’s
extensions to industry-standard Web pages are designed not to break in
other browsers.
The variety of tools and development opportunities has led Apple to focus on
three development platforms:
✓ Mac OS X for Macintosh computers: This environment is centered on
Objective-C and the Cocoa development framework.
✓ iOS for mobile devices, such as iPod touch, iPhone, and iPad: This
environment also uses Objective-C along with a customized development environment that handles mobile issues as well as interfaces that
may not have traditional menus or resizable windows.
✓ HTML 5 for Safari on Macs, iPads, and iPhone as well as Dashboard
on Mac OS X: This environment also includes JavaScript and Cascading
Style Sheets (CSS). Unlike Mac OS X and iOS, these technologies are not
proprietary, although some Mac-specific code in Safari is proprietary.
The Dashboard environment on Mac OS X also fits into this category
because of its use of HTML 5, JavaScript, and CSS as well as the absence
of a compiler.
Introducing Dashcode
The goal of the developer group at Apple was to make as much as possible of
the functionality of all the Apple devices available on each of these platforms.
Xcode and Interface Builder are the pair of development tools for the first
two platforms; Dashcode is the tool for the Third Platform.
“HTML for Safari on Macs, iPads and iPhone as well as Dashboard on Mac
OS X” is a bit of a mouthful. As described at Apple’s Worldwide Developers
Conference in June 2010, Mac OS X, iOS, and HTML 5 constitute Apple’s software strategy. To avoid that long description, I refer to the Third Platform
when talking about “HTML for Safari on Macs, iPads and iPhone as well as
Dashboard on Mac OS X.”
Sure, you can write HTML, CSS, and JavaScript code with any text editor or with
a variety of graphical user interface-based editors, but Dashcode is specifically
designed to develop Web applications for Safari on mobile devices such as iPhone
as well as the Mac itself and iPad. (iPad is definitely a mobile device, but in part
because of its size, it fits into the category of Safari for a Mac laptop or desktop.)
11
12
Part I: Introducing Dashcode and How You Can Use It
Maybe it’s because learning how to use the development tools for Mac OS X and
iOS is a major project or maybe it’s because developing on those platforms takes
more time and effort, Dashcode and the Third Platform sometimes get skipped
over. No more. This book is your guide to developing for the Third Platform.
By relying on open standards (such as CSS and JavaScript), Dashcode makes
the development process for the Third Platform as fast and easy as possible.
JavaScript code appears deep inside your Dashcode project templates, but
you may never see it. And when you do see this code, you’re likely to look at
it only to make modifications.
Inspectors make it easy to inspect and change interface elements — their
color and size, their behavior, and their interaction with data. A library of
reusable interface parts and code snippets further insulates you from the
process of starting from a blank piece of paper or an empty file and having to
write code from scratch.
Because Dashcode makes it possible to develop very powerful user interfaces, you have the time to think about how you’ll interact with the users of
your apps and widgets.
The rest of this chapter introduces you to the types of software you can
develop with Dashcode for the Third Platform. The examples here are built
on Dashcode templates, which means you can build them yourself. In the rest
of the book, you find more details on the process and additional features you
can add for yourself. In this chapter, the emphasis is on out-of-the-box functionality with minimal customization.
Talking the Dashcode Talk
Here’s a brief summary of the terms that you need to know to talk about
Dashcode:
✓ You use Dashcode to build projects. These projects can be Dashboard
widgets or Web applications for Safari on a Mac or a mobile device. You
see examples of widgets and apps throughout this chapter.
✓ Dashcode includes templates for projects. You choose a template and
the specific type of project you want to build and Dashcode builds the
code. Sometimes you need to customize that template, but other times,
the code is complete just by using the template.
✓ Dashcode has a Library of reusable interface parts and code snippets.
You can use this Library to build and customize your projects.
✓ Dashcode includes simulators. The simulators let you run your projects
as if they were running in Safari (on a personal computer or on a mobile
device) or in Dashboard.
Chapter 1: Exploring the World of Apps and Widgets
✓ The end result of a project is a product, which can be a widget or an
app. You can deploy a completed project with Dashcode to Dashboard
or to a Web site (including a MobileMe site); you can also save a
Dashcode project to disk so that you can send it to people or post it on
a Web site for further deployment and distribution.
Visiting a Small World:
Apps and Widgets
Compared to traditional software programs, apps and widgets are smaller.
They’re often physically smaller, and their scope is smaller because they
tend to focus on one thing. This section shows you some Dashcode projects
built from the included templates that demonstrate the point. I also show you
some features that Dashcode lets you build into your apps and widgets.
Figure 1-1 shows the Dashcode Utility template built for Safari on a Mac.
Figure 1-1:
The Utility
template
lets you
build a
small word
processor in
Safari.
You can change fonts and apply styles, such as underlining or bold. Figure
1-1 also helps demonstrate the difference between Dashcode projects and
traditional applications. The Utility template does one thing (word processing) with a number of features, but it’s not a substitute for Word or Pages.
You can’t easily add an image, for example, and you won’t find commands
to place headers and footers. And search though you might, you won’t find a
Save button or Save command. What you type is automatically saved.
You can target the same Utility template for mobile Safari on iPhone (see Figure
1-2). In this figure, the Dashcode project is running in the iPhone simulator.
The code is different for the two versions of the app, but it uses similar features. In each case, the template uses appropriate interface elements. For
example, the options in Figure 1-3 let you select fonts and sizes.
13
14
Part I: Introducing Dashcode and How You Can Use It
Figure 1-2:
Build the
template
for mobile
Safari.
If you click one of the pop-up menus in the simulator or tap one of them
on your iPhone, the typical iPhone interface element, shown in Figure 1-4,
appears. You don’t have to do anything special.
Figure 1-5 shows a Dashboard widget built from the Countdown template. It
provides a countdown (or countup) clock.
This example shows a project template that may need some customization to
work. You can see how far Dashcode is from the complicated programming
techniques of old.
The template can count down from a specific date and time to zero; alternatively, it can count up from that given date and time. In version 3.0 of
Dashcode, the specific date is 4/1/2010, and the time is 4 a.m. The default is
to count down to zero, and so the clock won’t run because that date is in the
past. To make it work, you can either change the date to a date and time in the
future, or you can use the option to count up from the specific date and time.
Chapter 1: Exploring the World of Apps and Widgets
Figure 1-3:
Select fonts
and font
sizes.
Figure 1-6 shows how you make such a change. This layout has a lot of settings, but all you need to do is either change the date and time or choose to
count up.
The Countdown template is yet another example of how you can focus
Dashcode projects; it isn’t a stopwatch. Instead, this example is a countdown/countup clock for a specific date and time. Simple and focused.
Utility and Countdown are just two of the built-in templates. What you might
want to take away from them are the following aspects of Dashcode projects:
✓ Projects focus on a goal.
✓ Traditional menu bars are nowhere to be found.
✓ The windows aren’t resizable, and there are no scroll bars.
✓ It’s easy to build these projects.
15
16
Part I: Introducing Dashcode and How You Can Use It
Figure 1-4:
The appropriate
interface
elements
are automatically
used.
Figure 1-5:
Count down
or up from a
time.
When I say it’s easy to build these projects, I mean that you can make a
change to a template to see whether it might work in only a few minutes.
Even if you have to do some customization, such as entering a start date for
the countdown timer your changes to the templates can often be fast. And if
the changes don’t work out, just move on to the next idea.
Not all Dashcode project modifications are as simple as changing the start
or end time for a countdown/countup clock. Some of the examples in this
book can take quite some time to complete, but once you’ve got the basic
structure of an app or widget set up, the tweaks can be accomplished quite
simply. In fact, as soon as you can think of a modification, you may be able to
put it into place if you already have set up one of the templates.
Chapter 1: Exploring the World of Apps and Widgets
Figure 1-6:
Modify the
settings.
Categorizing Widgets and
Apps Apple’s Way
As you explore the templates and think about developing your own projects, it can help to categorize your ideas. One of the challenges in designing
Dashcode projects is keeping them focused. Identifying the kind of project
you’re building helps with the focus.
Here are the three categories that Apple uses for apps on iPhone and iPad:
they apply very well to Dashcode projects, too:
✓ Immersive: These projects are often games. They’re immersive in the
sense that you can “lose yourself” in them. The whole point is to take
you out of your office, the line for the bus, or whatever situation you’re
in that you’d rather not be in.
✓ Utility: These projects provide some kind of service. They often work
with the Internet. A utility app can be a currency converter; another
example is the Maps Dashboard widget template (see Figure 1-7).
Like the Countdown widget, this widget requires customization. You
need to register with Google to get a key to use the mapping system,
and you need to supply the initial address. It’s just a matter of typing in
17
18
Part I: Introducing Dashcode and How You Can Use It
those two values, as you see in Figure 1-8. (You can see how to get the
key in “Chapter 8.)
✓ Productivity: Finally, projects such as the Utility template let you create
a small word processor. Often, a productivity project is characterized by
the fact that the user puts data into it; a utility app often is characterized
by the fact that the user gets data out of it (a map, the translation of a
word or phrase, and so on).
Figure 1-7:
The Maps
widget is
an example
of a utility
widget.
Figure 1-8:
Set the API
key and
the initial
address.
Chapter 1: Exploring the World of Apps and Widgets
Navigating the Data
Dashcode templates provide tools for users to navigate through data easily.
One of the handiest constructs is the browser interface tool that is available
on iPhone in many apps built on iOS as well as Dashcode. Figure 1-9 shows
the Browser Dashcode template in action. This example uses the data that is
built into the template: It is information about a number of national parks in
the United States.
Figure 1-9:
Use the
Browser
template.
Precisely because this interface is used so frequently on iPhone, users recognize it, know how to use it, and know what to expect from it. Figure 1-9 shows
a list of parks; the arrows at the right of the park’s name take you to details
about that park, as shown in Figure 1-10.
The data is provided in this template; you can modify it for your own project.
In fact, to modify this project for your own purpose, the only thing you may
need to do is to change the data. The project itself doesn’t contain any text
except for the data.
19
20
Part I: Introducing Dashcode and How You Can Use It
Figure 1-10:
Details are
provided for
each item.
Dashcode can use data that is included in the project as the National Park
data is, but it can also use data that it accesses at runtime from a location on
the Internet. In either case, the data needs to be in a standard format — JSON
(JavaScript Object Notation) or XML (eXtensible Markup Language). You can
find examples of the data files in Chapter 12.
Understanding the Structure
of Apps and Widgets
You can work with Dashcode without knowing the details of how it does what
it does. (In fact, that’s true of most hardware and software.) How deeply you
get into the structure of Dashcode is up to you. This section provides a highlevel structural view; you find details throughout the book. And if you just
want to focus on what you can do with Dashcode, feel free to do so.
Dashcode projects consist of code that is contained within the templates. You
create a new Dashcode project by selecting a template. You can add your own
Chapter 1: Exploring the World of Apps and Widgets
code to the project to augment the template’s code, but, most often, you customize with specific information on forms (refer to Figures 1-6 and 1-8).
Sometimes, you need to enter information into the code that Dashcode has
generated; in those cases, clear comments tell you what to do. For example,
Figure 1-11 shows you code that you can drag from the Library into your project. It lets you enable a specific button.
A comment directs you to change elementID to the name of the button you
want to enable. Although Figure 1-11 may not be shown in color, Dashcode
helps you further by placing elementID in purple. It’s hard to make a mistake.
Your Dashcode project consists of a number of separate files; most are written in JavaScript. (See Appendix A for more information on JavaScript.”)
Other files are CSS files and PNG files that contain graphics for the projects.
These file types are used extensively across the Web, so if you want to learn
more about them, you can find many resources online and in libraries and
bookstores. Remember, though, that you will probably not find the need to
go into these files much of the time. And if you do, you can find help in the
form of comments in the sections you may need to customize.
You may see a number of other file types in your project, such as property
lists (plist), and localization folders (lproj). The only thing you must know
about the files and folders inside your project is that you shouldn’t move or
rename them. Dashcode relies on their having certain names and locations.
Some people think that because the files are visible and editable as well as
because they use standard Web formats, you can go into them and modify
them at will (see Part II). Look but don’t touch.
Figure 1-11:
Customize
the code for
your own
project.
Dashing through Dashboard Widgets
Dashboard widgets can be immersive, utility, or productivity. They can be
particularly effective at displaying data from live data sources. Navigating
21
22
Part I: Introducing Dashcode and How You Can Use It
through data is useful, but widgets shine at presenting changing data to you
in a way in which you don’t have to navigate to find what you want. Podcasts,
video podcasts, and RSS feeds all fit the bill: They’re changing data, and the
widget or app just needs to go out to an address that you specify once to find
the latest and greatest information.
Figure 1-12 shows the Daily Feed Dashboard widget template in action. It
shows the latest posting from the feed.
Figure 1-12:
Daily Feed
shows the
latest item
from an RSS
feed.
You can use the Daily Feed template almost with no changes in the template.
All you have to do is to supply the address of the RSS feed, as shown in
Figure 1-13.
Figure 1-13:
Customize
Daily Feed
with the URL
of an RSS
feed.
Chapter 1: Exploring the World of Apps and Widgets
At the bottom of Figure 1-13, you can see a section called Localization. This
section supports the ability to customize the interface automatically for various languages. Note that the languages supported are more than just languages: They include dialects and variants, such as UK and U.S. versions of
English. The actual languages that are supported for your widget or app are
up to you (some topics rely on specific languages), and you must provide the
translations. The localization section at the bottom of Figure 1-13 illustrates the
basic idea: You specify words and phrases used in your interface, and you then
provide translations of them for specific languages. You can find more on localization in Chapter 16, where you see how to implement localization.
Apps or widgets that present RSS feeds are a great way to provide languagespecific information to your users. If you subscribe to a feed that is in French,
then — voilà — you have a French app or widget. The only thing that isn’t
in French is any text that is in the widget itself, and that’s where localization
comes in. Many apps and widgets have no text in their interface other than
content: Plenty of icons and buttons in the Library provide functionality without the use of text. But if you do need text, consider localizing it.
Dashboard widgets have a front and a back. The front presents the main
information, and the back presents credits, options, and other related information. You flip the widget from front to back by clicking the i button. In
Figure 1-12, this button is in the upper right corner of the widget. This button
normally appears when you hover the mouse over the widget, and it’s typically in one of the four corners of the widget. The behavior to flip the widget
(complete with an animation of the flip) is built into your Dashcode project.
When you want to flip back to the front, a Done button does the trick, as you
can see in Figure 1-14.
RSS feeds are so useful because after you set them up, the feed you’re presenting
does all the work. That’s one of the reasons why Dashcode has several RSS feed
templates. Daily Feed shows the latest item from a given Feed. The RSS template
takes another approach: For a given feed, it shows you the latest stories rather
than just the most recent one. Figure 1-15 shows the RSS template in action.
Figure 1-14:
Flip back
to the front
with Done.
23
24
Part I: Introducing Dashcode and How You Can Use It
Figure 1-15:
RSS shows
several
stories.
Dashcode lets you specify the feed as with Daily Feed, but you also can specify
how many stories to show and the date range to use, as you see in Figure 1-16.
In addition to the options you specify in the widget, the back of the RSS
widget has an option that the user can set (see Figure 1-17).
Figure 1-16:
Specify
options for
RSS.
Chapter 1: Exploring the World of Apps and Widgets
Figure 1-17:
Users set
options on
the back of
Dashboard
widgets.
Trekking with Safari Web Apps
Safari is available on Mac OS X, Windows, and the iOS devices. Safari is compliant with the standards for the Web, including HTML 5, which is the latest version
of the basic Web programming language. HTML has a number of major additions
that Safari supports, along with many other browsers. Safari also has some additional features that come into play when it is running on iPhone or iPad.
The two most important aspects of HTML 5 that matter to you are its ability to
handle embedded media well and the ability to store data on the user’s computer. The ability to handle embedded media well can be a complicated and
contentious issue, but its basic consequence is that Flash isn’t needed in many
cases and, in fact, isn’t supported on devices, such as iPhone and iPad. If you
get too deeply into the issue, you may find yourself dealing with a lot of personal
theories. Steve Jobs has posted a note about Flash (www.apple.com/hotnews/thoughts-on-flash) that provides some information. In a nutshell, his
point is that there are some security issues, on mobile devices Flash uses a lot of
battery power, and there are some performance issues. Agree or not, HTML 5 is
where Apple and much of the industry are heading. It’s fully supported in Safari.
The fact that HTML 5 allows users to store data through their browser means
that your Dashcode apps for Safari (on mobile or other devices) have a way
to store data through HTML 5 and without going through some database or
file structure. In fact, it’s Safari’s implementation of HTML 5 that interacts
with the file system or a database. It doesn’t matter from your point of view:
All you care about is that you don’t have to do it in your Safari Web app.
The Utility template (refer to Figure 1-1) runs in Safari and uses the HTML 5
data storage features. Figure 1-18 provides a look at another Safari Web app:
It’s the RSS Web app that re-implements the RSS Dashboard widget in Safari.
Figure 1-18 shows the RSS Safari template running in the simulator.
25
26
Part I: Introducing Dashcode and How You Can Use It
Figure 1-18:
RSS Safari
Web app
behaves
like the RSS
Dashboard
widget.
The interface looks different, but it has the same information. As you can see
in Figure 1-19, the settings are the same as for the Dashboard widget. You
provide the URL for the feed, and the settings for the display.
Figure 1-19:
Settings
are similar to the
Dashboard
widget
setup.
Chapter 1: Exploring the World of Apps and Widgets
Calling iPhone Web Apps
The Safari RSS template allows you to build a mobile Safari version for iPhone
at the same time. So, without further ado, Figure 1-20 shows the same RSS
feed on the iPhone simulator.
Figure 1-20:
The same
RSS settings let you
produce
an iPhone
product with
Dashcode.
The difference in the interface reflects the size and features of iPhone:
Dashcode has done all the work for you.
Figure 1-21 shows how you can drill down to articles on iPhone. One reason
for drilling down is that you have a much smaller screen to deal with than on
a laptop or desktop computer.
If you want to read more, Safari on iPhone can display the original article, as
you see in Figure 1-21.
27
28
Part I: Introducing Dashcode and How You Can Use It
The settings for the mobile Safari version are shown in Figure 1-22. The feed
and the options (number of stories, for example) are the same settings as
they were for a regular Safari Web app. You don’t have to enter them again;
they’re the same values.
In Figure 1-23, you do see some additional settings that apply only to mobile
devices, such as iPhone. For example, you see the viewport settings, which
handle rotation of the device between horizontal and vertical orientations.
The issue of rotation applies only to mobile devices because rotating a desktop computer and its display from horizontal to vertical isn’t a supported or
recommended behavior.
In the Dashcode templates, you typically provide only the bare essentials, such
as the URL of an RSS feed. The templates provide the code to implement the
functionality appropriate for whatever your product will run on: Dashboard,
Safari, or mobile Safari. (Not all versions are supported for all templates.)
Figure 1-21:
Drill down to
an article on
iPhone.
Chapter 1: Exploring the World of Apps and Widgets
Figure 1-22:
You can see
the original
article in
Safari on
iPhone.
Figure 1-23:
Specific
iPhone
settings
handle the
rotation of
the device
between
horizontal
and vertical
orientations.
29
30
Part I: Introducing Dashcode and How You Can Use It