1
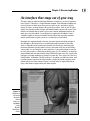
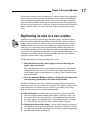
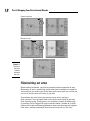
Chapter 1
AL
Discovering Blender
▶ Figuring out what Blender is and what it’s used for
RI
In This Chapter
▶ Understanding how the current version of Blender is influenced by its past
MA
TE
▶ Getting familiar with the Blender interface
I
GH
TE
D
n the world of 3D modeling and animation software, programs are usually expensive — like, thousands-of-dollars-and-maybe-an-arm expensive.
And there are some valid reasons for that cost. Software companies spend
millions of dollars and countless hours developing these programs. And the
large production companies that buy these programs for their staff make
enough money to afford the high cost, or they hire programmers and write
their own in-house software.
CO
PY
RI
But what about you and me, the little guys? We are the ambitious dreamers
with big ideas, high motivation . . . and tight budgets. How can we bring our
ideas to life and our stories to screen, even if only on our own computer monitors? Granted, we could shell out the cash (and hopefully keep our arms)
for the expensive programs that the pros use. But even then, animation is a
highly collaborative art, and it’s difficult to produce anything in a reasonable
amount of time without some help.
We need quality software and a strong community to work, grow, and evolve
with. Fortunately, Blender can provide us with both of these things. This
chapter is an introduction to Blender, its background, and its interface.
Getting to Know Blender
Blender is a free and open source 3D modeling and animation suite. Yikes!
What a mouthful, huh? Put simply, Blender is a computer graphics program
that allows you to produce high-quality still images and animations using
three-dimensional geometry. If you’ve seen an animated feature film or
watched a television show where they go behind the scenes and explain how
they made an actor look like he’s being chased by a giant monster although
10
Part I: Wrapping Your Brain Around Blender
he’s really just standing in a big green room, you’ve seen what can be done
with 3D computer graphics. In the right hands, Blender is capable of producing this kind of work. With a little patience and dedication, your hands can be
the right hands.
One thing that makes Blender different and special compared to other comparable 3D software is the fact that it is free and open source. Being free and
open source means that not only can you go to the Blender Web site (www.
blender.org) and download the entire program right now without paying
anything, but you can also freely download the source, or the code that makes
up the program. For most programs, the source code is a heavily guarded and
highly protected secret that only certain people (mostly programmers hired
by the company that distributes the program) can see and modify. Because
it’s open source, anybody can see Blender’s source code and make changes
to it. The benefit is that instead of having a small group of paid programmers
work on the program, Blender can be improved by programmers all over the
world!
Because of these strengths, Blender is an ideal program for small animation
companies, freelance 3D artists, independent filmmakers, students beginning
to learn about 3D computer graphics, and dedicated computer graphics
hobbyists.
Blender, like many other 3D computer graphics applications, has had a
reputation for being difficult for new users to understand. At the same time,
however, Blender is also known for allowing experienced users to bring their
ideas to life quickly. Fortunately, with the help of this book and the recent
improvements introduced in the latest version of Blender, that gap is becoming much easier to bridge.
Discovering Blender’s Beginnings
The Blender you know and love today wasn’t always free and open source.
Blender is pretty unique in that it’s one of the few software applications that
was “liberated” from proprietary control with the help of its user community.
Originally, Blender was an internal production tool for an award-winning
Dutch animation company called NeoGeo, founded in the late 1990s by
Blender’s original (and still lead) developer, Ton Roosendaal. As interest in
Blender grew, Ton spun off a new company, Not a Number (NaN), to market
and sell Blender. Sadly, NaN was forced to shut its doors in 2002, despite
Blender’s growing popularity. Ironically, this is where the story starts to get
exciting.
Chapter 1: Discovering Blender
Even though NaN went under, Blender had developed quite a strong community, which was eager to find a way to keep its beloved little program from
becoming lost and abandoned. In July 2002, Ton established a nonprofit organization called the Blender Foundation and arranged a deal with the original
NaN investors to release Blender’s source to the Blender Foundation. The
price tag was set at €100,000 (which at the time was about $100,000),. Initial
estimations were that it would take as long as six months to one year to raise
the necessary funds. Amazingly, the community was able to raise that money
in a mere seven weeks.
Because of the Blender community’s passion and willingness to put its
money where its metaphorical mouth was, Blender was released under the
GNU General Public License on October 13, 2002. With the source in the community’s hands, Blender had an avalanche of development and new features
added to it in a very short time. Eight years later, the Blender community
is larger and stronger than ever, and Blender is a powerful modern piece of
software, competitive in terms of quality with similar software costing thousands of dollars. Not too shabby. Figure 1-1 shows screenshots of Blender
from its early days to the Blender of today.
Figure 1-1:
Blender
through
the years:
Blender 1.8
(top left),
Blender
2.46 (top
right), and
the major
changes
apparent in
the Blender
of today
(bottom).
11
12
Part I: Wrapping Your Brain Around Blender
Making Open Movies and Games
One cool thing about the programmers who write Blender is that many of
them also use the program regularly. They’re writing code not just because
they’re told to do it, but also because they want to improve Blender for their
own purposes. Part of this motivation has to do with Blender’s open-source
nature, but it also has to do with Blender’s history as an in-house tool built
on direct artist input and sometimes written by the artists themselves.
Seeking to get even more of this direct artist feedback to developers, the
Blender Foundation launched Project Orange in 2005. The project’s purpose
was to create an animated short movie using open-source tools, primarily Blender. A small team of artists was assembled in Amsterdam, in the
Netherlands, and roughly seven months later, Elephants Dream premiered
and was released as the first open movie, meaning that not only was it created by using open-source tools, but all the production files — 3D models,
scenes, character rigs, and so on — were also released under a permissive
and open Creative Commons Attribution license. If you don’t like Elephants
Dream, you’re free to change it to your liking or use the files for something
else entirely! How many movies give you that luxury? You can see the film
and all the production files at www.elephantsdream.org.
Due to the success of Orange, the Blender Institute was established in 2007
for the expressed purpose of having a permanent space to create open projects, as well as provide the service of training people in Blender. The first
open project from the Blender Institute was Project Peach, which, following the model of Orange, assembled a team of artists who produced a short
comedic animation called Big Buck Bunny. Like Elephants Dream, all production files for the Peach project were released under an open license. You can
access them at www.bigbuckbunny.org.
Not being inclined to rest on its laurels, the Blender Institute launched
Project Apricot as the team creating Big Buck Bunny was wrapping up its
production. Apricot was a project similar to Orange and Peach, but rather
than create an animated movie, the goal here was to create a video game.
The result of this was Yo Frankie!, a game based on Frankie, the leader squirrel character from the Big Buck Bunny project. And, of course, all the content
is freely available at the Yo Frankie Web site, www.yofrankie.org, under a
permissive Creative Commons license.
With the completion of each project, the functionality and stability of Blender
increased by a large degree. Orange brought improved animation tools, basic
hair, and a node-based compositor. Peach provided enhanced particles for
better hair and fur, optimizations for large scenes, improved rendering, and
even better animation and rigging tools. Apricot revitalized Blender’s internal
game engine, which extended to better real-time visuals when modeling and
animating in Blender.
Chapter 1: Discovering Blender
And even as I wrote parts of this second edition of Blender For Dummies,
artists at the Blender Institute were finishing up the latest open project,
Project Durian. (A durian is a smelly Asian fruit with an exotic taste.) Durian
is another short movie project, named Sintel, with the lofty goals of making
Blender 2.5 production ready and adding features for epic scenes, including
highly detailed sculpting, large environments, and highly detailed, high-resolution renders. You can see the film and access all the Durian project files at
www.sintel.org. I’ve also included a copy of Sintel on the book’s companion DVD, and the color insert of this book has still images from a few of the
open movie projects.
All these projects continue to exhibit the strength of the Blender community.
Each of them are financed in a large part by DVD presales from users who
understand that regardless of the project’s final product, great improvements
to Blender are the result, and everyone benefits from that.
Getting to Know the Interface
Probably one of the most daunting aspects of Blender for newcomers and
longtime 3D professionals alike has been its unique and somewhat peculiar
interface. It’s arguably the most controversial feature Blender has. In fact, at
one time, merely calling the interface a feature would raise the blood pressure of some of you who tried using Blender in the past, but gave up in frustration when it did not behave as expected.
Although the interface wasn’t the primary focus, the interface updates to
Blender added in the 2.5 series of releases have made great strides toward
alleviating that frustration. As a small example, when you first launch
Blender, the splash image that appears is more functional now, providing you
with quick links to online documentation as well as a list of recently opened
files. Figure 1-2 shows the splash image you’re presented with when you start
Blender for the first time.
If you click anywhere other than the links provided by the splash image, the
splash image goes away, and you’re greeted with Blender’s default scene, as
shown in Figure 1-3. If you’re looking at the interface for the first time, you
may think it appears pretty daunting. However, the purpose of this book is to
help you get the hang of Blender, explaining some of the design decisions in
the interface and ultimately allowing you to be productive. Who knows, you
might even start to like it and wonder why other programs don’t work this way!
13
14
Part I: Wrapping Your Brain Around Blender
Figure 1-2:
The
new and
improved
Blender
splash
image.
Figure 1-3:
The default
Blender
interface.
Chapter 1: Discovering Blender
An interface that stays out of your way
The first thing to understand about Blender’s interface is its basic organization. Figure 1-3 displays a single Blender window. Each Blender window can
consist of one or more areas that you can split, resize, and join at will. In
nearly all cases, an area defines the space of an editor, such as the 3D View,
where you actually make changes and modifications to your 3D scene. Each
editor can include one or more regions that contain additional features or
tools for using that editor. An example of a region that all editors have is
a header region at the top or bottom of the editor that typically includes
menus and buttons to give you access to features in that editor.
Knowing this organizational structure, the next important thing to know is
that Blender is designed to be as nonblocking and nonmodal as possible.
Areas in Blender never overlap one another (nonblocking) and using one
feature of Blender typically won’t restrict you from using any of the others
(nonmodal). As an example, in most software, if you want to open a new file
or save your project, a file browser dialog pops up. This dialog is an overlapping window that not only blocks things behind it from view, but usually also
prevents you from making any changes to your file. This setup isn’t the case
with Blender. In Blender, the file browser is an editor just like any other, and
it makes perfect sense to be able to make a couple of tweaks to your scene
before hitting the Save button. Figure 1-4 shows what it might look like to
have a file browser open while you make tweaks.
Figure 1-4:
Doing those
last couple
of tweaks
before
finally saving (Model
credit:
Blender
Foundation,
Sintel).
15
16
Part I: Wrapping Your Brain Around Blender
At first, working in a nonblocking, nonmodal interface may seem to be really
restrictive. How do you see different types of editors? Can you see them at the
same time? Everything looks like it’s nailed in place, so is it even possible to
change anything? Fortunately, all these things are possible, and you get the
benefit of never having your view of one area obstructed by another. Having
an unobstructed workspace is a great way to be able to see at a glance what’s
going on in your file. Furthermore, as of the Blender 2.5 development series, if
you absolutely need multiple windows that can overlap, you can have them.
For example, you might have two computer monitors that are different sizes,
and you’d like a full-sized Blender window in each. I show you how to do task
later in this chapter in the “Duplicating an area to a new window” section.
Resizing an area
You can modify and change all the areas in a Blender window in the same
way: Change the size of an area by left-clicking the border between two areas
and dragging it to a new position. This method increases the size of one area
while reducing the size of those that adjoin it. If you have only one area in
your Blender window, it’s exactly the same size as that window. To resize it,
you need to either adjust the size of its parent Blender window or split a new
area into that space.
Splitting and removing areas
While working in Blender, it’s pretty common that the default layout isn’t quite
what you need to work efficiently. Sometimes you may need an additional 3D
View, or you may want to see the UV/Image Editor in addition to the 3D View.
To create either of these layout changes, you need to split an existing area
into two. Splitting a new area doesn’t work like it used to in previous versions
of Blender. In earlier versions, you’d split or join areas by right-clicking the
border and choosing an option from a pop-up menu. As of Blender 2.5, a new
system uses the corners at the bottom left and top right of any area. These
corner widgets are marked as a triangular region indicated by diagonal lines.
To split any area into two, use the following steps:
1. Left-click one of the corner widgets and drag your mouse cursor away
from the area’s border.
2. Drag your mouse cursor left or right to split the area vertically.
Dragging it up or down splits the area horizontally. As you drag your
mouse, the areas update in real time so that you can see the result of
the split while you’re working. To cancel the operation, right-click or
press Esc.
Chapter 1: Discovering Blender
If you want to remove an area, the process is similar. Rather than splitting an
area in two, you’re joining two areas together. So instead of left-clicking the
corner widget and dragging your mouse cursor away from the area border,
drag it toward the border of the area you want to join with. This action darkens the area your mouse is in and draws an arrow to indicate which area you
want to remove. Figure 1-5 shows the basic steps for splitting and joining
areas.
Duplicating an area to a new window
In addition to the new way of splitting and joining areas, the Blender developers have also introduced a brand-new feature in the 2.5 series via corner
widgets. You now have the ability to take any area and duplicate it to a new
Blender window. You can move that window to a separate monitor (if you
have one), or it can overlap your original Blender window. And within this
new Blender window, you can split the duplicated area into additional ones
as you like. This area duplication feature is a slight violation of Blender’s nonoverlapping principles, but the benefits it provides for users with multiple
computer screens make it very worthwhile.
To take advantage of this feature, follow these steps:
1. Shift+left-click one of the corner widgets in an area and drag your
mouse cursor away from it.
This step duplicates the area you clicked in and creates a new Blender
window to contain it. You can also achieve this effect from the menus
in the header region of some editors by choosing View➪Duplicate Area
into New Window.
2. Close the additional Blender window by clicking the close button that
your operating system adds to the border of the window.
All editors in Blender areas have a horizontal region called the header running along either the top or bottom of the editor. The header usually features
specialized menus or buttons that are specific to the editor you’re using.
Here are some ways you can customize the header:
✓ Hide the header. If you drag the seam all the way to the area border,
then the header becomes hidden, leaving only a small plus icon (+) in
the corner of the area. If the header is at the bottom of the editor, the
plus icon appears at the bottom right. If the header appears at the top,
it’s at the top left. Left-click this icon, and the header reappears.
✓ Change the location of the header. You can also change the location of
the header to either the top or bottom of the editor it belongs to. To do
so, right-click the header and choose Flip to Top (or Bottom, depending
on where your header currently is).
17
18
Part I: Wrapping Your Brain Around Blender
Create a new area
Remove an area
Figure 1-5:
Creating a
new area
and then
removing
that area.
Maximizing an area
When working in Blender, you also occasionally need to maximize an area.
Maximizing an area is particularly useful when you’re working on a model or
scene and you just want to get all the other areas out of your way so that you
can use as much screen real estate as possible.
To maximize any area, hover your mouse cursor over it and press
Shift+spacebar. You can toggle back to the tiled screen layout by pressing
Shift+spacebar again. These options are available in almost all editor types
by choosing View➪Toggle Full Screen from that editor’s header or by rightclicking the header and choosing Maximize Area from the menu that appears.
If the area is already maximized, then the menu item will say Tile Area.