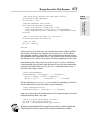
1
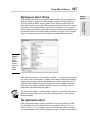
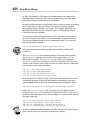
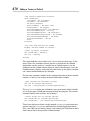
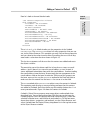
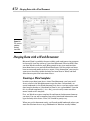
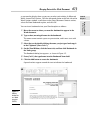
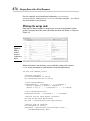
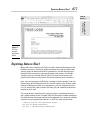
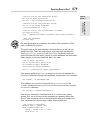
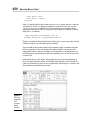
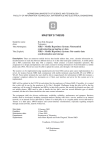
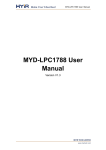
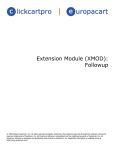
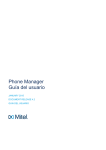
Chapter 1: Automation with
Other Office Programs
AL
In This Chapter
✓ Understanding Automation
✓ Merging data with a Word document
TE
✓ Exporting data to Excel
RI
✓ Adding a contact to Microsoft Outlook
MA
I
TE
D
n Book VIII, we show you VBA (Visual Basic for Applications) and give
you an understanding of some of the wonderful ways you can take control of your Access database. You can use VBA to open and close forms,
print reports, loop through tables and change data, and modify form
properties.
PY
RI
GH
Well, VBA isn’t there just for Access; you can also use VBA to control
other Microsoft Office applications including Outlook, Excel, Word, and
PowerPoint. With VBA, the possibilities are virtually endless when you consider what some advanced users do in these Office applications on a daily
basis. This chapter explains Automation and gives several examples of how
Access can interact with these other Office programs.
What Is Automation?
CO
Automation came about during the industrial revolution to replace tasks
performed by humans with faster, more efficient methods. Instead of phone
operators manually plugging and unplugging wires to make a connection,
large systems handle this automatically. Rather than having people assemble cars on the assembly line, industrial robots now handle the bulk of the
duties. Us humans just get in the way.
In the world of VBA, Automation (with a capital A) refers to the ability of
a program to expose itself to VBA so that VBA can control it behind the
scenes, with little or no human interaction. Humans just slow down the
process anyway. Other programming languages such as C++ and C# use
Automation as well, but since VBA is the language of Access, we focus on
using VBA.
666
Using Object Libraries
Automation with other Microsoft Office programs works only when you have
these programs installed on your computer. If you don’t have Word, Excel,
or Outlook installed, you won’t be able to control them from Access.
Using Object Libraries
To use VBA to control another program, you need to have access to that
program’s object library. Each program has its own set of properties and
methods, which allows VBA to control it. Just as each object (forms, text
boxes, buttons) has its own properties and methods, each application —
including Access — has a set of properties and methods, which is referred to
as the object library.
In order to access another program’s object library, you first have to tell
VBA where to find it. To add an object library to your VBA project, choose
Tools➪References from the Visual Basic Editor menu, and add the desired
object libraries, as shown in Figure 1-1.
Figure 1-1:
Choose
the object
libraries
from the
References
window.
For this example, we added the Microsoft Excel 14.0 Object Library,
Microsoft Office 14.0 Object Library, Microsoft Outlook 14.0 Object Library,
Microsoft Words 14.0 Object Library, and Microsoft PowerPoint 14.0 Object
Library.
If you have multiple versions of a program installed on your computer (for
instance, Excel 2003 and Excel 2010), you’ll see different versions of the
Excel Object Library in the References window. If you’re sure you’ll be working in the latest version only, choose the version with the highest number.
Applications in Office 2010 are version 14.0, whereas applications in Office
2007 are version 12.0. I guess the superstitious programmers at Microsoft
skipped version 13.0.
Using Object Libraries
667
Exploring an object library
Figure 1-2:
Use the
Object
Browser
to view a
program’s
object
model.
Each application exposes a lot of objects to VBA — way too many for you (or
any sane person) to remember. We don’t have enough room in this book to
define every property and every method for each Office application. We’d
probably need a book just for each application, which wouldn’t make too
many trees very happy, would it? Instead, you have to be able to get the
information you need when you need it.
To find out more about a selected object, property, or method in the Object
Browser, click the Help icon — the yellow question mark — in the Object
Browser window.
The Application object
Each application exposes (makes available) its own set of objects to VBA,
but one object that each application has in common is the Application
object. The Application object exposes that program’s objects, properties, and methods to VBA. When a program is open, its objects are available
Automation with Other
Office Programs
After adding a reference to a program’s object model, you can explore that
program’s objects, properties, and methods through the Object Browser.
In the Visual Basic Editor, choose View➪Object Browser from the Visual
Basic Editor menu or press F2. When you open the Object Browser, it shows
the objects for everything VBA has access to. To limit the list to a specific
library, choose the library’s name from the Project/Library drop-down list in
the top-left corner of the Object Browser window. In Figure 1-2, we selected
Excel to show only the classes and members related to Microsoft Excel.
Book IX
Chapter 1
668
Using Object Libraries
to VBA. For example, if VBA opens a Word document, everything in that
Word document is also exposed. VBA can do anything in the Word document that a human can do from the Word Ribbon.
In order to take control of an application, you first have to create an instance
of the application in VBA. An instance is basically the same as opening
the program from the Windows Start menu. For example, when you start
Microsoft PowerPoint on your computer, you’re creating an instance of
PowerPoint on your computer.
To create an instance of an application in VBA, you have to declare a variable that references that object. The variable name can be any name you
like, but you should attempt to give it a meaningful name. The syntax for
declaring an object variable is
Dim objectVariable as New program.Application
For more information on declaring and using variables, see Book VIII,
Chapter 3.
The objectVariable in the above example is the name of the variable.
The program is a reference to one of the Office applications (such as
Word, Excel, Outlook). The Application part refers to the program’s
Application object of that program. The New keyword ensures that VBA
creates a new instance of the program. Here are some examples of declaring
new instances of the Office programs:
Dim
Dim
Dim
Dim
XL as New Excel.Application
Wrd as New Word.Application
Olk as New Outlook.Application
PPT as New PowerPoint.Application
After you declare the object variable for the desired program, you can now
control that program. In order to take control of the program, you must
open the program from VBA. The syntax for opening a program in VBA is
Set objectVariable as CreateObject(“program.Application”)
where the objectVariable is the same name you specified in the Dim
statement and program is the name of the application. When using the Dim
statements described above, the corresponding Set statements for opening
the applications are:
Set
Set
Set
Set
XL as CreateObject(“Excel.Application”)
Wrd as CreateObject(“Word.Application”)
Olk as CreateObject(“Outlook.Application”)
PPT as CreateObject(“PowerPoint.Application”)
In order to control another program using VBA, you must first add the program’s object library to VBA using the References window.
Adding a Contact to Outlook
669
In the next few sections, you’ll see how Access can share information with
Outlook, Word, and Excel — oh my!
Suppose you’re working on an Access program and your users suggest that
it would be a good idea to include in your program the capability to add
a contact from your Access database to the Microsoft Outlook contacts.
You could be mean and tell them to just type it in themselves, or you can
impress them by adding a button to a form that adds the current contact to
their Outlook contacts.
Consider the form shown in Figure 1-3. This form is a basic customer contact
form that you might find in one of your applications, with one exception —
the addition of an Add to Outlook Contacts button.
Figure 1-3:
Changing
an Access
form to add
a contact to
Outlook.
Now just adding the button doesn’t accomplish much; you have to add code
to the button’s Click event procedure. In the form’s Design view, doubleclick the button to show the Property sheet, click the Event tab, click the
ellipsis button on the right of the On Click event property, and then click
Code Builder to open the Visual Basic Editor to the button’s Click event
procedure. The code looks something like this:
Private Sub cmdOutlook_Click()
‘Open Instance of Microsoft Outlook
Dim Olk As Outlook.Application
Set Olk = CreateObject(“Outlook.Application”)
‘Create Object for an Outlook Contact
Dim OlkContact As Outlook.ContactItem
Set OlkContact = Olk.CreateItem(olContactItem)
Automation with Other
Office Programs
Adding a Contact to Outlook
Book IX
Chapter 1
670
Adding a Contact to Outlook
‘Set Contact Properties and Save
With OlkContact
.FirstName = Me.FirstName
.LastName = Me.LastName
Me.Email.SetFocus
.Email1Address = Me.Email.Text
.CompanyName = Me.Company
.BusinessAddressStreet = Me.Address1
.BusinessAddressCity = Me.City
.BusinessAddressState = Me.StateProv
.BusinessAddressPostalCode = Me.ZIPCode
.BusinessTelephoneNumber = Me.Phone
.BusinessFaxNumber = Me.Fax
.Save
End With
‘Let User know contact was added
MsgBox “Contact Added to Outlook.”
‘Clean up object variables
Set OlkContact = Nothing
Set Olk = Nothing
End Sub
This might look like a lot of code, but it’s just a series of small steps. In laymen’s terms, this procedure creates and sets a variable for the Outlook
Application, creates and sets a variable for an Outlook contact, sets the
properties of the Outlook contact object to values from the form, saves the
Outlook contact, displays a message box, and cleans up the object variables.
Let’s take a detailed look into this example.
The first two statements under the first comment declare an object variable
named Olk and set it to an open instance of Microsoft Outlook.
‘Open Instance of Microsoft Outlook
Dim Olk As Outlook.Application
Set Olk = CreateObject(“Outlook.Application”)
The Application object for Outlook lets you create items within Outlook,
just as if you open Outlook and navigate through the program. The second
comment and the next two lines are as follows:
‘Create Object for an Outlook Contact
Dim OlkContact As Outlook.ContactItem
Set OlkContact = Olk.CreateItem(olContactItem)
These lines declare an object variable named OlkContact and create that
contact using the CreateItem method of the Outlook Application object.
This is the VBA way of clicking Contacts and clicking the Click Here to Add a
New Contact line at the top of the Outlook window.
Adding a Contact to Outlook
671
Now let’s look at the next block of code:
The With…End With block of code sets the properties of the Outlook
ContactItem. The ContactItem object has many properties that you can
see via the Object Browser. This example uses only a few of these properties
and sets them to the values from the form. Everything that uses the Me keyword reads a value from the form shown in Figure 1-3.
The last few statements tell the user that the contact was added and resets
the object variables.
The one tricky part of the above code lies in how Access stores an e-mail
address. Access doesn’t just store the e-mail address as text. Instead, it
stores additional information along with the e-mail address. So when reading
the e-mail address from the form, we want only the text component of the
e-mail address field on the form. In order for VBA to read this property on
the form, we must first use the SetFocus method of the Email text box to
make sure that the control has the focus — the cursor is in that field.
The Save method of the ContactItem object saves the contact in Outlook.
The remaining code displays a message letting you know that the contact
was added to Outlook, and it then cleans up the variables before the Click
event procedure ends. Figure 1-4 shows the contact in Outlook.
Outlook’s Object Library exposes many more objects and methods than
described here. You can do anything from VBA that you can do from the
Outlook program. You can compose and send e-mail messages, create and
schedule calendar items, and build tasks and to-do lists. To find out more
about these objects, properties, and methods, use the Object Browser and
select Outlook from the Project/Library drop-down list in the top-left corner
of the Object Browser window.
Automation with Other
Office Programs
‘Set Contact Properties and Save
With OlkContact
.FirstName = Me.FirstName
.LastName = Me.LastName
Me.Email.SetFocus
.Email1Address = Me.Email.Text
.CompanyName = Me.Company
.BusinessAddressStreet = Me.Address1
.BusinessAddressCity = Me.City
.BusinessAddressState = Me.StateProv
.BusinessAddressPostalCode = Me.ZIPCode
.BusinessTelephoneNumber = Me.Phone
.BusinessFaxNumber = Me.Fax
.Save
End With
Book IX
Chapter 1
672
Merging Data with a Word Document
Figure 1-4:
The contact
added to
Outlook
from VBA.
Merging Data with a Word Document
Microsoft Word is probably the most widely used word-processing program
in the world, if not the universe. If you have Microsoft Office installed, then
you have Word installed as well. Many people in any given work environment know how to use and edit Word documents, but they might not know
how to create and modify an Access report. Using Automation, you can give
some users the ability to edit the body of a form letter in Word, and then
allow them to print that letter from Access.
Creating a Word template
In order to put data from Access into a Word document, you have to tell
Access where in the Word document to put the data. One method is to
create bookmarks in the Word document that Access can later replace with
data from the database. A bookmark in Word is just a placeholder. If you do
this in a Word template file (.dotx file), you can easily create new documents based on this template.
First, use Word to create a template file and format the document however
you want. You can add a company logo, other letterhead information, and
type the body of the letter. So far, this should be pretty easy.
When you get the document ready, you’ll need to add bookmarks where you
want the data from Access to go. Bookmarks in Word are usually hidden,
Merging Data with a Word Document
673
You can insert bookmarks into your Word template as follows:
1. Move the cursor to where you want the bookmark to appear in the
Word document.
2. Type a short, meaningful name for the bookmark.
The name cannot contain spaces or punctuation, and it must start with
a letter.
3. Select the text by double-clicking the name you just typed and copy it
to the Clipboard. (Press Ctrl+C.)
4. On the Word Ribbon, click the Insert tab, and then click Bookmark in
the Links group.
The Bookmark dialog box appears, as shown in Figure 1-5.
5. Paste (Ctrl+V) the typed name into the Bookmark Name field.
6. Click the Add button to create the bookmark.
Square brackets appear around the text to indicate the bookmark.
Figure 1-5:
Adding
bookmarks
to a Word
template
(DOTX).
Book IX
Chapter 1
Automation with Other
Office Programs
so you need to display them so you can see what you’re doing. In Microsoft
Word, choose File➪Options. Click the Advanced option on the left side of the
Word Options window, scroll down to the Show Document Content section,
select the Show Bookmarks option, and click OK.
674
Merging Data with a Word Document
For this example, we created three bookmarks: CurrentDate,
AccessAddress, and AccessSalutation. We then saved the .dotx file in
the same folder as our database.
Writing the merge code
Now that the Word template is ready to go, we can create another button
on the Customer form that sends data from the form into Word, as shown in
Figure 1-6.
Figure 1-6:
Adding
another
button to
send data to
Word.
When the button is on the form, you can add this code to this button’s
Click event procedure to send the data to the Word document:
Private Sub cmdWord_Click()
‘Declare Variables
Dim sAccessAddress As String
Dim sAccessSalutation As String
‘Build sAccessAddress
sAccessAddress = FirstName & “ “ & LastName & _
vbCrLf & Company & vbCrLf & Address1 & _
vbCrLf & City & “, “ & StateProv & “ “ & ZIPCode
‘Build sAccessSalutation
sAccessSalutation = FirstName & “ “ & LastName
‘Declare and set Word object variables
Dim Wrd As New Word.Application
Set Wrd = CreateObject(“Word.Application”)
‘Specify Path to Template
Dim sMergeDoc As String
sMergeDoc = Application.CurrentProject.Path & _
“\WordMergeDocument.dotx”
Merging Data with a Word Document
675
‘Open Word using template and make Word visible
Wrd.Documents.Add sMergeDoc
Wrd.Visible = True
‘Open in PrintPreview mode, let user print
Wrd.ActiveDocument.PrintPreview
‘Clean Up code
Set Wrd = Nothing
End Sub
Again, there’s a lot of code here, but it breaks down into a number of different sections. We declare the variables we’re going to use, set the address
and salutation variables, open Word using the template we created, replace
the bookmarks with values from Access, and show the Print Preview view for
the document. Let’s take a closer look at some key components of this code.
After declaring the string values, we set the sAccessAddress variable to
a concatenated string of values from the form. We use the line continuation
character (an underscore) as well as the vbCrlf keyword, which starts a
new line in the string variable:
‘Build sAccessAddress
sAccessAddress = FirstName & “ “ & LastName & _
vbCrLf & Company & vbCrLf & Address1 & _
vbCrLf & City & “, “ & StateProv & “ “ & ZIPCode
We also build the sAccessSalutation variable by combining just the first
and last name fields on the form with a space in between:
‘Build sAccessSalutation
sAccessSalutation = FirstName & “ “ & LastName
Next, we use the syntax described earlier in this chapter to open an instance
of Microsoft Word. Here’s the code:
‘Declare and set Word object variables
Dim Wrd As New Word.Application
Set Wrd = CreateObject(“Word.Application”)
In order to control Word 2010 using VBA, you must first add the Microsoft
Office Word 14.0 Object Library to VBA using the References window.
Automation with Other
Office Programs
‘Replace Bookmarks with Values
With Wrd.ActiveDocument.Bookmarks
.Item(“CurrentDate”).Range.Text = Date
.Item(“AccessAddress”).Range.Text = sAccessAddress
.Item(“AccessSalutation”).Range.Text = sAccessSalutation
End With
Book IX
Chapter 1
676
Merging Data with a Word Document
After opening an instance of Word, we set the location of the Word
template created earlier. We use the Path property of Application.
CurrentProject in order to get the location, and then concatenate
it with the filename. In this case, we named the Word template file
WordMergeDocument.dotx, as follows:
‘Specify Path to Template
Dim sMergeDoc As String
sMergeDoc = Application.CurrentProject.Path & _
“\WordMergeDocument.dotx”
Next, we use the Add method of the Application.Documents object to
create a new document based on the template file. After creating a new
Word document, we set the Visible property of the Wrd object to true, letting the user see Word. When you open Word from VBA, it’s invisible to the
user unless you specify otherwise, as we’ve done here:
‘Open Word using template and make Word visible
Wrd.Documents.Add sMergeDoc
Wrd.Visible = True
After viewing the document, we use the Bookmarks collection within
the ActiveDocument to add the values from Access. We replace the
CurrentDate bookmark with the system date using the Date() function.
Then we replace the AccessAddress and AccessSalutation bookmarks
with the variables set earlier in the code, as follows:
‘Replace Bookmarks with Values
With Wrd.ActiveDocument.Bookmarks
.Item(“CurrentDate”).Range.Text = Date
.Item(“AccessAddress”).Range.Text = sAccessAddress
.Item(“AccessSalutation”).Range.Text = sAccessSalutation
End With
Finally, we switch to Print Preview view and clean up the code in Word.
Figure 1-7 shows the document with the bookmarks replaced with data from
Access.
Just like with the Outlook Object Library, the Word Object Library contains
many more properties and methods that allow you to control Word as if
you were clicking on the various Ribbon commands and typing in the Word
window. For more assistance on all of these commands, use the Object
Browser available by choosing View➪Object Browser from the Visual Basic
Editor menu or pressing F2.
Exporting Data to Excel
677
Book IX
Chapter 1
Automation with Other
Office Programs
Figure 1-7:
The final
merged
document in
Word.
Exporting Data to Excel
Many Office users familiar with Excel just don’t understand the power and
flexibility of Access. And many higher executives are used to viewing and
printing tables of data from an Excel spreadsheet. So even though you’re
convinced that everyone in your organization (and perhaps, the world)
should use Access instead of Excel, you’ll still come across quite a few
people who’d rather see the data in Excel than open an Access database.
Sure, you can export data to Excel (or a number of other formats) from the
Export group on the External Data tab, but that requires one of those pesky
humans to know what to do. As a compromise, you can automate the process by writing VBA code to export the data, plus do a number of other formatting tasks as well.
Let’s pretend once again that we’re going to create a spreadsheet of everyone’s phone number in the Customer table. We also want to add a meaningful
title with the date the phone numbers were exported. You can create a button
anywhere in your application to do this, so we’ll just show you the code:
‘Declare and set the Connection object
Dim cnn As ADODB.Connection
Set cnn = CurrentProject.Connection
678
Exporting Data to Excel
‘Declare and set the Recordset object
Dim rs As New ADODB.Recordset
rs.ActiveConnection = cnn
‘Declare and set the SQL Statement to Export
Dim sSQL As String
sSQL = “SELECT FirstName, LastName, Phone FROM Customers”
‘Open the Recordset
rs.Open sSQL
‘Set up Excel Variables
Dim Xl As New Excel.Application
Dim Xlbook As Excel.Workbook
Dim Xlsheet As Excel.Worksheet
Set Xl = CreateObject(“Excel.Application”)
Set Xlbook = Xl.Workbooks.Add
Set Xlsheet = Xlbook.Worksheets(1)
‘Set Values in Worksheet
Xlsheet.Name = “Phone List”
With Xlsheet.Range(“A1”)
.Value = “Phone List “ & Date
.Font.Size = 14
.Font.Bold = True
.Font.Color = vbBlue
End With
‘Copy Recordset to Worksheet Cell A3
Xlsheet.Range(“A3”).CopyFromRecordset rs
‘Make Excel window visible
Xl.Visible = True
‘Clean Up Variables
rs.Close
Set cnn = Nothing
Set rs = Nothing
Set Xlsheet = Nothing
Set Xlbook = Nothing
Set Xl = Nothing
As you can see, the code is starting to grow. It’s not out of control, but it’s
common to have procedures that grow to pages in length. But don’t be
afraid; as long as you break it down into small chunks, it’s not so hard to
understand.
The first chunk of code sets up the Recordset object with a simple SQL
Select statement that gets the first name, last name, and phone number from
the Customers table, as follows:
Exporting Data to Excel
679
‘Declare and set the Connection object
Dim cnn As ADODB.Connection
Set cnn = CurrentProject.Connection
‘Declare and set the SQL Statement to Export
Dim sSQL As String
sSQL = “SELECT FirstName, LastName, Phone FROM Customers”
‘Open the Recordset
rs.Open sSQL
For more information on recordsets and creating SQL statements in VBA
code, see Book VIII, Chapter 5.
The next chunk of VBA code initializes the Excel objects so that you can
manipulate them. There are three objects to declare when working with
Excel: Application, Workbook, and Worksheet. By default, when you
open Excel from the Start menu, it opens to a new workbook, and each workbook contains at least one worksheet. Here’s the code:
‘Set up Excel Variables
Dim Xl As New Excel.Application
Dim Xlbook As Excel.Workbook
Dim Xlsheet As Excel.Worksheet
Set Xl = CreateObject(“Excel.Application”)
After opening the Excel Application object, we use the Add method of the
Workbooks collection to create a new workbook, stored in the Xlbook variable:
Set Xlbook = Xl.Workbooks.Add
After adding a new Workbook to the Excel Application, we set the
Xlsheet variable to the first Worksheet of the Workbook object using the
Worksheets collection:
Set Xlsheet = Xlbook.Worksheets(1)
Now that the worksheet is initialized and set, it’s time to start playing
around. First, we set the Name of the worksheet to something other than
Sheet1. Then we change cell A1 to a meaningful heading that includes the
date, and format the cell to a larger, bolder, more colorful font:
‘Set Values in Worksheet
Xlsheet.Name = “Phone List”
With Xlsheet.Range(“A1”)
.Value = “Phone List “ & Date
.Font.Size = 14
Automation with Other
Office Programs
‘Declare and set the Recordset object
Dim rs As New ADODB.Recordset
rs.ActiveConnection = cnn
Book IX
Chapter 1
680
Exporting Data to Excel
.Font.Bold = True
.Font.Color = vbBlue
End With
Now it’s time to take the data from the Recordset object and put it into the
spreadsheet. There’s no looping through the recordset here; just use the
CopyFromRecordset method to copy the contents of a recordset into a
particular range of cell. Here, we copy the data from our recordset, starting
with cell A3, as follows:
‘Copy Recordset to Worksheet Cell A3
Xlsheet.Range(“A3”).CopyFromRecordset rs
Finally, we make the Excel application visible so we can see our data in Excel
(shown in Figure 1-8) and clean up our variables.
You can add so much more code to this routine to fully customize the look
of the spreadsheet. You can change the column widths, change the cells’
background colors, and sort the data. Just remember, if can perform a task
with the mouse and keyboard in the Excel window, you can find a way to do
it using VBA.
Automating Access with other Office programs can seem overwhelming at
first, but once you know where to find help and examples, you’ll be well on
your way to beefing up your Access applications and relying less and less on
those humans to perform these tasks.
Figure 1-8:
The Excel
worksheet
with
customer
phone
numbers.