1
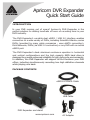
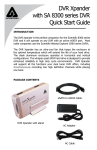
Quick Start Guide
Apricorn DVR Expander
Quick Start Guide
INTRODUCTION
Is your DVR running out of space? Apricorn’s DVR Expander is the
perfect solution for adding hundreds of hours of recording time to your
DVR instantly.
The DVR Expander’s versatile dual eSATA / USB 2.0 interface enables
connection to a wide variety of DVRs, including Scientific Atlanta® series
DVRs (provided by many cable companies - uses eSATA connection),
Dish Network® DVRs (via USB 2.0 connection) or any DVR with an active
eSATA port.
The DVR Expander’s sleek aluminum enclosure operates in horizontal
and vertical configurations and the high capacity SATA hard drive is
designed to provide enhanced reliability in high duty cycle environments.
In addition, the DVR Expander will support all the functions your DVR
offers, including simultaneously recording two high definition channels
while playing one back.
PACKAGE CONTENTS
eSATA to eSATA Cable
USB Cable
DVR Expander and stand
www.apricorn.com
AC Adapter
Connecting to Scientific Atlanta® series DVRs
1. Before starting the connection of your DVR Expander, check the current amount of
free space on your DVR. While this process varies depending on your DVR, many
DVRs show this information in the LIST option (press the LIST button on the DVR
remote control to access this option.) The amount of current used space is shown
as % full on the DVR.
2. When connecting your DVR Expander, check that the DVR Expander ON/OFF
switch, located on the back of the unit is in the OFF position. Connect the AC
adapter to the back of the DVR Expander, then connect the other end of the AC
cable to suitable power supply that will always stay on (like a wall outlet). Never
connect the DVR Expander to the AC plug on the back of the DVR.
3. Verify that the DVR Expander is turned off by observing the LED located at the
front of the unit. At this point there should not be any lights on the DVR Expander.
If there is a light glowing on the front of the DVR Expander, use the power switch
on the back of the DVR Expander to turn it off.
4. Now connect one end of the eSATA cable to the back of the DVR Expander and the
other end to the eSATA port on the back of the DVR.
5. Push the power button on the back of the DVR Expander to turn it on. The LED
light should start to glow.
6. There will likely be about a 15 second digital freeze in which your DVR will not
respond to any commands while it recognizes the newly attached DVR Expander.
Formatting the DVR Expander
Once your DVR recognizes the DVR Expander the following message or similar
should appear on the TV screen:
Attention
Format this external hard drive with this DVR?
Note: Any existing recordings on the external drive will be erased.
If you press C cancel, the external storage device will not be available
A yes, Format
C cancel
Press A to format the drive (Formatting will take several minutes)
Note: After it is complete you will get the message below
Attention
The formatting of the hard drive was successful. The external storage device
connected works with this DVR. NOTE: To safely unplug this device, first unplug
power from the DVR, and then wait 10 seconds before disconnecting
Press Exit to close the banner
www.apricorn.com
Exit Close
Once you have finished reformatting the drive we recommend
that your DVR be rebooted. If your system does not reboot
automatically, manually reboot your DVR by holding down the
POWER button the front of your DVR.
CONGRATULATIONS!
Your DVR and DVR Expander are now operational.
To see how much storage the DVR Expander has added to your system,
use the LIST option as described in Step 1 on the previous page.
FAQs for Scientific Atlanta series DVR Connection
For the most recent FAQs please go to the Support page at
www.Apricorn.com and click on DVR Expander.
How are recorded programs stored on the Scientific Atlanta DVR
once the DVR Expander is installed?
Recordings are balanced between the internal hard drive on the DVR and
the DVR Expander as follows: A recording is not split between an internal
hard drive and the DVR Expander. The DVR automatically stores complete
program using space available logic: If the DVR Expander has more space
available, the DVR Expander stores the next recording. If the internal hard
drive on the DVR has more space available, its internal hard drive will store
the next recording.
Why aren’t my recorded programs available for playback
The Scientific Atlanta series DVR does not designate which hard drive your
recorded programs have been stored on. When the DVR Expander is not
connected to the DVR, all the programs that were recorded to the DVR Expander
will still be listed on the menu, but will not be available for viewing.
How can I check which version of software is loaded on my
Scientific Atlanta series DVR?
The easiest way to check which version of software is loaded on your DVR
is to reboot your system. To reboot, hold down the POWER button on your
DVR until the unit reboots. On rebooting, watch for a screen that shows the
software version.
www.apricorn.com
Connection to Dish Network® DVRs
To find out if your Dish Network DVR model is compatible with DVR Expander, please
check on the Dish Network website at www.dishnetwork.com.
1. Check that the DVR Expander ON/OFF switch, located on the back of the
unit is in the OFF position. Connect the AC adapter to the back of the DVR
Expander, then connect the other end of the AC cable to suitable power
supply that will always stay on (like a wall outlet). Never connect the DVR
Expander to the AC plug on the back of the DVR.
2. Verify that the DVR Expander is turned off by observing the LED located at the
front of the unit. At this point there should not be any lights on the DVR
Expander. If there is a light glowing on the front of the DVR Expander, use
the power switch on the back of the DVR Expander to turn it off.
3. Connect the DVR Expander to one of the receiver’s two USB 2.0 ports.
Note: Currently, you can only connect one USB device to the receiver at
one time; however, you can connect multiple DVR Expanders one-at-atime (for example, to dedicate one DVR Expander for movies and one for
sporting events).
4. Push the power button on the back of the DVR Expander to turn it on. The
LED light should start to glow.
5. You will see a pop-up message asking if you want to reformat the drive.
If you select Yes, anything stored on the DVR Expander is erased. If you
select No, you cannot transfer DISH Network content until you select Yes
and the drive is reformatted. Afterwards, the satellite receiver reboots.
6. Call 888-241-2205 to activate the feature. You will pay a one-time Archiving
Activation fee, which covers all compatible receivers on your account.
Getting Started with the Multimedia Menu
• Press MENU, select Multimedia, then select USB Storage (or press DVR on
the remote control, then
select USB Storage).
• Select Manage Device to
see a list of the programs
stored on the DVR
Expander.
• Select Send to Device
to transfer pre-recorded
programs from the My
Recordings list to the
DVR Expander.
www.apricorn.com
Restoring and Playing from DVR Expander
• Choose Restore to transfer selected events from
the DVR Expander back to the satellite receiver’s
internal hard drive.
• Use Play to view the event directly from the DVR
Expander.
• Use Delete to remove unneeded events.
Considerations for Dish Network DVRs
• To find out if your Dish Network DVR model is compatible with DVR
Expander, please check on the Dish Network website. You can find the
receiver model listed on the System Information screen (accessed by
MENU-6-1-3 on most receivers).
• Only use the DVR Expander with a DISH Network DVR receiver — do
not use the drive for other purposes (for example, connecting to your
computer).
• If content contains copy protection that will impact transferring to the
hard drive, you will see a pop-up message with more information.*
• Currently, content on the hard drive can only be viewed using the receiver
it came from. If the receiver that originally recorded the event is no
longer available (due to an equipment return, for example), the content
can still be viewed using a compatible receiver or replacement receiver
on the account.
• Ensure the DVR Expander is kept in a cool, well-ventilated location for
optimum hard drive longevity. Do not move the drive while it is on.
• Content transferred to the DVR Expander is only listed under the USB
Storage option—it is moved from the My Recordings list.
Troubleshooting
After connecting the hard drive, if the Multimedia menu displays No Device
Attached under External USB Devices, the receiver does not recognize the
hard drive. Disconnect any device connected to the other USB port, then
reset the receiver with only the DVR Expander connected to see if the
receiver recognizes the hard drive after the reset. If not, the hard drive is not
compatible.
* For any DRM/copy protection restrictions, go to www.dishnetwork.com and
search for “copy protection.”
•
•
•
Choose Restore to transfer selected events from the DVR Expander back
to the satellite receiver’s internal hard drive.
Use Play to view the event directly from the external hard drive.
Use Delete to remove unneeded events.
www.apricorn.com
Connection to DirecTV® DVRs
To find out if your DirecTV DVR model is compatible with DVR Expander, please check on the
DirecTV website at www.directv.com.
DirecTV can only accept one hard drive as a recordable device (internal hard drive
or external hard drive). Multiple external hard drives can be used, however, the
system must be power cycled after adding the drive to rebuild available content.
1. Turn off the power button on the DirecTV receiver and disconnect the power
cable.
2. Connect the DVR Expander to the DirecTV receiver’s eSATA port. Connect the AC
adapter to the back of the DVR Expander, then connect the other end of the AC
cable to suitable power supply that will always stay on (like a wall outlet). Never
connect the DVR Expander to the AC plug on the back of the DVR.
3. Switch the power button on the back of the DVR Expander to on. The LED light
should start to glow.
4. Plug in the DirecTV receiver power cable and turn on the power button.
Note: If the receiver is not power cycled after attaching the external drive, you
will see list of shows from the hard drive previously used but shows will not be
accessible.
5. When power cycling with the DVR Expander attached, DirecTV will rebuild the
scheduler listing to the attached drive. Scheduled programs will automatically
record to the current drive (in this case the DVR Expander). The old recordings on
your DirecTV receiver will remain, but will not be shown on the DirecTV scheduler.
To show your old recordings you will have to detach the DVR Expander and restart
your system (refer to steps 1 & 4).
Note: Multiple drives can be used with the
DirecTV receiver. A complete power cycle will
need to be done after changing to a new drive.
After a re-start, all programs on the current drive
will be accessible.
Removing the DVR Expander
1. Turn off the power button on the DirecTV receiver & disconnect the power cable.
2. Turn off the DVR Expander using the power button on the back of the unit.
3. Disconnect the DVR Expander from the eSATA port of the receiver and unplug the
DVR Expander from the AC Adapter in the wall.
4. Plug in the DirecTV receiver to the power and restart. While rebooting, the
DirecTV scheduler will rebuild to the receiver’s internal drive.
5. To view the shows on the receiver, select the “List” button to view the prerecorded programs list.
www.apricorn.com
CONTACTING TECHNICAL SUPPORT
Apricorn provides the following helpful resources for you:
1. Apricorn’s Website (http://www.apricorn.com)
This gives you the ability to check for up-to-date information.
2. E-mail us at [email protected].
3. Or call the Technical Support Department at 1-800-458-5448.
Apricorn’s Technical Support Specialists are available from 8:00 a.m. to
5:00 p.m., Pacific Standard Time Monday through Friday.
WARRANTY
One Year Warranty:
Apricorn offers a 1-year warranty on the DVR Expander against defects in materials and workmanship
under normal use. The warranty period is effective from the date of purchase either directly from
Apricorn or an authorized reseller.
Disclaimer and terms of the warranties:
The warranty becomes effective on the date of purchase and must be verified with
your sales receipt or invoice displaying the date of product purchase.
Apricorn will, at no additional charge, repair or replace defective parts with
new parts or serviceable used parts that are equivalent to new in performance.
All exchanged parts and products replaced under this warranty will become the
property of Apricorn.
This warranty does not extend to any product not purchased directly from Apricorn
or an authorized reseller or to any product that has been damaged or rendered
defective: 1. As a result of accident, misuse, neglect, abuse or failure and/or inability
to follow the written instructions provided in this instruction guide: 2. By the use
of parts not manufactured or sold by Apricorn; 3. By modification of the product;
or 4. As a result of service, alternation or repair by anyone other than Apricorn and
shall be void. This warranty does not cover normal wear and tear.
No other warranty, either express or implied, including any warranty or
merchantability and fitness for a particular purpose, has been or will be made by
or on behalf of Apricorn or by operation of law with respect to the product or its
installation, use, operation, replacement or repair.
Apricorn shall not be liable by virtue of this warranty, or otherwise, for any
incidental, special or consequential damage including any loss of data resulting
from the use or operation of the product, whether or not Apricorn was apprised of
the possibility of such damages.
© Apricorn, Inc. 2010. All rights reserved.
12191 Kirkham Road
Poway, CA, U.S.A. 92064
1-858-513-2000
www.apricorn.com
www.apricorn.com