1
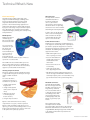
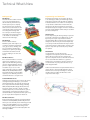
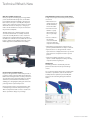
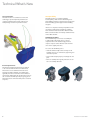
Technical What’s New
Autodesk
Inventor
®
®
2010
Autodesk Inventor
Autodesk Inventor Routed Systems
Autodesk Inventor Simulation
Autodesk Inventor Tooling
Autodesk Inventor Professional
Technical What’s New
Contents
Welcome to Inventor 2010�����������������������������������2
Assembly Management���������������������������������������8
Plastic Part Design����������������������������������������������3
User-defined Assembly Folders���������������������������������������8
Multibody Parts�������������������������������������������������������������������3
Enhanced Assembly Restructure �����������������������������������8
Inserting Components in Parts���������������������������������������3
User Coordinate Systems�������������������������������������������������8
Silhouette Curve�����������������������������������������������������������������3
Assembly Productivity Tools��������������������������������������������9
Technical Plastic Features�������������������������������������������������3
Sheet Metal Design���������������������������������������������9
AliasStudio to Inventor�����������������������������������������������������3
Contour Roll�������������������������������������������������������������������������9
Mold Design������������������������������������������������������������������������ 4
Rip������������������������������������������������������������������������������������������9
Mold Analysis �������������������������������������������������������������������� 4
Other Sheet Metal Enhancements������������������������������� 10
Mold Base Libraries ���������������������������������������������������������� 4
Weldments������������������������������������������������������� 10
Standard Mold Base Parts����������������������������������������������� 4
Groove Welds�������������������������������������������������������������������� 10
Mold Documentation������������������������������������������������������� 4
Fillet Welds������������������������������������������������������������������������� 10
Layout Design and Simulation���������������������������� 4
Drawing Manager���������������������������������������������� 11
Sketch Layouts������������������������������������������������������������������� 4
Aligned Section Views������������������������������������������������������ 11
Sketch Blocks���������������������������������������������������������������������� 4
Dual Units Display������������������������������������������������������������� 11
Make Part and Make Components���������������������������������5
Arrange Dimensions Tool������������������������������������������������ 11
Integrated Static and Modal Analysis����������������������������5
Design Accelerators������������������������������������������� 11
Unified FEA Environment for Parts and Assemblies��5
Drum Cam Generator������������������������������������������������������� 11
Optimization������������������������������������������������������������������������5
Spur Gear Improvements ����������������������������������������������� 11
Solver Performance������������������������������������������������������������6
O-Ring Generator Improvements���������������������������������� 11
Browser Improvements�����������������������������������������������������6
Bearing Generator Enhancements�������������������������������� 11
Interoperability��������������������������������������������������6
Bill of Materials�������������������������������������������������12
Shrink Wrap Assemblies����������������������������������������������������6
Assembly Level Storage of Custom Columns ������������12
AEC Exchange����������������������������������������������������������������������7
BOM Editor Usability��������������������������������������������������������12
JT Translator�������������������������������������������������������������������������7
Open from BOM Editor����������������������������������������������������12
Usability and Productivity����������������������������������7
Better Integration of BOM Editor and Graphics Window����������������������������������������������������������������������������������������12
User Interface Enhancements�����������������������������7
Task Oriented Ribbon��������������������������������������������������������7
Document Tabs��������������������������������������������������������������������7
2D Spline Behavior�������������������������������������������������������������7
Improved Loft Usability�����������������������������������������������������8
XYZ Axis Indicator Labels�������������������������������������������������8
Licensing, Installation, and Deployment�������������12
Dynamic Licensing������������������������������������������������������������12
FLEXnet��������������������������������������������������������������������������������12
Multiple Language Support���������������������������������������������12
Combined CAD Manager Control Utility���������������������12
Auto Save������������������������������������������������������������������������������8
MDT Translator Improvements���������������������������13
Content Management�����������������������������������������8
iFeature Enhancements��������������������������������������13
Desktop Content����������������������������������������������������������������8
Material Guide��������������������������������������������������������������������8
Improved Measure Command ���������������������������������������13
Other Enhancements ����������������������������������������13
Edit Family Tables in Excel������������������������������������������������8
Autodesk Inventor 2010
Technical What’s New
Welcome to the Autodesk® Inventor® 2010 software product line
The Autodesk® Inventor® 2010 software product line offers many significant usability and productivity enhancements that will benefit
users who need to create, optimize, and validate designs involving plastic parts, sheet metal parts, and large assemblies. Major areas of
focus in this release include the following.
Plastic Part Design
Multibody workflows, specialized plastic features, rule-based fillets, and associative import of exterior or A-side geometry from
Autodesk® AliasStudio software provide Inventor 2010 the tools for designing complex molded parts (that update smoothly when
changed) without requiring a lot of detailed geometry construction or intermediate steps.
The Autodesk Inventor software product family includes a new application, Autodesk Inventor Tooling (included in Autodesk® Inventor®
Professional software), for designing complex molded parts. It includes automated tools that leverage a digital prototype to quickly
create and validate complete mold designs, reducing errors and improving mold performance.
Simulation and Layout Design
The new sketch blocks in Inventor 2010 provide a logical representation of both rigid and moving bodies that can be combined into 2D
kinematic models for detailed motion studies on different mechanisms. Inventor sketch blocks can be used to populate the assembly with
correctly constrained part models based on the selected sketch.
Inventor 2010 offers a new integrated simulation environment for motion simulation and finite element analysis (FEA) of both parts and
assemblies. Support for modal analysis, parametric studies, and optimization helps make it much easier to perform what-if studies to
select the best design option and then push the resulting geometry back into the assembly model.
Interoperability and Data Exchange
With the new Shrinkwrap feature users have a new level of control over the simplification of large assemblies. You can quickly convert an
assembly into a single part or surface model for use as an assembly substitute or to protect intellectual property when sharing models
with third parties.
The enhanced AEC Exchange tool simplifies the exchange of data for use in building design. With support for the new Autodesk Package
files (.adsk) and the Shrinkwrap tool, AEC Exchange allows users to publish data files with simplified 3D representations and intelligent
connections points for use in building models created using Autodesk® Revit® MEP software and Autodesk® Revit® Architecture
software.
Inventor 2010 includes new translators for CATIA® V5 R6 through R18 as well as enhanced JT™ support for reading and writing JT files.
Usability and Productivity
Usability and productivity are enhanced with the introduction of a modern task based user interface and a large group of user requested
enhancements including user-defined browser folders, user-defined coordinate systems, document tabs, improved spline handles, XYZ
axis indicators, Auto-save option, and many more.
This release includes new sheet metal tools that simplify the creation of rolled features and lofted flanges such as square to round transitions. It also provides Unfold and Refold features making it much easier to define features in the flat.
Drawing manager highlights include aligned section views, dual units display, and a very cool arrange dimensions tool.
Inventor 2010 includes many enhancements designed to lower the cost of ownership: local, or desktop, content that does not require
installation of SQL/IIS on the user’s desktop, dynamic network licenses, and language packs.
Thank you for your continued support of Autodesk Inventor,
The Inventor Team
2
Autodesk Inventor 2010
Technical What’s New
Plastic Part Design
Autodesk Inventor software offers plastic parts
designers maximum flexibility by combining native
Inventor geometry with exterior surface models
designed in Autodesk® Alias software family of
products or other Industrial design applications. In
addition, Autodesk Inventor software helps automate
key aspects of the design of injection molds for plastic
parts. This allows you to quickly create and validate
complete mold designs, reducing errors and improving
mold performance.
Multibody Parts
With the introduction
of multibody part
files, top-down design
has never been easier.
You can create new
solid bodies in a part
file, import solid
bodies using the
Derive workflow, and
use one or more of
the bodies as tool
bodies with the new
Combine command to define cut, join, or intersect
operations on a selected solid.
The new Move Bodies command allows you to free
drag or accurately move bodies in a multibody part.
Each move appears in the browser and can be edited,
suppressed, or deleted like all other features.
Inserting Components in Parts
The Derive command contains powerful new features
to support multi-body parts. A derived part no longer
requires a “blank” document
state.
You can use the Derive
command to insert parts or
assemblies into a part file as:
1. A single solid body with
merged seams
2. A single solid body with
seams (retains component
colors)
3. Maintain each solid as
a solid body (all parts
become “bodies”)
4. A single composite surface
Options 1 and 2 work well to insert tool body
components for a cut, join, or intersect operation.
Option 3 results in multiple solid bodies. If you use
option 4, you cannot use the resulting surface as a tool
body. A component imported as a surface can be used
as the split tool for a split body operation.
3
Silhouette Curve
A new 3D sketch command
called Silhouette Curve is
introduced. A silhouette
curve is a 3D curve that
represents the outer boundary of
the outside surface of a part along
the direction vector and is useful for
determining the natural parting line.
To split a solid, use the silhouette
curve to create a boundary patch
surface and then use the Split
command with the Split Solid
option to create two bodies.
Technical Plastic Features
New Plastic Part commands are powerful rule-based
tools designed to automatically create complex plastic
part features. Specify the design rules in each tab of
the appropriate dialog box and then click OK to create
the feature. The following feature types are
supported in this release.
•Multi-element grill for use as
vents or openings on a body
•Bosses for threaded fasteners with support for head
and thread sides in the
same feature
•Rests to form a flat area on
a curved body
•Hook and loop style Snap
Fits to physically join bodies
•Rule Fillets that work by telling the feature how to
discover the edges. The Rule Fillet command is not
exclusively for plastic parts. It can create fillets on any
type of feature based on the specified design rules.
AliasStudio to Inventor
Autodesk AliasStudio WIRE
files are now supported in the
File Open, Insert Import, and
Drag and Drop commands.
You can select which surfaces
to bring into Inventor and use
the resulting surfaces with
the existing modeling tools,
including Sculpt, Stitch, and
Thicken, to generate 3D part
models.
These enhancements reduce
development time for molded
parts with complex external surfaces. The imported
AliasStudio data maintains associative links to the
original WIRE file allowing changes made in AliasStudio
to be quickly reviewed and incorporated into the
Inventor model.
Autodesk Inventor 2010
Technical What’s New
Tooling Design
Layout Design and Simulation
Mold Design
Autodesk Inventor software includes
easy-to-use mold design features
that work directly from Inventor 3D
models of plastic parts to simplify
part preparation, patch and parting
surface creation, automated core and
cavity design, runner and gate design,
and cooling channel design. Full
associativity to the Inventor digital
model helps ensure that any changes
to the model are automatically
reflected in the mold design.
Getting the initial design concept right is the key to
a successful project. Move your initial design studies
from paper by using the new sketch block capabilities
in Autodesk Inventor 2010 software to develop initial
concept sketches and kinematic models. Then take
advantage of the enhanced simulation environment,
which provides improved support for motion simulation
and static and modal finite element analysis at both the
part and assembly level.
Mold Analysis
Inventor software includes
Moldflow® plastic flow analysis tools.
Use them to determine material flow
rates, gate locations, shrinkage, and
process parameters. Mold analysis
enables you to optimize your design
and minimize the number of mold
iterations, helping to save time and
money.
Mold Base Libraries
Reuse standard mold bases across the
organization, enabling you to avoid
duplicate work while taking advantage
of proven design knowledge. Inventor
provides a single database that stores
and delivers easy access to a wide
range of mold base catalogs, including
DME, Futaba, HASCO, LKM, Pedrotti,
Polimold, Rabourdin, and Strack. When
required, you can efficiently customize
standard mold bases to suit your needs.
Sketch Layouts
Create a layout using 2D sketch geometry to represent
your design components and configurations. Use the
layout to position your components and evaluate
design feasibility. When component representations in
the layout are derived into part and assembly models,
associativity is maintained between the layout and the
components. Therefore, when changes are made to the
layout or component representations, the 3D models
are updated.
Sketch Blocks
Use sketch blocks to group 2D geometric
configurations that repeat in your models. After you
define a block, you place instances of the block to
represent component instances. Sketch block instances
are associated with their definitions so geometric
modifications to the definitions apply to all instances.
Use sketch blocks in your layouts to facilitate a topdown design workflow.
Define nested sketch blocks and place flexible instances
of these blocks to study assembly kinematics. These
flexible instances retain specified degrees of freedom
that allow them to simulate the kinematics of the
components under design.
Standard Mold Base Parts
Help improve productivity and avoid errors by reusing
existing mold design knowledge as you create the
detailed mold design in 3D. Begin by selecting mold
base components from standard catalogs, including
DME, HASCO, LKM, Meusburger, Misumi, National,
Progressive, Punch, and Sideco. Design or modify
standard components, such as sliders, lifters, ejectors,
sprue bushings, and locating rings. When you have
standard mold base components that meet your needs,
you can export them as templates for future use.
Mold Documentation
Reduce mold design lead time by generating drawings
and bills of materials (BOMs) automatically. Inventor
allows you to automatically create 2D drawings of mold
designs and related BOMs for use in documentation
or manufacturing. When you make changes to the
3D design model, Inventor automatically updates the
drawings and BOMs.
4
Autodesk Inventor 2010
Technical What’s New
Make Part and Make Components
Create your layout and investigate your design. When
you are satisfied with the design state, use the Make
Part or Make Components workflow to derive sketch
block instances into part or assembly file component
instances. The component instances remain associated
with the block instances and layout, so changes you
make to the block definitions or layout are reflected in
the part and assembly files.
The Make Components command translates sketch
constraints between blocks to assembly constraints
so all of the assembly kinematics can be created and
maintained associatively from the layout. In addition
the Make Part command can be used with the new solid
bodies to quickly produce multiple parts from a single
multibody part and assemble them in an assembly.
Unified FEA Environment for Parts and Assemblies
A single stress analysis environment provides you with
control over:
•Material selection—
change materials, update the simulation,
and see the results.
•Constraint and Load
definition—specify
the boundary conditions for your analysis.
•Contact conditions—
use automatic
contacts and manual
contacts to define the
component relationships.
•Mesh definition—global and local mesh controls
provide optimum refinement for analysis conditions.
•Representations—use design and level of detail
representations to simplify the model. Use positional
representations to analyze the model in a specific
position.
•Component visibility and exclusion—use these
options to further simplify the model by removing
components from being analyzed.
Optimization
Assembly optimization automatically seeks the
parameter values that meet the specified design
criteria.
Integrated Static and Modal Analysis
Easy-to-use integrated finite element analysis makes it
possible to analyze your design without translating the
CAD model or moving the data to another product. You
can perform both static and modal analysis to examine
deformation, and maximum and minimum stresses,
enabling you to design higher-quality parts and ensure
your design meets required safety factors.
You can promote the parameter values, resulting from
the studies or optimization, back into the Inventor
assembly model to update the part/assembly with
parameters selected during during the simulation
studies.
Create parametric studies, using the Parametric table,
to identify design constraints and parameter ranges.
Then use the parameter table controls to visualize the
effects of parameter changes on your design.
5
Autodesk Inventor 2010
Technical What’s New
Solver Performance
Autodesk Inventor 2010 software uses new solver
technology to provide improved performance for
complex assembly analysis and the exploration of
multiple design variations in parametric studies.
Interoperability
Autodesk Inventor 2010 software simplifies
interdisciplinary collaboration in the building sector
with simplified exchange of 3D mechanical systems data
between building systems suppliers and the building
designers.
Inventor 2010 expands an already comprehensive suite
of translators with support for CATIA V5, including
native translators that read and write files from other
CAD tools and translators for industry standard formats
such as IGES and STEP.
Shrink Wrap Assemblies
The new Shrinkwrap tool converts an assembly into
a single part file. The part file can be a solid or a
composite surface. The default setting produces a
compact composite surface file that retains all of the
colors of the original part bodies.
You can use the Shrinkwrap tool to:
•Hand off a dimensionally accurate envelope of the
assembly exterior to an architecture, engineering, and
construction partner.
•Protect intellectual property by concealing holes and
parts.
•Create an assembly that is greatly reduced in size for
use as an assembly substitute.
Browser Improvements
The Dynamic Simulation browser has been updated
to be consistent with the Inventor model browser.
The browser icons are familiar and have the same
meaning. Assembly commands are available, when
applicable, from the context menus in the simulation
environment. Additionally, this synchronization exposes
the constraints that make up each joint, giving you an
immediate picture of the relationship of the constraints
and joints.
6
Autodesk Inventor 2010
Technical What’s New
AEC Exchange
The new Export Building Components command
replaces the ABS Catalog Editor command in AEC
Exchange. This command saves model geometry,
properties, and connectors to an Autodesk Design
Package (.adsk) file. The .adsk file can be imported into
other Autodesk applications such as Autodesk Revit
MEP or AutoCAD MEP software.
When creating Duct and Pipe connectors, there are
new fields for System Type and Properties. The System
Type controls which properties are available for the
connector and the default values.
A new connector type called Electrical connector
has been added to the AEC Exchange environment.
This connector type supports electrical connections,
including power, telephone, alarm systems, and others. Usability and Productivity
Continued investment in improving the usability across
the product results in better workflows and increased
productivity. Improvements are to be found in the core
user interface as well as application areas including
the drawing manager, assembly management, content
management, sheet metal design, design accelerators,
weldments installation, and licensing. The following
sections discuss these enhancements in more detail.
User Interface Enhancements
Task Oriented Ribbon
The new Autodesk Inventor user interface provides
access to commands on a ribbon in place of the menu
and panel bars. The ribbon provides a single, compact
placement for operations that are relevant to the
current task at hand.
The File menu has been replaced by the Application
menu, which provides access to commands used to
work on a file as a whole. Access the Application menu
by clicking on the Autodesk Inventor product icon
located on the upper far left of the product interface.
Located just above the ribbon is the new Quick Access
toolbar, which you can use to store commands that you
use frequently.
CATIA V5 Translator
The new CATIA V5 translator gives you more flexibility
when working with vendors or customers that use
CATIA. You can import CATIA V5 files, versions R6
through R18, avoiding the need to use STEP or IGES.
The new translator reads both CATPart and CATProduct
files, bringing solids, surfaces, wires, and points into
Autodesk Inventor where they can then be used directly
in modeling operations. The CATIA translator also
exports models with support for CATIA V5 versions R10
through R18.
JT Translator
The existing JT export using tessellated surfaces is
enhanced with support for the JT precise (B-rep) format.
You can now import models with precise surface data to
support projects that require you to work with JT files
for effective collaboration with vendors or customers.
You can also export Inventor models as precise JT files
with the Save Copy As workflow. Supports JT Versions
8.2, 9.0, and 9.
7
Document Tabs
Each open document has a tab displayed along the
bottom of the Inventor window making it possible to
switch between open documents with a single mouse
click.
2D Spline Behavior
Tangent handles now display in a passive state when
you create a spline. You can now click anywhere on a
passive handle to activate it.
Two new commands are introduced to simplify a spline
handle reset: Reset All Handles and Reset Handle.
The word Bowtie is gone, and all options are available in
the root context menu.
Endpoints are square, and fit points are diamond
shaped to help identify joined sections.
Autodesk Inventor 2010
Technical What’s New
Improved Loft Usability
The process for creating lofted features involves
multiple selections to define the section profiles and
guide paths. You can use the dialog box to switch
between selecting the profile sections, rails, and
centerlines, or you can right-click and use the context
menu. Previous releases of Autodesk Inventor did
not have a context menu for the loft command. You
returned to the dialog box each time you changed the
selection type. The function to right-click and use a
context menu to change the selection type is added.
XYZ Axis Indicator Labels
X, Y, and Z labels are added to the ends of the
respective arrows of the XYZ indicator that appears in
3D views, part sketches and drawing sketches.
Auto Save
The new Auto Save function provides a save reminder
after a specified time period if your file needs to be
saved. You are provided with the option to launch a
standard File>Save request and save the document
in which you are working and its dependents.
Alternatively, you can click X to close the bubble
temporarily, and continue the timer, or click “Do not
show this message again” to turn off or turn on the Save
Reminder behavior.
Content Management
Desktop Content
If you are a stand-alone user, you can now store
Content Center libraries on your computer in the
Desktop Content folder. This new option provides
improved performance and eliminates the need to
install Microsoft® SQL and IIS on the desktop.
Material Guide
The Material Guide provides a streamlined environment
for adding material information to content. It includes
options for adding materials such as new Families
or new Family members and for adding a material
designator to File Name and Part Number. There is
also an option to remove existing materials that are no
longer needed.
Edit Family Tables in Excel
You can export the family table in Microsoft® Excel®,
edit the data, and then import the data back to the
family table.
Assembly Management
User-defined Assembly Folders
With browser folders, you can organize the browser to
more readily communicate design intent through logical
groupings of parts and drawing resources.
Use folders to organize your assembly browser and
improve workflow. Define folders, based on your chosen
convention, to group browser nodes.
Enhanced Assembly Restructure
Using Autodesk Inventor software, you can place or
create a component in an assembly without worrying
where it will reside in the final assembly structure. You
can restructure an assembly by moving parts, groups
of parts, component patterns, or entire subassemblies
within the browser hierarchy without changing the
physical position of previously placed parts.
Inventor will maintain constraints between components
when the assembly is restructured wherever possible.
User Coordinate Systems
The new user coordinate system,
or UCS, introduces more flexibility
and simplifies many advanced
design workflows. Commands
are provided to create a UCS in
parts, assemblies, and drawings.
Examples of the application of
user coordinate systems include:
•Moving sketches with respect to
reference geometry
•Changing the location of the 0, 0, 0 origin point, XY
plane, and Z axis
The user coordinate system is useful for entering
coordinates, creating 3D objects on 2D workplanes, and
rotating objects in 3D.
8
Autodesk Inventor 2010
Technical What’s New
Assembly Productivity Tools
Twelve tools that enhance assembly productivity are
included with this release. These tools were previously
available as an optional install.
•Rename Browser Nodes—This tool provides key enhancements and the ability to identify all component
nodes within an assembly using one of three naming
schemes: filename, part number, or the default.
Lofted Flange
The Lofted Flange provides the ability to create a
transition from one shape to another using two profiles
and to create these types of geometry. Selection of
two closed profiles such as a rectangle and a circle will
•Add Part—This tool provides a streamlined version of
Inventor software’s default Create Component command using a part file as the default.
•Add Subassembly —This tool provides a streamlined
version of Inventor software’s default Create Component command using an assembly file as the default.
•Save and Replace Component—This tool allows you
to select a component, save a copy, and replace the
component with the saved copy.
Sheet Metal Design
Contour Roll
Similar to the Contour Flange feature, the Contour Roll
requires an open profile sketch as input. Additionally,
the Contour Roll feature also requires the identification
of a sketched axis of revolution as well as an angle.
Offset direction options allow both the material
thickness and angle to be offset to one side or the other
of the selected profile or to use the selected profile as
the midplane of the material thickness or swept angle.
Contour Roll features may be unrolled using the Unfold
feature. The resulting straight section may be further
unfolded, allowing the addition of features to the model
in a flattened state. This flat model can then be refolded
and rerolled.
9
commonly be used to create parts similar to HVAC
ducting, material handling hoppers, exhaust hoods,
etc. In addition, the Lofted Flange will accept two open
profiles, or one closed and one open profile. The profiles
need not be parallel to each other.
An important consideration in the creation of a Lofted
Flange is the manufacturing process used to produce
the part. The Lofted Flange feature provides output
options that support both die-forming and press brake
fabrication. The die-form option produces smooth
transitions from one end to the other. The press brake
option automatically decomposes the shape into a
number of flat faces and straight bends.
Rip
Rip provides an easy way to add a gap in a
Lofted Flange that will allow the model
to flatten. The rip feature is defined by
identifying a point on one edge of the
face or by identifying two points—one
on either side of the selected face.
A Rip feature can also be created by
removing an entire face—often a bend
face between two shape defining faces.
Unfold/Refold Feature Pair
These two features are typically used as a pair. The
Unfold feature can be added to a folded sheet metal
model to allow the unfolding or unrolling of an existing
feature. Once the folded model has unfolded features it
is likely that features will be added that are most easily
defined in the flat. Following adding these features, a
Refold feature returns the model to the original folded
state.
Autodesk Inventor 2010
Technical What’s New
Bend Order Annotation
Features containing bends are created in a logical
sequence during the design of a folded part model;
however, it is rare that the fabrication of those bends
during manufacturing will follow the same sequence.
The Bend Order feature provides a means of specifying
a desired fabrication sequence to bends (including
Cosmetic Centerlines) identified in the flat pattern.
Other Sheet Metal Enhancements
•The Move Face feature is now available as a feature
that can be applied while working within the flat pattern.
•GapSize has been added as a system parameter that
can be used in value declarations.
•Sheet Metal Unfold Rules can now utilize Custom
Unfold Equations to define the bend zone
deformation applied when creating a flat pattern.
An equation editor and a bounding condition editor
have been added to the Style and Standard Editor for
Sheet Metal Unfold Rules to allow the definition of
equations and the conditions for using the equations.
•The width type of a specific bend from among a group
of bends created as a single feature can now be edited
by selecting the Bend Edit glyph during the creation
or edit of a Flange or Lofted Flange feature.
Weldments
Bends can be re-sequenced by: 1) selecting a beginning
bend and an ending bend and allowing the system to
reorder the bends that fall between, 2) by selecting
bends in the sequence desired, or 3) by applying a
specific bend order identification number to a selected
bend.
The Bend Order specified is subsequently recovered
when a Bend Table is created on a drawing containing a
flat pattern view.
Cosmetic Centerlines
There will be designs where you need a bend centerline
in your flat pattern for a feature that does not exist in
your folded model. A common example of this would be
for a stiffening crease. Another example would be the
addition of one or more bend lines on the flat pattern of
a die-formed design. The Cosmetic Centerline feature
allows you to select straight lines sketched on the flat
pattern and define these lines as bend centerlines with
bend direction and angle attributes.
Groove Welds
Groove welds have a new Fill Direction option called
Radial Fill. Use Radial Fill to satisfy conditions that do
not require a linear direction and avoid the need to split
faces.
A new Chain Faces option is added to allow you to
easily group face selections.
Fillet Welds
Fillet welds have new functionality that allows the weld
to span a gap that is smaller than the specified weld
bead.
A new Start-Length option is added to allow specifying
the Start position and Length of the weld. Use the
Direction arrow to reverse the start position if required.
Once a sketched line is declared to be a Cosmetic
Centerline, it will display bend extent lines in the flat
pattern. Cosmetic Centerlines can also be recovered in
flat pattern drawing view bend notes and bend tables.
10
Autodesk Inventor 2010
Technical What’s New
Drawing Manager
Design Accelerators
Aligned Section Views
Generate align section views on views where the
section line consist of two or more line segments.
Aligned or Projected methods of aligned section views
are controlled in the Section View dialog box.
Dual Units Display
Dual units can be displayed on Hole Notes, Chamfer
Notes, Bend Notes, Punch Notes, Hole Tables, Bend
Tables, and Punch Tables.
Drum Cam Generator
A new Drum Cam Generator was added to the Design
Accelerator design tools. It is located in the Design tab
in Assemblies. It enables you to design and calculate
drum cams, perform the strength check, and insert
them into the assembly.
The dual units display behavior is controlled by new
controls on the Alternate Units tab in dimension style
for all note types.
Arrange Dimensions Tool
A new command in the Annotate panel enables you to
arrange groups of selected dimensions (linear, angular,
coordinate, true isometric dimensions).
You can select dimensions in the drawing first, and
then execute the Arrange Dimensions command.
Alternatively, you can click the Arrange Dimensions
command first, and then select the dimensions in the
drawings.
You can select dimensions that lie along one axis or
dimensions arranged along multiple axes.
You can arrange dimensions in one or multiple views.
Spur Gear Improvements
You can now export exact tooth
geometry from spur gears as well as
manually adjust backlash in order
to achieve appropriate working and
manufacturing conditions for your spur
gear set.
An improved preview option provides
animated previews showing gear teeth
mesh as well as pinion-to-rack mesh
and gear-to-rack mesh.
O-Ring Generator Improvements
Using O-Ring Component Generator you can now
pattern radial and axial O-rings.
Bearing Generator Enhancements
A new Orientation button in the Bearing Generator
makes it easy to flip the bearing orientation to
simplify the addition of bearings that must be oriented
correctly such as tapered and angular contact bearings.
The bearing remains in the same position mated to
the same reference plane while the orientation its
orientation is changed by 180 degrees.
User-defined Symbol Folders
Use folders to organize your sketch symbols in the
Drawing Resources. Define folders under Sketched
Symbols and group the appropriate symbols within.
If you find that you recreate the same symbol folders
repeatedly for different drawings, consider using a
drawing template with the folders predefined.
User-defined symbol folders are represented by
distinctive icons and they exhibit the same open and
close behavior as other Inventor browser folders.
11
Autodesk Inventor 2010
Technical What’s New
Bill of Materials
Licensing, Installation, and Deployment
Assembly Level Storage of Custom Columns
Custom columns are now stored in the assembly file,
making it much easier to share custom BOM data.
Dynamic Licensing
Customers with a mix of Autodesk Inventor seats
(Inventor Suite, Simulation, Routed Systems, or
Professional) and who use the network license manager
typically install the higher-level Inventor flavor on
all machines so that each user can run the version of
Inventor that best meets their needs at the time.
BOM Editor Usability
The Bill of Materials dialog box now supports a
spreadsheet usage paradigm.
•Use the Shift or Ctrl key on your keyboard to control
selection.
•Use a grip point in the bottom-right corner of a selection to expand a single cell or block of cells. If the
original selection contains a single row or column,
values are copied to the expanded rows or columns.
•Copy BOM cells within the BOM table, to another
BOM view, or to an external editor. Copying preserves
BOM formulas.
•Drag and drop rows in the BOM table. The functionality is also available for noncontiguous selection sets.
•Commands are available in the context menu (Copy,
Paste, Capitalize, Find, and Replace).
•Copy and paste data between the Bill of Materials
dialog box and Microsoft Office Excel. Noncontiguous
selection sets in the BOM table are supported.
Open from BOM Editor
Use the Open command to open a part or assembly
file from the Bill of Materials dialog box. The Open
command is available in the right-click menu for a
selected (highlighted) component in the BOM table.
Better Integration of BOM Editor and Graphics
Window
The BOM Editor has been enhanced so you can now
pan, rotate, and zoom the model while working
in the BOM Editor. In addition, you now see parts
and assemblies highlighted when you select the
corresponding cell or row in the BOM dialog box.
Similarly, selecting a component in the assembly
browser or graphic window will highlight the
corresponding row in the BOM dialog.
12
In the past, switching from one version, such as
Autodesk® Inventor® Suite software, to another
version, such as Autodesk® Inventor® Professional
software, required you to close Inventor and restart it
again. With Inventor 2010 this is no longer necessary.
Inventor 2010 installations using network licenses
always start with an Inventor Suite license and
dynamically switch licenses only when you invoke a
command that requires a higher-value license. This
enhancement optimizes license usage since users only
consume higher-value licenses when required.
FLEXnet
The license manager for Inventor 2010 uses FLEXnet in
place of FLEXlm.
Multiple Language Support
Inventor 2010 installer provides support for language
packs, allowing you to select the language during
installation or during the creation of a deployment.
For 2010 the English language pack is included with the
localized product in North and South America and all
Asia regions except Japan. It is not available in EMIA
regions.
Combined CAD Manager Control Utility
The CAD Manager Control Utilities for AutoCAD®
software and Inventor have been combined into a
single utility.
Autodesk Inventor 2010
Technical What’s New
MDT Translator Improvements
Improved translation of MDT DWG™ files into Inventor
drawing files including:
•Option to convert all Autodesk® Mechanical annotation drawing symbols to Inventor sketch symbols
•Option to map Autodesk Mechanical datum IDs,
FCF, and surface texture symbols to native Inventor
symbols
•Thread representation improved by replacing thread
representations with Inventor thread feature edges
•Enhanced feature pattern and drawing dimension
translation
iFeature Enhancements
•Easily create a table-driven iFeature from a tabledriven iPart
•Flip Surface Normal upon iFeature Insertion
•Key 1 values in the iFeature may be displayed in the
browser
•Use a table-driven iFeature in table-driven iPart in a
table-driven iAssembly
•Extract iFeature custom properties in the custom
properties tab of the part file
•Create an iFeature from a table driven iPart
Other Enhancements
•Balloon snap and alignment in 15-degree increments
during creation reduces the need to realign balloons
after placement
•Projecting geometry in a drawing to a sketch associated with the view now matches the part modeling
workflow.
•Dimension selection filter
•Refresh model properties copied to drawing properties
•Open drawings from the part/assembly browser
•Option to set insertion point to view center or model
origin for DWG view blocks
•Insert option for placing a view block in DWG model
space
•Recover centerlines
•Dimensioning to spline end points and min/max
points
•Attach text to leadered annotations
•Insertion of view block definitions into Autodesk
Inventor DWG model space is now allowed
•Ability to define view block insertion point as model
origin rather than view center
Improved Measure Command
With the enhanced Measure command, you can now
preselect entities before you start the command. If the
selection set is compatible with the specified measure
tool, the results display. If the selection set is not
compatible with the requested measure command, the
selection set is cleared. For example, if three part edges
are selected before you choose to measure distance,
the selection set is cleared. If one object is selected and
it is compatible with the requested measure tool, the
selection is retained.
In assemblies, the default selection filter for the
measure distance command is now set to Select Faces
and Edges to support the most common workflows.
The selection filter is persistent. If the filter is changed,
that filter is active for the rest of the session unless a
new filter is selected. A preselected set uses a different
filter. A new session uses the filter defaults.
Autodesk and AutoCAD are registered trademarks of Autodesk, Inc., in the USA and/or other countries. All other brand names, product
names, or trademarks belong to their respective holders. Autodesk reserves the right to alter product offerings and specifications at
any time without notice, and is not responsible for typographical or graphical errors that may appear in this document.
© 2009 Autodesk, Inc. All rights reserved.