1
Operation of the WaveBird Controller
Nintendo GameCube™
WaveBird™ Wireless Controller
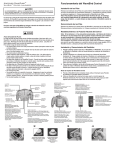
Installing Batteries
WARNING
PLEASE CAREFULLY READ THE HEALTH AND SAFETY PRECAUTIONS BOOKLET INCLUDED WITH THE
NINTENDO GAMECUBE SYSTEM OR GAMES BEFORE USING THIS ACCESSORY. THIS BOOKLET
CONTAINS IMPORTANT HEALTH AND SAFETY INFORMATION.
Please read the Nintendo GameCube instruction booklet before using this accessory.
The Nintendo GameCube WaveBird Wireless Controller allows you to play games on
your Nintendo GameCube without the inconvenience of long cords stretching between
the player and the video game console.
Please note that the WaveBird Controller does not have a built-in rumble feature
like the original Nintendo GameCube Controller.
Remove the battery cover on the back of the WaveBird and insert two AA batteries as
shown (Illustration 1). Be sure to insert the negative (-) ends first. Replace the battery
cover.
NOTE: Fresh high quality alkaline batteries will supply up to 100 hours of use,
however this will vary depending on surrounding temperature, type of game play,
type of battery and how long the WaveBird is left on when not in use.
Removing Batteries
Remove the cover on the back of the WaveBird and remove two AA batteries. Remove
the positive (+) ends first. Replace the battery cover.
Controller Neutral Position Reset
WARNING
BATTERY LEAKAGE:
Leakage of battery acid can cause personal injury as well as damage to your WaveBird
Controller. If battery leakage occurs, thoroughly wash the affected skin and clothes.
Keep battery acid away from your eyes and mouth. Leaking batteries may make
popping sounds.
To avoid battery leakage:
• Do not mix used and new batteries (replace all batteries at the same time).
• Do not mix alkaline with any other type of battery (carbon zinc, nickel cadmium, etc).
• Do not mix different brands of batteries.
• Use only alkaline or carbon zinc batteries. Do not use nickel cadmium (nicad) or
nickel metal hydride (nimh) batteries.
• Do not leave used batteries in the WaveBird Controller. When the batteries are
losing their charge, the Power Indicator will become dim. When this happens,
promptly replace all
used batteries with fresh new batteries.
• Do not leave batteries in the WaveBird Controller for long periods of non-use.
• Do not leave the Power Switch ON after the batteries have lost their charge.
When you finish using the WaveBird Controller, always slide the Power Switch OFF.
• Do not recharge the batteries.
• Do not put the batteries in backwards. Make sure that the positive (+) and
negative (-) ends are facing in the correct directions. Insert the negative end first.
When removing batteries, remove the positive end first.
• Do not dispose of batteries in a fire.
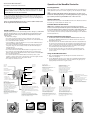
start/pause
mise en march/pause
empezar/pausar
control stick
mannette
palanca de control
+ control pad
+ coussinet de
contrôle manuel
+ mando de control
power switch
Slide switch up to turn power ON.
When finished playing, always slide
the power switch OFF.
commutateur d'alimentation
Faites glisser le commutateur en position
ON pour allumer l'appareil. Quand vous
cessez de jouer, faites toujours glisser ce
commutateur en position OFF pour
éteindre l'appareil.
interruptor para prender
Para prender, deslice el interruptor hacia
arriba (ON). Cuando haya terminado de jugar,
siempre deslice el interruptor a la posición
apagado (OFF).
1
Installing and Removing the Receiver
1. Set the same channel on both the WaveBird and the Receiver. When using
more than one WaveBird and Receiver, use a different channel for each pair of
WaveBirds and Receivers.
2. Insert the Receiver into the Nintendo GameCube Controller Socket (Illustration 3).
Be careful to insert the Receiver into the Controller Socket straight, parallel to the
socket as shown. The Controller Socket used will vary depending upon the game.
Please read the Game Disc instruction booklet for the game you are playing for
more information about which Controller Socket to use.
3. To remove the Receiver, pull it out of the Controller Socket (Illustration 4). Be
careful to pull the Receiver straight out of the Controller Socket, parallel to the
socket as shown.
Using the WaveBird Controller
1. Turn on the WaveBird Controller by sliding the Power Switch UP. The Power
Indicator should light up.
2. Use the WaveBird Controller as you would use the original Nintendo GameCube
Controller. Please read the Game Disc instruction booklet for the game you are
playing forÊspecific instructions on game controls.
battery cover
Remove cover to insert or
replace batteries.
r button
bouton r
botón r
l button
bouton l
botón l
NOTE: If the L or R Buttons are pressed or the Control Stick or C Stick are
moved out of neutral position when the power is turned ON, those positions will
be set as the neutral position, causing incorrect game control during game play.
To reset the controller, release all buttons and sticks to allow them to return to the
correct neutral position, then turn the power OFF and then ON again on the WaveBird
Controller (Illustration 2).
couvercle du logement des piles
Retirez le couvercle pour insérer
ou remplacer les piles.
z button
bouton z
botón z
cobertura de las pilas
Remueva la cobertura para insertar
o reemplazar pilas.
y button
bouton y
botón y
receiver indicator
Indicates that a signal sent from the
WaveBird is received properly.
témoin lumineux du récepteur
Indique qu'un signal envoyé à partir
du WaveBird est adéquatement re u.
indicador del recibidor
Indica que la señal enviada por el VaveBird
es redibida apropiadamente.
x button
bouton x
botón x
controller socket plug
Insert into one of the Nintendo GameCube
Controller Sockets
a button
bouton a
botón e
connexion du contrôle manuel
Insérez dans l'une des prises pour
contrôle manuel du Nintendo GameCube.
b button
bouton b
botón b
enchufe de control
Inserte en una de las entradas para los
controles en el Nintendo GameCube.
c stick
commande c
palanca c
power indicator
Lights up when power is on. The Power Indicator will
begin to fade when the batteries are losing their charge.
témoin lumineux d'alimentation
S'illumine quand l'appareil est en fonction. Le témoin
lumineux commencera à pâlir quand les piles perdront
leur charge.
indicador de encendido
Se ilumina cuando el Interruptor para Prender se
encuentra en la posición prenidido (ON). El Indicador
de Encendido se empezará a volver opaco cuando
las pilas estén perdiendo su energ’a.
channel switch (1-16)
Use switch to select matching channels for
each Controller and Receiver pair used.
channel switch (1-16)
Use switch to select matching channels
for each Controller and Receiver pair used.
commutateur de canal (1-16)
Utilisez ce commutateur pour régler le
m me canal sur chaque paire de
contrôle manuel/récepteur utilisée.
commutateur de canal (1-16)
Utilisez ce commutateur pour choisir
des canaux assortis pour chaque
paire de contrôle manuel/récepteur utilisée.
interruptor de canales (1-16)
Utilice este interruptor para escoger canales
que coincidan con cada pareja de controles y
recibidores que se usen.
interruptor de canales (1-16)
Utilice este interruptor para escoger canales
que coincidan con cada pareja de controles y
recibidores que se usen.
2
Control Stick neutral position
Position neutre de la manette
Posición neutral de la
Planca de Control
3
C Stick neutral position
Position neutre de la
commande C
Posición neutral de la
Palanca C
4
For best results, follow these guidelines:
Warranty & Service Information
•
You may need only simple instructions to correct a problem with your product. Try our web site at www.nintendo.com or call
our Consumer Assistance Hotline at 1-800-255-3700, rather than going to your retailer. Hours of operation are 6 a.m. to 7 p.m.,
Pacific Time, Monday - Sunday (times subject to change). If the problem cannot be solved with the troubleshooting information
available on-line or over the telephone, you will be offered express factory service through Nintendo or referred to the nearest
NINTENDO AUTHORIZED REPAIR CENTER. Please do not send any products to Nintendo without contacting us first.
•
•
•
•
Use the WaveBird and Receiver within 20 feet (6 meters) of each other. The
effective range may vary depending on outside interference from radio frequency
sources.
Avoid using the WaveBird around devices that may cause radio frequency
interference such as cordless phones, microwave devices or wireless LANs (local
area networks).
Change the channel settings on matching pairs of WaveBirds and Receivers if they
seem to be working improperly.
Replace the batteries if the Power Indicator becomes dim.
Be sure to turn the Power Switch OFF when not using the WaveBird.
Troubleshooting
If you are having trouble getting the WaveBird Controller to work properly, try the
following solutions before calling for service:
•
•
•
•
•
•
•
•
•
Make sure that the receiver is fully inserted into the correct controller socket on the
front of the Nintendo GameCube.
Make sure that the power is ON, and that the Power Indicator is lit. If the power is
ON but the Power Indicator is not lit or is dim, try installing fresh new batteries.
Make sure that the channel settings match for each pair of controllers/receivers that
are connected to the console.
Try setting the controller/receiver to a different channel if the operation seems
inconsistent or incorrect.
If you are using more than one set of controllers/receivers, make sure that they are
not set to the same channel.
Reset the control stick/analog button alignment by following the procedure
described earlier, if the game control seems inconsistent or incorrect.
Make sure you are 20 feet (6 meters) or less from the receiver.
Make sure when you are playing, that the top of the controller is pointed in the
direction of the receiver.
Check for interference from radio frequency devices such as cordless phones,
microwave devices, or wireless LANs (local area networks). Try removing the
source of interference or move the game system away from any potential
interference or try turning off the source of interference if possible. Try changing the
channel settings on the controller/receiver pair.
FCC Information
This device complies with Part 15 of the FCC Rules. Operation is subject to the
following two conditions: (1) This device may not cause harmful interference, and (2)
this device must accept any interference received, including interference that may
cause undesired operation.
CAUTION: Changes or modifications not expressly approved by the manufacturer could
void the user’s authority to operate this device.
Industry Canada Information
Operation is subject to the following two conditions: (1) this device may not cause
interference, and (2) this device must accept any interference, including interference
that may cause undesired operation of the device.
To prevent radio interference to the licensed service, this device is intended to be
operated indoors and away from windows to provide maximum shielding. Equipment
(or its transmit antenna) that is installed outdoors is subject to licensing.
The Term “IC:” before the certification/registration number only signifies that the
Industry Canada technical specifications were met.
HARDWARE WARRANTY
Nintendo of America Inc. ("Nintendo") warrants to the original purchaser that the hardware product shall be free from defects in material
and workmanship for twelve (12) months from the date of purchase. If a defect covered by this warranty occurs during this warranty
period, Nintendo or a NINTENDO AUTHORIZED REPAIR CENTER will repair the defective hardware product or component, free of
charge. The original purchaser is entitled to this warranty only if the date of purchase is registered at point of sale or the consumer can
demonstrate, to Nintendo's satisfaction, that the product was purchased within the last 12 months.
GAME PAK & ACCESSORY WARRANTY
Nintendo warrants to the original purchaser that the product (Game Paks and accessories) shall be free from defects in material and
workmanship for a period of three (3) months from the date of purchase. If a defect covered by this warranty occurs during this three
(3) month warranty period, Nintendo or a NINTENDO AUTHORIZED REPAIR CENTER will repair the defective product, free of charge.
SERVICE AFTER EXPIRATION OF WARRANTY
Please try our web site at www.nintendo.com or call the Consumer Assistance Hotline at 1-800-255-3700 for troubleshooting
information and/or referral to the nearest NINTENDO AUTHORIZED REPAIR CENTER. In some instances, it may be necessary for
you to ship the complete product, FREIGHT PREPAID AND INSURED FOR LOSS OR DAMAGE, to the nearest service location.
Please do not send any products to Nintendo without contacting us first.
WARRANTY LIMITATIONS
THIS WARRANTY SHALL NOT APPLY IF THIS PRODUCT: (a) IS USED WITH PRODUCTS NOT SOLD OR LICENSED BY
NINTENDO (INCLUDING, BUT NOT LIMITED TO, NON-LICENSED GAME ENHANCEMENT AND COPIER DEVICES, ADAPTERS,
AND POWER SUPPLIES); (b) IS USED FOR COMMERCIAL PURPOSES (INCLUDING RENTAL); (c) IS MODIFIED OR TAMPERED
WITH; (d) IS DAMAGED BY NEGLIGENCE, ACCIDENT, UNREASONABLE USE, OR BY OTHER CAUSES UNRELATED TO
DEFECTIVE MATERIALS OR WORKMANSHIP; OR (e) HAS HAD THE SERIAL NUMBER ALTERED, DEFACED OR REMOVED.
ANY APPLICABLE IMPLIED WARRANTIES, INCLUDING WARRANTIES OF MERCHANTABILITY AND FITNESS FOR A
PARTICULAR PURPOSE, ARE HEREBY LIMITED IN DURATION TO THE WARRANTY PERIODS DESCRIBED ABOVE (12
MONTHS OR 3 MONTHS, AS APPLICABLE). IN NO EVENT SHALL NINTENDO BE LIABLE FOR CONSEQUENTIAL OR
INCIDENTAL DAMAGES RESULTING FROM THE BREACH OF ANY IMPLIED OR EXPRESS WARRANTIES. SOME STATES DO
NOT ALLOW LIMITATIONS ON HOW LONG AN IMPLIED WARRANTY LASTS OR EXCLUSION OF CONSEQUENTIAL OR
INCIDENTAL DAMAGES, SO THE ABOVE LIMITATIONS MAY NOT APPLY TO YOU.
This warranty gives you specific legal rights. You may also have other rights which vary from state to state or province to
province.
Nintendo's address is: Nintendo of America Inc., P.O. Box 957, Redmond, WA 98073-0957 U.S.A.
This warranty is only valid in the United States and Canada.
NEED HELP WITH INSTALLATION, MAINTENANCE
OR SERVICE?
NINTENDO CUSTOMER SERVICE
WWW.NINTENDO.COM
or call 1-800-255-3700, MON.-SUN.,
6:00 a.m. to 7:00 p.m, Pacific Time
(Times subject to change)
TTY Consumer Service: 800-422-4281
NEED HELP PLAYING A GAME?
You can visit our web site at www.nintendo.com for game
play information. For automated game play tips and news,
call Nintendo's Power Line at: 1-425-885-7529.
This may be a long distance call, so please ask permission
from whomever pays the phone bill.
Rather talk with a game counselor?
1-800-521-0900
Available in U.S. and Canada - $1.50 Per Minute (In U.S. Funds)
Please have Visa or MasterCard Ready
MON. - SUN., 6:00 a.m. to 7:00 p.m.; Pacific Time
Callers under 18 need to obtain parental permission to call.
Prices subject to change.
TTY Game Play Assistance: 425-883-9714
If you would like to order Nintendo parts, please visit our online
store at www.nintendo.com or call 1-800-255-3700. This Nintendo
product is not designed for use with any unauthorized accessories.
TM and ® are trademarks of Nintendo. © 2003 Nintendo