1
Version 5.5
SurfControl Web Filter
Administrator's Guide
™
Notices
NOTICES
©1996–2008, Websense Inc.
All rights reserved.
10240 Sorrento Valley Rd., San Diego, CA 92121, USA
Published January 2008
This document may not, in whole or in part, be copied, photocopied, reproduced, translated, or reduced to any electronic medium or
machine-readable form without prior consent in writing from Websense Inc.
Every effort has been made to ensure the accuracy of this manual. However, Websense Inc., makes no warranties with respect to
this documentation and disclaims any implied warranties of merchantability and fitness for a particular purpose. Websense Inc. shall
not be liable for any error or for incidental or consequential damages in connection with the furnishing, performance, or use of this
manual or the examples herein. The information in this documentation is subject to change without notice.
Trademarks
SurfControl and Websense are registered trademarks of Websense, Inc. in the United States and certain international markets.
Websense has numerous other unregistered trademarks in the United States and internationally. All other trademarks are the
property of their respective owners.
Microsoft, Windows, Windows NT, Windows Server, and Active Directory are either registered trademarks or trademarks of Microsoft
Corporation in the United States and/or other countries.
This product includes software distributed by the Apache Software Foundation (http://www.apache.org).
Copyright (c) 2001-2004. The Apache Software Foundation. All rights reserved. Licensed under the Apache License, Version 2.0
(the "License"); you may not use this file except in compliance with the License. You may obtain a copy of the License at http://
www.apache.org/licenses/LICENSE-2.0.
Other product names mentioned in this manual may be trademarks or registered trademarks of their respective companies and are
the sole property of their respective manufacturers.
This product contains software licensed under the BSD open source license. For more information visit www.opensource.org.
SurfControl Web Filter contains the MD5.H - header file for MD5C.C: Copyright © 1991-2, ROSA Data Security, Inc. Created 1991. All
rights reserved.
SurfControl Web Filter v5.5
Administrator’s Guide
i
Notices
ii
Administrator’s Guide
SurfControl Web Filter v5.5
TABLE OF CONTENTS
Notices............................................................................................................................................. i
Introduction to Web Filter .............................................................................................. 1
About SurfControl Web Filter.......................................................................................................... 2
Basic Configuration........................................................................................................ 3
Introduction..................................................................................................................................... 4
Basic Web Filter Service Settings ..................................................................................... 4
Initial Monitored Data Settings........................................................................................... 4
Basic Rules Configuration ................................................................................................. 4
Scheduling Tasks .............................................................................................................. 4
Reporting ........................................................................................................................... 4
Basic Service Settings.................................................................................................................... 5
Accessing the Service Settings ......................................................................................... 5
Understanding the Settings ............................................................................................... 5
More Information ............................................................................................................... 8
Initial Monitored Data Settings........................................................................................................ 9
The Default Monitor Settings ............................................................................................. 9
More Information ............................................................................................................. 12
Basic Rule Configuration .............................................................................................................. 13
Recommendations for Creating and Applying Rules ....................................................... 13
Scheduling Tasks ......................................................................................................................... 14
More Information ............................................................................................................. 14
Remote Administration ................................................................................................ 15
Introduction................................................................................................................................... 16
What the Remote Administration Client Does ................................................................. 16
Prerequisites.................................................................................................................... 16
Licensing ....................................................................................................................... 17
Licensing Web Filter ..................................................................................................................... 18
Entering a Web Filter License Key .................................................................................. 18
Privacy Edition .............................................................................................................. 19
What It Does.................................................................................................................................
Comparing the Standard and Privacy Editions................................................................
Privacy Edition Features...............................................................................................................
Change the Manager and Union passwords ...................................................................
Viewing User Details .......................................................................................................
20
20
22
22
22
The Web Filter Manager ............................................................................................... 25
Introduction...................................................................................................................................
Opening the Web Filter Manager ....................................................................................
Working With the Web Filter Manager..........................................................................................
The Navigation Pane .......................................................................................................
The Central Pane ............................................................................................................
The Information Pane ......................................................................................................
SurfControl Web Filter v5.5
26
26
27
27
27
28
Administrator’s Guide
iii
SurfControl Web Filter ..................................................................................................................
Data Displayed ................................................................................................................
Tasks ...............................................................................................................................
Web Filter Server..........................................................................................................................
Server Information Dashboard ........................................................................................
Tasks ...............................................................................................................................
Monitored Data .............................................................................................................................
Data .................................................................................................................................
Filters...............................................................................................................................
Users ............................................................................................................................................
Summary User Information..............................................................................................
Detail User Information....................................................................................................
Tasks ...............................................................................................................................
Monitored Data Tasks .....................................................................................................
Monitored Users Tasks....................................................................................................
Monitored Connections Tasks .........................................................................................
Destinations..................................................................................................................................
Detail Destination Information .........................................................................................
Tasks ...............................................................................................................................
Monitored Destinations tasks ..........................................................................................
Categories ....................................................................................................................................
Summary Category Information.......................................................................................
Detail Category Information .............................................................................................
Tasks ...............................................................................................................................
Categories tasks..............................................................................................................
Content Protection........................................................................................................................
Maintenance .................................................................................................................................
30
30
30
32
32
33
34
34
34
36
36
36
38
39
41
44
45
45
46
47
49
49
49
51
51
52
53
Rules Administrator...................................................................................................... 55
Introduction...................................................................................................................................
Guidelines For Rule Creation ..........................................................................................
Rule Objects .................................................................................................................................
Who Objects .................................................................................................................................
Creating User Defined Who Objects ...............................................................................
Where Objects..............................................................................................................................
Creating User Defined Where Objects ............................................................................
Category Object...............................................................................................................
Where Lists......................................................................................................................
What Objects ................................................................................................................................
Protocols/Ports Objects ...................................................................................................
Precise Bandwidth Controls Object .................................................................................
What Lists........................................................................................................................
When Objects ...............................................................................................................................
Allowance Objects ........................................................................................................................
10 MB Volume Object......................................................................................................
30 Minute Time Object ....................................................................................................
Notify Objects ...............................................................................................................................
iv
Administrator’s Guide
56
56
59
60
61
64
64
67
69
70
70
73
74
75
78
78
79
81
SurfControl Web Filter v5.5
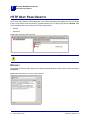
HTTP Deny Page Objects ............................................................................................................
Default .............................................................................................................................
Allowance ........................................................................................................................
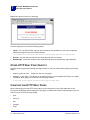
Other HTTP Deny Page Objects .....................................................................................
Constructing HTTP Deny Pages .....................................................................................
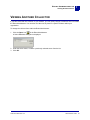
Viewing Another Collector ............................................................................................................
84
84
85
86
86
87
Real Time Monitor......................................................................................................... 89
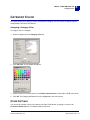
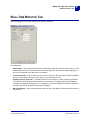
Introduction...................................................................................................................................
Display Columns...........................................................................................................................
Category Color .............................................................................................................................
Other Settings..................................................................................................................
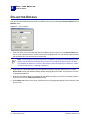
Collector Details ...........................................................................................................................
Stopping and Starting the Real-Time Monitor ..............................................................................
90
92
93
93
94
95
Web Filter Settings ....................................................................................................... 97
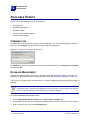
Introduction................................................................................................................................... 98
How To Configure the Web Filter Settings ...................................................................... 98
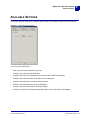
Available Settings ......................................................................................................................... 99
Start/Stop Service Tab ............................................................................................................... 100
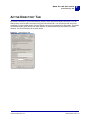
Active Directory Tab ................................................................................................................... 101
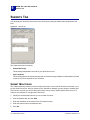
Subnets Tab ............................................................................................................................... 102
Subnet Monitoring ......................................................................................................... 102
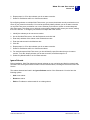
Advanced Tab ............................................................................................................................ 104
Network Settings ........................................................................................................... 104
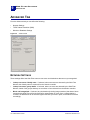
TCP/IP Name Resolution (DNS) ................................................................................... 105
Monitor to Database Settings ........................................................................................ 105
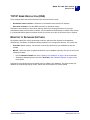
Categorization Tab ..................................................................................................................... 106
Categorization ............................................................................................................... 106
Company Domains and Intranet Destinations ............................................................... 106
Internet Threat Database Improvement Program .......................................................... 106
Protocol Signatures Tab ............................................................................................................. 107
Ignored Ports Tab....................................................................................................................... 108
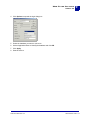
Creating new ports ........................................................................................................ 109
Username Resolution .................................................................................................... 109
Enterprise User Monitoring ............................................................................................ 110
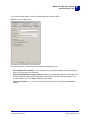
Real-Time Monitor Tab............................................................................................................... 111
Database Tab ............................................................................................................................. 112
E-mail Notifications Tab.............................................................................................................. 114
Custom Categorization............................................................................................... 117
Introduction.................................................................................................................................
How It Works .................................................................................................................
The VCA in Evaluation Mode ........................................................................................
Using Custom Categorization.....................................................................................................
List of Destinations Tab .................................................................................................
VCA Settings Tab ..........................................................................................................
VCA Results Tab ...........................................................................................................
The VCA Service Settings .............................................................................................
SurfControl Web Filter v5.5
118
118
118
119
119
121
122
124
Administrator’s Guide
v
Databases .................................................................................................................... 127
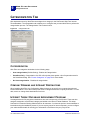
Creating a New SQL Server Database.......................................................................................
Managing databases ..................................................................................................................
Archive...........................................................................................................................
Purge .............................................................................................................................
Compact ........................................................................................................................
Delete ............................................................................................................................
Restore ..........................................................................................................................
Options ..........................................................................................................................
Updating Your Database ............................................................................................................
Upgrading your database ...........................................................................................................
Importing/exporting databases ...................................................................................................
exporting manually categorized sites ............................................................................
Importing manually categorized sites ............................................................................
128
129
130
130
131
131
132
133
134
136
137
137
138
Scheduler..................................................................................................................... 139
Introduction.................................................................................................................................
Available Events .........................................................................................................................
Command Line ..............................................................................................................
Database Management .................................................................................................
Database Update...........................................................................................................
Internet Threat Database Update ..................................................................................
Network Groups Update ................................................................................................
140
142
142
142
143
144
144
Appendix...................................................................................................................... 145
Contact Technical Support ......................................................................................................... 146
Sales and Feedback................................................................................................................... 148
Index..............................................................................................................................149
vi
Administrator’s Guide
SurfControl Web Filter v5.5
Chapter 1
Introduction to Web Filter
About SurfControl Web Filter. . . . . . . . . . . . . . . . . . . . . . . . . . . . . . . . . . . . . . . . . . . . . . . . . . . page 2
1
INTRODUCTION TO WEB FILTER
About SurfControl Web Filter
ABOUT SURFCONTROL WEB FILTER
Web-based e-mail, file downloads, Instant Messaging (IM), Peer to Peer (P2P), and unauthorized Web
surfing can expose your enterprise network to serious, debilitating attacks and undesirable code, including
spyware, adware, malware, and pornography. SurfControl Web Filter offers a proactive security solution
that protects your enterprise against known, emerging, and customer-specific threats before they reach
your network.
Your IT staff will appreciate how easy it is to deploy and manage SurfControl's enterprise-wide Web
protection. With fewer administrative headaches, they can focus on other important assignments and
projects.
SurfControl Web Filter allows you to actively monitor network use and abuse anywhere in your
organization. You can even extend real-time protection to mobile users who connect to the corporate
network with SurfControl Mobile Filter. The same corporate security rules apply, so mobile devices are
shielded from unwanted intrusions, minimizing unexpected shutdowns that lead to lapses in productivity.
SurfControl Web Filter bolsters your defenses by providing:
•
Bullet proof infrastructure security – Automatic, real-time security updates through our
comprehensive threat database, which is constantly kept current with knowledge gathered by our
global threat experts.
•
Legal liability protection – Prevents circulation of inappropriate content that violates copyright laws
or infringes rights.
•
Regulatory compliance – Helps you meet HIPAA, Sarbanes-Oxley, and other industry or government
security requirements.
•
Enhanced employee productivity – Limits Web surfing and downtime due to attacks and improves
IT productivity because it's easy to implement and manage.
2
Administrator’s Guide
SurfControl Web Filter v5.5
Chapter 2
Basic Configuration
Introduction . . . . . . . . . . . . . . . . . . . . . . . . . . . . . . . . . . . . . . . . . . . . . . . . . . . . . . . . . . . . . . . . . . . page 4
Basic Service Settings . . . . . . . . . . . . . . . . . . . . . . . . . . . . . . . . . . . . . . . . . . . . . . . . . . . . . . . . . . page 5
Initial Monitored Data Settings. . . . . . . . . . . . . . . . . . . . . . . . . . . . . . . . . . . . . . . . . . . . . . . . . . . . page 9
Basic Rule Configuration . . . . . . . . . . . . . . . . . . . . . . . . . . . . . . . . . . . . . . . . . . . . . . . . . . . . . . . page 13
Scheduling Tasks . . . . . . . . . . . . . . . . . . . . . . . . . . . . . . . . . . . . . . . . . . . . . . . . . . . . . . . . . . . . . page 14
2
BASIC CONFIGURATION
Introduction
INTRODUCTION
This chapter introduces you to some basic features and configuration settings that will help you set up
Web Filter effectively.
This chapter will cover the following:
BASIC WEB FILTER SERVICE SETTINGS
This section explains some of the service settings for Web Filter. These settings control how Web Filter
monitors Internet traffic and the actions it takes when blocking access to sites. This section covers:
•
Where to find the service settings.
•
What some of the basic service settings do.
•
What effect changing the settings will have.
•
Where to find more information.
INITIAL MONITORED DATA SETTINGS
Web Filter allows you to monitor various Internet behaviors, and apply settings to individual users or
groups. This section covers:
•
Where to find the monitor settings.
•
What the default settings are.
•
The other settings that are available.
BASIC RULES CONFIGURATION
You can either implement some of the default rules supplied with Web Filter or construct your own. This
section explains how you should approach rule creation.
SCHEDULING TASKS
You can organize tasks that need to be performed when Internet traffic is low, or when your users are not
logged on to your network. This section describes what events are available.
REPORTING
For reporting with Web Filter, you need to install SurfControl Report Central. This section describes some
of the features of our reporting tool.
4
Administrator’s Guide
SurfControl Web Filter v5.5
BASIC CONFIGURATION
Basic Service Settings
2
BASIC SERVICE SETTINGS
This section will explain some of the basic service settings for Web Filter.
ACCESSING THE SERVICE SETTINGS
You can access the service settings in one of three ways:
•
From the Control Panel > SurfControl Web Filter menu item.
•
By right-clicking the SurfControl Web Filter icon
Configure Web Filter Service from the menu.
•
From the Configuration menu item in the Web Filter Manager navigation tree.
in the notification area of the taskbar and selecting
UNDERSTANDING THE SETTINGS
This section explains the features of some of the service settings and further options you may want to
consider.
This section covers:
•
Stopping and starting the service
•
Configuring subnets for balancing the load on your Web Filter server.
•
E-mail notifications
Restart the Web Filter Service
Web Filter can require you to restart the Web Filter service before changes you have made can be applied.
These changes can include changing the Web Filter service settings. You can restart the service by rightclicking the SurfControl Web Filter icon and selecting Restart Web Filter Service.
Note: This option is also available in the Start/Stop Service tab of the SurfControl Web Filter
Service Settings dialog.
You can also stop or start the Web Filter service by right-clicking the Web Filter icon and selecting Start
Web Filter service or Stop Web Filter service.
SurfControl Web Filter v5.5
Administrator’s Guide
5
2
BASIC CONFIGURATION
Basic Service Settings
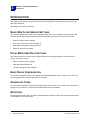
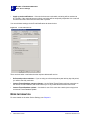
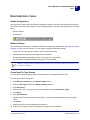
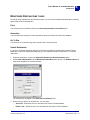
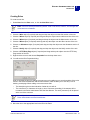
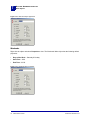
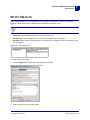
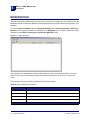
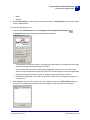
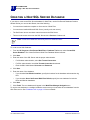
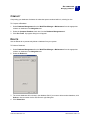
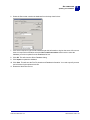
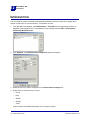
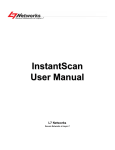
Configure Subnets
Configuring subnets helps to reduce or balance the load on your Web Filter server(s), enabling it to work
more efficiently. Use the Subnets tab to configure subnets:
Figure 2-1
Subnets tab
The Subnets tab has two sections:
•
Subnet Monitoring – These settings help reduce or balance the load on your Web Filter server.
•
Ignore Subnets – These settings show the internal subnets that were detected when you ran the
Configuration Wizard. These subnets are not monitored.
Subnet Monitoring
The Subnet Monitoring section is used to identify which parts of your network should be monitored or not
by each Web Filter server. How you decide on this, depends on whether you have single or multiple Web
Filter servers, and how you want to divide the network volume load of traffic between those servers. To
configure your subnets on a single Web Filter server:
1
Identify the external traffic subnets you do not want to monitor.
2
Click the Subnets tab, and click Add.
3
Enter the IP address of the subnet in the IP Address text box.
4
Enter the subnet mask in the Mask text box.
5
Click OK.
6
Repeat steps 1 to 5 for other subnets you do not want to monitor.
7
Select Do not Monitor traffic to or from these subnets.
6
Administrator’s Guide
SurfControl Web Filter v5.5
BASIC CONFIGURATION
Basic Service Settings
2
By configuring subnets on multiple Web Filter servers, you ensure the subnets are only monitored on one
server in your network environment. You need to specifically identify subnets you do not want to monitor
on one Web Filter server, and define one or more subnets you do want to monitor on each subsequent
Web Filter server. This allows you to divide the volume load of network traffic across your servers, making
them more efficient. To configure your subnets on multiple Web Filter servers:
1
Identify the subnets you do not want to monitor.
2
On the first Web Filter server, click the Subnet tab, and click Add.
3
Enter the IP address of the subnet in the IP Address text box.
4
Enter the subnet mask in the Mask text box.
5
Click OK.
6
Repeat steps 1 to 5 for other subnets you do not want to monitor.
7
Select Do not Monitor traffic to or from these subnets.
8
For each subsequent Web Filter server, you should identify a specific subnet that you do want to
monitor. To do this, identify subnets you do want to monitor, and follow steps 2 to 5.
9
Select Only Monitor traffic to or from these subnets.
Ignore Subnets
The internal subnets detected during the initial running of the Configuration Wizard are listed in the Ignore
Subnets section of the Subnets tab. You also have the following options:
•
Add a new subnet.
•
Remove a subnet.
•
Edit the IP address or subnet mask for an existing subnet.
E-mail Notifications
When running the Configuration Wizard during installation, you were asked to give the following e-mail
setup information:
•
E-mail Server
•
Recipient Address
•
From Address
You were also asked to select the types of messages that the System Administrator should receive alerts
about:
•
Service running status changes – If the Web Filter or Scheduler service is stopped or started.
•
Internet Threat Database license reminders – A reminder will be sent when a subscription to the
Internet Threat Database is due for renewal. A reminder will be sent a month from expiry, then a week
from expiry, and a day from expiry. Once a subscription has expired a reminder will be sent every 24
hours.
•
Scheduled task failures – If any scheduled task fails to run successfully.
SurfControl Web Filter v5.5
Administrator’s Guide
7
2
•
BASIC CONFIGURATION
Basic Service Settings
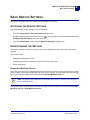
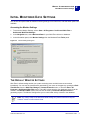
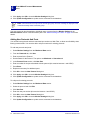
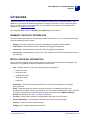
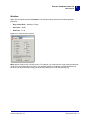
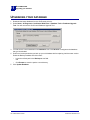
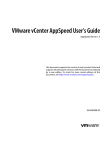
Catch up mode notifications – If the service becomes overloaded, monitoring will be restricted to
HTTP traffic. If the overload becomes critical, monitoring will be temporarily suspended. An e-mail will
be sent when Web Filter enters and exits catch up mode.
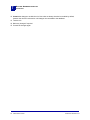
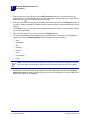
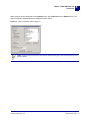
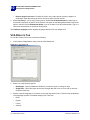
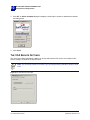
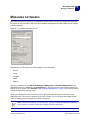
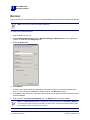
You can edit these settings via the E-mail Notification tab shown below:
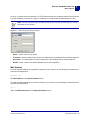
Figure 2-2
E-mail Notification tab
There are three other e-mail alerts that the recipient address will receive:
•
Unlicensed product reminders - If you are using an unlicensed product past its thirty day trial period,
you will be sent daily reminders.
•
Internet Threat Database category changes - As the Global Threat Experts add new categories to
the Internet Threat Database, this e-mail informs you of any modifications that have been made.
•
Internet Threat Database updates - A reminder is sent if it is more than a week (seven days) since
an Internet Threat Database update.
MORE INFORMATION
For more details on the other Service Settings, see Chapter 9.
8
Administrator’s Guide
SurfControl Web Filter v5.5
BASIC CONFIGURATION
Initial Monitored Data Settings
2
INITIAL MONITORED DATA SETTINGS
This section will explain what the default monitoring settings are for Web Filter, and what other options are
available.
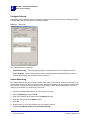
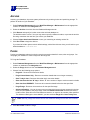
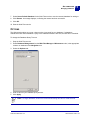
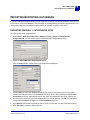
Accessing the Monitor Settings
1
To access the Monitor Settings, select: Start > All Programs > SurfControl Web Filter >
SurfControl Web Filter Manager.
2
In the Navigation tree, select Monitored Data for your Web Filter collector or database.
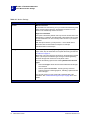
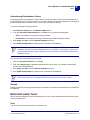
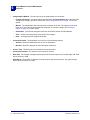
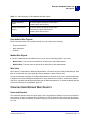
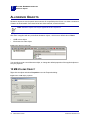
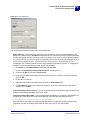
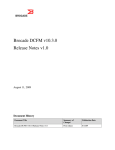
3
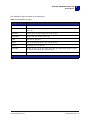
In the Information panel, click Monitor Settings from the Monitored Data Tasks panel.
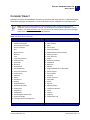
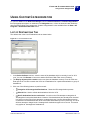
Figure 2-3
Monitor Settings dialog box
THE DEFAULT MONITOR SETTINGS
Web Filter’s default settings enable you to start monitoring users and their Internet connections
immediately. You can see the Internet traffic generated by your users as it happens by opening the RealTime Monitor from the Web Filter Manager > Content Protection menu, or from the Start > All
Programs > SurfControl Web Filter menu. This traffic is then saved to your database, where it can be
viewed in the Monitored Data window, and can also be used by SurfControl Report Central for
generating reports. The Monitor Settings allow you to control what activity is saved to the database.
Note: Any change made to the Monitored Data settings only affects data from that point
onwards. It does not affect historic data.
SurfControl Web Filter v5.5
Administrator’s Guide
9
2
BASIC CONFIGURATION
Initial Monitored Data Settings
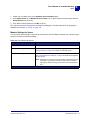
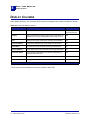
Table 2-1 Monitor Settings
Tab
Description
General
Monitor new users
By default all new users who log on to your network are detected by Web
Filter, and their Internet activity is automatically monitored. You can
select not to automatically monitor new users.
Page level information
This option is selected by default. It will only store the domain name of an
allowed site. For example, www.allowedsite.com/someinfo will be stored
as www.allowedsite.com. This can help reduce the size of your monitor
database.
With this option selected, you will just see a ‘/’ in the Detail column.
All blocked sites are stored with the full path. For example:
www.blockedsite.com/music/mp3
File Types
By default, only certain web page file types (asp, aspx, htm, html, jsp,
mspx, shtml, stm) are monitored. The complete list of file types is shown
in Table 2-2 on page 12.
Monitoring of too many file types can impact on the performance of Web
Filter. If you suspect a certain file type is being accessed significantly,
select the file type and monitor it for a set period of time.
You have the following options when selecting Monitored custom file
types:
•
Select the file type. All file extensions associated with this file type
are monitored.
•
Select a specific file extension. The file type entry which this
extension belongs to will be grayed out, indicating a partial selection
for this file type.
You can also create your own groups with customized lists of file
extensions. See "Create New File Type Groups" on page 39 for more
details.
10
Administrator’s Guide
SurfControl Web Filter v5.5
BASIC CONFIGURATION
Initial Monitored Data Settings
2
Table 2-1 Monitor Settings
Tab
Description
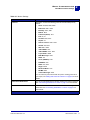
Protocols
Web Filter monitors the following protocols and associated ports by
default:
•
HTTP: 3128, 80, 8000, 8080
•
BitTorrent: 6881 - 6999
•
EDonkey: 4661, 4662
•
EZPeer: 8870
•
FastTrack (Kazaa): 1214
•
FTP: 20, 21
•
Gnutella: 6346, 6347
•
Gopher: 70
•
Hotline Connect: 5500 - 5503
•
HTTPS: 443, 8443
•
IRC: 6660 - 6669
•
Jabber/SIMP: 7467
•
Jabber/XMPP: 5222 - 5224
•
Liquid Audio: 18888
•
MSN Messenger: 1863
•
NNTP: 119
•
Oscar (AIM/ICQ): 5190
•
PNM/PNA: 7070
•
RTSP: 554, 8554
•
Skype: 33033
•
Windows Media: 1755
•
WinMX: 6699
•
Yahoo! Messenger: 5050
You can add new protocols and add new ports to existing protocols as
you require, see "Adding New Protocols And Ports" on page 40 for more
details.
Unmonitored Destinations
You can exclude destinations (including domains) from being monitored.
See "Unmonitoring Destinations or Users" on page 41 for more details.
Unmonitored Users
You can exclude individual users or a whole domain from being
monitored. See "Unmonitoring Destinations or Users" on page 41 for
more details.
SurfControl Web Filter v5.5
Administrator’s Guide
11
2
BASIC CONFIGURATION
Initial Monitored Data Settings
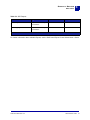
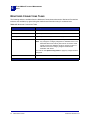
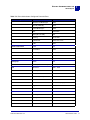
Table 2-2 List of File Types
File Type Group
File Extensions Monitored
Audio Files
aac, aif, aifc, aiff, au, cda, m3u, m4p, mid, midi, mp3, ogg, rmi, snd, wav, wax, wma.
Compressed Files
ace, arc, arj, b64, bhx, cab, gz, gzip, hqx, iso, jar, lzh, mim, rar, tar, taz, tgz, tz, uu, uue,
xxe, z, zip.
Documents
csv, doc, docx, dot, pdf, ppt, pptx, ps, rtf, txt, xls, xlsx.
Executables
bat, cfc, cmd, com, dll, exe, jse, ocx, xpi.
Feeds
opml, rdf, rss, rss2, xml.
Images
bmp, gif, jfif, jpe, jpeg, jpg, pcx, png, psd, tif, tiff, wmf.
Scripting
cgi, js, php, pl, py, vb, vbe, vbs.
Video Files
asf, asx, avi, divx, ivf, mlv, mov, mp2, mp2v, mpa, mpe, mpeg, mpg, mpv2, qt, ra, ram,
rm, swf, wm, wmd, wmp, wmv, wmx, wvx, wxv.
Web Pages
asp, aspx, css, htm, html, jsp, mspx, shtml, stm.
MORE INFORMATION
For further details on the Monitored Data settings, see Chapter 6.
12
Administrator’s Guide
SurfControl Web Filter v5.5
BASIC CONFIGURATION
Basic Rule Configuration
2
BASIC RULE CONFIGURATION
SurfControl Web Filter uses rules, which you can use to apply your Acceptable Use Policy to your users.
There are three types of rules:
•
Allow - Uses positive filtering to give access. This is the default setting for any new rule you create.
•
Disallow - Uses negative filtering to deny access.
•
Allowance - Uses a combination of positive and negative filtering to set up limits for internet access.
The allowance value can either be time based (allowing access for a predefined time limit), or value
based (allowing only a predefined amount of bandwidth to be consumed). Once these limits have been
reached, access is blocked.
Rules are created and activated from the Rules Administrator, which you can access via the Web Filter
Manager > Content Protection option for your collector or database, or from the Start > All Programs >
SurfControl Web Filter menu. Web Filter rules consist of various objects which can be configured to suit
your needs. To help you, the Rules Administrator comes supplied with some preconfigured rules. If you
wish to implement any of these rules, all you have to do is activate them. You can do this in the following
way from the Rules Administrator interface:
1
Select the check box to the left of the rule you wish to activate, or right-click the rule you want to
activate and select Active from the right-click menu.
2
Click Commit to save the changes to your database.
RECOMMENDATIONS FOR CREATING AND APPLYING RULES
Before building your own rules, consider altering one of the preconfigured rules in the list. To examine the
rule’s objects, select a rule and from the right-click menu, select properties. You can check how the rule
objects have been used, and modify the settings for each one. For an in depth description of the various
rule objects, see Chapter 7.
When applying rules keep the following in mind:
•
Rules are read sequentially and will not be overwritten by a rule that follows. The fewer rules you have,
the more efficiently Web Filter will perform.
•
Rules are processed from the top of the list in the Rule Panel downwards. Rules which are applied to
individuals or small groups should be placed near the top of the list.
•
NEVER set up a "Disallow, Anybody, Anywhere, Anytime" rule because it will block all access
throughout your network. It is recommended that you test rules on a single machine before
implementing a network-wide policy.
•
It is strongly recommended that only one user modifies rules in the Rules Administrator at any one
time. This is to prevent any corruption of the database which will cause the Rules Administrator to
crash, rendering it inoperable.
SurfControl Web Filter v5.5
Administrator’s Guide
13
2
BASIC CONFIGURATION
Scheduling Tasks
SCHEDULING TASKS
When you ran the Configuration Wizard, you were asked to set up two scheduled tasks:
1
Internet Threat Database updates
2
Database Maintenance
These tasks are controlled by the Scheduler, accessed from the Web Filter Manager > Maintenance
option for your database, or from the Start > All Programs > SurfControl Web Filter menu. The
Scheduler enables you to run certain events at a time when you will have no users logged on to your
network, or if an event requires a lot of bandwidth.
You can configure the following events in the Scheduler:
•
Command Line
•
Database Management
•
Database Update
•
Internet Threat Database Update
•
Network Groups Update
MORE INFORMATION
For more information on configuring the various events, see Chapter 12.
14
Administrator’s Guide
SurfControl Web Filter v5.5
Chapter 3
Remote Administration
Introduction . . . . . . . . . . . . . . . . . . . . . . . . . . . . . . . . . . . . . . . . . . . . . . . . . . . . . . . . . . . . . . . . . . page 16
What the Remote Administration Client Does . . . . . . . . . . . . . . . . . . . . . . . . . . . . . . . . . . . . . . page 16
Prerequisites . . . . . . . . . . . . . . . . . . . . . . . . . . . . . . . . . . . . . . . . . . . . . . . . . . . . . . . . . . . . . . . . . page 16
3
REMOTE ADMINISTRATION
Introduction
INTRODUCTION
The Remote Administration Client allows you to remotely access the Web Filter server to create reports,
design or edit rules, and view the database.
You can install the Remote Administration Client on computers in your network that comply to the
minimum requirements specified in the Starter Guide. For details on installing the Remote Administration
Client, refer to the Starter Guide.
WHAT THE REMOTE ADMINISTRATION CLIENT DOES
You can use the Remote Administration Client to access the following Web Filter functions from a different
computer:
•
The Web Filter Manager - View Internet traffic via the Monitored Data Navigation tree option.
•
The Rules Administrator - Create and edit rules.
•
The Web Filter database - Connect to your database without being at the actual machine.
•
The Real-Time Monitor - See your Internet traffic in real time.
Note: You cannot use the Remote Administrator to configure the Web Filter service.
PREREQUISITES
For each Computer:
•
The Remote Administration Client version of Web Filter must be installed. Refer to the Starter Guide
for more details.
•
From the Web Filter Manager, select Add Server from the Tasks tab. Enter the name of the Web
Filter server you want to connect to.
•
For reports you will need the client shortcut URL to be able to log in to Report Central. See the
SurfControl Report Central Starter Guide for more details.
16
Administrator’s Guide
SurfControl Web Filter v5.5
Chapter 4
Licensing
Licensing Web Filter . . . . . . . . . . . . . . . . . . . . . . . . . . . . . . . . . . . . . . . . . . . . . . . . . . . . . . . . . . . page 18
4
LICENSING
Licensing Web Filter
LICENSING WEB FILTER
You can use Web Filter on a trial basis for 30 days. To continue to use the full functionality of the product
past the trial period, including updating the Internet Threat Database, you must contact SurfControl to
obtain an appropriate license for your user count. For more details on obtaining a license, visit
www.surfcontrol.com
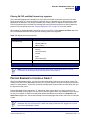
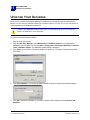
ENTERING A WEB FILTER LICENSE KEY
To license your Web Filter product:
1
Obtain a Web Filter license serial number from SurfControl.
2
Right-click the SurfControl icon
in the notification area of the taskbar. From the menu, select
About. The About SurfControl dialog box will appear.
3
Click Serialize. The Serialize dialog box will appear. Enter the Serial Number obtained from
SurfControl in the field. Click OK.
The next time you view the About dialog box, you will see your serial number and user license details. This
dialog box also holds information on the latest Internet Threat Database installed, as well as the number of
days your subscription has left. When you purchase a license for Web Filter, a one year subscription to
Internet Threat Database updates is included. A reminder e-mail will be sent to the Systems Administrator
when this subscription is due for renewal.
18
Administrator’s Guide
SurfControl Web Filter v5.5
Chapter 5
Privacy Edition
What It Does. . . . . . . . . . . . . . . . . . . . . . . . . . . . . . . . . . . . . . . . . . . . . . . . . . . . . . . . . . . . . . . . . . page 20
Privacy Edition Features. . . . . . . . . . . . . . . . . . . . . . . . . . . . . . . . . . . . . . . . . . . . . . . . . . . . . . . . page 22
5
PRIVACY EDITION
What It Does
WHAT IT DOES
In certain European countries, laws have been passed which prohibit the use of monitoring software to
check user browsing details, unless express permission has been given by a manager and a union
representative.
COMPARING THE STANDARD AND PRIVACY EDITIONS
The tables below outline the differences between Web Filter Standard and Privacy Editions of SurfControl
Web Filter.
Table 5-1 Web Filter Manager
Item
Action
Standard Edition
Privacy Edition
User Menu
Rename User
Yes
No
Right-Click User Menu
Get Friendly Name
Yes
No
Get User Name
Yes
No
View User Detail
No
Yes
Change Manager
Password
No
Yes
Change Union Password
No
Yes
Monitored Data Tasks
Table 5-2 Real-Time Monitor
Item
Action
Standard Edition
Privacy Edition
Options Menu
User
Yes
Unavailable
Client Name
Yes
Unavailable
Client IP Address
Yes
Unavailable
20
Administrator’s Guide
SurfControl Web Filter v5.5
PRIVACY EDITION
What It Does
5
Table 5-3 SRC Reports
Item
Type
Standard Edition
Privacy Edition
Quick Reports
Top N Workstations by
Connections
Yes
No
Summary Reports
Top N Workstations by
Connections
No
Yes
For further information about available Reports, see the SurfControl Report Central Administrator’s Guide.
SurfControl Web Filter v5.5
Administrator’s Guide
21
5
PRIVACY EDITION
Privacy Edition Features
PRIVACY EDITION FEATURES
Viewing users details requires the permission of a manager and a union representative. The Privacy
Edition is supplied with a preconfigured password of ‘admin’, for both the manager and union
representative. SurfControl recommends that the designated manager and union representative change
their password as soon as possible after installation.
CHANGE THE MANAGER AND UNION PASSWORDS
To change the passwords:
1
From the Web Filter Manager > Monitored Data, select Change Manager or Change Union
Password from the Tasks tab.
2
Enter the old password (‘admin’ for the original password).
3
Enter a new password. This can be up to 40 characters long and can be alpha, numeric or a
combination of both.
4
Verify the password by re-entering it.
5
Click OK to set the password.
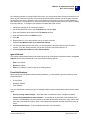
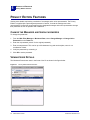
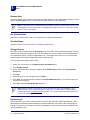
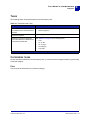
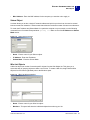
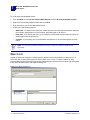
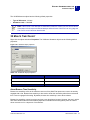
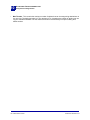
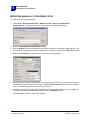
VIEWING USER DETAILS
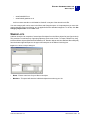
The Monitored Data shows users in the format ‘User X’ as shown in the figure below:
Figure 5-1
22
Privacy Edition Monitored Users
Administrator’s Guide
SurfControl Web Filter v5.5
PRIVACY EDITION
Privacy Edition Features
5
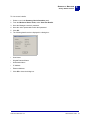
To view a user’s details:
1
Select a user in the Summary User Information panel.
2
From the Monitored Users Tasks, select View User Details.
3
Have the Manager enter their password.
4
Have the union representative enter their password.
5
Click OK.
6
The following details are then displayed in a dialog box:.
•
User Name
•
Original Detected Name
•
Workstation Name
•
IP Address
•
Ethernet Address
7
Click OK to close the dialog box.
SurfControl Web Filter v5.5
Administrator’s Guide
23
5
24
PRIVACY EDITION
Privacy Edition Features
Administrator’s Guide
SurfControl Web Filter v5.5
Chapter 6
The Web Filter Manager
Introduction . . . . . . . . . . . . . . . . . . . . . . . . . . . . . . . . . . . . . . . . . . . . . . . . . . . . . . . . . . . . . . . . . . page 26
Working With the Web Filter Manager. . . . . . . . . . . . . . . . . . . . . . . . . . . . . . . . . . . . . . . . . . . . . page 27
SurfControl Web Filter . . . . . . . . . . . . . . . . . . . . . . . . . . . . . . . . . . . . . . . . . . . . . . . . . . . . . . . . . page 30
Web Filter Server . . . . . . . . . . . . . . . . . . . . . . . . . . . . . . . . . . . . . . . . . . . . . . . . . . . . . . . . . . . . . . page 32
Monitored Data . . . . . . . . . . . . . . . . . . . . . . . . . . . . . . . . . . . . . . . . . . . . . . . . . . . . . . . . . . . . . . . page 34
Users. . . . . . . . . . . . . . . . . . . . . . . . . . . . . . . . . . . . . . . . . . . . . . . . . . . . . . . . . . . . . . . . . . . . . . . . page 36
Destinations . . . . . . . . . . . . . . . . . . . . . . . . . . . . . . . . . . . . . . . . . . . . . . . . . . . . . . . . . . . . . . . . . . page 45
Categories . . . . . . . . . . . . . . . . . . . . . . . . . . . . . . . . . . . . . . . . . . . . . . . . . . . . . . . . . . . . . . . . . . . page 49
Content Protection . . . . . . . . . . . . . . . . . . . . . . . . . . . . . . . . . . . . . . . . . . . . . . . . . . . . . . . . . . . . page 52
Maintenance. . . . . . . . . . . . . . . . . . . . . . . . . . . . . . . . . . . . . . . . . . . . . . . . . . . . . . . . . . . . . . . . . . page 53
6
THE WEB FILTER MANAGER
Introduction
INTRODUCTION
The SurfControl Web Filter Manager:
•
Shows the Servers and databases you are monitoring with Web Filter.
•
Displays the historic Internet activity of users.
•
Helps you configure how Web Filter manages Internet threats.
•
Helps you maintain Web Filter to ensure it performs efficiently.
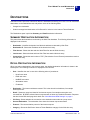
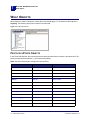
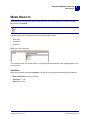
OPENING THE WEB FILTER MANAGER
Select Web Filter Manager From the Start > All Programs > SurfControl Web Filter menu.
Figure 6-1
26
Web Filter Manager
Administrator’s Guide
SurfControl Web Filter v5.5
THE WEB FILTER MANAGER
Working With the Web Filter Manager
6
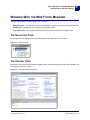
WORKING WITH THE WEB FILTER MANAGER
The Web Filter Manager screen is divided into 3 columns:
•
Navigation pane - This displays the server and database connections you have made with Web Filter.
•
Central pane - Displays the item selected in the navigation pane.
•
Information pane - This displays tasks and help for the item selected in the navigation pane.
THE NAVIGATION PANE
The Navigation pane displays the servers and databases that Web Filter is connected to.
Figure 6-2
Navigation Pane
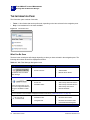
THE CENTRAL PANE
Depending on the option selected in the navigation pane, information about your Web Filter installation will
be displayed in the central pane.
Figure 6-3
Web Filter Manager Dashboard
SurfControl Web Filter v5.5
Administrator’s Guide
27
6
THE WEB FILTER MANAGER
Working With the Web Filter Manager
THE INFORMATION PANE
The information pane consists of two tabs:
•
Tasks - A list of tasks that can be performed, depending on the item selected in the navigation pane.
•
Help - User assistance for the tasks available.
Figure 6-4
Information Pane
What Can Be Seen
The data in the central pane will change depending on what you have selected in the navigation pane. The
following table shows what will be displayed and when:
Table 6-1 Web Filter Manager Navigation items
Navigation tree item
Data viewed
Tasks
•
SurfControl Web Filter Dashboard
•
Add Server
•
Server Overview
•
Add Database
•
Refresh Server Status
The default view of the Web
Filter Manager.
For more details on the information displayed and tasks at this level. ("SurfControl Web Filter" on page 30)
This is the server that you set
up in the Configuration Wizard
during the installation of Web
Filter.
•
Service Status
•
Remove Server
•
Server Info
•
Start or Stop Web Filter Service
•
Database Status
•
Start or Stop Scheduler Service
•
Start or Stop VCA Service
•
Refresh Database
For more details on the information displayed and tasks at this level. ("Web Filter Server" on page 32)
•
28
Administrator’s Guide
Users tab
•
Monitored Data tasks
•
Destinations tab
•
Monitored Users tasks
•
Categories tab
•
Monitored Connections tasks
•
Print Destinations/Categories
SurfControl Web Filter v5.5
THE WEB FILTER MANAGER
Working With the Web Filter Manager
6
Table 6-1 Web Filter Manager Navigation items
Navigation tree item
Data viewed
Tasks
For more details on the information displayed and tasks at this level. ("Monitored Data" on page 34)
•
Rules Administrator
•
Real-Time Monitor
•
Custom Categorization
For more details on the Content Protection tools. ("Content Protection" on page 52)
•
Web Filter Settings
•
Database Management
•
Virtual Control Agent Settings
•
Database Updater
•
Scheduler
For more details on the Maintenance tools. ("Maintenance" on page 53)
SurfControl Web Filter v5.5
Administrator’s Guide
29
6
THE WEB FILTER MANAGER
SurfControl Web Filter
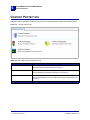
SURFCONTROL WEB FILTER
This is the default view when you open the Web Filter Manager.
DATA DISPLAYED
In the central pane you will see the following information:
•
The Web Filter Dashboard
•
The Web Filter Server Overview
Web Filter Dashboard
The dashboard is a central place for obtaining further information and advice about Web Filter. You can
access documentation about the following:
•
Threat alerts
•
Knowledge Base articles
•
Information on other SurfControl products
•
Product upgrades
•
White papers and tools
•
Access and raise tickets with Technical Support
Web Filter Server Overview
This shows which servers you have Web Filter installed on, and their current status.
TASKS
From the SurfControl Web Filter Dashboard view, you can import and analyse the monitored data from
multiple Web Filter servers and databases, by adding them from the Tasks pane.
Add Server (if you are running a multi-collector environment)
If you wish to install Web Filter on more than one machine, for instance to monitor specific areas of your
network, you need to add the server to your Web Filter Manager. See the Network Considerations chapter
of the Starter Guide for more details about installing Web Filter on your network.
To add a new server to the Web Filter Manager:
1
Select the SurfControl Web Filter item in the Navigation pane tree.
2
From the Tasks pane select Add Server.
3
In the Add Server dialog box, enter either the name or IP address of the server you want to add.
30
Administrator’s Guide
SurfControl Web Filter v5.5
THE WEB FILTER MANAGER
SurfControl Web Filter
4
Click OK.
5
The server should be visible in the Navigation tree.
6
Add Database
To add a new database to an existing server:
1
Select the SurfControl Web Filter item in the Navigation pane tree.
2
From the Tasks pane select Add database.
3
In the Add Database dialog box, enter the name or IP address in the Server text box.
4
Use either the Trusted Connection (selected by default) or enter a valid SQL Server Login ID and
Password.
5
Select an available Web Filter database from the Database drop-down list box.
6
Click OK.
7
The database should be visible under the server Navigation tree item.
Refresh Server Status
You can refresh the status of your server at any time.
SurfControl Web Filter v5.5
Administrator’s Guide
31
6
THE WEB FILTER MANAGER
Web Filter Server
WEB FILTER SERVER
When you installed SurfControl Web Filter, you set up a server using the Configuration Wizard. This server
will appear in the navigation tree under the SurfControl Web Filter item as shown below:
Figure 6-5
Web Filter server
SERVER INFORMATION DASHBOARD
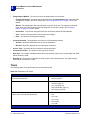
With the server selected, the Server Information Dashboard displays the following information:
Table 6-2 Server Information Dashboard
Section
Data
Service Status
This section displays the status of the following Web Filter services:
Server Info
•
Web Filter Service
•
Scheduler Service
•
VCA Service
This section displays the following information:
•
Database Status
32
Administrator’s Guide
Web Filter Platform
•
Web Filter Version
•
Last Update Time (for the Internet Threat Database)
•
User License - Shows the current product license information.
•
Internet Threat Database - Displays the version number and the
number of days remaining for the General List and Search Engine
Database for your current subscription.
This section displays the following information about your Web Filter
database:
•
Database Server - The name of the server your database is installed
on.
•
Database Name - The name of the Web Filter database. The default
name is SurfControl_WebFilter.
•
Destination Count - The number of Internet destinations stored in
the database.
•
User Count - The number of users monitored in your database.
•
Database size - The current size of your Web Filter database. If
using a SQL Server Express database, the Microsoft recommended
maximum size is 4GB.
SurfControl Web Filter v5.5
THE WEB FILTER MANAGER
Web Filter Server
6
TASKS
From the SurfControl Web Filter Server view, you can perform the following tasks:
•
Remove Server
•
Stop or Start Web Filter Service
•
Stop or Start Scheduler Service
•
Stop or Start VCA Service
•
Refresh Database
SurfControl Web Filter v5.5
Administrator’s Guide
33
6
THE WEB FILTER MANAGER
Monitored Data
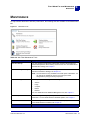
MONITORED DATA
Monitored data is where you see who has been using the internet, the sites they have visited, and the
categories those sites have been assigned to in the SurfControl Internet Threat Database.
DATA
The central pane consists of 3 tabs for Monitored Data:
•
Users - Those employees detected by Web Filter.
•
Destinations - Where those employees have been visiting on the Internet.
•
Categories - Destinations visited are categorized, either by the standard categories as supplied by the
SurfControl Internet Threat Database, or any custom or manual categories you may create.
How Data is sorted in the Web Filter Manager
In the three Monitored Data tabs, the default view is restricted to the first 5000 entries in the summary
panels. If you have less than 5000 entries, these will be automatically sorted on the first column in the row
(User, Destination or Category), showing the latest entry at the top.
If you have more than 5000 entries (you will see a caution if you exceed this limit), the first 5000 entries are
shown based on the Last Access information. To change the default number of rows:
1
Close the SurfControl Web Filter Manager application.
2
Locate the file SurfControl.Application.exe.config.
In a default installation this is located in C:\Program Files\SurfControl\Web Filter.
3
Open SurfControl.Application.exe.config with Notepad.
4
Locate the line: <add key="SurfControl.Plugins.WF.Monitor.DataSetFillCount"
value="5000"/>
5
Change the value="5000" setting to the required value.
6
Save the SurfControl.Application.exe.config file.
7
Open the SurfControl Web Filter Manager application.
Note: Increasing the number of rows may have a significant impact on the performance of the
Web Filter server.
FILTERS
Filters are available for all Monitored Data tabs. You can filter by the following options:
•
Show All (default view)
•
Access Date
34
Administrator’s Guide
SurfControl Web Filter v5.5
THE WEB FILTER MANAGER
Monitored Data
•
Access Time
•
Categorization Method
•
Category
•
Connection Status
•
Destination
•
Destination IP
•
Detail
•
Group
•
Protocol Name
•
Source IP
•
Source Workstation
•
User Name
•
Via Proxy
•
Custom Filters
6
Alternatively you can create your own custom filters from the two pre-configured filters:
•
Last 24 Hours
•
Last 7 Days
Creating a Custom Filter
To create your own custom filter:
1
From the Filter drop-down list box select Custom Filters > Manage Custom Filters.
2
Select New from the Custom Filters dialog box.
3
Enter a name for your filter.
4
Select the option that you want to customize in the left-hand pane.
5
Configure the criteria to suit your needs.
6
Repeat steps 1 to 5 for any additional filters.
7
Click OK to save your custom filter.
8
Click Close to close the Custom Filters dialog box. You can now select your filter from the Custom
Filters drop-down list box.
9
You can also Edit or Delete your custom filters from the Custom Filters > Manage Custom Filters
menu, or when selected with the Edit or Delete buttons next to the Filters drop-down list box.
Note: You can only have one of each criteria type for each custom filter. Once you have created
a custom filter, it is available on all the Monitored Data tabs.
SurfControl Web Filter v5.5
Administrator’s Guide
35
6
THE WEB FILTER MANAGER
Users
USERS
SurfControl Web Filter monitors all users who log on to your network. The Users tab shows various
information about users’ Internet activity. You can perform tasks, such as assigning users to groups for
more meaningful reporting. You can decide what activity you want to monitor and whether you want to
exclude any users from having their activity recorded in the database.
The Users pane is split into Summary and Detail users information.
SUMMARY USER INFORMATION
This pane shows the users monitored by the Web Filter database. The following information is displayed in
the columns:
•
User - Identifies the user’s name (in the following order of precedence):
–
Novell user name
–
EUM user name
–
NetBIOS user name
–
Workstation name
–
IP address
•
Last Workstation - Displays the name of the last workstation the user was monitored on. If the name
is not available, the IP Address will be displayed.
•
Last IP Address - Shows the last IP Address the user was monitored on.
•
First Access - Shows the date and time Web Filter first logged Internet activity from this user.
•
Last Access - Displays the date and time Web Filter last logged Internet activity from this user.
•
Connections - Shows the total number of TCP (Transmission Control Protocol) transactions a user
has received from the Internet.
•
Monitor Setting - Shows the file type monitoring setting. The installed Default setting monitors Web
page traffic only.
DETAIL USER INFORMATION
When you select a user in the summary pane, details of their monitored activity are shown in the bottom
pane. The following information is displayed:
•
36
User - Identifies the user’s name (in the following order of precedence):
–
Novell user name
–
EUM user name
–
NetBIOS user name
–
Workstation name
–
IP address
Administrator’s Guide
SurfControl Web Filter v5.5
THE WEB FILTER MANAGER
Users
6
•
Destination - The Internet address accessed. This is the domain level address, for example
www.mysite.com.
•
Detail - Shows any page level detail of the Internet request, for example www.mysite.com/
morestuff.htm. By default, Internet requests with a connection status of Allowed will not show any
detail information. Requests with a status of Blocked will show page level detail. See "The Default
Monitor Settings" on page 9 for more details.
•
Via Proxy - Shows if the connection to the destination was made via a proxy server.
•
Source Workstation - The workstation from where the Internet request was made.
•
Protocol - The protocol of the Internet request.
•
Category - The category assigned to the request.
•
Categorization Method - The various sources of categorization are as follows:
•
–
Company & Intranet - The destination is specified within the Categorization tab of the Web Filter
settings as a company domain or Intranet site. See "Categorization" on page 106 for more details.
–
Manual - The administrator has manually set the category of the site. The category could have
been set to one of the SurfControl defined categories or a custom category. See "Category
Object" on page 67 for more details.
–
SurfControl - The site was categorized from the SurfControl Internet Threat Database.
–
VCA - The site was categorized by the Virtual Control Agent.
–
None - A category was not assigned to the site.
Connection Status - The destination can have one of the following statuses:
–
Allowed - Web Filter allowed the user to visit the destination.
–
Blocked - Web Filter stopped the user visiting the destination.
•
Access Time - The date and time the Internet request was made.
•
Connection Duration - The duration of the request in minutes.
•
Data Sent - The number of kilobytes sent as part of the Internet request. Any request larger than 2GB
will be shown as >2GB.
•
Data Recvd - The number of kilobytes received as part of the Internet request. Any request larger
than 2GB will be shown as >2GB.
SurfControl Web Filter v5.5
Administrator’s Guide
37
6
THE WEB FILTER MANAGER
Users
TASKS
The following user tasks can be performed from the Information pane:
Table 6-3 Users tab Tasks
Section
Tasks
Monitored Data
•
Monitor Settings (page 39)
Note: Monitored Data tasks are
available across all the
Monitored Data tabs.
•
Refresh (page 41)
•
Change Manager Password (Privacy Edition only) (page 22)
•
Change Union Password (Privacy Edition only) (page 22)
Monitored Users
•
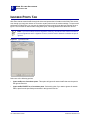
Print (page 41)
•
Rename User (page 42)
•
Get Friendly Name (page 42)
•
Get User Name (page 42)
•
Change Groups (page 42)
•
Monitor Settings for Users (page 43)
•
Delete User(s) (page 42)
•
View User Details (Privacy Edition only) (page 22)
Monitored Connections
See Table 6-5 on page 44 for the following tasks:
Note: Monitored Connections tasks
are available across all the
Monitored Data tabs.
•
Print
•
Go To Site
•
Go To Page
•
Set Category
•
Copy URL
38
Administrator’s Guide
SurfControl Web Filter v5.5
THE WEB FILTER MANAGER
Users
6
MONITORED DATA TASKS
Update Configuration
After performing certain tasks, the following message will appear at the top of the Monitored Data screen.
The servers connected to the database you are making changes to, will require updating after the following
tasks:
•
Monitor Settings
•
Set Category
Monitor Settings
The default Monitor Settings are described in the Basic Configuration chapter. See "Initial Monitored Data
Settings" on page 9 for more details. You can change or add to the following settings:
•
Create new File Type groups to monitor. See below for more details.
•
Add new protocols and ports. See page 40 for more details.
•
Exclude destinations from being monitored. See page 41 for more details.
•
Exclude users from being monitored. See page 41 for more details.
Note: Any changes made to the Monitored Data settings only affect data from that point onwards, it does
not affect historic data.
Create New File Type Groups
You can create custom file type groups to complement the ones supplied with Web Filter.
To create your own file type groups:
1
Select Monitor Settings from the Monitored Data section.
2
Select the File Types tab from the Monitor Settings window.
3
Click New Group.
4
Add a name for your new group in the box that displays under All Custom File Types.
5
Press Enter.
6
Click New Extension.
7
Add the new file extension (minus the preceding '.') in the box that displays below your new group
name.
8
Press Enter.
9
Repeat steps 6 to 8 for any additional file extensions.
10 Select your new group to start monitoring the file types you have specified.
SurfControl Web Filter v5.5
Administrator’s Guide
39
6
THE WEB FILTER MANAGER
Users
11 Click Apply, then OK to close the Monitor Settings dialog box.
12 Click Update Configuration to update servers connected to the database.
Note: A file extension can only exist in one file type group. An error message is displayed if the
extension already exists in another group.
Your new group can also be applied to individual users or groups from the Monitor Settings in the
Monitored Users section of the Information pane. See "Monitor Settings for Users" on page 43 for more
details.
Adding New Protocols And Ports
You can add new protocols and their associated port numbers to Web Filter, to allow more flexiblility when
filtering network traffic. You can also add or edit port numbers for existing protocols.
To add new protocols and ports:
1
Select Monitor Settings from the Monitored Data section.
2
From the Protocols tab, click New.
3
Enter a name for the Protocol.
4
Set the Status for the Protocol. The options are Monitored or Unmonitored.
5
In the Protocol Ports section, click New Port.
6
Enter a number for the port associated with the protocol (this must be between 1 and 65535).
7
Press Enter.
8
Repeat as necessary for additional ports.
9
Click OK to close the New Protocol dialog box.
10 Click Apply, then OK to close the Monitor Settings dialog box.
11 Click Update Configuration to update servers connected to the database.
To edit ports for existing protocols:
1
Select Monitor Settings from the Monitored Data section.
2
Select the protocol and click Edit.
3
Click New Port.
4
Enter the new port number (this must be between 1 and 65535).
5
Click OK to close the New Protocol dialog box.
6
Click Apply, then OK to close the Monitor Settings dialog box.
7
Click Update Configuration to update servers connected to the database.
40
Administrator’s Guide
SurfControl Web Filter v5.5
THE WEB FILTER MANAGER
Users
6
Unmonitoring Destinations or Users
Unmonitoring users or destinations is useful when you want Web Filter to ignore specific destinations, or
the browsing behaviour of particular users. For example, destinations that are categorized as ‘Company &
Intranet’ may be heavily browsed, and as a result, may not require monitoring.
To prevent a destination being monitored:
1
Select Monitor Settings from the Monitored Data section.
2
From the Unmonitored Destinations tab, click New. You can add the following data:
•
URLs - The address of the Web Site being accessed.
•
IP addresses - If a destination is being accessed by this method instead of its URL.
3
Click Apply, then OK to close the Monitor Settings dialog box.
4
Click Update Configuration to update servers connected to the database.
Note: When entering IP addresses, do not include the http:// prefix. If this is added the
destination will still be monitored. Wildcard entries, for example; *.yourcompany.* will ignore all
your corporate Web sites. When a destination is unmonitored, it can still be filtered (blocked or
allowed ) by rules.
To prevent a user or a domain being monitored:
1
From the Unmonitored Users tab, click New.
2
Enter the network name for the user. Wildcard entries can be used. For example to add a whole
domain enter YOURDOMAIN\*.
3
Click Apply, then OK to close the Monitor Settings dialog box
4
Click Update Configuration to update servers connected to the database.
Note: Unmonitored users do not have their data recorded to the database. However, they are
still checked by the Anti-Virus Agent and filtered by any rules that you have in place.
Refresh
Refresh updates the summary and detailed user information in the Monitored Data panes as it is added to
the database.
MONITORED USERS TASKS
As well as being available from the Information pane, you can access the Monitored Users tasks by rightclicking a selected user.
Print
You can print the information shown for a selected user.
SurfControl Web Filter v5.5
Administrator’s Guide
41
6
THE WEB FILTER MANAGER
Users
Rename User
This option allows you to rename a user in the Web Filter database. In the dialog box that displays, enter a
name in the New name text box. The original information about the user is also listed.
Note: If a duplicate name is detected during a database update, a modified name insertion will
be attempted in the following format: “Friendly Name (domain\some.user)”. If this fails a second
time, the name is not added.
Get Friendly Name
Displays the network name of the user, as entered by the System Administrator.
Get User Name
Shows the domain name of the user. For example: domain1\user1.
Change Groups
Web Filter creates a default group of Everybody when you install it. All users detected by Web Filter are
automatically assigned to this group. You can create groups to more accurately reflect the departments in
your organization (sales, accounts, administration, etc.), and assign users to them. This can help when
running reports in SurfControl Report Central and setting up rules.
To set up groups and assign users to them:
1
Select one or more users in the Summary User Information pane.
2
Click Change Groups.
3
Check that the group has not been created in the Available Groups pane from the SurfControl
Groups tab.
4
Click New.
5
Enter the name for your new group and click Enter.
6
Click Add. Your new group will be shown in the Group Membership pane. Your selected users are
now added to this group.
7
Click OK to close the Change Groups dialog box.
Note: Network Groups are updated during the update of the Web Filter database or by a
scheduled event. See "Available Events" on page 142. For more details on network group
updates please see Knowledge Base article 1467. You cannot change the Network group for a
user from the Network Groups tab.
Delete User(s)
Perform this task if you want to remove specific users from the Users tab in Web Filter Manager. This is
advantageous if workstation names have been recorded rather than user names. After completing this
task, the user(s) will not be shown in the Web Filter Manager, but they will still exist in the database until
the next database purge.
42
Administrator’s Guide
SurfControl Web Filter v5.5
THE WEB FILTER MANAGER
Users
6
1
Select one or multiple users in the Summary User Information pane.
2
Click Delete User(s) in the Monitored Users Tasks box, or right-click the selected user(s) and click
Delete User(s) from the menu.
3
Click Yes to confirm deletion or click No to cancel.
The user has now been removed from the Web Filter Manager. For further instructions on purging the
database, see Chapter 11 "Purge” on page 130.
Monitor Settings for Users
You can select which file types a user can be monitored for from the Monitor settings. Any custom file type
groups you create will also be available.
Table 6-4 User Monitoring Options
Option
Description
Unmonitor
The user’s Internet activity is not monitored.
Monitor default file types
Only the default file types (certain Web page types) are monitored. See
"Monitor Settings" on page 39 for details on default file types.
Monitor custom file types
You can choose which file types you want to monitor for selected users.
See "The Default Monitor Settings" on page 9 for details of the supplied
file type groups.
Note: Monitoring too many File Types can impact on the performance of
Web Filter. If you suspect a certain file type is being accessed
significantly, select the file type and monitor it for a set period of
time.
SurfControl Web Filter v5.5
Administrator’s Guide
43
6
THE WEB FILTER MANAGER
Users
MONITORED CONNECTIONS TASKS
The following tasks are available from the Monitored Connections tasks section. Monitored Connections
tasks are also available, by right-clicking the detailed user Information entry for a selected user.
Table 6-5 Monitored Connections Tasks
Task
Description
Print
Prints a selected Detailed User Information entry.
Go to Site
Opens up a selected entry at the domain level in a Web browser.
Go to Page
Opens up a selected entry at the individual page level in a Web browser
Set Category
You can change the category for a selected entry.
Note: Any changes to a category assigned to a destination seen in the
Monitored Data section will only affect future connections. Data
already saved to the database cannot be changed, as this is a
historical record of the category assigned at the time the
destination was visited.
You need to click Update Configuration to apply any changes made to
categories.
Copy URL
44
Administrator’s Guide
Copies the URL to the Windows clipboard.
SurfControl Web Filter v5.5
THE WEB FILTER MANAGER
Destinations
6
DESTINATIONS
SurfControl Web Filter stores information about the destinations visited by your users. You can view these
destinations on the Destinations tab, and perform some of the following tasks:
•
Categorize a destination
•
Submit uncategorized destinations to SurfControl for inclusion in the Internet Threat Database.
The Destinations pane is split into Summary and Detail destination information.
SUMMARY DESTINATION INFORMATION
This pane shows the destinations monitored by the Web Filter database. The following information is
displayed in the columns:
•
Destination - Identifies the domain level Web site address as detected by Web Filter.
•
Destination IP - Shows the IP address of the domain level entry.
•
First Access - Shows the date and time Web Filter first saw the Web site entry.
•
Last Access - Shows the date and time Web Filter last saw the Web site entry.
•
Connections - Shows the total number of TCP (Transmission Control Protocol) transactions made to
the Web site entry.
DETAIL DESTINATION INFORMATION
When you select a destination in the summary pane, the detailed destination information is shown in the
bottom pane. The following information is displayed in the columns:
•
User - Identifies the user’s name in the following order of precedence:
–
Novell user name
–
EUM user name
–
NetBIOS user name
–
Workstation name
–
IP address
•
Destination - The Internet address accessed. This is the domain level address, for example
www.mysite.com.
•
Detail - Shows any page level detail of the Internet request, for example www.mysite.com/
morestuff.htm. By default, allowed Internet requests will not show any detailed information. Requests
that are blocked will show page level detail. See "Initial Monitored Data Settings" on page 4.
•
Via Proxy - Shows whether the connection to the destination was made via a proxy server.
•
Source Workstation - The workstation from where the Internet request was made.
•
Protocol - The communication protocol of the Internet request.
•
Category - Shows the SurfControl Internet Threat Database category for the Web site entry.
SurfControl Web Filter v5.5
Administrator’s Guide
45
6
•
THE WEB FILTER MANAGER
Destinations
Categorization Method - The various sources of categorization are as follows:
•
–
Company & Intranet - The destination is specified within the Categorization tab of the Web Filter
settings as a company domain or Intranet site. See "Categorization Tab" on page 106 for more
details.
–
Manual - The administrator has manually set the category of the site. The category could have
been set to one of the SurfControl defined categories or a custom category. See "Category
Object" on page 67 for more details.
–
SurfControl - The site was categorized from the SurfControl Internet Threat Database.
–
VCA - The site was categorized by the Virtual Control Agent.
–
None - The site was not assigned a category.
Connection Status - The destination can have one of the following statuses:
–
Allowed - Web Filter allowed the user to visit the destination.
–
Blocked - Web Filter stopped the user visiting the destination.
•
Access Time - The date and time the Internet request was made.
•
Connection Duration - The duration of the request in minutes.
•
Data Sent - The number of kilobytes sent as part of the Internet request. Any request larger than 2GB
will be shown as >2GB.
•
Data Recvd - The number of kilobytes received as part of the Internet request. Any request larger
than 2GB will be shown as >2GB.
TASKS
The following tasks can be performed from the Information pane.
Table 6-6 Destinations Tab Tasks
Section
Tasks
Monitored Data. Monitored Data tasks are available across
all the Monitored Data tabs.
•
Monitor Settings (page 39)
•
Refresh (page 41)
Monitored Destinations
•
Print (page 47)
•
Unmonitor (page 47)
•
Go To Site (page 47)
•
Submit Destination (page 47)
•
Set Category (page 48)
Monitored Connections. Monitored Connections tasks are
available across all the Monitored Data tabs.
46
Administrator’s Guide
See Table 6-5 on page 44 for the following tasks:
•
Print
•
Go To Site
•
Go To Page
•
Set Category
•
Copy URL
SurfControl Web Filter v5.5
THE WEB FILTER MANAGER
Destinations
6
MONITORED DESTINATIONS TASKS
As well as being available from the Information pane, you can access the Monitored Destinations tasks by
right-clicking a selected destination.
Print
You can print all the information shown in the Summary Destination Information pane.
Unmonitor
You can stop future requests to visit a selected site being recorded in the Web Filter database.
Go To Site
You can open up a selected entry at the domain level in a Web browser.
Submit Destination
If you see a monitored destination that you feel should be included in the SurfControl Internet Threat
Database, or should be categorized differently, you can submit the details to SurfControl. To submit a
destination:
1
Select the destination in either the Destination Summary or Detail information pane.
2
Select Submit Destination from the Monitored Destinations tasks section. The Submit-a-Site Web
page will be displayed in a browser window:
The selected site will appear in the URL (Internet Address) field.
3
Select what you want to do with the site. You can either:
•
Add a site - Submit the site to be included in the Internet Threat Database.
•
Delete a site - Submit the site to be removed from the Internet Threat Database.
SurfControl Web Filter v5.5
Administrator’s Guide
47
6
•
THE WEB FILTER MANAGER
Destinations
Change the category - Select a new category for the site in the Internet Threat Database.
4
If you want to change the category of the site, select which category you want the site to be changed to
from the Choose Category drop-down list box.
5
Click Submit.
Set Category
You can change the category for a selected entry in the Destinations tab. Any changes made to the
destination’s category, will only affect future connections. Data already saved to the database cannot be
changed, as this is a historical record of the category assigned at the time the destination was visited.
You need to click Update Configuration to apply any changes to servers connected to the database.
48
Administrator’s Guide
SurfControl Web Filter v5.5
THE WEB FILTER MANAGER
Categories
6
CATEGORIES
SurfControl Web Filter uses its Internet Threat Database to categorize the destinations saved in your
database. You can view the destinations grouped by category on this tab. You can use the categories
seen to construct rules for your organization. For more details on the Internet Threat Database and
categories, visit www.surfcontrol.com.
The Categories pane is split into Summary and Detail category information.
SUMMARY CATEGORY INFORMATION
This pane displays the categories monitored by the Web Filter database. You can also see the following
information displayed in the columns.
•
Category - Shows the SurfControl Internet Threat Database category for the destination.
•
First Access - Shows the date and time Web Filter first logged the destination.
•
Last Access - Shows the date and time Web Filter last logged the destination.
•
Connections - Shows the total number of TCP (Transmission Control Protocol) transactions made to
the destination.
DETAIL CATEGORY INFORMATION
When you select a category in the summary pane, the detailed category information is displayed in the
bottom pane. The following information is displayed in the columns:
•
User - Identifies the user’s name in the following order of precedence:
–
Novell user name
–
EUM user name
–
NetBIOS user name
–
Workstation name
–
IP address
•
Destination - The Internet address accessed. This is the domain level address, for example
www.mysite.com.
•
Detail - Shows any page level detail of the Internet request, for example www.mysite.com/
morestuff.htm. By default, Internet requests with a connection status of allowed will not show any detail
information. Requests that are blocked will show page level detail. See the Monitor Settings >
General tab description in Table 2-1 on page 10 for details.
•
Via Proxy - Shows if the connection to the destination was made via a proxy server.
•
Source Workstation - The workstation from where the Internet request was made.
•
Protocol - The protocol of the Internet request.
•
Category - The category assigned to the request.
SurfControl Web Filter v5.5
Administrator’s Guide
49
6
•
•
THE WEB FILTER MANAGER
Categories
Categorization Method - The various sources of categorization are as follows:
–
Company & Intranet - The destination is specified within the Categorization tab of the Web Filter
settings as a company domain or Intranet site. See "Categorization Tab" on page 106 for more
details.
–
Manual - The administrator has manually set the category of the site. The category could have
been set to one of the SurfControl defined categories or a custom category. See "Category
Object" on page 67 for more details.
–
SurfControl - The site was categorized from the SurfControl Internet Threat Database.
–
VCA - The site was categorized by the Virtual Control Agent.
–
None - A category was not assigned to the site.
Connection Status - The destination can have one of the following statuses:
–
Allowed - Web Filter allowed the user to visit the destination.
–
Blocked - Web Filter stopped the user visiting the destination.
•
Access Time - The date and time the Internet request was made.
•
Connection Duration - The duration of the request in minutes.
•
Data Sent - The number of kilobytes sent as part of the Internet request. Any request larger than 2GB
will be shown as >2GB.
•
Data Recvd - The number of kilobytes received as part of the Internet request. Any request larger
than 2GB will be shown as >2GB.
50
Administrator’s Guide
SurfControl Web Filter v5.5
THE WEB FILTER MANAGER
Categories
6
TASKS
The following tasks can be performed from the Information pane.
Table 6-7 Destinations tab Tasks
Section
Tasks
Monitored Data. Monitored Data tasks
are available across all the Monitored
Data tabs.
•
Monitor Settings (page 39)
•
Refresh (page 41)
Monitored Categories
•
Print (page 51)
Monitored Connections. Monitored
Connections tasks are available across
all the Monitored Data tabs.
See Table 6-5 on page 44 for the following tasks:
•
Print
•
Go To Site
•
Go To Page
•
Set Category
•
Copy URL
CATEGORIES TASKS
As well as being available from the Information pane, you can access the Categories tasks by right-clicking
a selected category.
Print
You can print the information for a selected category.
SurfControl Web Filter v5.5
Administrator’s Guide
51
6
THE WEB FILTER MANAGER
Content Protection
CONTENT PROTECTION
SurfControl Web Filter has a number of tools to help you manage Internet threats, as illustrated below:
Figure 6-6
Content Protection tab
Table 6-8 Web Filter Content Protection Tools
Tool
Description
Rules Administrator
You can apply rules to implement your Acceptable Use Policy. For more
details about the Rules Administrator, see Chapter 7.
Real-Time Monitor
You can see the Internet traffic being generated by your users as it happens.
For more details about the Real-Time Monitor, see Chapter 8.
Custom Categorization
You can classify destinations that have yet to be assigned to a category in the
Internet Threat Database. For more details about Custom Categorization, see
Chapter 10.
52
Administrator’s Guide
SurfControl Web Filter v5.5
THE WEB FILTER MANAGER
Maintenance
6
MAINTENANCE
To help continue Web Filter’s effective performance, the following tools are available on the Maintenance
tab:
Figure 6-7
Maintenance tab
Table 6-9 Web Filter Maintenance Tools
Tool
Description
Web Filter Settings
You can configure how SurfControl Web Filter monitors Internet traffic and
actions that it performs when blocking access to sites. For more details about
the Web Filter settings, see Chapter 9.
Virtual Control Agent Settings
You can configure the VCA Service settings with this tool. For more details
about the VCA Service Settings, see Chapter 10.
Note: The VCA Service is only available for licensed copies of Web Filter. You
can still use the standalone version of the VCA (via Custom
Categorization) during the 30 day trial period.
Database Management
You can perform the following database management tasks from this tool:
•
Archive
•
Purge
•
Compact
•
Delete
•
Restore
For more details about the Database Management tool, see Chapter 11.
Database Updater
You can configure how you update your database from the flat files created by
Web Filter. For more details about the Database Updater, see Chapter 11.
Scheduler
You can configure various events to run at times you specify with this tool. For
more details about the Scheduler, see Chapter 12.
SurfControl Web Filter v5.5
Administrator’s Guide
53
6
54
THE WEB FILTER MANAGER
Maintenance
Administrator’s Guide
SurfControl Web Filter v5.5
Chapter 7
Rules Administrator
Introduction . . . . . . . . . . . . . . . . . . . . . . . . . . . . . . . . . . . . . . . . . . . . . . . . . . . . . . . . . . . . . . . . . . page 56
Rule Objects. . . . . . . . . . . . . . . . . . . . . . . . . . . . . . . . . . . . . . . . . . . . . . . . . . . . . . . . . . . . . . . . . . page 59
Who Objects. . . . . . . . . . . . . . . . . . . . . . . . . . . . . . . . . . . . . . . . . . . . . . . . . . . . . . . . . . . . . . . . . . page 60
Where Objects . . . . . . . . . . . . . . . . . . . . . . . . . . . . . . . . . . . . . . . . . . . . . . . . . . . . . . . . . . . . . . . . page 64
What Objects . . . . . . . . . . . . . . . . . . . . . . . . . . . . . . . . . . . . . . . . . . . . . . . . . . . . . . . . . . . . . . . . . page 70
When Objects. . . . . . . . . . . . . . . . . . . . . . . . . . . . . . . . . . . . . . . . . . . . . . . . . . . . . . . . . . . . . . . . . page 75
Allowance Objects. . . . . . . . . . . . . . . . . . . . . . . . . . . . . . . . . . . . . . . . . . . . . . . . . . . . . . . . . . . . . page 78
Notify Objects . . . . . . . . . . . . . . . . . . . . . . . . . . . . . . . . . . . . . . . . . . . . . . . . . . . . . . . . . . . . . . . . page 81
HTTP Deny Page Objects . . . . . . . . . . . . . . . . . . . . . . . . . . . . . . . . . . . . . . . . . . . . . . . . . . . . . . . page 84
Viewing Another Collector . . . . . . . . . . . . . . . . . . . . . . . . . . . . . . . . . . . . . . . . . . . . . . . . . . . . . . page 87
7
RULES ADMINISTRATOR
Introduction
INTRODUCTION
This chapter explains how you use individual objects to build up rules that help you enforce your
Acceptable Use Policy. This will enable you to configure rules more accurately and precisely, to meet your
organization’s requirements. The rule object tabs are only visible if you have selected the default
Advanced view in the Rules Administrator. If you cannot see the Object tabs below the Rules panel, select
Advanced from the View menu.
To open the Rules Administrator, from the Web Filter Manager, select Content Protection > Rules
Administrator from the appropriate collector or database in the Navigation tree. The Rules Administrator
is also available from the Start > All Programs > SurfControl Web Filter menu.
There are three types of rules:
•
Allow - This is the default setting for any new rule you create which uses positive filtering to give
access.
•
Disallow - This type of rule uses negative filtering to deny access.
•
Allowance - This rule type uses a combination of positive and negative filtering to set up limits for
internet access. The allowance value can either be time based (allowing access for a predefined time
limit), or value based (allowing only a predefined amount of bandwidth to be consumed). Once
thisthese limits hasve been reached, access is blocked.
GUIDELINES FOR RULE CREATION
For best results, Surfcontrol recommends following these guidelines:
•
Place rules to be applied to individual or small groups near the top of the list. This is because rules are
processed from the top of the list downwards.
•
Use When and Allowance objects carefully. Use reports such as Protocol Data Analysis or Protocol
Time Analysis to narrow down who these rules should apply to, before creating them. See the SRC
Administrators Guide for more details.
•
Keep the number of rules to a minimum, to ensure the maximum efficiency of Web Filter.
•
Create, test and activate any global rules you create before creating user or group specific rules.
•
Ensure that only one person modifies rules at a time.
•
Ensure that the Monitor recognizes user names, to enable user based filtering.
•
Ensure auto-categorization is turned on in the Web Filter Service Settings Advanced tab. This is worth
checking if a destination specific rule is not working.
56
Administrator’s Guide
SurfControl Web Filter v5.5
RULES ADMINISTRATOR
Introduction
7
Creating Rules
To create a new rule:
1
Select New from the Rule menu, or click the New Rule button.
Note: A new rule is always enabled by default. It will not be active, however, until changes are
committed to the database.
2
Choose a Who object (if required) and drag and drop the object onto the Who section of the rule.
3
Choose a Where object (if required) and drag and drop the object onto the Where section of the rule.
4
Choose a What object (if required) and drag and drop the object onto the What section of the rule.
5
Choose a When object (if required) and drag and drop the object onto the When section of the rule.
6
Choose an Allowance object (if required) and drag and drop the object onto the Allowance section of
the rule.
7
Choose a Notify object (if required) and drag and drop the object onto the Notify section of the rule.
8
Choose a HTTP Deny Page object (if required) and drag and drop the object onto the HTTP Deny
Page section of the rule.
9
Right-click the new rule and choose Properties from the drop-down menu.
10 You will see the Rule Properties dialog:
Enter a comment for this rule. Adding a comment to a rule enables you to see a description of the rules
action in the Rules Administrator and Real-time Monitor, which enables you to see why a rule is
blocking a web page. When adding a comment ensure that:
•
The description gives a clear indication of what the rule will do.
•
The comment is 31 characters in length, or less. Comments exceeding 31 characters will be
truncated in the Rules Administrator and Real-time Monitor. The word ‘(truncated)’ will be placed
at the end of the comment.
Note: If you do not add a comment to the rule you will see ‘N/A’ in the Comment columns of
Rules Administrator and Real-time Monitor.
11 Move the rule to the appropriate level in the Rule List Panel.
SurfControl Web Filter v5.5
Administrator’s Guide
57
7
RULES ADMINISTRATOR
Introduction
12 Commit the changes to enable the rule. New rules are always checked as enabled by default,
however the rule will not be active until changes are committed to the database.
13 Test the rule.
14 Make any changes if required.
15 Commit the changes again.
58
Administrator’s Guide
SurfControl Web Filter v5.5
RULES ADMINISTRATOR
Rule Objects
7
RULE OBJECTS
You can create the following Rule objects:
•
Who (page 60)
•
Where (page 64)
•
What (page 70)
•
When (page 75)
•
Allowance (page 78)
•
Notify (page 81)
•
HTTP Deny Page (page 84)
Creating a New Rule Object
1
Select a rule object tab:
2
Highlight an individual object component from the left-hand pane below the tabs.
3
In the right-hand pane, right-click and select New.
4
Fill in the details on the dialog box that displays.
5
Click OK. The object can now be applied to any rule you create.
SurfControl Web Filter v5.5
Administrator’s Guide
59
7
RULES ADMINISTRATOR
Who Objects
WHO OBJECTS
Who objects are used to apply rules to certain individuals or groups. The default for Who objects is
Anybody. The following objects are included in the Who tab:
Figure 7-1
Who objects tab
Monitored Workstations
This rule object shows a list of workstations that are monitored by Web Filter manager, and stored in the
database. It is not possible to manually add workstations to this list, because the information is obtained
automatically from client machines that request internet access.
If workstations appear as IP addresses, you need to select Enable Workstation name resolution on the
Advanced Settings tab in the Web Filter Service Settings. See "Advanced Tab" on page 104 for more
details. You can refresh the list to show the most up to date monitored workstations by pressing F5.
Active Directory, NT and NetWare Domain Objects
These objects are obtained from the network domain, and only apply to local Active Directory, NT, or Novell
NetWare networks. It is not possible to manually add Active Directory or NT Domain Objects to this list.
You can refresh the list to show the most up to date monitored workstations by pressing F5. Depending on
where Web Filter is installed, you will see the objects as described in the table below.
Table 7-1 Active Directory, NT and NetWare Domain objects
Where Installed
Objects seen
Workgroup
NT Domain objects: Workgroup.
NT Domain
NT Domain objects: Workgroup, Domain object.
Active Directory
NT Domain objects: Workgroup, Domain object.
Active Directory objects: Domain object:
Note: Only the currently logged on Active Directory forest will be seen by the Who
Object. All trusted NT domains can be seen. SurfControl recommends using
the Active Directory objects if Web Filter has been installed in this
environment.
NetWare Domain/NT
Workgroup
60
Administrator’s Guide
NT Domain objects: Workgroup.
NetWare objects: Domain object.
SurfControl Web Filter v5.5
RULES ADMINISTRATOR
Who Objects
7
Table 7-1 Active Directory, NT and NetWare Domain objects
Where Installed
Objects seen
NetWare Domain/NT
Domain
NT Domain objects: Workgroup, Domain object.
NetWare Domain/Active
Directory
NT Domain objects: Workgroup, Domain object.
NetWare objects: Domain object.
Active Directory objects: Domain object.
NetWare objects: Domain object.
User-defined Who Objects
These rule objects have to be created manually, and can consist of the following:
•
Hosts and Domains
•
MAC Addresses
•
Subnets
Mobile Who Objects
If you have installed SurfControl Mobile Filter, you can use the following objects in your rules:
•
Mobile Users - The user name as defined in the SurfControl Client Administrator.
•
Mobile Hosts - The host name as defined in the SurfControl Client Administrator.
Who Lists
Who Lists are a combination of Monitored Workstations, NT Domain and User Defined Who Objects. Who
lists are a convenient way of grouping Who objects together to share common rules.
The list of workstations available in the Rules Administrator is the same as you see in the Monitored Data,
in addition to the Novell NetWare and Windows NT users defined for the network. As Web Filter detects
new users, it updates both the Monitored Data and the Rules Administrator. To refresh the display with the
most current contents of the database, press F5.
CREATING USER DEFINED WHO OBJECTS
Hosts and Domains
The Hosts and Domains object is used to apply a rule to a particular IP address, Host name or Domain on
your network. A host is a computer that is connected to a TCP/IP network which can include the Internet.
Each host has a unique IP address. A domain is a group of computers on a network that are administered
as a unit.
SurfControl Web Filter v5.5
Administrator’s Guide
61
7
RULES ADMINISTRATOR
Who Objects
Figure 7-2
Hosts and Domain object properties
Note: You can only add a single IP address, Host name or Domain for each object you create.
Wildcards are not allowed.
1
Enter a name for your object in the Name text box.
2
Select one of the following options:
•
IP address - Enter the IP address of the workstation the rule will be applied to.
•
Host Name - The default option. Enter the Workstation name. (You must have Enable
Workstation name resolution selected in the Advanced tab of the Web Filter Service settings to
be able to see Host names in the Monitor. See "Advanced Tab" on page 104 for more details).
3
Enter a name for a network Domain the rule will be applied to.
4
Click OK to confirm your settings, or click Cancel to disregard changes.
MAC Address
To obtain the MAC address for a particular computer on your network, run the following command from a
Command Prompt window:ipconfig /all
The MAC Address is the Physical Address entry.
To obtain the MAC addresses for all network cards on your network, run the following command from the
Command Prompt window: arp -a
Again, the MAC Addresses are the Physical Address entries.
Figure 7-3
MAC Address object properties.
•
Name - Enter a name for your MAC address object.
62
Administrator’s Guide
SurfControl Web Filter v5.5
RULES ADMINISTRATOR
Who Objects
•
7
MAC Address - Enter the MAC address for the computer you want the rule to apply to.
Subnet Object
A subnet allows you to take a single IP network address and split it up so that it can be used on several
interconnected local networks. A subnet mask determines the maximum number of hosts on a subnetwork.
To obtain the IP address and Subnet Mask for a particular computer on your network, run the following
command from a Command Prompt window: ipconfig /all Make a note of the IP Address and Subnet
Mask entries.
Figure 7-4
Subnet object properties.
•
Name - Enter a name for your Subnet object.
•
IP Address - Enter the IP address.
•
Subnet Mask - Enter the Subnet Mask.
Who List Objects
A Who list object can consist of several specific objects from the Who Object list. This gives you a
convenient way of grouping objects to share a set of rules. To create a Who List, drag individual Who
Objects from the bottom right-hand pane to the Members pane.
Figure 7-5
Who List object properties.
•
Name - Enter a name for your Who List object.
•
Members - This panel will show the individual objects that make up your list.
SurfControl Web Filter v5.5
Administrator’s Guide
63
7
RULES ADMINISTRATOR
Where Objects
WHERE OBJECTS
Where objects are used to identify the destinations that a rule should apply to. The default for Where
objects is Anywhere. The following objects are included in the Where tab:
Figure 7-6
Where Objects tab
Monitored Destinations
This rule object shows a list of destinations that are monitored by Web Filter manager, and stored in the
database. It is not possible to manually add destinations to this list, because the information is obtained
directly from the destinations visited by your users.
You can refresh the list to show the most up to date monitored workstations by pressing F5. See
"Monitored Data" on page 34 for more information.
User Defined Where Objects
These have to be created manually and can consist of the following:
•
Hosts and Domains
•
MAC Addresses
•
Subnets
Categories
This is a list of the SurfControl Internet Threat Database categories, and any manually created custom
categories.
Where Lists
Where Lists are a combination of Monitored Destinations, User Defined Where Objects and Categories.
This is a convenient way of grouping Where objects together to share common rules.
CREATING USER DEFINED WHERE OBJECTS
Hosts and Domains
The Hosts and Domains object is used to apply a rule to a particular IP address, Host name or Domain on
your network.
64
Administrator’s Guide
SurfControl Web Filter v5.5
RULES ADMINISTRATOR
Where Objects
7
A host is a computer that is connected to a TCP/IP network which can include the Internet. Each host has
a unique IP address. A domain is a group of computers on a network that are administered as a unit.
Note: You can only add a single IP address, Host name or Domain for each object you create.
Wildcards are not allowed.
Figure 7-7
Hosts and Domain object properties.
•
Name - Enter a name for your object.
•
IP address - Select IP address and enter the IP address for the workstation the rule will be applied to.
•
Host name - The default option. Enter the Host name in the following format: www.yoursite.com
•
Domain - Enter a name for a network Domain the rule will be applied to.
MAC Address
To obtain the MAC Address for a particular computer on your network, run the following command from a
Command Prompt window:
ipconfig /all
The MAC Address is the Physical Address entry.
To obtain the MAC Addresses for all network cards on your network, run the following command from the
Command Prompt window:
arp -a
Again, the MAC Addresses are the Physical Address entries.
SurfControl Web Filter v5.5
Administrator’s Guide
65
7
RULES ADMINISTRATOR
Where Objects
Figure 7-8
MAC Address object properties.
•
Name - Enter a name for your MAC address object.
•
MAC Address - Enter the MAC address for the computer you want the rule to apply to.
Subnet Object
A subnet enables you to take a single IP network address and split it up so that it can be used on several
interconnected local networks.
A subnet mask determines the maximum number of hosts on a subnetwork.
To obtain the IP address and Subnet Mask for a particular computer on your network, run the following
command from a Command Prompt window:
ipconfig /all
Make a note of the IP Address and Subnet Mask entries.
Figure 7-9
Subnet object properties.
•
Name - Enter a name for your Subnet object.
•
IP Address - Enter the IP address for the computer.
•
Subnet Mask - Enter the Subnet Mask.
66
Administrator’s Guide
SurfControl Web Filter v5.5
RULES ADMINISTRATOR
Where Objects
7
CATEGORY OBJECT
SurfControl’s Internet Threat Database contains over 24 million Web sites and over 3.5 billion Web pages.
These sites and pages are allocated to one of SurfControl’s fifty five categories as in the table below.
Note: As the SurfControl Adaptive Threat Intelligence team can dynamically add new
categories, this list is subject to change. For the latest list and detailed explanation of each
category, visit www.surfcontrol.com. You will receive an e-mail informing you of any changes
made to the SurfControl Internet Threat Database.
Table 7-2 SurfControl Categories
1
Company & Intranet
29 Kids Sites
2
Adult/Sexually Explicit
30 Motor Vehicles
3
Advertisements & Popups
31 News
4
Alcohol & Tobacco
32 Peer-to-Peer
5
Arts
33 Personals & Dating
6
Blogs & Forums
34 Philanthropic & Professional Orgs
7
Business
35 Phishing & Fraud
8
Chat
36 Photo Searches
9
Computing & Internet
37 Politics
10 Criminal Activity
38 Proxies & Translators
11 Downloads
39 Real Estate
12 Education
40 Reference
13 Entertainment
41 Religion
14 Fashion & Beauty
42 Ringtones/Mobile Phone Downloads
15 Finance & Investment
43 Search Engines
16 Food & Dining
44 Sex Education
17 Gambling
45 Shopping
18 Games
46 Society & Culture
19 Government
47 Spam URLs
20 Hacking
48 Sports
21 Health & Medicine
49 Spyware
22 Hobbies & Recreation
50 Streaming Media
23 Hosting Sites
51 Tasteless & Offensive
24 Illegal Drugs
52 Travel
25 Infrastructure
53 Violence
26 Intimate Apparel & Swimwear
54 Weapons
27 Intolerance & Hate
55 Web-based E-mail
28 Job Search & Career Development
SurfControl Web Filter v5.5
Administrator’s Guide
67
7
RULES ADMINISTRATOR
Where Objects
SurfControl Categories
SurfControl’s Adaptive Threat Intelligence team have the ability to dynamically add new categories via an
Internet Threat Database update. For this reason SurfControl categories are read only, and appear in the
Category Object list with the following icon:
You cannot re-name or delete them from within SurfControl Web Filter. SurfControl categories do not
support SmartScan. You must create a custom category to use this functionality.
Custom Categories
The Category object enables you to create custom categories, which can contain any of the following:
•
One or more of the pre-defined SurfControl categories.
•
Keywords that are matched against the domain level of a URL, using SmartScan.
Custom categories you create will appear in the Category object list with the following icon:
Custom categories can be re-named and deleted by right-clicking a selected category. If a SurfControl
category is added or re-named, and it has an identical name to a custom category you created, your
custom category will be amended with brackets containing a number, for example; custom(1).
Figure 7-10 Category List object properties.
1
Enter a name for your new category.
2
Select one or more of the SurfControl Categories you want to include in your new category.
3
If you want to refine the category match, select a category you are including in the object and click
SmartScan. Enter the keywords that you wish to match for any domains that will be allocated to the
category. The keyword must form all or part of the domain level URL.
Example:
Entering ‘football’ will match the following URLs:
68
Administrator’s Guide
SurfControl Web Filter v5.5
RULES ADMINISTRATOR
Where Objects
–
www.football365.com
–
www.football.guardian.co.uk
7
It will not return www.bbc.co.uk/football as ‘football’ is not part of the domain level URL.
Your new category will now be seen in the Where tab Categories pane. It is important that you move this
custom category to the top of the list, so it is applied before the standard categories. To do this, click Set
Category Object Order on the Tools menu.
WHERE LISTS
A Where list object can comprise of several specific objects from the Where object list (see figure below).
This provides a convenient way of grouping objects to share a set of rules. To create a Where List, drag
individual Where objects (Monitored Workstations, NT Domain objects and User-Defined Where Objects)
from the bottom right-hand pane to the upper left-hand pane in the Where List dialog box.
Figure 7-11 Where List object dialog box
•
Name - Enter a name here for your Where List object.
•
Members - This panel will show the individual objects that make up your list.
SurfControl Web Filter v5.5
Administrator’s Guide
69
7
RULES ADMINISTRATOR
What Objects
WHAT OBJECTS
What objects are used to identify the content that a rule should apply to. The default for What objects is
Anything. The following objects are included in the What tab:
Figure 7-12 What objects tab
PROTOCOLS/PORTS OBJECTS
In the Rules Administrator, the monitored protocols and associated ports are shown in the table below. The
protocols marked with an asterisk (*) are monitored by default.
Table 7-3 Rules Administrator Configured Protocols/Ports
Protocol Group
Protocol
Port
File Transfer
FTP*
20, 21
Gopher*
70
WAIS
210
FTTPS (FTP over SSL)
989, 990
Half Life
27010, 27015
Quake 3
27960 - 27969
World of Warcraft
3724
EVE Online
26000
Back Orifice
31337
Sub7
27374
Gadu-Gadu
8074
Jabber/SIMP*
7467
Jabber/XMPP*
5222 - 5224
Gaming
Hacking
Instant Messaging and Chat
70
Administrator’s Guide
SurfControl Web Filter v5.5
RULES ADMINISTRATOR
What Objects
7
Table 7-3 Rules Administrator Configured Protocols/Ports
Protocol Group
Mail & Collaboration
Newsgroup
P2P
Remote Access
SurfControl Web Filter v5.5
Protocol
Port
Windows Live Messenger*
1863
OSCAR (AIM/ICQ)*
5190
Yahoo! Messenger*
5050
IRC*
6660-6669
IRCS (IRC over SSL)
994
Camfrog
2778, 6005
Eyeball Chat
5500, 5501, 5515
X-IM
5221
POP3
110
Lotus Notes
1352
NetMeeting
522, 1503, 1720, 1731
SMTP
25
IMAP
143
NNTP*
119
NNTPS (NNTP over SSL)
563
BitTorrent*
6881 - 6999
eDonkey*
4661, 4662
EZPeer*
8870
FastTrack (Kazaa)*
1214
Gnutella*
6346, 6347
Hotline Connect*
5500 - 5503 (range)
Skype*
33033
WinMX*
6699
Citrix
1494
GoToMyPc
8200
PCAnywhere
5631, 5632, 65301
PCTelecommute
2299
Terminal Services
3389
Administrator’s Guide
71
7
RULES ADMINISTRATOR
What Objects
Table 7-3 Rules Administrator Configured Protocols/Ports
Protocol Group
Streaming Media
Web
Other
72
Administrator’s Guide
Protocol
Port
RAdmin remote administration
tool
4899
SOCKS 5
1080
PPTP
1723
Liquid Audio*
18888
PNM/PNA
7070
RTSP (Quicktime, RealPlayer)*
554, 8554
Windows Media/MMS*
1755
Google Web Accelerator
9100
HTTP*
80, 8000, 8080, 3128
HTTPS*
443, 8443
LDAP*
389
NFS
2049
SSH
22
Telnet
23
Daytime
13
Domain
53
Echo
7
Ident
113
Nbsession
139
Whois
43
Time
37
Finger
79
rlogin
513
SQL net
1433, 1434, 1521, 1525
Pptp
1723
SurfControl Web Filter v5.5
RULES ADMINISTRATOR
What Objects
7
Filtering IM, P2P and Web Protocols by signature
The Instant Messsaging and Chat (IM) Peer 2 Peer (P2P) and Web Accelerator protocols in the table
below are port-agile. If a connection fails (for example, due to a disallow rule) on the default port, these
applications will attempt to use another available port. Enabling Protocol Signature Scanning from the
Protocol Signatures tab in the Web Filter Settings will ensure that these protocols are filtered when the
protocols use non-default ports. See "Protocol Signatures Tab" on page 107 for further details.
When adding an Instant Messaging and Chat, Peer to Peer (P2P) or Web Protocol and Port object to a
rule, the Rules Administrator will only filter the following protocols by signature:
Table 7-4 Signature scanning protocols
Application type
Protocols
Instant Messaging
•
MSN Messenger
•
OSCAR (AIM/ICQ)
•
XMPP (Jabber)
•
BitTorrent
•
eDonkey
•
FastTrack (Kazaa)
•
Gnutella
•
Skype
•
Yahoo! Messenger
•
Google Web Accelerator
Peer to Peer (P2P)
Web
Note: Protocol signature scanning will filter direct HTTP connections and HTTP proxy
connections. It will not filter when connecting via a SOCKS proxy.
PRECISE BANDWIDTH CONTROLS OBJECT
With Precise Bandwidth Control, you can accurately define what content you want to allow or block. By
creating rules with Precise Bandwidth Controls, you can block pages or files that contain precise prefixes,
suffixes, or word patterns. These rules operate by identifying the contents within the URL rather than just
the top level domain name.
Precise Bandwidth Control objects are “if” statements, which means that if you apply more than one
Precise Bandwidth Control object to a rule, the rule will be triggered when any combination of the objects
are met. For example, a disallow rule which has precise bandwidth control objects of Audio files and
Video Files assigned to it, will block an attempt to access web pages that contain audio files or video files
or both.
Note: If a Category object is assigned to a rule containing Precise Bandwidth Controls, a
destination will only be blocked if it is within the category AND the URL triggers one or all of
your Precise Bandwidth Controls.
SurfControl Web Filter v5.5
Administrator’s Guide
73
7
RULES ADMINISTRATOR
What Objects
To create a precise bandwidth control:
1
From the What tab, expand User Defined What Objects and click Precise Bandwidth Controls.
2
Right-click in the display objects window and select New.
3
Enter a name for your Precise Bandwidth Control.
4
Select one of the following options:
–
Starts with - For instance, the word ‘jobs’ means any part of the URL that starts with the word jobs
(for example, www.jobserve.co.uk) will match, but www.topjobs.co.uk will not.
–
Ends with - If you specify the word ‘.gif’ for example, www.example.com/home.gif will match, but
www.example.com/my.gifs will not.
–
Contains - If you specify ‘jobs’ in the field both www.jobserve.co.uk and www.topjobs.co.uk will
match.
Note: You can enter multiple selections by using a comma or a space to separate the
selections.
WHAT LISTS
A What list object can comprise of several specific objects from the What object list. This gives you a
convenient way to group objects that you need to share a set of rules. To create a What List, drag
individual What objects (Protocols/Ports and Precise Bandwidth Controls) from the bottom right-hand pane
to the upper left-hand pane in the What List dialog box.
Figure 7-13 What List dialog box
74
Administrator’s Guide
SurfControl Web Filter v5.5
RULES ADMINISTRATOR
When Objects
7
WHEN OBJECTS
When objects are used to define the time and date when a rule will be applied. The default setting for
When objects is Anytime.
Note: When objects are defined in 24-hour clock notation.
SurfControl Web Filter is supplied with three pre-defined When objects:
•
After Work
•
Weekends
•
Worktime
Figure 7-14 When objects tab
You can either create a new When object, or change the default properties of the supplied objects to suit
your purposes.
After Work
Right-click the object and select Properties. The After work object has the following default properties:
•
Days of the Week - Monday to Friday.
•
Start Time - 17:30.
•
End Time - 23:59.
SurfControl Web Filter v5.5
Administrator’s Guide
75
7
RULES ADMINISTRATOR
When Objects
Figure 7-15 After Work object properties.
Weekends
Right-click the object and select Properties to view. The Weekends When object has the following default
properties:
•
Days of the Week – Saturday & Sunday.
•
Start Time – 0:00.
•
End Time – 23:59.
Figure 7-16 Weekend object properties
76
Administrator’s Guide
SurfControl Web Filter v5.5
RULES ADMINISTRATOR
When Objects
7
Worktime
Right-click the object and select Properties. The Worktime When object has the following default
properties:
•
Days of the Week – Monday to Friday.
•
Start Time – 09:00.
•
End Time – 17:30.
Figure 7-17 Worktime object properties
When objects cannot cross a 24 hour period. For example, you cannot have a single object that starts at
19:00 (7pm) and finishes at 07:00 (7am). You need two objects, one starting at 19:00 and finishing at
23:59 for one day and another starting at 00:00 and finishing at 07:00 for the following day.
SurfControl Web Filter v5.5
Administrator’s Guide
77
7
RULES ADMINISTRATOR
Allowance Objects
ALLOWANCE OBJECTS
Allowance objects are used to permit Internet access for a specified period of time or to allow a set amount
of data to be downloaded. Once these limits have been reached, access is blocked.
Note: Allowance objects can only be applied to the HTTP protocol.
Web Filter is supplied with two pre-defined Allowance objects, which have a default value of None:
•
10 MB volume object
•
30 minutes time value object
Figure 7-18 Allowance object tab
You can either create a new Allowance object, or change the default properties of the supplied objects to
suit your purposes.
10 MB VOLUME OBJECT
Right-click the object and select Properties to see the Properties dialog:
Figure 7-19 10 MB object properties
78
Administrator’s Guide
SurfControl Web Filter v5.5
RULES ADMINISTRATOR
Allowance Objects
7
The 10 MB Allowance object has the following default properties:
•
Type of Allowance - Volume
•
Allowance Limit - 10240 KB
Note: If the first file a user attempts to download exceeds the volume limit, this file will still be
downloaded. All subsequent download attempts will be blocked. Web Filter can only judge the
size of a file once it has been downloaded.
30 MINUTE TIME OBJECT
Right-click the object and select Properties. The 30 Minute Allowance object has the following default
properties:
Figure 7-20 30 Minute object properties
Table 7-5 30 Minute object properties
Type of Allowance
Allowance Limit
Time
30 min
Browse Time Sensitivity
3 min
About Browse Time Sensitivity
Browse time sensitivity refers to the maximum amount of time Web Filter presumes a user to be actively
engaged with a site. Browse time sensitivity is also used to offset the uncertainty about how much actual
time a user is engaged in browsing. By default, browse time sensitivity is set to three minutes.
Browse time sensitivity comes into play every time a user launches a browser. However, the way in which
Web Filter attributes browse time sensitivity depends on whether the browsing takes place as a standalone occurrence or in a sequence of connections.
SurfControl Web Filter v5.5
Administrator’s Guide
79
7
•
RULES ADMINISTRATOR
Allowance Objects
Stand-Alone Browsing
Stand-alone browsing is a single connection to the Internet. For example, stand-alone browsing occurs
when a user opens their browser and makes a connection to a site, does not go to any subdirectories
of the site, then either closes their browser or does not make any more connections.
When a user browses in a stand-alone occurrence, Web Filter calculates the browse time to be equal
to the Browse Time Sensitivity setting (by default, three minutes).
–
Example
A user opens a connection to CNN.com. Technically, they spend forty-five minutes at the site,
because even though they stop browsing and are working on other tasks, the browser is left open.
The browse time to CNN.com is calculated to be three minutes because the Browse Time
Sensitivity is set to three.
•
Continuous Browsing
Continuous browsing occurs when there is a sequence of connections, each one made within three
minutes of the last. SurfControl Web Filter automatically adds the browse time sensitivity value to the
last connection in the sequence.
–
Example
A user opens their browser and makes a connection to ebay.com for two minutes, connects to
ebay.com\ebaymotors for one minute, then opens ebay.com\ebaymotors\motorcycles for one
minute. Web Filter records the browse time as in the table below:
Table 7-6 Example of Continuous Browsing Recording
From
To
10:00
10:02
2 minutes
10:02
10:03
1 minute
10:03
10:04
80
+Browse Time Sensitivity
Duration
3 minutes
4 minutes
Total Browse time
7 minutes
Administrator’s Guide
SurfControl Web Filter v5.5
RULES ADMINISTRATOR
Notify Objects
7
NOTIFY OBJECTS
Notify objects enable you to e-mail specified people within the organization when a rule has been
triggered. These objects work in different ways, depending on the type of rule.
Note: A default Notify object is not provided.
•
Allow rule - One message will be sent once per hour per user.
•
Disallow rule - One message will be sent per user each time a rule is triggered.
•
Allowance rule - After the Allowance limit is exceeded, one message per user is sent each time the
rule is triggered.
Figure 7-21
Notify Objects tab
To create a new notify object:
1
Click the Notify tab and right-click in the display objects pane.
Figure 7-22 SMTP Email Notification object properties.
2
Enter a name for your new Notify object.
SurfControl Web Filter v5.5
Administrator’s Guide
81
7
RULES ADMINISTRATOR
Notify Objects
3
Enter the address of your mail server in the SMTP mail server text box. This information can be
obtained from the E-mail Notification tab in the Web Filter Service Settings dialog box. Right-click the
SurfControl icon
in the notification area of the taskbar.
4
Enter the e-mail address of the person you want to receive the notification in the Recipient text box. If
you want to send the message to multiple recipients, make sure there is a space between each e-mail
address.
5
In the From text box, you can either leave the default address in this field, or enter a suitable address
for your own organization.
6
Enter a relevant subject for your e-mail object in the Subject text box.
7
The object comes with pre-defined data that you can include in the construction of your notification
object. Click Insert in the Message Body text box and select any of the following:
–
User
–
Workstation
–
Site
–
Category
–
Protocol
–
Time
–
Rule Number
–
Page
Note: You can also use these variables in the Subject line, to enable the recipient to discover
why a web page is being blocked, without having to inspect the entire body of the message.
8
By default, the notification object is only triggered if the base Web page is blocked. Click Notify on
Specific File Types to specify which file types you want to send notifications on. Click the button and
select the file type from the dialog box.
82
Administrator’s Guide
SurfControl Web Filter v5.5
RULES ADMINISTRATOR
Notify Objects
7
The available file types are shown in the table below:
Table 7-7 Notification File Types
File Type Group
File Extensions
Audio Files
aac, aif, aifc, aiff, au, cda, m3u, m4p, mid, midi, mp3, ogg, rmi, snd, wav, wax, wma.
Compressed Files
ace, arc, arj, b64, bhx, cab, gz, gzip, hqx, iso, jar, lzh, mim, rar, tar, taz, tgz, tz, uu, uue,
xxe, z, zip.
Documents
csv, doc, docx, dot, pdf, ppt, pptx, ps, rtf, txt, xls, xlsx.
Executables
bat, cfc, cmd, com, dll, exe, jse, ocx, xpi.
Feeds
opml, rdf, rss, rss2, xml.
Images
bmp, gif, jfif, jpe, jpeg, jpg, pcx, png, psd, tif, tiff, wmf.
Scripting
cgi, js, php, pl, py, vb, vbe, vbs.
Video Files
asf, asx, avi, divx, ivf, mlv, mov, mp2, mp2v, mpa, mpe, mpeg, mpg, mpv2, qt, ra, ram,
rm, swf, wm, wmd, wmp, wmv, wmx, wvx, wxv.
Web Pages
asp, aspx, css, htm, html, jsp, mspx, shtml, stm.
SurfControl Web Filter v5.5
Administrator’s Guide
83
7
RULES ADMINISTRATOR
HTTP Deny Page Objects
HTTP DENY PAGE OBJECTS
HTTP Deny Page objects are Web pages that a user will see when they have triggered a rule, for example
if they try to access a site that is blocked. The default setting for HTTP Deny Page objects is Default. Web
Filter is supplied with two pre-defined HTTP Deny Page objects:
•
Default
•
Allowance
Figure 7-23 HTTP Deny Page object tab
Caution: Deny Page objects will not function when blocking HTTPS destinations.
DEFAULT
The Default HTTP Deny Page object has the following default properties. Right-click the object and select
Properties:
Figure 7-24 Default HTTP Deny Page object properties
84
Administrator’s Guide
SurfControl Web Filter v5.5
RULES ADMINISTRATOR
HTTP Deny Page Objects
7
You can edit the text from within the object. See "Constructing HTTP Deny Pages" on page 86 for
restrictions applying to editing or constructing deny pages.
Figure 7-25 Default HTTP Deny Web page
From the dialog box you have the following options:
•
Import - You can import HTML code you have created in a file elsewhere, or you can re-import the
default deny page text from the following location:
C:\Program Files\SurfControl\Web Filter\Sample Denied Text\Default_Denied.html
•
Preview - Use this option to see how your deny page will look in a browser.
•
Default Page - This option is selected as this is the default page supplied by SurfControl.
ALLOWANCE
The Allowance HTTP Deny Page object has the following default properties. Right-click the object and
select Properties.
Figure 7-26 Allowance HTTP Deny Page object properties
You can edit the text from within the object. See "Constructing HTTP Deny Pages" on page 86 for
restrictions applying to editing or constructing deny pages.
SurfControl Web Filter v5.5
Administrator’s Guide
85
7
RULES ADMINISTRATOR
HTTP Deny Page Objects
Figure 7-27 Allowance HTTP Deny Web page
From the dialog box you have the following options.
•
Import - You can import HTML code you have created in a file elsewhere, or you can re-import the
default deny page text from the following location:
C:\Program Files\SurfControl\Web Filter\Sample Denied Text\Default_Denied.html
•
Preview - Use this option to see how your deny page will look in a browser.
•
Default Page - Select this checkbox if you want this page to be the default Deny page displayed.
OTHER HTTP DENY PAGE OBJECTS
SurfControl has supplied the following html pages which you may find useful when creating custom deny
pages:
•
Redirect_Denied.html - Redirect a user to a deny page.
•
Refresh_to_AUP.html - This allows you to redirect a user to your Acceptable Use Policy. In a default
installation, these pages can be found in the following location:
C:\Program Files\SurfControl\Web Filter\Sample Denied Text\
CONSTRUCTING HTTP DENY PAGES
When constructing your own HTTP Deny Pages, you are restricted to using 1024 characters or less,
including the HTML tags, when building your deny page. In addition there are the following objects you can
insert into your HTTP Deny Page objects:
•
User
•
Client_IP
•
Site
•
Category
•
Page
86
Administrator’s Guide
SurfControl Web Filter v5.5
RULES ADMINISTRATOR
Viewing Another Collector
7
VIEWING ANOTHER COLLECTOR
If you have more than one collector on your network, you can quickly change to a different one from within
the Rules Administrator. You can then view the rules in place for a specific collector within your
organization.
To change the collector from within the Rules Administrator:
1
Click the Open icon
in the Rules Administrator.
A Select Database dialog box is displayed.
2
Enter the server name, or select a previously selected server from the list.
3
Click OK.
SurfControl Web Filter v5.5
Administrator’s Guide
87
7
88
RULES ADMINISTRATOR
Viewing Another Collector
Administrator’s Guide
SurfControl Web Filter v5.5
Chapter 8
Real Time Monitor
Introduction . . . . . . . . . . . . . . . . . . . . . . . . . . . . . . . . . . . . . . . . . . . . . . . . . . . . . . . . . . . . . . . . . . page 90
Display Columns . . . . . . . . . . . . . . . . . . . . . . . . . . . . . . . . . . . . . . . . . . . . . . . . . . . . . . . . . . . . . . page 92
Category Color. . . . . . . . . . . . . . . . . . . . . . . . . . . . . . . . . . . . . . . . . . . . . . . . . . . . . . . . . . . . . . . . page 93
Collector Details . . . . . . . . . . . . . . . . . . . . . . . . . . . . . . . . . . . . . . . . . . . . . . . . . . . . . . . . . . . . . . page 94
Stopping and Starting the Real-Time Monitor . . . . . . . . . . . . . . . . . . . . . . . . . . . . . . . . . . . . . . page 95
8
REAL TIME MONITOR
Introduction
INTRODUCTION
The Real-Time Monitor shows Internet activity on your network as it is happening. This is different from the
Monitored Data in the Web Filter Manager, which displays historic information that has been saved in your
database.
To open the Real-Time Monitor from the Web Filter Manager select Content Protection > Real-Time
Monitor from the appropriate collector or database in the Navigation tree. The Real-Time Monitor is also
available from the Start > All Programs > SurfControl Web Filter menu.
Figure 8-1
Real-Time Monitor
You can right click a destination in the Real-Time Monitor to visit the selected destination in your Web
browser. This is a convenient way to inspect the web sites frequented by users, as soon as they are
visited.
The following columns are visible by default in the Real-Time Monitor:
Table 8-1 Real-Time Monitor Columns
Column
Description
Destination
Identifies the destination name.
Category
Identifies the Category Web Filter has assigned to the destination.
User
Identifies the user.
Connection Status
Indicates whether the destination was Allowedor Blocked by Web Filter.
90
Administrator’s Guide
SurfControl Web Filter v5.5
REAL TIME MONITOR
Introduction
8
Other columns can be configured via the Options menu. Select General from the Options menu. The
Real-Time Monitor Options dialog box displays as shown below.
Figure 8-2
Real-Time Monitor Options dialog box
Note: Changes made in the Real-Time Monitor Options dialog box clear the existing Real-Time
Monitor buffer.
SurfControl Web Filter v5.5
Administrator’s Guide
91
8
REAL TIME MONITOR
Display Columns
DISPLAY COLUMNS
Under Display Columns, you can define which columns are displayed in the Real-Time Monitor window.
Table 8-2 Real-Time Monitor columns
Column
Description
Default Option
Destination
Shows the destination being visited
Yes (this option
cannot be cleared).
Category
Shows the SurfControl category assigned to the destination. If a
destination has not been categorized it will be shown as ‘None
Yes
User *
Shows the user name of the person accessing the destination.
Yes
Server IP Address
Shows the IP Address for the server hosting the destination.
No
Client Name *
The name of the client computer accessing the destination.
No
Client IP Address *
The IP Address of the client computer accessing the destination.
No
Connection Status
Shows whether the destination was Allowed or Blocked by a
SurfControl Web Filter rule.
Yes
Protocol
Displays the communication protocol used for the connection.
No
Rule Comment
Displays the description of the rule for easy identification.
No
* These columns are unavailable in the Privacy Edition of Web Filter.
92
Administrator’s Guide
SurfControl Web Filter v5.5
REAL TIME MONITOR
Category Color
8
CATEGORY COLOR
This option allows you to assign a color to a SurfControl Category. This can aid you in spotting trends in
surfing habits in the Real-Time Monitor.
Assigning a Category Color
To assign a color to a category:
1
Select a Category from the Category Color list.
2
Click Set Color. A color palette will appear.
3
Select a basic color from the chart or click Define Custom Colors to select HSL or RGB color values.
4
Click OK. The Category definition will now be highlighted in the color chosen.
OTHER SETTINGS
You can set the number of lines to be viewed in the Real-Time Monitor, by typing in a value in the
Connection buffer size field. The default setting is 500 lines.
SurfControl Web Filter v5.5
Administrator’s Guide
93
8
REAL TIME MONITOR
Collector Details
COLLECTOR DETAILS
You can view information about the Real-Time Monitor connector by selecting Collector Details from the
Options menu.
Figure 8-3
1
Collector Details
Enter the name of the server that the Real-Time Monitor should connect to, in the Server Name text
box. You can enter the name of a new server into the drop-down list box. This server is then stored in
the drop-down list. You can store up to ten servers.
Note: The first time you connect to the Real-Time Monitor, the Collector Details dialog box will
display, with localhost as its default Server Name. If you change the Server Name, the RealTime Monitor will attempt to connect to this collector when subsequently accessed. If it cannot
connect to this collector, a warning is displayed.
2
Enter the Port number which the Real-Time Monitor connects to the Web Filter service on, in the
Server Port text box (the default is 5000). Before changing the port number, check that it is not used
by another program first.
3
Enter the time that the Real-Time Monitor will wait before reporting an error if the connection with the
Server is lost, into the Timeout (seconds) text box.
4
Select Warn user if the service drops. If selected, an error message will display if the connection to the
server is lost.
94
Administrator’s Guide
SurfControl Web Filter v5.5
REAL TIME MONITOR
Stopping and Starting the Real-Time Monitor
8
STOPPING AND STARTING THE REAL-TIME MONITOR
If there is a lot of traffic being detected by the Real-Time Monitor, you can temporarily stop the traffic. This
will enable you to browse the destinations being seen at that time. The number of destinations you can see
is limited by the value set in the Connection buffer size option. Once you have finished browsing you can
start the Real-Time Monitor again.
Note: Data is not cached by the Real-Time Monitor when it is stopped, so destinations visited
while the Real-Time Monitor is stopped will not be seen when you restart.
SurfControl Web Filter v5.5
Administrator’s Guide
95
8
96
REAL TIME MONITOR
Stopping and Starting the Real-Time Monitor
Administrator’s Guide
SurfControl Web Filter v5.5
Chapter 9
Web Filter Settings
Introduction . . . . . . . . . . . . . . . . . . . . . . . . . . . . . . . . . . . . . . . . . . . . . . . . . . . . . . . . . . . . . . . . . . page 98
Available Settings . . . . . . . . . . . . . . . . . . . . . . . . . . . . . . . . . . . . . . . . . . . . . . . . . . . . . . . . . . . . . page 99
Start/Stop Service Tab . . . . . . . . . . . . . . . . . . . . . . . . . . . . . . . . . . . . . . . . . . . . . . . . . . . . . . . . page 100
Active Directory Tab . . . . . . . . . . . . . . . . . . . . . . . . . . . . . . . . . . . . . . . . . . . . . . . . . . . . . . . . . . page 101
Subnets Tab . . . . . . . . . . . . . . . . . . . . . . . . . . . . . . . . . . . . . . . . . . . . . . . . . . . . . . . . . . . . . . . . . page 102
Advanced Tab . . . . . . . . . . . . . . . . . . . . . . . . . . . . . . . . . . . . . . . . . . . . . . . . . . . . . . . . . . . . . . . page 104
Categorization Tab . . . . . . . . . . . . . . . . . . . . . . . . . . . . . . . . . . . . . . . . . . . . . . . . . . . . . . . . . . . page 106
Ignored Ports Tab . . . . . . . . . . . . . . . . . . . . . . . . . . . . . . . . . . . . . . . . . . . . . . . . . . . . . . . . . . . . page 108
Real-Time Monitor Tab . . . . . . . . . . . . . . . . . . . . . . . . . . . . . . . . . . . . . . . . . . . . . . . . . . . . . . . . . page 111
Database Tab . . . . . . . . . . . . . . . . . . . . . . . . . . . . . . . . . . . . . . . . . . . . . . . . . . . . . . . . . . . . . . . . .page 112
E-mail Notifications Tab . . . . . . . . . . . . . . . . . . . . . . . . . . . . . . . . . . . . . . . . . . . . . . . . . . . . . . . .page 114
9
WEB FILTER SETTINGS
Introduction
INTRODUCTION
You can configure how SurfControl Web Filter monitors and filters Internet traffic, by configuring the Web
Filter service settings.
HOW TO CONFIGURE THE WEB FILTER SETTINGS
There are three ways in which you can open the Web Filter settings:
•
Right-click the SurfControl icon
in the notification area of the task bar.
•
Select SurfControl Web Filter from the Control Panel.
•
From the Web Filter Manager, select Maintenance > Web Filter Settings from the appropriate
collector or database in the Navigation tree.
98
Administrator’s Guide
SurfControl Web Filter v5.5
WEB FILTER SETTINGS
Available Settings
9
AVAILABLE SETTINGS
To configure the Web Filter service settings, open the Web Filter Settings dialog box as shown below:
Figure 9-1
Web Filter service Settings
You can use this dialog box to:
•
Start, stop and restart the Web Filter service.
•
Configure any subnets and IP addresses.
•
Configure how users and destinations can be viewed in the Web Filter Manager.
•
Configure how monitored traffic is transferred to your database.
•
Configure how Web Filter connects to Active Directory.
•
Edit the e-mail notifications set up during installation.
•
Configure the Real-Time Monitor connection settings.
•
Configure how Web Filter categorizes the destinations it sees in the Web Filter Manager.
SurfControl Web Filter v5.5
Administrator’s Guide
99
9
WEB FILTER SETTINGS
Start/Stop Service Tab
START/STOP SERVICE TAB
Before applying changes to the service and monitored data settings, the service needs to be stopped. For
further details, see "Monitored Data" on page 34.
Figure 9-2
Start/Stop Service tab
When you stop the service, the SurfControl icon in the notification area of the task bar is grayed out. When
you start or restart the service, the icon will revert back to color.
Note: You can quickly start, stop, and restart the service from the SurfControl icon in the
notification area on the task bar.
100 Administrator’s Guide
SurfControl Web Filter v5.5
WEB FILTER SETTINGS
Active Directory Tab
9
ACTIVE DIRECTORY TAB
By default, connection to your Active Directory server is via a non-secured LDAP connection. You can
change this to a secure SSL connection using port 636 from this tab. You can also provide user name
credentials for each trusted domain, and one default user name and password for all domains. This allows
rules which contain group objects from other domains, to obtain relevant user information from those
domains. The Active Directory tab is shown below.
Figure 9-3
Active Directory tab.
SurfControl Web Filter v5.5
Administrator’s Guide 101
9
WEB FILTER SETTINGS
Subnets Tab
SUBNETS TAB
You can help your Web Filter server work more efficiently by using the Subnets tab to help balance the
load.
Figure 9-4
Subnets tab
The Subnets tab has two sections.
•
Subnet Monitoring
These settings help balance the load on your Web Filter service.
•
Ignore Subnets
These settings shows the internal subnets that are detected during installation to help balance the load
on the server. These subnets are not monitored.
SUBNET MONITORING
The Subnet Monitoring section is used to identify which parts of your network should be monitored or not
by each Web Filter server. How you decide on this, depends on whether you have single or multiple Web
Filter servers, and how you want to divide the network volume load of traffic between those servers. To
configure your subnets on a single Web Filter server:
1
Identify the external traffic subnets you do not want to monitor.
2
Click the Subnets tab, and click Add.
3
Enter the IP address of the subnet in the IP Address text box.
4
Enter the subnet mask in the Mask text box.
5
Click OK.
102 Administrator’s Guide
SurfControl Web Filter v5.5
WEB FILTER SETTINGS
Subnets Tab
6
Repeat steps 1 to 5 for other subnets you do not want to monitor.
7
Select Do not Monitor traffic to or from these subnets.
9
By configuring subnets on multiple Web Filter servers, you ensure the subnets are only monitored on one
server in your network environment. You need to specifically identify subnets you do not want to monitor
on one Web Filter server, and define one or more subnets you do want to monitor on each subsequent
Web Filter server. This allows you to divide the volume load of network traffic across your servers, making
them more efficient. To configure your subnets on multiple Web Filter servers:
1
Identify the subnets you do not want to monitor.
2
On the first Web Filter server, click the Subnet tab, and click Add.
3
Enter the ip address of the subnet in the IP Address text box.
4
Enter the subnet mask in the Mask text box.
5
Click OK.
6
Repeat steps 1 to 5 for other subnets you do not want to monitor.
7
Select Do not Monitor traffic to or from these subnets.
8
For each subsequent Web Filter server, you should identify a specific subnet that you do want to
monitor. To do this, identify subnets you do want to monitor, and follow steps 2 to 5.
9
Select Only Monitor traffic to or from these subnets.
Ignore Subnets
During installation, Web Filter detects the internal subnets on your monitoring and blocking network card.
The Web Filter server ignores inbound traffic to these internal subnets, reducing the load on the Web Filter
Service.
The subnets detected are listed in the Ignore Subnets section of the Subnets tab. You also have the
following options:
•
Add a new subnet.
•
Remove a subnet.
•
Edit the IP address or subnet mask for an existing subnet.
SurfControl Web Filter v5.5
Administrator’s Guide 103
9
WEB FILTER SETTINGS
Advanced Tab
ADVANCED TAB
From the Advanced tab you can define the following:
•
Network Settings
•
TCP/IP Name Resolution (DNS)
•
Monitor to Database Settings
Figure 9-5
Advanced tab
NETWORK SETTINGS
These settings affect how Web Filter reacts to new users and destinations that are not yet categorized:
•
Lookup new users’ friendly name - If selected, when new users are detected by the Web Filter
Monitor, their friendly name is retrieved from the domain controller.
•
Lookup new users’ group details - If selected, when new users are detected by the Web Filter
Monitor, details of the groups that they are a member of are retrieved from the domain controller.
•
Block until categorized - If selected, any destinations (including image searches) that haven’t been
categorized by Web Filter will be blocked until a categorization is given. Once a categorization is
received, the destination will be checked against the rules you have in place, and viewed or blocked
accordingly.
104 Administrator’s Guide
SurfControl Web Filter v5.5
WEB FILTER SETTINGS
Advanced Tab
9
TCP/IP NAME RESOLUTION (DNS)
These settings affect how SurfControl Web Filter resolves Domain names:
•
Workstation name resolution - Determines a workstation name based on IP address.
•
Site name resolution - Provides DNS resolution for destination names.
SurfControl recommends you leave these settings cleared to increase performance. If you need
workstation and site name resolution enabled, you must define the DNS settings on all Web Filter servers.
It is critical that DNS requests from those servers do not time out or take an excessive time to respond.
MONITOR TO DATABASE SETTINGS
By default the Web Filter service writes data to flat files, which are then imported to the database
automatically. The Monitor to Database settings enables you to configure this process. The options are:
•
Automatic (default setting) - Flat files are continuously imported into your database as they are
created.
•
Manual - Select this option to update the flat files to your database manually. This can be done in the
following two ways:
–
Use the Database Updater tool. See "Updating Your Database" on page 134 for more details.
–
Schedule a database update event in the Scheduler. See "Database Update" on page 143 for
more details.
SurfControl recommends using a scheduled event for updating your database. This ensures that your
database is automatically kept up to date, without the need to perform a manual update.
SurfControl Web Filter v5.5
Administrator’s Guide 105
9
WEB FILTER SETTINGS
Categorization Tab
CATEGORIZATION TAB
Web destinations seen by Web Filter are assigned to a category in the SurfControl Web Filter Internet
Threat Database. The categorization tab enables you to configure how you want Web Filter to perform the
categorization process. The Categorization Tab is shown below:
Figure 9-6
Categorization tab
CATEGORIZATION
Web Filter can categorize destinations in the following ways:
•
Auto-categorization (Default Setting) - Enables all Categorization.
•
SmartScan Only - Categorization of a URL will only take place against a list of keywords entered in
the SmartScan dialog. See "Custom Categories" on page 68 for more details.
•
No Auto-categorization - Disables all categorization.
COMPANY DOMAINS AND INTRANET DESTINATIONS
When installing Web Filter, the Configuration Wizard asked you to specify your company domains and
intranet destinations. This is then used by Web Filter to categorize these as ‘Company & Intranet’. You can
add, remove or change those destinations from here.
INTERNET THREAT DATABASE IMPROVEMENT PROGRAM
Uncategorized and VCA categorized destinations are sent anonymously to SurfControl. These are then
analyzed, assigned to a SurfControl category and added to the Internet Threat Database. This helps
SurfControl increase the filtering effectiveness for all customers. You have the option to choose whether to
install this during the installation process. If you use a proxy server for internet requests, you can configure
your authentication details for sending your information to SurfControl via your proxy server.
106 Administrator’s Guide
SurfControl Web Filter v5.5
WEB FILTER SETTINGS
Protocol Signatures Tab
9
PROTOCOL SIGNATURES TAB
The Protocol Signatures tab gives you the ability to enable signature scanning for certain Instant
Messenger, P2P and Web accelerator protocols. These protocols can establish connections with other
devices outside your corporate network, on a range of different ports, and are therefore known to be portagile. Web Filter monitors these protocols on specified static ports by default. If you enable protocol
signature scanning, these protocols will also be monitored by signature.
Caution: Enabling Protocol Signature Scanning may have an impact on the performance of
your Web Filter server.
After selecting Enable Protocol Signature Scanning, you can choose a type of scanning method to
detect the Skype protocol:
•
Detect Skype on all ports - This option is selected by default, and enables Web Filter to detect the
Skype protocol by signature on all ports. This option provides a higher level of protection but increases
the risk of falsely identifying other traffic as Skype. This option is recommended by SurfControl.
•
Detect Skype on standard ports only (HTTP, HTTPS) - The Skype protocol will be detected by
signature on ports 80 (HTTP) and 443 (HTTPS) only. This scanning method provides a lower level of
protection, but decreases the risk of falsely identifying other traffic as Skype. To identify all possible
Skype connections, you must ensure other ports are managed by your firewall.
A full list of protocols which can be monitored by signature, are outlined in the table below:
Table 9-1 Signature scanning protocols
Application Type
Protocols
Instant Messaging
•
MSN Messenger
•
OSCAR (AIM/ICQ)
•
XMPP (Jabber)
•
BitTorrent
•
eDonkey
•
FastTrack (Kazaa)
•
Gnutella
•
Skype
•
Yahoo! Messenger
•
Google Web Accelerator
Peer to Peer (P2P)
Web
SurfControl Web Filter v5.5
Administrator’s Guide 107
9
WEB FILTER SETTINGS
Ignored Ports Tab
IGNORED PORTS TAB
Web Filter detects network traffic through the driver and passes the information to the Web Filter service,
even though you may have chosen not to monitor certain protocols in the monitor settings. To improve the
performance of Web Filter, you can use the Ignored Ports tab to specify ports that you want the driver to
ignore. This will result in network traffic using those ports, not being passed to the Web Filter service.
Note: If you have enabled Protocol Signature Scanning, all network traffic will be scanned for
protocol signatures and if a signature is found, it will be used to determine whether the port is
ignored.
Figure 9-7
Ignored Ports tab
Select one of the following options:
•
Ignore traffic to or from these ports - This option will ignore all network traffic that use the ports in
the Ignored Ports list.
•
Ignore traffic EXCEPT to or from these ports - Select this option if you want to ignore all network
traffic, apart from the specified port numbers in the Ignored Ports list.
108 Administrator’s Guide
SurfControl Web Filter v5.5
WEB FILTER SETTINGS
Ignored Ports Tab
9
CREATING NEW PORTS
You can add either single ports or a range of ports to the Ignored Ports list. To create a new port entry:
1
On the Ignored Ports tab, click New.
2
In the Ports dialog that follows, select one of the following options:
3
•
Single Port - Enter a single port number.
•
Port Range - Enter a range of port numbers. For example, to allow the Web Filter driver to ignore
or acknowledge FTP network traffic, enter a range of 20 - 21.
Optionally enter a description into the Comment text box, and click OK to save your changes, or click
Cancel to abort.
You can also perform the following actions:
•
Delete - Removes a selected port number or port range from the list.
•
Edit - Launches the Ports dialog box to change details for a selected port, or port range in the list.
USERNAME RESOLUTION
The User Name Resolution tab allows you to configure how Web Filter detects user names:
Figure 9-8
User Name Resolution tab
The tab is split into two sections:
•
Username Resolution
•
Enterprise User Monitoring
SurfControl Web Filter v5.5
Administrator’s Guide 109
9
WEB FILTER SETTINGS
Ignored Ports Tab
These settings affect how Web Filter monitors users:
•
None - If selected, SurfControl monitors users based on workstation name or IP address.
•
Enterprise User Monitoring (EUM) - If you have installed EUM, this option will be selected by default.
SurfControl recommends the use of EUM for user name resolution. See the Starter Guide for details
on how to install EUM.
Note: If you install EUM in a NetWare environment, Enterprise User Monitoring is not selected
by default. You need to manually select it.
•
NetBIOS - Based on the MAC address of the workstation.
•
Lifetime of user name - This field is used by NetBIOS only. This determines how often Web Filter
should check each workstation for active users. The default value is 600 seconds.
ENTERPRISE USER MONITORING
If you choose to use EUM after installation, the options in this section enable you to configure how to
monitor user names in a NetWare environment. If you chose to monitor by EUM during installation, the
NetWare Tree and Context details you entered in the Configuration Wizard will be shown, but will not be
editable.
Note: These settings will only be available if the NetWare client has been installed. SurfControl
recommend installing the NetWare client before installing Web Filter. See Chapter 2 of the
Starter Guide for details.
•
Preferred Schema - You can monitor by both Windows and NetWare users. You can select your
preferred schema.
•
NetWare Monitoring - If monitoring by NetWare user names, you need to enter the following details.
–
NetWare Tree and Context - You need to enter your NetWare Tree and Context information in
this field. (For example: OUname.Orgname.Treename).
Caution: Ensure these details are entered correctly, as this information can not be edited
afterwards.
–
NDS tree Username and Password - Web Filter requires a valid NDS tree username and
password to be able to monitor NetWare users. For example: User.OUname.Orgname.
110 Administrator’s Guide
SurfControl Web Filter v5.5
WEB FILTER SETTINGS
Real-Time Monitor Tab
9
REAL-TIME MONITOR TAB
This tab displays the connection details for the Real-Time Monitor.
Figure 9-9
Real-Time Monitor Settings
The settings are:
•
Port Number - This is the port that the Real-Time Monitor connects to the Web Filter service on. The
default number is 5000. This port number must be the same as in the Collector Details dialog box in
the Real-Time Monitor. See page 94 for more details.
•
Timeout (seconds) - If the connection to the server is lost, this is the time that the Real-Time Monitor
will try re-connecting to the server before timing out and reporting an error.
•
Heartbeat Interval (seconds) - The Web Filter service will send an ‘I’m here’ message to the RealTime Monitor. The Real-Time Monitor will then send one back. This setting is the interval between
receiving a message and returning it. If no message is received by the Real-Time Monitor it assumes
that the connection to the Web Filter service has stopped.
•
Maximum Clients - The maximum allowed number of Real-Time Monitor connections to the server at
any one time.
SurfControl Web Filter v5.5
Administrator’s Guide 111
9
WEB FILTER SETTINGS
Database Tab
DATABASE TAB
The Database tab shows the current database being used for Monitoring, and Rules and Clients in Web
Filter. The default database name is SurfControl_WebFilter.SurfControl recommends you do not have
separate databases for Monitoring and Rules. For more information about Mobile Filter remote users,
consult the Mobile Filter Administrator’s Guide.
Figure 9-10 Database tab
To change the Web Filter Database:
1
Stop the service.
2
In the Database tab, click Browse alongside the type of Database you want to change.
A SQL Server Login dialog box is displayed. The Use Trusted Connection option is selected by
default. If you want to use a SQL Server Login ID and Password, clear this option and enter the details
in the relevant fields.
3
Select the server you want to connect to from the Server list. The Options button will become enabled.
112 Administrator’s Guide
SurfControl Web Filter v5.5
WEB FILTER SETTINGS
Database Tab
4
Click Options to expand the login dialog box.
5
Select the database you want to connect to.
6
Add an Application Name to identify the database and click OK.
7
Click Apply.
8
Start the service.
SurfControl Web Filter v5.5
9
Administrator’s Guide 113
9
WEB FILTER SETTINGS
E-mail Notifications Tab
E-MAIL NOTIFICATIONS TAB
During installation you were asked to give the following information about the Systems Administrator:
•
E-mail Server
•
Recipient Address
•
From Address
You were also asked to select from the following message types that the System Administrator should
receive alerts about:
•
Service running status changes - If the Web Filter or Scheduler service is stopped or started.
•
Internet Threat Database license reminders - A reminder will be sent when a subscription to the
Internet Threat Database is due for renewal. A reminder will be sent a month from expiry, then a week
from expiry, and a day from expiry. Once a subscription has expired a reminder will be sent every 24
hours.
•
Scheduled task failures - If any scheduled task does not complete.
•
Catch up mode notifications - If the service becomes overloaded, monitoring will be restricted to
HTTP traffic. If the overload becomes critical, monitoring will be temporarily suspended. An e-mail will
be sent when Web Filter enters and exits catch up mode.
114 Administrator’s Guide
SurfControl Web Filter v5.5
WEB FILTER SETTINGS
E-mail Notifications Tab
9
You can select these options on the E-mail Notification tab as shown below:
Figure 9-11 E-mail Notification tab
There are three other e-mail alerts that the recipient address will receive:
•
Unlicensed product reminders - If you are still using an unlicensed product past its thirty day trial
period, you will be sent daily reminders.
•
Internet Threat Database category changes - Made by the SurfControl Global Threat Experts. The
Global Threat Experts may dynamically add new categories to the Internet Threat Database. This
e-mail will inform you of any additions that have been made.
•
Seven day reminder - If it is more than a week (seven days) since an Internet Threat Database
update.
SurfControl Web Filter v5.5
Administrator’s Guide 115
9
WEB FILTER SETTINGS
E-mail Notifications Tab
116 Administrator’s Guide
SurfControl Web Filter v5.5
Chapter 10
Custom Categorization
Introduction . . . . . . . . . . . . . . . . . . . . . . . . . . . . . . . . . . . . . . . . . . . . . . . . . . . . . . . . . . . . . . . . . .page 118
How It Works . . . . . . . . . . . . . . . . . . . . . . . . . . . . . . . . . . . . . . . . . . . . . . . . . . . . . . . . . . . . . . . . .page 118
Using Custom Categorization . . . . . . . . . . . . . . . . . . . . . . . . . . . . . . . . . . . . . . . . . . . . . . . . . . .page 119
List of Destinations Tab . . . . . . . . . . . . . . . . . . . . . . . . . . . . . . . . . . . . . . . . . . . . . . . . . . . . . . . .page 119
VCA Settings Tab . . . . . . . . . . . . . . . . . . . . . . . . . . . . . . . . . . . . . . . . . . . . . . . . . . . . . . . . . . . . page 121
VCA Results Tab . . . . . . . . . . . . . . . . . . . . . . . . . . . . . . . . . . . . . . . . . . . . . . . . . . . . . . . . . . . . . page 122
The VCA Service Settings. . . . . . . . . . . . . . . . . . . . . . . . . . . . . . . . . . . . . . . . . . . . . . . . . . . . . . page 124
10
CUSTOM CATEGORIZATION
Introduction
INTRODUCTION
Custom categorization uses SurfControl’s Virtual Control Agent™ (VCA) technology. The VCA evaluates
unknown Web destinations, reading and analyzing content page by page. It then uses cutting-edge
artificial intelligence algorithms to study and classify each Web page into one of the SurfControl Web Filter
categories. This allows sites initially shown as ‘Uncategorized’ in the Monitor to be categorized more
meaningfully.
HOW IT WORKS
1
The VCA collects a representative number of pages and analyzes their content.
2
The VCA’s Neural Network compares the page and site with other sites in the SurfControl Web Filter
categories.
3
It then puts the site into the category that it most resembles. For more details on SurfControl’s
categories, see "Category Object" on page 67.
THE VCA IN EVALUATION MODE
If you are using Web Filter in evaluation mode, none of the custom categorization changes made by the
VCA will be stored to the database. You can perform a categorization run and view the results, but these
will not be saved to the database.
118 Administrator’s Guide
SurfControl Web Filter v5.5
CUSTOM CATEGORIZATION
Using Custom Categorization
10
USING CUSTOM CATEGORIZATION
To open the VCA from the Web Filter Manager, select Content Protection > Custom Categorization
from the appropriate collector or database in the Navigation tree, or from the shortcut button within the
other SurfControl Web Filter components. Custom Categorization is also available from the Start > All
Programs > SurfControl Web Filter menu.
LIST OF DESTINATIONS TAB
The default view is the List of Destinations tab as shown below:
Figure 10-1 List of Destinations tab
1
In the Select Collector text box, enter the name of the database which is currently in use for VCA
runs, You can click Browse to connect to another SurfControl Web Filter server (Collector).
2
The Display objects which contain text box can show the database currently in use for VCA runs.
Enter part or all of a URL to search the VCA List of Destinations for a particular destination or group of
destinations.
3
Click one of the following buttons to perform a task:
•
Categorize all Uncategorized Destinations - Starts the VCA categorization process.
•
Refresh List - Used to refresh the destinations list in the VCA.
•
Set all destinations back to unchecked - In each run the VCA attempts to categorize all
'Uncategorized' unchecked destinations. However if the destinations have already been checked
in a former run the VCA will not attempt to re-categorize these. Use Set all destinations back to
unchecked to set destinations back to the 'unchecked' state that they were in previously. The VCA
will then attempt to categorize the ‘Uncategorized’ destinations again in the next run. This action
only applies to ‘Uncategorized’ destinations.
SurfControl Web Filter v5.5
Administrator’s Guide 119
10
CUSTOM CATEGORIZATION
Using Custom Categorization
The Monitored Destinations panel shows the current list of destinations in the Monitor database. Click
any of the column headings to sort by that data.
•
Destination - Shows the URL for a categorized destination.
•
Category - Shows the VCA category for the URL.
•
Categorization Method - The sources of categorization are as follows:
•
–
Company & Intranet - The destination is specified within the Categorization tab of the Web Filter
settings as a company domain or Intranet site. ("Categorization Tab" on page 106).
–
Manual - The administrator has manually set the category of the site. The category could have
been set to one of the SurfControl defined categories or a custom category. ("Category Object" on
page 67).
–
SurfControl - The site was categorized from the SurfControl Internet Threat Database.
–
VCA - The destination was categorized by the Virtual Control Agent.
–
None - The site was not assigned a category.
Last Access - The date the destination was last visited.
The VCA / Manual Categorizations panel shows any destinations that have been re-categorized, either
by the VCA or by yourself from the Monitored Destinations tab in the Web Filter Manager. See
"Monitored Destinations tasks" on page 47 for more details on manually categorizing a destination
originally set as ‘Uncategorized’.
•
Destination - Shows the URL for a categorized destination.
•
Page - Shows the page level information for the destination.
•
Category - Shows the VCA category for the destination.
•
Categorization Method - The sources of categorization are as follows:
•
–
Manual - The administrator has manually set the category of the destination. The category could
have been set to one of the SurfControl defined categories or a custom category. (See "Category
Object" on page 67 for more details).
–
VCA - The destination was categorized by the Virtual Control Agent.
Language - The language the destination was categorized in. See "VCA Settings Tab" on page 121
for details on the languages the VCA can categorize in.
Right-clicking any destination in the Monitored Destinations or VCA / Manual Categorizations panels
launches a menu with the following options.
•
Categorize Selection - Perform a VCA run on the selected destination.
•
Set Category - Manually set the category from the SurfControl Category list.
•
Uncheck Selection - Removes the Checked status from a destination, which will then be checked
again in a VCA run.
•
Remove Categorization - This option is only available in the VCA / Manual Categorizations panel.
This removes the manual categorization of a destination.
•
Go To HTTP - Opens the selected site in a Web browser.
120 Administrator’s Guide
SurfControl Web Filter v5.5
CUSTOM CATEGORIZATION
Using Custom Categorization
•
10
Find Destination - Allows you to search for a URL in the Monitored Destinations or VCA / Manual
Categorizations panels.
VCA SETTINGS TAB
To configure settings for the VCA:
1
In the Custom Categorization dialog, click the VCA Settings tab.
Figure 10-2 VCA Settings tab
2
Select the location of the Spider Files in the Spider Settings text box. In a default installation the
location will be:
C:\Program Files\SurfControl\Web Filter\SpiderFiles
This setting can also be changed via the VCA Control Panel application. See "The VCA Service
Settings" on page 124 for more details.
3
You can select any of the following options:
•
Observe Robot Exclusion Policy - Some destinations contain a text file that describes exactly
what each spider (or robot) can access on the destination. If you choose to ignore this policy then
the spider will try to access unauthorized areas on the destination. This may result in your IP
address being banned by the destination.
•
Cache retrieved web pages - Adds any pages directly retrieved during the VCA run to the local
web page cache, if available.
•
Impersonate Internet Explorer - The VCA will identify itself as Internet Explorer when making
requests to servers. If you clear this item the VCA will identify itself as SurfControl. Some
destinations are inaccessible unless you impersonate Internet Explorer, although destinations can
also ignore requests that originate from Internet Explorer. This option is selected by default.
SurfControl Web Filter v5.5
Administrator’s Guide 121
10
•
4
CUSTOM CATEGORIZATION
Using Custom Categorization
Retrieve pages from cache - Enables the VCA to use locally cached versions of pages of a
destination, rather than having to retrieve current versions from the Internet.
Select Use Proxy, if you are using a Proxy server. Select Use NT Authentication to enable you to
access the Proxy server as part of an NT Domain. This option is selected as default if the Proxy Server
option is selected. Select Authenticate Using if you do not want to use NT Authentication. Type in a
user name and password to access the Proxy server.
The Installed Languages section displays languages that the VCA can categorize in.
VCA RESULTS TAB
To view the results of VCA runs, perform the following:
1
In the Custom Categorization dialog, click the VCA Results tab.
Figure 10-3 VCA Results tab
2
3
Select one of the following options:
•
Date Range - Choose a From and To date if you want to report on a range of days.
•
Single Scan - Select this option and choose a single date and a time to run a scan on from the
drop-down list boxes.
Choose a specific language to run reports on from the drop-down list box. This will return destinations
in the language specified. The default setting is All. These are:
•
Dutch
•
English
•
French
•
German
122 Administrator’s Guide
SurfControl Web Filter v5.5
CUSTOM CATEGORIZATION
Using Custom Categorization
4
•
Italian
•
Spanish
10
Select Show Results to view the results in the window below, or Purge Results to remove the results
from the window below.
To perform a Categorization run:
1
From the List of Destinations tab, click Categorize all Uncategorized destinations
A Categorizing dialog box displays with the following information:
2
•
A Progress bar showing the number of ‘Uncategorized’ destinations being categorized on the right
and the percentage of those destinations processed.
•
Active Threads are the number of pages being categorized at any one time. You can limit the
amount of active threads being used for this in the Virtual Control Agent Control Panel application.
•
Destinations Checked counts the number of destinations checked during the VCA run.
•
Destinations Categorized is the number of destinations that have been categorized by the VCA
during this run.
Click Cancel to stop the VCA run at any time. On completion of the run, a VCA Results dialog box
shows the VCA categorized destinations and the category to which they have been assigned:
SurfControl Web Filter v5.5
Administrator’s Guide 123
10
CUSTOM CATEGORIZATION
Using Custom Categorization
3
Click OK. An Action Complete dialog box displays, confirming the number of destinations checked
and Categorized.
4
Click Close.
THE VCA SERVICE SETTINGS
The VCA Control Panel application enables you to stop and start the VCA service and configure VCA
service settings, as shown in the figures below.
Note: The VCA service does not function if you are using a 30 day evaluation version of Web
Filter.
Figure 10-4 VCA Service Control tab
124 Administrator’s Guide
SurfControl Web Filter v5.5
CUSTOM CATEGORIZATION
Using Custom Categorization
10
Figure 10-5 VCA Settings tab
You can perform the following tasks on the VCA Settings tab:
•
Select Collector - Select the server (collector) you want the VCA to save its categorizations to. By
default, the collector is set to localhost. In this instance, the VCA service will use a trusted connection
and the local system account to connect to the local collector. If you want to save VCA categorizations
to a remote collector, you will need to set up a separate user account and manually configure the VCA
service to run using this account. (The VCA service will not connect to a remote collector if it is
configured to use a trusted connection and to log on with the local system account). To configure the
service to log on using a different account, perform the following:
i
Click Start, point to Administrative Tools and click Services.
ii
Double-click SurfControl Virtual Control Agent in the services list.
iii
Click the Log On tab and select This account.
iv
Enter the user name and password the VCA service will use to connect to the remote collector,
and click OK.
v
Restart the VCA service.
vi
Open the VCA Control Panel application and click the VCA Settings tab.
vii Click Browse and type in the ip address or hostname of the server that will act as the remote
collector, and click OK.
•
Commit Change(s) Interval (hours) - You can configure the time in hours before the VCA will commit
changes to the selected database and flush its cache.
•
Temporary Internet files folder - The VCA spiders will download up to 10 pages of a destination it is
categorizing. It downloads them to the folder specified in this field. By default this location is:
C:\Program Files\SurfControl\Web Filter\SpiderFiles
Once the spiders have finished categorizing the destination, the pages are deleted from the folder.
This setting can also be changed from within the VCA. See page 121 for more details.
SurfControl Web Filter v5.5
Administrator’s Guide 125
10
•
CUSTOM CATEGORIZATION
Using Custom Categorization
Max Threads - This controls the maximum number of spiders that can be categorizing destinations at
any one time. The default number is 8. The maximum is 32. Increasing the number of spiders can use
up your available bandwidth. For this reason SurfControl recommends you keep this setting at its
default number.
126 Administrator’s Guide
SurfControl Web Filter v5.5
Chapter 11
Databases
Creating a New SQL Server Database . . . . . . . . . . . . . . . . . . . . . . . . . . . . . . . . . . . . . . . . . . . . page 128
Managing databases . . . . . . . . . . . . . . . . . . . . . . . . . . . . . . . . . . . . . . . . . . . . . . . . . . . . . . . . . . page 129
Updating Your Database. . . . . . . . . . . . . . . . . . . . . . . . . . . . . . . . . . . . . . . . . . . . . . . . . . . . . . . page 134
Upgrading your database . . . . . . . . . . . . . . . . . . . . . . . . . . . . . . . . . . . . . . . . . . . . . . . . . . . . . . page 136
Importing/exporting databases . . . . . . . . . . . . . . . . . . . . . . . . . . . . . . . . . . . . . . . . . . . . . . . . . page 137
11
DATABASES
Creating a New SQL Server Database
CREATING A NEW SQL SERVER DATABASE
If you wish to create a new SQL Server database for Web Filter, use the SurfControl Database Creation
Wizard. Before you can use the Wizard, check the following:
•
You must have installed a complete or client version of Web Filter.
•
You must have installed Microsoft SQL Server (usually on its own server).
•
The SurfControl server must have network access to the SQL Server.
•
There must be a user account on the SQL Server with a Database Creators role.
Note: A SurfControl database should only have one database owner.
To create a new SQL Database:
1
From the All Programs > SurfControl Web Filter > Database Tools menu select Create SQL
Server Database. The Create SurfControl Web Filter Database Wizard will start.
2
Click Next.
3
Enter the name of the SQL Server and the proper authentication:
•
For Windows authentication, select Use Trusted Connection.
•
For SQL authentication, leave Use Trusted Connection deselected.
•
Enter the SQL Administrator Username and Password.
4
Click Next.
5
Enter the name of the database.
•
If you deselect Use Default Locations, specify the locations for the database and transaction log
files.
•
If you deselect Set as SurfControl Web Filter Default, specify the new database for both the
Rules and Monitor databases.
6
Click Next.
7
Click Finish. The new database will appear in the Web Filter Manager Navigation tree.
To use the new database in a multiple installation environment you must select the new database from the
Web Filter service. See "Database Tab" on page 112 for more details.
128 Administrator’s Guide
SurfControl Web Filter v5.5
DATABASES
Managing databases
11
MANAGING DATABASES
As SurfControl Web Filter builds up its database of Internet traffic, you need to consider how to manage
the volume of data it contains. Web Filter has a database management tool that enables you to manage
your data efficiently.
Figure 11-1 The Database Management Tool
With this tool you can perform the following tasks on your databases.
•
Archive
•
Purge
•
Compact
•
Delete
•
Restore
The tool is available from the Web Filter Manager > Maintenance > Database Management for the
appropriate collector or database in the Navigation tree. The Purge, Archive and Compact options can
also be set up as events in the Scheduler. See "Database Management" on page 142 for more details on
setting up these tasks in the Scheduler.
When you installed Web Filter you could choose to set up an automatic Archive followed by Purge
scheduled event. This event is configured to run once a month. You can configure the settings for this
event by selecting it in the Scheduler and clicking Configure.
Note: You can set up tasks to run individually or you can configure the Database Management
tool to perform an Archive, Purge and Compact task at the same time.
SurfControl Web Filter v5.5
Administrator’s Guide 129
11
DATABASES
Managing databases
ARCHIVE
Archiving your database, improves system performance by reducing its size and optimizing storage. To
perform an archive of your database:
1
Select Database Management from the Web Filter Manager > Maintenance from the appropriate
collector or database in the Navigation tree.
2
Select the Archive check box from the Database Management tab.
3
Click Browse and specify a location to save the archived database to.
The default location is drive C, but you may want to specify a different location, to prevent the archive
file being overwritten the next time you archive your database.
4
Choose Unique date-based filename to save you overwriting an existing archive file.
5
Click Run Tasks to begin the Archive.
If you have left all the options at their default settings, with all check boxes clear, you will archive your
whole database to C:\Archive.dat.
PURGE
Purging your database reduces its size by removing connection details for users, sites and groups. You
can purge your database in various ways from the Purge tab.
To Purge the Database:
1
Select Database Management from the Web Filter Manager > Maintenance from the appropriate
collector or database in the Navigation tree.
2
Select the Purge check box from the Database Management tab.
3
Choose from the following purge options:
•
Purge All - Removes all connection details.
•
Purge Unused Items Only - Removes connection details that are no longer necessary.
•
Save Today's data - Removes all but that day’s connection details.
•
Save data from the last “N” days - Where “N” is the number of days to retain connection details.
•
Save data from DD/MM/YY - Removes all connections details before the date specified.
•
Purge Range - Removes all connections for the specified range.
•
Advanced Settings - You can choose to remove sites which have not been accessed in the last
24hrs, but are outside of the purge range. Select the Remove Sites with checkbox and set the
number of hits. Sites will be removed that have less than, or equal to, the number of hits specified.
The Advanced Settings are not available if you have selected Purge All or Save Todays data.
Note: Manually categorized sites that meet the Advanced Settings criteria will not be deleted
4
Click Run Tasks to start the Purge.
130 Administrator’s Guide
SurfControl Web Filter v5.5
DATABASES
Managing databases
11
COMPACT
Compacting your database eliminates the redundant space contained within it, reducing its size.
To Compact a Database:
1
Select Database Management from the Web Filter Manager > Maintenance from the appropriate
collector or database in the Navigation tree.
2
Select the Compact Database check box from the Database Management tab.
3
Click Run Tasks. A progress dialog box will appear.
DELETE
Use the Delete tab to permanently delete a database from your system.
To Delete a Database:
1
Select Database Management from the Web Filter Manager > Maintenance from the appropriate
collector or database in the Navigation tree.
2
Select the Delete tab:
3
The current database will be shown in the database field. If you want to delete another database, click
Select to choose another via the SQL Server Login dialog box.
4
Click Delete Now.
SurfControl Web Filter v5.5
Administrator’s Guide 131
11
DATABASES
Managing databases
RESTORE
Restore enables you to view and report on an archived database using the SurfControl Web Filter Monitor.
Note: You can only restore local SQL databases.
To Restore an Archived Database:
1
Stop the Web Filter service.
2
Select Database Management from the Web Filter Manager > Maintenance from the appropriate
collector or database in the Navigation tree.
3
Select the Restore tab:
4
Click Browse.
A Restore from Archive dialog box will appear. The default location for your archived databases is
drive C. If you archived your database to another location, use Browse to locate it.
5
Click Open on the relevant file. The Restore tab fields will now be populated with information from the
archived database.
6
Enter a name in the Restore As Database field. The Restore button becomes enabled.
Note: The Named Instance field is required for restoring databases to SQL Server Express.
You can also use this to specify an instance of SQL Server, if you have multiple installs of SQL
Server 2000 or above on the same computer.
132 Administrator’s Guide
SurfControl Web Filter v5.5
DATABASES
Managing databases
11
7
Select Set as Default Database for the Web Filter service to use the restored database for writing to.
8
Click Restore. A message displays, confirming the restore has been successful.
9
Click OK.
10 Start the Web Filter service.
OPTIONS
The Options tab enables you to set a timeout value in seconds for your database. If a database
maintenance task cannot establish a query to the database within the time set, the task will be cancelled.
To change the Database Query Timeout:
1
Stop the Web Filter service.
2
Select Database Management from the Web Filter Manager > Maintenance node, in the appropriate
collector or database of the Navigation tree.
3
Select the Options tab:
4
Enter a value for your database query timeout.
5
Click Apply.
Note: For larger databases, SurfControl recommends setting this value to 3600 seconds.
SurfControl Web Filter v5.5
Administrator’s Guide 133
11
DATABASES
Updating Your Database
UPDATING YOUR DATABASE
There are two methods for manually updating the database from the flat files that are created by the
Monitor. You can set up a scheduled event (see "Database Update" on page 143), or you can perform a
manual update with the Database Updater tool.
Caution: The Database Updater Tool will not run if the Web Filter service is running and
Monitor to Database is set to Automatic.
To perform a Manual Database Update:
1
Stop the Web Filter service.
2
From the Web Filter Manager, select Maintenance > Database Updater from the appropriate
database in the Navigation tree or select Start > All Programs > SurfControl Web Filter > Database
Tools > Database Updater. The Database Updater dialog is displayed.
3
Click Add to select a flat file. The default location for flat files is: C:\Program Files\SurfControl\Web
Filter\TMP:
4
Click Open Database. You will see the Select Database dialog box showing the default database:
5
Click OK to update this database. If you wish to update another database click Connect to SQL
Database.
134 Administrator’s Guide
SurfControl Web Filter v5.5
DATABASES
Updating Your Database
11
6
Select the Server that contains the database from the drop down list box:
7
If the server requres a Login ID and Password enter this information to log into the server. If the server
does not require this information select the Use Trusted connection check box then select the
database you wish to update from the Databases list box.
8
Click OK. This will close the Select Database dialog.
9
Click Import to update the database.
10 Click Save. This will save the Flat File location and Database information. You need to specify a name
and a location for the update criteria file.
11 Restart the Web Filter service.
SurfControl Web Filter v5.5
Administrator’s Guide 135
11
DATABASES
Upgrading your database
UPGRADING YOUR DATABASE
1
Download the latest database from the SurfControl web site.
2
Select Start > All Programs > SurfControl Web Filter > Database Tools > Database Upgrade
Tool. You will now see the SurfControl Database Upgrade Tool:
3
You will see the current database in the Database: field. Click Browse to navigate to the database
that you downloaded.
4
SurfControl recommends that you back up your old database before replacing it with a newer version.
Select the Backup Database check box then:
5
•
Leave the default path in the Backup to: text field.
OR
•
Click Browse to enter the path to a new directory.
Click Update Database.
136 Administrator’s Guide
SurfControl Web Filter v5.5
DATABASES
Importing/exporting databases
11
IMPORTING/EXPORTING DATABASES
If you have categorized sites manually you can import these sites from an existing database, then export to
these sites to a new blank database. This can useful for creating backups of manual categorizations, or for
adding these sites to a new database without having to manually categorize them again.
EXPORTING MANUALLY CATEGORIZED SITES
To export your manual categorizations:
1
Select Start > SurfControl Web Filter > Database Tools > Import or Export Manual
Categorizations. You will see the Import or Export Manual Categorizations dialog:
2
Select the Export Manual Categorizations option.
3
Click the Select button. A SQL Server Login dialog will be displayed:
4
Use this dialog to select the database containing the manually categorized sites that you want to
export by choosing the server from the Server drop-down list box then selecting the Use Trusted
Connection check box. Alternatively enter a user name and password if this server requires one.
5
Use the Options section to select the database that you wish to use then click OK. The information
relevant to that database will appear in the From database text field.
6
Click Browse and navigate to the flat file that you wish to export the manually categorized sites to.
7
Click Run task to export the sites to this file.
SurfControl Web Filter v5.5
Administrator’s Guide 137
11
DATABASES
Importing/exporting databases
IMPORTING MANUALLY CATEGORIZED SITES
To import your manual categorizations:
1
Select Start > SurfControl Web Filter > Database Tools > Import or Export Manual
Categorizations. You will see the Import or Export Manual Categorizations dialog:
2
Select the Import Manual Categorizations option.
3
Click the Browse button and navigate to the flat file that contains your manually categorized sites. This
could be a file containing sites that you exported earlier. The path will appear in the From file text field.
4
Next click the Select button. A SQL Server Login dialog will be displayed:
5
Use this dialog to select the database that you want to import the sites to by choosing the server from
the Server drop-down list box, then selecting the Use Trusted Connection check box. Alternatively
enter a user name and password if this server requires one.
6
Use the Options section to select the database that you wish to import the sites to, then click OK. The
information relevant to that database will appear in the To database text field.
7
Click Run task to import the sites to this database.
138 Administrator’s Guide
SurfControl Web Filter v5.5
Chapter 12
Scheduler
Introduction . . . . . . . . . . . . . . . . . . . . . . . . . . . . . . . . . . . . . . . . . . . . . . . . . . . . . . . . . . . . . . . . . page 140
Available Events . . . . . . . . . . . . . . . . . . . . . . . . . . . . . . . . . . . . . . . . . . . . . . . . . . . . . . . . . . . . . page 142
Command Line. . . . . . . . . . . . . . . . . . . . . . . . . . . . . . . . . . . . . . . . . . . . . . . . . . . . . . . . . . . . . . . page 142
Database Management . . . . . . . . . . . . . . . . . . . . . . . . . . . . . . . . . . . . . . . . . . . . . . . . . . . . . . . . page 142
Database Update . . . . . . . . . . . . . . . . . . . . . . . . . . . . . . . . . . . . . . . . . . . . . . . . . . . . . . . . . . . . . page 143
Internet Threat Database Update . . . . . . . . . . . . . . . . . . . . . . . . . . . . . . . . . . . . . . . . . . . . . . . . page 144
Network Groups Update . . . . . . . . . . . . . . . . . . . . . . . . . . . . . . . . . . . . . . . . . . . . . . . . . . . . . . . page 144
12
SCHEDULER
Introduction
INTRODUCTION
You can schedule certain events that consume high bandwidth or that need users to be logged off the
network to take place at a convenient time. To Schedule an event:
1
From the Web Filter Manager, select Maintenance > Scheduler from the appropriate collector or
database in the Navigation tree. The Scheduler is also available from the Start > All Programs >
SurfControl Web Filter menu.
2
Click Add Item. The Scheduler Item Configuration dialog box displays.
3
Select the event you want to configure from the Select item to configure list.
4
Select when you want the event to occur:
•
Hourly
•
Daily
•
Weekly
•
Monthly
•
Yearly
Further options are available depending on the frequency chosen.
140 Administrator’s Guide
SurfControl Web Filter v5.5
SCHEDULER
Introduction
12
5
Enter a name for the event in the Description field.
6
Click Configure. Depending on the event chosen, a dialog box will appear.
7
Once you have completed the details in the dialog box, click OK.
8
Click OK in the Item Configuration dialog box. Your event should now be listed in the Scheduler main
dialog box.
SurfControl Web Filter v5.5
Administrator’s Guide 141
12
SCHEDULER
Available Events
AVAILABLE EVENTS
You can set up the following events in the Scheduler:
•
Command Line
•
Database Management
•
Database Update
•
Internet Threat Database Update
•
Network Groups Update
COMMAND LINE
Command line items such as batch routines can be scheduled to run. The following dialog box displays
when you click Configure from the Scheduler Item configuration dialog box:
Figure 12-1 Command Line Configuration dialog box
Click Browse to locate the required file. Enter any required Parameters in the Command Line Parameter
box and Click OK.
DATABASE MANAGEMENT
Choosing this option enables you to set up a scheduled event that will Archive, Purge or Compact your
database. For detailed information on setting up these events, see "Managing databases" on page 129.
You can set up a separate event for each routine, or create a combined event for the routines you want to
schedule.
Note: When you installed Web Filter you could choose to set up a combined Archive and Purge
scheduled event. This event is configured to run once a month. You can configure the settings
for this event by selecting it in the Scheduler and clicking Configure.
To schedule Database Management events:
1
Select Database Management Tasks from the Select item to configure list.
2
Set the date and time for when the database management task will occur, using the Occurs sections.
3
Enter a name for your event in the Description field.
142 Administrator’s Guide
SurfControl Web Filter v5.5
SCHEDULER
Available Events
12
4
Click Configure. The Database Management dialog box will be displayed. The default database is
shown in the Database field.
5
If you wish to run the event on a different database, click Select to choose a different database. A SQL
Server Login dialog box displays.
6
Select an available Server from the Server list.
7
Click Options and select the database you want to use from the drop-down list box. The database
selected will be retained by the Database management settings.
8
Click OK.
DATABASE UPDATE
If you have selected to update the flat files into your database manually, you can schedule this at a time
that best suits your network. See "Advanced Tab" on page 104 for more details on database update
settings.
Caution: Do not schedule flat file updates from multiple collectors to take place at the same
time. This can corrupt your database.
To schedule a flat file import to your database:
1
Click Add to navigate to the folder where your flat files are located. Click Remove if you want to delete
a location. Flat files are stored in the following folder by default:
C:\Program Files\SurfControl\Web Filter\tmp
2
3
Click Open Database. You have two choices:
•
Choose a SurfControl Collector from the drop-down list box then click Connect to SQL Server to
select a SQL Server Database resident on the Collector.
•
Click Connect to SQL Server if using a database on the local computer.
Select Use Trusted connection for Windows Authentication (the default option), or deselect this
option and use a valid SQL Login ID and Password.
SurfControl Web Filter v5.5
Administrator’s Guide 143
12
SCHEDULER
Available Events
INTERNET THREAT DATABASE UPDATE
Your Internet Threat Database is important in helping you to identify the nature of Web destinations being
accessed on your network. Internet Threat Database updates are produced daily and can vary in size.
SurfControl recommends that you schedule this event to take place every day at a time when Internet
traffic is low.
Caution: Internet Threat Database Updates are only available to licensed product users or
products within the 30 day evaluation period.
NETWORK GROUPS UPDATE
To update your Network Groups:
1
Make sure you have set up the occurrence options first, then click Configure.
2
A Network Group Lookup Configuration dialog box will appear as shown in the figure below.
3
If you enable the Automatic Removal of Inactive Users option, users who do not belong to a network
group, and whose last monitored connection was more than ‘N’ days ago, will be removed from the
database along with their connection information. ‘N’ is the figure set in the Removal Time Period
(days) field. The default setting is 90 days.
4
Click OK to confirm the network Group Update.
144 Administrator’s Guide
SurfControl Web Filter v5.5
Appendix
Contact Technical Support. . . . . . . . . . . . . . . . . . . . . . . . . . . . . . . . . . . . . . . . . . . . . . . . . . . . . page 146
Sales and Feedback . . . . . . . . . . . . . . . . . . . . . . . . . . . . . . . . . . . . . . . . . . . . . . . . . . . . . . . . . . page 148
APPENDIX
Contact Technical Support
CONTACT TECHNICAL SUPPORT
Websense provides technical information about SurfControl products online 24 hours a day, including:
•
latest release information
•
searchable Knowledge Base
•
show-me tutorials
•
product documents
•
tips
•
in-depth technical papers
Access support on the Web site at:
www.websense.com/SupportPortal/
If you need additional help, please fill out the online support form at:
www.websense.com/SupportPortal/Contact.aspx
Note your case number. If you need to send Support files to help us diagnose your problem, do the
following:
1
Select Start > SurfControl Web Filter > Support Tools > Create Web Filter Support Files. This
creates an e-mail message containing a copy of your configuration files that will help Support to
discover the reason for any problems you are having. These include:
•
Event Logs (System and Application)
•
A list of file Versions
•
Registry Keys
•
System Information
•
Trace Logs
2
Add your case number to the subject line of the email message.
3
Navigate to C:\Program Files\SurfControl\Web Filter\Support. In this directory you will find the
following files:
•
Application.evt
•
System.evt
•
FileVersion.txt
•
registry.txt
•
systeminfo.txt
4
Zip or rar these files and attach them to the email.
5
Press Send.
146 Administrator’s Guide
SurfControl Web Filter v5.5
APPENDIX
Contact Technical Support
If your issue is urgent, please call one of the offices listed below.
Location
Contact information
North America
+1 858-458-2940
France
Contact your Websense Reseller. If you cannot locate your Reseller: +33 1573 232 27
Germany
Contact your Websense Reseller. If you cannot locate your Reseller: +49 6951 709 347
UK
Contact your Websense Reseller. If you cannot locate your Reseller: +44 (0) 2030 244 401
Rest of Europe
Contact your Websense Reseller. If you cannot locate your Reseller: +44 (0) 2030 244 401
Middle East
Contact your Websense Reseller. If you cannot locate your Reseller: +44 (0) 2030 244 401
Africa
Contact your Websense Reseller. If you cannot locate your Reseller: +44 (0) 2030 244 401
Australia/NZ
Contact your Websense Reseller. If you cannot locate your Reseller: 1-800-881-011, Access
Code 800-542-8609
Asia
Contact your Websense Reseller. If you cannot locate your Reseller: +86 (10) 5884-4200
Latin America
Contact your Websense Reseller.
and Caribbean
You will be routed to the first available technician, who will gladly assist you.
For the latest support information on SurfControl products, visit www.websense.com/SupportPortal/.
SurfControl Web Filter v5.5
Administrator’s Guide 147
APPENDIX
Sales and Feedback
SALES AND FEEDBACK
For product and pricing information, or to place an order, contact Websense. To find your nearest
Websense office, please visit our web site: www.websense.com
148 Administrator’s Guide
SurfControl Web Filter v5.5
INDEX
Set Category 48
Submit to SurfControl 47
Document Files 12, 83
A
Active Directory
LDAP connection 101
SSL connection 101
Active Directory Domain Object 60
After work object 75
Allowance Objects
10Mbyte Volume object 78
30 Minute Time object 79
Audio Files 12, 83
Auto Categorization 106
E
E-mail Notifications 7, 114
Enterprise User Monitoring (EUM) 110
Executables 12, 83
B
Browse Time Sensitivity 79
C
Catch up mode notifications 114
Categorization Method 37, 46, 50
Category Object 67
Change Web Filter Groups 42
Company & Intranet 37
Company Domains and Intranet Sites 106
Compressed Files 12, 83
Connection Duration 37
Connections 36
Content Protection 52
Custom Categories 68
Custom Categorization - VCA
List Of Destinations Tab 119
Results tab 122
Settings tab 121
VCA Service 124
Custom Filters 35
Customer Feedback 106
D
Database
Create a New SQL Server Database 128
Database Management
Archive 130
Delete 131
Purge 130
Restore 132
Database Tab 112
Status 32
Deny Pages 84
Destination 37
149 Administrator’s Guide
F
Feeds 12, 83
File Type Groups 39
First Access 36
H
Heartbeat Interval 111
Hosts and Domains object 61, 64
HTTP Deny Page Objects
Allowance 85
Constructing Deny Pages 86
Default 84
Other Deny Page objects 86
I
Ignored Ports tab 108
Creating new ports 109
Deleting Ports 109
Editing Ports 109
Image Files 12, 83
Internet Threat Database license reminders 114
L
Last Access 36
Last IP Address 36
Last Workstation 36
Licensing
Web Filter 18
M
MAC Address 62, 65
Maintenance Tools 53
Maximum Clients for Real-Time Monitor 111
Monitor new users 10
Monitor Setting 36
Monitor to Database 105
Automatic 105
Manual 105
Database Updater tool 105
Scheduled Event 105
Monitored Data
Categories 49
SurfControl Web Filter v5.5
Data 34
Destinations 45
Filters 34
Users 36
Monitored Destinations object 64
N
NetBIOS 110
NetWare Domain object 60
Network Settings 104
Notify Objects
NT Domain object 60
O
Other e-mail alerts 115
P
Page level information 10
Port Number for Real-Time Monitor 111
Precise Bandwidth Controls 73
Privacy Edition
Changes to Monitored Data 20
Changes to Real-Time Monitor 20
Changes to Reports 21
Protocol Signatures Tab 107
Detecting Skype 107
Enable Protocol Signature Scanning 107
Protocols 11, 40
R
Real-Time Monitor
Collector Details 94
Real-Time Monitor Timeout 111
Remote Administration Client 16
Rules
Objects 59
Types 56
S
Scheduled task failures 114
Scheduler
Options 144
Scheduled Events
Database Management 142
Database Update 143
Internet Threat Database Update 144
Scripting 12, 83
Server Info 32
Server Information Dashboard 32
Service Status 32
Service status changes 114
SurfControl Web Filter v5.5
Site name resolution 105
SmartScan 68, 106
Subnets
Ignore Settings 103
SurfControl Categories 64, 67
SurfControl icon 98
T
TCP/IP Name Resolution (DNS) 105
Threat Management Tools 52
U
User Defined Where Objects 64
User-defined Who Objects 61
Username Resolution 109
V
Video Files 12, 83
W
Web Filter Dashboard 30
Web Filter Settings
Active Directory 101
Advanced 104
Categorization 106
Database 112
E-mail Notifications 114
Ignored Ports 108
Protocol Signatures 107
Real-Time Monitor 111
Start/Stop Service 100
Subnets 102
User Name Resolution 109
Web Pages 12, 83
Weekends object 76
What Lists 74
What Objects 70
Where Lists 69
Where Objects 64
Who Lists 63
Who Objects 60
Workstation name resolution 105
Worktime object 77
Administrator’s Guide 150