Transcript
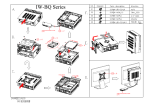
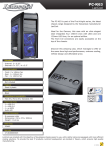
NU-0528i/NU-0548i Mini-ITX Chassis
3.5” HDD ASSEMBLY
(1) Before assembling the systems, -
(2) Use 2 pcs of 6#-32*L4 Flat Head Screws to –
Dismantle the Front Panel from the Chassis Frame,
Secure the 2.5” HDD Bracket onto the front steel panel of
Unscrew and remove the 3.5” HDD Bay (Including the 4 pcs of the Chassis Frame (Covering the Slim ODD Inlet).
Shockproof Rubber Cushions inserted in the 3.5” HDD Bay).
Use 4 pcs of Shockproof Rubber Cushions and EMI
Take out the 2.5” HDD Bracket (Steel Bracket Cover for the
Clipped M3*0.5*L8 Hexagon Head Screws to secure the
Slim ODD’s Inlet) from the Accessory Box and, -
3.5” HDD in the 3.5” HDD Bay.
Insert 2 pcs of Shockproof Rubber Cushions into the widest
apart Circular Holes.
(3) Before installing back the Front Panel onto the Chassis, Secure the Slim ODD’s Plastic Bay Cover,
Seat the assembled 3.5” Drive Bay back into the Chassis,
Use 2 pcs of 6#-32*L4 Flat Head Screws to secure the 3.5”
HDD Bay on the Chassis Frame and then, Clip the Front Panel back into the Chassis Frame to complete.
.