Transcript
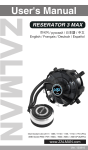
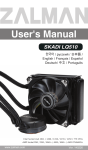
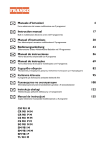
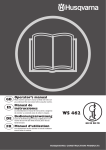
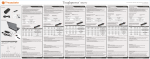
English
Clip for
Socket+ 1366
A
B
Application for
Intel (Socket 1336)
Core i7 series processor
Intel 1366 - Secure Waterblock onto CPU
Components for 1366:
A-Metal H-type clip
B-Cushion
C-Insulator
C
Install the Clip on Motherboard
1 Tear off the tape on the back of the insulator (C)
and place it on the metal
H-type clip(A).
2 Combine the insulator(C) and the cushion (B)
1
using the adhesive. Stick the metal H-type clip(A)
with the insulators (BC). Tear off the protective
layer to adhere it onto the motherboard.
3 Attach H-type clips(including ABC) on back side
Français
Deutsch
Anwendung für
Intel (Sockel 1366)
Core i7 Serie Prozessor
Application pour
Intel (Socket 1366)
Processeur Core i7
Intel 1366
- Befestigung des Wasserblocks an der CPU
Komponenten für 1366:
A-Metall Clip, Typ H
B-Polsterung
C-Isolator
Intel 1366
Installieren Sie den Clip am Motherboard
1 Ziehen Sie die Folie auf der Rückseite des
Isolators (C) ab und platzieren Sie ihn am MetallClip Typ H (A).
2 Verbinden Sie den Isolator (C) und die Polsterung
(B) mit dem Klebestreifen. Befestigen Sie den
Metall-Clip, Typ H (A) am Isolator(BC). Ziehen
Sie die Schutzfolie ab, um ihn an das
Motherboard zu kleben.
Español
Aplicación para
- Sécurisez le bloc d'eau sur le microprocesseur
Composants pour 1366:
A-clip en métal de type H
B-Coussinet
C-Isolant
utilisant l'adhésif. Collez le clip en métal de type
H (A) avec les isolants (BC). Détachez la couche
protectrice pour la coller sur la carte mère.
3 Attachez les clips de type H (incluant ABC) au
dos de la carte mère.
Intel 1366 - Fissare il waterblock sulla CPU
Componentes para 1366:
A-Sujetador tipo H metálico
B-Almohadilla
C-Aislante
Componenti per 1366:
A-Clip in metallo di tipo H
B-Cuscinetto
C-Isolante
1 Quite la cinta de la parte trasera del aislante (C) y
sur le clip en métal de type H (A).
2 Joignez l'isolant (C) et le coussinet (B) en
Intel (Zócalo 1366)
Procesadores de las Series Core i7
Intel 1366 - Asegure el Bloque de agua a la CPU
Instale el Sujetador en la Placa madre
Installez le clip sur la carte mère
1 Détachez la bande du dos de l'isolant et placez la
colóquela en el sujetador (A) tipo H metálico.
2 Una el aislante(C) y la almohadilla (B) utilizando
el adhesivo. Pegue el sujetador tipo H
metálico(A) a los aislantes (BC). Retire la capa
protectora para adherirla a la placa madre.
3 Ajuste los sujetadores tipo H (incluidos ABC) en
la parte posterior de la placa madre.
3 Bringen Sie die Clips, Typ H (einschl. ABC) an
of motherboard.
Italiano
Applicazione
Intel (Socket 1366)
Processore di serie: Core i7
Installare la clip sulla scheda madre
1 Staccare il nastro nella parte posteriore
dell'isolante (C) e posizionarlo sulla clip di
metallo di tipo H (A).
2 Unire l'isolante (C) e il cuscinetto (B) utilizzando
l'adesivo. Attaccare la clip di metallo di tipo H (A)
con gli isolanti (B C). Staccare la pellicola di
protezione per farlo aderire alla scheda madre.
3 Fissare le clip di tipo H (incluse ABC) nel lato
posteriore della scheda madre.
der Rückseite des Motherboards an.
4 Install Waterblock on Motherboard
1.Insert the screws through the clip(ABC) into the
four holes on the Motherboard.
2.Put the washers along the screws to prevent the
electric current.
3.Put the stand offs along the screws to fix the
screws on the motherboard.
4.Place waterblock on the processor through the
screws and fix it by thumb nuts.
2
B
C
3
A
Please visit our Support Section for more technical
support or update at www.thermaltake.com
4 Installez le bloc d'eau sur la carte mère
4 Installieren Sie den Wasserblock am
Motherboard
1.Stecken Sie die Schrauben durch den Clip
(ABC) in die vier Löcher am Motherboard.
2.Legen Sie die Unterlegscheiben auf die
Schrauben, um den elektrischen Strom
abzuwenden.
3.Bringen Sie die Abstandhalter an den
Schrauben an, um die Schrauben am
Motherboard zu befestigen.
4.Platzieren Sie den Wasserblock durch die
Schrauben am Prozessor und befestigen Sie
ihn mit den Flügelmuttern.
Bitte besuchen Sie unsere Kundendienstabteilung
für weitere technische Unterstützung oder
Aktualisierungen unter www.thermaltake.com
简体中文
繁體中文
4
A
適用:
适用:
Intel (Socket 1366)
Core i7 series processor
Intel (Socket 1366)
Core i7 series processor
Intel 1366 - 將水冷頭固定在CPU 上
Intel 1366 - 将水冷头固定于 CPU 之上
1366所需元件:
A-H 型金屬扣具
B-絕緣泡棉
C-絕緣背貼
1366所需组件:
A-H 型金属扣具
B-绝缘泡棉
C-绝缘背贴
將扣具安裝在主機板上
1 撕掉絕緣背貼 (C) 背面膠帶並將其貼在 H 型金屬扣
具 (A) 上。
2 將絕緣泡棉 (C) 與絕緣背貼 (B) 貼合在一起。將絕
緣材質 (BC) 貼在H 型金屬扣具 (A) 上。撕下扣具
上的保護膜後,將其貼在主機板上。
3 將 H 型扣具 (包括 ABC) 安裝在主機板背面。
将扣具安装于主板上
1 撕掉绝缘背贴 (C) 后的胶带,将其贴于 H 型金属扣
具 (A) 上。
2 将绝缘泡棉 (C) 和绝缘背贴 (B) 粘合在一起。将绝
缘材质 (BC) 贴于H 型金属扣具 (A) 上。撕下扣具
上的保护层后,将其粘贴在主板上。
3 将 H 型扣具 包括 ABC 安装在主板背面。
1.Insérez les vis à travers le clip (ABC) dans les
quatre trous sur la carte mère.
2.Mettez les rondelles dans les vis pour éviter le
courant électrique.
3.Mettez les séparateurs le long des vis pour fixer
les vis sur la carte mère.
4.Placez le bloc d'eau sur le processeur à
travers les vis et fixez le avec les écrous
papillon.
4 Instale el Bloque de agua en la Placa madre
1.Inserte los tornillos a través del sujetador
(ABC) en los dos orificios de la Placa madre.
2.Coloque las arandelas junto a los tornillos
para evitar la corriente eléctrica.
3.Coloque los separadores junto a los tornillos
para fijarlos en la placa madre.
4.Coloque el bloque de agua en el procesador a
través de los tornillos y fíjelo con las tuercas
de mano.
4 Installare il waterblock sulla scheda madre
1.Inserire le viti attraverso la clip (ABC)
nei quattro fori della scheda madre.
2.Posizionare le rondelle lungo le viti per
evitare scariche di elettricità.
3.Posizionare i distanziatori lungo le viti per
fissarle alla scheda madre.
4.Posizionare il waterblock nel processore
attraverso le viti e fissarlo mediante i dadi
ad alette.
Veuillez vous reporter à la Partie Support pour un
support plus technique ou effectuez la mise à
jour sur www.thermaltake.com
Visite nuestra Sección de Soporte para más soporte
técnico o actualizaciones www.thermaltake.com
Per ulteriore assistenza tecnica, visitare la sezione
sull'assistenza nel sito Web www.thermaltake.com
日本語
Русский
Türkçe
用途
Intel (Socket 1366)
Область применения
Intel (Socket 1366)
Core i7 シリーズプロセッサ
Процессор серии Core i7
Kullanılabilecek İşlemci Tipleri :
Intel (Socket 1366)
Core ı7 İşlemci serisi
Intel 1366
- CPU にウォータブロックを固定する
Intel 1366 - крепление водоблока на ЦП
Intel 1366 - Su Blokunu CPU'ya Sabitleme
Компоненты для 1366:
1366 の コンポーネント:
A-металлический H-образный фиксатор
B-прокладка
C-изолятор
1366 bilesenleri:
A-Metal H tipi klips
B-Tampon
C-Yalıtıcı
A-金属 Hタイプク リップ
B-クッション
C-絶縁体
マザーボードにクリップを取り付ける
Установка фиксатора на материнскую плату
1 Снимите пленку с задней части изолятора (C)
и установите его на H-образный
металлический фиксатор (A).
1 絶縁体 (C) 裏面のテープを剥がし、金属製 Hタイ
プクリップ (A) に取り付けます。
yalıtıcıyı, metal H tipi klipsin (A) üzerine
yerlestirin.
2 Нанесите на изолятор (C) и прокладку (B) клей
2 Yalıtıcı (C) ve tamponu (B) yapıskanla birlestirin.
и совместите их. Склейте H-образный
металлический фиксатор (A) и изоляторы (BC).
Снимите защитный слой для крепления
конструкции на материнскую плату.
Metal H tipi klipsi (A) yalıtıcılara (BC) yapıstırın.
Ana karta yerlestirmeden önce koruyucu katmanı
çıkarın.
2 接着剤を使用して絶縁体 (C) とクッション (B) を
結合します。絶縁体 (BC) に Hタイプのクリップ
(A) を貼り付けます。保護テープを剥がして、マ
ザーボードに貼り付けます。
Klipsi Anakarta Takma
1 Yalıtıcının (C) arkasındaki bandı çıkarın ve
3
3 H tipi klipsi (ABC dahil) ana kartın arka tarafına
Закрепите H-образные фиксаторы (включая
ABC) на задней части материнской платы.
3 Hタイプのクリップ (ABC を含む)をマザーボード
yapıstırın.
の裏面に取り付けます。
4 將水冷頭安裝在主機板上
ABC
1.將螺絲穿過扣具 (ABC),並插入主機板上的四個
孔位。
4 将水冷头安装在主板上
1.将螺丝穿过扣具 (ABC) 插入主板上的四个孔位。
2.为预防导电,请将绝缘垫片随螺丝插入。
4 マザーボードにウォータブロックを取り付ける
2.為預防導電,請將墊片随着螺絲插入。
3.将六角铜柱沿着螺丝将螺丝固定于主板。
1.クリップ (ABC) を通してねじをマザーボードの
4 つの穴に挿入します。
3.將六角銅柱沿著螺絲將螺絲固定在主機板上。
4.用螺丝将水冷头置于处理器上,并用蝶形螺母锁
紧。
2.ショートしないように、ねじに沿ってワッシャ
を取り付けます。
4.用螺絲將水冷頭放置在處理器上,並用指捻螺帽
鎖緊。
3.ねじに沿って支柱を置き、マザーボードにねじ
を固定します。
4.ねじを通してプロセッサにウォーターブロック
を取り付け、つまみねじで固定します。
4
Установка водоблока на материнскую плату
1.Вставьте винты через фиксатор (ABC) в
четыре отверстия на материнской плате.
2.Во избежание прохождения электрического
тока установите на винты шайбы.
3.Установите на винты проставки, чтобы
зафиксировать винты на материнской плате.
4.Установите водоблок на процессор через
винты и закрепите его с помощью гаекбарашков.
4 Su Blokunu Anakarta Takma
1.Vidaları Klips (ABC) üzerinden ana karttaki dört
delige yerlestirin.
2.Elektrik akımını önlemek için vidalarla birlikte
pulları da takın.
3.Vidaları ana karta sabitlemek için ara parçaları
vidalarla birlikte yerlestirin.
4.Su blokunu vidalar aracılıgıyla islemciye
yerlestirin ve dıs yüzü tırtıllı silindirik
somunlarla sabitleyin.
BK00070
請查詢本公司網址 www.thermaltake.com, 可獲得更
多技術上與最新的相關資訊
© 2008 Thermaltake Technology Co., Ltd.
All Rights Reserved.
REVISION A.2008
请查询本公司网址 www.thermaltake.com,可获得更
多技术上与最新的相关信息
技術サポートまたは更新の詳細については、当社の
サポートセクション www.thermaltake.com にアク
セスしてください
Для получения дополнительной технической
поддержки или обновления посетите раздел
поддержки на веб-сайте www.thermaltake.com.
Daha fazla teknik destek ve güncellemeler için
www.thermaltake.com sitesindeki Support
bölümünü ziyaret edin.