1
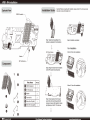
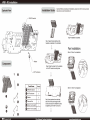
VRM - R3 installation
Important! Before proceeding with installation, please check for the most up-to-date
Exploded View Installation Guide instructions at www.thermalright.com
VRM-R3 heatsink
0 à 3)
Ta A
x ro Ш Nar fh yet ;
== an A
mn”
= ADN A
=) I A =
Ue A
Step 4:Installation completed.
Step 1:Apply thermal padding to the
heatsink as depicted in the illustration.
Fan Installation:
80mm X 25mm Fan Installation:
Washer [f= i
Component RZ
Step 2:Align the holes from the heatsink |
to the GPU socket mounting holes.
© M3 Thumbscrew
O Parts Name Piece(s) вот X 15mm Fan Installation:
ET D VRM-R3 heatsink 1 Ш rim ren PR EEE
© M3 Thumbscrew 3
3) Washer 3
Step 3:Insert washers from the back
@ Thermal Pad 2 side of the VGA card through the M3
screws and secure the heatsink in place
© 80mm Fan Clip (left) 1 by tightening on the M3 Thumbscrew.
О 80mm Fan Clip (right)| 1 JL
mm | hermalright The Ultimate Cooling Solutions! www.thermalright.com
VRM - R4 installation
Important! Before proceeding with installation, please check for the most up-to-date
Exploded View Installation Guide instructions at www.thermalright.com
VRM-R4 heatsink
XIN
18) non
4.
A =>
—
=
7 OL CNT)
—
A A UT)
TN O
A] TU ООПТ
Na
aay,” ор
ATH O Go
DU AM
3 = a CD vf 2
|
Step 4:Installation completed.
Fan Installation
80mm X 25mm Fan Installation:
Washer
M3 Thumbscrew
Step 2:Align the holes from the heatsink
to the GPU socket mounting holes.
TT
LQ o Parts Name Piece(s)
Te E VRM-R4 heatsink 1
UTA LL) Nu
€ M3 Thumbscrew 3
3, Washer 3
Ф O Thermal Pad 2
Step 3:Insert washers from the back
© somm Fan Ciip (left) | 0 side of the VGA card through the M3
— screws and secure the heatsink in place
О 80mm Fan Clip (right)[ 1 by tightening on the M3 Thumbscrew.
Ц
Г Thermalright The Ultimate Cooling Solutions! www.thermalright.com